By David Rodríguez and Matt Abrams

The author selected the Diversity in Tech Fund to receive a donation as part of the Write for DOnations program.
Introduction
DDEV is an open-source tool that uses Docker to build local development environments for many different PHP frameworks. Using the power of containerization, DDEV can greatly simplify how you work on multiple projects that use multiple tech stacks and multiple cloud servers. DDEV includes templates for WordPress, Laravel, Magento, TYPO3, Drupal, and more.
Drupal 9 was released on June 3, 2020 for the Drupal CMS. Known for its ease of use and a massive library of modules and themes, Drupal is a popular PHP framework for building and maintaining various websites and applications of all sizes.
In this tutorial, you will begin developing a Drupal 9 website on your local machine using DDEV. This will allow you to build your website first, and then later, when you are ready, deploy your project to a production server.
Prerequisites
To complete this tutorial, you will need:
-
One local machine running Linux or macOS
-
For macOS: the Homebrew package manager, which you will use to install DDEV. To install Homebrew on your local machine, follow Step 3 — Installing and Setting up Homebrew in this Ruby tutorial.
-
Docker and Docker Compose installed on your local machine.
- For Linux: You can install Docker and Docker Compose following these two tutorials: How to Install and Use Docker and How to Install Docker Compose. Choose your Linux distribution from the list and follow the included instructions.
- For macOS: Docker Compose was formerly available as part of Docker Toolbox, but Docker Toolbox is now a legacy solution. Today, Docker officially recommends that you install Docker Desktop, which includes Docker Compose, Docker Engine, and more. Follow Docker’s official guide to install Docker Desktop on macOS. For more information you can read the official Docker Desktop getting started guide. If you previously used Docker Toolbox to install various Docker tools, you can read this official article about the differences between Docker Toolbox and Docker Desktop and how they can coexist.
Note: It is possible to develop Drupal 9 using DDEV on a remote server, but you will need a solution to access localhost in a web browser. The DDEV command ddev share works with ngrok, which creates a secure tunnel into your server for you and other stakeholders to view your development site. For personal use, you could also install a GUI on your remote server and access your development site through a web browser inside that interface. To do this, you could follow our guide on how to install and configure VNC on Ubuntu 20.04. For an even quicker GUI solution you can follow our guide on how to set up a remote desktop with X2Go on Ubuntu 20.04.
Step 1 — Installing DDEV
In this step you will install DDEV on your local machine. Option 1 includes instructions for macOS while Option 2 provides instructions for Linux. This tutorial was tested on DDEV version 1.15.0.
Option 1 — Installing DDEV on macOS
DDEV advises that macOS users install their tool using the Homebrew package manager. Use the following brew command to install the newest stable release:
- brew tap drud/ddev && brew install drud/ddev/ddev
If you prefer the absolute newest version, you can use brew to install ddev-edge:
- brew tap drud/ddev-edge && brew install drud/ddev-edge/ddev
If you already have a version of DDEV installed, or if you ever wish to update your version, shut down DDEV and use brew to update your installation:
- ddev poweroff
- brew upgrade ddev
Once you have installed or updated DDEV, run ddev version to verify your software:
- ddev version
You will see an output like this:
OutputDDEV-Local version	v1.15.0
commit            	v1.15.0
db                	drud/ddev-dbserver-mariadb-10.2:v1.15.0
dba               	phpmyadmin/phpmyadmin:5
ddev-ssh-agent    	drud/ddev-ssh-agent:v1.15.0
docker            	19.03.8
docker-compose    	1.25.5
os                	darwin
router            	drud/ddev-router:v1.15.0
web               	drud/ddev-webserver:v1.15.0
DDEV includes a powerful CLI, or command line interface. Run ddev to learn about some common commands:
- ddev
You will see the following output:
OutputCreate and maintain a local web development environment.
Docs: https://ddev.readthedocs.io
Support: https://ddev.readthedocs.io/en/stable/#support

Usage:
  ddev [command]

Available Commands:
  auth             A collection of authentication commands
  composer         Executes a composer command within the web container
  config           Create or modify a ddev project configuration in the current directory
  debug            A collection of debugging commands
  delete           Remove all project information (including database) for an existing project
  describe         Get a detailed description of a running ddev project.
  exec             Execute a shell command in the container for a service. Uses the web service by default.
  export-db        Dump a database to a file or to stdout
  help             Help about any command
  hostname         Manage your hostfile entries.
  import-db        Import a sql file into the project.
  import-files     Pull the uploaded files directory of an existing project to the default public upload directory of your project.
  list             List projects
  logs             Get the logs from your running services.
  pause            uses 'docker stop' to pause/stop the containers belonging to a project.
  poweroff         Completely stop all projects and containers
  pull             Pull files and database using a configured provider plugin.
  restart          Restart a project or several projects.
  restore-snapshot Restore a project's database to the provided snapshot version.
  sequelpro        This command is not available since sequel pro.app is not installed
  share            Share project on the internet via ngrok.
  snapshot         Create a database snapshot for one or more projects.
  ssh              Starts a shell session in the container for a service. Uses web service by default.
  start            Start a ddev project.
  stop             Stop and remove the containers of a project. Does not lose or harm anything unless you add --remove-data.
  version          print ddev version and component versions

Flags:
  -h, --help          help for ddev
  -j, --json-output   If true, user-oriented output will be in JSON format.
  -v, --version       version for ddev

Use "ddev [command] --help" for more information about a command.
For more information about using the DDEV CLI, visit the official DDEV documentation.
With DDEV installed on your local machine, you are now ready to install Drupal 9 and begin developing a website.
Option 2 — Installing DDEV on Linux
On a Linux operating system, you can install DDEV using Homebrew for Linux or using the official installation script. On Ubuntu, begin by updating your list of packages in the apt package manager (you can use apt in Debian, otherwise use the equivalent package manager associated with your Linux distribution):
- sudo apt update
Now install some prerequisite packages from Ubuntu’s official repository:
- sudo apt install build-essential apt-transport-https ca-certificates software-properties-common curl
These packages will allow you to download the DDEV installation script from their official GitHub repository.
Now download the script:
- curl -O https://raw.githubusercontent.com/drud/ddev/master/scripts/install_ddev.sh
Before running the script, open it in nano or your preferred text editor and inspect its contents:
nano install_ddev.sh
Once you have reviewed the script’s contents and you are satisfied, save and close the file. Now you are ready to run the installation script.
Use the chmod command to make the script executable:
- chmod +x install_ddev.sh
Now run the script:
- ./install_ddev.sh
The installation process might prompt you to confirm some settings or to enter your sudo password. Once the installation completes, you will have DDEV available on your Linux operating system.
Run ddev version to verify your software:
- ddev version
You will see an output like this:
OutputDDEV-Local version	v1.15.0
commit            	v1.15.0
db                	drud/ddev-dbserver-mariadb-10.2:v1.15.0
dba               	phpmyadmin/phpmyadmin:5
ddev-ssh-agent    	drud/ddev-ssh-agent:v1.15.0
docker            	19.03.8
docker-compose    	1.25.5
os                	linux
router            	drud/ddev-router:v1.15.0
web               	drud/ddev-webserver:v1.15.0
DDEV is a powerful CLI, or command line interface. Run ddev without anything else to learn about some common commands:
- ddev
You will see the following output:
OutputCreate and maintain a local web development environment.
Docs: https://ddev.readthedocs.io
Support: https://ddev.readthedocs.io/en/stable/#support

Usage:
  ddev [command]

Available Commands:
  auth             A collection of authentication commands
  composer         Executes a composer command within the web container
  config           Create or modify a ddev project configuration in the current directory
  debug            A collection of debugging commands
  delete           Remove all project information (including database) for an existing project
  describe         Get a detailed description of a running ddev project.
  exec             Execute a shell command in the container for a service. Uses the web service by default.
  export-db        Dump a database to a file or to stdout
  help             Help about any command
  hostname         Manage your hostfile entries.
  import-db        Import a sql file into the project.
  import-files     Pull the uploaded files directory of an existing project to the default public upload directory of your project.
  list             List projects
  logs             Get the logs from your running services.
  pause            uses 'docker stop' to pause/stop the containers belonging to a project.
  poweroff         Completely stop all projects and containers
  pull             Pull files and database using a configured provider plugin.
  restart          Restart a project or several projects.
  restore-snapshot Restore a project's database to the provided snapshot version.
  sequelpro        This command is not available since sequel pro.app is not installed
  share            Share project on the internet via ngrok.
  snapshot         Create a database snapshot for one or more projects.
  ssh              Starts a shell session in the container for a service. Uses web service by default.
  start            Start a ddev project.
  stop             Stop and remove the containers of a project. Does not lose or harm anything unless you add --remove-data.
  version          print ddev version and component versions

Flags:
  -h, --help          help for ddev
  -j, --json-output   If true, user-oriented output will be in JSON format.
  -v, --version       version for ddev

Use "ddev [command] --help" for more information about a command.
For more information about using the DDEV CLI, you can visit the official DDEV documentation.
With DDEV installed on your local machine, you are now ready to deploy Drupal 9 and begin developing a website.
Step 2 — Deploying a New Drupal 9 Site Using DDEV
With DDEV running, you will now use it to create a Drupal-specific filesystem, install Drupal 9, and then initiate a standard website project.
First, you will create a project root directory and then move inside it. You will run all remaining commands from this location. This tutorial will use d9test, but you are free to name your directory something else. Note, however, that DDEV doesn’t handle hyphenated names well. It is considered a best practice to avoid directory names like my-project or drupal-site-1.
Create your project root directory and navigate inside:
- mkdir d9test
- cd d9test
DDEV excels at creating directory trees that match specific CMS platforms. Use the ddev config command to create a directory structure specific to Drupal 9:
- ddev config --project-type=drupal9 --docroot=web --create-docroot
You will see an output like this:
OutputCreating a new ddev project config in the current directory (/Users/sammy/d9test)
Once completed, your configuration will be written to /Users/sammy/d9test/.ddev/config.yaml

Created docroot at /Users/sammy/d9test/web
You have specified a project type of drupal9 but no project of that type is found in /Users/sammy/d9test/web
Ensuring write permissions for d9new
No settings.php file exists, creating one
Existing settings.php file includes settings.ddev.php
Configuration complete. You may now run 'ddev start'.
Because you passed --project-type=drupal9 to your ddev config command, DDEV created several subdirectories and files that represent the default organization for a Drupal website. Your project directory tree will now look like this:
.
├── .ddev
│   ├── .gitignore
│   ├── config.yaml
│   ├── db-build
│   │   └── Dockerfile.example
│   └── web-build
│       └── Dockerfile.example
└── web
    └── sites
        └── default
            ├── .gitignore
            ├── settings.ddev.php
            └── settings.php

6 directories, 7 files
.ddev/ will be the main folder for the ddev configuration. web/ will be the docroot for your new project; it will contain several specific settings. files. You now have the initial scaffolding for your new Drupal project.
Your next step is to initialize your platform, which will build the necessary containers and networking configurations. DDEV binds to ports 80 and 443, so if you are running a web server like Apache on your machine, or anything else that uses those ports, stop those services before continuing.
Use the ddev start command to initialize your platform:
- ddev start
This will build all the Docker-based containers for your project, which include a web container, a database container, and phpmyadmin. When the initialization completes you will see an output like this (your port number might differ):
...
[secondary_label Output]
Successfully started d9test
Project can be reached at http://d9test.ddev.site http://127.0.0.1:32773
Note: Remember that DDEV is starting Docker containers behind the scenes here. If you want to view those containers or verify that they are running, you can always use the docker ps command:
- docker ps
Alongside any other containers that you are currently running, you will find four new containers, each running a different image: php-myadmin, ddev-webserver, ddev-router, and ddev-dbserver-mariadb.
ddev start has successfully built your containers and given you an output with two URLs. While this output says that your project “can be reached at http://d9test.ddev.site and http://127.0.0.1:32773,” visiting these URLs right now will throw an error. Starting with Drupal 8, the Drupal core and the contrib modules function like dependencies. Therefore, you’ll first need to finish installing Drupal using Composer, the package manager for PHP projects, before anything loads in your web browser.
One of the most useful and elegant features of DDEV is that you can pass Composer commands through the DDEV CLI and into your containerized environment. This means that you can separate your machine’s specific configuration from your development environment. You no longer have to manage the various file path, dependency, and version issues that generally accompany local PHP development. Moreover, you can quickly context-switch between multiple projects using different frameworks and tech stacks with minimal effort.
Use the ddev composer command to download drupal/recommended-project. This will download Drupal core, its libraries, and other related resources and then create a default project:
- ddev composer create "drupal/recommended-project"
Now download one final component called Drush, or Drupal Shell. This tutorial will only use one drush command, and this tutorial provides an alternative, but drush is a powerful CLI for Drupal development that can improve your efficiency.
Use ddev composer to install drush:
- ddev composer require "drush/drush"
You have now built a default Drupal 9 project and installed drush. Now you will view your project in a browser and configure your website’s settings.
Step 3 — Configuring Your Drupal 9 Project
Now that you have installed Drupal 9 you can visit your new project in your browser. To do this, you can rerun ddev start and copy one of the two URLs that it outputs, or you can use the following command, which will automatically launch your site in a new browser window:
- ddev launch
You will encounter the standard Drupal installation wizard.
Here you have two options. You can use this UI and follow the wizard through installation, or you can return to your terminal and pass a drush command through ddev. The latter option will automate the installation process and set admin as both your username and password.
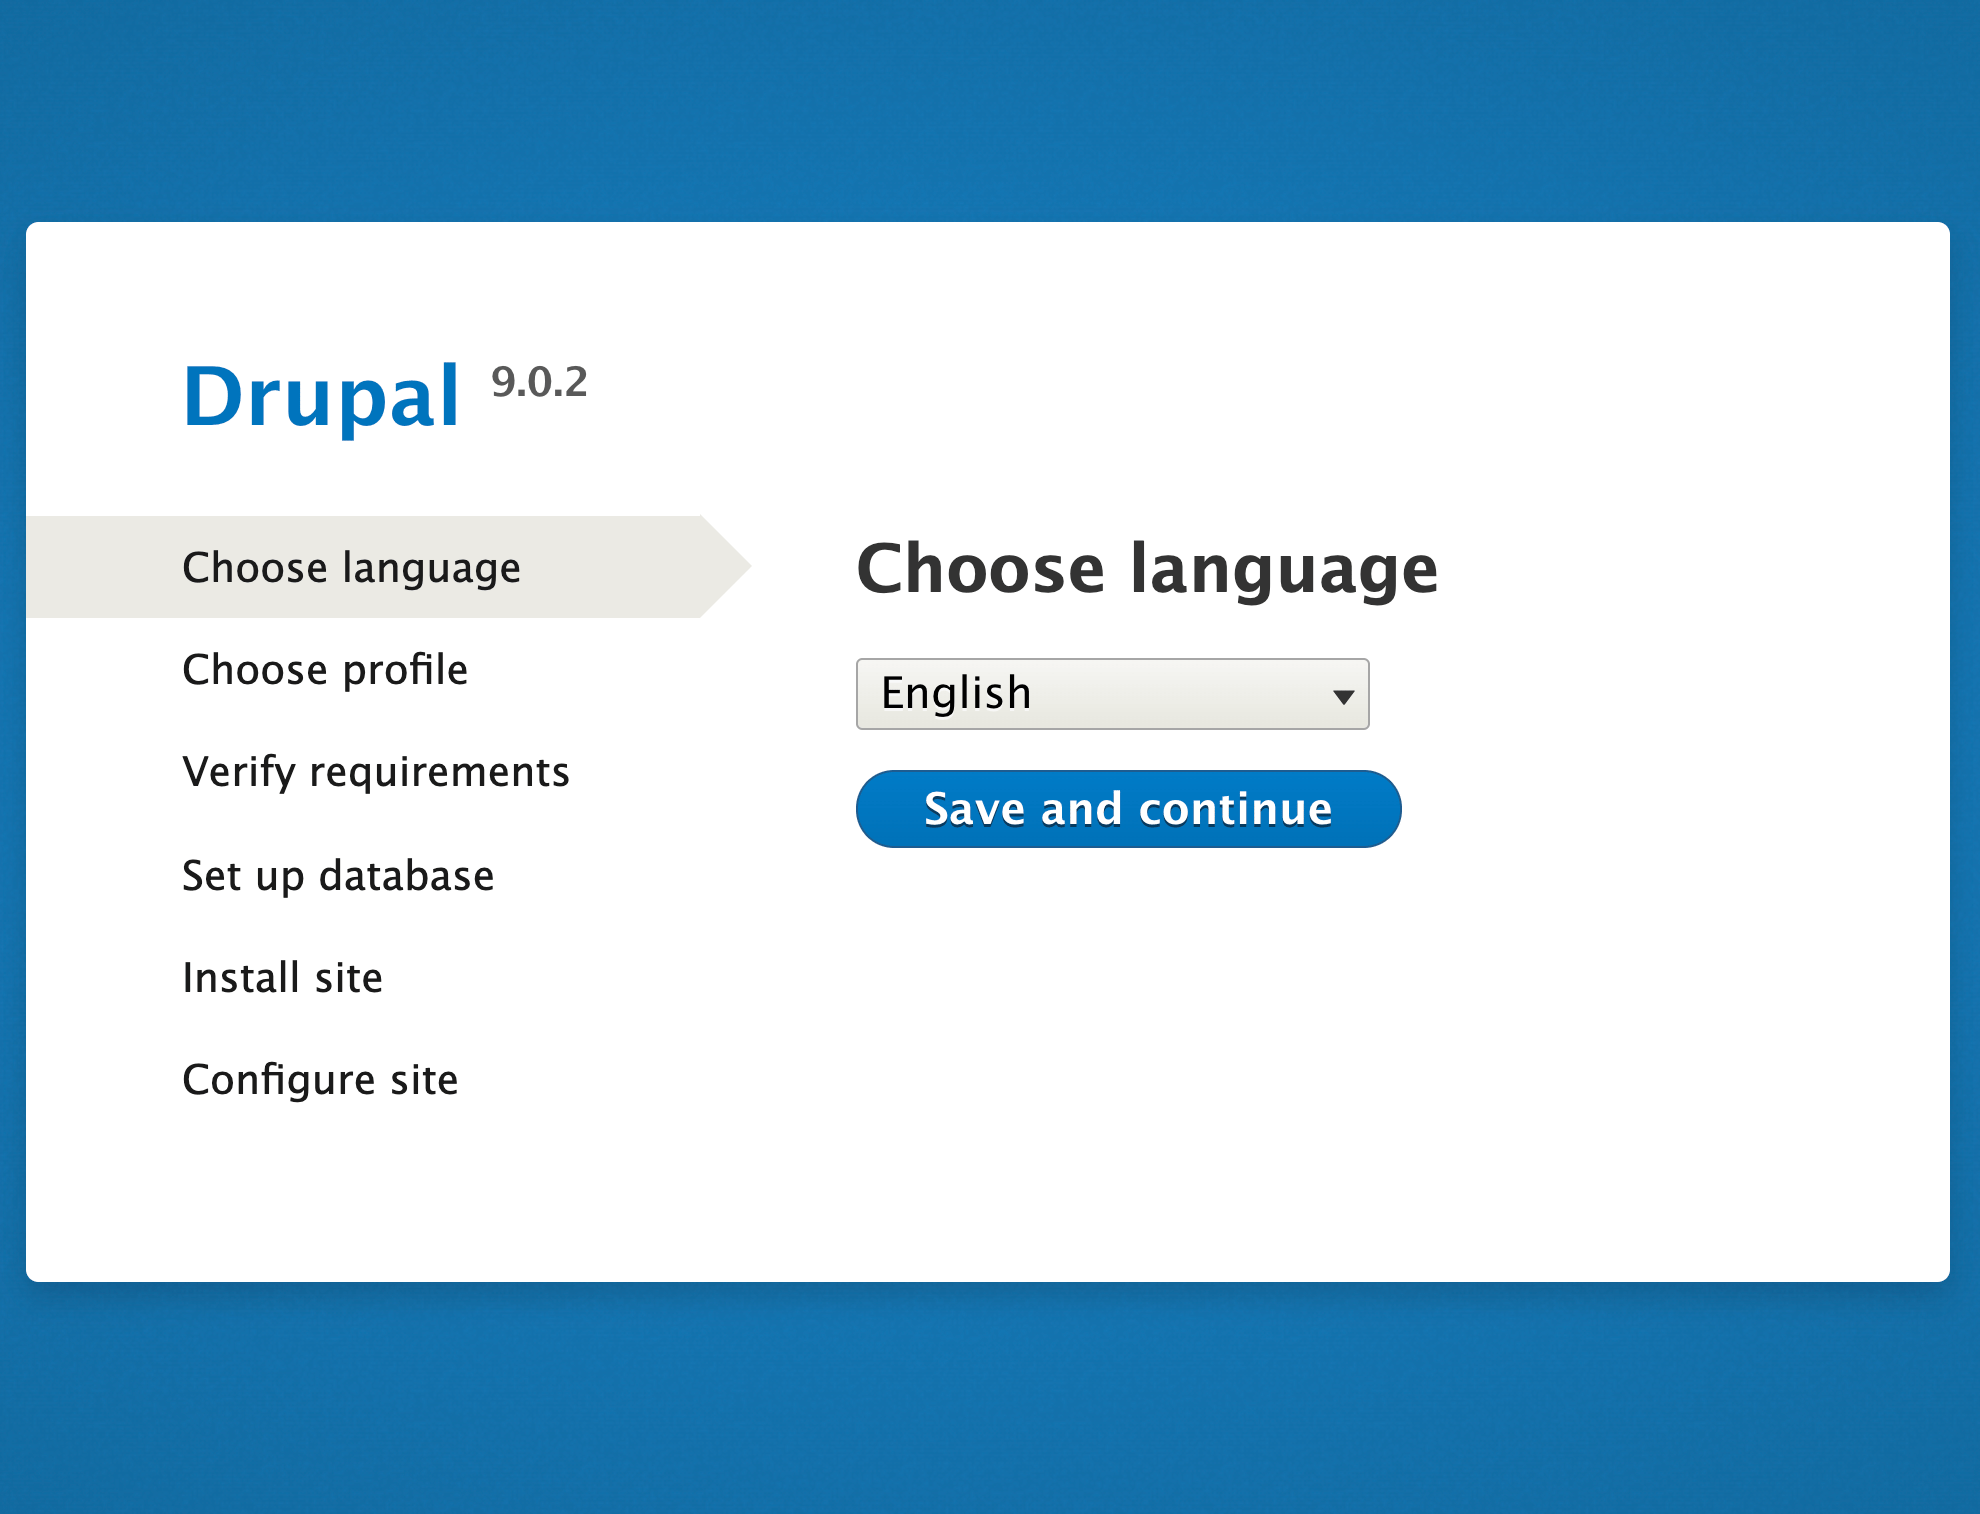
Option 1 — Using the Wizard
Return to the wizard in your browser. Under Choose language select a language from the drop-down menu and click Save and continue. Now select an installation profile. You can choose between Standard, Minimal, and Demo. Make your choice and then click Save and continue. Drupal will automatically verify your requirements, set up a database, and install your site. Your last step is to customize a few configurations. Add a site name and a site email address that ends in your domain. Then choose a username and password. Choose a strong password and keep your credentials somewhere safe. Lastly, add a private email address that you regularly check, fill in the regional settings, and press Save and continue.
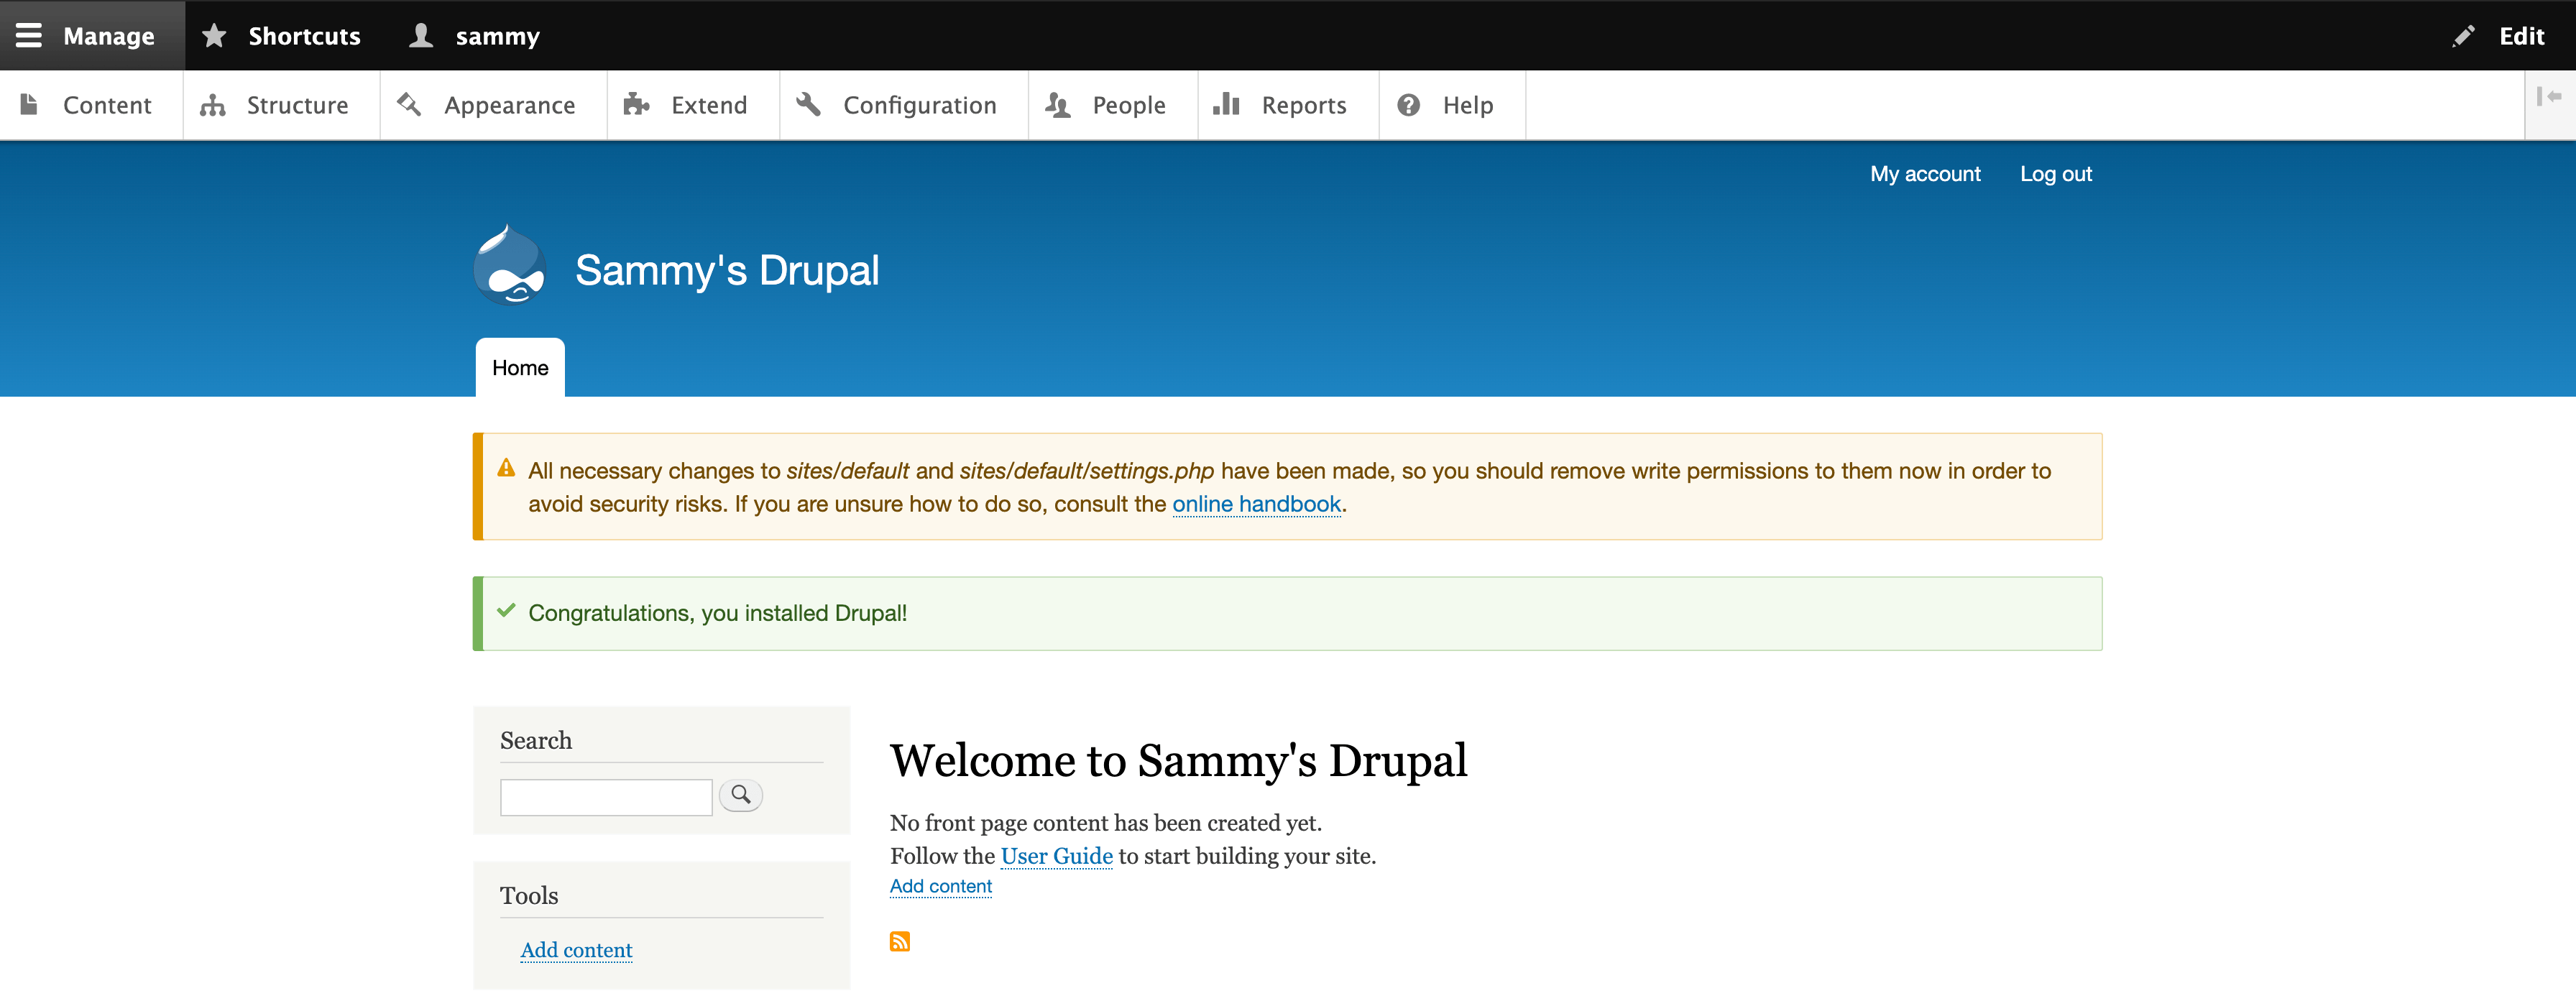
Your new site will load with a welcome message.
Option 2 — Using the Command Line
From your project’s root directory, run this ddev exec command to install a default Drupal site using drush:
- ddev exec drush site:install --account-name=admin --account-pass=admin
This will create your site just like the wizard will but with some boilerplate configurations. Your username and password will be admin.
Now launch the site to view it in your browser:
- ddev launch
You are now ready to begin building your website, but it is considered best practice to check that your permissions are correct for the /sites/web/default directory. While you are working locally, this is not a significant concern, but if you transfer these permissions to a production server, they will pose a security risk.
Step 4 — Checking Your Permissions
During the wizard installation, or when your welcome page first loads, you might see a warning about the permissions settings on your /sites/web/default directory and one file inside that directory: settings.php.
After the installation script runs, Drupal will try to set the web/sites/default directory permissions to read and execute for all groups: this is a 555 permissions setting. It will also attempt to set permissions for default/settings.php to read-only, or 444. If you encounter this warning, run these two chmod commands from your project’s root directory. Failure to do so poses a security risk:
- chmod 555 web/sites/default
- chmod 444 web/sites/default/settings.php
To verify that you have the correct permissions, run this ls command with the a, l, h, and d switches:
- ls -alhd web/sites/default web/sites/default/settings.php
Check that your permissions match the following output:
Outputdr-xr-xr-x 8 sammy staff 256 Jul 21 12:56 web/sites/default
-r--r--r-- 1 sammy staff 249 Jul 21 12:12 web/sites/default/settings.php
You are now ready to develop a Drupal 9 website on your local machine.
Step 5 — Creating Your First Post in Drupal
To test some of Drupal’s functionality, you will now create a post using the web UI.
From your site’s initial page, click the Content button on the upper menu’s left-hand edge. Now click the blue add content button. A new page will appear. Click Article, and another page will appear.
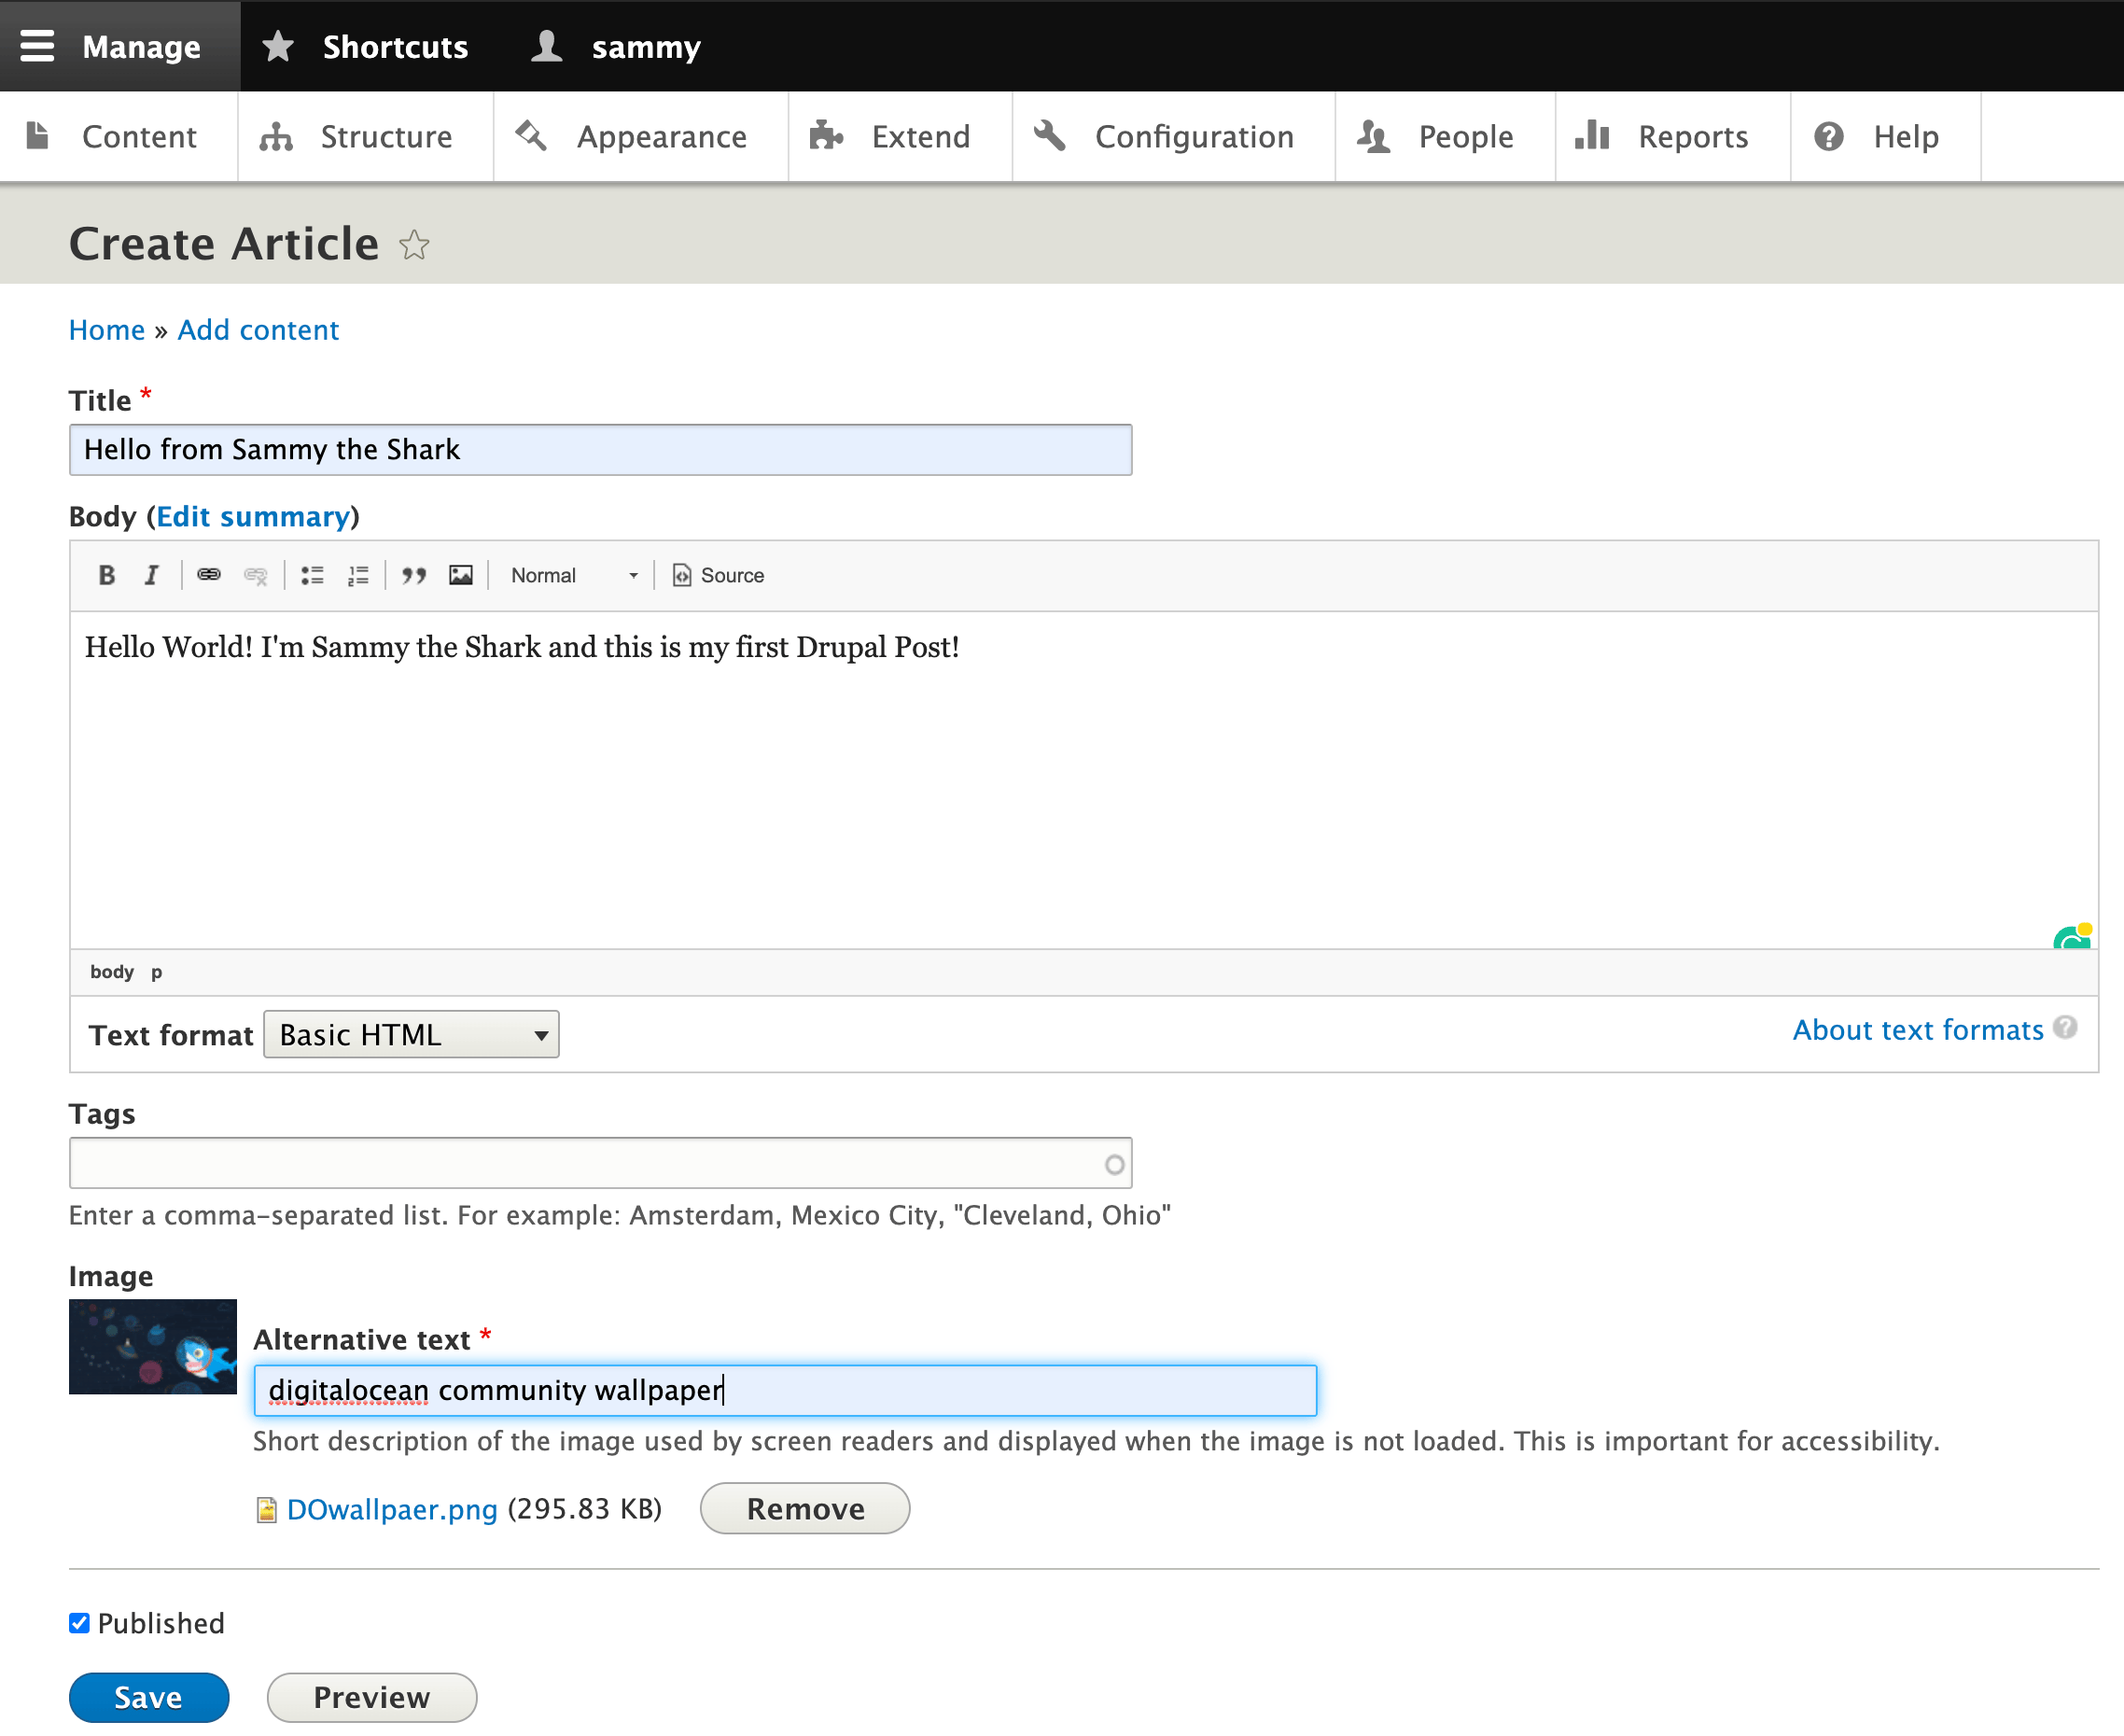
Add whatever title and content you like. You can add an image, too, like one of DigitalOcean’s wallpapers. When ready, click the blue save button.
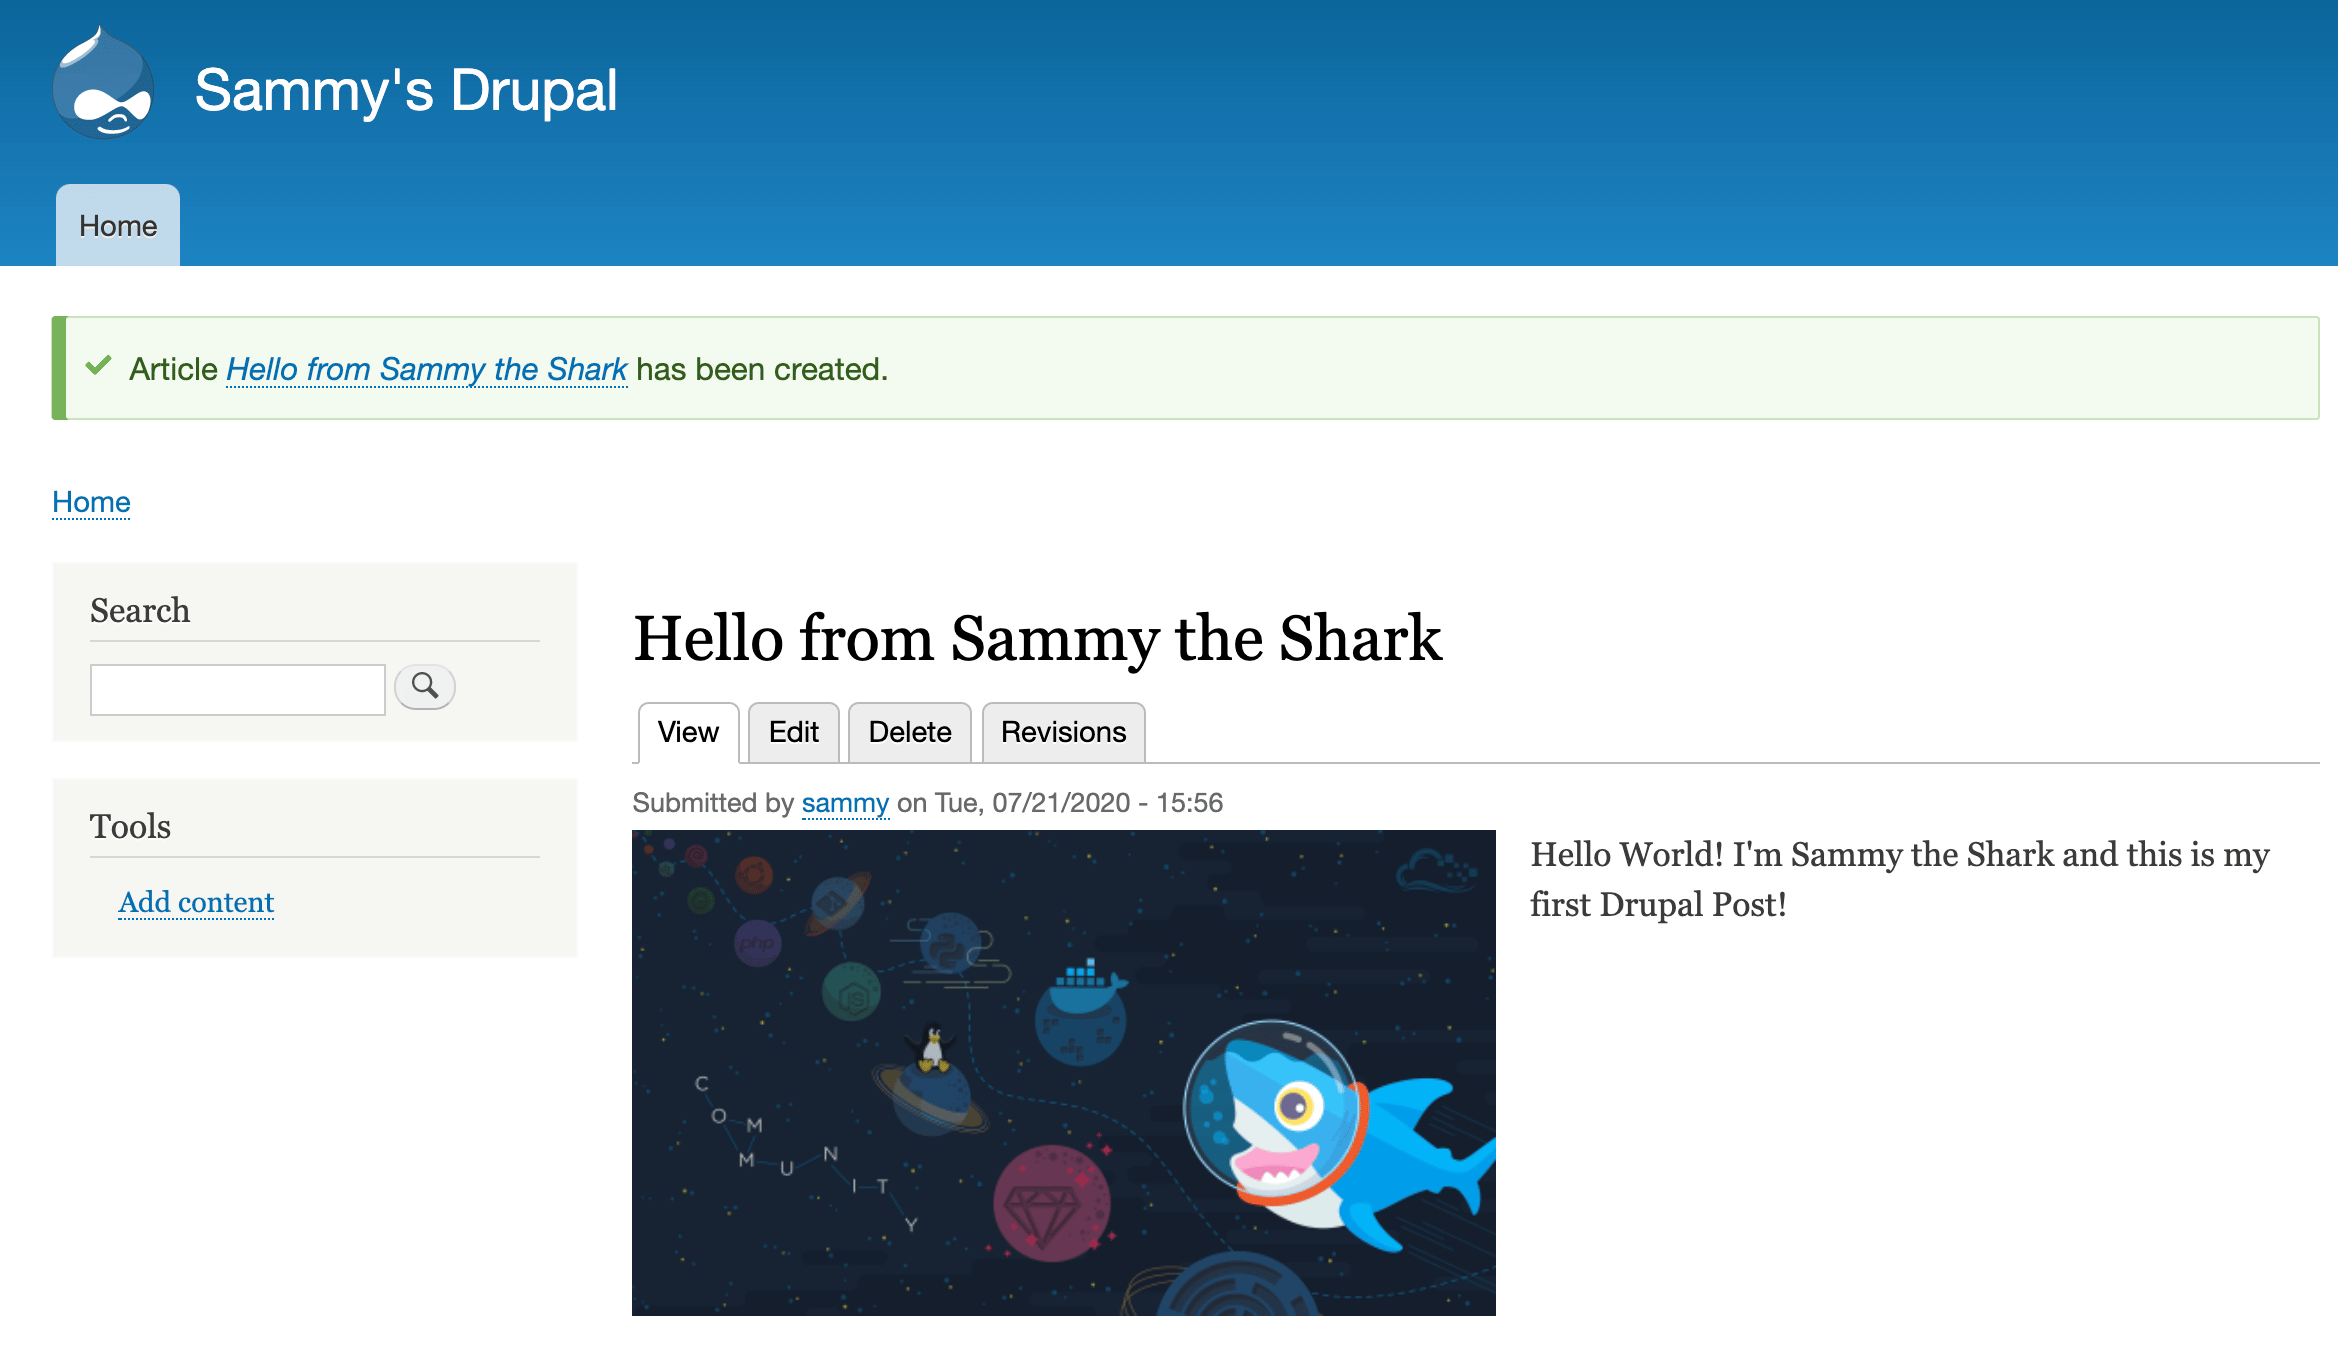
Your first post will appear on your website.
You are now developing a Drupal 9 website on your local machine without ever interacting with a server, thanks to Docker and DDEV. In the following step, you will manage the DDEV container to accomodate your workflow.
Step 6 — Managing the DDEV Container
When you have finished developing your project, or when you want to take a break, you can stop your DDEV container without worrying about data loss. DDEV can manage rapid context-switching among many projects; this is one of its most useful features. Your code and data are always preserved in your project directory, even after you stop or delete the DDEV container.
To free up resources, you can stop DDEV at any time. From your project’s root directory, run the following command:
- ddev stop
DDEV is available globally, so you can run ddev commands from anywhere, as long as you specify the DDEV project:
- ddev stop d9test
You can also view all your projects at once using ddev list:
- ddev list
DDEV includes many other useful commands.
You can restart DDEV and continue developing locally at any time.
Conclusion
In this tutorial, you used Docker and the power of containerization to develop a Drupal site locally, with the help of DDEV. DDEV also integrates well with numerous IDEs, and it provides built-in PHP debugging for Atom, PHPStorm, and Visual Studio Code (vscode). From here, you can also learn more about creating development environments for Drupal with DDEV or developing other PHP frameworks like Wordpress.
Thanks for learning with the DigitalOcean Community. Check out our offerings for compute, storage, networking, and managed databases.
About the author(s)
PHP Senior Developer for Drupal based projects. Focused in backend. Bartender and writer in therussianlullaby.com
Supporting the open-source community one tutorial at a time. Former Technical Editor at DigitalOcean. Expertise in topics including Ubuntu 22.04, Ubuntu 20.04, CentOS, and more.
Still looking for an answer?
This textbox defaults to using Markdown to format your answer.
You can type !ref in this text area to quickly search our full set of tutorials, documentation & marketplace offerings and insert the link!
This is fantastic! Thank you!
One note for others finding this, this will install the latest version of Drupal which is now 10. Drupal 10 requires PHP 8.1 this install used PHP 8.0. To fix this issue goto d9test/.ddev/config.yaml and change the PHP version to read
php_version: "8.1"
 This work is licensed under a Creative Commons Attribution-NonCommercial- ShareAlike 4.0 International License.
Become a contributor for community
Get paid to write technical tutorials and select a tech-focused charity to receive a matching donation.

DigitalOcean Documentation
Full documentation for every DigitalOcean product.

Resources for startups and AI-native businesses
The Wave has everything you need to know about building a business, from raising funding to marketing your product.
The developer cloud
Scale up as you grow — whether you're running one virtual machine or ten thousand.

Start building today
From GPU-powered inference and Kubernetes to managed databases and storage, get everything you need to build, scale, and deploy intelligent applications.
