
The author selected the COVID-19 Relief Fund to receive a donation as part of the Write for DOnations program.
Introduction
Remote Desktop Protocol (RDP) is a network protocol developed by Microsoft that allows users to remotely access and interact with the graphical user interface of a remote Windows server. RDP works on the client-server model, where an RDP client is installed on a local machine, and an RDP server is installed on the remote server.
RDP is widely used for Windows remote connections, but you can also access and interact with the graphical user interface of a remote Linux server by using a tool like xrdp, an open-source implementation of the RDP server.
In this tutorial, you will install and configure xrdp on an Ubuntu 22.04 server to enable Remote Desktop access using the RDP protocol. You will set up a lightweight desktop environment, configure the firewall, and test the connection from Windows, macOS, and Linux clients. You’ll also learn how to optimize performance, support multiple users, and address compatibility with Wayland and Xorg.
Key Takeaways
- You can install and configure
xrdpon an Ubuntu 22.04 server to allow remote desktop access using the standard RDP protocol from Windows, macOS, or Linux clients. - A lightweight desktop environment like Xfce is ideal for RDP sessions, providing a responsive graphical interface with minimal resource usage.
- To allow RDP access, TCP port 3389 must be opened on the server’s firewall, ideally restricted to specific IP addresses for security.
- For each Linux user account, a
.xsessionfile specifying the session (e.g.,xfce4-session) must be created to start the desktop environment correctly over RDP. xrdpsupports concurrent sessions with isolated environments for each user, provided system resources are sufficient and user accounts are properly configured.- xrdp requires Xorg for stable operation. If the system uses Wayland, it must be disabled (e.g.,
gdm3settings) for xrdp to function correctly. - Reducing screen resolution and color depth, disabling desktop effects, and enabling client-side compression can significantly improve RDP performance over low-bandwidth networks.
- Depending on your needs, tools like VNC, TeamViewer, or X2Go may offer better performance, features, or compatibility for remote desktop access in Linux environments.
Prerequisites
To complete this tutorial, you will need:
-
One Ubuntu 22.04 server with a non-root user with
sudoprivileges, a firewall, and at least 2GB of RAM, which you can set up by following the Ubuntu 22.04 initial server setup guide. -
A local computer with an RDP client installed. A list of available RDP clients for different operating systems is provided below:
- On Windows, you can use the default Remote Desktop Connection application.
- On macOS, you can use the Microsoft Remote Desktop application.
- On Linux, you can use FreeRDP, or Remmina.
Step 1 — Installing a Desktop Environment on Ubuntu
In this step, you will install and configure a desktop environment on your Ubuntu server. By default, an Ubuntu server comes with only a terminal environment. A desktop environment will need to be installed to access a user interface.
From the available options for Ubuntu, you will install the Xfce desktop environment. Xfce offers a lightweight, user-friendly desktop environment for Linux-based systems.
To begin, connect to your server using SSH and update the list of available packages using the following command:
- sudo apt update
Next, install the xfce4 and xfce4-goodies packages on your server:
- sudo apt install xfce4 xfce4-goodies -y
You will be prompted to choose a display manager, which is a program that manages graphical login mechanisms and user sessions. For a lightweight setup that complements XFCE, it is recommended to select lightdm. This tutorial will use gdm3, but lightdm is an excellent alternative.
After installing the desktop environment, you will now install xrdp on your server.
Step 2 — Installing xrdp on Ubuntu
xrdp is an open-source implementation of the RDP server that allows RDP connections for Linux-based servers. In this step, you will install xrdp on your Ubuntu server.
To install xrdp, run the following command in the terminal:
- sudo apt install xrdp -y
After installing xrdp, verify the status of xrdp using systemctl:
- sudo systemctl status xrdp
This command will show the status as active (running):
● xrdp.service - xrdp daemon
     Loaded: loaded (/lib/systemd/system/xrdp.service; enabled; vendor preset: enabled)
     Active: **active (running)** since Sun 2022-08-07 13:00:44 UTC; 26s ago
       Docs: man:xrdp(8)
             man:xrdp.ini(5)
   Main PID: 17904 (xrdp)
      Tasks: 1 (limit: 1131)
     Memory: 1016.0K
     CGroup: /system.slice/xrdp.service
             └─17904 /usr/sbin/xrdp
If the status of xrdp is not running, you may have to start the service manually with this command:
- sudo systemctl start xrdp
After executing the above command, verify the status again to ensure xrdp is in a running state.
You have now installed xrdp on your server. Next, you will review the xrdp configuration to accept connections from remote clients.
Step 3 — Configuring xrdp and Updating Your Firewall
In this step, you will review the default configuration of xrdp, which is stored in /etc/xrdp/xrdp.ini, and add a configuration for an RDP connection. You will also update the firewall settings.
xrdp.ini is the default configuration file to set up RDP connections to the xrdp server. The configuration file can be modified and customized to meet the RDP connection requirements.
Open the file in nano text editor or any editor of your choice:
- sudo nano /etc/xrdp/xrdp.ini
The configuration file contains different sections:
- Globals defines some global configuration settings for xrdp.
- Logging defines logging subsystem parameters for logs.
- Channels defines multiple channel parameters that RDP supports.
- Session types defines multiple supported session types by xrdp. Every session type configuration is defined as a separate section under its session type name enclosed in square brackets, such as
[Xorg]and[XVnc]. There is no[Sessions types]heading in the file; instead, it is written as a comment.
In the configuration file, navigate to the Session types section. You will find multiple supported session types and their parameters listed:
...

;
; Session types
;

; Some session types such as Xorg, X11rdp, and Xvnc start a display server.
; Startup command-line parameters for the display server are configured
; in sesman.ini. See and configure also sesman.ini.
[Xorg]
name=Xorg
lib=libxup.so
username=ask
password=ask
ip=127.0.0.1
port=-1
code=20

[Xvnc]
name=Xvnc
lib=libvnc.so
username=ask
password=ask
ip=127.0.0.1
port=-1
#xserverbpp=24
#delay_ms=2000

[vnc-any]
...

[neutrinordp-any]
...

...
By default, the username and password parameters are set to ask, which means the user will be prompted to enter their username and password to connect over RDP. Parameters, such as name, username, and password, can be modified if necessary. For the initial RDP connection to the server, the default configuration will suffice.
Save and close the file when finished.
Next, you will create a .xsession file under /home/sammy and add the xfce4-session as the session manager to use upon login:
- echo "xfce4-session" | tee ~/.xsession
tee writes the echoed string "xfce4-session" to the file .xsession. The above configuration ensures that xfce4-session is used as a session manager upon graphical login request. As a result of installing xfce as your desktop environment, xfce4-session serves as its session manager. If you don’t include this information in the .xsession file, no session manager is chosen, and the RDP session will fail to connect to the graphical display.
Restart the xrdp server:
- sudo systemctl restart xrdp
Next, you will configure your firewall to allow remote connections from your public IP on port 3389. An RDP connection serves on TCP/IP port 3389. To access the remote server over RDP, you must allow port 3389 in your firewall.
First, find the public IP for your local machine:
- curl ifconfig.me
On Windows, use the Windows Command Prompt to run this command.
curl places a request on ifconfig.me that returns your public IP as an output:
...
your_local_ip
Next, allow access to the RDP port 3389 on your remote server, replacing your_local_ip with the output of the last command:
- sudo ufw allow from your_local_ip/32 to any port 3389
Note: Ensure ufw is enabled (sudo ufw enable) and configured correctly before adding rules.
Verify the status of your UFW firewall:
- sudo ufw status
The output should look like the following:
Status: Active
To                         Action      From
--                         ------      ----
OpenSSH                    ALLOW       Anywhere
3389                       ALLOW       your_local_ip
OpenSSH (v6)               ALLOW       Anywhere (v6)
...
You have now enabled port 3389 to accept connections from your public IP. Next, you will test your local machine’s RDP connection to your remote server.
Step 4 — Testing the RDP Connection
In this step, you will test the RDP connection from your local machine. The sections below include actions for testing the connection on Windows, macOS, and Linux machines.
Testing the RDP Connection on Windows
To test the connection using the Remote Desktop Connection client on Windows, first launch the Remote Desktop Connection app.
Enter your remote server’s public IP and username into the fillable text boxes for Computer and User name. You may need to press the down arrow for Show Options to input the username:
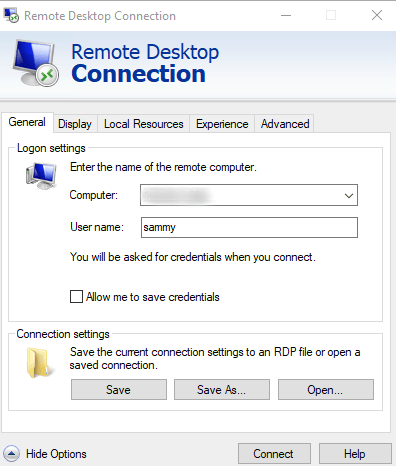
Press the Connect button. If you receive an alert that the Remote Desktop can’t connect to the remote computer, verify that the server’s firewall allows port 3389 and that xrdp is running.
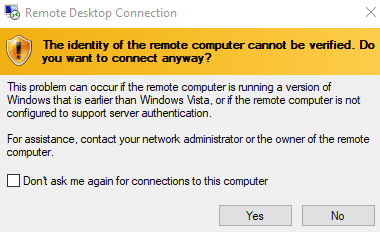
Press Yes if you receive the identity verification popup:
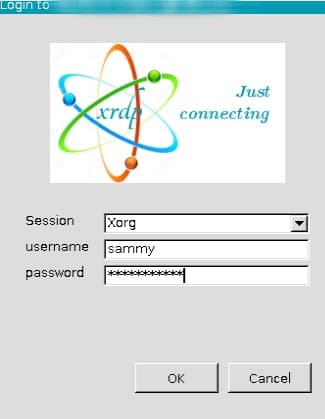
Then, enter your remote server’s username (sammy) and the password you created for user sammy during the initial server setup. Press Ok.
Once you have logged in, you should be able to access your Ubuntu Desktop environment:
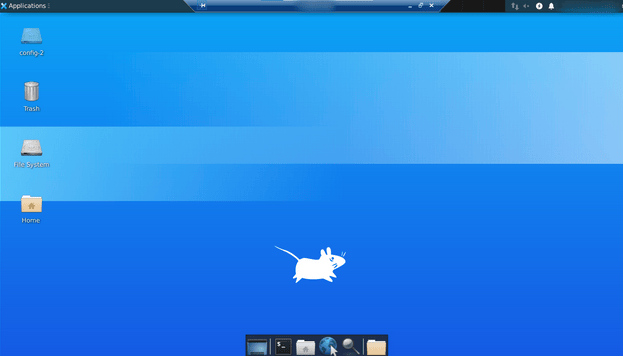
Using RDP, you successfully connected to your remote Ubuntu server from your local machine. You can close it with the exit button when you have finished using your graphical desktop.
Testing the RDP Connection on macOS
To test the connection using the Remote Desktop Connection client on macOS, first launch the Microsoft Remote Desktop app.
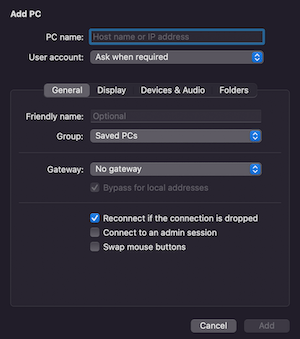
Press Add PC, then enter your remote server’s public IP in the fillable box:
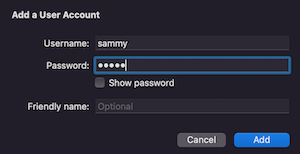
You can Add a user account when setting up the connection:
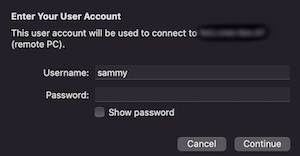
If you do not add a user during setup, you will be prompted for your user login credentials:
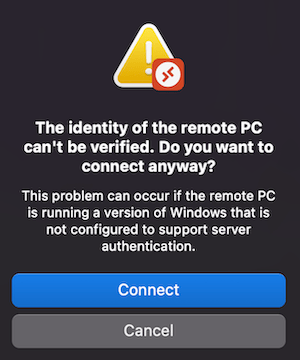
Press Yes to bypass the identity verification popup:
Once you have logged in, you can access your Ubuntu remote desktop. You can close it with the exit button when you have finished using your graphical desktop.
Testing the RDP Connection on Linux
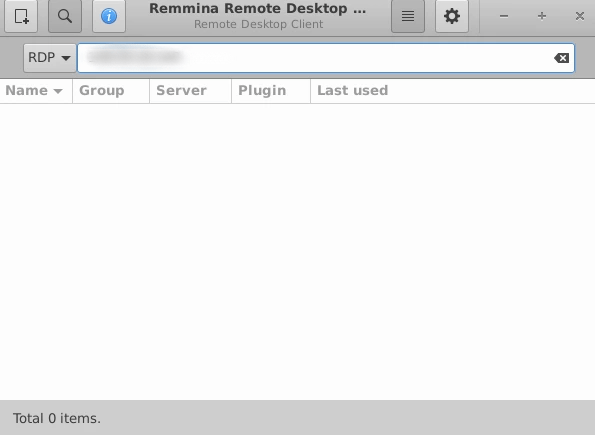
You will need an RDP client to test the RDP connection on a local Linux machine. First, install the remmina RDP client for Ubuntu:
- sudo apt install remmina
Select y if prompted to complete the installation. This command will install Remmina, an open-source remote desktop client on your Ubuntu system using apt. For other Linux distributions, you can review the Remmina documentation for installation.
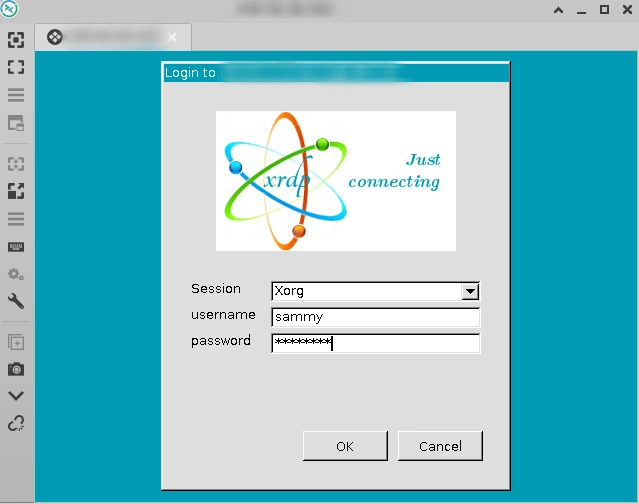
Once installed, launch the Remmina application on your local Linux machine and enter your remote server’s public IP in the fillable box. Press Enter on your keyboard to connect to your remote desktop.
Then, enter your remote server’s username (for this tutorial, the username is sammy) and the password you created for the user during the initial server setup. Press Ok.
You may need to enter your user’s password again to unlock the remote desktop.
Once you have logged in, you should be able to access your Ubuntu Desktop environment.
Using RDP, you successfully connected to your remote Ubuntu server from your local machine. You can close it with the exit button when you have finished using your graphical desktop.
Once you have ensured the remote connection works, you can use this sequence whenever you need to use the graphical interface for your remote Linux server.
Configuring Multiple Users or Concurrent Sessions in xrdp
By default, xrdp supports multiple users connecting to a Linux server concurrently, provided that each user has a separate account and session. This makes it suitable for shared environments or team-based development setups.
Let’s set up multiple users with independent xrdp sessions on the same Ubuntu server.
1. Add New Users
To allow another person to log in via RDP, create a new system user account:
- sudo adduser alice
You will be prompted to assign a password and optional user details. Repeat this process for each user who needs RDP access.
2. Create Session Configuration for Each User
Each user must define which session to load when connecting via xrdp. Switch to the user or use sudo to create a .xsession file:
- echo "xfce4-session" | sudo tee /home/alice/.xsession
- sudo chown alice:alice /home/alice/.xsession
- sudo chmod 644 /home/alice/.xsession
Ensure the home directory has appropriate permissions:
- sudo chmod 755 /home/alice
This ensures that the xrdp-sesman process can read the session startup file.
3. Verify xrdp Session Limits
By default, xrdp supports multiple simultaneous sessions (typically 50). You can change this in the session manager configuration:
- sudo nano /etc/xrdp/sesman.ini
Locate the following section and modify as needed:
MaxSessions=20
Save the file and restart the service:
- sudo systemctl restart xrdp
4. Monitor Sessions
To view currently active xrdp sessions:
- sudo loginctl list-sessions
You can also monitor xrdp logs under /var/log/xrdp-sesman.log or /var/log/xrdp.log to troubleshoot user login issues.
Each user will have their own isolated graphical session, separate from others. This makes xrdp suitable for multi-user servers or development machines where each user needs a GUI interface.
Optimizing xrdp Performance for Slower or High-Latency Connections
If you’re accessing your Ubuntu server over a slower internet connection or a high-latency network (such as a mobile hotspot, VPN, or transcontinental link), default xrdp settings may result in laggy performance or session timeouts. Let’s discuss the various techniques you can use to optimize your xrdp experience for improved responsiveness and lower bandwidth usage.
Choose a Lightweight Desktop Environment
The choice of desktop environment greatly affects session responsiveness. Heavy environments like GNOME or KDE Plasma consume more CPU and memory, leading to slow performance under constrained network conditions.
As outlined in this tutorial, using Xfce provides a balanced experience in terms of resource usage and usability. Alternatives like LXDE or MATE can further reduce memory consumption and improve load times:
- sudo apt install lxde -y
After installing, update the .xsession file accordingly:
- echo "startlxde" > ~/.xsession
Disable Desktop Visual Effects
Most desktop environments include visual enhancements like compositing, shadows, window animations, and transparency. These features are unnecessary for remote access and consume additional bandwidth.
In Xfce, you can disable these effects by going to:
Applications Menu → Settings → Window Manager Tweaks → Compositor Tab → Uncheck “Enable display compositing”
Reduce Display Resolution and Color Depth
Higher display resolutions and 32-bit color depth require more bandwidth. Lowering these settings on the client side can significantly improve remote performance.
On Windows RDP Client:
- Open the Remote Desktop Connection window.
- Go to the Display tab.
- Set a lower screen resolution (e.g., 1024×768).
- Change Colors to High Color (16-bit).
On Remmina (Linux):
- Edit your saved RDP connection.
- Navigate to the Display tab.
- Select Color Depth: 16-bit or 24-bit.
Enable Compression and Caching
Some RDP clients offer bitmap or glyph caching and compression features to optimize data transfer:
- Windows RDP Client: Under Experience, choose a lower connection speed (e.g., 56 Kbps) to enable compression and disable unnecessary visual features.
- Remmina: Under the Advanced tab, enable compression and caching if supported.
These settings reduce repeated data transfer, especially for static screen elements like menus and backgrounds.
Disable Background Wallpaper
Wallpaper images are resource-intensive and unnecessary for most remote sessions. In Xfce, disable the background image:
Settings → Desktop → Background Tab → Style: None
This reduces graphical complexity and speeds up redraw time.
By combining these steps, you can significantly improve xrdp performance even over slower or congested connections.
Understanding xrdp Compatibility with Wayland and Xorg
Ubuntu and other modern Linux distributions have increasingly adopted Wayland as the default display server protocol, replacing the older Xorg system. However, Wayland is not fully compatible with xrdp at the time of writing. Let’s explore the differences between the two and how to configure your system for best results.
What is Xorg?
Xorg (X11) is the traditional display server used by Linux desktops. It is mature, widely supported, and compatible with nearly all remote desktop protocols including RDP.
xrdp works with Xorg to create virtual desktop sessions for incoming RDP connections, making it the most stable option for remote access.
What is Wayland?
Wayland is a modern replacement for Xorg, designed to be more secure and efficient. It is the default display server for GNOME on recent Ubuntu releases. However, Wayland restricts remote access to the display server, making it difficult for xrdp (and some VNC servers) to function properly.
Symptoms of Wayland Incompatibility
- Login screen appears but session fails to start.
- Blank or black screen after RDP authentication.
- Session closes immediately after login attempt.
Disabling Wayland for xrdp Compatibility
If your system is using GDM (GNOME Display Manager), you can force it to use Xorg by disabling Wayland:
-
Open the GDM configuration file:
- sudo nano /etc/gdm3/custom.conf
-
Uncomment and set the following line:
WaylandEnable=false -
Save and close the file.
-
Restart the display manager or reboot:
- sudo systemctl restart gdm3
Alternatively, use a desktop environment like Xfce, MATE, or LXDE that defaults to Xorg, especially when used in headless or server environments.
Until upstream support for Wayland becomes stable in xrdp, using Xorg is recommended for reliable session creation and graphical login.
Comparing xrdp with Alternatives: VNC, TeamViewer, and NoMachine
While xrdp offers a convenient way to access a graphical session on a Linux server via the Remote Desktop Protocol, it is not the only option available for remote desktop access. Depending on your requirements, such as performance, ease of setup, platform compatibility, or security, other remote access tools may be more suitable. The following table shows how xrdp compares with alternatives like VNC, TeamViewer, and NoMachine.
| Feature/Tool | xrdp | VNC | TeamViewer | NoMachine |
|---|---|---|---|---|
| Protocol | RDP (Microsoft Remote Desktop Protocol) | RFB (Remote Framebuffer Protocol) | Proprietary | NX Protocol (NoMachine Proprietary) |
| Open Source | Yes | Yes (varies by implementation) | No | Partially (Free for personal use) |
| Platform Support | Linux server; RDP clients on Windows/macOS/Linux | Cross-platform (server and client on all OS) | Windows, macOS, Linux, Android, iOS | Windows, macOS, Linux, Android, iOS |
| Setup Complexity | Moderate (requires desktop environment and configuration) | Moderate to High (manual setup per implementation) | Very Low (auto-setup with GUI) | Moderate |
| Performance Over LAN | Good with lightweight desktop environments (Xfce, LXDE) | Fair; can lag at high resolutions | Excellent | Excellent |
| Performance Over WAN | Acceptable with optimizations | Poor to Fair | Excellent (NAT traversal, compression) | Excellent (adaptive compression) |
| File Transfer | No (unless configured separately) | Varies by implementation | Yes (built-in) | Yes (built-in) |
| Multi-User Support | Yes (isolated sessions with separate users) | Typically shared session (varies by implementation) | One session at a time (per connection) | Yes (single or multiple sessions) |
| Security | Relies on SSH/UFW rules for security | Needs SSH tunneling for secure usage | Encrypted connections, 2FA, account-based access | Encrypted by default |
| Best Use Case | Native RDP access to Linux from Windows/macOS | Viewing an existing desktop session | Remote support, unattended access | High-performance multimedia and desktop access |
If you are looking for native RDP support with minimal overhead and integration with existing RDP clients, xrdp is a strong choice. However, for real-time collaboration or multimedia applications, TeamViewer or NoMachine may be more suitable. For open-source environments where shared access is required, VNC remains a popular option.
FAQs
1. Can I use xrdp to connect from Windows to Ubuntu?
Yes. xrdp allows you to connect from a Windows machine to a remote Ubuntu server using the built-in Remote Desktop Connection (RDP) client. Once xrdp is installed and configured on the Ubuntu server, you can initiate an RDP session by entering the server’s public IP address in the Windows RDP client.
2. What port does xrdp use?
By default, xrdp listens on TCP port 3389, which is the standard port for RDP connections. You need to ensure that this port is open on your server’s firewall and accessible from your client machine.
3. Why do I get a black screen after logging in via RDP?
A black screen usually indicates a session misconfiguration. Common causes include:
- Missing or incorrect
.xsessionfile in the user’s home directory. - Incompatible or unsupported desktop environment.
- Conflicts with Wayland (ensure the system is using Xorg).
- Permission issues with the home directory or
.xsessionfile.
Verifying the desktop session setup and switching to a lightweight DE like Xfce usually resolves the issue.
4. Is xrdp secure for remote access?
While RDP includes built-in encryption, additional security measures are recommended:
- Limiting access to port
3389using UFW or firewalls. - Tunneling the RDP session through SSH for encryption.
- Restricting access to known IP addresses.
- Using strong user passwords and disabling root login.
For production environments, securing xrdp with SSH or a VPN is strongly recommended.
5. How do I change the desktop environment used by xrdp?
To change the desktop environment used in your xrdp session, update the .xsession file in your home directory. For example, if you want to switch to LXDE:
- echo "startlxde" > ~/.xsession
Ensure the selected desktop environment is installed, and restart the xrdp service for changes to take effect.
6. Do I need to open any ports on the firewall for xrdp to work?
Yes. xrdp requires TCP port 3389 to be open for RDP connections. You can allow access to this port for your IP using ufw:
- sudo ufw allow from <your_ip_address>/32 to any port 3389
Replace <your_ip_address> with your actual public IP address.
7. Can multiple users connect to the same server using xrdp?
Yes. xrdp supports multiple users with isolated desktop sessions. Each user must have a separate Linux system account and their own .xsession configuration. You can monitor active sessions and adjust limits using /etc/xrdp/sesman.ini.
8. How do I fix authentication issues when connecting with xrdp?
Authentication failures can be caused by:
- Incorrect username or password
- Missing
.xsessionfile - Misconfigured desktop environment
- File permission issues in the user’s home directory
Verify that the user exists, the .xsession file is correctly set, and file permissions are appropriate (e.g., chmod 755 ~/ and chown user:user ~/.xsession).
Conclusion
In this tutorial, you configured xrdp on an Ubuntu 22.04 server to enable remote desktop access using the RDP protocol. You installed a desktop environment, set up firewall rules, and connected from various operating systems including Windows, macOS, and Linux. You also learned how to optimize performance for slower networks, configure multi-user sessions, and address compatibility issues between xrdp and Wayland. With these steps complete, your Ubuntu server is now accessible through a graphical interface, making it easier to manage remotely from almost any device.
To learn more about remote desktop access and user management on Ubuntu, check out the following tutorials:
Thanks for learning with the DigitalOcean Community. Check out our offerings for compute, storage, networking, and managed databases.
About the author(s)
Still looking for an answer?
This textbox defaults to using Markdown to format your answer.
You can type !ref in this text area to quickly search our full set of tutorials, documentation & marketplace offerings and insert the link!
This default doesn’t seem to work for me out of the box. Using a default Ubuntu 22.04 installation. Is that because of the shell that is being used by default?
Hi, Thanks for the subject training materials. I have followed the steps, but still, after connecting from my machine, which is Windows 10, to my remote Ubuntu machine, there is only a black screen. Please let me know if you have any suggestions on how to troubleshoot this issue .
Thanks,
Managed to connect from Windows 10 to Ubuntu 22.04 by this step. But there pair of steps that should be done additionally:
a) sudo adduser xrdp ssl-cert
b) echo "sudo -u ${USER} xfce4-session" | tee .xsession
Pavel A.
If you have the autologin activated you will have to disable it for the XRDP to work. Otherwise you will have issue with snap.
It’s extremely irresponsible to add -y to apt without giving the user the opportunity to realise what’s happening, and then let them inspect the output first. You, the author, cannot predict the output of every Ubuntu-based system out there, no matter how experienced you are.
Case in point, the above commands cause xorg to be uninstalled on Linux Mint 19.1 setups.
Hi, thanks for this excellent work. is there a way to always send output to remote/client screen? (sometimes sub-windows open on server screen, instead of desired remote screen steps to repeat - VS-code runs on servers I open vscode on remote/client screen, it opens properly on remote screen then using vs-code I open directory, the directory selector screen open on server.
Hi, If you are using Windows and want to RDP Ubuntu VM using Hyper V virtualization then please see my detailed answer on askubuntu.com/a/1503875/1751721 The steps are staright forward and no new installation is required.
Best Regards, Syed Nasir Abbas
just a reference. if install xrdp on ubuntu and met the following errors:
sudo apt install xrdp
Reading package lists… Done
Building dependency tree… Done
Reading state information… Done
E: Unable to locate package xrdp
Unable to locate a package using apt is the package repository hasn’t been added or updated. Enable universe repository may solve it:
sudo add-apt-repository universe
Hi. Just thank you all, i m learning a lot with your tutorials.
 This work is licensed under a Creative Commons Attribution-NonCommercial- ShareAlike 4.0 International License.
Become a contributor for community
Get paid to write technical tutorials and select a tech-focused charity to receive a matching donation.

DigitalOcean Documentation
Full documentation for every DigitalOcean product.

Resources for startups and AI-native businesses
The Wave has everything you need to know about building a business, from raising funding to marketing your product.
The developer cloud
Scale up as you grow — whether you're running one virtual machine or ten thousand.

Start building today
From GPU-powered inference and Kubernetes to managed databases and storage, get everything you need to build, scale, and deploy intelligent applications.
