Not using Ubuntu 16.04?
Choose a different version or distribution.
Warning: This version of Drone is deprecated. For help installing the newest version of Drone, visit our Ubuntu 20.04 Drone installation tutorial.
Introduction
Drone is a popular continuous integration and delivery platform built in Go. It integrates with many popular version control repository services like GitHub, GitLab, and Bitbucket to watch for code changes and automatically build and test changes as they are committed.
In this guide, we will demonstrate how to set up a complete Drone continuous integration environment for your infrastructure. We will install Drone and configure it to integrate with your source code repository. Along the way, we will configure Nginx, protected by Let’s Encrypt, as a frontend to Drone. This will encrypt requests to Drone’s web interface and allow the CI server to securely integrate with the source code server.
Prerequisites
In order to get started, you should have an Ubuntu 16.04 server configured with a non-root sudo user for administrative tasks. The server should also have a firewall to filter incoming connections. You can learn how to configure these items by following out Ubuntu 16.04 initial server setup guide.
You will have to complete some additional steps to satisfy the other requirements for our setup. Because Drone is primarily distributed as a Docker image, we will use Docker Compose to manage the CI server containers. For security and performance purposes, we will be proxying requests to Drone through an Nginx instance protected by Let’s Encrypt. You will need a domain name attached to your CI server to properly set this up.
Before you begin, use the following articles to set up these additional requirements:
- How To Install and Use Docker on Ubuntu 16.04
- How To Install Docker Compose on Ubuntu 16.04: Install Docker and Docker Compose by following the prerequisites and first step of this guide.
- How To Install Nginx on Ubuntu 16.04: Install Nginx on the server.
- How To Secure Nginx with Let’s Encrypt on Ubuntu 16.04: Secure Nginx with a trusted SSL certificate.
When you have finished the above guides, your Drone server should have:
- A
sudouser configured for administrative tasks - A UFW firewall enabled. It should be blocking all connections except for SSH, HTTP, and HTTPS requests on ports 22, 80, and 443 respectively.
- Docker and Docker Compose installed.
- An Nginx server configured with an SSL certificate provided by Let’s Encrypt
Continue below when you are ready to begin.
Add An Application to Your Source Code Repository
In order to monitor code changes to trigger build and test stages, Drone will need access to your source code repository. Drone can integrate with GitHub, GitLab, Gogs, Bitbucket Cloud, and Bitbucket Server.
In this guide, we will focus on integrating with a GitHub repository, but the process should be similar for other systems. If you are using a different source code repository, follow the appropriate link above to learn about the software specific configuration you’ll need.
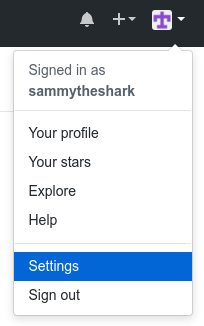
Begin by visiting your GitHub account. Click on your user icon in the upper-right corner and select Settings from the drop down menu:
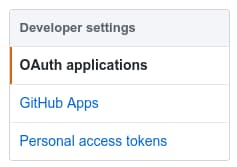
Next, find the OAuth applications item in the Developer settings section on the left-hand side of the screen:
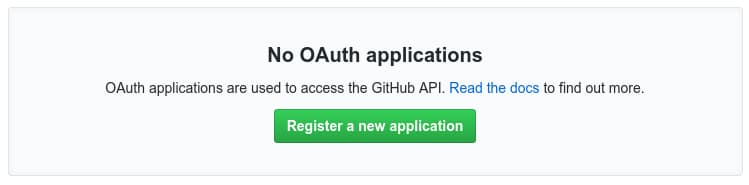
On the page that follows, click Register a new application:
Next, you will see the OAuth application registration form:
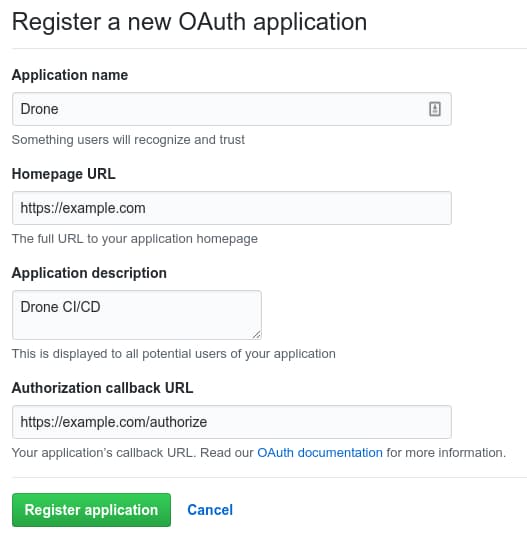
You will need to fill out the following fields (these fields are present on GitHub. Other repository providers may have different prompts):
- Application name: A name you choose to identify the integration. “Drone” is a good choice if you don’t have special needs.
- Homepage URL: Your Drone server’s domain name. Use
https://here since we are using a secured domain. - Application description: A simple description of Drone and it’s purpose.
- Authorization callback URL: This must be the
https://schema specifier, followed by your Drone server’s domain name, followed by/authorize. If our domain name isexample.com, this file will behttps://example.com/authorize.
When you are ready, click Register application.
On the following page, you will see the details for your new application. The two items we need are the Client ID and the Client Secret:
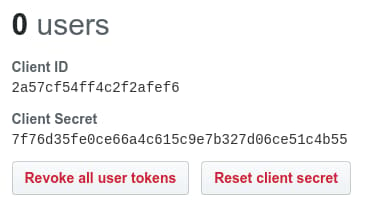
Copy these two values for later. We will need these to connect Drone to our GitHub account.
Pull the Drone Docker Image and Prepare for Configuration
Now that you have your Drone server registered with a repository provider, you can install and configure Drone on your server.
Drone is distributed as a Docker container, so it will be automatically downloaded if we use it in a Docker Compose file. To speed up the process slightly though, we can pull down the image ahead of time:
- docker pull drone/drone:0.7
The Drone Docker image is a unified container that can be run in a few different ways. We will run one container that operates as the Drone server, which coordinates repository access, hosts the web UI, and serves the API. Using the same image with different settings, we will run another container as a Drone agent, which is responsible for building and testing software from the configured repositories.
We will run both of these containers on the Drone host using Docker Compose. Start by creating a configuration directory to store the files we’ll need:
- sudo mkdir /etc/drone
Next, we will create a few files within to configure our services.
Create a Docker Compose File for Drone
First, create a Docker Compose file in the configuration directory:
- sudo nano /etc/drone/docker-compose.yml
Inside, we will mark the Docker Compose file format as version “3”. Afterwards, we will define services for both of the services we described above.
The drone-server service will start the main Drone server container listening on port 8000. We will mount the host’s /var/lib/drone directory inside of the container so that Drone can persist its data. We will configure the service to restart automatically and to read more detailed configuration instructions in the form of environment variables defined in a file we’ll create at /etc/drone/server.env.
The drone-agent service uses the same image, started with the agent command. It receives instructions from the main Drone server instance, so while it does not need general network access, it does need to be started after the Drone service. It also needs access to Docker’s socket file to spin up containers to run the actual build and test steps. Like the drone-server service, this service will also automatically restart and read an environment file at /etc/drone/agent.env for additional configuration.
Use the following Docker Compose file to configure these two services. Pay close attention to the YAML formatting of the file, as mistakes in indentation or formatting can cause errors:
version: '3'

services:
  drone-server:
    image: drone/drone:0.7
    ports:
      - 127.0.0.1:8000:8000
    volumes:
      - /var/lib/drone:/var/lib/drone
    restart: always
    env_file:
      - /etc/drone/server.env

  drone-agent:
    image: drone/drone:0.7
    command: agent
    depends_on:
      - drone-server
    volumes:
      - /var/run/docker.sock:/var/run/docker.sock
    restart: always
    env_file:
      - /etc/drone/agent.env
When you are finished, save and close the Docker Compose file.
Configure the Drone Server’s Environment Variable File
Next, we need to create the Drone server’s environment variable file that we referenced in the Docker Compose file above.
Before we open the file, we should generate a strong key to authenticate the agent and server components. Although our setup will have both of these components on the same server, as your testing infrastructure scales out, a strong key is essential. On the command line, generate a key by typing:
- LC_ALL=C </dev/urandom tr -dc A-Za-z0-9 | head -c 65 && echo
This command temporarily sets the language in the shell to a limited range of characters. It then takes a stream of random bytes from /dev/urandom and further filters out any non-alphanumeric characters. We take the first 65 characters as our key.
The output will look similar to this (Do not copy the value below! Generate your own!):
OutputERmA7xubDvTa8i0wYBlljc9yjT1NJPG7xOlZBwAdMAmBYL4RZE4QngxWcCLowk9KN
Copy the generated key to use in the server environment file.
Create a new file at /etc/drone/server.env and open it in your text editor:
- sudo nano /etc/drone/server.env
Inside, we will define the environment variables that Drone uses to connect to bind start the service, connect to the repository provider, and set account authorization policies. You will need the values you copied from your repository provider earlier to fill out the values correctly.
To begin, set the DRONE_HOST and DRONE_SECRET values. Set DRONE_SECRET to the key you generated on the command line. The DRONE_HOST setting informs Drone of its publicly accessible address. This should be your Let’s Encrypt protected domain, preceded by the https:// schema specifier:
# Service settings
DRONE_SECRET=secret_generated_on_command_line
DRONE_HOST=https://example.com
Next, we will configure the integration with our VCS provider, which is GitHub in our case. The settings appropriate for your project may differ depending on your needs and how your GitHub assets are organized.
We will lock down our Drone install and disable open registration by setting DRONE_OPEN to false. This will mean that only the GitHub account names specified in DRONE_ADMIN will be able to log in.
Note: If you work with collaborators as a GitHub organization, it is better to set DRONE_OPEN to true and replace DRONE_ADMIN with DRONE_ORGS. The DRONE_ORGS setting allows you to specify one or more GitHub organizations whose members should be allowed register. Drone will limit registration to users who belong to those groups.
Make sure that DRONE_ADMIN contains your GitHub account name.
Afterward, activate the GitHub integration plugin by setting DRONE_GITHUB to true. We will then set the DRONE_GITHUB_CLIENT and DRONE_GITHUB_SECRET to the keys we copied from the GitHub OAuth application page when we registered our Drone application:
# Service settings
DRONE_SECRET=secret_generated_on_command_line
DRONE_HOST=https://example.com

# Registration settings
DRONE_OPEN=false
DRONE_ADMIN=sammytheshark

# GitHub Settings
DRONE_GITHUB=true
DRONE_GITHUB_CLIENT=Client_ID_from_GitHub
DRONE_GITHUB_SECRET=Client_Secret_from_GitHub
We are finished configuring the server component. Before leaving, copy the DRONE_SECRET value from the file. We will need to set this same key in the next section when we configure the agent. Save and close the file when you are finished.
Configure the Drone Agent’s Environment Variable File
Next, we will create an environment file for the Drone agent component.
Open a new file to set the agent environment variables:
- sudo nano /etc/drone/agent.env
Inside, we only need to define two values. The DRONE_SECRET will match the configuration in the sever.env file.
The DRONE_SERVER setting will configure how the agent should connect to the Drone server component. It will start with a wss:// protocol prefix to indicate that the connection will use an encrypted web socket followed by the Drone server’s domain name with the /ws/broker URI appended to the end:
DRONE_SECRET=secret_generated_on_command_line
DRONE_SERVER=wss://example.com/ws/broker
Save and close the file when you are finished.
Configure the Drone Systemd Unit File
Now that our configuration files are in place, we can define a systemd unit file to manage the Drone service.
Open a new .service file in the /etc/systemd/system directory to configure the service:
- sudo nano /etc/systemd/system/drone.service
Inside paste the following contents:
[Unit]
Description=Drone server
After=docker.service nginx.service

[Service]
Restart=always
ExecStart=/usr/local/bin/docker-compose -f /etc/drone/docker-compose.yml up
ExecStop=/usr/local/bin/docker-compose -f /etc/drone/docker-compose.yml stop

[Install]
WantedBy=multi-user.target
The first section tells systemd to start this service after Docker and Nginx are available. The second section tells the init system to automatically restart the service in case of failures. It then defines the commands to start and stop the Drone service using Docker Compose and the configuration file we created earlier. Finally, the last section defines how to enable the service to start at boot.
Save and close the file when you are finished.
Before we start the Drone service, we have to configure Nginx. The Drone agent needs to be able to connect to the Drone server and the connection relies on the Nginx proxy being in place.
Configure Nginx To Proxy Requests to Drone
Next, we need to modify Nginx’s configuration to proxy requests to our Drone server.
Begin by finding the server block configuration that handles your Let’s Encrypt-protected domain. Search for server_name attribute in all of the enabled server blocks by typing:
- grep -R server_name /etc/nginx/sites-enabled
Output/etc/nginx/sites-enabled/default:   server_name example.com;
/etc/nginx/sites-enabled/default:   return 301 https://$server_name$request_uri;
/etc/nginx/sites-enabled/default:   server_name example.com;
/etc/nginx/sites-enabled/default:#  server_name example.com;
In the above output, the domain name (example.com in this instance) is being defined within the /etc/nginx/sites-enabled/default file. You will want to edit the file (the first column) associated with your domain name.
It’s possible that you might also see something like this:
Output/etc/nginx/sites-enabled/default:   server_name _;
/etc/nginx/sites-enabled/default:   return 301 https://$server_name$request_uri;
/etc/nginx/sites-enabled/default:   server_name _;
/etc/nginx/sites-enabled/default:#  server_name example.com;
In the above output, the server_name _; lines represent server blocks meant to act as fallback mechanisms. The “_” host specifier is an invalid host, so it will never match on its own.
In the configuration, these are paired with listen directives that set the default_server option so that the block acts as a default when the requested host does not match any other defined server block. If you cannot find a server_name definition that matches your domain name, you should use the file that defines these fallback blocks instead.
Open the file best associated with your domain in your text editor:
- sudo nano /etc/nginx/sites-enabled/default
Inside, we will start by adding two sections outside of the existing server blocks:
upstream drone {
    server 127.0.0.1:8000;
}

map $http_upgrade $connection_upgrade {
    default upgrade;
    ''      close;
}

server {
    . . .
The first block configures an upstream location called drone where we can proxy requests. The server directive defines how to connect to our the Drone service, which will be running on port 8000.
The second block sets a user-defined variable called $connection_upgrade based on the value of the $http_upgrade variable, which Nginx sets when an “Upgrade” HTTP header is received. If an Upgrade header is received, Nginx will set the $connection_upgrade variable to upgrade. If not, it will set it to close. These variables allow us to set the correct headers when proxying WebSocket requests.
Next, find the server block with the listen 443 directive inside. Replace the contents of the location / block with the following directives. Make sure to comment out or remove any existing configuration from that block to avoid conflicts:
. . .
server {
    listen 443 ssl;
    . . .
    location / {
        # try_files $uri $uri/ =404;
        proxy_pass http://drone;

        include proxy_params;
        proxy_set_header Upgrade $http_upgrade;
        proxy_set_header Connection $connection_upgrade;

        proxy_redirect off;
        proxy_http_version 1.1;
        proxy_buffering off;
        chunked_transfer_encoding off;
        proxy_read_timeout 86400;
    }
    . . .
}
The proxy_pass line tells Nginx to pass all traffic served out of this block to the upstream we defined earlier. Next, we include some proxy header definitions from the proxy_params file and add the additional headers based on our map setting from earlier.
We then adjust some other proxy-specific settings to make sure the WebSocket proxy works correctly and to make sure our components can communicate effectively.
When you are finished save and close the file.
Test and Restart Nginx and Drone
Our configuration is now complete. We just need to start or restart our services to implement the configuration.
To start, check the Nginx configuration for syntax errors:
- sudo nginx -t
Outputnginx: the configuration file /etc/nginx/nginx.conf syntax is ok
nginx: configuration file /etc/nginx/nginx.conf test is successful
If the output indicates that there was a configuration issue, go back and check the Nginx configuration again.
When you are ready to continue, restart Nginx:
- sudo systemctl restart nginx
Now that Nginx is available to proxy requests between the agent and server, we can start up Drone:
- sudo systemctl start drone
Check to make sure the service was able to start successfully:
- sudo systemctl status drone
Output● drone.service - Drone server
   Loaded: loaded (/etc/systemd/system/drone.service; disabled; vendor preset: enabled)
   Active: active (running) since Fri 2017-06-09 21:56:33 UTC; 2min 58s ago
 Main PID: 15225 (docker-compose)
    Tasks: 5
   Memory: 37.7M
      CPU: 1.544s
   CGroup: /system.slice/drone.service
           ├─15225 /usr/local/bin/docker-compose -f /etc/drone/docker-compose.yml up
           └─15228 /usr/local/bin/docker-compose -f /etc/drone/docker-compose.yml up

. . .
Jun 09 21:56:35 drone docker-compose[15225]: drone-agent_1   | pipeline: request next execution
If the service is marked as active (running) and no errors are present in the log, Drone is up and running.
If you run into problems, you can check the Nginx logs by typing:
- sudo less /var/log/nginx/error.log
You can check the Drone logs by typing:
- sudo journalctl -u drone
If everything is running correctly, enable Drone to start at boot by typing:
- sudo systemctl enable drone
The Drone service will start up after the Docker and Nginx services are available.
Log into Drone To Authorize Access to Your Repository
Now that Drone is up and running, we can log into the web interface and authorize the application to use our GitHub account.
Visit your server’s domain name in your web browser to view the Drone web interface:
https://example.com
On your first time visiting, you will be prompted to log in:
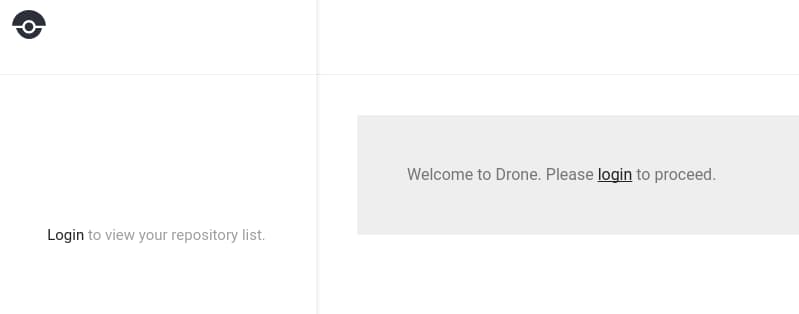
Click login to authenticate to Drone with your GitHub account using OAuth. If you are not currently logged into GitHub, you will be directed to log in to GitHub first.
Afterwards, you will be prompted to allow Drone to access your GitHub account:
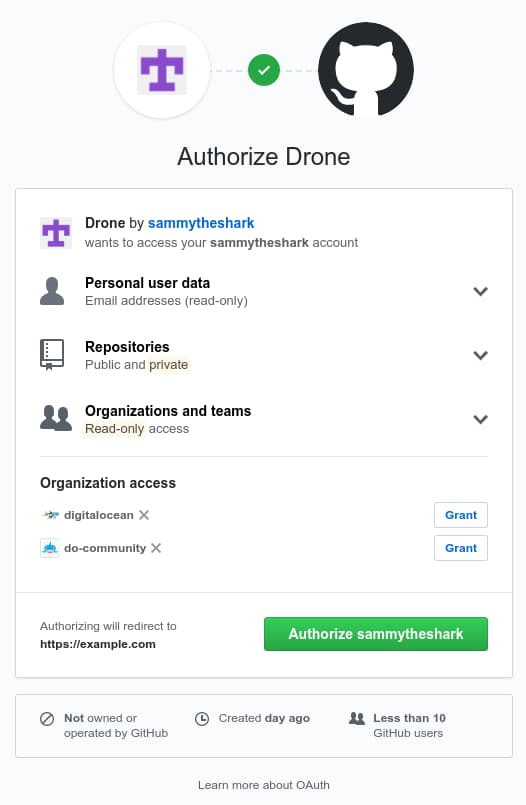
After reviewing the requested permissions and making any adjustments, click the Authorize username button to authorize Drone.
You will be redirected back to your Drone server:

From here, you can activate and configure your repositories to automatically test your code.
Conclusion
In this guide, we set up Drone as a continuous integration and delivery server for our GitHub projects. We configured the Drone server as a central hub to delegate work, handle authentication, and listen for changes from our repositories. We also configured a Drone agent which can run tests and manage containers. In front of all of this, we configured Nginx to act as a secure reverse proxy.
When you’re ready to set up Drone to automatically run tests against your repositories, check out the Drone documentation to learn how to define a .drone.yml file with your testing procedures.
Thanks for learning with the DigitalOcean Community. Check out our offerings for compute, storage, networking, and managed databases.
About the author
Former Senior Technical Writer at DigitalOcean, specializing in DevOps topics across multiple Linux distributions, including Ubuntu 18.04, 20.04, 22.04, as well as Debian 10 and 11.
Still looking for an answer?
This textbox defaults to using Markdown to format your answer.
You can type !ref in this text area to quickly search our full set of tutorials, documentation & marketplace offerings and insert the link!
I followed your tutorial and unable to access the deployed service on my droplet. Drone would not response to web request.
For drone 0.8, you should change this line in ‘/etc/drone/agent.env’:
DRONE_SERVER=wss://example.com/ws/broker
to
DRONE_SERVER=drone-server:9000
because they changed protocol of exchange between drone server and drone agents.
I got error as following: Jan 21 01:28:26 ip-172-31-2-184 docker-compose[8379]: drone-agent_1 | rpc: error re-connecting: malformed ws or wss URL
Great article. I noticed a type under the “Configure the Drone Agent’s Environment Variable File” section. sever.env should be server.env
A few things have changed from Drone version 0.7 (this tutorial) to version 1.0 and I’ve had to make a few modifications, to the examples provided here. These changes are as follows:
in docker-compose.yml
you have to use drone/agent:1 as the image and not drone/drone:1
In server.env there are quite a few changes as it seems many of these env variables have changed. My server.env file looks like so:
# Service settings
DRONE_SECRET= ***

# Registration settings
DRONE_OPEN=false
DRONE_ADMIN=****

# GitHub Settings
DRONE_SERVER_PROTO=https
DRONE_SERVER_HOST=example.com
DRONE_SERVER_PORT=:8000
DRONE_BITBUCKET_CLIENT_ID= ***
DRONE_BITBUCKET_CLIENT_SECRET= ***
in agent.env i also changed it to this, but I’m not convinced this is the end of it.
DRONE_SECRET=****
DRONE_SERVER=example.com:9000
Hope this helps others.
 This work is licensed under a Creative Commons Attribution-NonCommercial- ShareAlike 4.0 International License.
Become a contributor for community
Get paid to write technical tutorials and select a tech-focused charity to receive a matching donation.

DigitalOcean Documentation
Full documentation for every DigitalOcean product.

Resources for startups and AI-native businesses
The Wave has everything you need to know about building a business, from raising funding to marketing your product.
The developer cloud
Scale up as you grow — whether you're running one virtual machine or ten thousand.

Start building today
From GPU-powered inference and Kubernetes to managed databases and storage, get everything you need to build, scale, and deploy intelligent applications.
