![How To Install LAMP on Ubuntu 14.04 [Quickstart]](https://www.digitalocean.com/api/static-content/v1/images?src=%2F_next%2Fstatic%2Fmedia%2Fintro-to-cloud.d49bc5f7.jpeg&width=1920 "How To Install LAMP on Ubuntu 14.04 [Quickstart]")
Introduction
The LAMP stack (Linux, Apache, MySQL, PHP) is a group of open source software that is typically installed together to enable a server to host dynamic PHP websites and web apps. This guide includes the steps to set up a LAMP stack on Ubuntu 14.04, on a single server, so you can quickly get your PHP application up and running.
A more detailed version of this tutorial, with better explanations of each step, can be found here.
Step 1: Update apt-get package lists
- sudo apt-get update
Step 2: Install Apache, MySQL, and PHP packages
- sudo apt-get -y install apache2 mysql-server php5-mysql php5 libapache2-mod-php5 php5-mcrypt
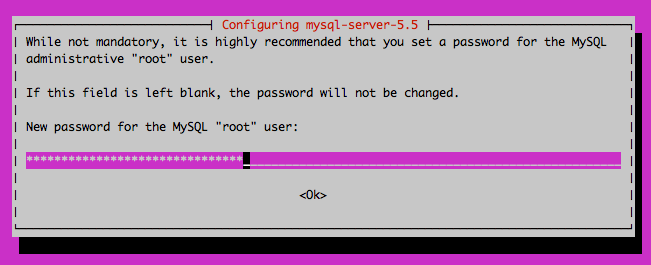
When prompted, set and confirm a new password for the MySQL “root” user:
Step 3: Create MySQL database directory structure
- sudo mysql_install_db
Step 4: Run basic MySQL security script
- sudo mysql_secure_installation
At the prompt, enter the password you set for the MySQL root account:
MySQL root password prompt:Enter current password for root (enter for none):
OK, successfully used password, moving on...
At the next prompt, if you are happy with your current MySQL root password, type “n” for “no”:
MySQL root password prompt:Change the root password? [Y/n] n
For the remaining prompts, simply hit the “ENTER” key to accept the default values.
Step 5: Configure Apache to prioritize PHP files (optional)
Open Apache’s dir.conf file in a text editor:
- sudo nano /etc/apache2/mods-enabled/dir.conf
Edit the DirectoryIndex directive by moving index.php to the first item in the list, so it looks like this:
DirectoryIndex index.php index.html index.cgi index.pl index.xhtml index.htm
Save and exit.
Restart Apache to put the change into place:
- sudo service apache2 restart
Step 6: Test PHP processing (optional)
Create a basic test PHP script in /var/www/html:
- echo '<?php phpinfo(); ?>' | sudo tee /var/www/html/info.php
Open the PHP script in a web browser. Replace your_server_IP_address with your server’s public IP address:
Visit in a web browser:http://your_server_IP_address/info.php
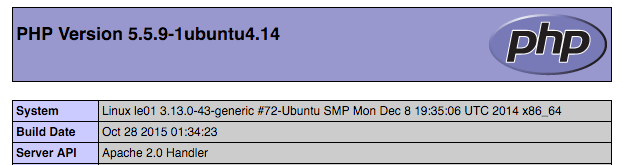
If you see a PHP info page, PHP processing is working:
Delete the test PHP script:
- sudo rm /var/www/html/info.php
Related Tutorials
Here are links to more detailed tutorials that are related to this guide:
Thanks for learning with the DigitalOcean Community. Check out our offerings for compute, storage, networking, and managed databases.
About the author
Software Engineer @ DigitalOcean. Former Señor Technical Writer (I no longer update articles or respond to comments). Expertise in areas including Ubuntu, PostgreSQL, MySQL, and more.
Still looking for an answer?
This textbox defaults to using Markdown to format your answer.
You can type !ref in this text area to quickly search our full set of tutorials, documentation & marketplace offerings and insert the link!
Remember the final critical step…
Restart Apache to put the change into place: sudo service apache2 restart
For some reason I managed to overlook this step, and while everything appeared to be functioning, I kept getting unexplainable errors that appeared (to the professionals whom I consulted) to be a misconfiguration of the PDO drivers, which I was told meant that PHP could not connect to MySQL.
After about a week of trouble-shooting and head-banging on my desk, this simple (overlooked) restart command solved all my problems. Ouch.
If you are with permission issues with the wp-content that can help you: in /etc/apache2/envvars
change:
export APACHE_RUN_USER = www-data
export APACHE_RUN_GROUP = www-data
for:
export APACHE_RUN_USER = [you-user]
export APACHE_RUN_GROUP = [you-user]
I have followed this tutorial but when I test my info.php: all I get is a blank page
The sudo apt-get install now says that it can’t install ANY of the php5 packages. You may want to update these instructions.
 This work is licensed under a Creative Commons Attribution-NonCommercial- ShareAlike 4.0 International License.
Become a contributor for community
Get paid to write technical tutorials and select a tech-focused charity to receive a matching donation.

DigitalOcean Documentation
Full documentation for every DigitalOcean product.

Resources for startups and AI-native businesses
The Wave has everything you need to know about building a business, from raising funding to marketing your product.
The developer cloud
Scale up as you grow — whether you're running one virtual machine or ten thousand.

Start building today
From GPU-powered inference and Kubernetes to managed databases and storage, get everything you need to build, scale, and deploy intelligent applications.
