Not using CentOS 7?
Choose a different version or distribution. stack On CentOS 7")
Introduction
A “LAMP” stack is a group of open-source software that is typically installed together to enable a server to host dynamic websites and web apps. This term is an acronym which represents the Linux operating system, with the Apache web server. The site data is typically stored in a MySQL database and dynamic content is processed by PHP.
On most Linux systems, you can install MySQL by downloading the mysql-server package from your system’s default package management repositories. However, on CentOS 7 the mysql-server package will actually install MariaDB, a community-developed fork of the MySQL relational database management system which works as a drop-in replacement for MySQL. Thus, this tutorial will outline how to install a LAMP stack that consists of Linux, Apache, MariaDB, and PHP on a CentOS 7 server.
Prerequisites
Before you begin with this guide, you should have a separate, non-root user account set up on your server. You can learn how to do this by following our initial server setup for CentOS 7 tutorial.
Step 1 — Installing the Apache Web Server
Apache is a popular open-source web server that is used to display web pages to visitors. You can configure it to serve PHP pages.
Install Apache using CentOS’s package manager, yum. A package manager allows you to install most software from a repository maintained by CentOS.
Type this command in your terminal to install the httpd Apache package:
When prompted, enter Y to confirm the Apache installation.
Once the installation is complete, start your Apache server with this command:
You can test if your server is running by entering your public IP address or your domain name in your web browser.
Note: If you are using DigitalOcean as DNS hosting provider, you can check our product docs for detailed instructions on how to set up a new domain name and point it to your server.
If you do not have a domain name pointed at your server or do not know your server’s public IP address, you can find it by running the following command:
This will print out a few different addresses. You can try each of them in your web browser.
An alternative method is to use an outside party to tell you how it sees your server. You can do this by asking a specific server what your IP address is with this command:
Whichever method you choose, type in your IP address into your web browser to verify that your server is running.
http://your_server_IP_address
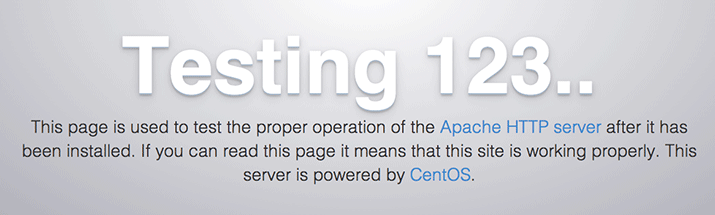
You will be presented with the default CentOS 7 Apache landing page:
You can enable Apache to start on boot with:
Step 2 — Installing MySQL (MariaDB)
With your web server up and running, you can install MariaDB. It will organize and provide access to databases where your site can store information.
To install the MariaDB software package, run:
When the installation is complete, start MariaDB:
You can enable MariaDB to start on boot with this command:
To improve the security of your database server, it’s recommended that you run a security script that comes pre-installed with MariaDB. This script will remove some insecure default settings and lock down access to your database system.
Start the interactive script by running:
This script will take you through a series of prompts where you can make some changes to your MariaDB setup. The first prompt will ask you to enter the current database root password. This is not to be confused with the system root user. The database root user is an administrative user with full privileges over the database system. Because you just installed MariaDB and haven’t made any configuration changes, this password will be blank. Press ENTER at the prompt.
The next prompt asks you whether you’d like to set up a database root password. Type N and then press ENTER.
From there, you can press Y, and then ENTER, to accept the defaults for all the subsequent questions. This will remove anonymous users and the test database, disable remote root login, and load these new rules so that the server immediately respects the changes you have made.
When you’re finished, log in to the MariaDB console by entering:
This connects you to the MariaDB server as the administrative database user root:
OutputWelcome to the MariaDB monitor.  Commands end with ; or \g.
Your MariaDB connection id is 12
Server version: 5.5.68-MariaDB MariaDB Server

Copyright (c) 2000, 2018, Oracle, MariaDB Corporation Ab and others.

Type 'help;' or '\h' for help. Type '\c' to clear the current input statement.
For increased security, it’s best to have dedicated user accounts with less expansive privileges set up for every database. This is especially important if you plan on having multiple databases hosted on your server.
To demonstrate such a setup, create a database named example_database and a user named example_user. You can replace these names with different values.
Run the following command from your MariaDB console to create a new database:
You can create a new user and grant them full privileges on the custom database you’ve just created. The following command defines this user’s password as password, but you should replace this value with a secure password:
This command gives the example_user user full privileges over the example_database database, while preventing this user from creating or modifying other databases on your server.
Use the FLUSH statement to reload and save the privileges you just granted to example_user:
Exit the MariaDB shell:
You can test if the new user has the proper permissions by logging in to the MariaDB console again, but using the example_user credentials you created above:
Note the -p flag in this command, which will prompt you for the password you chose when creating the example_user user. After logging in to the MariaDB console, confirm that you have access to the example_database database with this statement:
Your example_database should be listed in the output:
Output+--------------------+
| Database           |
+--------------------+
| example_database   |
| information_schema |
+--------------------+
2 rows in set (0.000 sec)
To exit the MariaDB shell, type:
Your database system is set up and you can move on to installing PHP.
Step 3 — Installing PHP
You have Apache installed to serve your content and MariaDB to store and manage your data. PHP will process code to display dynamic content to the user. In addition to the php package, you’ll need php-mysql, a PHP module that allows PHP to communicate with MySQL-based databases. Core PHP packages will automatically be installed as dependencies.
Use this command to install the php and php-mysql packages with yum:
Restart the Apache web server to enable the PHP module you installed:
Your server is now configured with all the components necessary for your LAMP stack application. The next step is to test your configuration to ensure that everything is working harmoniously.
Step 4 — Testing PHP on your Apache Web Server
The default Apache installation on CentOS 7 will create a document root located at /var/www/html. You don’t need to make any changes to Apache’s default settings in order for PHP to work correctly within your web server.
You can, however, make an adjustment to change the default permission settings on your Apache document root folder. This allows you to create and modify files in that directory with your regular system user without the need to prefix each command with sudo.
The following command will change the ownership of the default Apache document root to a user and group called sammy, so be sure to replace the highlighted username and group in this command to reflect your system’s username and group:
You can create a PHP test file to ensure the web server works as expected. Use your preferred text editor to create this file. The following examples use the default vi text editor in CentOS 7.
Create a PHP file called info.php at the var/www/html directory:
This opens a blank PHP file at the /var/www/html directory. Press I to enter into INSERT mode in the vi editor. This allows you to type and make changes within the text editor. Type the following PHP code:
This PHP code displays information about the PHP environment running on your server. When you are finished with making your changes to this file, press the ESC key to exit out of INSERT mode in vi. Type :x – a semicolon and the letter x in lowercase – to save and close the file.
You can test whether your web server correctly displays PHP content by going to your server’s public IP address, followed by /info.php:
http://your_server_IP_address/info.php
A web page, similar to the one below, will be displayed in your browser:
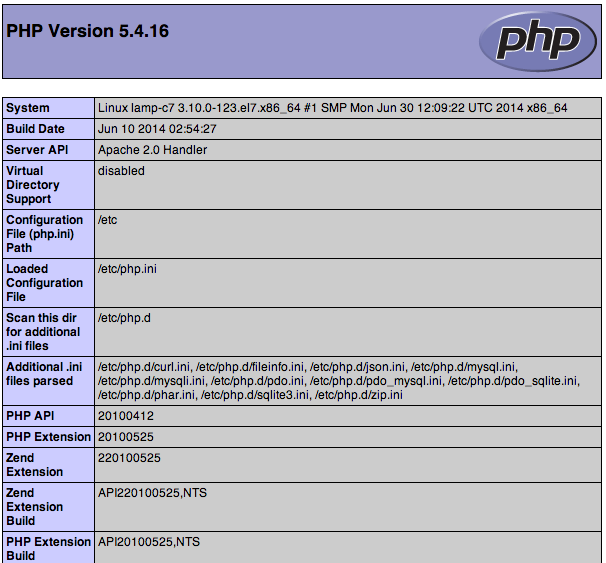
This page gives you information about your server from the perspective of PHP. It is useful for debugging and ensuring that your settings are being applied correctly. After checking the relevant information about your PHP server, it’s best to remove this file as it contains sensitive information about your PHP environment and your CentOS server.
You can use rm to remove this file:
You can always recreate this page if you need to access the information again later. Next, you can test the database connection utilizing PHP.
Step 5 – Testing Database Connection with PHP (Optional)
You can test if PHP connects to MariaDB and executes database queries by creating a test table with some test data. You can query for its contents from a PHP script.
First, connect to the MariaDB console with the database user you created in Step 2 of this guide:
From the MariaDB console, run the following statement to create a table named todo_list within your example_database:
The MariaDB console will notify you about changes to your table after each edit.
Query OK, 0 rows affected (0.00 sec)
Insert a few rows of content in the test table. You can repeat the next command a few times, using different values, to populate your test table:
To confirm that the data was successfully saved to your table, run:
Below is an example of the output:
Output+---------+--------------------------+
| item_id | content                  |
+---------+--------------------------+
|       1 | My first important item  |
|       2 | My second important item |
|       3 | My third important item  |
|       4 | and this one more thing  |
+---------+--------------------------+
4 rows in set (0.000 sec)
After confirming that you have valid data in your test table, you can exit the MariaDB console:
Now you can create the PHP script that will connect to MariaDB and query for your content. Create a new PHP file in your custom web root directory using your preferred editor. This example uses vi:
Add the following content by pressing I in the vi text editor, remembering to replace the example_user and password with your own:
Save and close the file when you’re done editing by pressing ESC, followed by typing :x in vi.
You can now access this page in your web browser by visiting your server’s host name or public IP address, followed by /todo_list.php:
http://server_host_or_IP/todo_list.php
Below is an example of the web page, revealing the content you’ve inserted in your test table:

Conclusion
In this guide, you’ve built a flexible foundation for serving PHP websites and applications to your visitors, using Apache as a web server. You’ve set up Apache to handle PHP requests, and set up a MariaDB database to store your website’s data.
Thanks for learning with the DigitalOcean Community. Check out our offerings for compute, storage, networking, and managed databases.
About the author
Software Engineer @ DigitalOcean. Former Señor Technical Writer (I no longer update articles or respond to comments). Expertise in areas including Ubuntu, PostgreSQL, MySQL, and more.
Still looking for an answer?
This textbox defaults to using Markdown to format your answer.
You can type !ref in this text area to quickly search our full set of tutorials, documentation & marketplace offerings and insert the link!
I can not load the page, if I type
ip addr show | grep inet | awk ‘{ print $2; }’ | sed ‘s//.* $//’
I received this
127.0.0.1 ::1 192.168.2.128 fe80::250:56ff:fe8e:450c
If I try to load 192.168.2.128 never load it
And if I type: ]# ip addr show eth0 | grep inet | awk ‘{ print $2; }’ | sed ‘s//.*$//’ I get:
Device “eth0” does not exist.
@dgonzalez: Are you running this on a droplet? What’s the output of ip link show?
Is Apache running? Can you post the output of the following two commands?
sudo ps wwaux | egrep "apache|http"
sudo nestat -plutn
I wish there was a Tutorial, that showed me how to add phpmyadmin, imagemagick and mcrypt to Centos 7 after this tut. Does anybody know where can I get that information, appreciate any help
How to install phpMyAdmin on CentOS 7
Install epel
rpm -ivh http://dl.fedoraproject.org/pub/epel/beta/7/x86_64/epel-release-7-0.2.noarch.rpm
Install phpMyAdmin
yum install phpmyadmin
Backup old config file
mv /etc/httpd/conf.d/phpMyAdmin.conf /etc/httpd/conf.d/phpMyAdmin.conf.old
Create new one
nano /etc/httpd/conf.d/phpMyAdmin.conf
Add these lines in it and save and close nano
<Directory "/usr/share/phpMyAdmin">
	AllowOverride None
	Options None
	Allow from All
	Require all granted
</Directory>

Alias /phpmyadmin /usr/share/phpMyAdmin
Restart apache and mysql
systemctl restart mariadb
service httpd restart
And reach via your server IP
http://ip.add.ress/phpmyadmin
Thanks. How to change server tokens? OS to Prod.
I want hidden web server name (Apache/2.4.6 (CentOS) PHP/5.4.16).
Love the guide! But how do i actually USE php-fpm with apache in Centos 7 ? I am using it in Centos 6.5 with apache with mod_fastcgi as the middleman and my boxes are ligtning fast…
But i cant find a guide anywhere on how to get php-fpm running with apache !!
Love the guide! But how do i actually USE php-fpm with apache in Centos 7 ? I am using it in Centos 6.5 with apache with mod_fastcgi as the middleman and my boxes are ligtning fast…
But i cant find a guide anywhere on how to get php-fpm running with apache !!
Just wanted to point out, as a noob having a hell of a time getting to the default Apache screen, this guide, while otherwise spot on, neglects to point out that CentOS7 has firewall rules on by default that block http/s.
The commands I used to fix this were:
firewall-cmd --permanent --zone=public --add-service=http
firewall-cmd --permanent --zone=public --add-service=https
firewall-cmd --reload
Cheers!
Great article also should i install these
mod_autoindex.c (autoindex_module)
mod_deflate.c (deflate_module)
mod_expires.c (expires_module)
mod_filter.c (filter_module)
mod_headers.c (headers_module)
mod_include.c (include_module)
mod_mime.c (mime_module)
mod_rewrite.c (rewrite_module)
mod_setenvif.c (setenvif_module)
I read online that it is recommended, How do i install? and then enable?
I get this error trying to start MariaDB.
[root@centos7 lib]# systemctl start mariadb Job for mariadb.service failed. See ‘systemctl status mariadb.service’ and ‘journalctl -xn’ for details. [root@centos7 lib]# systemctl status mariadb.service mariadb.service - MariaDB database server Loaded: loaded (/usr/lib/systemd/system/mariadb.service; disabled) Active: failed (Result: exit-code) since Mon 2014-12-01 03:44:59 EST; 4s ago Process: 14703 ExecStartPost=/usr/libexec/mariadb-wait-ready $MAINPID (code=exited, status=1/FAILURE) Process: 14702 ExecStart=/usr/bin/mysqld_safe --basedir=/usr (code=exited, status=0/SUCCESS) Process: 14675 ExecStartPre=/usr/libexec/mariadb-prepare-db-dir %n (code=exited, status=0/SUCCESS) Main PID: 14702 (code=exited, status=0/SUCCESS)
Dec 01 03:44:58 centos7 systemd[1]: Starting MariaDB database server… Dec 01 03:44:58 centos7 mysqld_safe[14702]: 141201 03:44:58 mysqld_safe Logging to ‘/var/log/mariadb/mariadb.log’. Dec 01 03:44:58 centos7 mysqld_safe[14702]: 141201 03:44:58 mysqld_safe Starting mysqld daemon with databases from /var/lib/mysql Dec 01 03:44:58 centos7 mysqld_safe[14702]: 141201 03:44:58 mysqld_safe mysqld from pid file /var/run/mariadb/mariadb.pid ended Dec 01 03:44:59 centos7 systemd[1]: mariadb.service: control process exited, code=exited status=1 Dec 01 03:44:59 centos7 systemd[1]: Failed to start MariaDB database server. Dec 01 03:44:59 centos7 systemd[1]: Unit mariadb.service entered failed state.
Great post! Thanks for writing it. Everything worked well for me, now time to install WordPress.
This comment has been deleted
When attempting to install “yum” getting error that “user is not in the sudoers file. This incident will be reported.”
Also, on initial set up guide my system wasn’t recognizing “systemctl” as a command. It was listed to restart the ssh connection so I googled and alternative and used “service sshd restart”. I noticed that “sytemctl” is listed again on this tutorial - is there another alternative for desired commands?
Very good article! The first link points to initial steps for centos 6 not 7. You should fix that.
Hello, I just got failed in Rhcsa ex200 last month (27th Feb,2015), Onwards, it’s time to learn version 7, coz no more ex200 in version 6 now. So it is good article for new learners. I learn many from this article.
That took like, let’s say… 30 seconds… Who needs a hosted account if you could do this? :P
I’ve successfully completed the above steps but when I was trying to install Wordpress, I got an error saying ‘PHP is not running’. It was strange because php -v command was returning the version number.
Anyways, the solution is to make Apache recognise PHP. To do so:
- go to /etc/httpd/conf
- sudo vim httpd.conf
- find the IfModule named IfModule mime_module,
- inside that module, add the following line of code to the end.
AddType application/x-httpd-php .php
After running the sudo mysql_secure_installation command I’m getting an error:
[user@server ~]$ sudo mysql_secure_installation
[sudo] password for user:
/bin/mysql_secure_installation: line 379: find_mysql_client: command not found

NOTE: RUNNING ALL PARTS OF THIS SCRIPT IS RECOMMENDED FOR ALL MariaDB
      SERVERS IN PRODUCTION USE!  PLEASE READ EACH STEP CAREFULLY!

In order to log into MariaDB to secure it, we'll need the current
password for the root user.  If you've just installed MariaDB, and
you haven't set the root password yet, the password will be blank,
so you should just press enter here.

Enter current password for root (enter for none):
ERROR 2002 (HY000): Can't connect to local MySQL server through socket '/var/lib/mysql/mysql.sock' (2)
Enter current password for root (enter for none):
I have not created a password for mysql so I left it blank and pressed enter. I can’t get past this step. What do I need to do?
Its really helped me for the very first time to setup the server without any issues :), thanks for the good steps & documentations.
awesome. Thanks for the straightforward and step-by-step tutorial. Worked flawlessly.
I have created a script to create and destrou virtualhost easily on centos: https://github.com/ivankristianto/virtualhost Hope it might helps the community.
Hello I have installed MariaDB 10.1.21 and PHP7 from Webtatic . Both works, but when I try to execute php script $connection=mysqli_connect($host,$db_login,$db_password); I have an error “PHP Warning: mysqli_connect(): Headers and client library minor version mismatch. Headers:50550 Library:100121” I execute php script phpinfo() and got: PHP Version 7.0.14; Client API library version 10.1.21-MariaDB ; Client API header version 5.5.50-MariaDB What should I do? Do I need to reinstall MariaDB for version 5.5 or not? Do you have any solution?
I’m shocked that the default yum respository in my CentOS 7 droplet only contains php version 5.4, that was has long been out of support period, even 5.5 is now out of support period. How can we configure a secure LAMP stack with PHP versions that are no longer patched!!
This tutorial left a lot of open questions in my mind… any good tutorials on next steps with LAMP stack? Installing/testing myphpadmin is functioning, configuring vhosts, configuring fast cgi support for PHP.
Also, how do I support automatic vhosts for domains ? I think I’ve seen some hosting providers using some module that automatically redirect requests against a domain to a particular vhost subdirectory without having to manually configure Apache, just create the subdirectory for hosting the files.
This comment has been deleted
Hi,
Is there any working solution for installing phpmyadmin? there are plenty of threat but none of them working for me. I constantly get Forbidden Error when I open the page. However I set all those IP and Allow and Deny.
Thanks for you help
 This work is licensed under a Creative Commons Attribution-NonCommercial- ShareAlike 4.0 International License.
Become a contributor for community
Get paid to write technical tutorials and select a tech-focused charity to receive a matching donation.

DigitalOcean Documentation
Full documentation for every DigitalOcean product.

Resources for startups and SMBs
The Wave has everything you need to know about building a business, from raising funding to marketing your product.
The developer cloud
Scale up as you grow — whether you're running one virtual machine or ten thousand.

Get started for free
Sign up and get $200 in credit for your first 60 days with DigitalOcean.*

*This promotional offer applies to new accounts only.