By Abdelhadi Dyouri and Brian MacDonald
The author selected the Free and Open Source Fund to receive a donation as part of the Write for DOnations program.
Introduction
Flask is a lightweight Python web framework that provides useful tools and features for creating web applications in the Python Language. SQLAlchemy is an SQL toolkit that provides efficient and high-performing database access for relational databases. It provides ways to interact with several database engines such as SQLite, MySQL, and PostgreSQL. It gives you access to the database’s SQL functionalities. And it also gives you an Object Relational Mapper (ORM), which allows you to make queries and handle data using simple Python objects and methods. Flask-SQLAlchemy is a Flask extension that makes using SQLAlchemy with Flask easier, providing you tools and methods to interact with your database in your Flask applications through SQLAlchemy.
In this tutorial, you’ll use Flask and Flask-SQLAlchemy to create an employee management system with a database that has a table for employees. Each employee will have a unique ID, a first name, a last name, a unique email, an integer value for their age, a date for the day they joined the company, and a boolean value to determine whether an employee is currently active or out of office.
You’ll use the Flask shell to query a table, and get table records based on a column value (for example, an email). You’ll retrieve employees’ records on certain conditions, such as getting only active employees or getting a list of out-of-office employees. You’ll order the results by a column value, and count and limit query results. Finally, you’ll use pagination to display a certain number of employees per page in a web application.
Prerequisites
-
A local Python 3 programming environment. Follow the tutorial for your distribution in How To Install and Set Up a Local Programming Environment for Python 3 series. In this tutorial we’ll call our project directory
flask_app. -
An understanding of basic Flask concepts, such as routes, view functions, and templates. If you are not familiar with Flask, check out How to Create Your First Web Application Using Flask and Python and How to Use Templates in a Flask Application.
-
An understanding of basic HTML concepts. You can review our How To Build a Website with HTML tutorial series for background knowledge.
-
An understanding of basic Flask-SQLAlchemy concepts, such as setting up a database, creating database models, and inserting data into the database. See How to Use Flask-SQLAlchemy to Interact with Databases in a Flask Application for background knowledge.
Step 1 — Setting up the Database and Model
In this step, you’ll install the necessary packages, and set up your Flask application, the Flask-SQLAlchemy database, and the employee model that represents the employee table where you’ll store your employee data. You’ll insert a few employees into the employee table, and add a route and a page where all employees are displayed on your application’s index page.
First, with your virtual environment activated, install Flask and Flask-SQLAlchemy:
- pip install Flask Flask-SQLAlchemy
Once the installation is complete, you will receive output with the following line at the end:
Output
Successfully installed Flask-2.1.2 Flask-SQLAlchemy-2.5.1 Jinja2-3.1.2 MarkupSafe-2.1.1 SQLAlchemy-1.4.37 Werkzeug-2.1.2 click-8.1.3 greenlet-1.1.2 itsdangerous-2.1.2
With the required packages installed, open a new file called app.py in your flask_app directory. This file will have code for setting up the database and your Flask routes:
- nano app.py
Add the following code to app.py. This code will set up an SQLite database and an employee database model representing the employee table you’ll use to store your employee data:
import os
from flask import Flask, render_template, request, url_for, redirect
from flask_sqlalchemy import SQLAlchemy


basedir = os.path.abspath(os.path.dirname(__file__))

app = Flask(__name__)
app.config['SQLALCHEMY_DATABASE_URI'] =\
        'sqlite:///' + os.path.join(basedir, 'database.db')
app.config['SQLALCHEMY_TRACK_MODIFICATIONS'] = False

db = SQLAlchemy(app)


class Employee(db.Model):
    id = db.Column(db.Integer, primary_key=True)
    firstname = db.Column(db.String(100), nullable=False)
    lastname = db.Column(db.String(100), nullable=False)
    email = db.Column(db.String(100), unique=True, nullable=False)
    age = db.Column(db.Integer, nullable=False)
    hire_date = db.Column(db.Date, nullable=False)
    active = db.Column(db.Boolean, nullable=False)

    def __repr__(self):
        return f'<Employee {self.firstname} {self.lastname}>'
Save and close the file.
Here, you import the os module, which gives you access to miscellaneous operating system interfaces. You’ll use it to construct a file path for your database.db database file.
From the flask package, you import helpers you need for your application: the Flask class to create a Flask application instance, render_template() to render templates, the request object to handle requests, url_for() to construct URLs, and the redirect() function for redirecting users. For more information on routes and templates, see How To Use Templates in a Flask Application.
You then import the SQLAlchemy class from the Flask-SQLAlchemy extension, which gives you access to all the functions and classes from SQLAlchemy, in addition to helpers and functionality that integrates Flask with SQLAlchemy. You’ll use it to create a database object that connects to your Flask application.
To construct a path for your database file, you define a base directory as the current directory. You use the os.path.abspath() function to get the absolute path of the current file’s directory. The special __file__ variable holds the pathname of the current app.py file. You store the absolute path of the base directory in a variable called basedir.
You then create a Flask application instance called app, which you use to configure two Flask-SQLAlchemy configuration keys:
-
SQLALCHEMY_DATABASE_URI: The database URI to specify the database you want to establish a connection with. In this case, the URI follows the formatsqlite:///path/to/database.db. You use theos.path.join()function to intelligently join the base directory you constructed and stored in thebasedirvariable with thedatabase.dbfile name. This will connect to adatabase.dbdatabase file in yourflask_appdirectory. The file will be created once you initiate the database. -
SQLALCHEMY_TRACK_MODIFICATIONS: A configuration to enable or disable tracking modifications of objects. You set it toFalseto disable tracking, which uses less memory. For more, see the configuration page in the Flask-SQLAlchemy documentation.
After configuring SQLAlchemy by setting a database URI and disabling tracking, you create a database object using the SQLAlchemy class, passing the application instance to connect your Flask application with SQLAlchemy. You store your database object in a variable called db, which you’ll use to interact with your database.
After setting up the application instance and the database object, you inherit from the db.Model class to create a database model called Employee. This model represents the employee table, and it has the following columns:
id: The employee ID, an integer primary key.firstname: The employee’s first name, a string with a maximum length of 100 characters.nullable=Falsesignifies that this column should not be empty.lastname: The employee’s last name, a string with a maximum length of 100 characters.nullable=Falsesignifies that this column should not be empty.email: The employee’s email, a string with a maximum length of 100 characters.unique=Truesignifies that each email should be unique.nullable=Falsesignifies that it’s value should not be empty.age: The employee’s age, an integer value.hire_date: The date at which the employee was hired. You setdb.Dateas the column type to declare it as a column that holds dates.active: A column which will hold a boolean value to indicate whether the employee is currently active or out of office.
The special __repr__ function allows you to give each object a string representation to recognize it for debugging purposes. In this case, you use the employee’s first and last name to represent each employee object.
Now that you’ve set the database connection and the employee model, you’ll write a Python program to create your database and employee table and populate the table with some employee data.
Open a new file called init_db.py in your flask_app directory:
- nano init_db.py
Add the following code to delete existing database tables to start from a clean database, create the employee table, and insert nine employees into it:
from datetime import date
from app import db, Employee

db.drop_all()
db.create_all()

e1 = Employee(firstname='John',
              lastname='Doe',
              email='jd@example.com',
              age=32,
              hire_date=date(2012, 3, 3),
              active=True
              )

e2 = Employee(firstname='Mary',
              lastname='Doe',
              email='md@example.com',
              age=38,
              hire_date=date(2016, 6, 7),
              active=True
              )

e3 = Employee(firstname='Jane',
              lastname='Tanaka',
              email='jt@example.com',
              age=32,
              hire_date=date(2015, 9, 12),
              active=False
              )

e4 = Employee(firstname='Alex',
              lastname='Brown',
              email='ab@example.com',
              age=29,
              hire_date=date(2019, 1, 3),
              active=True
              )

e5 = Employee(firstname='James',
              lastname='White',
              email='jw@example.com',
              age=24,
              hire_date=date(2021, 2, 4),
              active=True
              )

e6 = Employee(firstname='Harold',
              lastname='Ishida',
              email='hi@example.com',
              age=52,
              hire_date=date(2002, 3, 6),
              active=False
              )

e7 = Employee(firstname='Scarlett',
              lastname='Winter',
              email='sw@example.com',
              age=22,
              hire_date=date(2021, 4, 7),
              active=True
              )

e8 = Employee(firstname='Emily',
              lastname='Vill',
              email='ev@example.com',
              age=27,
              hire_date=date(2019, 6, 9),
              active=True
              )

e9 = Employee(firstname='Mary',
              lastname='Park',
              email='mp@example.com',
              age=30,
              hire_date=date(2021, 8, 11),
              active=True
              )

db.session.add_all([e1, e2, e3, e4, e5, e6, e7, e8, e9])

db.session.commit()
Here, you import the date() class from the datetime module to use it to set employee hire dates.
You import the database object and the Employee model. You call the db.drop_all() function to delete all existing tables to avoid the chance of an already populated employee table existing in the database, which might cause issues. This deletes all database data whenever you execute the init_db.py program. For more information on creating, modifying, and deleting database tables, see How to Use Flask-SQLAlchemy to Interact with Databases in a Flask Application.
You then create several instances of the Employee model, which represent the employees you’ll query in this tutorial, and add them to the database session using the db.session.add_all() function. Lastly, you commit the transaction and apply the changes to the database using the db.session.commit().
Save and close the file.
Execute the init_db.py program:
- python init_db.py
To take a look at the data you added to your database, make sure your virtual environment is activated, and open the Flask shell to query all employees and display their data:
- flask shell
Run the following code to query all employees and display their data:
- from app import db, Employee
-
-
- employees = Employee.query.all()
-
- for employee in employees:
- print(employee.firstname, employee.lastname)
- print('Email:', employee.email)
- print('Age:', employee.age)
- print('Hired:', employee.hire_date)
- if employee.active:
- print('Active')
- else:
- print('Out of Office')
- print('----')
You use the all() method of the query attribute to get all employees. You loop through the results, and display employee information. For the active column, you use a conditional statement to display the current status of the employee, either 'Active' or 'Out of Office'.
You’ll receive the following output:
OutputJohn Doe
Email: jd@example.com
Age: 32
Hired: 2012-03-03
Active
----
Mary Doe
Email: md@example.com
Age: 38
Hired: 2016-06-07
Active
----
Jane Tanaka
Email: jt@example.com
Age: 32
Hired: 2015-09-12
Out of Office
----
Alex Brown
Email: ab@example.com
Age: 29
Hired: 2019-01-03
Active
----
James White
Email: jw@example.com
Age: 24
Hired: 2021-02-04
Active
----
Harold Ishida
Email: hi@example.com
Age: 52
Hired: 2002-03-06
Out of Office
----
Scarlett Winter
Email: sw@example.com
Age: 22
Hired: 2021-04-07
Active
----
Emily Vill
Email: ev@example.com
Age: 27
Hired: 2019-06-09
Active
----
Mary Park
Email: mp@example.com
Age: 30
Hired: 2021-08-11
Active
----
You can see that all of the employees we’ve added to the database are properly displayed.
Exit the Flask shell:
- exit()
Next, you’ll create a Flask route to display employees. Open app.py for editing:
- nano app.py
Add the following route at the end of the file:
...

@app.route('/')
def index():
    employees = Employee.query.all()
    return render_template('index.html', employees=employees)
Save and close the file.
This queries all employees, renders an index.html template, and passes it the employees you fetch.
Create a templates directory and a base template:
- mkdir templates
- nano templates/base.html
Add the following to base.html:
<!DOCTYPE html>
<html lang="en">
<head>
    <meta charset="UTF-8">
    <title>{% block title %} {% endblock %} - FlaskApp</title>
    <style>
        .title {
            margin: 5px;
        }

        .content {
            margin: 5px;
            width: 100%;
            display: flex;
            flex-direction: row;
            flex-wrap: wrap;
        }

        .employee {
            flex: 20%;
            padding: 10px;
            margin: 5px;
            background-color: #f3f3f3;
            inline-size: 100%;
        }

        .name {
            color: #00a36f;
            text-decoration: none;
        }

        nav a {
            color: #d64161;
            font-size: 3em;
            margin-left: 50px;
            text-decoration: none;
        }

        .pagination {
            margin: 0 auto;
        }

        .pagination span {
            font-size: 2em;
            margin-right: 10px;
        }

        .page-number {
            color: #d64161;
            padding: 5px;
            text-decoration: none;
        }

        .current-page-number {
            color: #666
        }

    </style>
</head>
<body>
    <nav>
        <a href="{{ url_for('index') }}">FlaskApp</a>
        <a href="#">About</a>
    </nav>
    <hr>
    <div class="content">
        {% block content %} {% endblock %}
    </div>
</body>
</html>
Save and close the file.
Here, you use a title block and add some CSS styling. You add a navbar with two items, one for the index page, and one for an inactive About page. This navbar will be reused throughout the application in the templates that inherit from this base template. The content block will be replaced with the content of each page. For more on templates, check out How to Use Templates in a Flask Application.
Next, open a new index.html template you rendered in app.py:
- nano templates/index.html
Add the following code to the file:
{% extends 'base.html' %}

{% block content %}
    <h1 class="title">{% block title %} Employees {% endblock %}</h1>
    <div class="content">
        {% for employee in employees %}
            <div class="employee">
                <p><b>#{{ employee.id }}</b></p>
                <b>
                    <p class="name">{{ employee.firstname }} {{ employee.lastname }}</p>
                </b>
                <p>{{ employee.email }}</p>
                <p>{{ employee.age }} years old.</p>
                <p>Hired: {{ employee.hire_date }}</p>
                {% if employee.active %}
                    <p><i>(Active)</i></p>
                {% else %}
                    <p><i>(Out of Office)</i></p>
                {% endif %}
            </div>
        {% endfor %}
    </div>
{% endblock %}
Here, you loop through employees and display each employee’s information. If the employee is active you add an (Active) label, otherwise you display an (Out of Office) label.
Save and close the file.
While in your flask_app directory with your virtual environment activated, tell Flask about the application (app.py in this case) using the FLASK_APP environment variable. Then set the FLASK_ENV environment variable to development to run the application in development mode and get access to the debugger. For more information about the Flask debugger, see How To Handle Errors in a Flask Application. Use the following commands to do this:
- export FLASK_APP=app
- export FLASK_ENV=development
Next, run the application:
- flask run
With the development server running, visit the following URL using your browser:
http://127.0.0.1:5000/
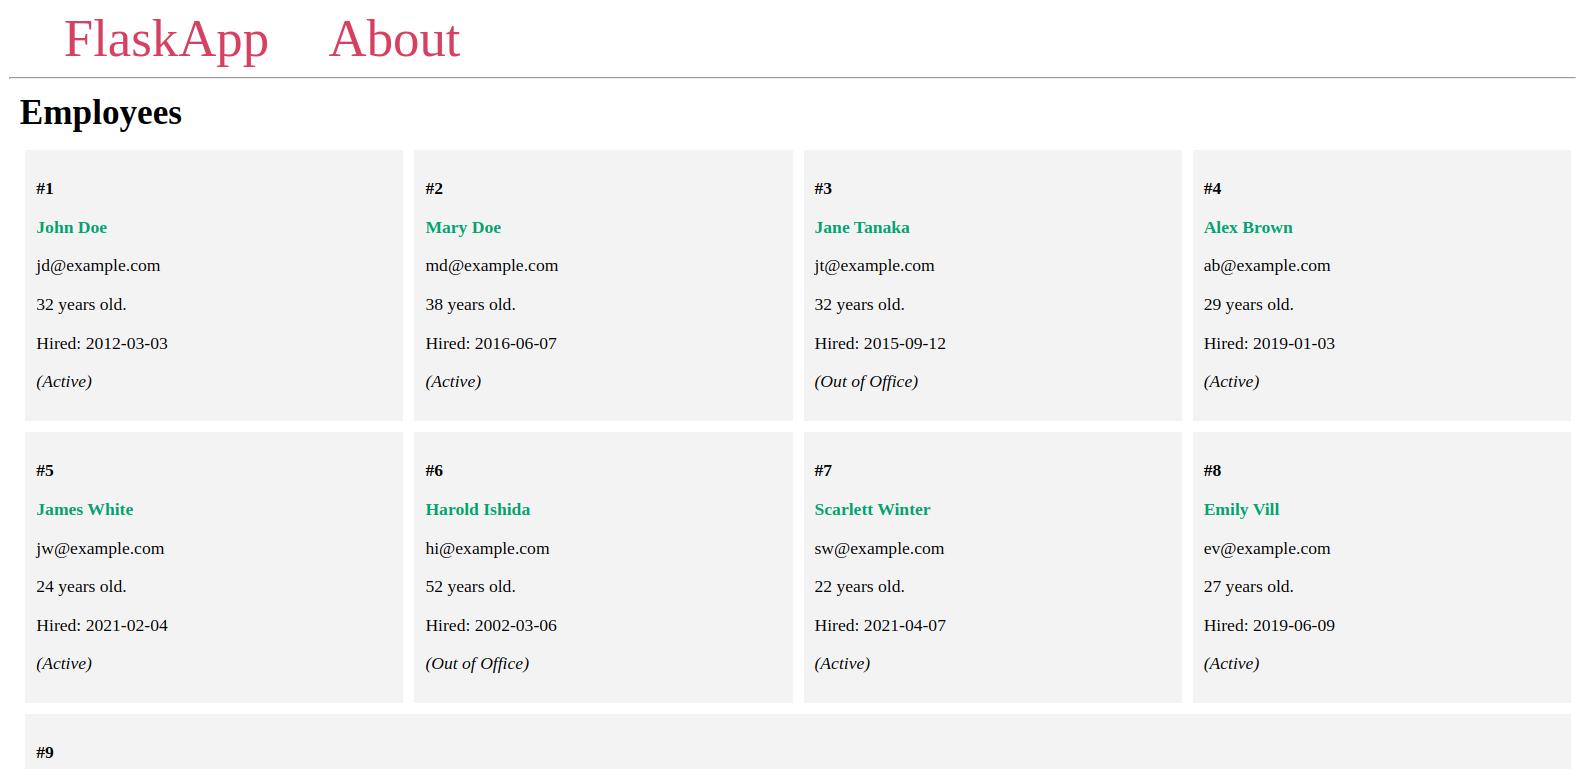
You’ll see the employees you added to the database in a page similar to the following:
Leave the server running, open another terminal, and continue to the next step.
You’ve displayed the employees you have in your database on the index page. Next, you’ll use the Flask shell to query employees using different methods.
Step 2 — Querying Records
In this step, you’ll use the Flask shell to query records, and filter and retrieve results using multiple methods and conditions.
With your programming environment activated, set the FLASK_APP and FLASK_ENV variables, and open the Flask shell:
- export FLASK_APP=app
- export FLASK_ENV=development
- flask shell
Import the db object and the Employee model:
- from app import db, Employee
Retrieving All Records
As you’ve seen in the previous step, you can use the all() method on the query attribute to get all the records in a table:
- all_employees = Employee.query.all()
- print(all_employees)
The output will be a list of objects representing all employees:
Output
[<Employee John Doe>, <Employee Mary Doe>, <Employee Jane Tanaka>, <Employee Alex Brown>, <Employee James White>, <Employee Harold Ishida>, <Employee Scarlett Winter>, <Employee Emily Vill>, <Employee Mary Park>]
Retrieving the First Record
Similarly, you can use the first() method to get the first record:
- first_employee = Employee.query.first()
- print(first_employee)
The output will be an object that holds the first employee’s data:
Output<Employee John Doe>
Retrieving a Record by ID
In most database tables, records are identified with a unique ID. Flask-SQLAlchemy allows you to fetch a record using its ID with the get() method:
- employee5 = Employee.query.get(5)
- employee3 = Employee.query.get(3)
- print(f'{employee5} | ID: {employee5.id}')
- print(f'{employee3} | ID: {employee3.id}')
Output<Employee James White> | ID: 5
<Employee Jane Tanaka> | ID: 3
Retrieving a Record or Multiple Records by a Column Value
To get a record using the value of one of its columns, use the filter_by() method. For example, to get a record using its ID value, similar to the get() method:
- employee = Employee.query.filter_by(id=1).first()
- print(employee)
Output<Employee John Doe>
You use first() because filter_by() may return multiple results.
Note: For getting a record by ID, using the get() method is a better approach.
For another example, you can get an employee using their age:
- employee = Employee.query.filter_by(age=52).first()
- print(employee)
Output<Employee Harold Ishida>
For an example where the query result holds more than one matching record, use the firstname column and the first name Mary, which is a name shared by two employees:
- mary = Employee.query.filter_by(firstname='Mary').all()
- print(mary)
Output[<Employee Mary Doe>, <Employee Mary Park>]
Here, you use all() to get the full list. You can also use first() to get only the first result:
- mary = Employee.query.filter_by(firstname='Mary').first()
- print(mary)
Output<Employee Mary Doe>
You’ve fetched records through column values. Next, you’ll query your table using logical conditions.
Step 3 — Filtering Records Using Logical Conditions
In complex, full-featured web applications, you often need to query records from the database using complicated conditionals, such as fetching employees based on a combination of conditions that take into account their location, availability, role, and responsibilities. In this step, you’ll get practice using conditional operators. You’ll use the filter() method on the query attribute to filter query results using logical conditions with different operators. For example, you can use logical operators to fetch a list of which employees are currently out of office, or employees due for a promotion, and maybe provide a calendar of employee vacation time, etc.
Equals
The simplest logical operator you can use is the equality operator ==, which behaves in a similar way to filter_by(). For example, to get all the records where the value of the firstname column is Mary, you can use the filter() method like so:
- mary = Employee.query.filter(Employee.firstname == 'Mary').all()
- print(mary)
Here you use the syntax Model.column == value as an argument to the filter() method. The filter_by() method is a shortcut for this syntax.
The result is the same as the result of the filter_by() method with the same condition:
Output[<Employee Mary Doe>, <Employee Mary Park>]
Like filter_by(), you can also use the first() method to get the first result:
- mary = Employee.query.filter(Employee.firstname == 'Mary').first()
- print(mary)
Output<Employee Mary Doe>
Not Equals
The filter() method allows you to use the != Python operator to get records. For example, to get a list of out-of-office employees, you can use the following approach:
- out_of_office_employees = Employee.query.filter(Employee.active != True).all()
- print(out_of_office_employees)
Output[<Employee Jane Tanaka>, <Employee Harold Ishida>]
Here you use the Employee.active != True condition to filter results.
Less Than
You can use the < operator to get a record where the value of a given column is less than the given value. For example, to get a list of employees under 32 years old:
- employees_under_32 = Employee.query.filter(Employee.age < 32).all()
-
- for employee in employees_under_32:
- print(employee.firstname, employee.lastname)
- print('Age: ', employee.age)
- print('----')
Output
Alex Brown
Age:  29
----
James White
Age:  24
----
Scarlett Winter
Age:  22
----
Emily Vill
Age:  27
----
Mary Park
Age:  30
----
Use the <= operator for records that are less than or equal to the given value. For example, to include employees aged 32 in the previous query:
- employees_32_or_younger = Employee.query.filter(Employee.age <=32).all()
-
- for employee in employees_32_or_younger:
- print(employee.firstname, employee.lastname)
- print('Age: ', employee.age)
- print('----')
Output
John Doe
Age:  32
----
Jane Tanaka
Age:  32
----
Alex Brown
Age:  29
----
James White
Age:  24
----
Scarlett Winter
Age:  22
----
Emily Vill
Age:  27
----
Mary Park
Age:  30
----
Greater Than
Similarly, the > operator gets a record where the value of a given column is greater than the given value. For example, to get employees over 32:
- employees_over_32 = Employee.query.filter(Employee.age > 32).all()
-
- for employee in employees_over_32:
- print(employee.firstname, employee.lastname)
- print('Age: ', employee.age)
- print('----')
OutputMary Doe
Age:  38
----
Harold Ishida
Age:  52
----
And the >= operator is for records that are greater than or equal to the given value. For example, you can again include 32-year-old employees in the previous query:
- employees_32_or_older = Employee.query.filter(Employee.age >=32).all()
-
- for employee in employees_32_or_older:
- print(employee.firstname, employee.lastname)
- print('Age: ', employee.age)
- print('----')
Output
John Doe
Age:  32
----
Mary Doe
Age:  38
----
Jane Tanaka
Age:  32
----
Harold Ishida
Age:  52
----
In
SQLAlchemy also provides a way to get records where a column’s value matches a value from a given list of values using the in_() method on the column like so:
- names = ['Mary', 'Alex', 'Emily']
- employees = Employee.query.filter(Employee.firstname.in_(names)).all()
- print(employees)
Output[<Employee Mary Doe>, <Employee Alex Brown>, <Employee Emily Vill>, <Employee Mary Park>]
Here, you use a condition with the syntax Model.column.in_(iterable), where iterable is any type of object you can iterate through. For another example, you can use the range() Python function to get employees from a certain age range. The following query gets all the employees that are in their thirties.
- employees_in_30s = Employee.query.filter(Employee.age.in_(range(30, 40))).all()
- for employee in employees_in_30s:
- print(employee.firstname, employee.lastname)
- print('Age: ', employee.age)
- print('----')
OutputJohn Doe
Age:  32
----
Mary Doe
Age:  38
----
Jane Tanaka
Age:  32
----
Mary Park
Age:  30
----
Not In
Similar to the in_() method, you can use the not_in() method to get records where a column value is not in a given iterable:
- names = ['Mary', 'Alex', 'Emily']
- employees = Employee.query.filter(Employee.firstname.not_in(names)).all()
- print(employees)
Output
[<Employee John Doe>, <Employee Jane Tanaka>, <Employee James White>, <Employee Harold Ishida>, <Employee Scarlett Winter>]
Here, you get all employees except those with a first name in the names list.
And
You can join several conditions together using the db.and_() function, which works like Python’s and operator.
For example, let’s say you want to get all the employees that are 32 years old and are currently active. First, you can check who is 32 using the filter_by() method (you can also use filter() if you want):
- for employee in Employee.query.filter_by(age=32).all():
- print(employee)
- print('Age:', employee.age)
- print('Active:', employee.active)
- print('-----')
Output<Employee John Doe>
Age: 32
Active: True
-----
<Employee Jane Tanaka>
Age: 32
Active: False
-----
Here, you see that John and Jane are the employees that are 32 years old. John is active, and Jane is out of office.
To get the employees that are 32 and active, you’ll use two conditions with the filter() method:
Employee.age == 32Employee.active == True
To join these two conditions together, use the db.and_() function like so:
- active_and_32 = Employee.query.filter(db.and_(Employee.age == 32,
- Employee.active == True)).all()
- print(active_and_32)
Output[<Employee John Doe>]
Here, you use the syntax filter(db.and_(condition1, condition2)).
Using all() on the query returns a list of all the records that match the two conditions. You can use the first() method to get the first result:
- active_and_32 = Employee.query.filter(db.and_(Employee.age == 32,
- Employee.active == True)).first()
- print(active_and_32)
Output<Employee John Doe>
For a more complex example, you can use the db.and_() with the date() function to get employees who were hired in a specific time span. In this example, you get all the employees hired in the year 2019:
- from datetime import date
-
- hired_in_2019 = Employee.query.filter(db.and_(Employee.hire_date >= date(year=2019, month=1, day=1), Employee.hire_date < date(year=2020, month=1, day=1))).all()
-
- for employee in hired_in_2019:
- print(employee, ' | Hired: ', employee.hire_date)
Output<Employee Alex Brown>  | Hired:  2019-01-03
<Employee Emily Vill>  | Hired:  2019-06-09
Here you import the date() function, and you filter results using the db.and_() function to combine the following two conditions:
Employee.hire_date >= date(year=2019, month=1, day=1): This isTruefor employees hired the first of January 2019 or later.Employee.hire_date < date(year=2020, month=1, day=1): This isTruefor employees hired before the first of January 2020.
Combining the two conditions fetches employees hired from the first day of 2019 and before the first day of 2020.
Or
Similar to db.and_(), the db.or_() function combines two conditions, and it behaves like the or operator in Python. It fetches all records that meet one of two conditions. For example, to get employees aged 32 or 52, you can combine two conditions with the db.or_() function as follows:
- employees_32_or_52 = Employee.query.filter(db.or_(Employee.age == 32, Employee.age == 52)).all()
-
- for e in employees_32_or_52:
- print(e, '| Age:', e.age)
Output<Employee John Doe> | Age: 32
<Employee Jane Tanaka> | Age: 32
<Employee Harold Ishida> | Age: 52
You can also use the startswith() and endswith() methods on string values in conditions you pass to the filter() method. For example, to get all the employees whose first name starts with the string 'M' and those with a last name that ends with the string 'e':
- employees = Employee.query.filter(db.or_(Employee.firstname.startswith('M'), Employee.lastname.endswith('e'))).all()
-
- for e in employees:
- print(e)
Output<Employee John Doe>
<Employee Mary Doe>
<Employee James White>
<Employee Mary Park>
Here you combine the following two conditions:
Employee.firstname.startswith('M'): Matches employees with a first name that starts with'M'.Employee.lastname.endswith('e'): Matches employees with a last name that ends with'e'.
You can now filter query results using logical conditions in your Flask-SQLAlchemy applications. Next, you’ll order, limit, and count the results you get from the database.
Step 4 — Ordering, Limiting, and Counting Results
In web applications, you often need to order your records when displaying them. For example, you might have a page to display the latest hires in each department to let the rest of the team know about new hires, or you can order employees by displaying the oldest hires first to recognize long-tenured employees. You will also need to limit your results in certain cases, such as displaying only the latest three hires on a small sidebar. And you often need to count the results of a query, for example, to display the number of employees who are currently active. In this step, you’ll learn how to order, limit, and count results.
Ordering Results
To order results using the values of a specific column, use the order_by() method. For example, to order results by the employees’ first name:
- employees = Employee.query.order_by(Employee.firstname).all()
- print(employees)
Output[<Employee Alex Brown>, <Employee Emily Vill>, <Employee Harold Ishida>, <Employee James White>, <Employee Jane Tanaka>, <Employee John Doe>, <Employee Mary Doe>, <Employee Mary Park>, <Employee Scarlett Winter>]
As the output shows, the results are ordered alphabetically by the employee’s first name.
You can order by other columns. For example, you can use the last name to order employees:
- employees = Employee.query.order_by(Employee.lastname).all()
- print(employees)
Output[<Employee Alex Brown>, <Employee John Doe>, <Employee Mary Doe>, <Employee Harold Ishida>, <Employee Mary Park>, <Employee Jane Tanaka>, <Employee Emily Vill>, <Employee James White>, <Employee Scarlett Winter>]
You can also order employees by their hire date:
- em_ordered_by_hire_date = Employee.query.order_by(Employee.hire_date).all()
-
- for employee in em_ordered_by_hire_date:
- print(employee.firstname, employee.lastname, employee.hire_date)
Output
Harold Ishida 2002-03-06
John Doe 2012-03-03
Jane Tanaka 2015-09-12
Mary Doe 2016-06-07
Alex Brown 2019-01-03
Emily Vill 2019-06-09
James White 2021-02-04
Scarlett Winter 2021-04-07
Mary Park 2021-08-11
As the output shows, this orders results from the earliest hire to the latest hire. To reverse the order and make it descending from the latest hire to the earliest, use the desc() method like so:
- em_ordered_by_hire_date_desc = Employee.query.order_by(Employee.hire_date.desc()).all()
-
- for employee in em_ordered_by_hire_date_desc:
- print(employee.firstname, employee.lastname, employee.hire_date)
OutputMary Park 2021-08-11
Scarlett Winter 2021-04-07
James White 2021-02-04
Emily Vill 2019-06-09
Alex Brown 2019-01-03
Mary Doe 2016-06-07
Jane Tanaka 2015-09-12
John Doe 2012-03-03
Harold Ishida 2002-03-06
You can also combine the order_by() method with the filter() method to order filtered results. The following example gets all the employees hired in 2021 and orders them by age:
- from datetime import date
- hired_in_2021 = Employee.query.filter(db.and_(Employee.hire_date >= date(year=2021, month=1, day=1), Employee.hire_date < date(year=2022, month=1, day=1))).order_by(Employee.age).all()
-
- for employee in hired_in_2021:
- print(employee.firstname, employee.lastname,
- employee.hire_date, '| Age', employee.age)
OutputScarlett Winter 2021-04-07 | Age 22
James White 2021-02-04 | Age 24
Mary Park 2021-08-11 | Age 30
Here, you use the db.and_() function with two conditions: Employee.hire_date >= date(year=2021, month=1, day=1) for employees hired on the first day of 2021 or later, and Employee.hire_date < date(year=2022, month=1, day=1) for employees hired before the first day of 2022. You then use the order_by() method to order the resulting employees by their age.
Limiting Results
In most real world cases, when querying a database table, you might get up to millions of matching results, and it is sometimes necessary to limit results to a certain number. To limit results in Flask-SQLAlchemy, you can use the limit() method. The following example queries the employee table and returns only the first three matching results:
- employees = Employee.query.limit(3).all()
- print(employees)
Output[<Employee John Doe>, <Employee Mary Doe>, <Employee Jane Tanaka>]
You can use limit() with other methods, such as filter and order_by. For example, you can get the last two employees hired in 2021 using the limit() method like so:
- from datetime import date
- hired_in_2021 = Employee.query.filter(db.and_(Employee.hire_date >= date(year=2021, month=1, day=1), Employee.hire_date < date(year=2022, month=1, day=1))).order_by(Employee.age).limit(2).all()
-
- for employee in hired_in_2021:
- print(employee.firstname, employee.lastname,
- employee.hire_date, '| Age', employee.age)
OutputScarlett Winter 2021-04-07 | Age 22
James White 2021-02-04 | Age 24
Here, you use the same query in the previous section with an additional limit(2) method call.
Counting Results
To count the number of results of a query, you can use the count() method. For example, to get the number of employees that are currently in the database:
- employee_count = Employee.query.count()
- print(employee_count)
Output9
You can combine the count() method with other query methods similar to limit(). For example, to get the number of employees hired in 2021:
- from datetime import date
- hired_in_2021_count = Employee.query.filter(db.and_(Employee.hire_date >= date(year=2021, month=1, day=1), Employee.hire_date < date(year=2022, month=1, day=1))).order_by(Employee.age).count()
- print(hired_in_2021_count)
Output3
Here you use the same query you used previously for getting all the employees that were hired in 2021. And you use the count() to retrieve the number of entries, which is 3.
You’ve ordered, limited, and counted query results in Flask-SQLAlchemy. Next, you’ll learn how to split query results into multiple pages and how to create a pagination system in your Flask applications.
Step 5 — Displaying Long Record Lists on Multiple Pages
In this step, you’ll modify the main route to make the index page display employees on multiple pages to make navigating the employee list easier.
First, you’ll use the Flask shell to see a demonstration of how to use the pagination feature in Flask-SQLAlchemy. Open the Flask shell if you haven’t already:
- flask shell
Let’s say you want to split the employee records in your table into multiple pages, with two items per page. You can do this using the paginate() query method like so:
- page1 = Employee.query.paginate(page=1, per_page=2)
- print(page1)
- print(page1.items)
Output<flask_sqlalchemy.Pagination object at 0x7f1dbee7af80>
[<Employee John Doe>, <Employee Mary Doe>]
You use the page parameter of the paginate() query method to specify the page you want to access, which is the first page in this case. The per_page parameter specifies the number of items each page must have. In this case you set it to 2 to make each page have two items.
The page1 variable here is a pagination object, which gives you access to attributes and methods you’ll use to manage your pagination.
You access the page’s items using the items attribute.
To access the next page, you can use the next() method of the pagination object like so, the returned result is also a pagination object:
- page2 = page1.next()
-
- print(page2.items)
- print(page2)
Output[<Employee Jane Tanaka>, <Employee Alex Brown>]

<flask_sqlalchemy.Pagination object at 0x7f1dbee799c0>
You can get a pagination object for the previous page using the prev() method. In the following example you access the pagination object for the fourth page, then you access the pagination object of its previous page, which is page 3:
- page4 = Employee.query.paginate(page=4, per_page=2)
- print(page4.items)
- page3 = page4.prev()
- print(page3.items)
Output[<Employee Scarlett Winter>, <Employee Emily Vill>]

[<Employee James White>, <Employee Harold Ishida>]
You can access the current page number using the page attribute like so:
- print(page1.page)
- print(page2.page)
Output1
2
To get the total number of pages, use the pages attribute of the pagination object. In the following example, both page1.pages and page2.pages return the same value because the total number of pages is a constant:
- print(page1.pages)
- print(page2.pages)
Output5
5
For the total number of items, use the total attribute of the pagination object:
- print(page1.total)
- print(page2.total)
Output9
9
Here, since you query all employees, the total number of items in the pagination is 9, because there are nine employees in the database.
Following are some of the other attributes that pagination objects have:
prev_num: The previous page number.next_num: The next page number.has_next:Trueif there is a next page.has_prev:Trueif there is a previous page.per_page: The number of items per page.
The pagination object also has an iter_pages() method you can loop through to access page numbers. For example, you can print all page numbers like so:
- pagination = Employee.query.paginate(page=1, per_page=2)
-
- for page_num in pagination.iter_pages():
- print(page_num)
Output1
2
3
4
5
The following is a demonstration of how to access all pages and their items using a pagination object and the iter_pages() method:
- pagination = Employee.query.paginate(page=1, per_page=2)
-
- for page_num in pagination.iter_pages():
- print('PAGE', pagination.page)
- print('-')
- print(pagination.items)
- print('-'*20)
- pagination = pagination.next()
Output
PAGE 1
-
[<Employee John Doe>, <Employee Mary Doe>]
--------------------
PAGE 2
-
[<Employee Jane Tanaka>, <Employee Alex Brown>]
--------------------
PAGE 3
-
[<Employee James White>, <Employee Harold Ishida>]
--------------------
PAGE 4
-
[<Employee Scarlett Winter>, <Employee Emily Vill>]
--------------------
PAGE 5
-
[<Employee Mary Park>]
--------------------
Here, you create a pagination object that starts from the first page. You loop through pages using a for loop with the iter_pages() pagination method. You print the page number and page items, and you set the pagination object to the pagination object of its next page using the next() method.
You can also use the filter() and the order_by() methods with the paginate() method to paginate filtered and ordered query results. For example, you can get employees over thirty and order results by age and paginate the results like so:
- pagination = Employee.query.filter(Employee.age > 30).order_by(Employee.age).paginate(page=1, per_page=2)
-
- for page_num in pagination.iter_pages():
- print('PAGE', pagination.page)
- print('-')
- for employee in pagination.items:
- print(employee, '| Age: ', employee.age)
- print('-'*20)
- pagination = pagination.next()
OutputPAGE 1
-
<Employee John Doe> | Age:  32
<Employee Jane Tanaka> | Age:  32
--------------------
PAGE 2
-
<Employee Mary Doe> | Age:  38
<Employee Harold Ishida> | Age:  52
--------------------
Now that you have a solid understanding of how pagination works in Flask-SQLAlchemy, you will edit the index page of your application to display employees on multiple pages for easier navigation.
Exit the Flask shell:
- exit()
To access different pages, you’ll use URL parameters, also known as URL query strings, which are a way to pass information to the application through the URL. Parameters are passed to the application in the URL after a ? symbol. For example, to pass a page parameter with different values you can use the following URLs:
http://127.0.0.1:5000/?page=1
http://127.0.0.1:5000/?page=3
Here, the first URL passes a value 1 to the URL parameter page. The second URL passes a value 3 to the same parameter.
Open the app.py file:
- nano app.py
Edit the index route to look as follows:
@app.route('/')
def index():
    page = request.args.get('page', 1, type=int)
    pagination = Employee.query.order_by(Employee.firstname).paginate(
        page, per_page=2)
    return render_template('index.html', pagination=pagination)
Here, you get the value of the page URL parameter using the request.args object and its get() method. For example /?page=1 will get the value 1 from the page URL parameter. You pass 1 as a default value, and you pass the int Python type as an argument to the type parameter to make sure the value is an integer.
Next you create a pagination object, ordering query results by the first name. You pass the page URL parameter value to the paginate() method, and you split results into two items per page by passing the value 2 to the per_page parameter.
Lastly, you pass the pagination object you constructed to the rendered index.html template.
Save and close the file.
Next, edit the index.html template to display pagination items:
- nano templates/index.html
Change the content div tag by adding an h2 heading that indicates the current page, and changing the for loop to loop through the pagination.items object instead of the employees object, which is no longer available:
<div class="content">
    <h2>(Page {{ pagination.page }})</h2>
    {% for employee in pagination.items %}
        <div class="employee">
            <p><b>#{{ employee.id }}</b></p>
            <b>
                <p class="name">{{ employee.firstname }} {{ employee.lastname }}</p>
            </b>
            <p>{{ employee.email }}</p>
            <p>{{ employee.age }} years old.</p>
            <p>Hired: {{ employee.hire_date }}</p>
            {% if employee.active %}
                <p><i>(Active)</i></p>
            {% else %}
                <p><i>(Out of Office)</i></p>
            {% endif %}
        </div>
    {% endfor %}
</div>
Save and close the file.
If you haven’t already, set the FLASK_APP and FLASK_ENV environment variables and run the development server:
- export FLASK_APP=app
- export FLASK_ENV=development
- flask run
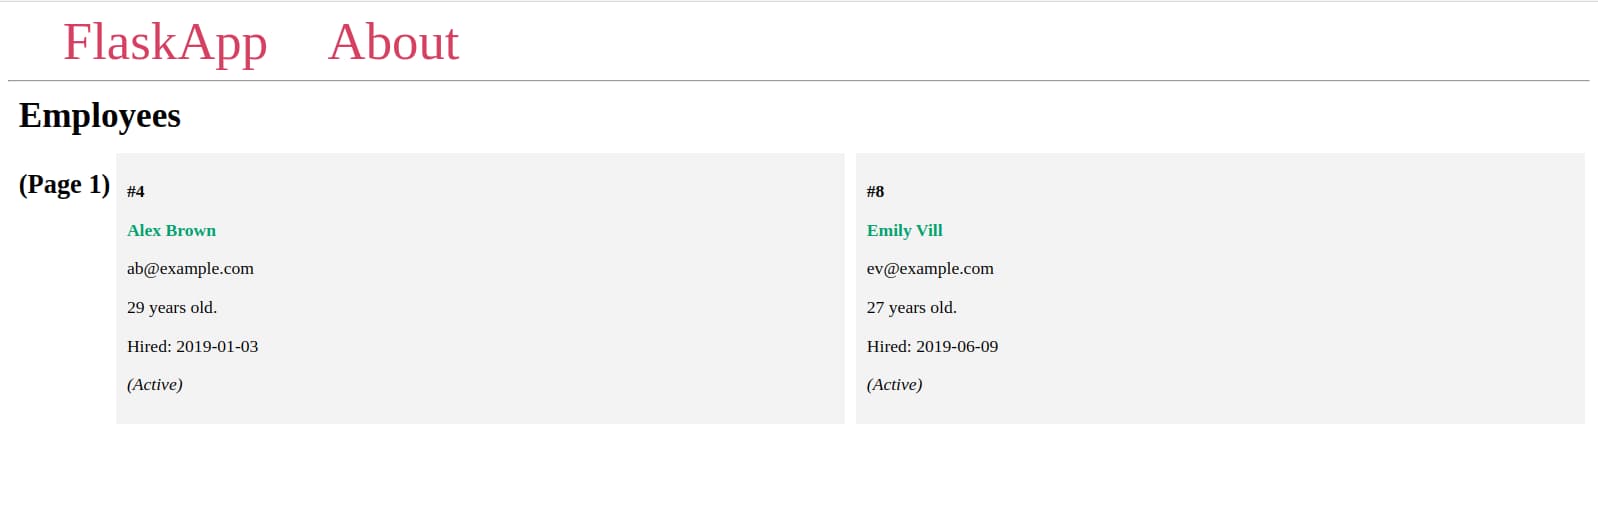
Now, navigate to the index page with different values for the page URL parameter:
http://127.0.0.1:5000/
http://127.0.0.1:5000/?page=2
http://127.0.0.1:5000/?page=4
http://127.0.0.1:5000/?page=19
You’ll see different pages with two items each, and different items on each page, as you’ve seen previously in the Flask shell.
If the given page number does not exit, you’ll get a 404 Not Found HTTP error, which is the case with the last URL in the preceding URL list.
Next, you’ll create a pagination widget to navigate between pages, you’ll use a few attributes and methods of the pagination object to display all page numbers, each number links to its dedicated page, and a <<< button for going back if the current page has a previous page, and a >>> button for going to the next page if it exists.
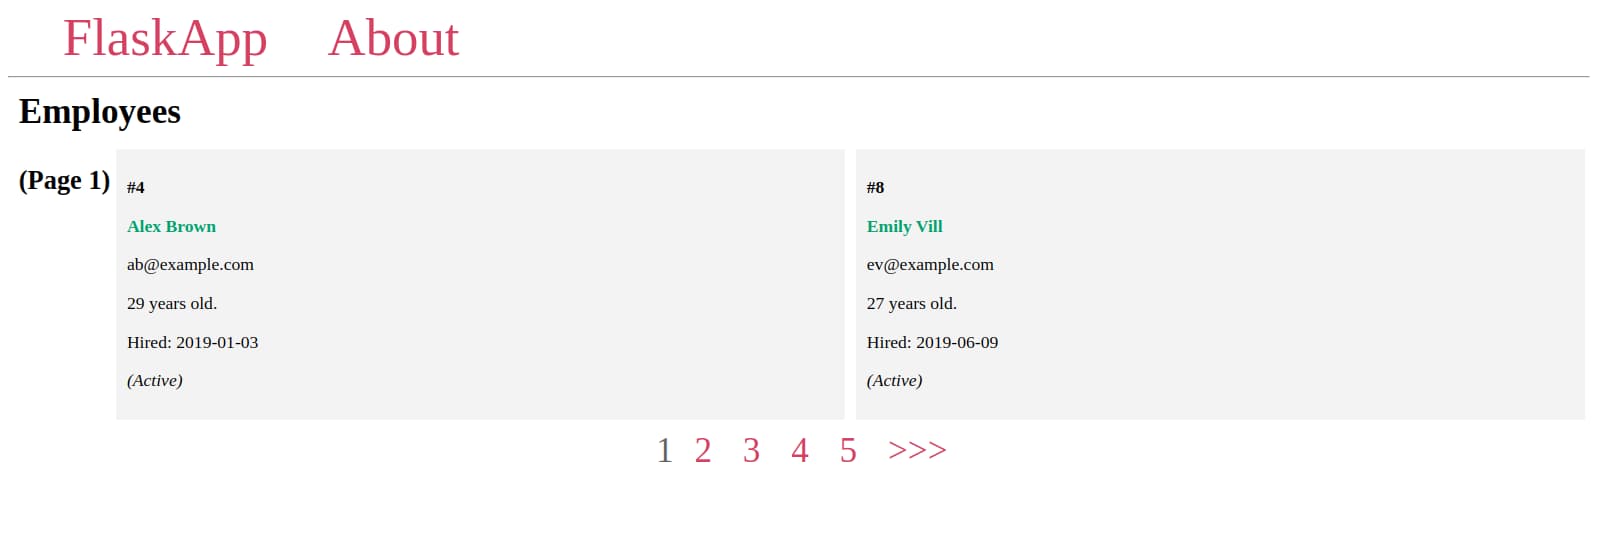
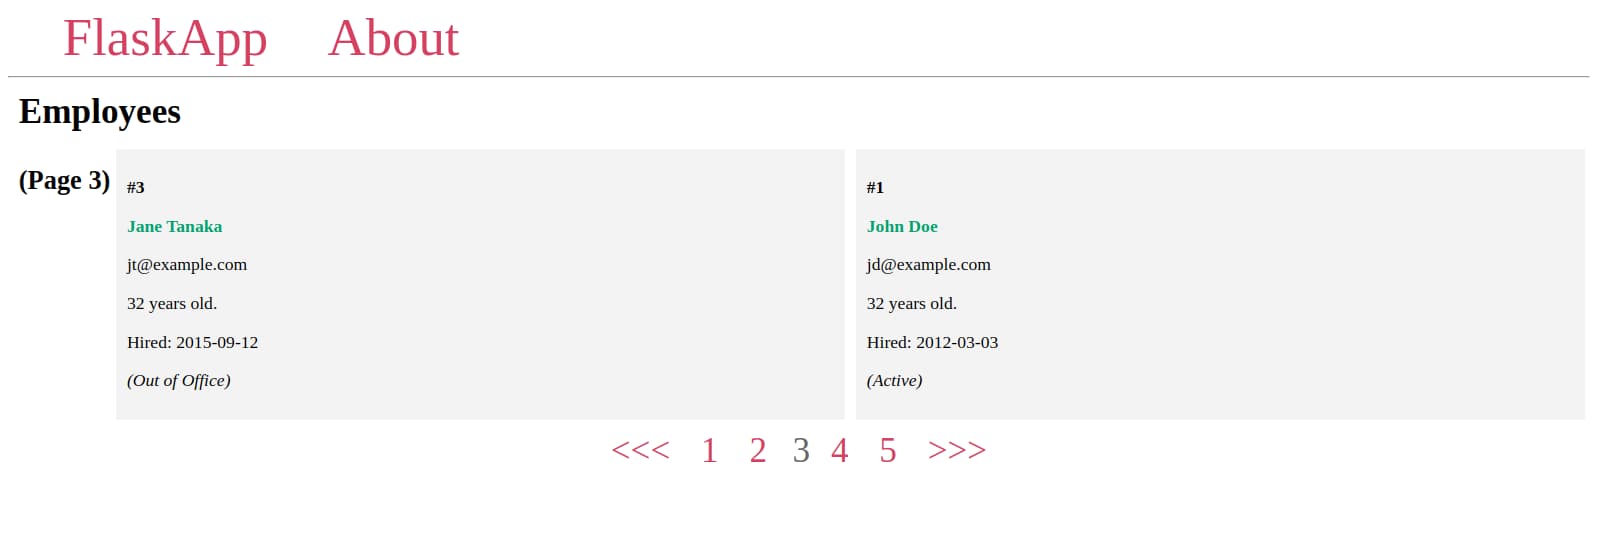
The pagination widget will look as follows:
To add it, open index.html:
- nano templates/index.html
Edit the file by adding the following highlighted div tag below the content div tag:
<div class="content">
    {% for employee in pagination.items %}
        <div class="employee">
            <p><b>#{{ employee.id }}</b></p>
            <b>
                <p class="name">{{ employee.firstname }} {{ employee.lastname }}</p>
            </b>
            <p>{{ employee.email }}</p>
            <p>{{ employee.age }} years old.</p>
            <p>Hired: {{ employee.hire_date }}</p>
            {% if employee.active %}
                <p><i>(Active)</i></p>
            {% else %}
                <p><i>(Out of Office)</i></p>
            {% endif %}
        </div>
    {% endfor %}
</div>

<div class="pagination">
    {% if pagination.has_prev %}
        <span>
            <a class='page-number' href="{{ url_for('index', page=pagination.prev_num) }}">
                {{ '<<<' }}
            </a>
        </span>
    {% endif %}

    {% for number in pagination.iter_pages() %}
        {% if pagination.page != number %}
            <span>
                    <a class='page-number'
                        href="{{ url_for('index', page=number) }}">
                    {{ number }}
                    </a>
            </span>
        {% else %}
            <span class='current-page-number'>{{ number }}</span>
        {% endif %}
    {% endfor %}

    {% if pagination.has_next %}
        <span>
            <a class='page-number'
                href="{{ url_for('index', page=pagination.next_num) }}">
                {{ '>>>' }}
            </a>
        </span>
    {% endif %}
</div>
Save and close the file.
Here, you use the condition if pagination.has_prev to add a <<< link to the previous page if the current page isn’t the first page. You link to the previous page using the url_for('index', page=pagination.prev_num) function call, in which you link to the index view function, passing the pagination.prev_num value to the page URL parameter.
To display links to all the available page numbers, you loop through the items of the pagination.iter_pages() method which gives you a page number on each loop.
You use the if pagination.page != number condition to see whether the current page number isn’t the same as the number in the current loop. If the condition is true, you link to the page to allow the user to change the current page to another page. Otherwise, if the current page is the same as the loop number, you display the number without a link. This allows users to know the current page number in the pagination widget.
Lastly, you use the pagination.has_next condition to see whether the current page has a next page, in which case you link to it using the url_for('index', page=pagination.next_num) call and a >>> link.
Navigate to the index page in your browser: http://127.0.0.1:5000/
You’ll see the pagination widget is fully functional:
Here, you use >>> for moving to the next page and <<< for the previous page, but you can also use any other characters you’d like, such as > and < or images in <img> tags.
You’ve displayed employees on multiple pages and learned how to handle pagination in Flask-SQLAlchemy. And you can now use your pagination widget on other Flask applications you build.
Conclusion
You used Flask-SQLAlchemy to create an employee management system. You queried a table and filtered results based on column values and simple and complex logical conditions. You ordered, counted, and limited query results. And you created a pagination system to display a certain number of records on each page in your web application, and navigate between pages.
You can use what you’ve learned in this tutorial in combination with concepts explained in some of our other Flask-SQLAlchemy tutorials to add more functionality to your employee management system:
- How to Use Flask-SQLAlchemy to Interact with Databases in a Flask Application to learn how to add, edit, or delete employees.
- How to Use One-to-Many Database Relationships with Flask-SQLAlchemy to learn how to use one-to-many relationships to create a department table to link each employee to the department they belong to.
- How To Use Many-to-Many Database Relationships with Flask-SQLAlchemy to learn how to use many-to-many relationships to create a
taskstable and link it to theemployeetable, where each employee has many tasks and each task is assigned to multiple employees.
If you would like to read more about Flask, check out the other tutorials in the How To Build Web Applications with Flask series.
Thanks for learning with the DigitalOcean Community. Check out our offerings for compute, storage, networking, and managed databases.
Tutorial Series: How To Build Web Applications with Flask

Flask is a lightweight Python web framework that provides useful tools and features for creating web applications in the Python Language. It gives developers flexibility and is an accessible framework for new developers because you can build a web application quickly using only a single Python file. Flask is also extensible and doesn’t force a particular directory structure or require complicated boilerplate code before getting started. Learning Flask will allow you to quickly create web applications in Python. You can take advantage of Python libraries to add advanced features to your web application, like storing your data in a database, or validating web forms.
Browse Series: 13 tutorials
About the author(s)
Web developer. I mostly use Python & JavaScript. I like Flask and I am currently learning React. You can say hi on Twitter :)
Editor at DigitalOcean, former book editor at Pragmatic, O'Reilly, and others. Occasional conference speaker. Highly nerdy.
Still looking for an answer?
 This work is licensed under a Creative Commons Attribution-NonCommercial- ShareAlike 4.0 International License.
Become a contributor for community
Get paid to write technical tutorials and select a tech-focused charity to receive a matching donation.

DigitalOcean Documentation
Full documentation for every DigitalOcean product.

Resources for startups and AI-native businesses
The Wave has everything you need to know about building a business, from raising funding to marketing your product.
The developer cloud
Scale up as you grow — whether you're running one virtual machine or ten thousand.

Start building today
From GPU-powered inference and Kubernetes to managed databases and storage, get everything you need to build, scale, and deploy intelligent applications.
