
The author selected the COVID-19 Relief Fund to receive a donation as part of the Write for DOnations program.
Introduction
Created by one of the founders of StackOverflow, Discourse is an open-source discussion platform. Discourse can power an online forum, a mailing list, a chat room, and more.
Discourse works well on a single Droplet using DigitalOcean’s one-click install, but as your community grows, it could outgrow a single Droplet. Using multiple Droplets provides your community with resiliency if one of your Droplets goes offline. Each Droplet also increases your bandwidth allowance. When using multiple Droplets, a Load Balancer can help scale your deployment and bring high-availability to your web app. Finally, a Managed Database instance ensures a consistent user experience across multiple Droplets.
After completing this tutorial, you will have a highly available, easily scalable Discourse deployment running on DigitalOcean. You’ll start with a fresh Ubuntu 20.04 Droplet and you’ll finish with a horizontally scalable Discourse installation that includes a Load Balancer, Managed PostgreSQL cluster, Redis instance (optional), and additional Droplets.
Prerequisites
To follow this tutorial, you will need:
- An Ubuntu 20.04 server with at least 2GB of RAM configured with a non-root user with
sudoprivileges and a firewall, which you can do by following the guide, Initial Server Setup with Ubuntu 20.04. - Discourse installed and configured on your server, which you can do by following the tutorial, How to Install Discourse on Ubuntu 20.04.
- A domain name whose DNS records are managed by DigitalOcean, which you can do by following the tutorial, How to Point to DigitalOcean Nameservers From Common Domain Registrars. When setting up Discourse on your server, be sure to use the main domain name and not a subdomain (for example, use
yoursite.comrather thandiscourse.yoursite.com). - Familiarity with Docker, which you can gain from the tutorial, The Docker Ecosystem: An Introduction to Common Components.
- Familiarity with Load Balancers, which you can find in our product documentation.
Step 1 — Adding a DigitalOcean Load Balancer to a Discourse Server
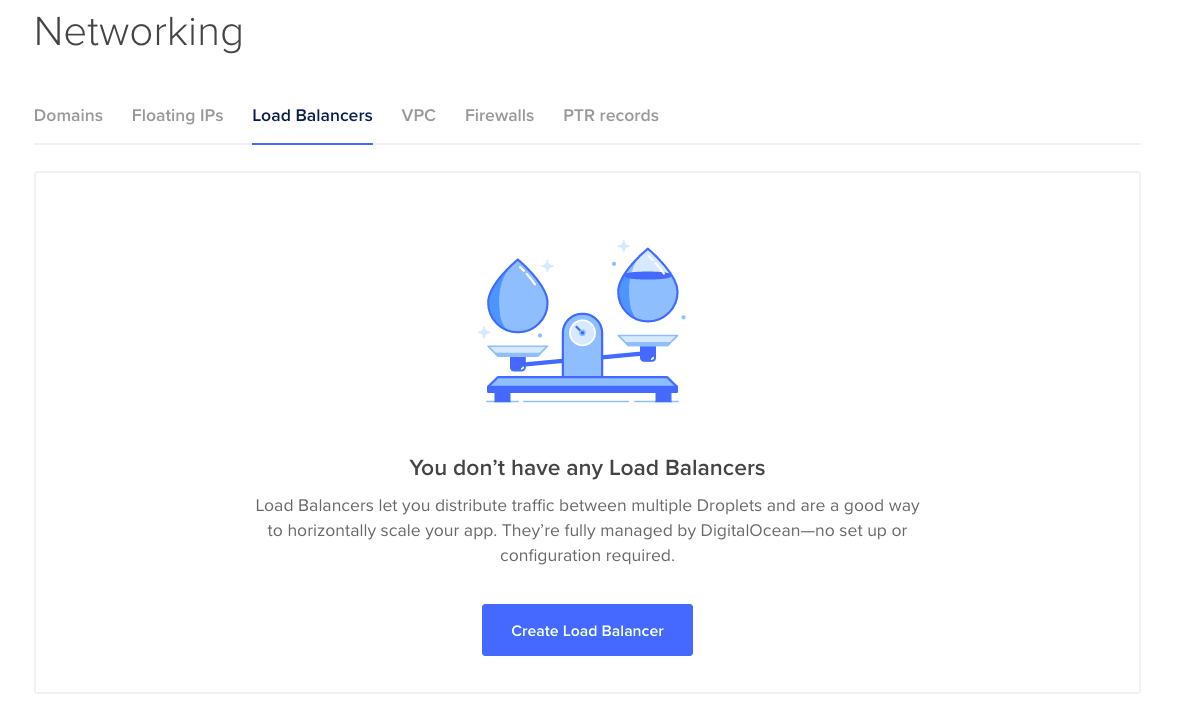
In this step, you will add a DigitalOcean Load Balancer to the Discourse server you created in the prerequisites. Access your DigitalOcean control panel, click Networking, then Load Balancers, and then click Create Load Balancer.
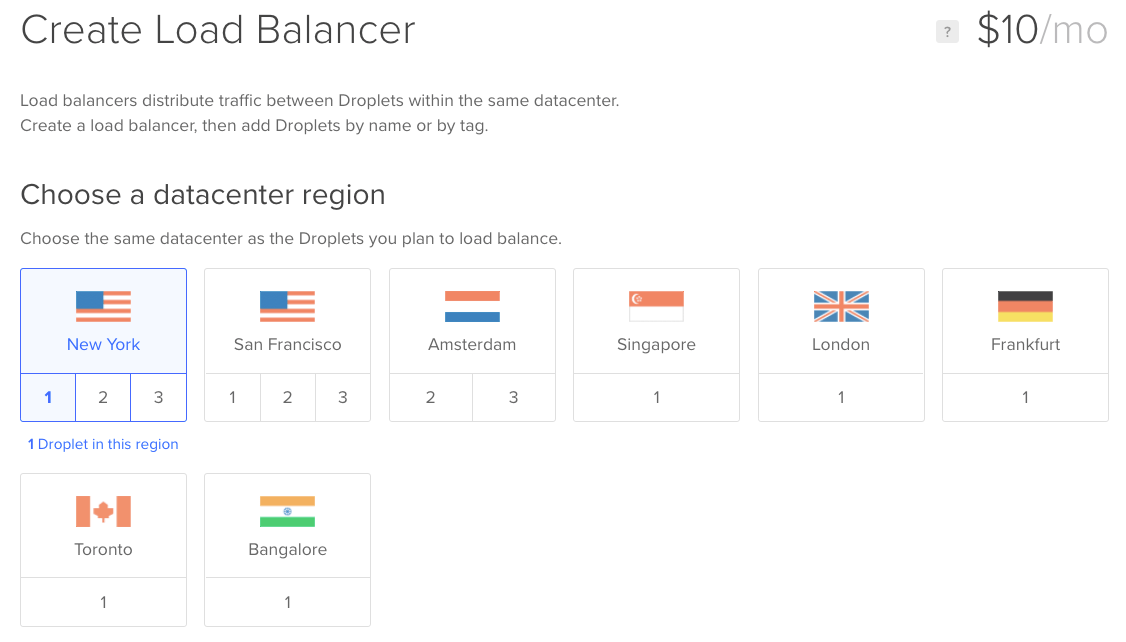
You’ll need to choose a datacenter region for your load balancer. Be sure to choose the same region you chose for your Discourse Droplet. Load Balancers communicate with your Droplet using its private network, so both your Droplet and Load Balancer need to be in the same region.
Next, add your Droplet to your Load Balancer by typing your Droplet’s name into the text field.

Discourse typically handles HTTPS for you by issuing a free Let’s Encrypt certificate during the installation process. However, when your Droplet is behind a Load Balancer, Let’s Encrypt won’t be able to renew your certificate because your domain’s IP address won’t match your Droplet’s IP.
Luckily, DigitalOcean Load Balancers can manage certificates for you. You just need to add a forwarding rule for HTTPS to your Load Balancer. A forwarding rule tells the Load Balancer to forward a specific kind of traffic to your Droplet.
Note: For more about forwarding rules, see the product documentation for Load Balancers.
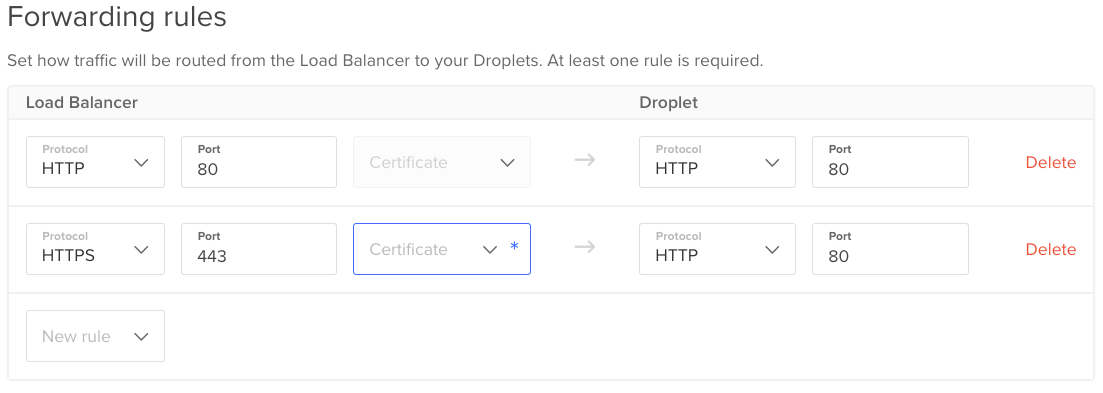
You need two forwarding rules, one for HTTP and one for HTTPS. By adding a forwarding rule for HTTPS, DigitalOcean can automatically generate and renew a certificate for you. HTTPS support is also imporant for security and your site’s SEO.
Since you added your domain to DigitalOcean as part of the prerequisites, adding HTTPS support takes just a few clicks. In the Forwarding rules section, add a new rule called HTTPS, which you can select from the dropdown list. Now click Certificate, then + New certificate.
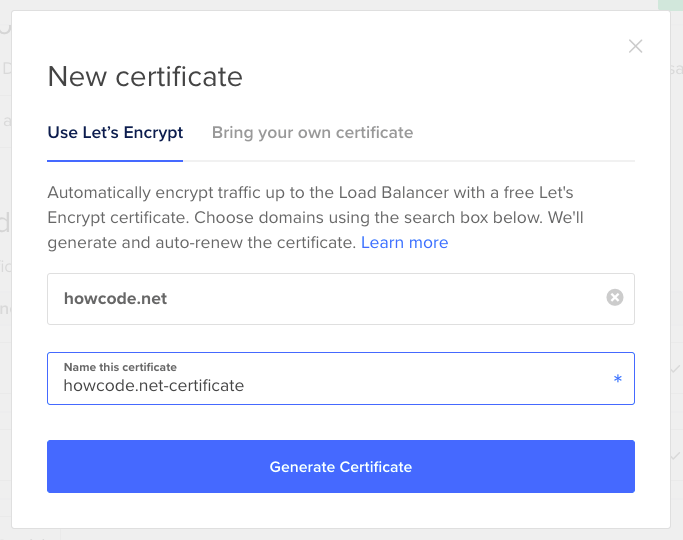
Type your domain name into the text field, which should auto-fill for you. Then give your certificate a name and click Generate Certificate to have DigitalOcean request and manage a certificate for you.
You’re almost done setting up your Load Balancer. Click the Edit Advanced Settings button and tick the box labeled Enable Proxy Protocol. When the PROXY protocol is enabled, the Load Balancer will forward client information like the user’s IP address to the Droplets behind the Load Balancer. Without the PROXY protocol, Discourse would think all its traffic came from a single user (the Load Balancer), and all the logs would show the Load Balancer’s IP address rather than the real IP addresses of your users.
Finally, choose a name for your Load Balancer and click Create Load Balancer.
Now that you’ve got a Load Balancer set up, you’ll need to modify your Discourse configuration files.
Step 2 — Modifying the Discourse Configuration Files
In this step, you will modify the default configuration files included with Discourse. SSH into your Droplet and move to the /var/discourse directory using this command:
- cd /var/discourse
Using nano or your favorite text editor, create and open a new file in the templates directory called loadbalancer.template.yml:
- sudo nano templates/loadbalancer.template.yml
The templates folder holds files for your Discourse configuration. Here, you’re adding a new custom template to enable PROXY protocol support for your Discourse installation.
In loadbalancer.template.yml, insert the following lines:
run:
  - exec: "sed -i 's:listen 80: listen 80 proxy_protocol:g' /etc/nginx/conf.d/discourse.conf"
  - exec: "sed -i 's:$remote_addr:$proxy_protocol_addr:g' /etc/nginx/conf.d/discourse.conf"
  - exec: "sed -i 's:X-Forwarded-For $proxy_add_x_forwarded_for:X-Forwarded-For $proxy_protocol_addr:g' /etc/nginx/conf.d/discourse.conf"
The first line modifies the Discourse Nginx configuration to enable support for the PROXY protocol. Discourse will return a server error if PROXY protocol is enabled on the Load Balancer but not in Nginx.
The second line performs a find and replace, replacing all occurrences of $remote_addr with $proxy_protocol_addr. $proxy_protocol_addr contains the IP address of the client, forwarded from the Load Balancer. $remote_addr normally shows the user’s IP address but because Discourse is behind a Load Balancer, it will show the Load Balancer’s IP address.
The final line replaces all occurrences of X-Forwarded-For $proxy_add_x_forwarded_for with X-Forwarded-For $proxy_protocol_addr, ensuring the X-Forwarded-For header correctly records the client IP address and not the IP address of the Load Balancer.
Save and close the file by pressing CTRL+X followed by y.
The last thing you need to do is load the template into Discourse and rebuild Discourse.
Using nano or your favorite text editor, edit the file called app.yml in the containers directory:
- sudo nano containers/app.yml
First, you’ll add the template you just created. Under templates, add the highlighted line as shown:
templates:
  - "templates/postgres.template.yml"
  - "templates/redis.template.yml"
  - "templates/web.template.yml"
  - "templates/web.ratelimited.template.yml"
  - "templates/loadbalancer.template.yml"
Be sure to add the new template on a line below templates/web.template.yml.
Next, make sure the two lines web.ssl.template.yml and templates/web.letsencrypt.ssl.template.yml are both commented out by adding a pound sign [#] as shown:
templates:
  - "templates/postgres.template.yml"
  - "templates/redis.template.yml"
  - "templates/web.template.yml"
  - "templates/web.ratelimited.template.yml"
  - "templates/loadbalancer.template.yml"
## Uncomment these two lines if you wish to add Lets Encrypt (https)
#  - "templates/web.ssl.template.yml"
#  - "templates/web.letsencrypt.ssl.template.yml"
Finally, go down a few lines until you see expose. Comment out the line - "443:443" # https by adding a pound sign [#] as shown:
...
expose:
  - "80:80"   # http
# - "443:443" # https
HTTPS will now be disabled on Discourse when you rebuild Discourse. The HTTPS connection terminates at the Load Balancer and the Load Balancer communicates with your Droplet over DigitalOcean’s secure private network, so you don’t need HTTPS set up on your Discourse server directly.
Save and close the file by pressing CTRL+X followed by y.
To apply the configuration and rebuild Discourse, run the following command:
- sudo ./launcher rebuild app
This command requires super-user privileges, which is why it’s prepended with sudo.
At this point, you’ve finished configuring Discourse and your Load Balancer. Next, you’ll point your domain name to the IP address of the Load Balancer.
Step 3 — Updating Your DNS
In this step, you’ll point your domain to the Load Balancer’s IP address instead of the Droplet’s IP address.
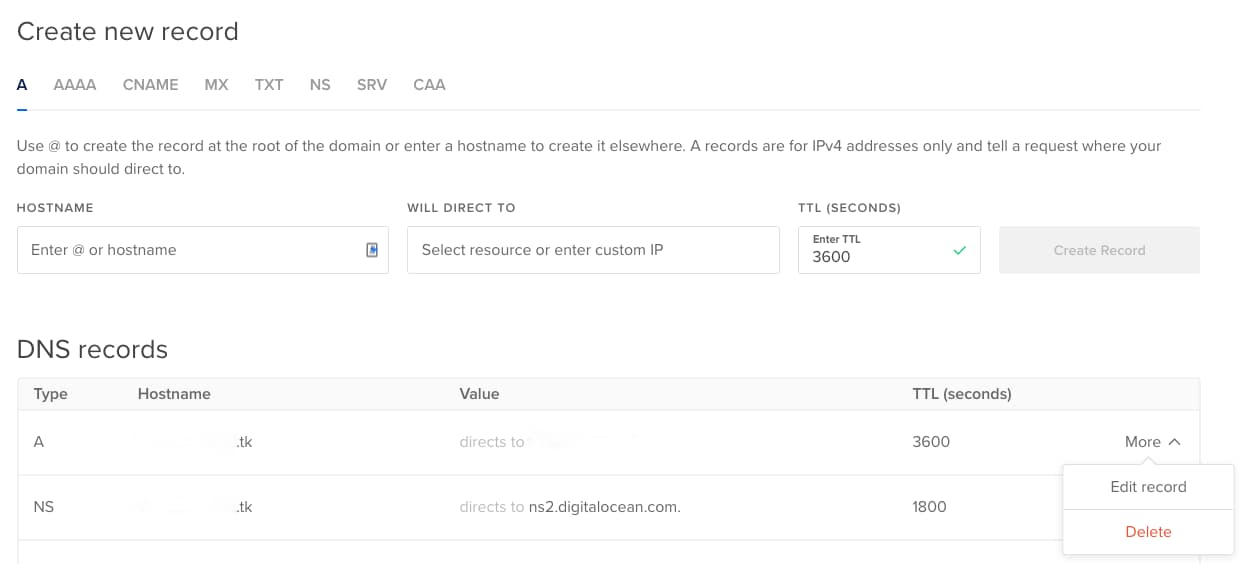
If you’re using DigitalOcean’s DNS hosting, go to the Control Panel and click Networking. Click on your domain name, then look for the A record that points to your Droplet. Select the record’s More menu to modify the record. Change this record’s value from your Droplet’s IP address to your Load Balancer’s IP address.
Your Discourse server will be running behind a DigitalOcean Load Balancer, and you won’t have to manage your own SSL certificates because DigitalOcean will do it for you.
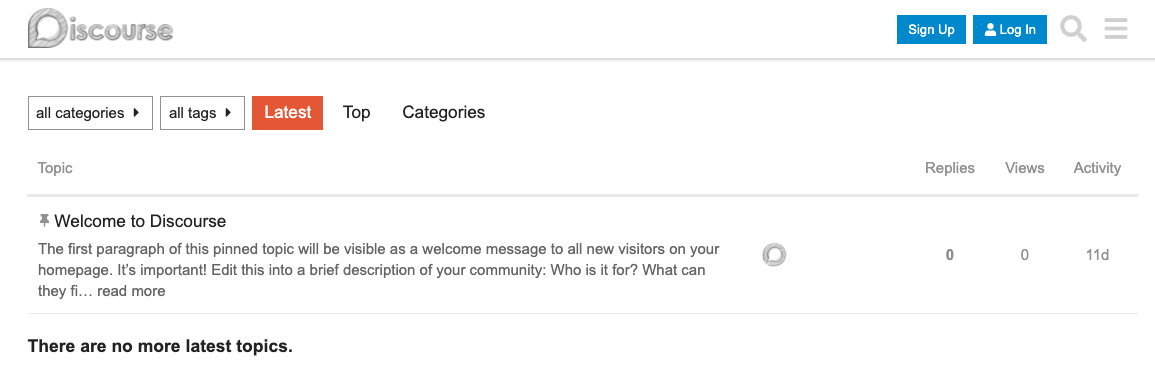
Test your Discourse installation is working by visiting your domain name. You should see a page that looks similar to this:
Now that your domain points to the Load Balancer, you’ll add a managed database instance to create a consistent experience for your users.
Step 4 — Adding a Managed DigitalOcean Database
In this step, you’ll create a DigitalOcean Managed PostgreSQL instance and add it to your Discourse deployment.
The main advantage of a Load Balancer is to divide your traffic between multiple Droplets. Until now, your database, Redis server, and web server have all been running on a single Droplet. If you add a second Discourse instance, it will have its own database, Redis server, and web server, and will act like a completely different website. Your visitors may feel like they’re going to other websites with different posts and users because they’ll be connected to different databases. You can solve this problem by using one of DigitalOcean’s Managed PostgreSQL instances, rather than having a separate database run on each Discourse Droplet.
Setup a DigitalOcean Managed PostgreSQL instance by going to the DigitalOcean control panel. Click Databases, then Create Database Cluster, finally choose PostgresSQL, set the region to match your Droplet’s location, and click Create a Database Cluster.
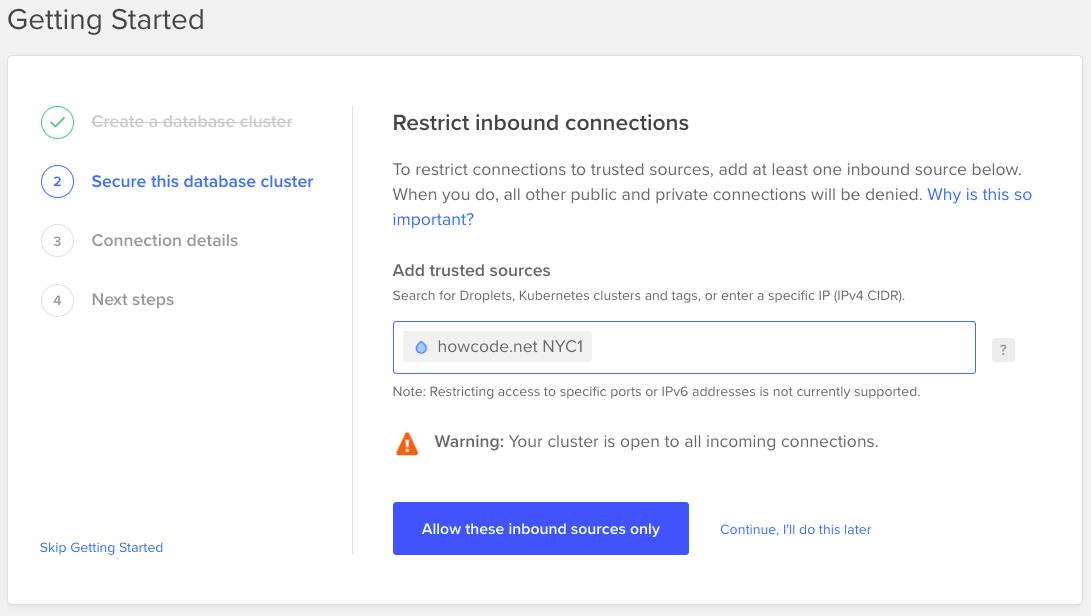
While your database is provisioning, add your Droplet as a trusted source to your database. This will allow your Droplet to communicate with your database using DigitalOcean’s secure private network.
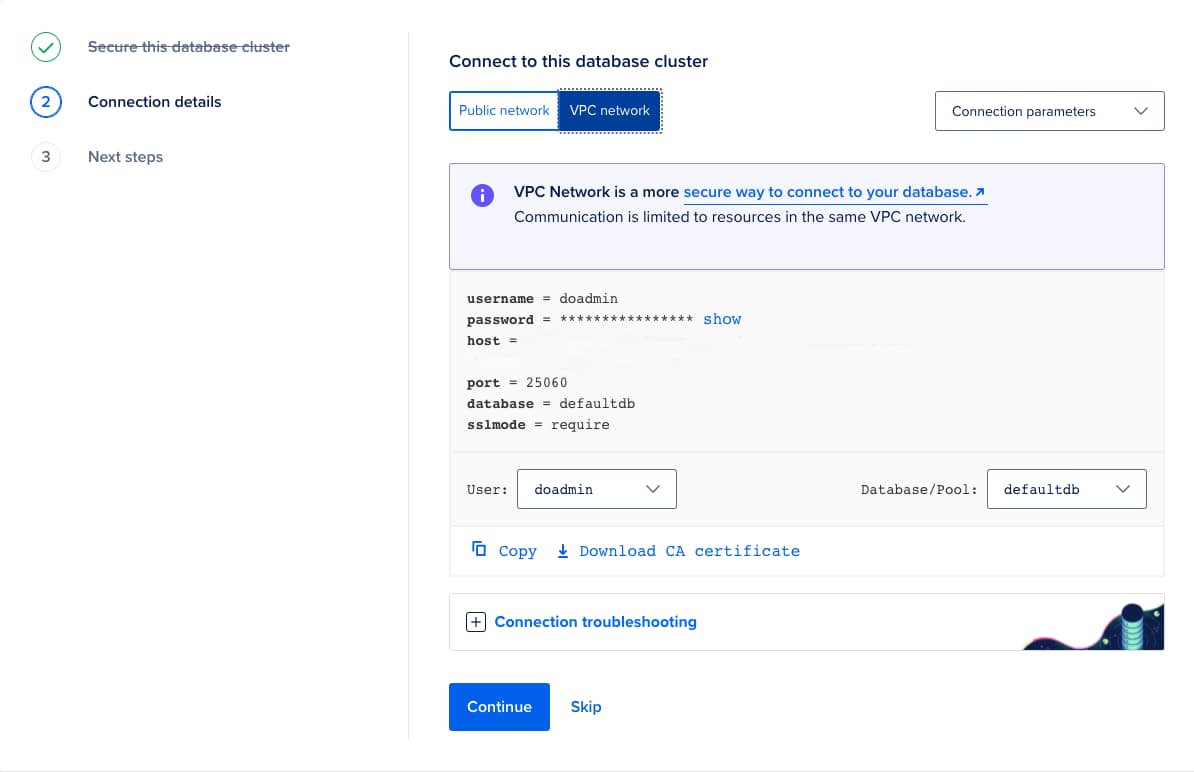
On the next screen choose VPC Network and note the values for database host, username, password, and port, as you’ll need to add these to your containers/app.yml file.
Once your database cluster is created, you’ll need to update the configuration for Discourse. Open containers/app.yml:
- sudo nano containers/app.yml
In the templates section, comment out the line - templates/postgres.template.yml as shown:
templates:
# - "templates/postgres.template.yml"
  - "templates/redis.template.yml"
  - "templates/web.template.yml"
  - "templates/web.ratelimited.template.yml"
  - "templates/loadbalancer.template.yml"
This prevents Discourse from provisioning its own Postgres server when it’s rebuilt.
Next, look for the env section of containers/app.yml and add the lines below, replacing the values with your own values for database username, password, host, name, and port.
env:
    DISCOURSE_DB_USERNAME: your_db_username
    DISCOURSE_DB_PASSWORD: your_db_password
    DISCOURSE_DB_HOST: your_db_host
    DISCOURSE_DB_NAME: your_db_name
    DISCOURSE_DB_PORT: your_db_port
These extra variables allow your Droplet to connect to your external database.
Save the file by pressing CTRL+X followed by y.
If you have a pre-existing Discourse installation, you should export it as a backup. You can do that by going to your site’s admin area, clicking Backups, and then clicking Backup.
Note: For more information about backing up and restoring your site, please see the Discourse product documentation, Move Your Discourse Instance to a Different Server.
To apply the configuration and rebuild Discourse, run the following command:
- sudo ./launcher rebuild app
Even if you exported your site, you’ll have to go through the Discourse web installation again to create a new admin account. You can then use this account to restore Discourse now that you’re connected to your new database.
Finally, you’ll change one setting to ensure users stay on the same Droplet while visiting the site.
Go back to your Load Balancer’s settings in the DigitalOcean control panel. Go to Networking, then Load Balancers, then Settings, and look for Sticky Sessions. Click Edit.
Change Sticky Sessions from none to Cookie and click Save.
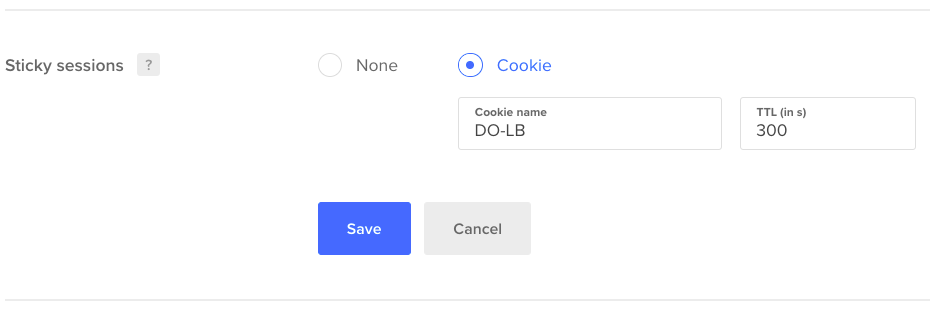
Sticky Sessions ensure each user who visits your website through your Load Balancer stays connected to the same Droplet for the duration of their visit. This is important because each Droplet still has its own Redis instance and Redis is how Discourse keeps track of a user when they’re logged in. Without Sticky Sessions, a user could log in on one Droplet, then visit a new page and (unknown to them) be swapped to the other Droplet they aren’t logged in on. Sticky Sessions prevents this by keeping the user on the same Droplet.
As we did with the database, you could move Redis to its own dedicated instance, and then you wouldn’t need Sticky Sessions. You can try this out in the next step.
Step 5 — (Optional) Adding a DigitalOcean Managed Redis Instance
This step is optional and requires a DigitalOcean Managed Redis instance. Until this point, the Redis instance was baked into the Droplet behind the Load Balancer, which requires Sticky Sessions to make sure users stay logged in. If a Droplet goes down, the Load Balancer will share users among your remaining Droplets. However, in the previous set up, users would be logged out once they switched Droplets because their session information is stored on the Droplet.
Adding a Redis server external to the Droplets can address this problem. This would effectively move Discourse’s state away from your Droplets. If a Droplet goes offline, your users won’t be logged out — in fact, they won’t even notice.
You can set up a DigitalOcean managed Redis server the same way you created your managed PostgreSQL database. Go to the DigitalOcean control panel. Click Databases, then Create, then Database, and choose Redis for your database engine. Select the same region as your other resources to ensure they will be on the same VPC network. Give your server a name and click Create a database cluster.
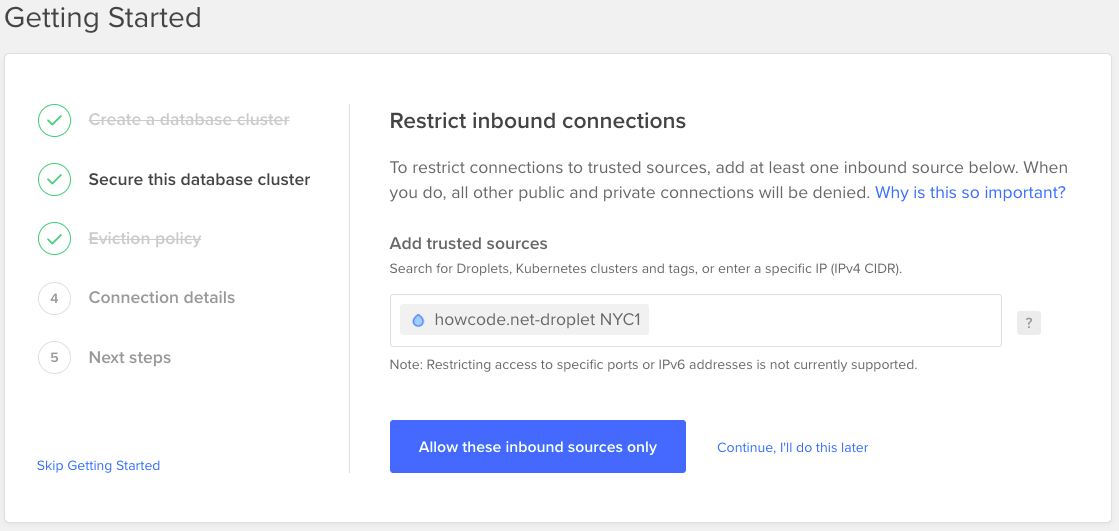
Just like when creating your Postgres database, you’ll see a welcome screen with some Getting Started steps. Click Secure this database cluster, enter the name of your Droplet, and then click Allow these inbound sources only. This ensures only your Droplet can connect to Redis.
Now you need to choose the eviction policy for your Redis server. Choose allkeys-lru. This policy means if your Redis server fills up, it will start deleting its oldest entries. This will log out users who haven’t used your website in a while, but it’s better than having Redis return errors and stop working.

Save your eviction policy. Like your PostgreSQL database, on the Connection details screen, choose VPC network.
Once the Redis instance has been created, you’ll need to update your Discourse configuration. Open containers/app.yml using nano:
- sudo nano containers/app.yml
Add the Redis connection details into the env section as shown here. Be sure to replace the highlighted text with your own information. (You don’t need to include the username field.)
env:
    DISCOURSE_REDIS_HOST: your_redis_host
    DISCOURSE_REDIS_PASSWORD: your_redis_password
    DISCOURSE_REDIS_PORT: your_redis_port
    DISCOURSE_REDIS_USE_SSL: true
Next, in the templates section, comment out the line - templates/redis.template.yml as shown:
templates:
# - "templates/postgres.template.yml"
# - "templates/redis.template.yml"
  - "templates/web.template.yml"
  - "templates/web.ratelimited.template.yml"
  - "templates/loadbalancer.template.yml"
This prevents Discourse from creating its own Redis instance.
Save and close the file by pressing CTRL+X followed by y.
To apply the configuration and rebuild Discourse, run the following command:
- sudo ./launcher rebuild app
With a managed Redis instance, you don’t need Sticky Sessions anymore. You can turn off that option if you’d like, but your users won’t notice a difference either way.
Now that you’ve added managed databases to your configuration, you’ll create snapshots of your Discourse server to add more Droplets.
Step 6 — Adding Extra Droplets
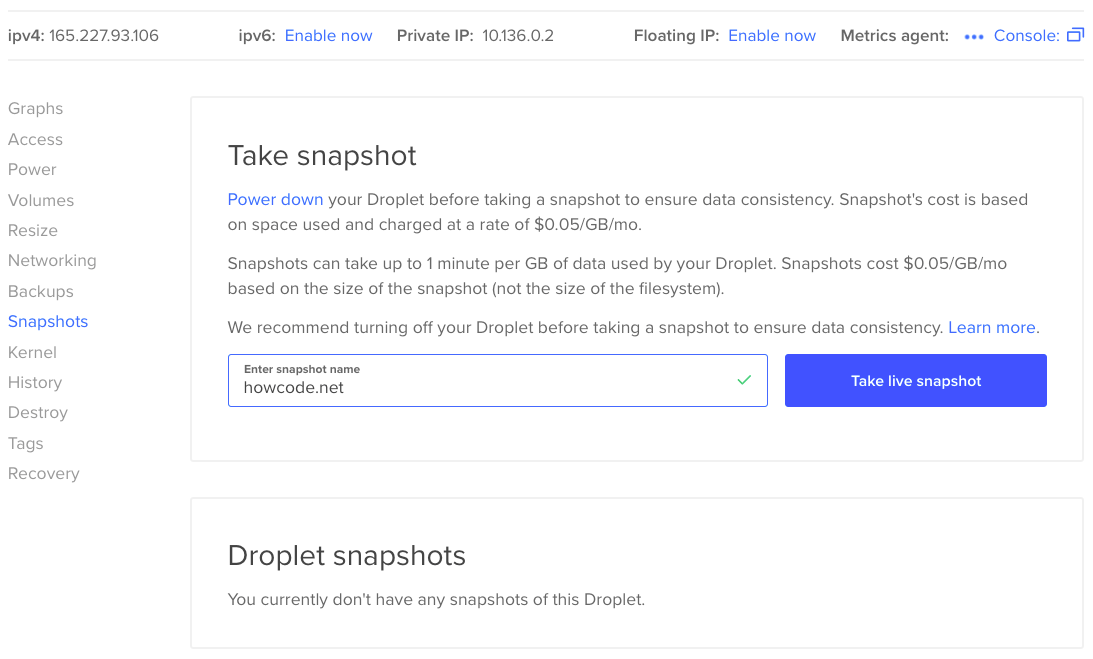
In this step, you’ll create a snapshot of your Discourse Droplet, which makes creating new servers easier to do. A snapshot provides a full copy of an existing Droplet, and you can use them to create new Droplets with the same contents.
Create a new snapshot by going to the DigitalOcean control panel. Click Droplets, find your Droplet, and click Snapshots. Give your snapshot a name and click Take live snapshot.
You can use this snapshot to add extra Droplets behind your Load Balancer and increase the capacity of your website.
Each time you create a new Droplet, you’ll need to update the trusted sources on your Postgres and Redis servers, which you can do through the Control Panel. As you did in a previous step, select the database instance you’d like to modify, go to Overview, and then Secure this database cluster. Add your new Droplet IP addresses to the list of trusted sources.
In this step, you used a Snapshot to create additional Droplets, and added them as trusted sources to your PostgreSQL and Redis instances.
Conclusion
In this tutorial, you set up a Discourse server behind a DigitalOcean Load Balancer. To help scale your deployment, you also added a Managed PostgreSQL Database and Managed Redis instance. Finally, using snapshots and the Control Panel, you added more Droplets. Using the Control Panel, you can add more resources as your community grows.
Now you’ve set up a Load Balancer, you could explore other use cases for DigitalOcean Load Balancers, like Canary Deployments. You could also try connecting to your Redis instance using the command line by following the tutorial, How To Connect to a Managed Redis Instance over TLS with Stunnel and redis-cli. Finally, you can also learn more about DigitalOcean’s databases and their performance with Managed Databases Documentation and the tutorial, Managed Databases Connection Pools and PostgreSQL Benchmarking Using pgbench.
Thanks for learning with the DigitalOcean Community. Check out our offerings for compute, storage, networking, and managed databases.
About the author(s)
Still looking for an answer?
This textbox defaults to using Markdown to format your answer.
You can type !ref in this text area to quickly search our full set of tutorials, documentation & marketplace offerings and insert the link!
As someone who loves Digital Ocean and is a full-time Discourse consultant, I’ll say that these instructions will be hard to use and are unlikely to lead to a site that is broken and hard to diagnose. And you won’t be able to get help at meta.discourse.org.
If you have multiple redis servers as suggested, your site won’t work reliablly. Do not attempt this without an external redis that all Discourse servers use. Things will be broken in ways that will be difficult to track down or explain. Redis is used for lots more than just keeping up with who is logged in.
If you attempt this, you must first see that all of your assets are on S3. Otherwise, uploads will be split between each of your servers and will be accessible only for those lucky enough to be using the same server that the person who uploaded the image (or whatever) was using. I didn’t see any mention of this, so if you follow these instructions your uploads will be split across multiple droplets which will require a bunch of work.
You also will want to see that each of your Discourse instances is pinned to using the same commit. If you follow a standard installation and are running tests-passed, there is a good chance that your servers will all be running different versions of Discourse. Sometimes it won’t matter much, but others, you might be really unlucky and have two versions that expect a different database migration. Plugins are updated less frequently, but you’d really want to see that each of them is pinned to the same commit as well if you want to count on this working.
If you have under 200K page views per day a 8GB droplet with a CDN will be more reliable, easier to set up, and a good deal cheaper. If you have a site big enough to need this, you’ll need at least 4GB of RAM for your database, which is already close to the price of a 8GB droplet. However, there could be good reasons to use an external database even if you do wish to use an external database.
Here is what a senior engineer at Discourse.org has to say: https://meta.discourse.org/t/problems-with-patreon-login-force-https-and-s3-cdn-three-issues/223144/3?u=pfaffman
Very interesting article. I am currently designing the exact same architecture with another clouder. There is a thing I did not see in your solution : discourse drops uploaded images on filesystem. So if you deploy several webservers, you should use a shared filesystem. Otherwise some users will randomly see or not images. The same shared filesystem could be used to define discourse configuration.
 This work is licensed under a Creative Commons Attribution-NonCommercial- ShareAlike 4.0 International License.
Become a contributor for community
Get paid to write technical tutorials and select a tech-focused charity to receive a matching donation.

DigitalOcean Documentation
Full documentation for every DigitalOcean product.

Resources for startups and AI-native businesses
The Wave has everything you need to know about building a business, from raising funding to marketing your product.
The developer cloud
Scale up as you grow — whether you're running one virtual machine or ten thousand.

Start building today
From GPU-powered inference and Kubernetes to managed databases and storage, get everything you need to build, scale, and deploy intelligent applications.
