
Introduction
Node.js is an open source Javascript runtime environment for easily building server-side and networking applications. The platform runs on Linux, OS X, FreeBSD, and Windows, and its applications are written in JavaScript. Node.js applications can be run at the command line but we will teach you how to run them as a service, so they will automatically restart on reboot or failure, so you can use them in a production environment.
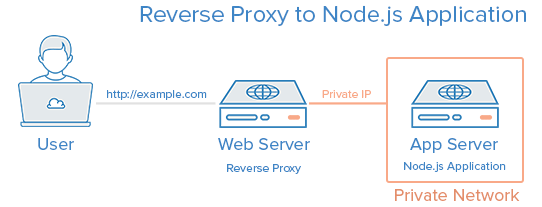
In this tutorial, we will cover setting up a production-ready Node.js environment that is composed of two Ubuntu 14.04 servers; one server will run Node.js applications managed by PM2, while the other will provide users with access to the application through an Nginx reverse proxy to the application server.
The CentOS version of this tutorial can be found here.
Prerequisites
This guide uses two Ubuntu 14.04 servers with private networking (in the same datacenter). We will refer to them by the following names:
- app: The server where we will install Node.js runtime, your Node.js application, and PM2
- web: The server where we will install the Nginx web server, which will act as a reverse proxy to your application. Users will access this server’s public IP address to get to your Node.js application.
It is possible to use a single server for this tutorial, but you will have to make a few changes along the way. Simply use the localhost IP address, i.e. 127.0.0.1, wherever the app server’s private IP address is used.
Here is a diagram of what your setup will be after following this tutorial:
Before you begin this guide, you should have a regular, non-root user with sudo privileges configured on both of your servers–this is the user that you should log in to your servers as. You can learn how to configure a regular user account by following steps 1-4 in our initial server setup guide for Ubuntu 14.04.
If you want to be able to access your web server via a domain name, instead of its public IP address, purchase a domain name then follow these tutorials:
- How To Set Up a Host Name with DigitalOcean
- How to Point to DigitalOcean Nameservers From Common Domain Registrars
Let’s get started by installing the Node.js runtime on the app server.
Install Node.js
We will install the latest LTS release of Node.js, on the app server.
On the app server, let’s update the apt-get package lists with this command:
Then use apt-get to install the git package, which npm depends on:
Go to the Node.js Downloads page and find the Linux Binaries (.tar.xz) download link. Right-click it, and copy its link address to your clipboard. At the time of this writing, the latest LTS release is 4.2.3. If you prefer to install the latest stable release of Node.js, go to the appropriate page and copy that link.
Change to your home directory and download the Node.js source with wget. Paste the download link in place of the highlighted part:
Now extract the tar archive you just downloaded into the node directory with these commands:
If you want to delete the Node.js archive that you downloaded, since we no longer need it, change to your home directory and use this rm command:
Next, we’ll configure the global prefix of npm, where npm will create symbolic links to installed Node packages, to somewhere that it’s in your default path. We’ll set it to /usr/local with this command:
Now we’re ready to move the node and npm binaries to our installation location. We’ll move it into /opt/node with this command:
At this point, you may want to make root the owner of the files:
Lastly, let’s create symbolic links of the node and npm binaries in your default path. We’ll put the links in /usr/local/bin with these commands:
Verify that Node is installed by checking its version with this command:
The Node.js runtime is now installed, and ready to run an application! Let’s write a Node.js application.
Create Node.js Application
Now we will create a Hello World application that simply returns “Hello World” to any HTTP requests. This is a sample application that will help you get your Node.js set up, which you can replace it with your own application–just make sure that you modify your application to listen on the appropriate IP addresses and ports.
Because we want our Node.js application to serve requests that come from our reverse proxy server, web, we will utilize our app server’s private network interface for inter-server communication. Look up your app server’s private network address.
If you are using a DigitalOcean droplet as your server, you may look up the server’s private IP address through the Metadata service. On the app server, use the curl command to retrieve the IP address now:
You will want to copy the output (the private IP address), as it will be used to configure our Node.js application.
Hello World Code
Next, create and open your Node.js application for editing. For this tutorial, we will use vi to edit a sample application called hello.js:
Insert the following code into the file, and be sure to substitute the app server’s private IP address for both of highlighted APP_PRIVATE_IP_ADDRESS items. If you want to, you may also replace the highlighted port, 8080, in both locations (be sure to use a non-admin port, i.e. 1024 or greater):
var http = require('http');
http.createServer(function (req, res) {
  res.writeHead(200, {'Content-Type': 'text/plain'});
  res.end('Hello World\n');
}).listen(8080, 'APP_PRIVATE_IP_ADDRESS');
console.log('Server running at http://APP_PRIVATE_IP_ADDRESS:8080/');
Now save and exit.
This Node.js application simply listens on the specified IP address and port, and returns “Hello World” with a 200 HTTP success code. This means that the application is only reachable from servers on the same private network, such as our web server.
Test Application (Optional)
If you want to test if your application works, run this node command on the app server:
Note: Running a Node.js application in this manner will block additional commands until the application is killed by pressing CTRL+C.
In order to test the application, open another terminal session and connect to your web server. Because the web server is on the same private network, it should be able to reach the private IP address of the app server using curl. Be sure to substitute in the app server’s private IP address for APP_PRIVATE_IP_ADDRESS, and the port if you changed it:
If you see the following output, the application is working properly and listening on the proper IP address and port:
Output:Hello World
If you do not see the proper output, make sure that your Node.js application is running, and configured to listen on the proper IP address and port.
On the app server, be sure to kill the application (if you haven’t already) by pressing CTRL+C.
Install PM2
Now we will install PM2, which is a process manager for Node.js applications. PM2 provides an easy way to manage and daemonize applications (run them as a service).
We will use Node Packaged Modules (NPM), which is basically a package manager for Node modules that installs with Node.js, to install PM2 on our app server. Use this command to install PM2:
Manage Application with PM2
PM2 is simple and easy to use. We will cover a few basic uses of PM2.
Start Application
The first thing you will want to do is use the pm2 start command to run your application, hello.js, in the background:
This also adds your application to PM2’s process list, which is outputted every time you start an application:
Output:┌──────────┬────┬──────┬──────┬────────┬───────────┬────────┬────────────┬──────────┐
│ App name │ id │ mode │ PID  │ status │ restarted │ uptime │     memory │ watching │
├──────────┼────┼──────┼──────┼────────┼───────────┼────────┼────────────┼──────────┤
│ hello    │ 0  │ fork │ 5871 │ online │         0 │ 0s     │ 9.012 MB   │ disabled │
└──────────┴────┴──────┴──────┴────────┴───────────┴────────┴────────────┴──────────┘
As you can see, PM2 automatically assigns an App name (based on the filename, without the .js extension) and a PM2 id. PM2 also maintains other information, such as the PID of the process, its current status, and memory usage.
Applications that are running under PM2 will be restarted automatically if the application crashes or is killed, but an additional step needs to be taken to get the application to launch on system startup (boot or reboot). Luckily, PM2 provides an easy way to do this, the startup subcommand.
The startup subcommand generates and configures a startup script to launch PM2 and its managed processes on server boots. You must also specify the platform you are running on, which is ubuntu, in our case:
The last line of the resulting output will include a command (that must be run with superuser privileges) that you must run:
Output:[PM2] You have to run this command as root
[PM2] Execute the following command :
[PM2] sudo su -c "env PATH=$PATH:/opt/node/bin pm2 startup ubuntu -u sammy --hp /home/sammy"
Run the command that was generated (similar to the highlighted output above) to set PM2 up to start on boot (use the command from your own output):
Other PM2 Usage (Optional)
PM2 provides many subcommands that allow you to manage or look up information about your applications. Note that running pm2 without any arguments will display a help page, including example usage, that covers PM2 usage in more detail than this section of the tutorial.
Stop an application with this command (specify the PM2 App name or id):
Restart an application with this command (specify the PM2 App name or id):
The list of applications currently managed by PM2 can also be looked up with the list subcommand:
More information about a specific application can be found by using the info subcommand (specify the PM2 App name or id)::
The PM2 process monitor can be pulled up with the monit subcommand. This displays the application status, CPU, and memory usage:
Now that your Node.js application is running, and managed by PM2, let’s set up the reverse proxy.
Set Up Reverse Proxy Server
Now that your application is running, and listening on a private IP address, you need to set up a way for your users to access it. We will set up an Nginx web server as a reverse proxy for this purpose. This tutorial will set up an Nginx server from scratch. If you already have an Nginx server setup, you can just copy the location block into the server block of your choice (make sure the location does not conflict with any of your web server’s existing content).
On the web server, let’s update the apt-get package lists with this command:
Then install Nginx using apt-get:
Now open the default server block configuration file for editing:
Delete everything in the file and insert the following configuration. Be sure to substitute your own domain name for the server_name directive (or IP address if you don’t have a domain set up), and the app server private IP address for the APP_PRIVATE_IP_ADDRESS. Additionally, change the port (8080) if your application is set to listen on a different port:
server {
    listen 80;

    server_name example.com;

    location / {
        proxy_pass http://APP_PRIVATE_IP_ADDRESS:8080;
        proxy_http_version 1.1;
        proxy_set_header Upgrade $http_upgrade;
        proxy_set_header Connection 'upgrade';
        proxy_set_header Host $host;
        proxy_cache_bypass $http_upgrade;
    }
}
This configures the web server to respond to requests at its root. Assuming our server is available at example.com, accessing http://example.com/ via a web browser would send the request to the application server’s private IP address on port 8080, which would be received and replied to by the Node.js application.
You can add additional location blocks to the same server block to provide access to other applications on the same web server. For example, if you were also running another Node.js application on the app server on port 8081, you could add this location block to allow access to it via http://example.com/app2:
    location /app2 {
        proxy_pass http://APP_PRIVATE_IP_ADDRESS:8081;
        proxy_http_version 1.1;
        proxy_set_header Upgrade $http_upgrade;
        proxy_set_header Connection 'upgrade';
        proxy_set_header Host $host;
        proxy_cache_bypass $http_upgrade;
    }
Once you are done adding the location blocks for your applications, save and exit.
On the web server, restart Nginx:
Assuming that your Node.js application is running, and your application and Nginx configurations are correct, you should be able to access your application via the reverse proxy of the web server. Try it out by accessing your web server’s URL (its public IP address or domain name).
Conclusion
Congratulations! You now have your Node.js application running behind an Nginx reverse proxy on Ubuntu 14.04 servers. This reverse proxy setup is flexible enough to provide your users access to other applications or static web content that you want to share. Good luck with your Node.js development!
Also, if you are looking to encrypt transmissions between your web server and your users, here is a tutorial that will help you get HTTPS (TLS/SSL) support set up.
Thanks for learning with the DigitalOcean Community. Check out our offerings for compute, storage, networking, and managed databases.
About the author
Software Engineer @ DigitalOcean. Former Señor Technical Writer (I no longer update articles or respond to comments). Expertise in areas including Ubuntu, PostgreSQL, MySQL, and more.
Still looking for an answer?
This textbox defaults to using Markdown to format your answer.
You can type !ref in this text area to quickly search our full set of tutorials, documentation & marketplace offerings and insert the link!
What could be the reason I’m getting the error EADDRNOTAVAIL when executing
node hello.js ?
If we are using nginx here, maybe we can use some additional cache settings? So nginx can serve all static files, and node will wake up only for executing some logic.
If I want to run my node.js app across 3 nodes with multi-core processors, PM2 can help me achieve that? I know PM2 helps me run my app across a single server with multi-core support, but if I have more nodes, Can I use PM2 or need a load-balancer like Haproxy or Nginx Proxy?
Digital Oceans always on top of their game. I have been using Monit and Upstart directly, but this seems like a quicker alternative. Thanks.
What are the advantages of suing PM2 vs using something like nodejs forever + nohup?
Great tutorial, but why you are not using NPM to install node instead? @manicas Secondly, if we are using only a single server to be APP and WEB, what would it affect?
hi Please could you tell me … Is it Ok (good ?) to use for creating the app server the image “Node -v 0.12 on 14.04” provided under the *“Create Droplet -Application” * menu ?
Hi! i have this:
g++: internal compiler error: Killed (program cc1plus) Please submit a full bug report, with preprocessed source if appropriate. See <file:///usr/share/doc/gcc-4.8/README.Bugs> for instructions. make[1]: *** [/root/node-v0.12.0/out/Release/obj.target/v8_base/deps/v8/src/api.o] Error 4 make[1]: Leaving directory `/root/node-v0.12.0/out’ make: *** [node] Error 2
What happened?
Wonderful stuff! Question is how can I prevent directory browsing of my root folder when running my app in Ubuntu? Can nginx help me save my world in this case? if I run my web server on port 8000 and my rest api on 8001 how can nginx help me start both in one command :(
Just create a separate server block for each app (listening port). Check out this tutorial: How To Set Up Nginx Server Blocks
@manicas I’m kind of confused on what the following do to the HTTP headers:
What is HTTP Upgrade? How does that have to do with reverse proxy?
This was a really excellent guide, just the info I needed to get started, thanks!
Thanks for the guide. I assuming that if I configure nginx accordingly I can use this set up for a) multiple domains, and b) multiple app servers. Am I correct in that assumption?
@manicas, great tutorial.
My connection was hanging until I commented out the following line,
proxy_set_header Connection 'upgrade';
Do you have any idea why this would happen?
When using nginx I am able to access my nodejs app at the URL myapp.com/home, but if I navigate to myapp.com I still get the nginx welcome page. Is there a fix for this?
Thanks Mitchell. Wonderful post and has helped us setting our Nodejs production environment. We are facing issue where Nginx is not severing updated HTML files which is part of one nodejs application.
Do Ngnix cache all static contents by default? If yes, then what is the location of caching in Ubantu? Or it doesnt cache, can you pls help with providing required conf setting for this. Googled alot but not able to find the solution.
Great post! Now I’m truly ready for production. Digital Ocean you are really good!
Stupid question, but which droplet should the actual domain name (e.g. example.com) be registered to: the WEB droplet or the APP droplet?
I get this, whats missing or wrong ?
pm2 hello.js [PM2] Spawning PM2 daemon Error: spawn ENOENT at errnoException (child_process.js:988:11) at Process.ChildProcess._handle.onexit (child_process.js:779:34) Error: spawn ENOENT at errnoException (child_process.js:988:11) at Process.ChildProcess._handle.onexit (child_process.js:779:34) Did you forgot to call pm2.connect(function() { }) before interacting with PM2 ?
the part about PM2 will save my life some day…
I have read dozens of other ways to restart an app after reboot but NONE worked. Maybe because my app runs in /home/myUser and this is not yet ready when the server boots and the configured files are started?
Well, PM2 works well.
Actually: today a digital ocean server went down momentarily (first time in two years and about 6 apps) and my application didn’t restart after reboot - that’s why I finally found this article. It won’t happen again!
thanks!
Thank you! This was really informative and well explained! I only had one problem, but the problem did not stop me from setting everything up. Running sudo npm install pm2 -g gave me errors regarding git. I realized I did not have git installed. But even after installation of git I got a new error: “npm WARN optional dep failed, continuing fsevents@0.3.6”
Well, Its working atleast! I am also just using one server.
I couldn’t get my private ip address, what should i input to my command prompt exactly?
Very nice tutorial, nginx is returning a 404, after a redirect from my node app to a static login page (the login page didn’t load. should i have another configuration if node is using ui-route? or does it have a conflict with static content being serve by node?
Replying to voidyucatan
I’m not sure what your app or configuration looks like, but you may have to configure nginx URL rewrites.
In my application with nodejs + redis + rails, can i use this configuration for node and use this (https://www.digitalocean.com/community/tutorials/how-to-deploy-a-rails-app-with-passenger-and-nginx-on-ubuntu-14-04) for my rails app? With some changes, off course.
You can start a droplet with nodejs already installed, is it safe to skip your install step? or is there something different compared to yours.
Adding additional locations other than a root ‘/’ domain it not working for me. The additional locations just redirects to the default nginx page or to the app deployed to / (if any)
In the example below /uds will redirect to the default nginx page if I replace the /uds with / - it’s getting to my node app.
server {
    listen 80;

    server_name mydomain.com;

    location /uds {
        proxy_pass http://127.0.0.1:3000;
        proxy_http_version 1.1;
        proxy_set_header Upgrade $http_upgrade;
        proxy_set_header Connection 'upgrade';
        proxy_set_header Host $host;
        proxy_cache_bypass $http_upgrade;
    }
}
Hi I followed this blog. I am using one Digital Ocean droplet to set up. I end up with a error of 502 Bad Gateway.
Do you know what I can do to fix this?
Thanks for the amazing tutorial! Really helped! One problem: when I access my app by it’s domain+port like http://www.site.com:8000 it works fine, I can see all data and all. But when I access without the port, it doesn’t show any of the data. Weird part: when I add data from the address WITHOUT the port, it adds normally, but shows only on the app WITH the 8000 port, and not on the one without port. What should I do?
Hi everybody, I do not understand why sometines you do use sudo and sometines you don’t.
Hello, I have a problem, with this settings nginx doesnt load the website when accessed with “www.” because it’s a subdomain, how can I do this? I have tried this in nginx config default ( /etc/nginx/sites-available/default ) : server { listen 80; server_name www.domain.com; return 301 $scheme://domain.com$request_uri; }
server { listen 80;
server_name domain.com;
location / {
    proxy_pass http://127.0.0.1:8080;
    proxy_http_version 1.1;
    proxy_set_header Upgrade $http_upgrade;
    proxy_set_header Connection 'upgrade';
    proxy_set_header Host $host;
    proxy_cache_bypass $http_upgrade;
}
}
I found this in stackoverflow but it doesnt work, how can i make www. to redirect to non-www or at least be able to see the website also with www?
Thank you for your help!
Hello,
I am newbie in administration of server. Should I use two droplets with ubuntu for this example? Did I understand it right?
Node source mentioned is very old. Current Node version 5.0.0
Would be nice to see the article being updated once in a while…
is it possible to setup 2 reverse proxy to point to Node.js application server ?
Awesome tutorial! Been using this on my droplet for a while and it all worked well. But now when I’m updated my source code and done ubuntu updates, nginx/pm2 crashed and I dont have any idea why really. For starter I had a problem running pm2 without “sudo” but I think I figured that out, and now to the remaining problem: When visiting the site in the browser I get 502 Bad gateway, and when looking at the log I get this:
nginx: [emerg] bind() to 0.0.0.0:80 failed (98: Address already in use)
nginx: [emerg] still could not bind()
and I dont get any errors when running nginx -t. So a little out of my knowledge right now.
Have been looking around in the nginx files and /etc/nginx/sites-available/default and /etc/nginx/sites-enabled/default contains the same information and that is the only thing I can think of?
The configuration for nginx are as in the tutorial.
Hi, i did my setup at the end of tutorial like this server { listen 80;
server_name www.myPortfolio.com;

location / {
    proxy_pass http://my_private_ip:8080;
    proxy_http_version 1.1;
    proxy_set_header Upgrade $http_upgrade;
    proxy_set_header Connection 'upgrade';
    proxy_set_header Host $host;
    proxy_cache_bypass $http_upgrade;
}
}
Now, my next step it’s to upload my front-end via filezilla
thats what i put
host: 159.203.22.215
username: me
password: XXXXXXX
port: 8080
then somehow i still get Connecting to 159.203.22.215:8080… Status: Connection attempt failed with “ECONNREFUSED - Connection refused by server”. Error: Could not connect to server
i need help !!! :(
Did this all just change in the last two weeks? I swear the commands are different from when I went through this last month and now the commands like “yum” and “systemctl” aren’t being recognized and I don’t remember them from before. I’m on Ubuntu 14.
I have been trying to figure out how to point the server to my static page that i store it up somewhere in my cloud server. Also, i am using NodeJs as my backend.
My new problem: After this new configuration that i did, it points me to a 404 page instead of pointing to my index.html
Also, in the line 20, it gives me an error of duplicate “/” when i run sudo nginx -t for debugging purpose
````nginx: [emerg] duplicate location "/" in /etc/nginx/sites-enabled/default:20 ````
here’s my Nginx configuration file…
    server {
        listen 80 default_server;
        listen [::]:80 default_server ipv6only=on;

        server_name www.andii90s.com;

        root /home/andy/www/myProjectX/app;
        index index.html index.htm;


        location / {
            proxy_pass http://10.137.10.140:8080;
            proxy_http_version 1.1;
            proxy_set_header Upgrade $http_upgrade;
            proxy_set_header Connection 'upgrade';
            proxy_set_header Host $host;
            proxy_cache_bypass $http_upgrade;
        }

        location / {
            #Line 20
            try_files $uri $uri/ =404;
        }

        error_page 404 /404.html;
        error_page 500 502 503 504 /50x.html;
        location = /50x.html {
           root /home/andy/www/myProjectX/app;
        }
    }
Is there a way to do this on an apache server that points to a subdomain e.g. node.example.com instead of IP_ADDRESS:8080? Forgive me if this is a silly question. Very new to it all.
Do I have to have two droplets—one for app and the other for web—for this to work?
Hey,
I’m a bit confused and lost. Does the APP_PRIVATE_ID_ADDRESS equal with the “Droplet/Settings/ (Networking tab) Private Network/Private IP” ??
Hi Mitchell, great tutorial! How could I serve a second app on a second server block?
I tried to serve a second app on port 8081, and connect it with a second server block file, when I restart nginx it fails an I receive the following error log: 2016/02/02 11:21:23 [emerg] 5447#0: invalid port in upstream "10.135.0.205:8081
I´m able to connect the app with curl http://10.135.0.205:8081
content of my server block file:
server { listen 80;
server_name sidejob.ch;

location / {
    proxy_pass http://10.135.0.205:8081>;
    proxy_http_version 1.1;
    proxy_set_header Upgrade $http_upgrade;
    proxy_set_header Connection 'upgrade';
    proxy_set_header Host $host;
    proxy_cache_bypass $http_upgrade;
}
}
If i’d wanted to make a GET request to the nodejs from my website like this:
< script src =" urltothefile /file. js" > < / script >
how would i do that?!
Hello Sir I have configured Nginx successfully and it works well. For example I could visit my site from http://123.123.123.123. But I can also visit it from inner port like: http://123.123.123.123:7999, is this result normal or I should do something to ban the 7999 connections ? By the way the Nginx and Nodejs are on the same instance and the app was started by : sudo npm start. The conf file is like this: server { listen 80; server_name 123.123.123.123;
location / {
    proxy_pass http://127.0.0.1:7999;
    proxy_http_version 1.1;
    proxy_set_header Upgrade $http_upgrade;
    proxy_set_header Connection 'upgrade';
    proxy_set_header Host $host;
    proxy_cache_bypass $http_upgrade;
}
}
Thanks a lot, Sir, your tutorial is excellent and very easy to learn.
I have my app running on http://PRIVATE_IP:3000
My droplet configured to MY_DOMAIN.com in Networks.
My nginx file at /etc/nginx/sites-available/default configured to
server {
    listen 80;
    server_name MY_DOMAIN.com;

    location / {
        proxy_pass http://PRIVATE_IP:3000;
        proxy_http_version 1.1;
        proxy_set_header Upgrade $http_upgrade;
        proxy_set_header Connection 'upgrade';
        proxy_set_header Host $host;
        proxy_cache_bypass $http_upgrade;
    }
}
And I have restarted nginx.
But i can only connect to MY_DOMAIN.com:3000 not MY_DOMAIN.com . Any ideas why?
For me to get pm2 restarting to work I had to run** $ pm2 save** after I had run sudo su -c “env PATH=$PATH:/opt/node/bin pm2 startup ubuntu -u sammy --hp /home/sammy”
I found this on https://serversforhackers.com/node-process-management-with-pm2
Hello, I have created two droplets:
- Web Server(not installed NGINX yet, as operating system Ubuntu)
- App Server(have enabled the IP-adress, installed “MEAN Stack one-click-app” and as Operatiog System Ubuntu)
Well, I have create at my App Server the “hello.js” file for testing like the example above:
var http = require(‘http’); http.createServer(function (req, res) { res.writeHead(200, {‘Content-Type’: ‘text/plain’}); res.end(‘Hello World\n’); }).listen(8080, ‘APP_PRIVATE_IP_ADDRESS’); console.log(‘Server running at http://APP_PRIVATE_IP_ADDRESS:8080/’);
The app is running at my App server and at my Web server I want to run the command “curl http://APP_PRIVATE_IP_ADDRESS:8080” for testing but it happened nothing. Just the connection timed out.
In Menu Networking I have set the domains for the app server as follow:
A: @ -> public IP CNAME www - mydomain
What I did wrong?
After run the sudo command to set pm2 up on boot, you have to run “pm2 save”. With this, your app will run too…
This comment has been deleted
for some reason when i use curl to test if the hello.js app is working on the web server it doesnt work
It doesn’t work with my routes in node (it gives me an 404 error). Anyone knows what can I do to solve this issue?
Thanks
Critical step:
After you do a pm2 start hello.js, I had to do a pm2 save, before I daemonized. Otherwise when I did a sudo service pm2 restart my application did not get spawned automatically (Ubuntu 14.04, node v4.4.5).
I was getting an error when using pm2: /usr/bin/env: node: No such file or directory
And I found the solution, in case anyone was searching for it: I had installed node.js with this method: sudo apt-get install nodejs
this installs node as “nodejs” instead of “node” (there is another Ubuntu package named “node” that is a Ham Radio program), so pm2 couldn’t find it. So, I found this fix:
sudo ln -s /usr/bin/nodejs /usr/bin/node
this creates a symbolic link from “nodejs” to “node”. Now pm2 can continue as expected. You might want to be sure you don’t need to use a ham radio on your server before using this fix though ;)
The line sudo npm install pm2 -g shouldn’t include sudo. You should never run npm as sudo! There’s a help page on the npm website to fix the sudo problem - https://docs.npmjs.com/getting-started/fixing-npm-permissions
Great tutorial!
I just add two helpful tutorials as complement:
my pm2 not woking at restart the machine…
pm2 start hello.js pm2 startup ubuntu
[PM2] Generating system init script in /etc/init.d/pm2-init.sh
[PM2] Making script booting at startup...
[PM2] -ubuntu- Using the command:
      su -c "chmod +x /etc/init.d/pm2-init.sh && update-rc.d pm2-init.sh defaults"


[PM2] Done.
su -c “chmod +x /etc/init.d/pm2-init.sh && update-rc.d pm2-init.sh defaults” pm2 save
[PM2] Saving current process list...
[PM2] Successfully saved in /root/.pm2/dump.pm2
App working :)
shutdown -r now
waiting start…
App not working :(
pm2 list
no running
Hey Team,
After configuring nginx along with domain name. I am getting ngix successful configuration message but not the node js message which should be Hello World in this case. Any help would be appreciated.
Hi i got this problem, when I use 127.0.0.1 in the app server everything works fine, but when I use my private network address it crashes and shows me the following message:
events.js:141 throw er; // Unhandled ‘error’ event ^
Error: listen EADDRNOTAVAIL 10.132.83.150:8080 at Object.exports._errnoException (util.js:874:11) at exports._exceptionWithHostPort (util.js:897:20) at Server._listen2 (net.js:1221:19) at listen (net.js:1270:10) at net.js:1379:9 at doNTCallback3 (node.js:452:9) at process._tickCallback (node.js:358:17) at Function.Module.runMain (module.js:469:11) at startup (node.js:136:18) at node.js:963:3
Please need help,
I tried the application (hello.js) following this tutorial and all was ok. But I tried another app that contains static files and it doesn’t work. What’s the problem ? thanks
For this instruction i am getting not found
curl -w “\n” http://169.254.169.254/metadata/v1/interfaces/private/0/ipv4/address not found
Hi,
Am trying to setup multiple domain multiple app nginx node.js apps with https, and so far only one of them works at a time. my setup is as follows for the sites-enabled.
I hope someone can spot the mistake, thanks a lot
default
# HTTP - redirect all requests to HTTPS:
server {
        listen 80;
        listen [::]:80 default_server ipv6only=on;
        return 301 https://$host$request_uri;
}
server {
        listen 443;
        server_name domain1.com, www.domain1.com;

        ssl on;
        # Use certificate and key provided by Let's Encrypt:
        ssl_certificate /etc/letsencrypt/live/domain1.com/fullchain.pem;
        ssl_certificate_key /etc/letsencrypt/live/domain1.com/privkey.pem;
        ssl_session_timeout 5m;
        ssl_protocols TLSv1 TLSv1.1 TLSv1.2;
        ssl_prefer_server_ciphers on;
        ssl_ciphers 'EECDH+AESGCM:EDH+AESGCM:AES256+EECDH:AES256+EDH';

        # Pass requests for / to localhost:8080:
        location / {
                proxy_set_header X-Real-IP $remote_addr;
                proxy_set_header X-Forwarded-For $proxy_add_x_forwarded_for;
                proxy_set_header X-NginX-Proxy true;
                proxy_pass http://localhost:5000/;
                proxy_ssl_session_reuse off;
                proxy_set_header Host $http_host;
                proxy_cache_bypass $http_upgrade;
                proxy_redirect off;
        }
}
server {
        listen 443;
        server_name domain2.com, www.domain2.com;

        ssl on;
        # Use certificate and key provided by Let's Encrypt:
        ssl_certificate /etc/letsencrypt/live/domain2.com/fullchain.pem;
        ssl_certificate_key /etc/letsencrypt/live/domain2.com/privkey.pem;
        ssl_session_timeout 5m;
        ssl_protocols TLSv1 TLSv1.1 TLSv1.2;
        ssl_prefer_server_ciphers on;
        ssl_ciphers 'EECDH+AESGCM:EDH+AESGCM:AES256+EECDH:AES256+EDH';

        # Pass requests for / to localhost:8080:
        location / {
                proxy_set_header X-Real-IP $remote_addr;
                proxy_set_header X-Forwarded-For $proxy_add_x_forwarded_for;
                proxy_set_header X-NginX-Proxy true;
                #DIFFERENT PORT
                proxy_pass http://localhost:3000/;
                proxy_ssl_session_reuse off;
                proxy_set_header Host $http_host;
                proxy_cache_bypass $http_upgrade;
                proxy_redirect off;
        }
}
Thanks for the guide.
I’ve set up my Nginx proxy and it works just fine. But when I try to access the ip and port directly, I get an unable to connect error.
That is: http://mydomain.com works just fine
But: http://myserverip:port fails
Yes, the server ip alone returns the default Nginx page. But add the port and the error occurs. Should my default Nginx config have a proxy in it too?
This command:
curl -w "\n" http://169.254.169.254/metadata/v1/interfaces/private/0/ipv4/address
Returns not found.
I’m not sure how I’m supposed to determine my private IP address. Can I use the eth1 ip address? It looks like it’s a 10.x.x.x non-routable IP.
To some people it is probably obvious but I struggled for a bit on the part about the server_name in the config file. I was putting the private_ip as the server_name instead of the public ip since the article does not specify. Most people probably won’t have this issue but I slipped up and wasted a good hour or so. Just a heads up. Great article by the way!
JFYI… when creating Node.js applications you might need to store configuration items in a file. Instead of keeping them in cleartext, use the masterkey package as mentioned here: https://www.attosol.com/secure-application-secrets-using-masterkey-in-azure-key-vault/
How to check is my proxy server is working or not. I follow all the above step to set my proxy server but how I know that proxy server is really working.
I’m doing like this
My node app :
const fs = require('fs');
const https = require('https');
const express    = require('express');
const app        = express();

var router = express.Router();

router.get('/',function(req,res){
    	// console.log("Route = /");
    	res.json({"success" : 1})
});

app.use('/api/v2', router);

app.listen(8080);
My proxy config :
server {
    listen 80;

    server_name APP_PRIVATE_IP_ADDRESS;

    location / {
        proxy_pass http://APP_PRIVATE_IP_ADDRESS:8080;
        proxy_http_version 1.1;
        proxy_set_header Upgrade $http_upgrade;
        proxy_set_header Connection 'upgrade';
        proxy_set_header Host $host;
        proxy_cache_bypass $http_upgrade;
    }
}
this blog providing good information To learn NodeJS visit http://iwebworld.info contact: iwebworldinfo@gmail.com
I’m getting the error EADDRNOTAVAIL when executing node hello.js, and I am using both Node.JS and nginx at the same droplet. When using private IP, it cause this error and hello.js never works, but using localhost or the public ip, it is working ( but not accessd via browser, I can access it using another terminal and login into the root to test it).
For starters who are not comfortable on the command line, this is simply a no go for many. This is where a tool like opscaptain can help you deploy Node.js applications to your digitalocean droplet the easy way with either a simple upload from the dashboard or run [opscaptain deploy] and that is it. No need to fiddle with bash scripts and maintain them. Simply connect your droplet and you are ready to deploy. https://www.opscaptain.com/nodejs-hosting
hi ,
i am running npm app.js instead the actual directory and it is successful but when i close putty the application stops running and says site cant be reached . This is happening recently in digital ocean server
I have two app server , both need to run npm build before pm2 start , built command generate dist folder , each app different content in dist folder. Am using load balancer with upsteam backend but its getting issue, that is ,first time any user load web site and he may connect to app1 server from the upsteam ,and if he reload once again it will connect second app server, this time he con’t load website correctly because dist folder files will miss mach, can u plz suggest better solution , am looking both app can use one dist folder or any other better solution is there.
 This work is licensed under a Creative Commons Attribution-NonCommercial- ShareAlike 4.0 International License.
Become a contributor for community
Get paid to write technical tutorials and select a tech-focused charity to receive a matching donation.

DigitalOcean Documentation
Full documentation for every DigitalOcean product.

Resources for startups and SMBs
The Wave has everything you need to know about building a business, from raising funding to marketing your product.
The developer cloud
Scale up as you grow — whether you're running one virtual machine or ten thousand.

Get started for free
Sign up and get $200 in credit for your first 60 days with DigitalOcean.*

*This promotional offer applies to new accounts only.