By James and Sharon Campbell
Not using Ubuntu 14.04?
Choose a different version or distribution.
Introduction
Want to access the Internet safely and securely from your smartphone or laptop when connected to an untrusted network such as the WiFi of a hotel or coffee shop? A Virtual Private Network (VPN) allows you to traverse untrusted networks privately and securely to your DigitalOcean Droplet as if you were on a secure and private network. The traffic emerges from the Droplet and continues its journey to the destination.
When combined with HTTPS connections, this setup allows you to secure your wireless logins and transactions. You can circumvent geographical restrictions and censorship, and shield your location and unencrypted HTTP traffic from the untrusted network.
OpenVPN is a full-featured open source Secure Socket Layer (SSL) VPN solution that accommodates a wide range of configurations. In this tutorial, we’ll set up an OpenVPN server on a Droplet and then configure access to it from Windows, OS X, iOS and Android. This tutorial will keep the installation and configuration steps as simple as possible for these setups.
Note: OpenVPN can be installed automatically on your Droplet by adding this script to its User Data when launching it. Check out this tutorial to learn more about Droplet User Data.
Prerequisites
The only prerequisite is having a Ubuntu 14.04 Droplet established and running. You will need root access to complete this guide.
- Optional: After completion of this tutorial, It would be a good idea to create a standard user account with sudo privileges for performing general maintenance on your server.
Step 1 — Install and Configure OpenVPN’s Server Environment
Complete these steps for your server-side setup.
###OpenVPN Configuration
Before we install any packages, first we’ll update Ubuntu’s repository lists.
apt-get update
Then we can install OpenVPN and Easy-RSA.
apt-get install openvpn easy-rsa
The example VPN server configuration file needs to be extracted to /etc/openvpn so we can incorporate it into our setup. This can be done with one command:
gunzip -c /usr/share/doc/openvpn/examples/sample-config-files/server.conf.gz > /etc/openvpn/server.conf
Once extracted, open server.conf in a text editor. This tutorial will use Vim but you can use whichever editor you prefer.
vim /etc/openvpn/server.conf
There are several changes to make in this file. You will see a section looking like this:
# Diffie hellman parameters.
# Generate your own with:
#   openssl dhparam -out dh1024.pem 1024
# Substitute 2048 for 1024 if you are using
# 2048 bit keys.
dh dh1024.pem
Edit dh1024.pem to say:
dh2048.pem
This will double the RSA key length used when generating server and client keys.
Still in server.conf, now look for this section:
# If enabled, this directive will configure
# all clients to redirect their default
# network gateway through the VPN, causing
# all IP traffic such as web browsing and
# and DNS lookups to go through the VPN
# (The OpenVPN server machine may need to NAT
# or bridge the TUN/TAP interface to the internet
# in order for this to work properly).
;push "redirect-gateway def1 bypass-dhcp"
Uncomment push "redirect-gateway def1 bypass-dhcp" so the VPN server passes on clients’ web traffic to its destination. It should look like this when done:
push "redirect-gateway def1 bypass-dhcp"
The next edit to make is in this area:
# Certain Windows-specific network settings
# can be pushed to clients, such as DNS
# or WINS server addresses.  CAVEAT:
# http://openvpn.net/faq.html#dhcpcaveats
# The addresses below refer to the public
# DNS servers provided by opendns.com.
;push "dhcp-option DNS 208.67.222.222"
;push "dhcp-option DNS 208.67.220.220"
Uncomment push "dhcp-option DNS 208.67.222.222" and push "dhcp-option DNS 208.67.220.220". It should look like this when done:
push "dhcp-option DNS 208.67.222.222"
push "dhcp-option DNS 208.67.220.220"
This tells the server to push OpenDNS to connected clients for DNS resolution where possible. This can help prevent DNS requests from leaking outside the VPN connection. However, it’s important to specify desired DNS resolvers in client devices as well. Though OpenDNS is the default used by OpenVPN, you can use whichever DNS services you prefer.
The last area to change in server.conf is here:
# You can uncomment this out on
# non-Windows systems.
;user nobody
;group nogroup
Uncomment both user nobody and group nogroup. It should look like this when done:
user nobody
group nogroup
By default, OpenVPN runs as the root user and thus has full root access to the system. We’ll instead confine OpenVPN to the user nobody and group nogroup. This is an unprivileged user with no default login capabilities, often reserved for running untrusted applications like web-facing servers.
Now save your changes and exit Vim.
###Packet Forwarding
This is a sysctl setting which tells the server’s kernel to forward traffic from client devices out to the Internet. Otherwise, the traffic will stop at the server. Enable packet forwarding during runtime by entering this command:
echo 1 > /proc/sys/net/ipv4/ip_forward
We need to make this permanent so the server still forwards traffic after rebooting.
vim /etc/sysctl.conf
Near the top of the sysctl file, you will see:
# Uncomment the next line to enable packet forwarding for IPv4
#net.ipv4.ip_forward=1
Uncomment net.ipv4.ip_forward. It should look like this when done:
# Uncomment the next line to enable packet forwarding for IPv4
net.ipv4.ip_forward=1
Save your changes and exit.
Uncomplicated Firewall (ufw)
ufw is a front-end for iptables and setting up ufw is not hard. It’s included by default in Ubuntu 14.04, so we only need to make a few rules and configuration edits, then switch the firewall on. As a reference for more uses for ufw, see How To Setup a Firewall with UFW on an Ubuntu and Debian Cloud Server.
First set ufw to allow SSH. In the command prompt, ENTER:
ufw allow ssh
This tutorial will use OpenVPN over UDP, so ufw must also allow UDP traffic over port 1194.
ufw allow 1194/udp
The ufw forwarding policy needs to be set as well. We’ll do this in ufw’s primary configuration file.
vim /etc/default/ufw
Look for DEFAULT_FORWARD_POLICY="DROP". This must be changed from DROP to ACCEPT. It should look like this when done:
DEFAULT_FORWARD_POLICY="ACCEPT"
Next we will add additional ufw rules for network address translation and IP masquerading of connected clients.
vim /etc/ufw/before.rules
Make the top of your before.rules file look like below. The area in red for OPENVPN RULES must be added:
#
# rules.before
#
# Rules that should be run before the ufw command line added rules. Custom
# rules should be added to one of these chains:
#   ufw-before-input
#   ufw-before-output
#   ufw-before-forward
#

# START OPENVPN RULES
# NAT table rules
*nat
:POSTROUTING ACCEPT [0:0]
# Allow traffic from OpenVPN client to eth0
-A POSTROUTING -s 10.8.0.0/8 -o eth0 -j MASQUERADE
COMMIT
# END OPENVPN RULES

# Don't delete these required lines, otherwise there will be errors
*filter
With the changes made to ufw, we can now enable it. Enter into the command prompt:
ufw enable
Enabling ufw will return the following prompt:
Command may disrupt existing ssh connections. Proceed with operation (y|n)?
Answer y. The result will be this output:
Firewall is active and enabled on system startup
To check ufw’s primary firewall rules:
ufw status
The status command should return these entries:
Status: active

To                         Action      From
--                         ------      ----
22                         ALLOW       Anywhere
1194/udp                   ALLOW       Anywhere
22 (v6)                    ALLOW       Anywhere (v6)
1194/udp (v6)              ALLOW       Anywhere (v6)
Step 2 — Creating a Certificate Authority and Server-Side Certificate & Key
OpenVPN uses certificates to encrypt traffic.
###Configure and Build the Certificate Authority
It is now time to set up our own Certificate Authority (CA) and generate a certificate and key for the OpenVPN server. OpenVPN supports bidirectional authentication based on certificates, meaning that the client must authenticate the server certificate and the server must authenticate the client certificate before mutual trust is established. We will use Easy RSA’s scripts we copied earlier to do this.
First copy over the Easy-RSA generation scripts.
cp -r /usr/share/easy-rsa/ /etc/openvpn
Then make the key storage directory.
mkdir /etc/openvpn/easy-rsa/keys
Easy-RSA has a variables file we can edit to create certificates exclusive to our person, business, or whatever entity we choose. This information is copied to the certificates and keys, and will help identify the keys later.
vim /etc/openvpn/easy-rsa/vars
The variables below marked in red should be changed according to your preference.
export KEY_COUNTRY="US"
export KEY_PROVINCE="TX"
export KEY_CITY="Dallas"
export KEY_ORG="My Company Name"
export KEY_EMAIL="sammy@example.com"
export KEY_OU="MYOrganizationalUnit"
In the same vars file, also edit this one line shown below. For simplicity, we will use server as the key name. If you want to use a different name, you would also need to update the OpenVPN configuration files that reference server.key and server.crt.
export KEY_NAME="server"
We need to generate the Diffie-Hellman parameters; this can take several minutes.
openssl dhparam -out /etc/openvpn/dh2048.pem 2048
Now let’s change directories so that we’re working directly out of where we moved Easy-RSA’s scripts to earlier in Step 2.
cd /etc/openvpn/easy-rsa
Initialize the PKI (Public Key Infrastructure). Pay attention to the dot (.) and space in front of ./vars command. That signifies the current working directory (source).
. ./vars
The output from the above command is shown below. Since we haven’t generated anything in the keys directory yet, the warning is nothing to be concerned about.
NOTE: If you run ./clean-all, I will be doing a rm -rf on /etc/openvpn/easy-rsa/keys
Now we’ll clear the working directory of any possible old or example keys to make way for our new ones.
./clean-all
This final command builds the certificate authority (CA) by invoking an interactive OpenSSL command. The output will prompt you to confirm the Distinguished Name variables that were entered earlier into the Easy-RSA’s variable file (country name, organization, etc.).
./build-ca
Simply press ENTER to pass through each prompt. If something must be changed, you can do that from within the prompt.
###Generate a Certificate and Key for the Server
Still working from /etc/openvpn/easy-rsa, now enter the command to build the server’s key. Where you see server marked in red is the export KEY_NAME variable we set in Easy-RSA’s vars file earlier in Step 2.
./build-key-server server
Similar output is generated as when we ran ./build-ca, and you can again press ENTER to confirm each line of the Distinguished Name. However, this time there are two additional prompts:
Please enter the following 'extra' attributes
to be sent with your certificate request
A challenge password []:
An optional company name []:
Both should be left blank, so just press ENTER to pass through each one.
Two additional queries at the end require a positive (y) response:
Sign the certificate? [y/n]
1 out of 1 certificate requests certified, commit? [y/n]
The last prompt above should complete with:
Write out database with 1 new entries
Data Base Updated
###Move the Server Certificates and Keys
OpenVPN expects to see the server’s CA, certificate and key in /etc/openvpn. Let’s copy them into the proper location.
cp /etc/openvpn/easy-rsa/keys/{server.crt,server.key,ca.crt} /etc/openvpn
You can verify the copy was successful with:
ls /etc/openvpn
You should see the certificate and key files for the server.
At this point, the OpenVPN server is ready to go. Start it and check the status.
service openvpn start
service openvpn status
The status command should return:
VPN 'server' is running
Congratulations! Your OpenVPN server is operational. If the status message says the VPN is not running, then take a look at the /var/log/syslog file for errors such as:
Options error: --key fails with 'server.key': No such file or directory
That error indicates server.key was not copied to /etc/openvpn correctly. Re-copy the file and try again.
Step 3 — Generate Certificates and Keys for Clients
So far we’ve installed and configured the OpenVPN server, created a Certificate Authority, and created the server’s own certificate and key. In this step, we use the server’s CA to generate certificates and keys for each client device which will be connecting to the VPN. These files will later be installed onto the client devices such as a laptop or smartphone.
###Key and Certificate Building
It’s ideal for each client connecting to the VPN to have its own unique certificate and key. This is preferable to generating one general certificate and key to use among all client devices.
Note: By default, OpenVPN does not allow simultaneous connections to the server from clients using the same certificate and key. (See
duplicate-cnin/etc/openvpn/server.conf.)
To create separate authentication credentials for each device you intend to connect to the VPN, you should complete this step for each device, but change the name client1 below to something different such as client2 or iphone2. With separate credentials per device, they can later be deactivated at the server individually, if need be. The remaining examples in this tutorial will use client1 as our example client device’s name.
As we did with the server’s key, now we build one for our client1 example. You should still be working out of /etc/openvpn/easy-rsa.
./build-key client1
Once again, you’ll be asked to change or confirm the Distinguished Name variables and these two prompts which should be left blank. Press ENTER to accept the defaults.
Please enter the following 'extra' attributes
to be sent with your certificate request
A challenge password []:
An optional company name []:
As before, these two confirmations at the end of the build process require a (y) response:
Sign the certificate? [y/n]
1 out of 1 certificate requests certified, commit? [y/n]
If the key build was successful, the output will again be:
Write out database with 1 new entries
Data Base Updated
The example client configuration file should be copied to the Easy-RSA key directory too. We’ll use it as a template which will be downloaded to client devices for editing. In the copy process, we are changing the name of the example file from client.conf to client.ovpn because the .ovpn file extension is what the clients will expect to use.
cp /usr/share/doc/openvpn/examples/sample-config-files/client.conf /etc/openvpn/easy-rsa/keys/client.ovpn
You can repeat this section again for each client, replacing client1 with the appropriate client name throughout.
Transferring Certificates and Keys to Client Devices
Recall from the steps above that we created the client certificates and keys, and that they are stored on the OpenVPN server in the /etc/openvpn/easy-rsa/keys directory.
For each client we need to transfer the client certificate, key, and profile template files to a folder on our local computer or another client device.
In this example, our client1 device requires its certificate and key, located on the server in:
/etc/openvpn/easy-rsa/keys/client1.crt/etc/openvpn/easy-rsa/keys/client1.key
The ca.crt and client.ovpn files are the same for all clients. Download these two files as well; note that the ca.crt file is in a different directory than the others.
/etc/openvpn/easy-rsa/keys/client.ovpn/etc/openvpn/ca.crt
While the exact applications used to accomplish this transfer will depend on your choice and device’s operating system, you want the application to use SFTP (SSH file transfer protocol) or SCP (Secure Copy) on the backend. This will transport your client’s VPN authentication files over an encrypted connection.
Here is an example SCP command using our client1 example. It places the file client1.key into the Downloads directory on the local computer.
scp root@your-server-ip:/etc/openvpn/easy-rsa/keys/client1.key Downloads/
Here are several tools and tutorials for securely transfering files from the server to a local computer:
- WinSCP
- How To Use SFTP to Securely Transfer Files with a Remote Server
- How To Use Filezilla to Transfer and Manage Files Securely on your VPS
At the end of this section, make sure you have these four files on your client device:
client1.crtclient1.keyclient.ovpnca.crt
Step 4 - Creating a Unified OpenVPN Profile for Client Devices
There are several methods for managing the client files but the easiest uses a unified profile. This is created by modifying the client.ovpn template file to include the server’s Certificate Authority, and the client’s certificate and its key. Once merged, only the single client.ovpn profile needs to be imported into the client’s OpenVPN application.
We will create a single profile for our client1 device on the local computer we downloaded all the client files to. This local computer could itself be an intended client or just a temporary work area to merge the authentication files. The original client.ovpn template file should be duplicated and renamed. How you do this will depend on the operating system of your local computer.
Note: The name of your duplicated client.ovpn doesn’t need to be related to the client device. The client-side OpenVPN application will use the file name as an identifier for the VPN connection itself. Instead, you should duplicate client.ovpn to whatever you want the VPN’s nametag to be in your operating system. For example: work.ovpn will be identified as work, school.ovpn as school, etc.
In this tutorial, we’ll name the VPN connection DigitalOcean so DigitalOcean.ovpn will be the file name referenced from this point on. Once named, we then must open DigitalOcean.ovpn in a text editor; you can use whichever editor you prefer.
The first area of attention will be for the IP address of your Droplet. Near the top of the file, change my-server-1 to reflect your VPN’s IP.
# The hostname/IP and port of the server.
# You can have multiple remote entries
# to load balance between the servers.
remote my-server-1 1194
Next, find the area shown below and uncomment user nobody and group nogroup, just like we did in server.conf in Step 1. Note: This doesn’t apply to Windows so you can skip it. It should look like this when done:
# Downgrade privileges after initialization (non-Windows only)
user nobody
group nogroup
The area given below needs the three lines shown to be commented out so we can instead include the certificate and key directly in the DigitalOcean.ovpn file. It should look like this when done:
# SSL/TLS parms.
# . . .
#ca ca.crt
#cert client.crt
#key client.key
To merge the individual files into the one unified profile, the contents of the ca.crt, client1.crt, and client1.key files are pasted directly into the .ovpn profile using a basic XML-like syntax. The XML at the end of the file should take this form:
<ca>
(insert ca.crt here)
</ca>
<cert>
(insert client1.crt here)
</cert>
<key>
(insert client1.key here)
</key>
When finished, the end of the file should be similar to this abbreviated example:
<ca>
-----BEGIN CERTIFICATE-----
. . .
-----END CERTIFICATE-----
</ca>

<cert>
Certificate:
. . .
-----END CERTIFICATE-----
. . .
-----END CERTIFICATE-----
</cert>

<key>
-----BEGIN PRIVATE KEY-----
. . .
-----END PRIVATE KEY-----
</key>
The client1.crt file has some extra information in it; it’s fine to just include the whole file.
Save the changes and exit. We now have a unified OpenVPN client profile to configure our client1.
Step 5 - Installing the Client Profile
Now we’ll discuss installing a client VPN profile on Windows, OS X, iOS, and Android. None of these client instructions are dependent on each other so you can skip to whichever is applicable to you.
Remember that the connection will be called whatever you named the .ovpn file. In our example, since the file was named DigitalOcean.ovpn, the connection will be named DigitalOcean.
Windows
Installing
The OpenVPN client application for Windows can be found on OpenVPN’s Downloads page. Choose the appropriate installer version for your version of Windows.
Note: OpenVPN needs administrative privileges to install.
After installing OpenVPN, copy the unified DigitalOcean.ovpn profile to:
C:\Program Files\OpenVPN\config
When you launch OpenVPN, it will automatically see the profile and makes it available.
OpenVPN must be run as an administrator each time it’s used, even by administrative accounts. To do this without having to right-click and select Run as administrator every time you use the VPN, you can preset this but it must be done from an administrative account. This also means that standard users will need to enter the administrator’s password to use OpenVPN. On the other hand, standard users can’t properly connect to the server unless OpenVPN on the client has admin rights, so the elevated privileges are necessary.
To set the OpenVPN application to always run as an administrator, right-click on its shortcut icon and go to Properties. At the bottom of the Compatibility tab, click the button to Change settings for all users. In the new window, check Run this program as an administrator.
Connecting
Each time you launch the OpenVPN GUI, Windows will ask if you want to allow the program to make changes to your computer. Click Yes. Launching the OpenVPN client application only puts the applet in the system tray so the the VPN can be connected and disconnected as needed; it does not actually make the VPN connection.
Once OpenVPN is started, initiate a connection by going into the system tray applet and right-clicking on the OpenVPN applet icon. This opens the context menu. Select DigitalOcean at the top of the menu (that’s our DigitalOcean.ovpn profile) and choose Connect.
A status window will open showing the log output while the connection is established, and a message will show once the client is connected.
Disconnect from the VPN the same way: Go into the system tray applet, right-click the OpenVPN applet icon, select the client profile and click Disconnect.
OS X
Installing
Tunnelblick is a free, open source OpenVPN client for Mac OS X. You can download the latest disk image from the Tunnelblick Downloads page. Double-click the downloaded .dmg file and follow the prompts to install.
Towards the end of the installation process, Tunnelblick will ask if you have any configuration files. It can be easier to answer No and let Tunnelblick finish. Open a Finder window and double-click DigitalOcean.ovpn. Tunnelblick will install the client profile. Administrative privileges are required.
Connecting
Launch Tunnelblick by double-clicking Tunnelblick in the Applications folder. Once Tunnelblick has been launched, there will be a Tunnelblick icon in the menu bar at the top right of the screen for controlling connections. Click on the icon, and then the Connect menu item to initiate the VPN connection. Select the DigitalOcean connection.
iOS
Installing
From the iTunes App Store, search for and install OpenVPN Connect, the official iOS OpenVPN client application. To transfer your iOS client profile onto the device, connect it directly to a computer.
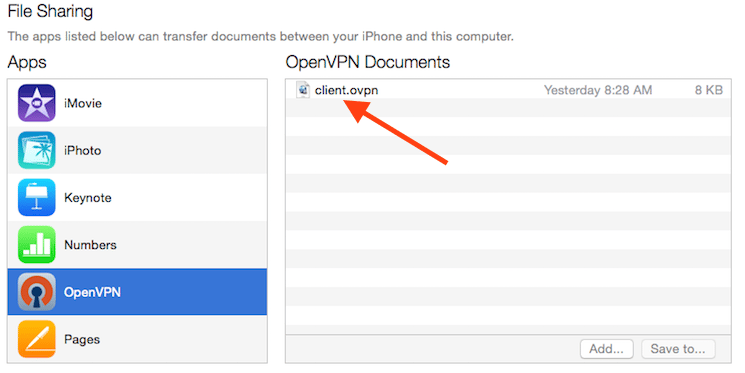
Completing the transfer with iTunes will be outlined here. Open iTunes on the computer and click on iPhone > apps. Scroll down to the bottom to the File Sharing section and click the OpenVPN app. The blank window to the right, OpenVPN Documents, is for sharing files. Drag the .ovpn file to the OpenVPN Documents window.
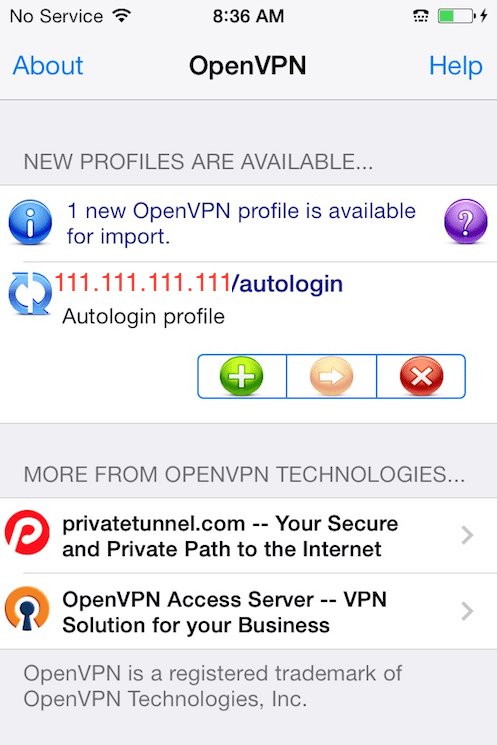
Now launch the OpenVPN app on the iPhone. There will be a notification that a new profile is ready to import. Tap the green plus sign to import it.
Connecting
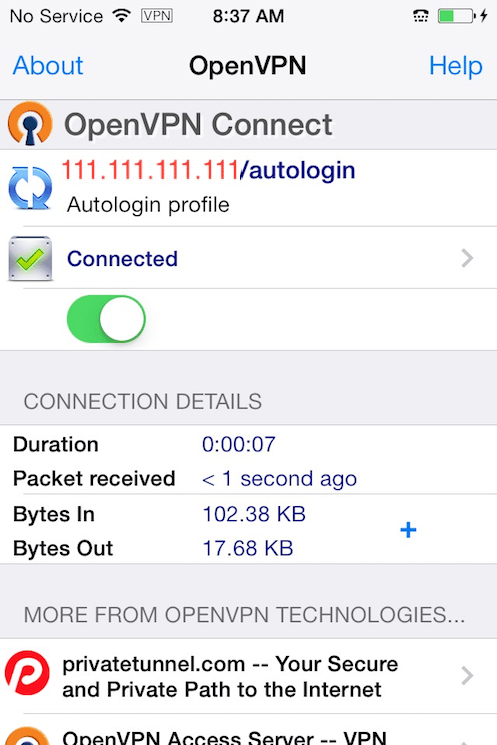
OpenVPN is now ready to use with the new profile. Start the connection by sliding the Connect button to the On position. Disconnect by sliding the same button to Off.
Note: The VPN switch under Settings cannot be used to connect to the VPN. If you try, you will receive a notice to only connect using the OpenVPN app.
Android
Installing
Open the Google Play Store. Search for and install Android OpenVPN Connect, the official Android OpenVPN client application.
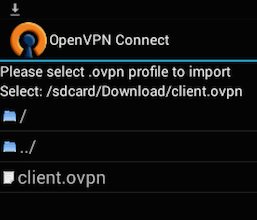
The .ovpn profile can be transferred by connecting the Android device to your computer by USB and copying the file over. Alternatively, if you have an SD card reader, you can remove the device’s SD card, copy the profile onto it and then insert the card back into the Android device.
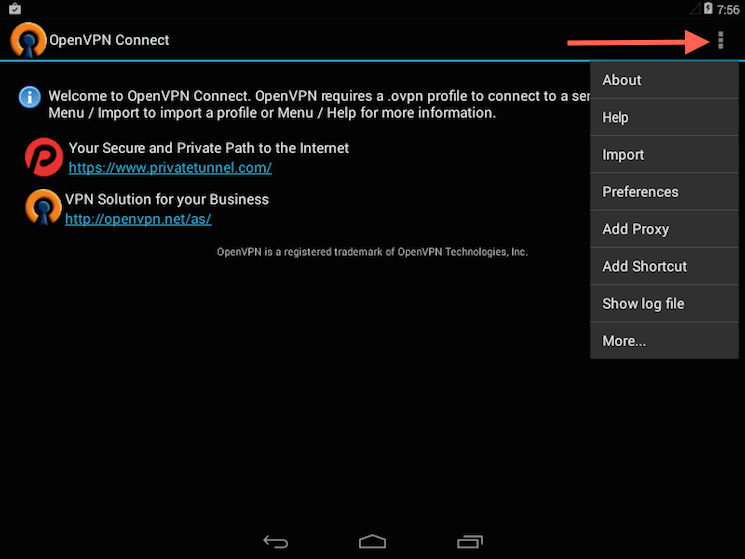
Start the OpenVPN app and tap the menu to import the profile.
Then navigate to the location of the saved profile (the screenshot uses /sdcard/Download/) and select the file. The app will make a note that the profile was imported.
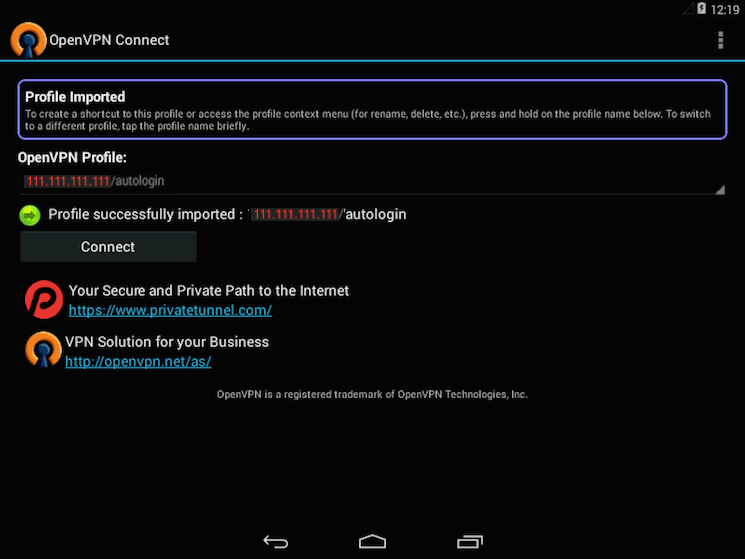
Connecting
To connect, simply tap the Connect button. You’ll be asked if you trust the OpenVPN application. Choose OK to initiate the connection. To disconnect from the VPN, go back to the the OpenVPN app and choose Disconnect.
Step 6 - Testing Your VPN Connection
Once everything is installed, a simple check confirms everything is working properly. Without having a VPN connection enabled, open a browser and go to DNSLeakTest.
The site will return the IP address assigned by your internet service provider and as you appear to the rest of the world. To check your DNS settings through the same website, click on Extended Test and it will tell you which DNS servers you are using.
Now connect the OpenVPN client to your Droplet’s VPN and refresh the browser. The completely different IP address of your VPN server should now appear. That is now how you appear to the world. Again, DNSLeakTest’s Extended Test will check your DNS settings and confirm you are now using the DNS resolvers pushed by your VPN.
Congratulations! You are now securely traversing the internet protecting your identity, location, and traffic from snoopers and censors.
Thanks for learning with the DigitalOcean Community. Check out our offerings for compute, storage, networking, and managed databases.
About the author(s)
Operations research analyst, data scientist, Chief Information Officer, college professor.
Current fan and former Editorial Manager at DigitalOcean. Hi! Expertise in areas including Ubuntu, Docker, Rails, and more.
Still looking for an answer?
This textbox defaults to using Markdown to format your answer.
You can type !ref in this text area to quickly search our full set of tutorials, documentation & marketplace offerings and insert the link!
Thank you for this! Absolutely great article! Including all the commands and explaining the reason for them is awesome.
First. Sorry for my bad english…
Thanks for this great Tutorial its work without any problem. but now i have a Problem it doesn’t route all traffic trough the ports https://diafygi.github.io/webrtc-ips/ here u can see its can resolve my real IP adress. please can u make a tutorial for route the complete traffic im in Germany and many videos on Youtube are blocked from the Gema and youtube detects my real ip and block the video again…
Newby question: I have a lemp stack, can i configure vpn (as in this tutorial) in the same droplet without it interfering with the lemp stack and the wordpress install??
Followed the guide and everything appeared to work correctly until I try to browse the internet through the VPN and it wont go anywhere. I connect to the VPN using my Android phone as per the instructions but nothing is being received if I look at the statistics there is barely anything coming in over to the Android phone. Plenty of information is being sent out, just not in.
It sounds like others above are having similar problems maybe?
Hello I cannot edit the server.conf file. Can someone help me please?
I could be able to successfully connect to the VPN , but it seems that traffic forward is not working as internet is not working
i executed
cat /proc/sys/net/ipv4/ip_forward
returned 1
any support ?
 This work is licensed under a Creative Commons Attribution-NonCommercial- ShareAlike 4.0 International License.
Become a contributor for community
Get paid to write technical tutorials and select a tech-focused charity to receive a matching donation.

DigitalOcean Documentation
Full documentation for every DigitalOcean product.

Resources for startups and AI-native businesses
The Wave has everything you need to know about building a business, from raising funding to marketing your product.
The developer cloud
Scale up as you grow — whether you're running one virtual machine or ten thousand.

Start building today
From GPU-powered inference and Kubernetes to managed databases and storage, get everything you need to build, scale, and deploy intelligent applications.
