By Jesin A and Sharon Campbell

About DNSSEC
DNS Security Extensions (DNSSEC) is a technology designed to protect applications and DNS resolvers from using forged or manipulated DNS data.
The problem: It is possible for an attacker to tamper with a DNS response or poison the DNS cache and take users to a malicious site with the legitimate domain name in their address bar.
The solution: DNSSEC configured authoritative DNS servers prevent this kind of attack by digitally signing each resource record with a private key. The DNS resolver verifies the integrity of a zone record using the public key and the digital signature.
About NSD
Name Server Daemon (NSD) is an open source authoritative-only DNS server software developed by NLNet Labs. It uses BIND-style zone files for easy configuration.
An authoritative-only DNS server provides answers to queries for the zones that it is responsible for. In this article we will be setting up our own authoritative NSD nameservers for two domain names. We will configure NSD to provide DNSSEC signed replies for both domain names.
Prerequisites
This article requires the reader to be knowledgeable in the following areas:
- An Introduction to DNS Terminology, Components, and Concepts
- A Comparison of DNS Server Types: How To Choose the Right DNS Configuration
Two domain names will be used in this article:
| Domain Name | Nameservers |
|---|---|
| example.com | master.example.com |
| slave.example.com | |
| foobar.org | master.example.com |
| slave.example.com |
The following two Droplets will run NSD:
| Hostname | IP Address |
|---|---|
| master.example.com | 1.1.1.1 |
| slave.example.com | 2.2.2.2 |
You should replace 1.1.1.1 with the IP address of your master nameserver throughout the tutorial, and 2.2.2.2 with the IP address of your slave nameserver.
The objective of this article is to show how to set up a nameserver that, regardless of its own domain’s DNSSEC status, can serve domains that use DNSSEC. The domain example.com is used for the nameservers for convenience; there is no requirement to configure DNSSEC for the nameserver domain name. The nameservers could just as easily be set to master.my-soa.com and slave.my-soa.com.
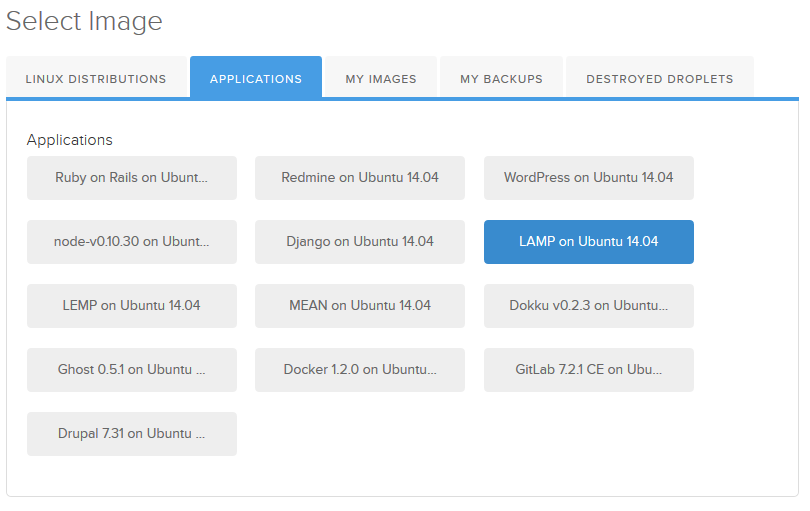
You will also want to have an IP address in mind where you want your domains to resolve. If you don’t have web hosts set up for these domains yet, you can create another test Droplet which will run a web server. Choose the LAMP on Ubuntu 14.04 image.
The IP address of the LAMP Droplet will be 3.3.3.3. This IP will be used as the A record for both the domain names to check if they resolve from a web browser. You should replace 3.3.3.3 with your desired web host IP address(es) throughout the tutorial.
DNSSEC Terminology
DNSSEC works on the concept of public-key cryptography and introduces new DNS record types. In this section we will discuss some of the terms that will be used in this article.
Keys
- ZSK: Zone Signing Key is a private/public pair of keys. The private key creates a digital signature for all the DNS records while the public key is used by the DNS resolver to verify it.
- KSK: Key Signing Key is a private/public pair of keys. The private key signs the ZSK while the public key verifies it.
Records
- DNSKEY: Contains the public keys of KSK and ZSK.
- RRSIG: Resource Record Signature exists for each record and provides the digital signature of that record. The RRSIG record is based on the record itself and the ZSK.
- DS: The Delegation Signer record is used to verify the integrity of the DNSKEY records. This record is entered in the domain registrar’s control panel and resides on the TLD’s authoritative nameserver.
Setting up DNSSEC for a domain requires appropriate records with both the nameservers and the registrar.
How DNSSEC Works
First we’ll talk about DNSSEC from the domain owner’s perspective (that’s you!). You want to make sure all of the DNS records that are coming from your nameservers are signed. That way, if someone tries to spoof your DNS records, they’ll be identified as false, and your visitors can avoid going to a malicious site.
So how do you set that up? First, for every domain, you have to generate two unique pairs of private/public keys on the nameserver. The public keys for the domain get stored in the DNSKEY records, which are listed in the zone file for that domain. Two other types of records, the DS records and the RRSIG records, get generated from the DNSKEY records. These three types of records are all cryptographically linked. That is, once you have seen one of the three, you can tell whether the other two are valid.
(Note: For clarity, while there are multiples of each type of record for each domain, we’ll refer to them in the singular for the rest of this explanation.)
Next, you upload the DS record to your registrar, which publishes it to the TLD nameservers for your domain. Since the only way to publish a DS record is through the registrar, this proves that the domain owner is the one who published the DS record, which proves the validity of that DS record. The DS record’s purpose is to establish an authentication chain between the TLD nameserver and the nameservers you are running for your domain. This works because the DS record is based on the DNSKEY, so any DNS resolver can check that your DNSKEY matches the DS record, and thus that it is the correct one for the domain.
An RRSIG record is a signature that accompanies other types of DNS record (like A, MX, etc) that is based on the record value itself (such as an IP address) and the DNSKEY.
With the DNSKEY, DS, and RRSIG records configured, DNSSEC is now set up for your domain.
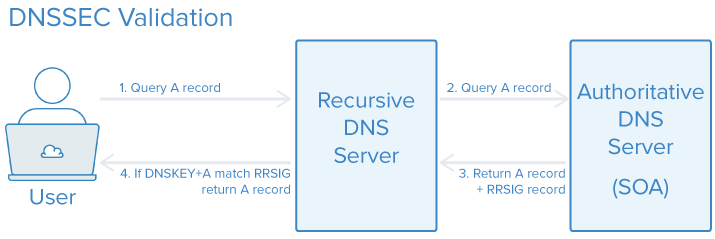
Next we’ll talk about it from a user perspective. Say that a user wants to visit your domain, so they query a DNS resolver for your domain’s A record. In this example, the recursive DNS resolver has already checked the validity of the DNSKEY for this domain against the DS record on the TLD nameservers, although it could easily check this for the first time as well.
Here’s an illustration of how this query works:
- The user sends a query for an A record, which reaches a DNSSEC aware recursive DNS server.
- The DNS server finds out that the queried domain supports DNSSEC by discovering its DS records. It sends a query for the A record with the DO bit to your authoritative nameservers.
- Your nameservers respond with the A record and the corresponding RRSIG record.
- The recursive DNS server calculates the value of the A record + the DNSKEY record it has on file, and checks it against the decrypted RRSIG record. (It could check the DS record to validate the DNSKEY record first, if it’s not on file.) If the hashes match, the DNS server returns the A record to the user, who can now visit your website.
For more about how DNSSEC works, you may want to read this article. For a more comprehensive list of DNSSEC terminology, read this.
Step Zero — Check for Domain and Registrar Support
Before deciding to setup DNSSEC on your own NSD nameservers, make sure your domain extension (.com, .org, etc.) and registrar support DNSSEC.
To check if a domain extension is DNSSEC ready, query for its DNSKEY record with the following command:
dig DNSKEY com. +short
This should return the public keys as follows:
256 3 8 AQPbokupKUJ5LLAtDEs6R3nDOHxF2jQEFtJEFTiDcfbsZia4fg3EK9Wv D9ZIr+7t2n1ddqRGHnTTInHTjduaKFPqm2iKaDHdrc6095o1mzqojnd1 bTtI45XNu61QmT5IU4VPT7HDUSby+53gLAsjLPyNsNEMp7Cc52RVxCHD no9efw==
257 3 8 AQPDzldNmMvZFX4NcNJ0uEnKDg7tmv/F3MyQR0lpBmVcNcsIszxNFxsB fKNW9JYCYqpik8366LE7VbIcNRzfp2h9OO8HRl+H+E08zauK8k7evWEm u/6od+2boggPoiEfGNyvNPaSI7FOIroDsnw/taggzHRX1Z7SOiOiPWPN IwSUyWOZ79VmcQ1GLkC6NlYvG3HwYmynQv6oFwGv/KELSw7ZSdrbTQ0H XvZbqMUI7BaMskmvgm1G7oKZ1YiF7O9ioVNc0+7ASbqmZN7Z98EGU/Qh 2K/BgUe8Hs0XVcdPKrtyYnoQHd2ynKPcMMlTEih2/2HDHjRPJ2aywIpK Nnv4oPo/
No output indicates lack of DNSSEC support for that domain extension.
It is not enough if your TLD supports DNSSEC; the domain registrar must also have an option for entering DS records in their control panel. This can be confirmed by Googling “registrar name dnssec” or by asking a registrar directly. Following are some popular registrars who support DNSSEC:
Once you confirm that both your TLD and domain registrar support DNSSEC, you can start setting up your custom nameservers.
Step One — Install and Set Up NSD on Both Servers
In this step we will install and configure NSD on both the master and slave servers. We will also set up DNS records for the domain example.com. This section will serve as a quick setup for NSD. Read this article for detailed instructions on setting up NSD.
Master Server
In addition to the NSD server package the master server requires the following packages:
- ldnsutils: For DNSSEC key generation and zone signing.
- haveged: For increasing entropy. Installing this package quickens the key generation process.
To avoid an error during installation create a system user named nsd:
useradd -r nsd
The -r option creates a system user. Update the repository and install NSD, ldnsutils, and haveged.
apt-get update
apt-get install nsd ldnsutils haveged
DNS zone transfer from the master server to the slave server is secured by a shared secret. Use the following command to generate the secret randomly:
dd if=/dev/random count=1 bs=32 2> /dev/null | base64
Note down the output string. We will be using it in the configuration file of both the master and slave servers.
sHi0avMk1bME89cnJdHkYzFBbvQmQ8YZ
Create a separate directory for zone files:
mkdir /etc/nsd/zones
Edit NSD’s configuration file:
nano /etc/nsd/nsd.conf
The first is the server section which specifies locations for the zone files, logs, and PID (Process ID) files:
server:
    username: nsd
    hide-version: yes
    zonesdir: "/etc/nsd/zones"
    logfile: "/var/log/nsd.log"
    pidfile: "/run/nsd/nsd.pid"
The hide-version directive prevents NSD from returning its version when CHAOS class query is done.
In the key section we define a key named mykey and input the previously generated secret.
key:
    name: "mykey"
    algorithm: hmac-sha256
    secret: "sHi0avMk1bME89cnJdHkYzFBbvQmQ8YZ"
Each zone section will contain the domain name, zone filename, and details of its slave server:
zone:
    name: example.com
    zonefile: example.com.zone
    notify: 2.2.2.2 mykey
    provide-xfr: 2.2.2.2 mykey
zone:
    name: foobar.org
    zonefile: foobar.org.zone
    notify: 2.2.2.2 mykey
    provide-xfr: 2.2.2.2 mykey
The notify: and provide-xfr: lines should have the IP address of the slave server. Save the file and create a zone file for example.com.
nano /etc/nsd/zones/example.com.zone
We will add the following data into the zone file. Variables are not marked, since you will need to customize all of the entries:
$ORIGIN example.com.
$TTL 1800
@       IN      SOA     master.example.com.    email.example.com. (
                        2014080301
                        3600
                        900
                        1209600
                        1800
                        )
@       IN      NS      master.example.com.
@       IN      NS      slave.example.com.
master  IN      A       1.1.1.1
slave   IN      A       2.2.2.2
@       IN      A       3.3.3.3
www     IN      CNAME   example.com.
@       IN      MX      10 aspmx.l.google.com.
@       IN      MX      20 alt1.aspmx.l.google.com.
@       IN      MX      20 alt2.aspmx.l.google.com.
@       IN      MX      30 aspmx2.googlemail.com.
@       IN      MX      30 aspmx3.googlemail.com.
Save this file and create a zone file for foobar.org.
nano /etc/nsd/zones/foobar.org.zone
The second zone file:
$ORIGIN foobar.org.
$TTL 1800
@       IN      SOA     master.example.com.    email.example.com. (
                        2014080301
                        3600
                        900
                        1209600
                        1800
                        )
@       IN      NS      master.example.com.
@       IN      NS      slave.example.com.
@       IN      A       3.3.3.3
www     IN      CNAME   foobar.org.
@       IN      MX      0 mx.sendgrid.com.
Save the file and check for configuration errors using the nsd-checkconf command:
nsd-checkconf /etc/nsd/nsd.conf
A valid configuration should not output anything. Restart the NSD server:
service nsd restart
Check if the DNS records are in effect for the domains using the dig command.
dig ANY example.com. @localhost +norec +short
A sample output from this command:
master.example.com. email.example.com. 2014080301 3600 900 1209600 1800
master.example.com.
slave.example.com.
3.3.3.3
10 aspmx.l.google.com.
20 alt1.aspmx.l.google.com.
20 alt2.aspmx.l.google.com.
30 aspmx2.googlemail.com.
30 aspmx3.googlemail.com.
Repeat the dig command for the second domain:
dig ANY foobar.org. @localhost +norec +short
We have successfully installed and configured NSD on the master server and have also created two zones.
Slave Server
The slave server requires only the NSD package as no key generation or signing is done on it.
Create a system user named nsd:
useradd -r nsd
Update the repository and install NSD:
apt-get update
apt-get install nsd
Create a directory for the zone files:
mkdir /etc/nsd/zones
Edit the NSD configuration file:
nano /etc/nsd/nsd.conf
Add configuration directives:
server:
    username: nsd
    hide-version: yes
    zonesdir: "/etc/nsd/zones"
    logfile: "/var/log/nsd.log"
    pidfile: "/run/nsd/nsd.pid"

key:
    name: "mykey"
    algorithm: hmac-sha256
    secret: "sHi0avMk1bME89cnJdHkYzFBbvQmQ8YZ"

zone:
    name: example.com
    zonefile: example.com.zone
    allow-notify: 1.1.1.1 mykey
    request-xfr: 1.1.1.1 mykey
zone:
    name: foobar.org
    zonefile: foobar.org.zone
    allow-notify: 1.1.1.1 mykey
    request-xfr: 1.1.1.1 mykey
The secret for mykey should be exactly same as the one entered in the master server. Use the master server’s IP address in the allow-notify and request-xfr lines.
Check for configuration errors:
nsd-checkconf /etc/nsd/nsd.conf
Restart the NSD service:
service nsd restart
Force a zone transfer for both the domains with the nsd-control command:
nsd-control force_transfer example.com
nsd-control force_transfer foobar.org
Now check if this server can answer queries for the domain example.com.
dig ANY example.com. @localhost +norec +short
If this returns the same result as the master this zone is setup properly. Repeat the dig command for the foorbar.org domain to verify if its zone is set up properly. We now have a pair of NSD DNS servers which are authoritative for the domains example.com and foobar.org.
At this point, you should be able to visit your domains in your web browser. They will resolve to the default LAMP server we set up, or whichever host you specified.
Step Two — Generate the Keys and Sign the Zone
In this step we will generate a pair (private and public) of Zone Signing Keys (ZSK) and Key Signing Keys (KSK) for each domain. The commands in the section should be executed on the master server unless otherwise specified.
Change the current directory to NSD’s zone directory:
cd /etc/nsd/zones
The ldns-keygen command generates key files and prints their names in the format K<domain>+<algorithm>+<key-id>. Instead of noting down this name we will assign it to variable so that it can be easily referenced later.
Generate the ZSK in the RSASHA1-NSEC3-SHA1 algorithm:
export ZSK=`ldns-keygen -a RSASHA1-NSEC3-SHA1 -b 1024 example.com`
Next generate a KSK by adding the -k option to the same command:
export KSK=`ldns-keygen -k -a RSASHA1-NSEC3-SHA1 -b 2048 example.com`
This directory will now have the following six additional files:
- 2 private keys with a .private extension.
- 2 public keys with a .key extension.
- 2 DS records with a .ds extension.
In Step Three we will be generating DS records of a different digest type, so, to avoid confusion, delete these DS record files.
rm $ZSK.ds $KSK.ds
Repeat the ldns-keygen commands for the foobar.org domain:
export ZSK2=`ldns-keygen -a RSASHA1-NSEC3-SHA1 -b 1024 foobar.org`
export KSK2=`ldns-keygen -k -a RSASHA1-NSEC3-SHA1 -b 2048 foobar.org`
rm $ZSK2.ds $KSK2.ds
The ldns-signzone command is used to sign the DNS zone. The -s option of this command takes in a salt value. We generate random charaters, compute a SHA1 hash, and pass this value as the salt.
ldns-signzone -n -p -s $(head -n 1000 /dev/random | sha1sum | cut -b 1-16) example.com.zone $ZSK $KSK
A new file named example.com.zone.signed is created.
Execute the ldns-signzone command for the foobar.org domain:
ldns-signzone -n -p -s $(head -n 1000 /dev/random | sha1sum | cut -b 1-16) foobar.org.zone $ZSK2 $KSK2
NSD has to be configured to use the .signed zone files. Edit the configuration file:
nano /etc/nsd/nsd.conf
Modify the zonefile: option under the zone: section for both the domains.
zone:
    name: example.com
    zonefile: example.com.zone.signed
    notify: 2.2.2.2 mykey
    provide-xfr: 2.2.2.2 mykey
zone:
    name: foobar.org
    zonefile: foobar.org.zone.signed
    notify: 2.2.2.2 mykey
    provide-xfr: 2.2.2.2 mykey
To apply the changes and reload the zone file execute the following commands:
nsd-control reconfig
nsd-control reload example.com
nsd-control reload foobar.org
Check for DNSKEY records by doing a DNS query:
dig DNSKEY example.com. @localhost +multiline +norec
This should print the public keys of ZSK and KSK as follows:
; <<>> DiG 9.9.5-3-Ubuntu <<>> DNSKEY example.com. @localhost +norec +multiline
;; global options: +cmd
;; Got answer:
;; ->>HEADER<<- opcode: QUERY, status: NOERROR, id: 14231
;; flags: qr aa; QUERY: 1, ANSWER: 2, AUTHORITY: 0, ADDITIONAL: 1

;; OPT PSEUDOSECTION:
; EDNS: version: 0, flags:; udp: 4096
;; QUESTION SECTION:
;example.com.                IN DNSKEY

;; ANSWER SECTION:
example.com.            1800 IN DNSKEY 256 3 7 (
                                AwEAAbUfMzOJWWWniRSwDb2/2Q6bVpVoEPltPj0h5Qu6
                                hzBdYA4HJYlVXTJ6veNENI/5lV1y84Dhc47j4VAoA66F
                                j7xuTTZjzcuu0KAkQg8Jr2uCmmOuI/rZR7sWZMooHFZ1
                                JPPJZak8HKSNGvHXlMJiz9JPOA3ebJ/liG6lCGJshPah
                                ) ; ZSK; alg = NSEC3RSASHA1; key id = 2870
example.com.            1800 IN DNSKEY 257 3 7 (
                                AwEAAeMDpaVQJixHg1deUDBRRwVldJadgyRZPlieSoVf
                                ps3tYPvTD0nVBOQxenf+m4N/ALpnC5TH4GpxZLYS9IFc
                                rujudQrqA0UuTXBvIWP+XvuJ1yoyZCxO9PHV+GsefjI7
                                kvnmBD1V9UJlGVlHlB3YXHa3f/J5E0RujMnE4a19KG7b
                                HkYebK/2zjzhqXan9442VAG6jhw0lUUJZrCpZjMDEi9n
                                LhJOUSymxglQv1BftALmYnYcuHId9NCwZbvZMb7bS239
                                bm6ONjwqSHqW2slNhBnDVnng2tDfNwjR+eDz5oUbtw4b
                                LMtVACx1WzJEKbIN4rHY7aRe7Ao+4jvSJ8ozVrM=
                                ) ; KSK; alg = NSEC3RSASHA1; key id = 17385

;; Query time: 5 msec
;; SERVER: 127.0.0.1#53(127.0.0.1)
;; WHEN: Thu Sep 04 01:37:18 IST 2014
;; MSG SIZE  rcvd: 467
Repeat the dig command for the second domain and verify the response:
dig DNSKEY foobar.org. @localhost +multiline +norec
The master server now provides signed DNS responses.
Slave
This zone has to be transfered to the slave server now. Log in to the slave server and force a transfer of both the zones.
nsd-control force_transfer example.com
nsd-control force_transfer foobar.org
Query for the DNSKEY records on this server:
dig DNSKEY example.com. @localhost +multiline +norec
This should return the same DNSKEY we saw on the master server. Both the DNS servers have been configured to provide signed DNS replies.
Step Three — Generate DS Records
In this step we will generate two DS records which, in the next step, you will enter in the domain registar’s control panel. The DS records will be of the following specification:
| Algorithm | Digest Type | |
|---|---|---|
| DS record 1 | RSASHA1-NSEC3-SHA1 | SHA1 |
| DS record 2 | RSASHA1-NSEC3-SHA1 | SHA256 |
The following commands are to be executed on the master server.
The ldns-key2ds command generates DS records from the signed zone file. Switch to the zone files directory and execute the commands:
cd /etc/nsd/zones
ldns-key2ds -n -1 example.com.zone.signed && ldns-key2ds -n -2 example.com.zone.signed
The -1 option uses SHA1 as the hash function while -2 uses SHA256 for the same. The -n option writes the result DS record to stdout instead of a file.
This returns two lines of output:
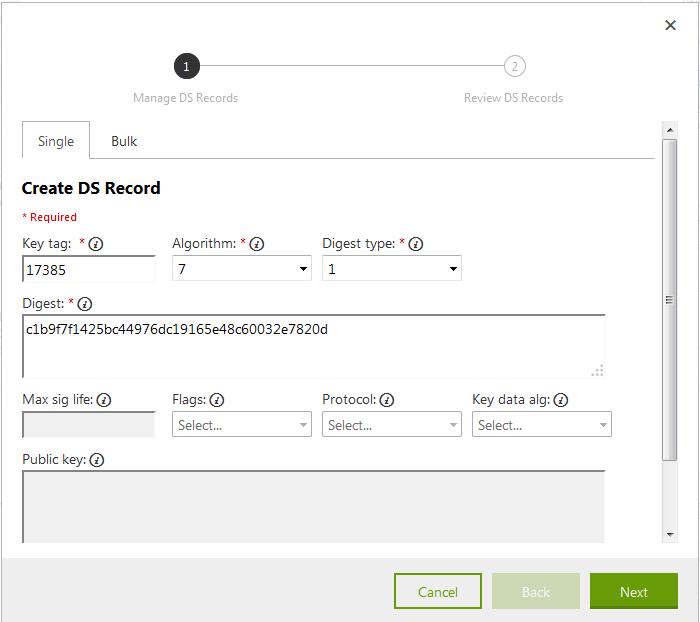
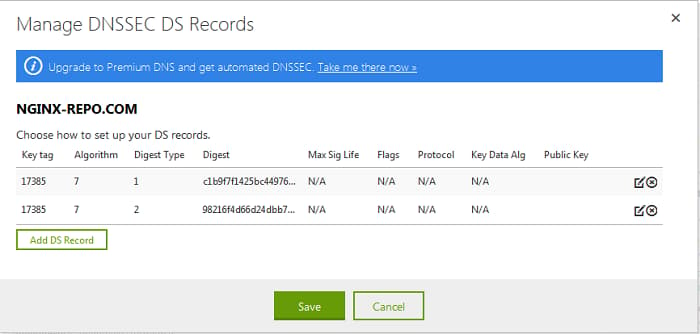
example.com. 1800 IN DS 17385 7 1 c1b9f7f1425bc44976dc19165e48c60032e7820d
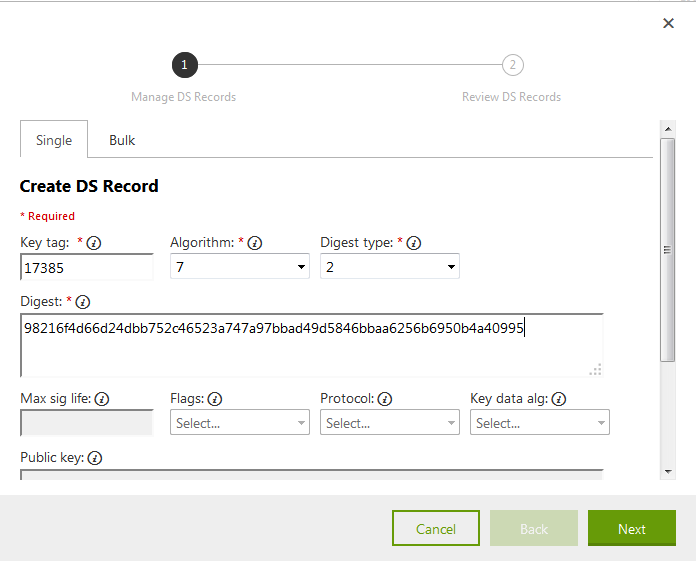
example.com. 1800 IN DS 17385 7 2 98216f4d66d24dbb752c46523a747a97bbad49d5846bbaa6256b6950b4a40995
The following table shows each field of these DS records:
| Key tag | Algorithm | Digest type | Digest | |
|---|---|---|---|---|
| DS record #1 | 17385 | 7 | 1 | c1b9f7f1[…] |
| DS record #2 | 17385 | 7 | 2 | 98216f4d[…] |
Generate DS records for the foobar.org:
cd /etc/nsd/zones
ldns-key2ds -n -1 foobar.org.zone.signed && ldns-key2ds -n -2 foobar.org.zone.signed
Note down all the pieces of all four DS records (two per domain) as shown in the table above. We will be needing them in the next step.
Step Four — Configure DS Records with the Registrar
In this section we will add the DS records in the domain registrar’s control panel. This publishes the DS records to the nameservers of the Top Level Domain (TLD). This step will use GoDaddy’s control panel as an example.
Log in to GoDaddy and choose your domain name.
First time nameserver setup only:
The Host Names section needs to be done once to set up the nameservers for the first time. If your nameserver domain is something different like my-soa.com, you should do this step for the nameserver domain only.
Click Manage in the Host Names section.
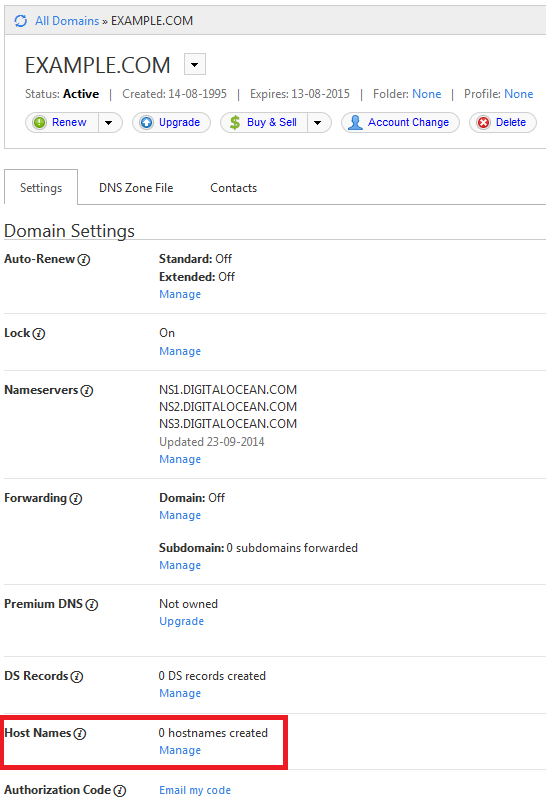
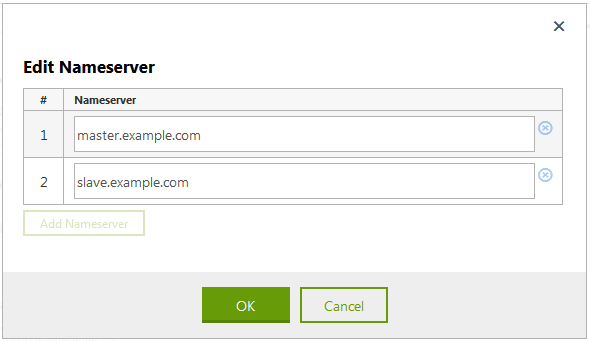
Some registrars may refer to this as “Child nameservers.” Click Add Hostname and create a hostname master.example.com pointing to the IP of the first Droplet.
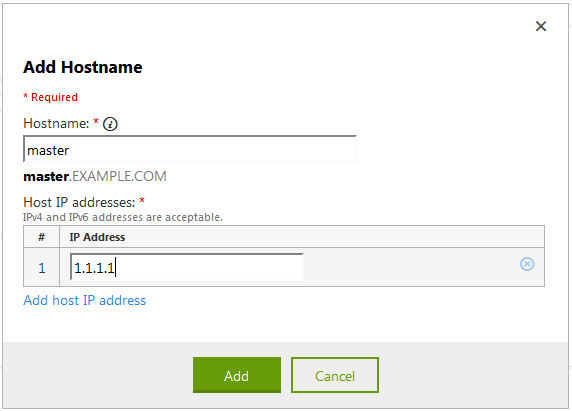
Click Add. Repeat this step once more and create a hostname slave.example.com pointing to the IP of the second Droplet.
All domains:
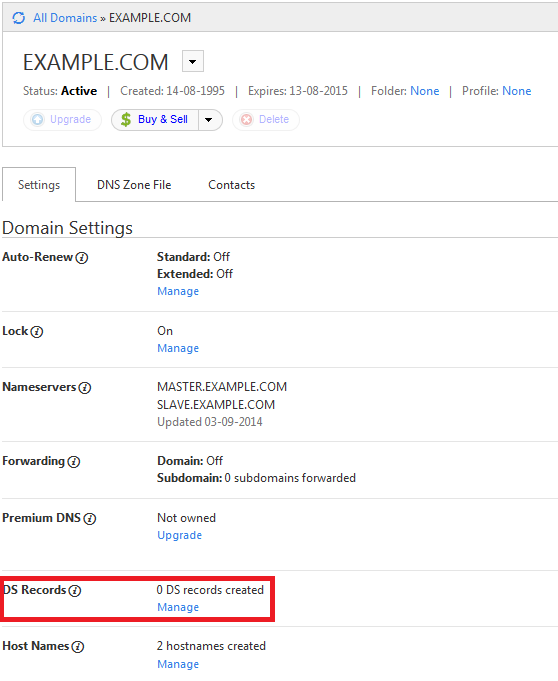
These two hostnames have to be set as nameservers for this domain. Click Manage in the Nameservers section and add both of them.
Click Manage in the DS records section.
Fill in the details in the appropriate fields. Reference the chart in the previous step if necessary.
Save both the records.
After a few minutes, query for DS records.
dig DS example.com. +trace +short | egrep '^DS'
The output should contain both the DS records.
DS 17385 7 2 98216F4D66D24DBB752C46523A747A97BBAD49D5846BBAA6256B6950 B4A40995 from server 192.55.83.30 in 1 ms.
DS 17385 7 1 C1B9F7F1425BC44976DC19165E48C60032E7820D from server 192.55.83.30 in 1 ms.
When doing these steps for the second domain, make sure you set the nameservers to the appropriate nameserver domain.
No hostnames have to be created for this domain.
Step Five — Verify DNSSEC Operation
DNSSEC can be verified at the following sites:
A successful test from the first website displays the following result:
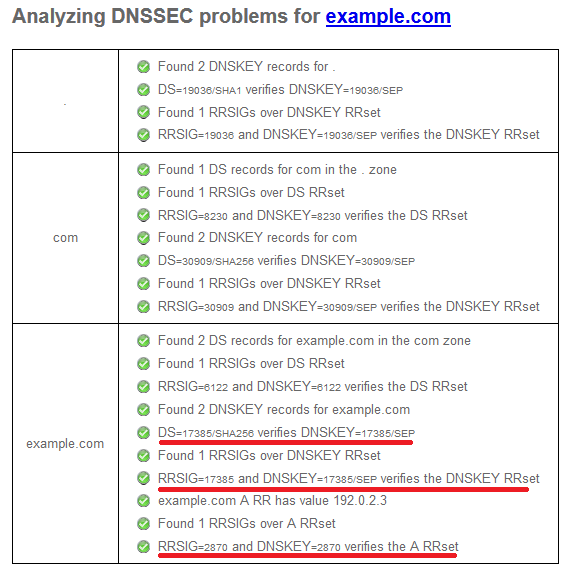
Take note of the marked lines. In plain terms they read:
- DS record #2 (digest type SHA256) verifies KSK (key id 17385)
- KSK (key id 17385) verifies the other DNSKEY (ZSK)
- ZSK (key id 2870) verifies the A record’s signature
Both the master and the slave servers now provide DNSSEC responses.
You should also be able to view both domains in your web browser. They should point to the default Apache/Ubuntu page on the test web server we set up on 3.3.3.3, or whatever web hosts you specified in the domains’ @ entries.
Modifying Zone Records
To modify a zone record the non-signed file (example.com.zone) must be edited. Once modified, the SOA serial number must be incremented, and the zone must be signed again for the changes to take effect.
The SOA serial is in the following format.
YYYYMMDDnn
When making changes to the zone files, set it to the current date. So when making the first change on 22nd September 2014, the serial would be:
2014092201
The first two digits should be incremented when making subsequent changes on the same day. If you forget to increment the SOA serial, changes made to the zone file will not be transferred to the slave server.
Note: Making changes to the .signed file directly will invalidate the signature and cause validation failure.
Instead of entering long commands each time to sign the zone we will create a shell script. Create a file on the master DNS server and edit it.
nano /usr/local/bin/dnszonesigner
Paste the following code:
#!/bin/bash
PDIR=`pwd`
ZONEDIR="/etc/nsd/zones" #location of your zone files
DOMAIN=$1
cd $ZONEDIR
KSK=$(basename $(grep -r "`grep '(ksk)' $DOMAIN.zone.signed | cut -f3-10`" K$DOMAIN.*.key | cut -d':' -f1) .key)
ZSK=$(basename $(grep -r "`grep '(zsk)' $DOMAIN.zone.signed | cut -f3-10`" K$DOMAIN.*.key | cut -d':' -f1) .key)
/usr/bin/ldns-signzone -n -p -s $(head -n 1000 /dev/random | sha1sum | cut -b 1-16) -f $ZONEDIR/$DOMAIN.zone.signed $DOMAIN.zone $ZSK $KSK
/usr/sbin/nsd-control reload $DOMAIN
/usr/sbin/nsd-control notify $DOMAIN
cd $PDIR
You should recognize most of these lines from earlier in the tutorial where we executed them manually.
Make this file executable:
chmod +x /usr/local/bin/dnszonesigner
Now after adding, removing or editing DNS records make sure to increment the SOA serial and execute this script.
dnszonesigner example.com
This shell script works from any directory as we placed it in a directory defined in the $PATH variable.
Additional Reading
Additional copy by Sharon Campbell
Thanks for learning with the DigitalOcean Community. Check out our offerings for compute, storage, networking, and managed databases.
About the author(s)
Independent Technical writer, WordPress developer and Linux administrator.
Current fan and former Editorial Manager at DigitalOcean. Hi! Expertise in areas including Ubuntu, Docker, Rails, and more.
Still looking for an answer?
This textbox defaults to using Markdown to format your answer.
You can type !ref in this text area to quickly search our full set of tutorials, documentation & marketplace offerings and insert the link!
Hi,
Great article! One remark though: Have you thought about how to keep the signed zone fresh? RRSIG’s will expire and should be refreshed in time. In other words, a signed zone should be resigned every once in a while. Would be great if your article would mention that.
Cheers,
– Marco
 This work is licensed under a Creative Commons Attribution-NonCommercial- ShareAlike 4.0 International License.
Become a contributor for community
Get paid to write technical tutorials and select a tech-focused charity to receive a matching donation.

DigitalOcean Documentation
Full documentation for every DigitalOcean product.

Resources for startups and AI-native businesses
The Wave has everything you need to know about building a business, from raising funding to marketing your product.
The developer cloud
Scale up as you grow — whether you're running one virtual machine or ten thousand.

Start building today
From GPU-powered inference and Kubernetes to managed databases and storage, get everything you need to build, scale, and deploy intelligent applications.
