By Jesin A and Sharon Campbell

Introduction
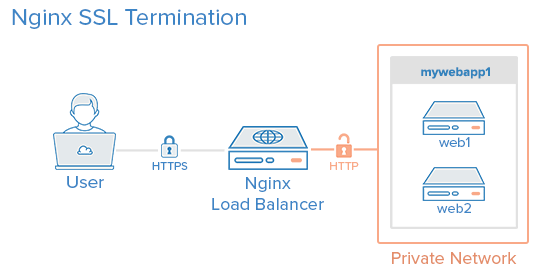
This article shows you how to set up Nginx load balancing with SSL termination with just one SSL certificate on the load balancer. This will reduce your SSL management overhead, since the OpenSSL updates and the keys and certificates can now be managed from the load balancer itself.
About SSL Termination
Nginx can be configured as a load balancer to distribute incoming traffic around several backend servers. SSL termination is the process that occurs on the load balancer which handles the SSL encryption/decryption so that traffic between the load balancer and backend servers is in HTTP. The backends must be secured by restricting access to the load balancer’s IP, which is explained later in this article.
Prerequisites
In this tutorial the commands must be run as the root user or as a user with sudo privileges. You can see how to set that up in the Users Tutorial.
The following guides can be used as reference:
A LAMP server is not required, but we’ll be using it as an example in this tutorial.
Setup
This tutorial makes use of the following 3 droplets:
Droplet 1 (Frontend)
- Image: Ubuntu 14.04
- Hostname: loadbalancer
- Private IP: 10.130.227.33
Droplet 2 (Backend)
- Image: Ubuntu 14.04
- Hostname: web1
- Private IP: 10.130.227.11
Droplet 3 (Backend)
- Image: Ubuntu 14.04
- Hostname: web2
- Private IP: 10.130.227.22
Domain name - example.com
All these Droplets must have private networking enabled.
Update and upgrade the software on all three servers:
apt-get update && apt-get upgrade -y
Reboot each server to apply the upgrades. This is important, since OpenSSL needs to be on its latest version to be secure.
We will be setting up a new Nginx virtual host for the domain name with the upstream module load balancing the backends.
Prior to setting up Nginx loadbalancing, you should have Nginx installed on your VPS. You can install it quickly with apt-get:
apt-get install nginx
On the two backend servers, update your repositories and install Apache:
apt-get install apache2
Install PHP on both backend servers:
apt-get install php5 libapache2-mod-php5 php5-mcrypt
For more information, see this article.
Generate Keys And Create An SSL Certificate
In this section, you will run through the steps needed to create an SSL certificate. This article explains in detail about SSL certificates on Nginx.
Create the SSL certificate directory and switch to it.
mkdir -p /etc/nginx/ssl/example.com
cd /etc/nginx/ssl/example.com
Create a private key:
openssl genrsa -des3 -out server.key 2048
Remove its passphrase:
openssl rsa -in server.key -out server.key
Create a CSR (Certificate Signing Request):
openssl req -new -key server.key -out server.csr
Use this CSR to obtain a valid certificate from a certificate authority or generate a self-signed certificate with the following command.
openssl x509 -req -days 365 -in server.csr -signkey server.key -out server.crt
Once this is done this directory will contain the following files:
- server.key - The private key
- ca-certs.pem - A collection of your CA’s root and intermediate certificates. Only present if you obtained a valid certificate from a CA.
- server.crt - The SSL certificate for your domain name
Virtual Host File And Upstream Module
Create a virtual hosts file inside the Nginx directory
nano /etc/nginx/sites-available/example.com
Add the upstream module containing the private IP addresses of the backend servers
upstream mywebapp1 {
    server 10.130.227.11;
    server 10.130.227.22;
}
Begin the server block after this line. This block contains the domain name, references to the upstream servers, and headers that should be passed to the backend.
server {
    listen 80;
    server_name example.com www.example.com;

    location / {
        proxy_pass http://mywebapp1;
        proxy_set_header Host $host;
        proxy_set_header X-Real-IP $remote_addr;
        proxy_set_header X-Forwarded-For $proxy_add_x_forwarded_for;
        proxy_set_header X-Forwarded-Proto $scheme;
    }
}
The proxy_set_header directive is used to pass vital information about the request to the upstream servers.
Save this file and create a symbolic link to the sites-enabled directory.
ln -s /etc/nginx/sites-available/example.com /etc/nginx/sites-enabled/example.com
Perform a configuration test to check for errors.
service nginx configtest
If no errors are displayed, reload the nginx service.
service nginx reload
Load balancing has now been configured for HTTP.
Enable SSL
Add the following directives to the virtual hosts file (/etc/nginx/sites-available/example.com) inside the server {} block. These lines will be shown in context in the next example.
listen 443 ssl;
ssl on;
ssl_certificate         /etc/nginx/ssl/example.com/server.crt;
ssl_certificate_key     /etc/nginx/ssl/example.com/server.key;
ssl_trusted_certificate /etc/nginx/ssl/example.com/ca-certs.pem;
Ignore the ssl_trusted_certificate directive if you are using self-signed certificates. Now the server block should look like this:
server {
    listen 80;
    listen 443 ssl;
    server_name example.com www.example.com;

    ssl on;
    ssl_certificate         /etc/nginx/ssl/example.com/server.crt;
    ssl_certificate_key     /etc/nginx/ssl/example.com/server.key;
    ssl_trusted_certificate /etc/nginx/ssl/example.com/ca-certs.pem;

    location / {
        proxy_pass http://mywebapp1;
        proxy_set_header Host $host;
        proxy_set_header X-Real-IP $remote_addr;
        proxy_set_header X-Forwarded-For $proxy_add_x_forwarded_for;
        proxy_set_header X-Forwarded-Proto $scheme;
    }
}
Check for configuration errors and reload the Nginx service.
service nginx configtest && service nginx reload
Securing The Backend Servers
Currently, the website hosted on the backend servers can be directly accessed by anyone who knows its public IP address. This can be prevented by configuring the web servers on the backends to listen only on the private interface. The steps to do this in Apache are as follows.
Edit the ports.conf file.
nano /etc/apache2/ports.conf
Find the following line:
Listen 80
Replace it with the backend server’s own private IP address:
Listen 10.130.227.22:80
Do this on all the backend servers and restart Apache.
service apache2 restart
The next step is to restrict HTTP access to the load balancer’s private IP. The following firewall rule achieves this.
iptables -I INPUT -m state --state NEW -p tcp --dport 80 ! -s 10.130.227.33 -j DROP
Replace the example with the load balancer’s private IP address and execute this rule on all the backend servers.
Testing The Setup
Create a PHP file on all the backend servers (web1 and web2 in this example). This is for testing and can be removed once the setup is complete.
nano /var/www/html/test.php
It should print the accessed domain name, the IP address of the server, the user’s IP address, and the accessed port.
<?php
    header( 'Content-Type: text/plain' );
    echo 'Host: ' . $_SERVER['HTTP_HOST'] . "\n";
    echo 'Remote Address: ' . $_SERVER['REMOTE_ADDR'] . "\n";
    echo 'X-Forwarded-For: ' . $_SERVER['HTTP_X_FORWARDED_FOR'] . "\n";
    echo 'X-Forwarded-Proto: ' . $_SERVER['HTTP_X_FORWARDED_PROTO'] . "\n";
    echo 'Server Address: ' . $_SERVER['SERVER_ADDR'] . "\n";
    echo 'Server Port: ' . $_SERVER['SERVER_PORT'] . "\n\n";
?>
Access this file several times with your browser or using curl. Use curl -k on self-signed certificate setups to make curl ignore SSL errors.
curl https://example.com/test.php https://example.com/test.php https://example.com/test.php
The output will be similar to the following.
   Host: example.com
   Remote Address: 10.130.245.116
   X-Forwarded-For: 117.193.105.174
   X-Forwarded-Proto: https
   Server Address: 10.130.227.11
   Server Port: 80

   Host: example.com
   Remote Address: 10.130.245.116
   X-Forwarded-For: 117.193.105.174
   X-Forwarded-Proto: https
   Server Address: 10.130.227.22
   Server Port: 80

   Host: example.com
   Remote Address: 10.130.245.116
   X-Forwarded-For: 117.193.105.174
   X-Forwarded-Proto: https
   Server Address: 10.130.227.11
   Server Port: 80
Note that the Server Address changes on each request, indicating that a different server is responding to each request.
Hardening SSL Configuration
This section explains configuring SSL according to best practices to eliminate vulnerabilities with older ciphers and protocols. Individual lines are shown in this section and the complete configuration file is shown in the last section of this tutorial.
Enabling SSL session cache improves the performance of HTTPS websites. The following directives must be placed after ssl_trusted_certificate. They enable shared caching of size 20MB with a cache lifetime of 10 minutes.
ssl_session_cache shared:SSL:20m;
ssl_session_timeout 10m;
Specify the protocols and ciphers to be used in the SSL connection. Here we have omitted SSLv2 and disabled insecure ciphers like MD5 and DSS.
ssl_prefer_server_ciphers       on;
ssl_protocols                   TLSv1 TLSv1.1 TLSv1.2;
ssl_ciphers                     ECDH+AESGCM:DH+AESGCM:ECDH+AES256:DH+AES256:ECDH+AES128:DH+AES:ECDH+3DES:DH+3DES:RSA+AESGCM:RSA+AES:RSA+3DES:!aNULL:!MD5:!DSS;
Strict Transport Security instructs all supporting web browsers to use only HTTPS. Enable it with the add_header directive.
add_header Strict-Transport-Security "max-age=31536000";
Check for configuration errors and reload the Nginx service.
service nginx configtest && service nginx reload
Complete Configuration
After configuring and hardening SSL termination, the complete configuration file will look like this:
/etc/nginx/sites-available/example.com
upstream mywebapp1 {
    server 10.130.227.11;
    server 10.130.227.22;
}

server {
    listen 80;
    listen 443 ssl;
    server_name example.com www.emxaple.com;

    ssl on;
    ssl_certificate         /etc/nginx/ssl/example.com/server.crt;
    ssl_certificate_key     /etc/nginx/ssl/example.com/server.key;
    ssl_trusted_certificate /etc/nginx/ssl/example.com/ca-certs.pem;

    ssl_session_cache shared:SSL:20m;
    ssl_session_timeout 10m;

    ssl_prefer_server_ciphers       on;
    ssl_protocols                   TLSv1 TLSv1.1 TLSv1.2;
    ssl_ciphers                     ECDH+AESGCM:DH+AESGCM:ECDH+AES256:DH+AES256:ECDH+AES128:DH+AES:ECDH+3DES:DH+3DES:RSA+AESGCM:RSA+AES:RSA+3DES:!aNULL:!MD5:!DSS;

    add_header Strict-Transport-Security "max-age=31536000";

    location / {
        proxy_pass http://mywebapp1;
        proxy_set_header Host $host;
        proxy_set_header X-Real-IP $remote_addr;
        proxy_set_header X-Forwarded-For $proxy_add_x_forwarded_for;
        proxy_set_header X-Forwarded-Proto $scheme;
    }
}
Do a SSL Server Test and this setup should get an A+ grade. Run the curl test again to check if everything is working properly.
curl https://example.com/test.php https://example.com/test.php https://example.com/test.php
Further Reading
To learn more about load-balancing algorithms read this article.
Thanks for learning with the DigitalOcean Community. Check out our offerings for compute, storage, networking, and managed databases.
About the author(s)
Independent Technical writer, WordPress developer and Linux administrator.
Current fan and former Editorial Manager at DigitalOcean. Hi! Expertise in areas including Ubuntu, Docker, Rails, and more.
Still looking for an answer?
This textbox defaults to using Markdown to format your answer.
You can type !ref in this text area to quickly search our full set of tutorials, documentation & marketplace offerings and insert the link!
A quick question, as you’re using plain ol’ http between the LB and the web servers, how can you stop others on the DO private network from sniffing out your packets. Given you’ve gone to lengths to secure the public connection what would you do for the other bits? Nice article by the way, I have wondered about SSLs and nginx before, thanks!
@aled.skyrail DO might have tools in place to prevent packet sniffers from running on their network by detecting promiscuous network interfaces.
But I’m not sure, you may want to create a ticket and ask them about it.
@jesin.a thanks for the response, and okay, I’ll see what they say. I’m not setting anything up at the moment but it’s handy to know. Thanks again!
In my case i don’t needed load balance (yet), but migrate from pound proxy to a more flexible solution. I simply added a separate:
/etc/nginx/sites-available/example.com /etc/nginx/sites-available/a.example.com /etc/nginx/sites-available/example.net
per each SSL independent site i wanted to aggregate, nginx handled all the certificates and now i have upstream config that could grow later on the infrastructure.
Great tutorial !!
Overall, great tutorial !!! However, it would be better to add some info about which plan to choose, and how many users/requests can handle load-balancer/web-servers approximately.
How can i configure the backend servers to run NGINX istead of APACHE? I mean, shall i just install and configure nginx normally instead of apache?
Thanks for the article. My simple question is, this configuration takes a way the need for redundancy to grantee availability. I mean a failure of the LoadBalancer means no service!!! How can several LoadBalancers be configured to run in parallel?
 This work is licensed under a Creative Commons Attribution-NonCommercial- ShareAlike 4.0 International License.
Become a contributor for community
Get paid to write technical tutorials and select a tech-focused charity to receive a matching donation.

DigitalOcean Documentation
Full documentation for every DigitalOcean product.

Resources for startups and AI-native businesses
The Wave has everything you need to know about building a business, from raising funding to marketing your product.
The developer cloud
Scale up as you grow — whether you're running one virtual machine or ten thousand.

Start building today
From GPU-powered inference and Kubernetes to managed databases and storage, get everything you need to build, scale, and deploy intelligent applications.
