By Jesin A and Sharon Campbell

Introduction
WordPress’s multisite feature offers the ability to create multiple websites from a single installation of WordPress. Each site can have a separate theme, set of plugins, and collection of content (posts and pages). This reduces the overhead of maintaining and updating several installations of WordPress, while allowing you to host multiple sites which are totally unrelated to one another.
WordPress multisite comes in two flavours: subdirectory or subdomain. In this tutorial, we will set up WordPress multisite to use subdomains. That means that sites we create will have a subdomain web address like http://wp-site.yourdomain.com. This can be mapped to an external domain like http://wp-site.net so that each site looks independent from the outside.
Prerequisites
This tutorial requires the user to have a knowledge of the following:
We will be creating three WordPress sites with the following domain names:
-
Site 1:
Domain: examplewp.com (Primary domain)
This is the site that is created when WordPress is installed. -
Site 2:
External Domain: shoppingsite.com
Subdomain: shoppingsite.example.com -
Site 3:
External Domain: companysite.org
Subdomain: companysite.example.com
The first domain is the primary domain name through which WordPress will be installed. Make sure to set up DNS for all three domains to point to the IP address of the Droplet which will host WordPress.
Step One - Set Up DNS Wildcard Records
In this section, we will add a DNS wildcard record for the primary domain so that more sites can be added at any time, without needing individual A records. (Alternately, you can add a new A record for each subdomain.)
Note: This has to be done only for the *primary domain (examplewp.comin this tutorial).
Log in to your DigitalOcean control panel and navigate to the Networking section. Edit the primary domain and create a wildcard A record for this domain pointing to the Droplet’s IP address. A wildcard record is created by entering an asterisk (*) in the hostname input box as shown in the screenshot below.
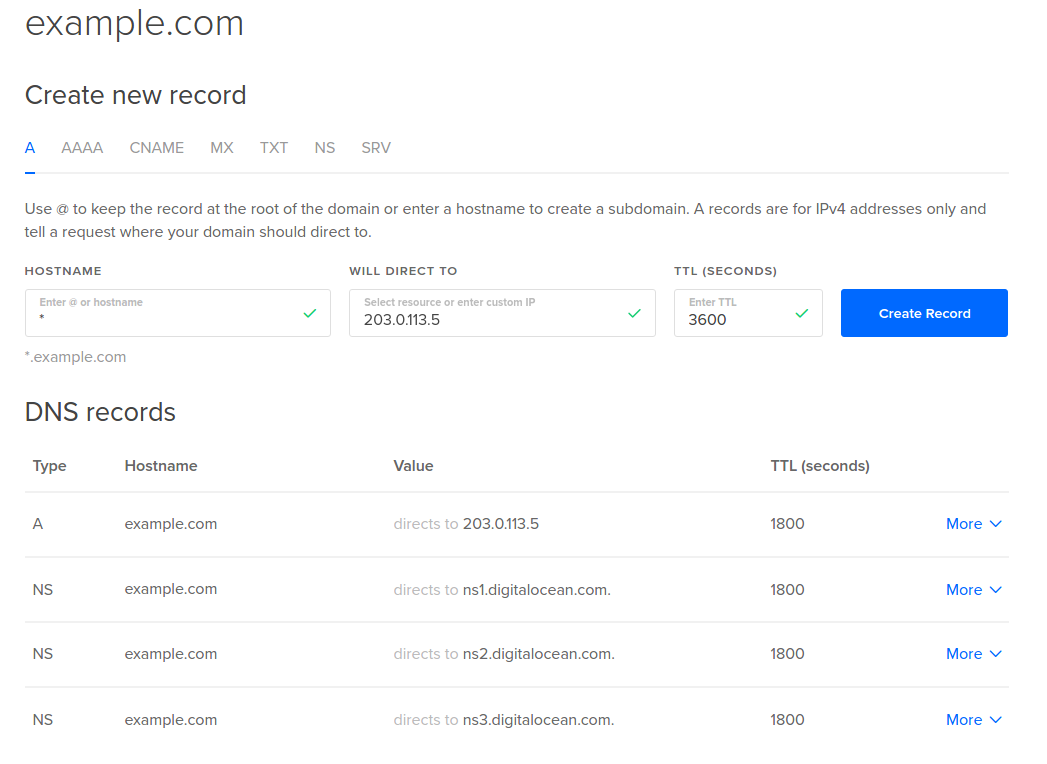
If you host your domain’s DNS elsewhere, you should set the wildcard record there instead.
What you should see now:
DNS queries for any random-sub-domain.examplewp.com should return the IP address of your Droplet.
Step Two - Install and Configure the LEMP Stack
In this section, we will install and configure Nginx, MySQL, and PHP. There is a detailed article on setting up a LEMP stack that you can reference if you would like to. This section will serve as a quick setup. There is also a LEMP on Ubuntu 14.04 image under the Applications tab in the Select Image section when creating a Droplet.
Update the repositories and install Nginx, MySQL, PHP5-FPM and other necessary PHP modules.
apt-get update
apt-get install -y nginx mysql-server php5-fpm php5-mysql php5-curl php5-mcrypt php5-gd
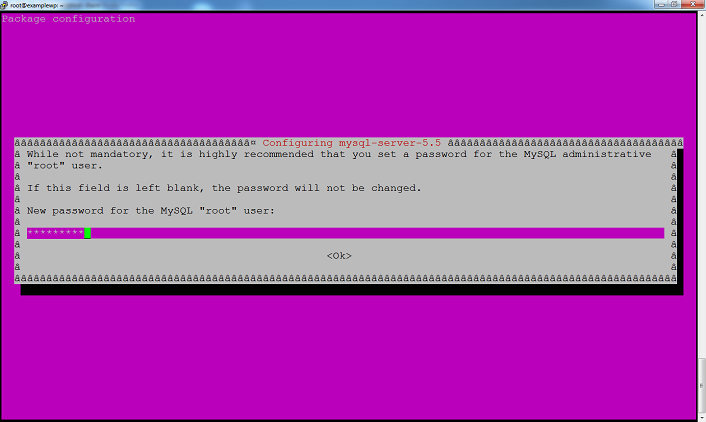
When MySQL server is being installed, you will be prompted to enter a password for the root database user. Please enter a strong password and do not leave it blank. You will enter the password twice.
Create a document root for Nginx which will hold the WordPress files. We will use /usr/share/nginx/wordpress throughout this tutorial.
mkdir /usr/share/nginx/wordpress
We will replace Nginx’s default virtual host with our own, so remove its symlink in the sites-enabled directory.
rm /etc/nginx/sites-enabled/default
Create a new virtual host file inside the sites-available directory. This file can be named anything. In our example, we will call it wp-ms.
nano /etc/nginx/sites-available/wp-ms
Edit this file and place the following configuration. Edit the text highlighted in red according to your environment. In the server_name line, you should add all three (or more) of your multisite domains, and the wildcard subdomain for the first domain.
server {
    listen [::]:80 ipv6only=off;
    server_name examplewp.com *.examplewp.com shoppingsite.com companysite.org;

    root /usr/share/nginx/wordpress;
    index index.php index.html index.htm;

    location / {
	    try_files $uri $uri/ /index.php?$args ;
    }

    location ~ /favicon.ico {
        access_log off;
        log_not_found off;
    }

    location ~ \.php$ {
        try_files $uri /index.php;
		include fastcgi_params;
        fastcgi_pass unix:/var/run/php5-fpm.sock;
	}

	access_log	/var/log/nginx/$host-access.log;
	error_log	/var/log/nginx/wpms-error.log;
}
If this Droplet will host only this WordPress installation, the listen and server_name directives can be changed to the following:
listen [::]:80 default_server ipv6only=off;
server_name examplewp.com *.examplewp.com;
The use of the $host variable in the access_log directive creates separate log files for each domain like examplewp.com-access.log and shoppingsite.com-access.log. It is not possible to use such variables for the error_log directive, so all errors are logged in a single file.
Save this file and create a symlink of this file inside the sites-enabled directory.
ln -s /etc/nginx/sites-available/wp-ms /etc/nginx/sites-enabled/wp-ms
Execute an Nginx configuration test and restart if it returns OK.
service nginx configtest
service nginx restart
Step Three - Create a MySQL Database and User for WordPress
In this section, we will create a MySQL database for WordPress and a user with permissions for this database only.
Log in to the MySQL command line as the root user.
mysql -u root -p
Create a database.
CREATE DATABASE wordpress;
Create a MySQL user and grant permissions to this database:
CREATE USER 'wordpress_user'@'localhost' IDENTIFIED BY 'password';
GRANT ALL PRIVILEGES ON wordpress.* TO 'wordpress_user'@'localhost';
Replace the word password with a strong password. Flush the privileges and exit the MySQL command line.
FLUSH PRIVILEGES;
exit
Note down these details as will be needing them in Step Four.
Database Name: wordpress
Database User: wordpress_user
Database Password: password
More information about MySQL users can be found in this article.
Step Four - Download and Install WordPress
In this section, we will download the latest version of WordPress and install it. This will be for our first site, examplewp.com.
Download and extract WordPress.
wget http://wordpress.org/latest.tar.gz
tar -xf latest.tar.gz
Move the extracted files into the document root.
mv wordpress/* /usr/share/nginx/wordpress/
Assign ownership to the user www-data. This is essential for media uploads and for core/plugin/theme updates to work in WordPress.
chown -R www-data:www-data /usr/share/nginx/wordpress
Access the primary domain in your browser to begin the WordPress installation.
http://examplewp.com/
You can add the “www” suffix to the URL if needed. Click the Create a Configuration File button followed by the Let’s go! button. Fill in the database details (use the information from Step Three) and click Submit.

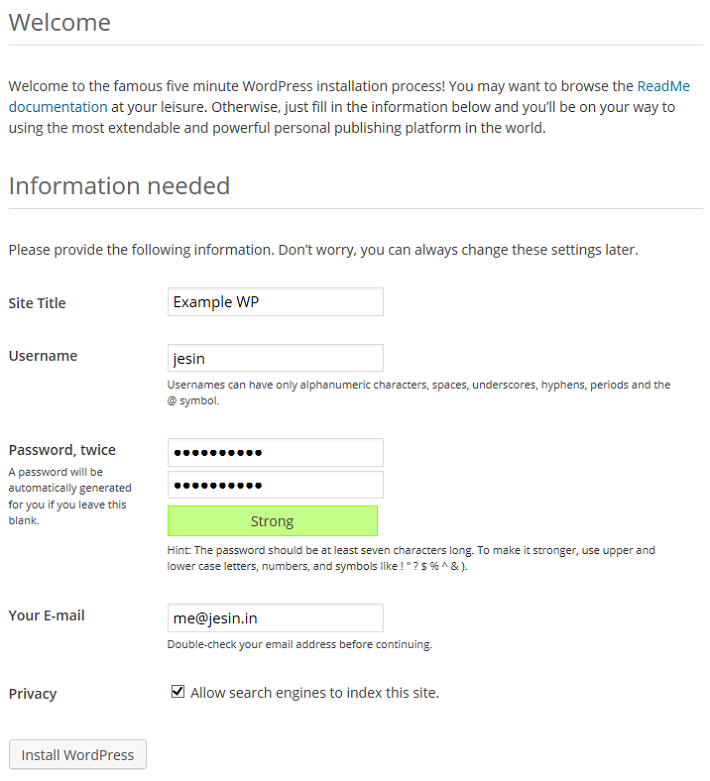
At this point, WordPress will establish a connection with the database to test the entered credentials. Once the connection succeeds, the Run the install button appears. Click on it. Complete the Information needed form to set up your site title, username, password, and email, and then click Install WordPress. It is recommended to choose a non-generic username for security.
Step Five - Enable Multisite and Create Additional Sites
In this section, we will enable WordPress Multisite and create the two additional sites mentioned in the Prequisites section of this article.
A PHP constant has to be defined in the wp-config.php file to enable the Network Setup page.
Edit the wp-config.php file:
nano /usr/share/nginx/wordpress/wp-config.php
Add the following code before the comment /* That's all, stop editing! Happy blogging. */:
/* Multisite settings */
define( 'WP_ALLOW_MULTISITE', true );
We will be editing this file a few more times during this tutorial. Feel free to add all of the new lines in the /* Multisite settings */ section we just created.
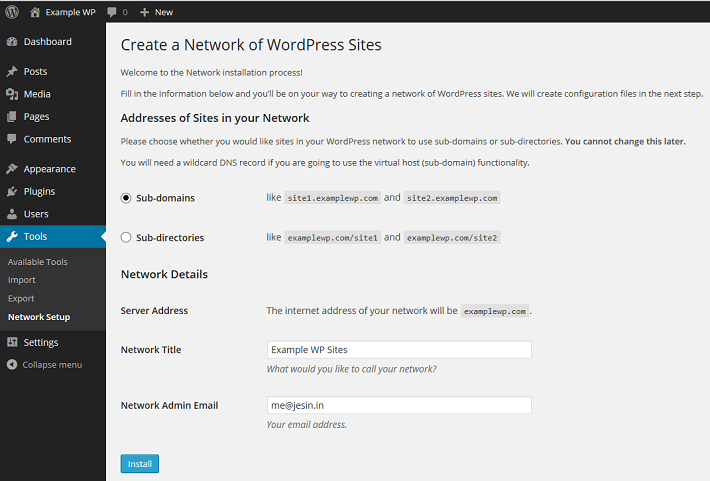
Save the file. Log in to the WordPress admin panel and navigate to Tools > Network Setup. Choose the Sub-domains option, modify the Network Title as desired, and then click Install.
You will be presented with two blocks of code to be added in the wp-config.php and .htaccess files. Copy the wp-config.php code which looks similar to the following:
define('MULTISITE', true);
define('SUBDOMAIN_INSTALL', true);
define('DOMAIN_CURRENT_SITE', 'examplewp.com');
define('PATH_CURRENT_SITE', '/');
define('SITE_ID_CURRENT_SITE', 1);
define('BLOG_ID_CURRENT_SITE', 1);
Edit the wp-config.php file.
nano /usr/share/nginx/wordpress/wp-config.php
Add these lines before the comment /* That's all, stop editing! Happy blogging. */ and save it. The code displayed for .htaccess can be ignored, as Nginx does not have this file.
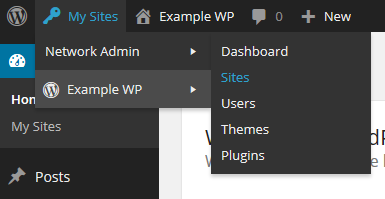
Log out of the WordPress admin panel, and log in again. From the admin toolbar on the top left, navigate to the My Sites > Network Admin > Sites.
Click the Add New button to open the Add New Site form. The following screenshot shows the filled-in details for the shopping site in our example. The Site Address entered will form the subdomain of this site.
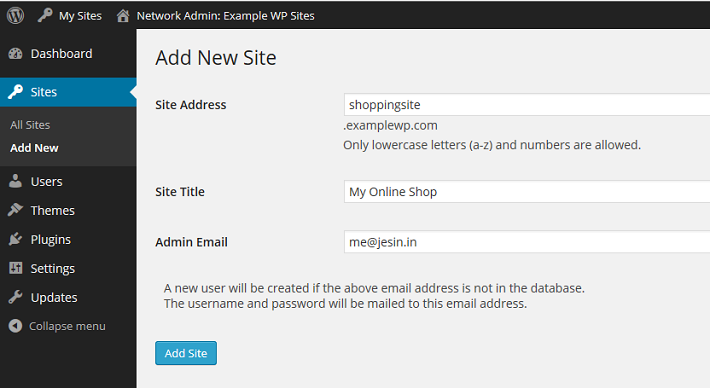
Click Add Site and the created site will be accessible via http://shoppingsite.examplewp.com.
Repeat these steps to create the second site (companysite.examplewp.com in our example).
What you should see now:
The following three WordPress sites:
Each of them will have their own content, theme, and active set of plugins.
Step Six - Set Up Domain Mapping
In this section, we will enable you to use a separate domain name for each WordPress site, by downloading and enabling the WordPress MU Domain Mapping plugin. This plugin allows users of WordPress Multisite to map their blog/site to another domain.
Log in to your Droplet via SSH and download the WordPress MU Domain Mapping plugin. First install the unzip command, and then extract the plugin.
wget http://downloads.wordpress.org/plugin/wordpress-mu-domain-mapping.latest-stable.zip
apt-get install unzip
unzip wordpress-mu-domain-mapping.latest-stable.zip
Move the extracted files to the WordPress plugin directory.
mv wordpress-mu-domain-mapping /usr/share/nginx/wordpress/wp-content/plugins/
Copy the sunrise.php file from the plugin’s directory to the wp-content directory.
cp /usr/share/nginx/wordpress/wp-content/plugins/wordpress-mu-domain-mapping/sunrise.php /usr/share/nginx/wordpress/wp-content/
Edit the wp-config.php file and add the following line before the comment /* That's all, stop editing! Happy blogging. */.
File: /usr/share/nginx/wordpress/wp-config.php
define('SUNRISE', 'on');
Save this file and return to the web browser. From the WordPress toolbar navigate to My Sites > Network Admin > Plugins.

Click the Network Activate link under the WordPress MU Domain Mapping plugin. Go to Settings > Domain Mapping and make changes to the Domain Options as follows:
- Uncheck Remote Login
- Check Permanent Redirect
- Uncheck Redirect administration pages to site’s original domain
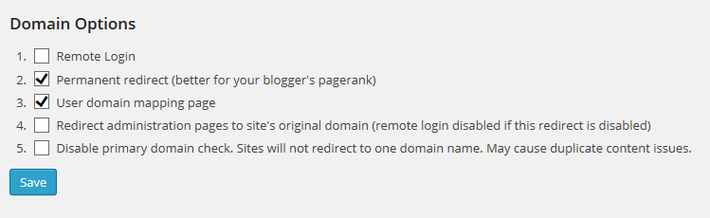
Click Save once done. These settings redirect all requests for subdomains (like companysite.examplewp.com) to their respective external domains (like companysite.org) including the administration pages (/wp-admin).
In the next step we will be mapping a domain name to each site based on its site ID. There are many ways to find the ID of a site but for easier administration we will create a simple WordPress Must-use plugin that displays an additional ID column on the Sites page.
Log in to your Droplet via SSH and create an mu-plugins directory.
mkdir /usr/share/nginx/wordpress/wp-content/mu-plugins
Create a PHP file inside this directory and paste the code that follows:
nano /usr/share/nginx/wordpress/wp-content/mu-plugins/wpms_blogid.php
You can copy this content exactly:
<?php
add_filter( 'wpmu_blogs_columns', 'do_get_id' );
add_action( 'manage_sites_custom_column', 'do_add_columns', 10, 2 );
add_action( 'manage_blogs_custom_column', 'do_add_columns', 10, 2 );

function do_add_columns( $column_name, $blog_id ) {
    if ( 'blog_id' === $column_name )
	    echo $blog_id;
    return $column_name;
}

function do_get_id( $columns ) {
	$columns['blog_id'] = 'ID';
	return $columns;
}
The Sites > All Sites section should now show an additional ID column.
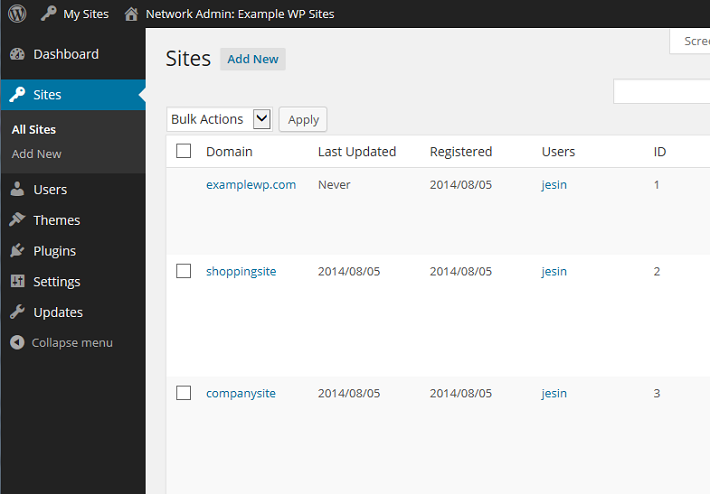
Note down the ID values for each site and go to the Settings > Domains page. Enter the site ID followed by the external domain for the site. For example, since companysite has an ID of 3, on this page, the Site ID should be 3, and the domain should be companysite.org.
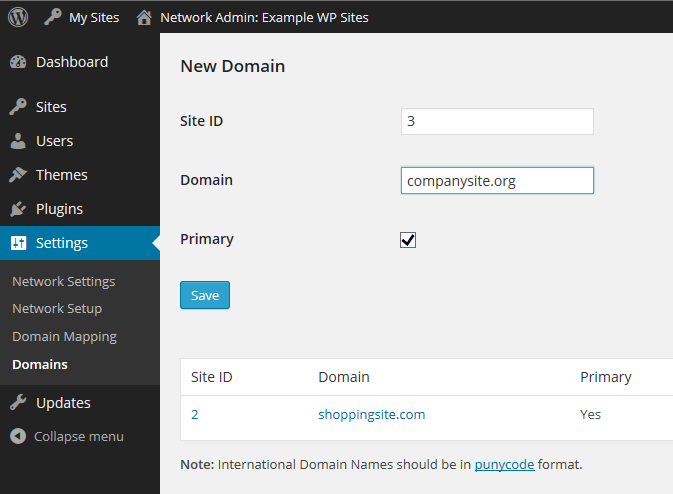
You may add a “www” prefix if you wish to set the site URL as www.companysite.org. Repeat these steps for the other domains. Click Save at the bottom of the page.
What you should see now:
Each site will have its own domain name instead of a subdomain; i.e., entering http://companysite.org in your browser will open the My Online Company Site. You can check this now by visiting http://shoppingsite.com and http://companysite.org. You should see the site title change in the upper left corner of the page.
Now each site can be maintained separately through its own WordPress admin panel:
http://examplewp.com/wp-admin/
http://shoppingsite.com/wp-admin/
http://companysite.org/wp-admin/
Updates to the core/plugins/themes and installation of plugins/themes should be done from the network admin page of the primary domain:
http://examplewp.com/wp-admin/network/
Further reading
Thanks for learning with the DigitalOcean Community. Check out our offerings for compute, storage, networking, and managed databases.
About the author(s)
Independent Technical writer, WordPress developer and Linux administrator.
Current fan and former Editorial Manager at DigitalOcean. Hi! Expertise in areas including Ubuntu, Docker, Rails, and more.
Still looking for an answer?
This textbox defaults to using Markdown to format your answer.
You can type !ref in this text area to quickly search our full set of tutorials, documentation & marketplace offerings and insert the link!
Following these steps exactly… I’m on step 5 and I’m not able to Choose the Sub-domains option (It says: “Because your install is in a directory, the sites in your WordPress network must use sub-directories.”)
Thanks
I installed the Multisite network with Sub-domain option! I set up a wildcard record according to these steps for my primary domain… But I am not sure what kind of DNS query to do to make sure it is working. Will a WHOIS lookup or PING work? Unfortunately I can’t reach any subsites in my browser (e.g. example.mydomain.com ) I was able to install everything and add a subsite but the pages are not loading
Great Tutorial BTW,
Quick question - How do we increase the Max Upload Size?
Changing the Upload size in Mutlisite Dashboard -> Settings -> Network Settings -> Max upload file size does not work.
I believe there may be a conflict somewhere with another file(s).
Thanks, Joe.
I’ll confess, I did skip the site ID plugin and just refer to the “ID=#” in the address - ended up working great though!
Most excellent tutorial, thanks Jesin!
If my primary site is mysite.com and I want to add 10-20 sites like site.mysite.com, site2.mysite.com and so on… when they are mapped to their original domain like site1.com, site2.com, will be they accessible also in their sub-domain site.mysite.com and how Google will index that sites?
Can this be a solution for a web agency to host and maintain clients sites? or their is another approach?
Replying to tosho
Hosting WordPress sites of different clients on a single installation is not recommended. It is better to have separate installations and use InfiniteWP to manage them from a single place.
I am currently hosting domain1.com with WordPress on my server. All is working well and it functions like a normal website would. I want to host domain2.com on the same server. It will have an entirely different domain name. I don’t want domain2.domain1.com. I have Nginx, MySQL, PHP, and WordPress. I want to have domain2.com be similar in nature to domain1.com. What’s the best way to accomplish this?
Is this really the best method? It doesn’t seem very elegant for something simple like this. If it still is the best route though, could you expand upon those steps? Thanks.
I tried step five with modifying the wp-config.php file and then my website stopped working (shows zero content). I removed the stuff I just put in and it still isn’t working. Not sure what is wrong. Don’t think anything in that file is beyond what I normally have. Also moved the plugins up a directory to see if they were the problem, but that didn’t help.
Hi, great tutorial.
I’m having trouble with my multi-site setup and am looking for help. I’ve followed the steps above but can’t seem to access my multi-sites.
My server setup is as follows:
Each virtual block is running their own instance of Wordpress. The wpmu.domain.com block will be running a multisite. The multisite is configured to run subdirectories, wpmu.domain.com/site1 for example.
The problem is that when I try to access any of the multisites I get a 404 error. I’ve noticed that whenever I attempt to access a multisite the following entry is made in the access log (note the missing url):
IPADDRESS - - [16/Sep/2014:18:29:47 -0400] “GET /site1 HTTP/1.1” 404 208 “-” …
The strange part is when I access wp-admin (wpmu.domain.com/wp-admin), it works, and the following entry is made in the access log:
IPADDRESS - - [16/Sep/2014:18:29:31 -0400] “POST /wp-admin/admin-ajax.php HTTP/1.1” 200 59 “http://wpmu.domain.com/wp-admin/network/index.php” …
I’ve copied the nginx “Rewrite rules for Multisites using subdirectories” config from here: http://wiki.nginx.org/WordPress
Is there anything else I’m missing?
Thanks in advance.
Thanks Jesin! I was able to get it working with the following config:
server {
	server_name example.com *.example.com ;

	access_log   /var/log/nginx/example.com.access.log;
	error_log    /var/log/nginx/example.com.error.log;

	root /var/www/example.com/htdocs;
	index index.php;

	if (!-e $request_filename) {
		rewrite /wp-admin$ $scheme://$host$uri/ permanent;
		rewrite ^(/[^/]+)?(/wp-.*) $2 last;
		rewrite ^(/[^/]+)?(/.*\.php) $2 last;
	}

	location / {
		try_files $uri $uri/ /index.php?$args ;
	}

	location ~ \.php$ {
		try_files $uri /index.php;
		include fastcgi_params;
		fastcgi_pass unix:/var/run/php5-fpm.sock;
	}

	location ~* ^.+\.(ogg|ogv|svg|svgz|eot|otf|woff|mp4|ttf|rss|atom|jpg|jpeg|gif|png|ico|zip|tgz|gz|rar|bz2|doc|xls|exe|ppt|tar|mid|midi|wav|bmp|rtf)$ {
		access_log off;	log_not_found off; expires max;
	}

	location = /robots.txt { access_log off; log_not_found off; }
	location ~ /\. { deny  all; access_log off; log_not_found off; }
}
Hi Jesin,
Do you have any tips on how to make sure sitemaps are working correctly with subdomains? Mine was working before - but something may have happened where some of my sitemaps are pointing to the subdomain and not the correct URL.
Check out an example here: My Sitemap
The sitemaps for iOS points to the subdomain, while the sitemaps for OSX points to the correct URL.
It started about a week ago where the issues came up.
I am using Yoast SEO which comes with an internal sitemap option.
It’s mentioning since I am on NGINX, it’s saying this message here
As you're on NGINX, you'll need the following rewrites:
# PLUGINS : Enable Rewrite Rules for Yoast SEO SiteMap
rewrite ^/sitemap_index\.xml$ /index.php?sitemap=1 last;
rewrite ^/([^/]+?)-sitemap([0-9]+)?\.xml$ /index.php?sitemap=$1&sitemap_n=$2 last;
Not too entirely sure if I am putting this in the right place, as I placed that code in this file:
nano /etc/nginx/sites-available/wp-ms
I don’t think this is a plugin issue, but maybe a setup configuration.
Any help is appreciated.
Thanks! Joe.
Ok, it seems to be working alright so far. When I go to secondarydomain.com though, it still get the SSL/TLS certifcate for primarydomain.com, so it gets an error. I already have the certificate for seconarydomain.com. How do I make it so secondarydomain.com gets the correct certifcate? I’m using Nginx. Thanks.
I can only access the nginx Welcome page.
I deleted default from sites-enabled, added my edited config file to sites-available and symlinked it to sites-enabled, ran the config test and restarted nginx.
Checking the error log shows me:
2014/10/06 15:05:21 [error] 1568#0: *2 rewrite or internal redirection cycle while internally redirecting to "/index.php", client: ::ffff:198.12.87.151, server: pnwild.net, request: "GET //MyAdmin/scripts/setup.php HTTP/1.1", host: "104.131.132.198"
looking at my config file I don’t understand why the redirect issue:
server {
        listen [::]:80 ipv6only=off;
        server_name pnwild.net *.pnwild.net
        root /usr/share/nginx/sites;
        index index.php index.html index.htm;

        location / {
            try_files $uri $uri/ /index.php?$args ;
        }

        location ~ /favicon.ico {
            access_log off;
            log_not_found off;
        }

        location ~ \.php$ {
            try_files $uri /index.php;
            include fastcgi_params;
            fastcgi_pass unix:/var/run/php5-fpm.sock;
        }

        access_log  /var/log/nginx/$host-access.log;
        error_log   /var/log/nginx/wpms-error.log;
    }
Hi, I have followed this tutorial but wanted to know if this will also work for Wordpress Multisite Subdirectory installation instead of Subdomains?
Is there tutorials for a Subdirectory Multisite type?
Thanks
Hi Jesin, I just saw your tutorial after I created mine. I want to run several wordpress sites in their own directories and have their own domain name.
Currently I cant run phpmyadmin when I access ip_or_weburl/phpmyadmin, it returns me to 404page of wordpress and also I can run ip_or_weburl/info.php
I set each wordpress under /etc/nginx/sites-available/web1 /etc/nginx/sites-available/web2 /etc/nginx/sites-available/web3
Please help by commenting on https://www.digitalocean.com/community/questions/phpmyadmin-404-error-on-nginx-ubuntu-configuration
Hi, Great tutorial I have followed all and works fine but at this point I have an issue to connect using Winscp because my user don’t have write permissions. By the way I’ve found a tutorial to solve this but in it mention that it is not recommended install wordpress in /usr/share/nginx/wordpress instead it recommends create a dir on /var for instance /var/www.
I appreciate your comments.
Thanks
This does not seem to be working for me. I followed a tutorial on here about load balancing wordpress. I am guessing it does not work because of that. Any ideas?
Thanks you so much for the awesome write-up! Really helpful!
I followed it to the letter and it works perfect, so all good there! However I am running into an issue when using PHPMyAdmin. I’m really not comfortable doing mysql work without some kind of graphical interface, but I run into the same issue as reported by another user in October 2014 (all links to phpmyadmin end up in 404’s.
What can be done to solve this?
Thanks in advance!
Cheers, Piet
Thank you for the great tutorial. I followed your tutorial and managed to install WP multisite quite quickly.
However; when I would like to restore a site using a wpmu plugin ‘snapshots’, and I got an error message as follow:
Abort class-pclzip.php : Missing zlib extensions
I read lots of forums and they suggested to recompile php with option zlib. Could you please help me on this?
Thank you for your help. cheers,
Thanks for the comprehensive tutorial, i got it working!
Next i’d want to use a cache plugin like fastcash or w3 tc to work with this install, i seem to not get it right when updating nano /etc/nginx/sites-available/wp-ms
Thanx for this great tuto: in combination with some other tutos ive managed to get a wpms up and running its great because before 2015 i have had no server software experience at all!
For now i have a question: I want to set nginx up for wp rocket(caching) i have found a script that i should add to the nginx config file before any location block:
set $cache_uri $request_uri;

# POST requests and urls with a query string should always go to PHP
if ($request_method = POST) {
  set $cache_uri 'null cache';
}
if ($query_string != "") {
  set $cache_uri 'null cache';
}

# Don't cache uris containing the following segments
if ($request_uri ~* "(/wp-admin/|/xmlrpc.php|/wp-(app|cron|login|register|mail).php|wp-.*.php|/feed/|index.php|wp-comments-popup.php|wp-links-opml.php|wp-locations.php|sitemap(_index)?.xml|[a-z0-9_-]+-sitemap([0-9]+)?.xml)") {
  set $cache_uri 'null cache';
}

# Don't use the cache for logged in users or recent commenters
if ($http_cookie ~* "comment_author|wordpress_[a-f0-9]+|wp-postpass|wordpress_logged_in") {
  set $cache_uri 'null cache';
}

location / {
      try_files /wp-content/cache/wp-rocket/$http_host/$cache_uri/index.html $uri/ /index.php?$args;
}
As i have followed your tutorial earlier i have in /etc/nginx
nginx.conf
/sites-available/default /sites-available/wp-ms /sites-enabled/wp-ms (the symlink)
so ive pasted the code alternatively in each of the three location, after which ngingx wont restart it “fails” after removing the code: nginx will restart. Could this because its a multisite set-up and that would require a different approach??
Where should i put the code, or what should i do/change to make this work? Thanx for any advice!
Hi Jesin, Hope you can help me, when I’m trying to upload a theme about 3,2MB to my server I’m getting this error:
413 Request Entity Too Large nginx/1.4.6 (Ubuntu)
Any suggestion to solve this issue.
Thanks.
Hey Jesin. Got it al running thanks to your tutorial and you’ve helped me out with integrating wp rocket cache into ngingx. Thanks a lot!
Somehow i just broke my nginx, i wanted to update/upgrade but first make a snapshot. I powered off the droplet in my terminal with “poweroff” (instead of shutting it down) that somehow corrupted my set up (i didnt notice yet) i made the snapshot and now the server seems active i did a get update and get upgrade but nginx configtest returns fail, restart ngingx also returned fail. My websites are offline, the same if i revert to the snapshot.
Is there a way to fix nginx? If not: Is there a way to still back-up my wp multisite (the server is accesible through sftp and ssh)
any advice would be greatly appreciated!
Hi Jesin, A little off topic: How can i inspect my database, to clean it up if needed. i am used to PHP my admin Where i can easilly perform tasks like removing obsolete tables. Could you advise on msql maintainance.
thnx
I got a problem in installing plugins which are default in my theme and have an option to install automatically with a button “Begin installing plugins”. But when I click this button its showing “You do not have sufficient permissions to access this page.” what should I do. My plugins menu is disappeared in single site dashboard but its work in “network admin dashboard”
This comment has been deleted
Hi Jesin,
Awesome tutorial, I got my MU + SubDirectory working but I have mapped domains and when I map a domain, it just gives me the 404 Error, is there any tutorials how to do this?
As in do I need to ad the new mapped domain in the DNS? What records do I use?
What do I need to ad in the nginx config file etc? What do I ad into my domains settings on another host to point it. etc.
Thank You in advanced.
I’m a beginner, could you explain me how to fix on step 5 please? I’m not able to choose the Sub-domain. I see ur previous comment but i don’t know how to troubleshoot
"WordPress install is in a directory (not in document root). “WordPress address (URL)” is localhost. “WordPress address (URL)” is IP address such as 127.0.0.1.
Perfect! Is there a way (a tutorial perhaps) on how to achieve ssl certification for multiple domain mapped subdomain sites of a wpms nginx install? I have like: site1.mydomain.com site2.mydomain.com etc and with a domain mapping plugin i map unique domain names to those sites: site1.com mapped to site1.mydomain.com etc
thnx for any thoughts on this matter!
Unfortunately you get a blank page if following this using Debian 8 (Jessie), need the extra fastCGI params I think (well seemed to work so far dropping the following extra’s in the php location block of wp-ms file):
    fastcgi_index index.php;
    fastcgi_param SCRIPT_FILENAME $document_root$fastcgi_script_name;
    include fastcgi_params;
EDIT: So I thought, unfortunately full URL parameters are not carried by fastCGI it seems, not sure what I’m missing…
I followed tutorial step by step, until, install php!
I am facing blank page when, on this step;
Access the primary domain in your browser to begin the WordPress installation. http://examplewp.com/ #
But i can open http://www.mywpsite.com/readme.html
Can you please help me?
Thanks fot the article. How do you deal with domain mapping and different SSL certificates?
You no longer need the wpms_blogid.php plugin, the ID column is shown by default :)
I am using Nginx Virtual host… one My wordpress site post are not open… Wordpress homepage, pages, category pages, wp-admin work fine,… but Only site post are not working… What I do plz reply
This comment has been deleted
This comment has been deleted
Sorry for my bad English , my native language is Spanish.
I have a doubt. Although the tutorial works pretty well for me, I wonder how to get all my domains start with www.
How should your DNS settings in the control panel of Digital Ocean? And how must be setup in the domain mapping?
Thank you
This line said it all to me , thanks for the article
define( ‘WP_ALLOW_MULTISITE’, true );
I’m stack at the end of step 2.
I’m running the command service nginx configtest and i receive * Testing nginx configuration [fail]
I was trying to find the error_log, but everytime I try to access nginx different directories, to locate the error log, I receive a permissions denied.
Anyone can help me regarding that? Thank you.
If we externally host our DNS server, do we still need to point the NS records to digitalocean’s nameservers?
Thanks
Is it possible to do something like?
server_name * ;
I don’t want to have to manually add each site like this:
server_name examplewp.com *.examplewp.com shoppingsite.com companysite.org;
As there may be hundreds of sites on a multisite.
Any input is much appreciated!!
@jesin first of all thank you for this nice tutorial.
i created wp-multisite using this tutorial on sub-directory and its everything working perfectly. but maybe i done something wrong. when i try to change tagline or permalink of my site 2 & 3 it dont allow me. secondly, from the main site, example.com/wp-admin i cant find domain menu under tools but from 2nd & 3rd site i can find them. is it normal? lastly is there any way to disable network menu from the 3rd site? so that from that sites wp-admin only can manage that sites settings.
thanks in advance.
Hello people,
My site is in DO in nginx, and using Cloudflare’s CDN services. I recently activated Rede Multisite Wordpress, I created a CNAME educacao.proddigital.com.br registry in Cloudflare, and in my administrative panel of the WP network, I created a new site, educacao.proddigital.com.br, but it is not accessible, and the Admin panel returns me error 404, educacao.proddigital.com.br/wp-login.php.
Upon activation of the multisite network, WP asks to include two codes in wp-config.php and .htaccess. But my site is in nginx and does not have .htaccess, so just enter the code in wp-config.php. But the new site is not accessible.
After I activated the “All In One WP Security” plugin, it automatically created an .htaccess file. From there, do I have to use it to insert the code that the WP asks to insert?
Thank you and I await. Rodrigo
Please can you do the same post on how to do this on ubuntu 16.04 please. Thanks
I couldn’t get this to work until I added the following to the server block, to add a trailing slash. rewrite /wp-admin$ $scheme://$host$uri/ permanent;
So the beginning of my server block now looks like this:
server { listen [::]:80 default_server ipv6only=off; server_name example.com *.example.com;
root /usr/share/nginx/wordpress;
index index.php index.html index.htm;

rewrite /wp-admin$ $scheme://$host$uri/ permanent;
 This work is licensed under a Creative Commons Attribution-NonCommercial- ShareAlike 4.0 International License.
Become a contributor for community
Get paid to write technical tutorials and select a tech-focused charity to receive a matching donation.

DigitalOcean Documentation
Full documentation for every DigitalOcean product.

Resources for startups and SMBs
The Wave has everything you need to know about building a business, from raising funding to marketing your product.
The developer cloud
Scale up as you grow — whether you're running one virtual machine or ten thousand.

Get started for free
Sign up and get $200 in credit for your first 60 days with DigitalOcean.*

*This promotional offer applies to new accounts only.