By Portia Burton and Timothy Nolan

The author selected /dev/color to receive a donation as part of the Write for DOnations program.
Introduction
Gatsby is a React framework that allows you to create static and serverless apps. Gatsby websites are different from traditional websites because they are usually deployed on a content delivery network (CDN) and are content agnostic. The advantage of deploying from a CDN is that there is less latency and websites are usually served to the client faster.
Gatsby is often described as a content mesh. A content mesh means that as the user, you are able to pull data from diverse sources such as a WordPress site, a CSV file, and a variety of external APIs; as a result Gatsby is data agnostic. This is different from a traditional content management system (CMS) like WordPress and Drupal, where the data usually comes from a single source—a database. When you build an application upon Gatsby you don’t have to worry about maintaining and provisioning a database. Additionally, when you’re using Gatsby you’re able to build on a framework that is known for its speed and flexibility.
These serverless websites are also known as a JAMStack. In a JAMStack architecture, there is still a server involved, but the developer doesn’t need to provision or maintain the server. Some developers see serverless as a desirable feature because they can focus more of their attention on the business logic of their application. For example, if they were creating an e-commerce store, they could focus on the code that is directly related to creating and selling products. JAMStack helps developers quickly develop websites that are more secure, more performant, and cheaper to deploy than traditional CMS frameworks.
In this tutorial, you will:
- Install the Gatsby Starter default template.
- Modify metadata in
gatsby-config.js. - Run the development server and view the Gatsby site locally.
- Get a short introduction to JSX and Gatsby’s image optimization capabilities.
By the end of this tutorial, you will be able to create and modify a Gatsby site. Keep in mind that you will make this site on your local machine and you will not deploy it.
Prerequisites
-
Node.js version 14 (or above) installed on your computer. To install this on macOS or Ubuntu 20.04, follow the steps in How to Install Node.js and Create a Local Development Environment on macOS or the Installing Node.js with Apt Using a NodeSource PPA section of How To Install Node.js on Ubuntu 20.04.
-
It will help to be comfortable with building websites with HTML, and styling with CSS, which you can learn more about in the How To Style HTML with CSS series.
-
An understanding of JavaScript will be useful. You can learn more about JavaScript at our How To Code in JavaScript series. Although Gatsby uses React, you don’t need to know React in order to get started, but it would be helpful to be familiar with the basic concepts. You can learn React with this series.
Step 1 — Installing Gatsby and Creating a New Project
In this step you will install a new Gatsby site from a template. Gatsby provides users with starter templates, so you don’t have to worry about building a website from nothing.
Download the Gatsby CLI package. This Gatsby command-line interface will allow you to create and customize a new site:
- npm install -g gatsby-cli
The -g flag means you are installing the Gatsby command-line interface globally as opposed to locally. This will allow you to use the tool in any directory.
Note: On some systems such as Ubuntu 20.04, installing an npm package globally can result in a permission error, which will interrupt the installation. Since it is a security best practice to avoid using sudo with npm install, you can instead resolve this by changing npm’s default directory. If you encounter an EACCES error, follow the instructions at the official npm documentation.
If you type gatsby help you will find several commands that you can use in creating your Gatsby site:
- gatsby help
This will give the following output:
OutputUsage: gatsby <command> [options]

Commands:
  gatsby develop                      Start development server. Watches files, rebuilds, and hot reloads if something changes
  gatsby build                        Build a Gatsby project.
  gatsby serve                        Serve previously built Gatsby site.
  gatsby info                         Get environment information for debugging and issue reporting
  gatsby clean                        Wipe the local gatsby environment including built assets and cache
  gatsby repl                         Get a node repl with context of Gatsby environment, see (https://www.gatsbyjs.com/docs/gatsby-repl/)
  gatsby recipes [recipe]             [EXPERIMENTAL] Run a recipe
  gatsby plugin <cmd> [plugins...]    Useful commands relating to Gatsby plugins
  gatsby new [rootPath] [starter]     Create new Gatsby project.
  gatsby telemetry                    Enable or disable Gatsby anonymous analytics collection.
...
Here are the most important commands for this tutorial:
-
gatsby newcreates a brand new site. If you usegatsby newby itself you will get a barebones site. The more common way to usegatsby newis to combine it with a starter template, which is what you will do in this tutorial. -
gatsby developstarts the development server. Throughout this tutorial you will usegatsby developto see your site locally on port:8000. -
gatsby buildbundles static files and assets and creates a production build of your application.
You have now installed the Gatsby command-line tools, but you still don’t have a site. One of the advantages of Gatsby is that you don’t have to code a website from scratch. Gatsby has several starter templates that you can use to get your website up and running. There are hundreds of templates out there, and many of these contributions come from the community. For this tutorial, you are going to use one of Gatsby’s official starter templates, Gatsby Starter Default.
The first thing you will do is install a Gatsby starter via your terminal:
- gatsby new gatsby-starter-default https://github.com/gatsbyjs/gatsby-starter-default
gatsby new creates a new site. This tutorial will use the gatsby-starter-default template, and will name the project after the template.
The following output in the command line means you have successfully installed a Gatsby starter template:
Output...
Your new Gatsby site has been successfully bootstrapped. Start developing it by running:

  cd gatsby-starter-default
  gatsby develop
gatsby-starter-default is the name of your new directory. You will now change into gatsby-starter-default and list the contents of the directory:
- cd gatsby-starter-default && ls
This will give the following output:
OutputLICENSE    gatsby-browser.js  gatsby-node.js  node_modules       package.json
README.md  gatsby-config.js   gatsby-ssr.js   package-lock.json  src
The important files you will modify in this tutorial include:
-
gatsby-config.js: This contains your site-wide customizations. This is where you will modify metadata and add Gatsby plugins. -
src: This directory contains all of the pages, images, and components that make up the website. In React, components are isolated parts of a website. For instance, in your website, theindexpage is made up oflayout,image, andseocomponents.
Now that you have created a new Gatsby project and explored the file structure, you are ready to go into your project and customize your site’s metadata.
Step 2 — Modifying the Title, Description, and Author Metadata in Your Gatsby Config
If you want to have your website discovered by a search engine, it is important to correctly format your metadata. In this section, you will configure the title, description, and author metadata in your application.
gatsby-config.js is Gatsby’s configuration file. This is where you will find the site siteMetadata object. The site metadata helps boosts your site’s SEO and makes it more discoverable by search engines.
Open gatsby-config.js in a text editor to view Gatsby’s configuration. nano is the name of the text editor this tutorial will use to view the Gatsby config file, but you can use the editor of your choice:
- nano gatsby-config.js
The following is gatsby-config.js with the configurations that come with the Gatsby Default Starter template:
module.exports = {
  siteMetadata: {
    title: `Gatsby Default Starter`,
    description: `Kick off your next, great Gatsby project with this default starter. This barebones starter ships with the main Gatsby configuration files you might need.`,
    author: `@gatsbyjs`,
    siteUrl: `https://gatsbystarterdefaultsource.gatsbyjs.io/`,
  },
  plugins: [
    `gatsby-plugin-react-helmet`,
    `gatsby-plugin-image`,
    {
      resolve: `gatsby-source-filesystem`,
      options: {
        name: `images`,
        path: `${__dirname}/src/images`,
      },
    },
    `gatsby-transformer-sharp`,
    `gatsby-plugin-sharp`,
    {
      resolve: `gatsby-plugin-manifest`,
      options: {
        name: `gatsby-starter-default`,
        short_name: `starter`,
        start_url: `/`,
        background_color: `#663399`,
        // This will impact how browsers show your PWA/website
        // https://css-tricks.com/meta-theme-color-and-trickery/
        // theme_color: `#663399`,
        display: `minimal-ui`,
        icon: `src/images/gatsby-icon.png`, // This path is relative to the root of the site.
      },
    },
    // this (optional) plugin enables Progressive Web App + Offline functionality
    // To learn more, visit: https://gatsby.dev/offline
    // `gatsby-plugin-offline`,
  ],
}
The Gatsby config file is also home to your plugins. Plugins are packages you install to add functionality to your Gatsby app. This installation of Gatsby comes with the gatsby-plugin-react-helmet, gatsby-plugin-image, gatsby-transformer-sharp, gatsby-plugin-sharp, and gatsby-plugin-manifest plugins.
Every Gatsby Default Starter template contains the same generic metadata, which is embedded into every page of your site via the gatsby-plugin-react-helmet plugin. You are going to personalize this data and start the process of making this site your own.
Replace the text for title, description, and author with the following highlighted code:
module.exports = {
  siteMetadata: {
    title: `Getting Started with Gatsby`,
    description: `A tutorial that goes over Gatsby development`,
    author: `@digitalocean`,
    siteUrl: `https://gatsbystarterdefaultsource.gatsbyjs.io/`,
  },
  plugins: [
    `gatsby-plugin-react-helmet`,
    `gatsby-plugin-image`,
    {
      resolve: `gatsby-source-filesystem`,
      options: {
        name: `images`,
        path: `${__dirname}/src/images`,
      },
    },
    `gatsby-transformer-sharp`,
    `gatsby-plugin-sharp`,
    {
      resolve: `gatsby-plugin-manifest`,
      options: {
        name: `gatsby-starter-default`,
        short_name: `starter`,
        start_url: `/`,
        background_color: `#663399`,
        // This will impact how browsers show your PWA/website
        // https://css-tricks.com/meta-theme-color-and-trickery/
        // theme_color: `#663399`,
        display: `minimal-ui`,
        icon: `src/images/gatsby-icon.png`, // This path is relative to the root of the site.
      },
    },
    // this (optional) plugin enables Progressive Web App + Offline functionality
    // To learn more, visit: https://gatsby.dev/offline
    // `gatsby-plugin-offline`,
  ],
}
Save and exit the file.
Now when Google or another search engine crawls your website, it will retrieve the data associated with your app. You have changed the metadata; next you will change one of the website’s pages.
Step 3 — Modifying the Index Page
In this section you are going to learn about JSX, change the markup on the index page, add an image, and run your Gatsby site locally.
It is time to see what the Gatsby website looks like in your browser. Open a new window in the terminal and enter gatsby develop in the command line to view the local version of the site:
- gatsby develop
The gatsby develop command starts the development server. If you head over to the browser you can access your site at localhost:8000:
You are going to change the markup on the page to make it look more like the content you would find on an e-commerce site. Open the index page in your text editor:
- nano src/pages/index.js
This is what you will find in the text editor:
import * as React from "react"
import { Link } from "gatsby"
import { StaticImage } from "gatsby-plugin-image"
import Layout from "../components/layout"
import Seo from "../components/seo"
const IndexPage = () => (
<Layout>
<Seo title="Home" />
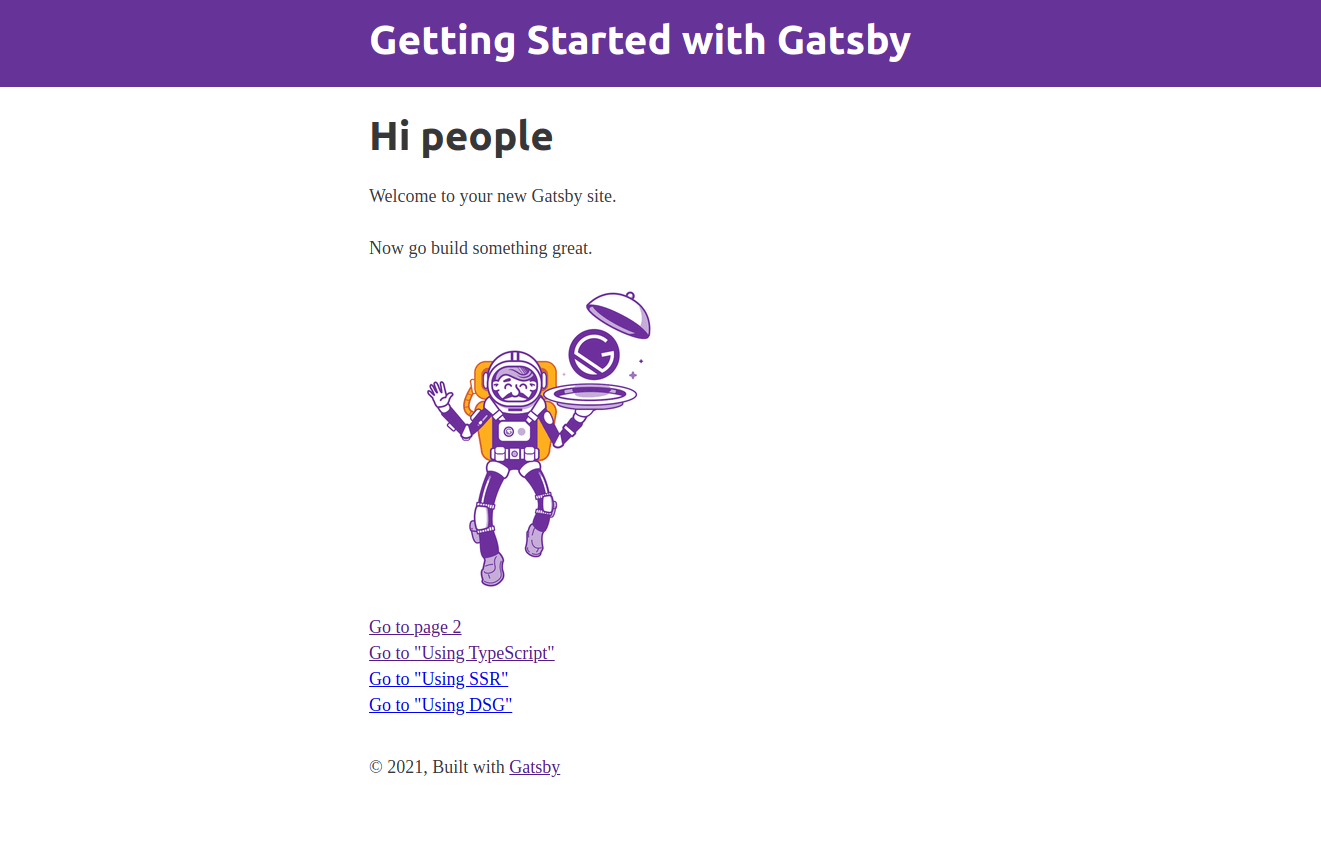
<h1>Hi people</h1>
<p>Welcome to your new Gatsby site.</p>
<p>Now go build something great.</p>
<StaticImage
src="../images/gatsby-astronaut.png"
width={300}
quality={95}
formats={["auto", "webp", "avif"]}
alt="A Gatsby astronaut"
style={{ marginBottom: `1.45rem` }}
/>
<p>
<Link to="/page-2/">Go to page 2</Link> <br />
<Link to="/using-typescript/">Go to "Using TypeScript"</Link>
<Link to="/using-ssr">Go to "Using SSR"</Link> <br />
<Link to="/using-dsg">Go to "Using DSG"</Link>
</p>
</Layout>
)
export default IndexPage
The code here is JSX. JSX allows you to write HTML elements in JavaScript. If you want a more comprehensive overview of JSX, go to our JSX tutorial.
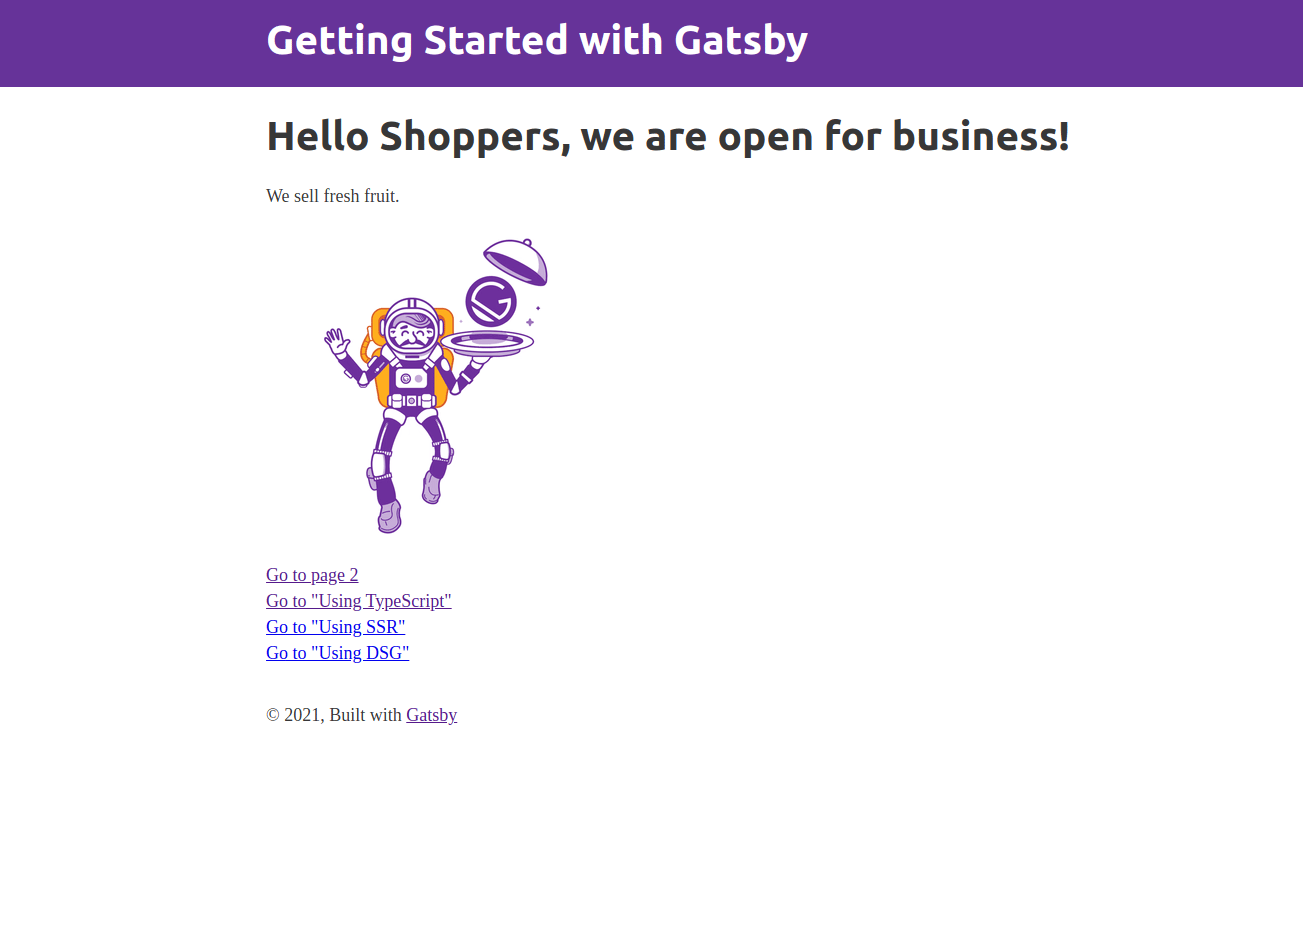
In the text editor, replace <h1>Hi People</h1> with <h1>Hello Shoppers, we are open for business!</h1> and <p>Welcome to your new Gatsby site.</p> with <p>We sell fresh fruit.</p>. Delete <p>Now go build something great.</p>:
import * as React from "react"
import { Link } from "gatsby"
import { StaticImage } from "gatsby-plugin-image"

import Layout from "../components/layout"
import Seo from "../components/seo"

const IndexPage = () => (
  <Layout>
    <Seo title="Home" />
    <h1>Hello Shoppers, we are open for business!</h1>
    <p>We sell fresh fruit.</p>
    <StaticImage
      src="../images/gatsby-astronaut.png"
      width={300}
      quality={95}
      formats={["auto", "webp", "avif"]}
      alt="A Gatsby astronaut"
      style={{ marginBottom: `1.45rem` }}
    />
    <p>
      <Link to="/page-2/">Go to page 2</Link> <br />
      <Link to="/using-typescript/">Go to "Using TypeScript"</Link>
      <Link to="/using-ssr">Go to "Using SSR"</Link> <br />
      <Link to="/using-dsg">Go to "Using DSG"</Link>
    </p>
  </Layout>
)

export default IndexPage
Save your changes. There is no need to start and stop the development server because Gatsby comes with hot reloading. Hot reloading refreshes the files in your app that you’ve changed:
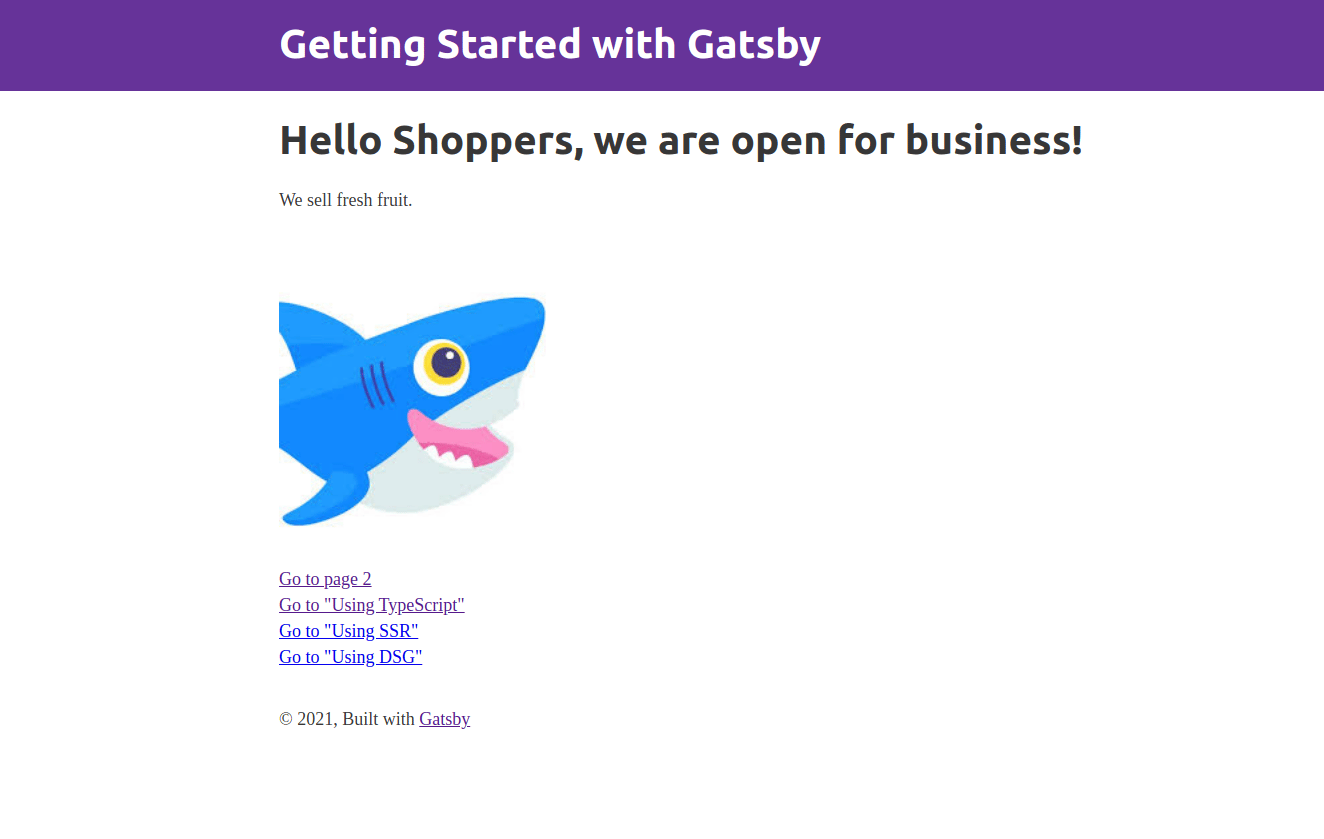
You are now going to change the image from the Gatsby astronaut to Sammy the Shark. Open the image in your browser and download the image to your src/images folder in your Gatsby project. Save the image as sammy-shark.jpeg. Alternatively, you can complete this step from your terminal, by running this command from the root of your Gatsby project:
- wget -O src/images/sammy-shark.jpeg https://html.sammy-codes.com/images/small-profile.jpeg
Double check to see if the Sammy the Shark image is in the right folder. Navigate to the images folder:
- cd src/images
After you have made your way to the images directory, check if sammy-shark.jpeg is in the images folder:
- ls
ls is the command for list. You are listing all the files found in the images folder:
Outputgatsby-astronaut.png gatsby-icon.png sammy-shark.jpeg
Now that you have confirmed that the file is there, you will reopen index.js in your favorite text editor. You are about to swap out the Gatsby astronaut image with Sammy the Shark.
First, return to your src directory:
- cd ..
Now open the index.js React component page:
- nano pages/index.js
Replace gatsby-astronaut.png with sammy-shark.jpeg:
import * as React from "react"
import { Link } from "gatsby"
import { StaticImage } from "gatsby-plugin-image"

import Layout from "../components/layout"
import Seo from "../components/seo"

const IndexPage = () => (
  <Layout>
    <Seo title="Home" />
    <h1>Hello Shoppers, we are open for business!</h1>
    <p>We sell fresh fruit.</p>
    <StaticImage
      src="../images/sammy-shark.jpeg"
      width={300}
      quality={95}
      formats={["auto", "webp", "avif"]}
      alt="Sammy the Shark, an adorable cartoon shark and DigitalOcean's mascot"
      style={{ marginBottom: `1.45rem` }}
    />
    <p>
      <Link to="/page-2/">Go to page 2</Link> <br />
      <Link to="/using-typescript/">Go to "Using TypeScript"</Link>
    </p>
  </Layout>
)

export default IndexPage
In the above page code, you have updated the StaticImage component from gatsby-plugin-image to load and render the Sammy the Shark image, instead of the astronaut. You have updated the src property to point to the local path of the new image file, and updated the alt text property so that screen reader software will read a helpful description of the new image to users that need it. Descriptive alt text is an important part of accessibility for images in HTML.
With the other existing settings for StaticImage, Gatsby scales the image size of sammy-shark.jpeg to a maximum width of 300, uses a quality setting of 95, generates multiple formats for optimized delivery, and adds a bottom margin through some inline CSS. You can read more about how Gatsby formats images in the Gatsby documentation.
Save the file. The server will restart, and you will find Sammy the Shark on your Gatsby page:
You now have your Gatsby e-commerce site up and running locally.
Conclusion
In this tutorial, you created your first Gatsby website. You have learned how to set up a basic Gatsby site on your local machine. Now that you can create and customize a Gatsby app, the next step is to deploy your Gatsby e-commerce site.
Thanks for learning with the DigitalOcean Community. Check out our offerings for compute, storage, networking, and managed databases.
Tutorial Series: How To Create Static Web Sites with Gatsby.js
Gatsby is a React framework that allows you to create static and serverless apps. Gatsby websites are different from traditional websites because they are usually deployed on a content delivery network (CDN) and are content agnostic. In this tutorial, you will learn the basics of creating a site with Gatsby, allowing you to create static sites that are optimized for your users.
About the author(s)
I own a technical documentation agency called DocumentWrite. I love writing JavaScript and documentation.
Former Senior Technical Editor at DigitalOcean, fiction writer and podcaster elsewhere, always searching for the next good nautical pun! Areas of expertise include Node.js, PostgreSQL, CSS, JavaScript.
Still looking for an answer?
This textbox defaults to using Markdown to format your answer.
You can type !ref in this text area to quickly search our full set of tutorials, documentation & marketplace offerings and insert the link!
 This work is licensed under a Creative Commons Attribution-NonCommercial- ShareAlike 4.0 International License.
Become a contributor for community
Get paid to write technical tutorials and select a tech-focused charity to receive a matching donation.

DigitalOcean Documentation
Full documentation for every DigitalOcean product.

Resources for startups and AI-native businesses
The Wave has everything you need to know about building a business, from raising funding to marketing your product.
The developer cloud
Scale up as you grow — whether you're running one virtual machine or ten thousand.

Start building today
From GPU-powered inference and Kubernetes to managed databases and storage, get everything you need to build, scale, and deploy intelligent applications.
