Founder of DocumentWrite

The author selected /dev/color to receive a donation as part of the Write for DOnations program.
Introduction
In this tutorial, you will deploy a Gatsby application to DigitalOcean’s App Platform. App Platform is a Platform as a Service that builds, deploys, and manages apps automatically. When combined with the speed of a static site generator like Gatsby, this provides a scalable JAMStack solution that doesn’t require server-side programming.
In this tutorial, you will create a sample Gatsby app on your local machine, push your code to GitHub, then deploy to App Platform.
Prerequisites
-
On your local machine, you will need a development environment running Node.js; this tutorial was tested on Node.js version 14.16.0 and npm version 6.14.11. To install this on macOS or Ubuntu 20.04, follow the steps in How to Install Node.js and Create a Local Development Environment on macOS or the Installing Using a PPA section of How To Install Node.js on Ubuntu 20.04.
-
Git installed onto your local machine. You can follow the tutorial Contributing to Open Source: Getting Started with Git to install and set up Git on your computer.
-
An account on GitHub, which you can create by going to the Create your Account page.
-
The Gatsby CLI tool downloaded onto your local machine. You can learn how to do this in Step 1 of the How To Set Up Your First Gatsby Website tutorial.
-
An understanding of JavaScript will be useful. You can learn more about JavaScript at our How To Code in JavaScript series. You don’t need to know React in order to get started, but it would be helpful to be familiar with the basic concepts. You can learn React with this series.
Step 1 — Creating a Gatsby Project
In this section, you are going to create a sample Gatsby application, which you will later deploy to App Platform.
First, clone the default Gatsby starter from GitHub. You can do that with the following command in your terminal:
- git clone https://github.com/gatsbyjs/gatsby-starter-default
The Gatsby starter site provides you with the boilerplate code you need to start coding your application. For more information on creating a Gatsby app, check out How To Set Up Your First Gatsby Website.
When you are finished with cloning the repo, cd into the gatsby-starter-default directory:
- cd gatsby-starter-default
Then install the Node dependencies:
- npm install
After you’ve downloaded the app and installed the dependencies, open the following file in a text editor:
- nano gatsby-config.js
You have just opened Gatsby’s config file. Here you can change metadata about your site.
Go to the title key and change Gatsby Default Starter to Save the Whales, as shown in the following highlighted line:
module.exports = {
  siteMetadata: {
    title: `Save the Whales`,
    description: `Kick off your next, great Gatsby project with this default starter. This barebones starter ships with the main Gatsby configuration files you might need.`,
    author: `@gatsbyjs`,
  },
  plugins: [
    `gatsby-plugin-react-helmet`,
    {
      resolve: `gatsby-source-filesystem`,
      options: {
        name: `images`,
        path: `${__dirname}/src/images`,
      },
    },
    `gatsby-transformer-sharp`,
    `gatsby-plugin-sharp`,
    {
      resolve: `gatsby-plugin-manifest`,
      options: {
        name: `gatsby-starter-default`,
        short_name: `starter`,
        start_url: `/`,
        background_color: `#663399`,
        theme_color: `#663399`,
        display: `minimal-ui`,
        icon: `src/images/gatsby-icon.png`, // This path is relative to the root of the site.
      },
    },
    // this (optional) plugin enables Progressive Web App + Offline functionality
    // To learn more, visit: https://gatsby.dev/offline
    // `gatsby-plugin-offline`,
  ],
}
Close and save the file. Now open the index file in your favorite text editor:
- nano src/pages/index.js
To continue with the “Save the Whales” theme, replace Hi people with Adopt a whale today, change Welcome to your new Gatsby site. to Whales are our friends., and delete the last <p> tag:
import React from "react"
import { Link } from "gatsby"
import { StaticImage } from "gatsby-plugin-image"

import Layout from "../components/layout"
import SEO from "../components/seo"

const IndexPage = () => (
  <Layout>
    <SEO title="Home" />
    <h1>Adopt a whale today</h1>
    <p>Whales are our friends.</p>
    <StaticImage
      src="../images/gatsby-astronaut.png"
      width={300}
      quality={95}
      formats={["AUTO", "WEBP", "AVIF"]}
      alt="A Gatsby astronaut"
      style={{ marginBottom: `1.45rem` }}
    />
    <Link to="/page-2/">Go to page 2</Link> <br />
    <Link to="/using-typescript/">Go to "Using TypeScript"</Link>
  </Layout>
)

export default IndexPage
Save and close the file. You are going to swap out the Gatsby astronaut image with a GIF of a whale. Before you add the GIF, you will first need to create a GIF directory and download it.
Go to the src directory and create a gifs file:
- cd src/
- mkdir gifs
Now navigate into your newly created gifs folder:
- cd gifs
Download a whales GIF from Giphy:
- wget https://media.giphy.com/media/lqdJsUDvJnHBgM82HB/giphy.gif
Wget is a utilty that allows you to download files from the internet. Giphy is a website that hosts GIFs.
Next, change the name from giphy.gif to whales.gif:
- mv giphy.gif whales.gif
After you have changed the name of the GIF, move back to the root folder of the project and open up the index file again:
- cd ../..
- nano src/pages/index.js
Now you will add the GIF to your site’s homepage. Delete the StaticImage import and element, then replace with the following highlighted lines:
import React from "react"
import { Link } from "gatsby"

import whaleGIF from "../gifs/whales.gif"
import Layout from "../components/layout"
import SEO from "../components/seo"

const IndexPage = () => (
  <Layout>
    <SEO title="Home" />
    <h1>Adopt a whale today</h1>
    <p>Whales are our friends.</p>
    <div style={{ maxWidth: `300px`, marginBottom: `1.45rem` }}>
        <img src={whaleGIF} alt="Picture of Whale from BBC America" />
    </div>
    <Link to="/page-2/">Go to page 2</Link> <br />
    <Link to="/using-typescript/">Go to "Using TypeScript"</Link>
  </Layout>
Here you imported the whales GIF and included it in an image tag between the <div> element. The alt tag informs the reader where the GIF originated.
Close and save the index file.
Now you will run your site locally to make sure it works. From the root of your project, run the development server:
- gatsby develop
After your site has finished building, put localhost:8000 into your browser’s search bar. You will find the following rendered in your browser:
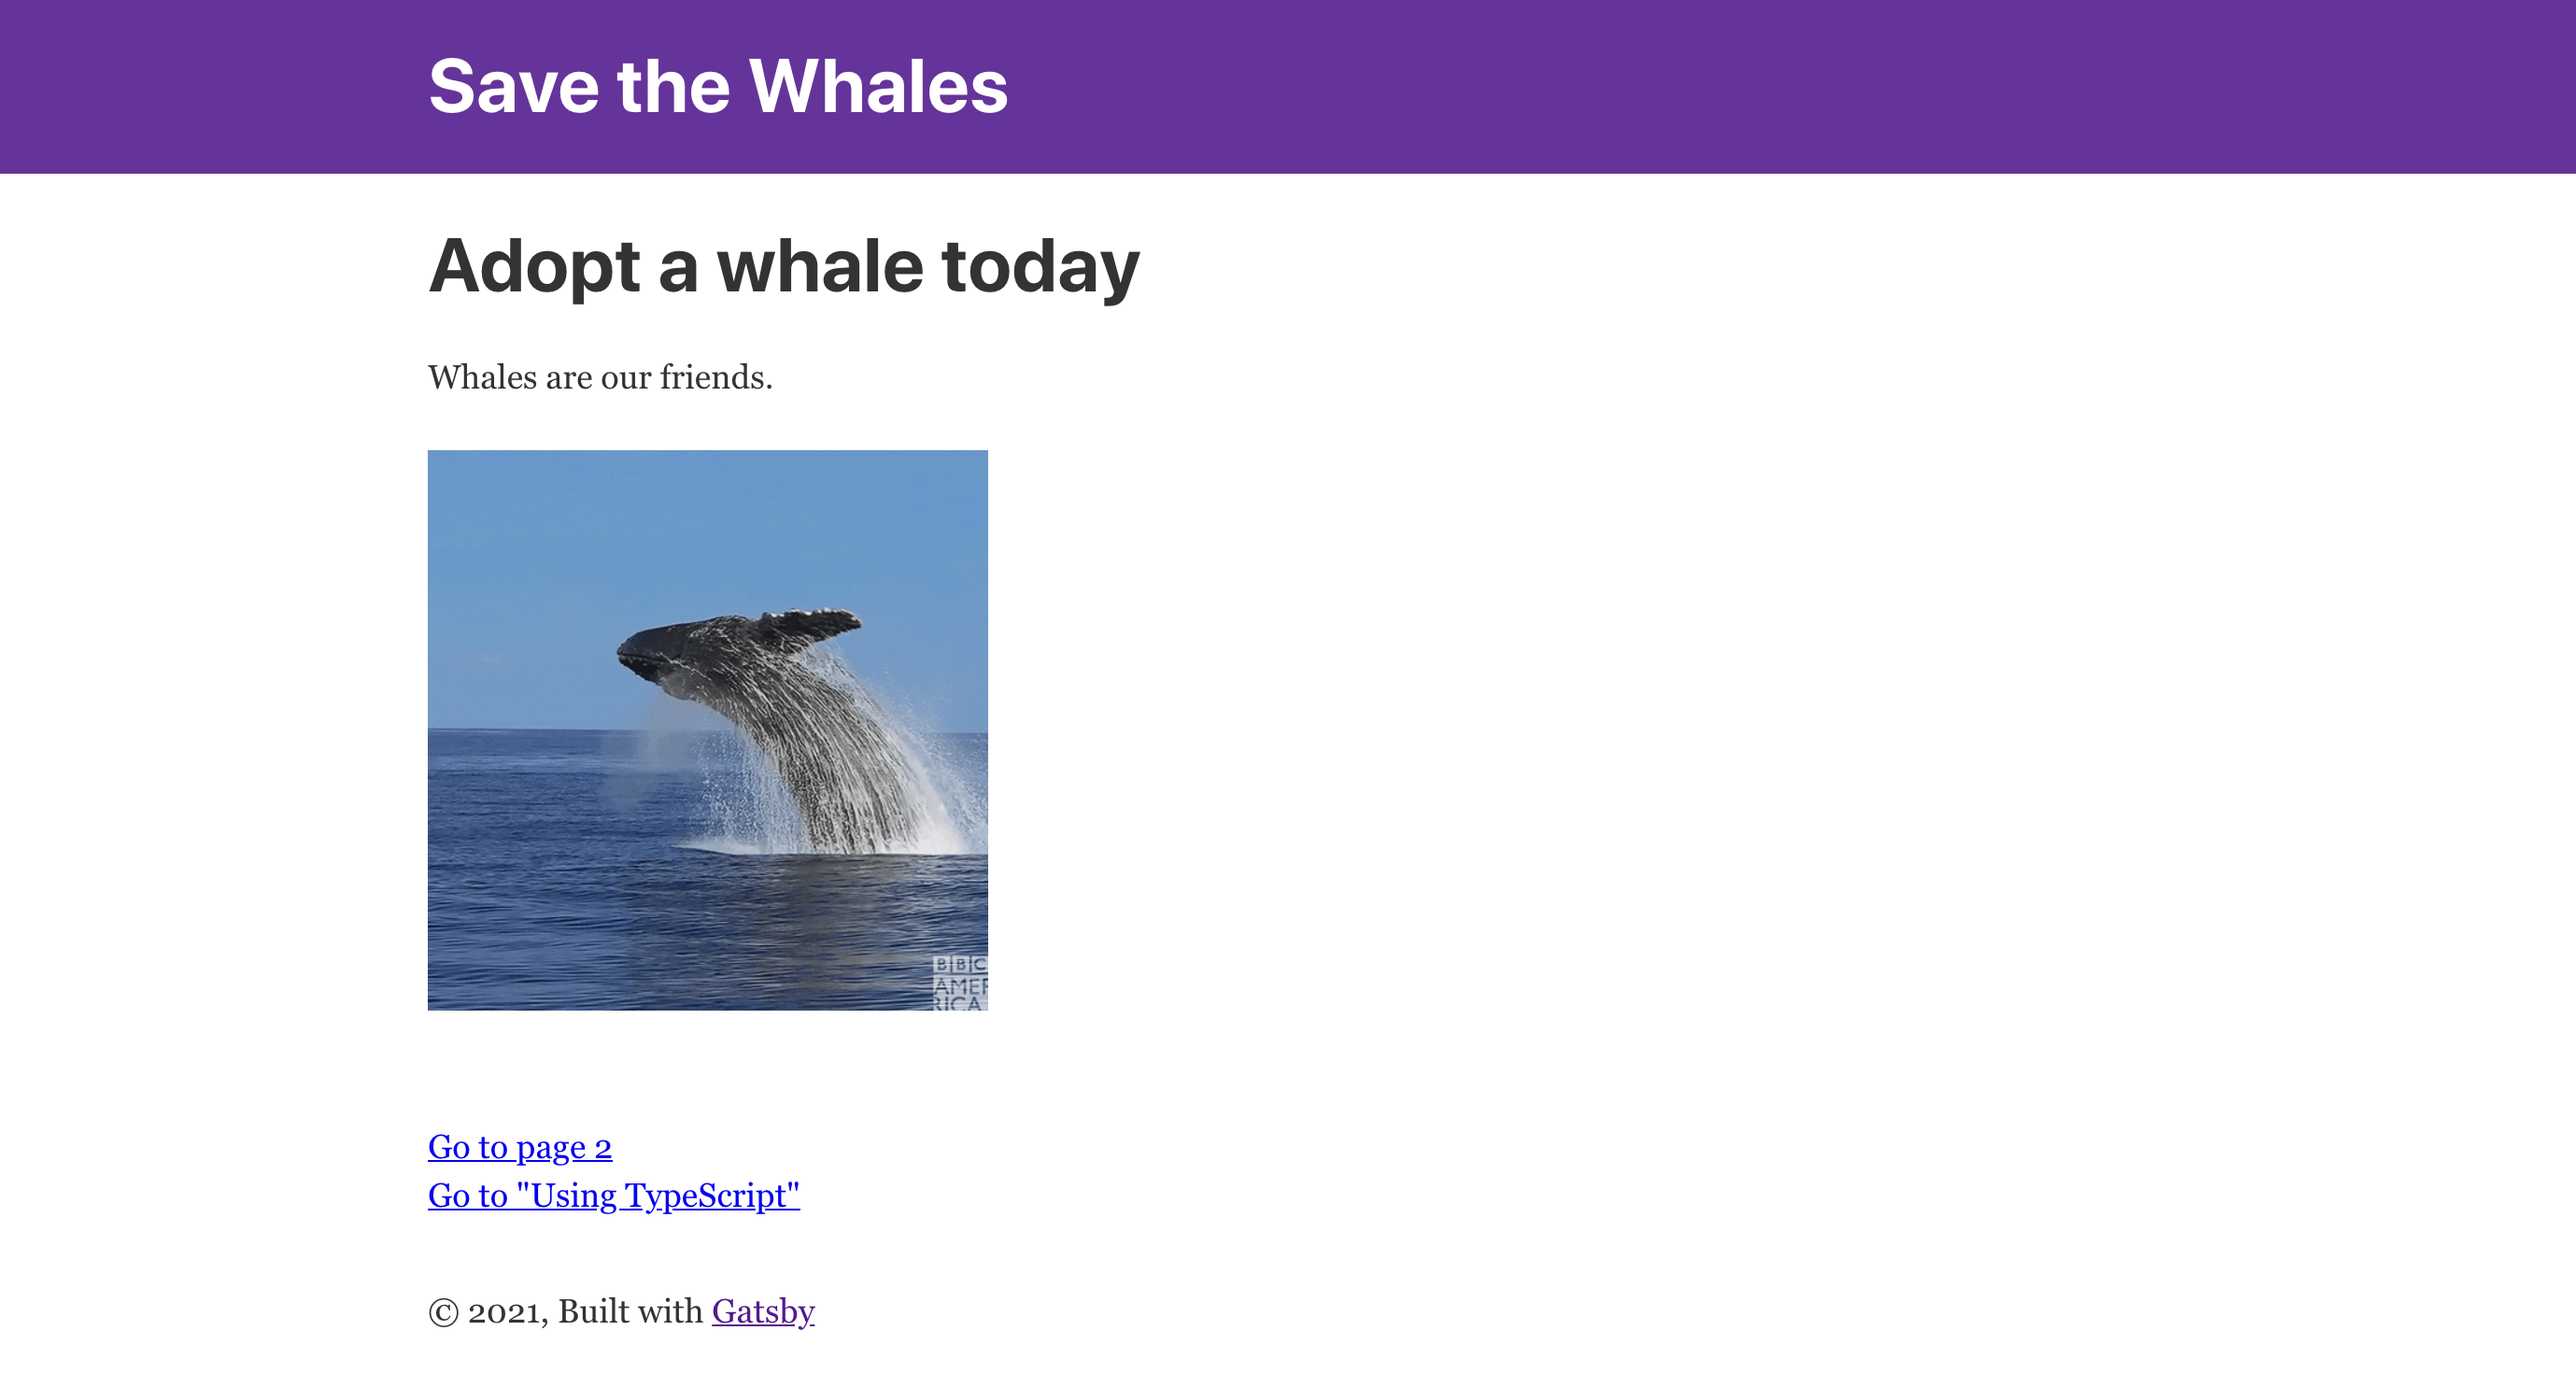
In this section, you created a sample Gatsby app. In the next section, you are going to push your code to GitHub so that it is accessible to App Platform.
Step 2 — Pushing Your Code to GitHub
In this section of the tutorial, you are going to commit your code to git and push it up to GitHub. From there, DigitalOcean’s App Platform will be able to access the code for your website.
Go to the root of your project and create a new git repository:
git init
Next, add any modified files to git:
- git add .
Finally, commit all of your changes to git with the following command:
- git commit -m "Initial Commit"
This will commit this version of your app to git version control. The -m takes a string argument and uses it as a message about the commit.
Note: If you have not set up git before on this machine, you may receive the following output:
*** Please tell me who you are.

Run

  git config --global user.email "you@example.com"
  git config --global user.name "Your Name"

to set your account's default identity.
Omit --global to set the identity only in this repository.
Run the two git config commands to provide this information before moving on. If you would like to learn more about git, check out our How To Contribute to Open Source: Getting Started with Git tutorial.
You will receive output like the following:
Output[master 1e3317b] Initial Commit
 3 files changed, 7 insertions(+), 13 deletions(-)
 create mode 100644 src/gifs/whales.gif
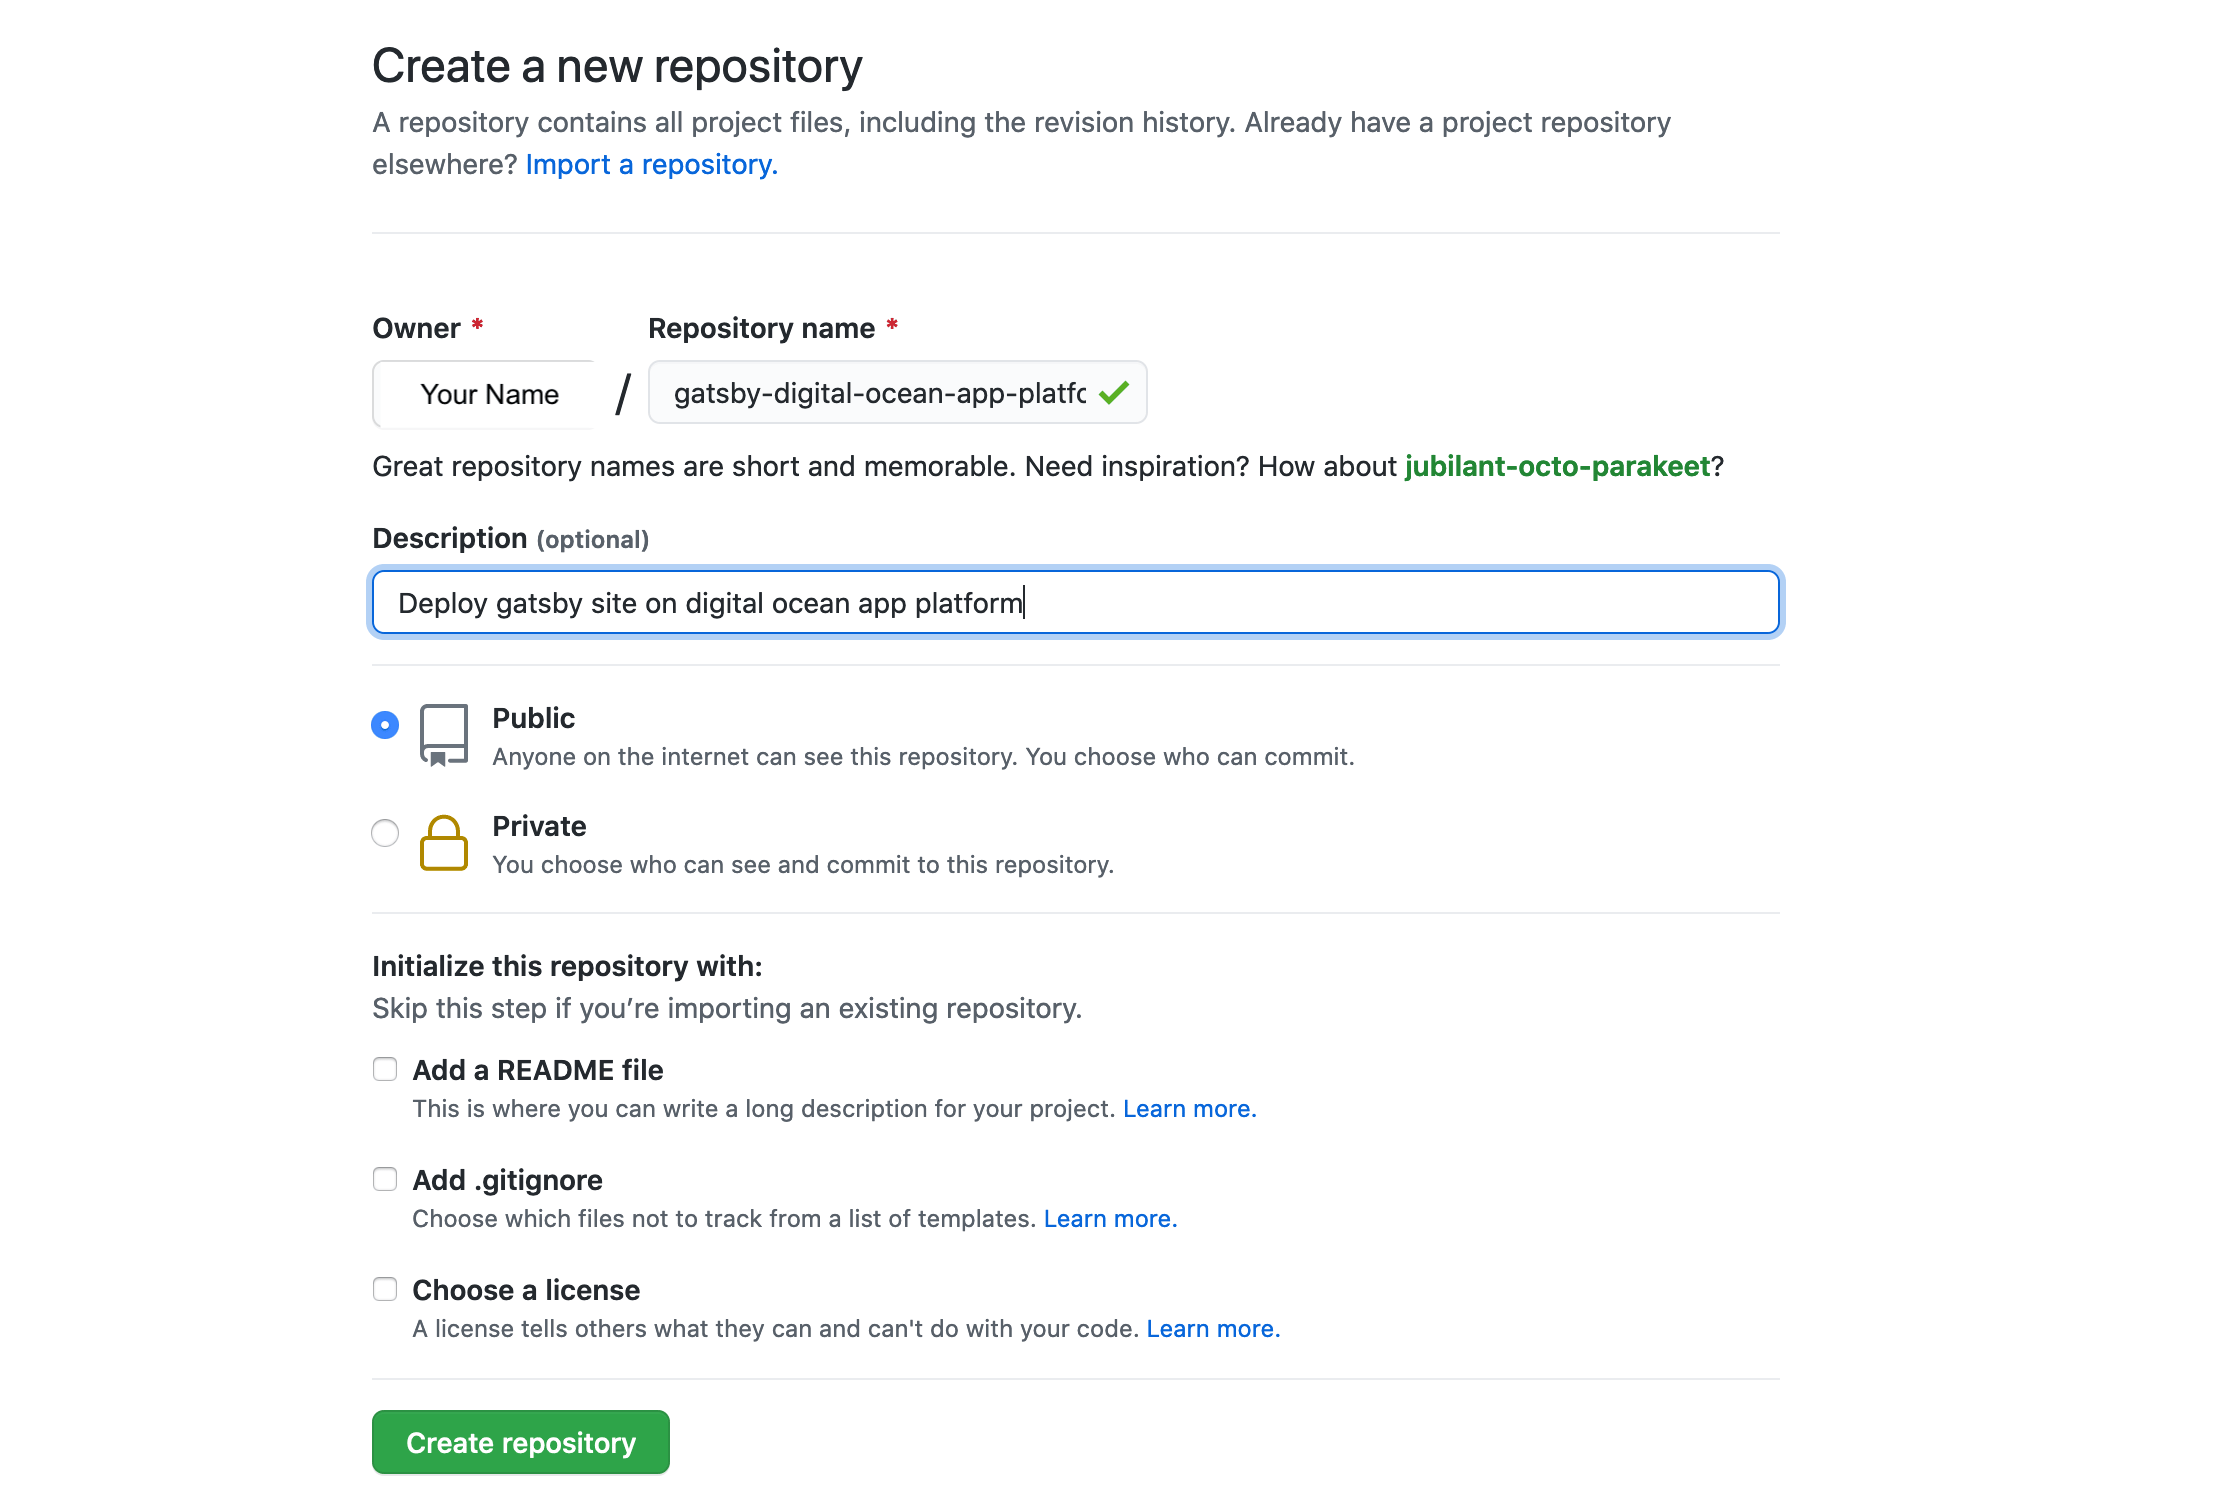
Once you have committed the file, go to GitHub and log in. After you log in, create a new repository called gatsby-digital-ocean-app-platform. You can make the repository either private or public:
After you’ve created a new repo, go back to the command line and add the remote repo address:
- git remote set-url origin https://github.com/your_name/gatsby-digital-ocean-app-platform
Make sure to change your_name to your username on GitHub.
Next, declare that you want to push to the main branch with the following:
- git branch -M main
Finally, push your code to your newly created repo:
- git push -u origin main
Once you enter your credentials, you will receive output similar to the following:
OutputCounting objects: 3466, done.
Compressing objects: 100% (1501/1501), done.
Writing objects: 100% (3466/3466), 28.22 MiB | 32.25 MiB/s, done.
Total 3466 (delta 1939), reused 3445 (delta 1926)
remote: Resolving deltas: 100% (1939/1939), done.
To https://github.com/your_name/gatsby-digital-ocean-app-platform
 * [new branch]      main -> main
Branch 'main' set up to track remote branch 'main' from 'origin'.
You will now be able to access your code in your GitHub account.
In this section you pushed your code to a remote GitHub repository. In the next section, you will deploy your Gatsby app from GitHub to App Platform.
Step 3 — Deploying your Gatsby App on DigitalOcean App Platform
In this step, you are going to deploy your app onto DigitalOcean App Platform. If you haven’t done so already, create a DigitalOcean account.
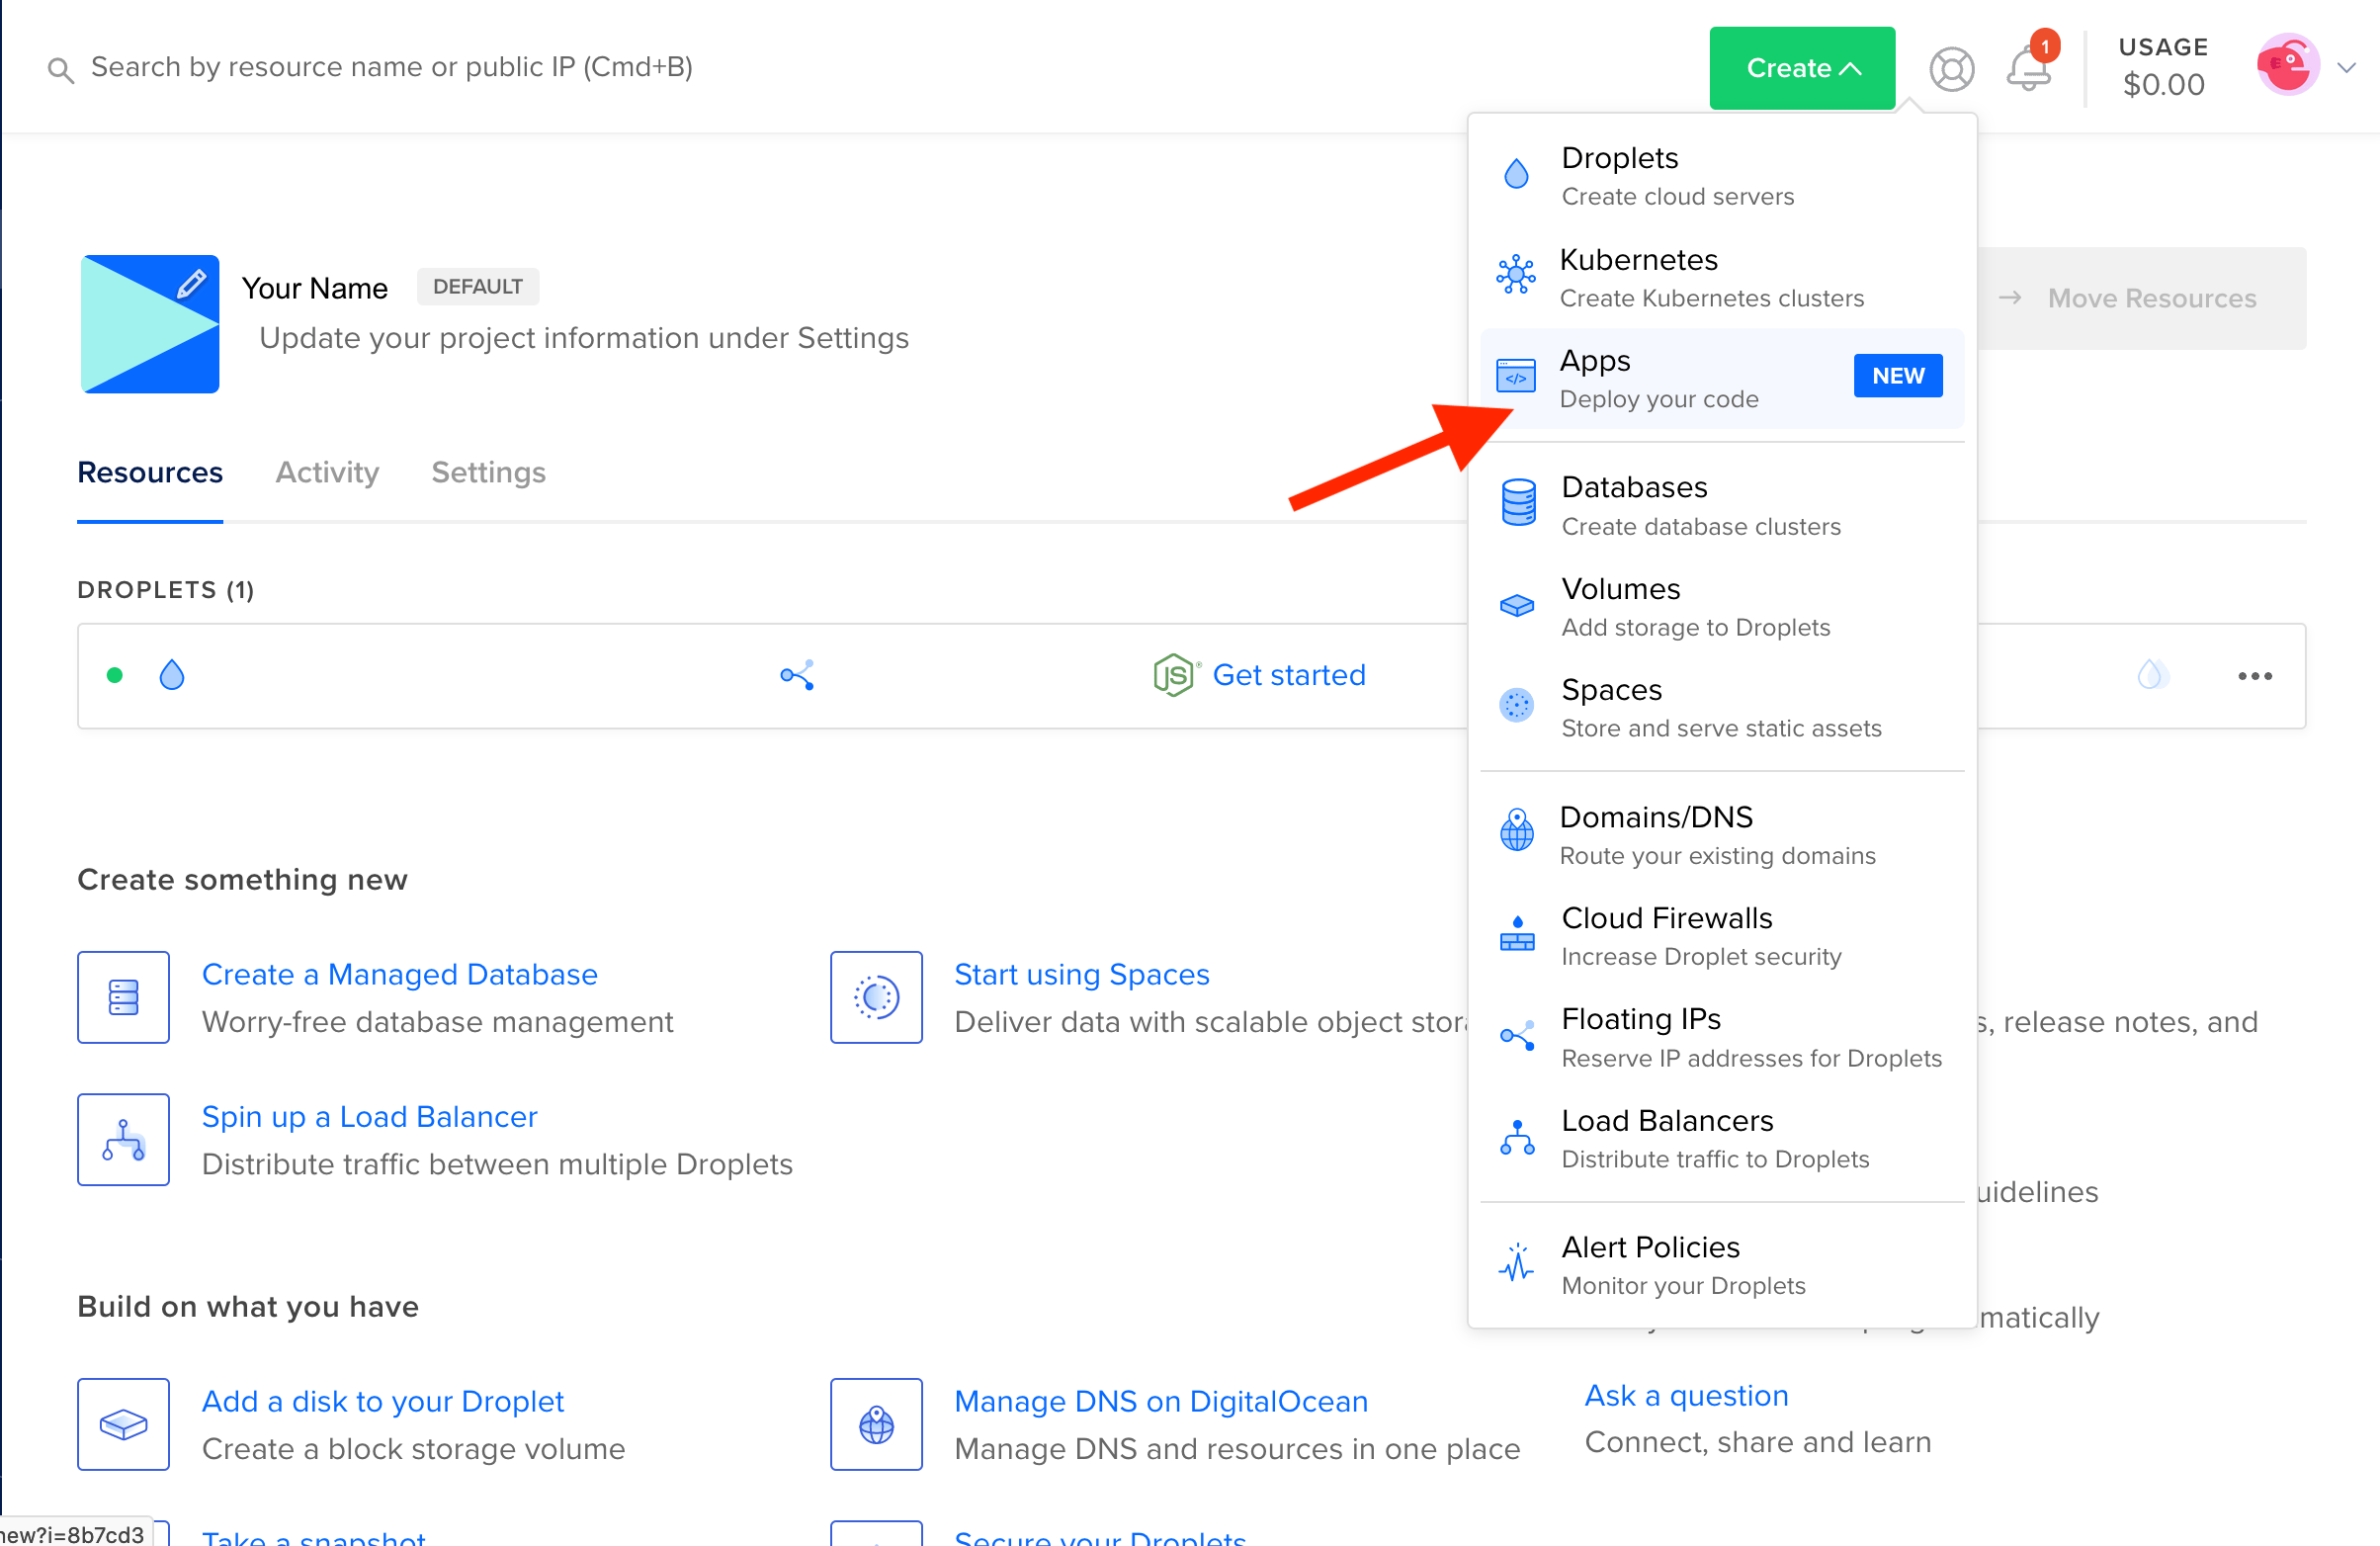
Open your DigitalOcean control panel, select the Create button at the top of the screen, then select Apps from the dropdown menu:
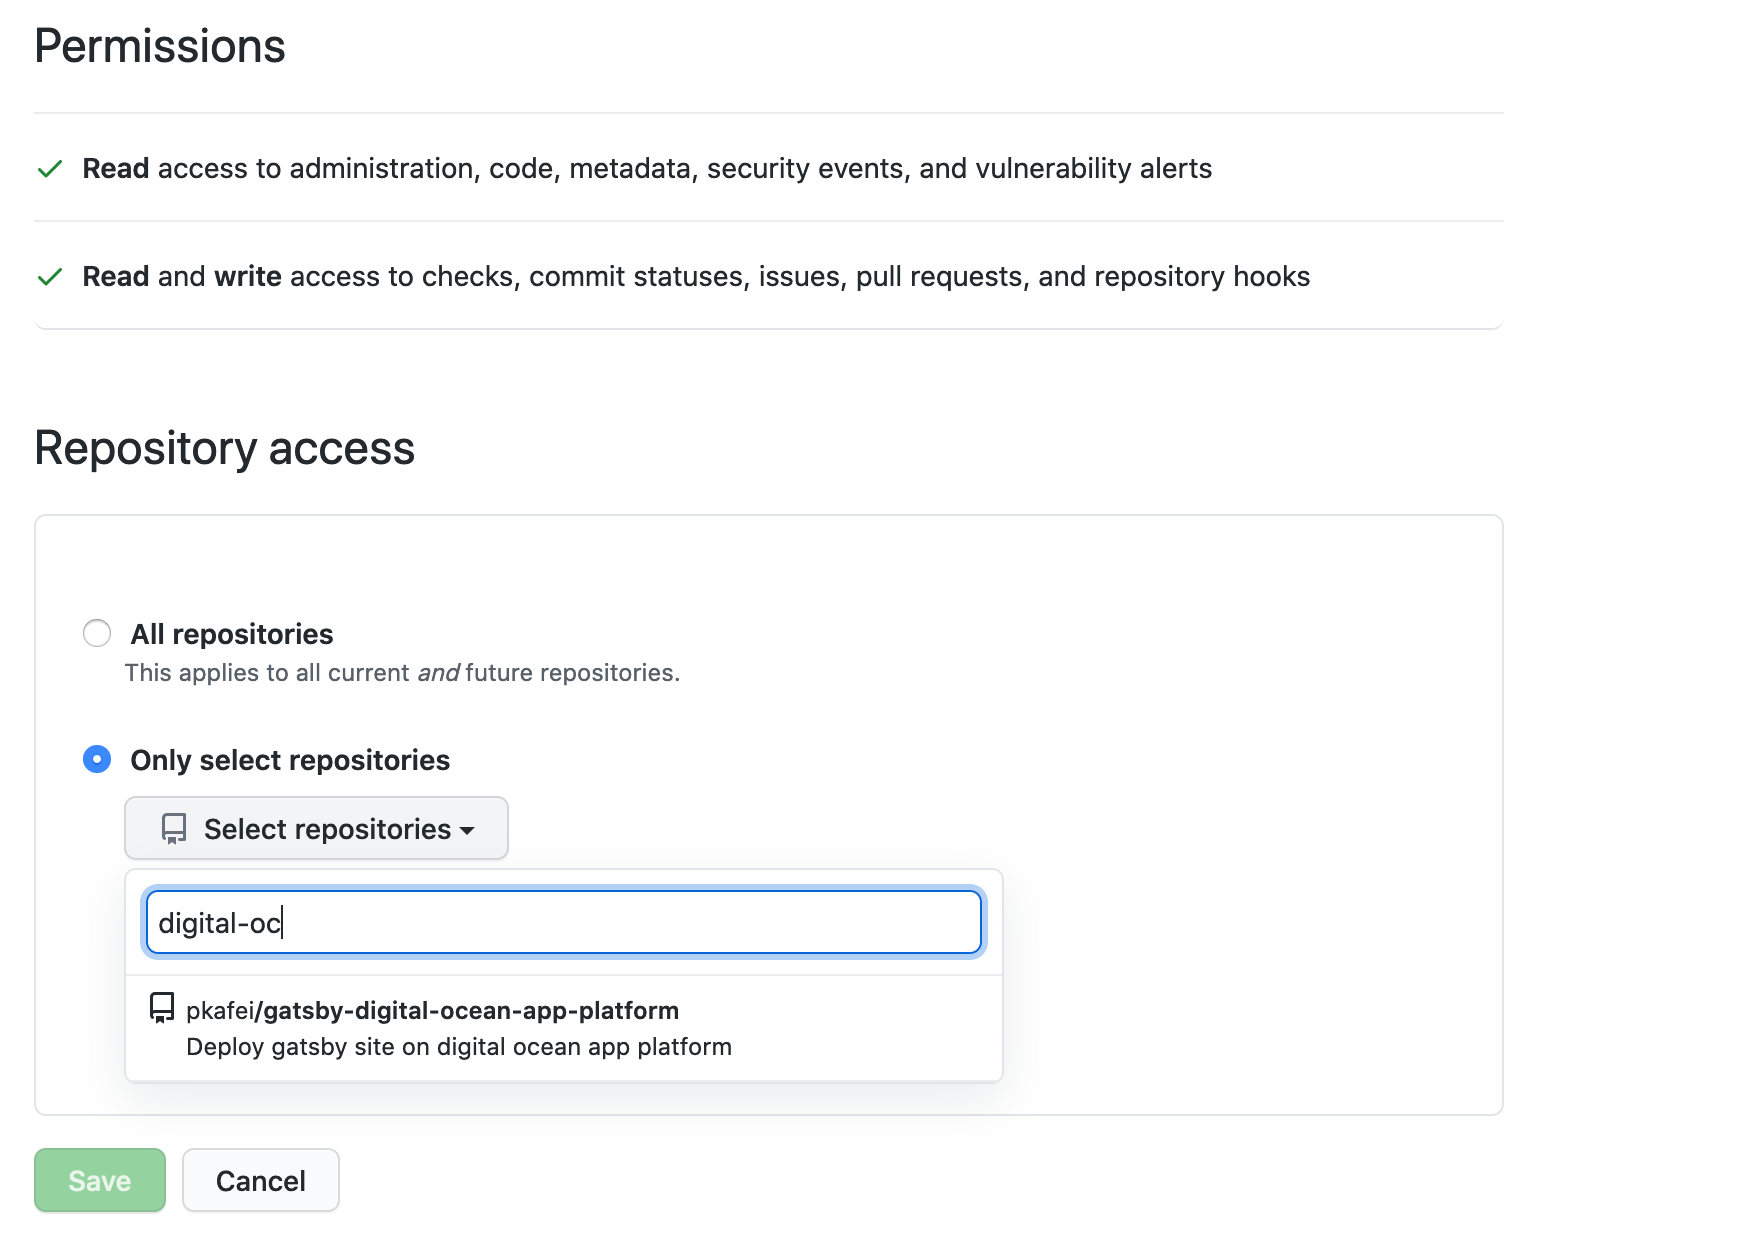
After you have selected Apps, you are going to retrieve your repository from GitHub. Click on the GitHub icon and give DigitalOcean permission to access your repositories. It is a best practice to only select the repository that you want deployed.
You’ll be redirected back to DigitalOcean. Go to the Repository field and select the project and branch you want to deploy, then click Next:
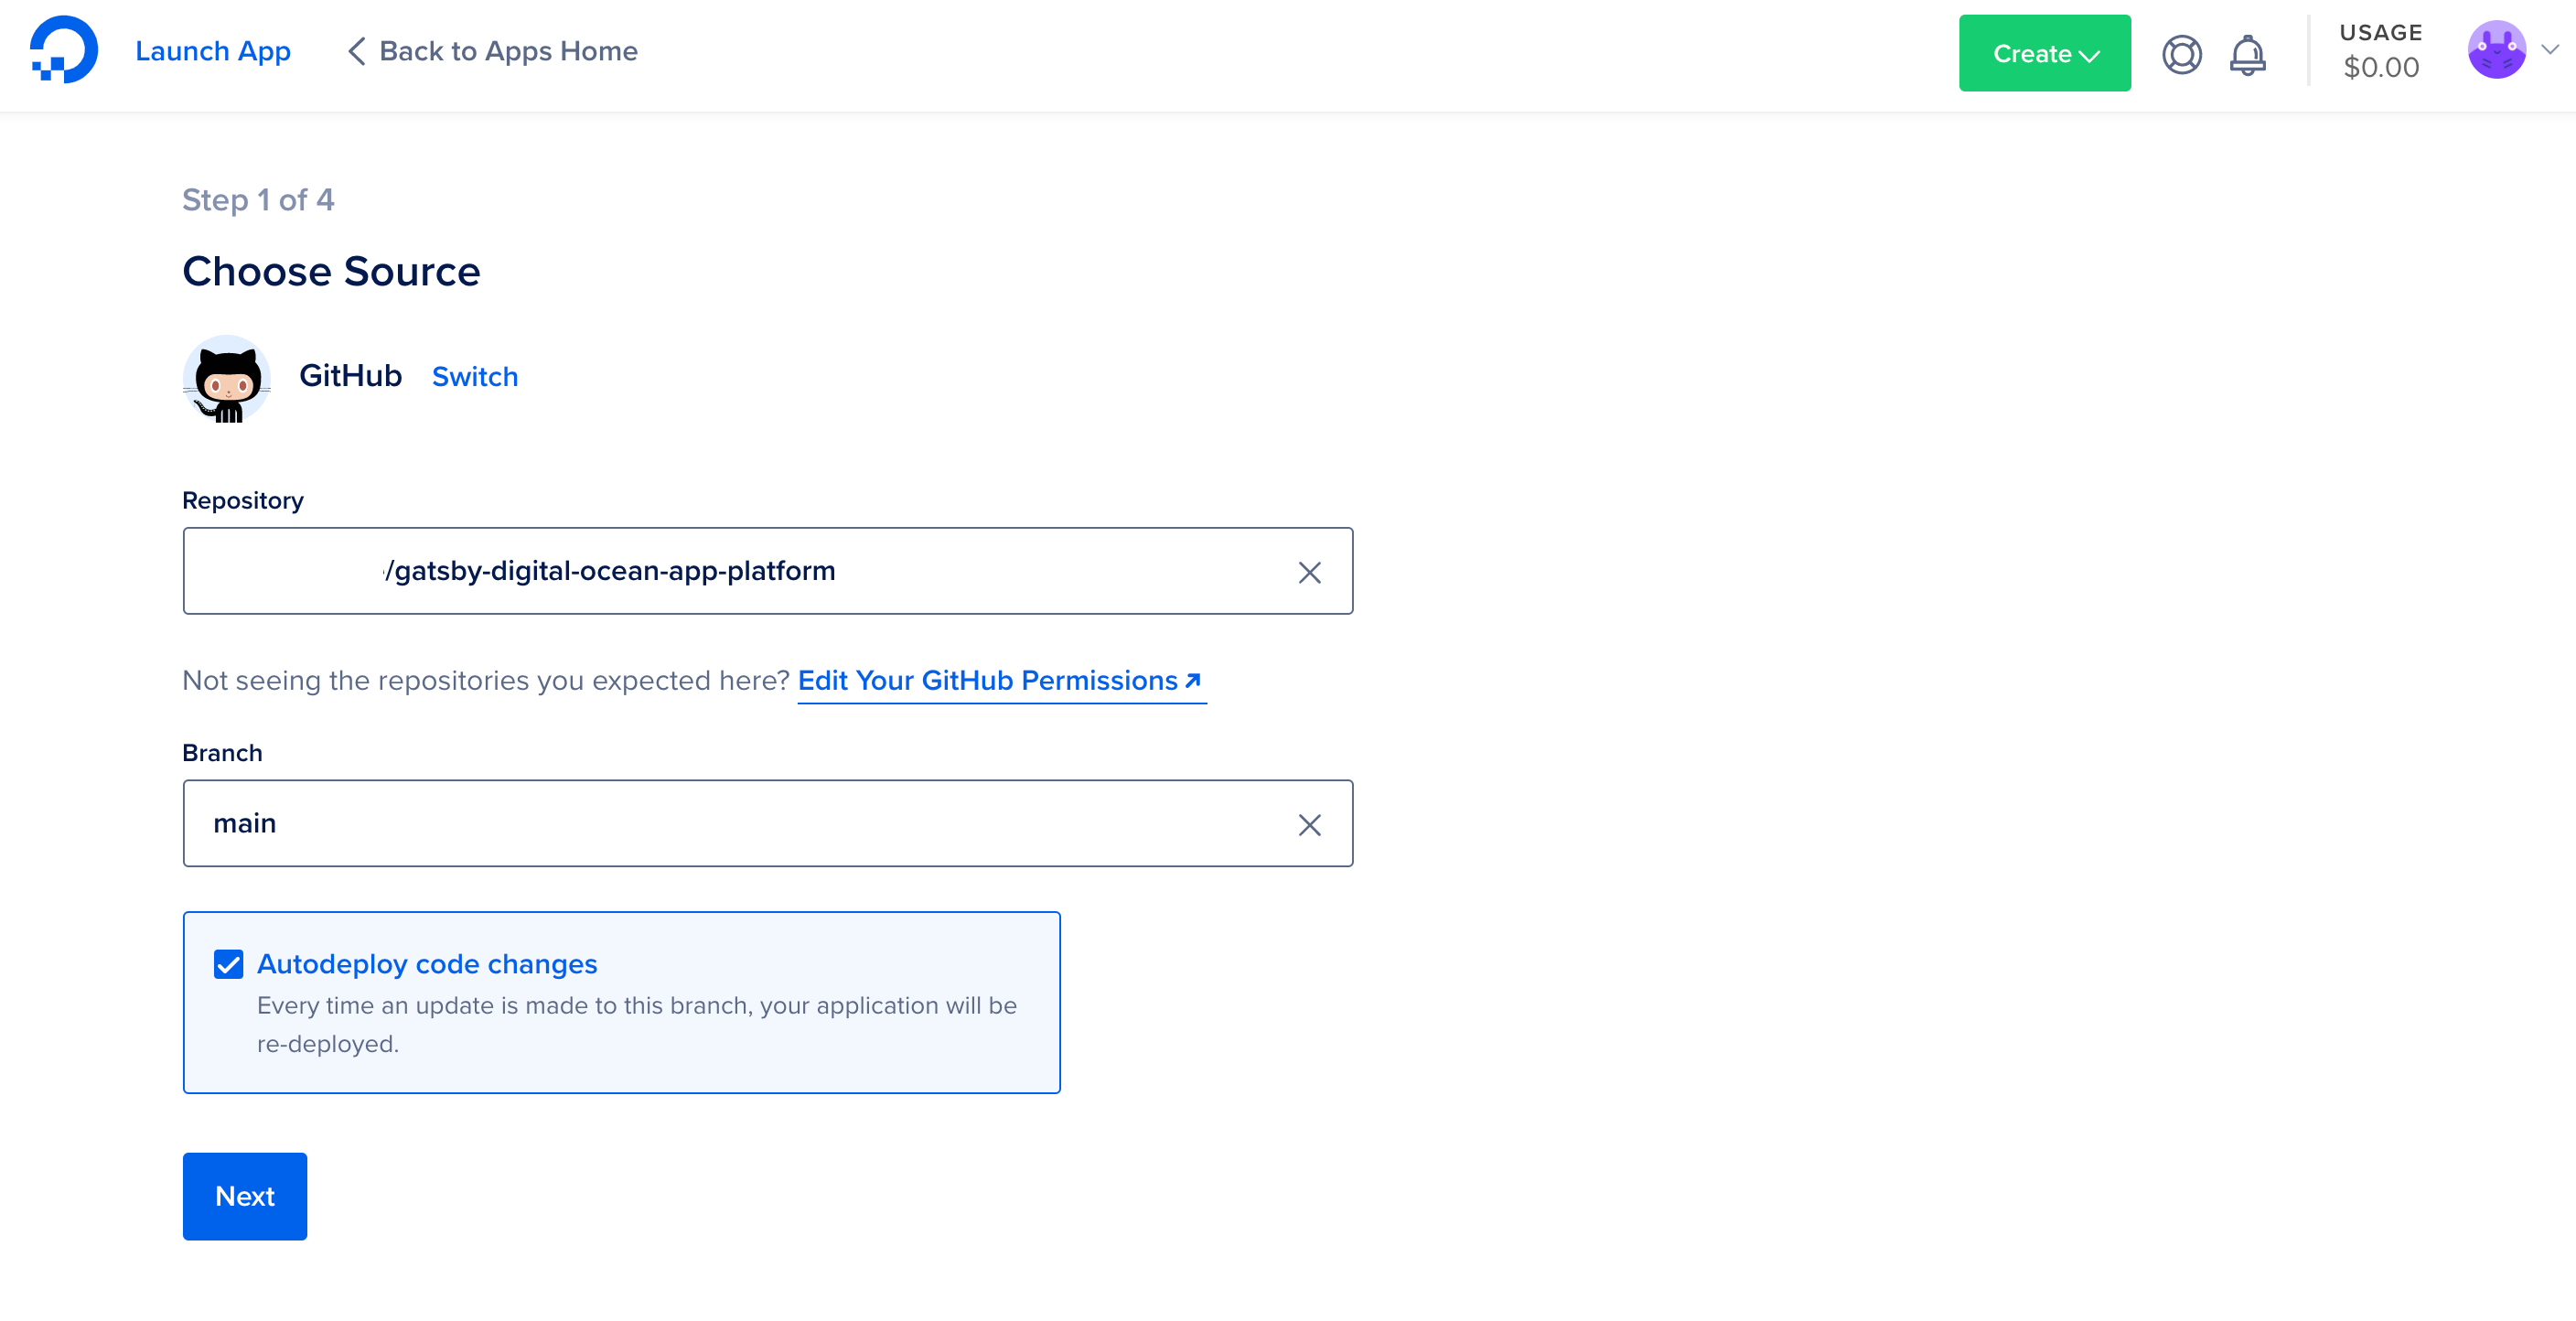
Note: Below Branch there is a pre-checked box that says Autodeploy code changes. This means if you push any changes to your GitHub repository, DigitalOcean will automatically deploy those changes.
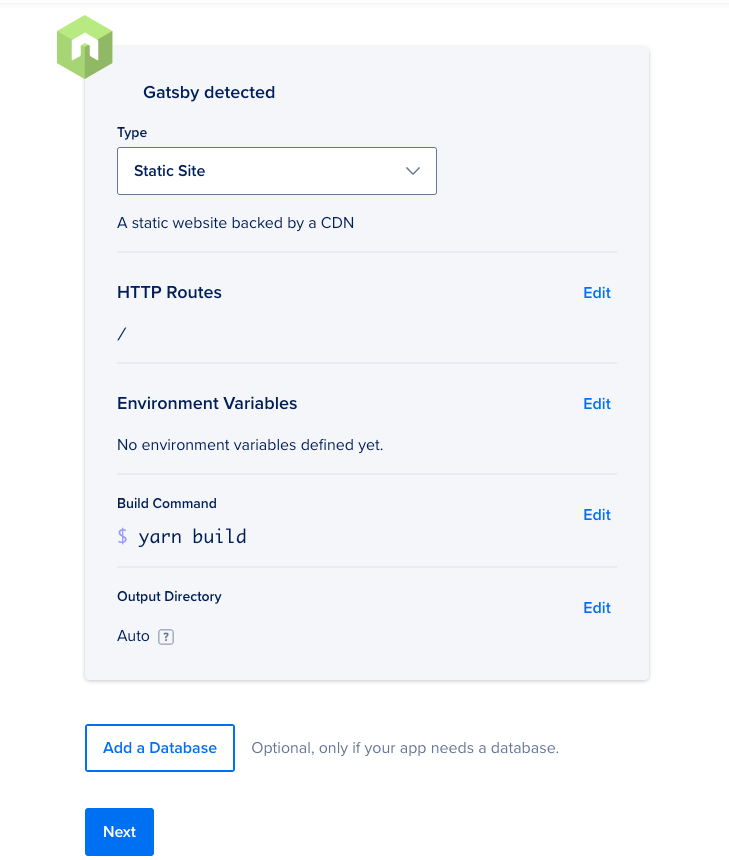
On the next page you’ll be asked to configure your app. In your case, all of the presets are correct, so you can click on Next:
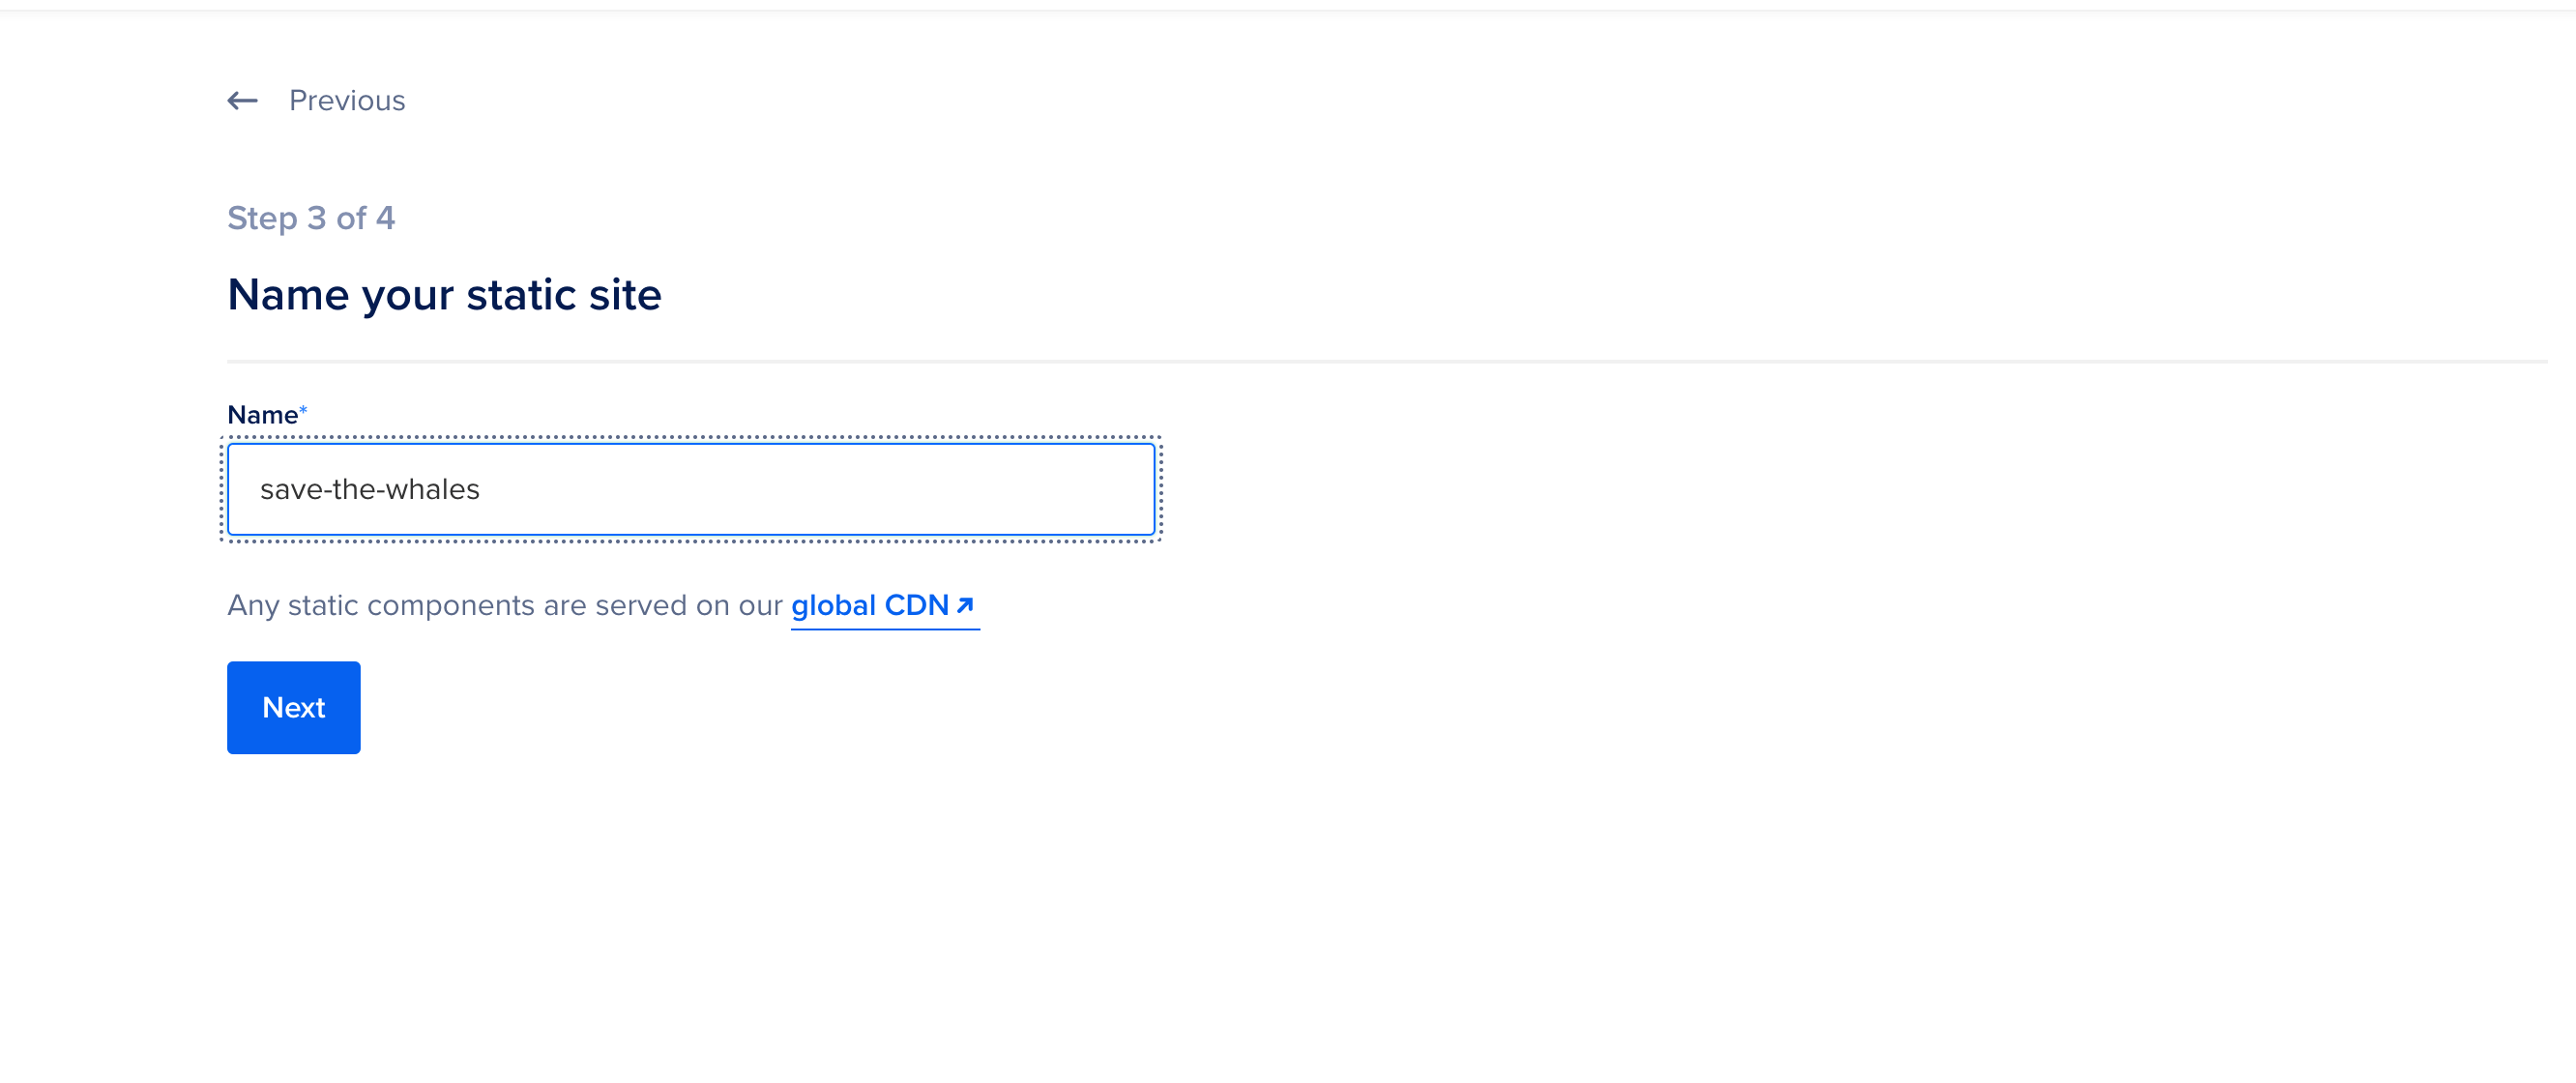
When you’ve finished configuring your app, give it a name like save-the-whales:
Once you select your name and click Next, you will go to the payment plan page. Since your app is a static site, you can choose the Starter plan, which is free:
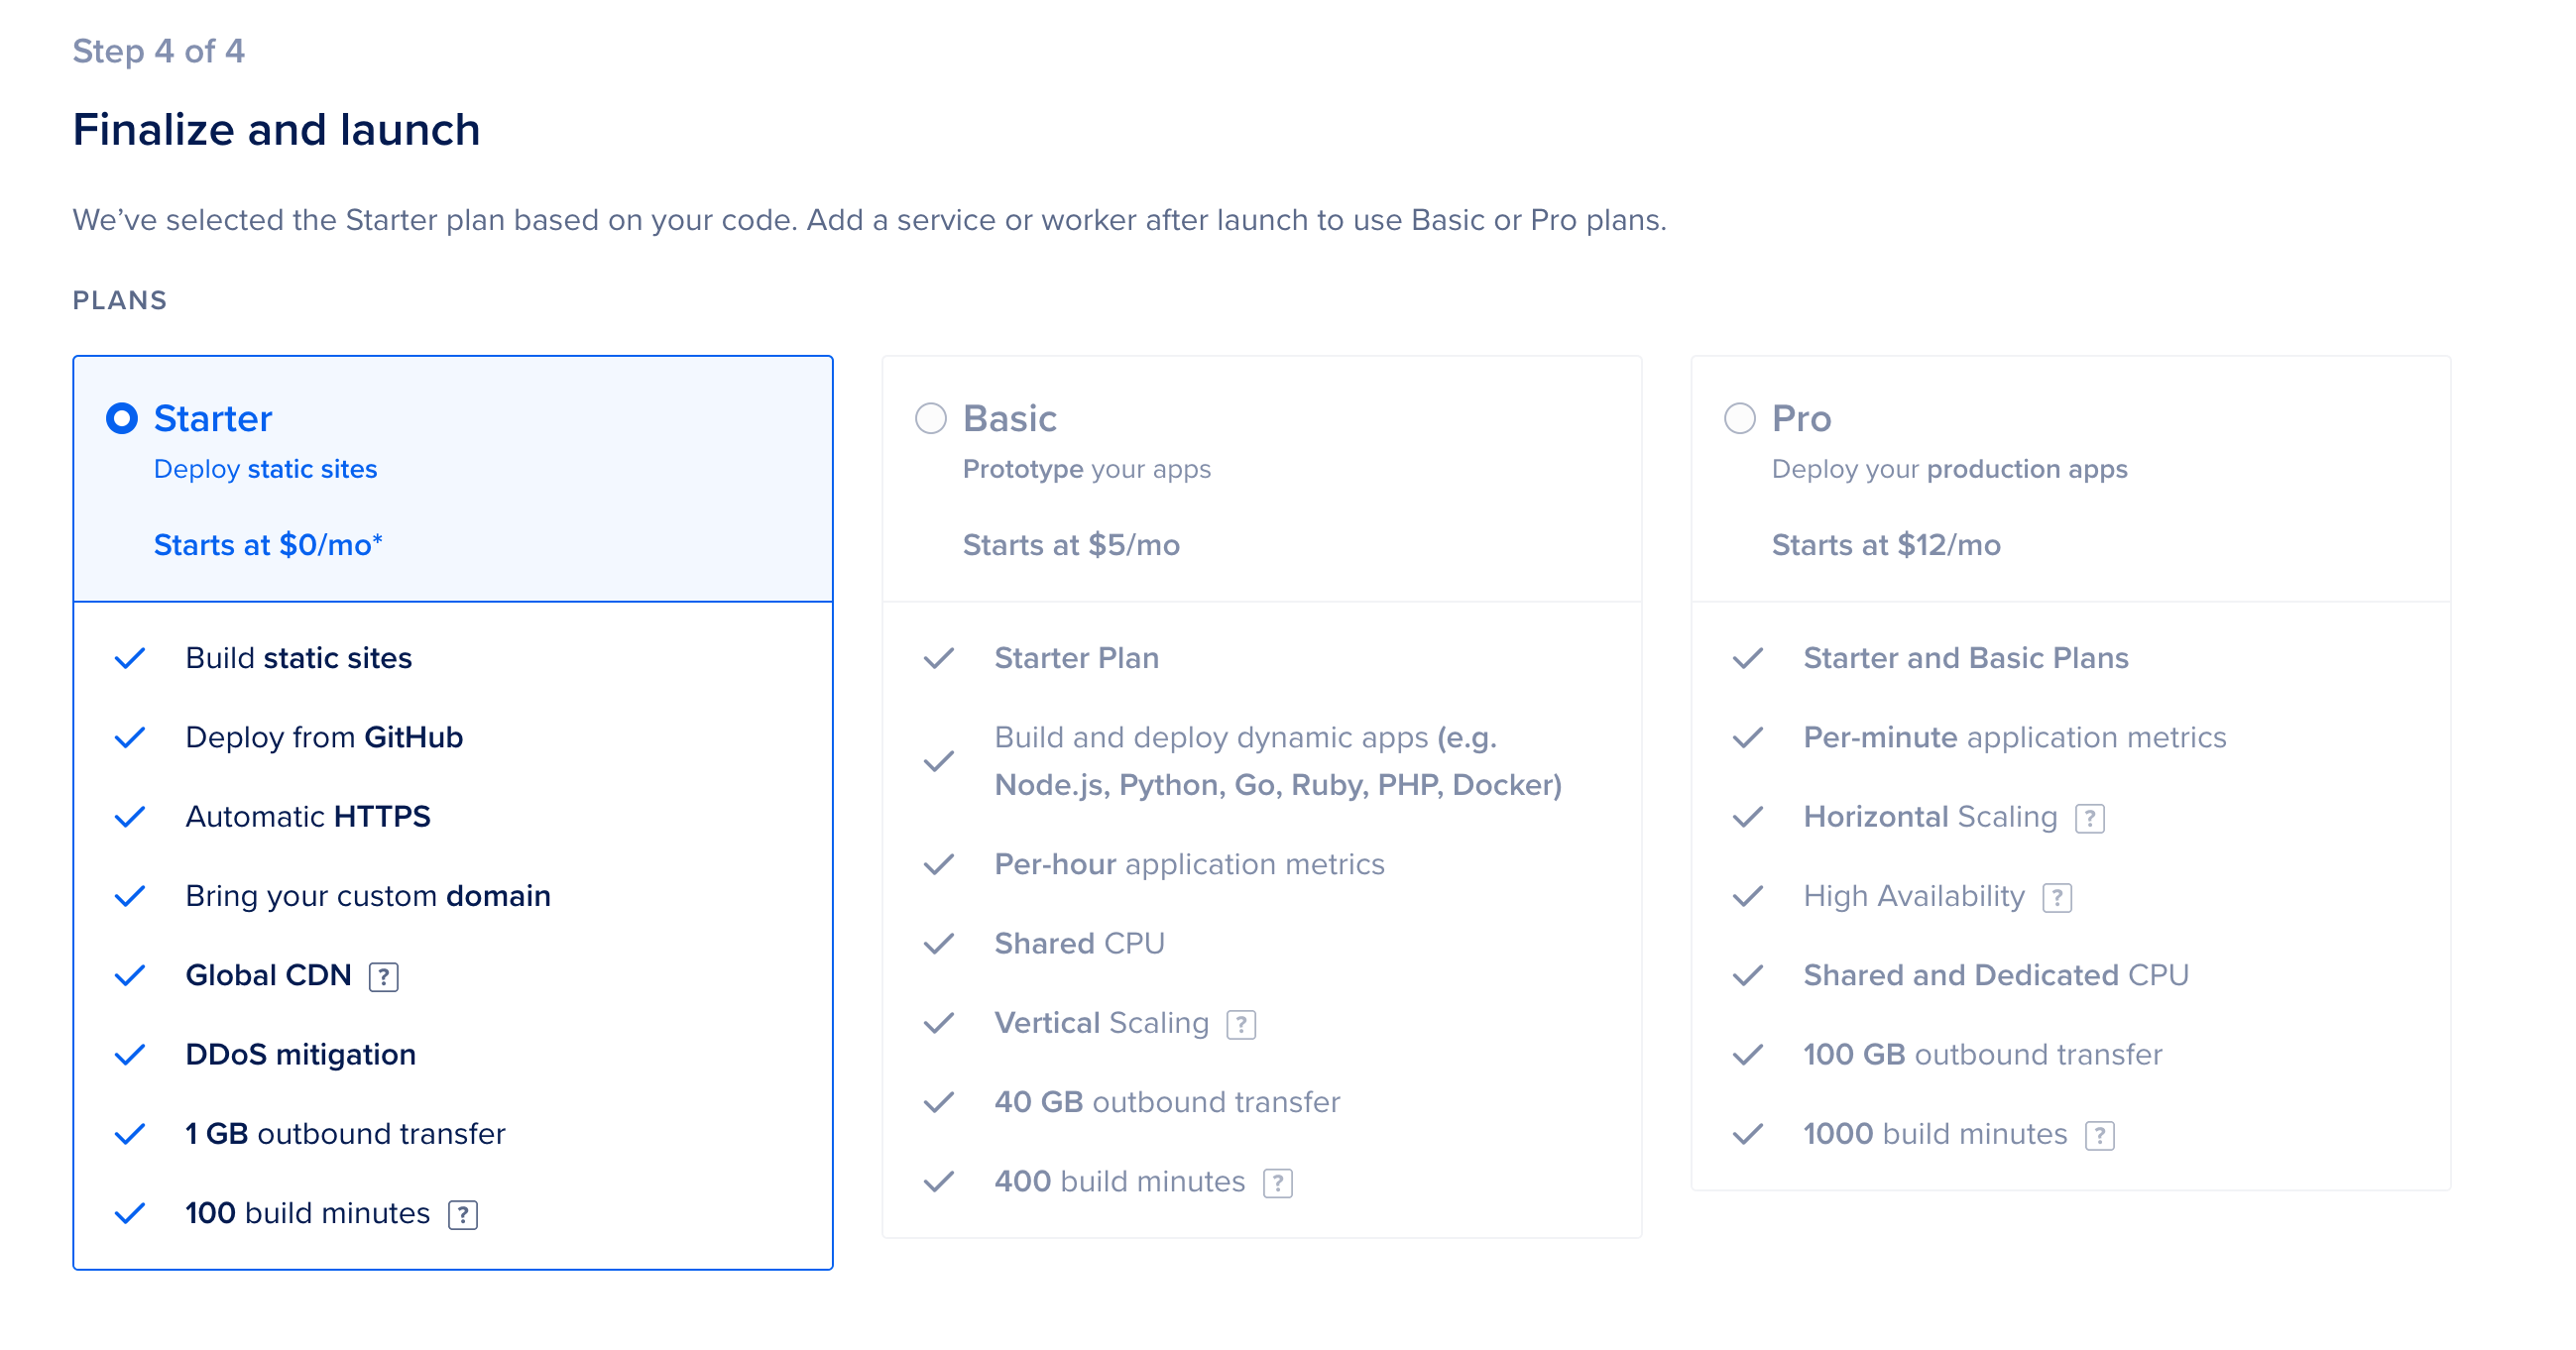
Now click the Launch Starter App button. After waiting a couple of minutes, your app will be deployed.
Navigate to the URL listed beneath the title of your app. You will find your Gatsby app successfully deployed.
Conclusion
In this tutorial, you created a Gatsby site with GIFs and deployed the site onto DigitalOcean App Platform. DigitalOcean App Platform is a convenient way to deploy and share your Gatsby projects. If you would like to learn more about this product, check out the official documentation for App Platform.
Thanks for learning with the DigitalOcean Community. Check out our offerings for compute, storage, networking, and managed databases.
Tutorial Series: How To Create Static Web Sites with Gatsby.js
Gatsby is a React framework that allows you to create static and serverless apps. Gatsby websites are different from traditional websites because they are usually deployed on a content delivery network (CDN) and are content agnostic. In this tutorial, you will learn the basics of creating a site with Gatsby, allowing you to create static sites that are optimized for your users.
About the author
I own a technical documentation agency called DocumentWrite. I love writing JavaScript and documentation.
Still looking for an answer?
This textbox defaults to using Markdown to format your answer.
You can type !ref in this text area to quickly search our full set of tutorials, documentation & marketplace offerings and insert the link!
This article is wrong. You currently don’t support Gatsby in such a simple manner. Support node 18 or take down this article cause it’s misleading.
 This work is licensed under a Creative Commons Attribution-NonCommercial- ShareAlike 4.0 International License.
Become a contributor for community
Get paid to write technical tutorials and select a tech-focused charity to receive a matching donation.

DigitalOcean Documentation
Full documentation for every DigitalOcean product.

Resources for startups and AI-native businesses
The Wave has everything you need to know about building a business, from raising funding to marketing your product.
The developer cloud
Scale up as you grow — whether you're running one virtual machine or ten thousand.

Start building today
From GPU-powered inference and Kubernetes to managed databases and storage, get everything you need to build, scale, and deploy intelligent applications.
