
Introduction
With the introduction of the DigitalOcean metadata service, it is possible to start configuring your servers before you even log in. In short, the metadata service is an HTTP location that your server can access during the boot process.
The metadata location will contain basic data about the server’s configuration and environment, such as network addresses, hostname, etc. During the initial setup, these values can be pulled down by a program called cloud-init to help configure essential services.
The most powerful feature is that you can pass a script to the metadata service when you create a server using a field called user-data. This will be run during the initial boot process and is very flexible, allowing you to accomplish whatever you can script.
The most common type of script to pass in is called a cloud-config script. This is a YAML formatted file that provides simple, readable methods of setting up common configuration items by declaration. It also has the ability to run arbitrary commands for other tasks.
In this guide, we will get familiar with the DigitalOcean metadata service and cloud-config files by trying out a simple example. We will be recreating some of the steps outlined in the initial server setup for Ubuntu 14.04 guide in order to demonstrate.
Goals
In order to successfully replicate the steps in the Ubuntu 14.04 initial server setup guide, our script would have to do a number of tasks.
These are the basic tasks that the above guide accomplishes:
- Change the root user’s password
- Create a new user
- Create the new user’s password
- Give the new user root privileges
- (Optional) Change the port the SSH daemon listens on
- (Optional) Restrict root SSH login
- (Optional) Explicitly permit our new user
Modifying the Goals to Address the Environment
For our servers created with a cloud-config file, we will have to modify our goals a bit. Any information passed in through a cloud-config file is accessible to any user of the system for the entire life of the server.
This introduces a number of security issues that are important to understand and address. Some things to keep in mind are:
- Any information passed in your
cloud-configis accessible to every user on the system. Do not place anything confidential in yourcloud-configfiles. - You can set the password for existing users, but you must pass it in plain text.
- For new users, you can pass in a hashed version of a password, but these hashes can be broken very easily with modern hardware.
With these things in mind, our setup should do everything possible to avoid committing passwords, in any form, within the cloud-config file. We can adjust our goals to accommodate the specific needs of our deployment environment.
Our adjusted strategy will look something like this:
- Set no password and provide no SSH keys for the root account through
cloud-config(any SSH keys added though the DigitalOcean interface will still be added as usual) - Create a new user
- Set no password for the new user account
- Set up SSH access for the new user account
- Give the new user password-less sudo privileges to make administrative changes.
- (Optional) Change the port the SSH daemon listens on
- (Optional) Restrict root SSH login (especially if you do not include SSH keys through the DigitalOcean interface)
- (Optional) Explicitly permit our new user
Besides removing the passwords for both accounts, the most drastic change here is that the new account will be allowed to use sudo without entering an account password. This is necessary since we are not allowing root logins and we are not setting an account password for our new user.
After the new user logs in, they will have freedom to set a password for themselves securely and modify the sudo privileges to require a password, if desired.
With these adjusted goals in mind, let’s get started.
Using Cloud-Config Files
A cloud-config file is basically a YAML file that understands certain directives. YAML is a data serialization format that is meant to be very human readable, making it simple to understand and edit.
YAML files rely on a few rules for formatting:
- Indentation with whitespace indicates the structure and relationship of the items to one another. Items that are more indented are sub-items of the first item with a lower level of indentation above them.
- List members can be identified by a leading dash.
- Associative array entries are created by using a colon (:) followed by a space and the value.
- Blocks of text are indented. To indicate that the block should be read as-is, with the formatting maintained, use the pipe character (|) before the block.
The first line of a cloud-config file must contain a special identifier so that the cloud-init program knows that the file is a cloud-config file. This looks like this:
#cloud-config
This must be placed alone on the very first line. The cloud-config file must be provided when the server is created. This can be accomplished in a two different ways.
Keep in mind that the metadata service is only available in regions where cloud 1.5 is deployed. Additionally, the version of cloud-init needed to consume the user-data field is currently only available in Ubuntu 14.04 and CentOS 7, as well as application images based on these releases.
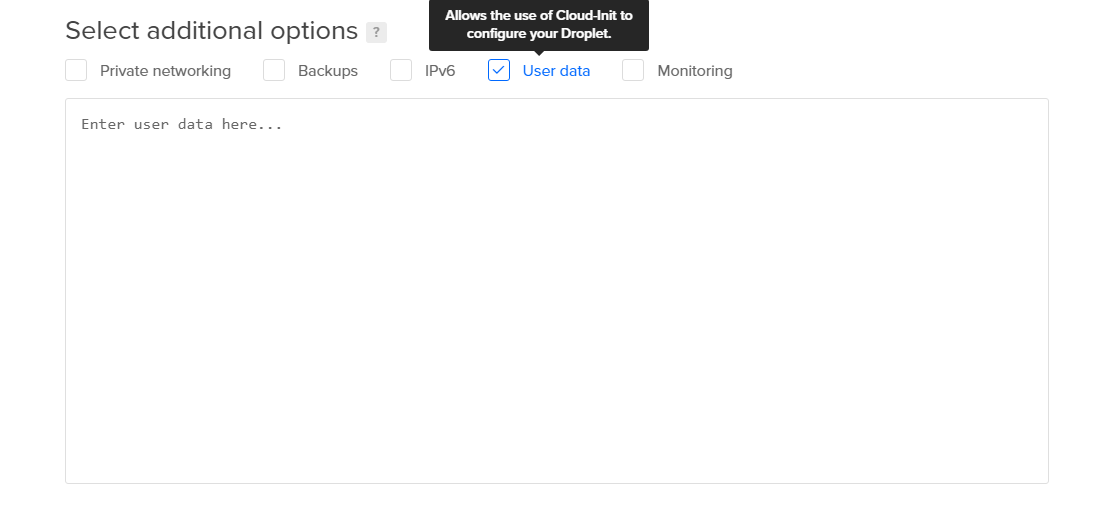
Through the control panel interface, there is an optional check box to enable user data. When you select this, a text box will show up where you can paste your cloud-config file:
If you are using the API, the JSON object that is passed in during a create request can utilize a field called user_data. For example, you could pass in a JSON object that looks similar to this:
{
    "name": "test",
    "private_networking": true,
    "region": "nyc3",
    "size": "512mb",
    "image": "ubuntu-14-04-x64",
    "user_data":"#cloud-config
        config_data
        more_config"
    "ssh_keys":[ 12345,56789 ]
}
Both of these methods work exactly the same in practice, so use whichever is most comfortable for you.
Setting Up the New User Account
The first thing we need to do is configure our new user account.
This is where almost all of the work will take place. The root account has no password by default, so we do not have to “unset” any password there.
Create the New User
To create a new user, we use the users directive. This will be contain a list of all of the new accounts that we want to create. Since we are only creating a single account, we will have a list of one. To follow the guide we linked to, we will call this new account demo.
Remember, we must start out our cloud-config files with #cloud-config alone on the first line. So far, our file will look like this:
#cloud-config
users:
  - name: demo
If we wanted to add additional users, we could do so by placing an item below and horizontally aligned with this one, beginning with a dash again, like this:
#cloud-config
users:
  - name: demo
  - name: second_user
Each of the dashes indicates a separate user account under which we can add the user’s details (which we will be doing momentarily). We are only creating a single user though, so we won’t have this second line in this guide.
Adding Authorized Keys
In order to log into this new account without a password, we will need to provide one or more of our SSH public keys. These will be added to the new user’s authorized_keys file within the .ssh directory in their home directory.
This is accomplished with the ssh-authorized-keys directive, which is a sub-item to a users entry. Basically this means that we align it with our name directive, but do not give it a dash, since it is not the start of a new user entry.
The ssh-authorized-keys entry actually takes a list of keys. This allows you to add more than one SSH public key to the file. For instance, if you have an SSH key pair for your laptop, your desktop, and your computer at work, you could add all of those as separate items in the ssh-authorized-keys list.
To get the contents of your public key of your local computer, you can type:
cat ~/.ssh/id_rsa.pub
ssh-rsa AAAAB3NzaC1yc2EAAAADAQABAAABAQCv60WjxoM39LgPDbiW7ne3gu18q0NIVv0RE6rDLNal1quXZ3nqAlANpl5qmhDQ+GS/sOtygSG4/9aiOA4vXO54k1mHWL2irjuB9XbXr00+44vSd2q/vtXdGXhdSMTf4/XK17fjKSG/9y3yD6nml6q9XgQxx9Vf/IkaKdlK0hbC1ds0+8h83PTb9dF3L7hf3Ch/ghvj5++tWJFdFeG+VI7EDuKNA4zL8C5FdYYWFA88YAmM8ndjA5qCjZXIIeZvZ/z9Kpy6DL0QZ8T3NsxRKapEU3nyiIuEAmn8fbnosWcsovw0IS1Hz6HsjYo4bu/gA82LWt3sdRUBZ/7ZsVD3ELip user@example.com
You can then paste the complete contents as an item under our ssh-authorized-keys entry. SSH public keys can be posted openly, so this does not represent a security risk:
#cloud-config
users:
  - name: demo
    ssh-authorized-keys:
      - ssh-rsa AAAAB3NzaC1yc2EAAAADAQABAAABAQCv60WjxoM39LgPDbiW7ne3gu18q0NIVv0RE6rDLNal1quXZ3nqAlANpl5qmhDQ+GS/sOtygSG4/9aiOA4vXO54k1mHWL2irjuB9XbXr00+44vSd2q/vtXdGXhdSMTf4/XK17fjKSG/9y3yD6nml6q9XgQxx9Vf/IkaKdlK0hbC1ds0+8h83PTb9dF3L7hf3Ch/ghvj5++tWJFdFeG+VI7EDuKNA4zL8C5FdYYWFA88YAmM8ndjA5qCjZXIIeZvZ/z9Kpy6DL0QZ8T3NsxRKapEU3nyiIuEAmn8fbnosWcsovw0IS1Hz6HsjYo4bu/gA82LWt3sdRUBZ/7ZsVD3ELip user@example.com
If you wanted to add additional keys, that can be done by adding another dash followed by the second public key:
#cloud-config
users:
  - name: demo
    ssh-authorized-keys:
      - key_one
      - key_two
Add any keys that you wish to use to log into this account here.
Set Up Sudo Access
The next step is to configure sudo access to our new account. To reiterate, we will be configuring password-less sudo access since we will not be setting a password on this account due to the security limitations.
To configure access, we will actually be doing two separate steps.
First, we will be creating the entry we want to use for the sudoers file. Our changes will actually be written to a separate file in the /etc/sudoers.d directory, which /etc/sudoers includes when parsed.
The entry we need to create will not need to include the username, since cloud-init is smart enough to figure out the account name from the entry information. The directive we need to use is sudo, which is aligned with our other users level directives.
For our guide, since we are configuring password-less sudo capability, will look like this:
#cloud-config
users:
  - name: demo
    ssh-authorized-keys:
      - ssh-rsa AAAAB3NzaC1yc2EAAAADAQABAAABAQCv60WjxoM39LgPDbiW7ne3gu18q0NIVv0RE6rDLNal1quXZ3nqAlANpl5qmhDQ+GS/sOtygSG4/9aiOA4vXO54k1mHWL2irjuB9XbXr00+44vSd2q/vtXdGXhdSMTf4/XK17fjKSG/9y3yD6nml6q9XgQxx9Vf/IkaKdlK0hbC1ds0+8h83PTb9dF3L7hf3Ch/ghvj5++tWJFdFeG+VI7EDuKNA4zL8C5FdYYWFA88YAmM8ndjA5qCjZXIIeZvZ/z9Kpy6DL0QZ8T3NsxRKapEU3nyiIuEAmn8fbnosWcsovw0IS1Hz6HsjYo4bu/gA82LWt3sdRUBZ/7ZsVD3ELip user@example.com
    sudo: ['ALL=(ALL) NOPASSWD:ALL']
This will create a file in the /etc/sudoers.d directory called 90-cloud-init-users. Inside of this file, the entry will look like this:
demo ALL=(ALL) NOPASSWD:ALL
The second thing we are going to do is actually add our user to the sudo group. This is not strictly necessary since we have an entry specific to our new account that is parsed by sudo, but it gives us more flexibility.
Later on, we may wish to manually set a password for our user and require that password for sudo commands. If our user is already in the sudo group, all we would have to do is set a password and remove the entry in the 90-cloud-init-users file.
To add a supplementary group, we can use the groups directive:
#cloud-config
users:
  - name: demo
    ssh-authorized-keys:
      - ssh-rsa AAAAB3NzaC1yc2EAAAADAQABAAABAQCv60WjxoM39LgPDbiW7ne3gu18q0NIVv0RE6rDLNal1quXZ3nqAlANpl5qmhDQ+GS/sOtygSG4/9aiOA4vXO54k1mHWL2irjuB9XbXr00+44vSd2q/vtXdGXhdSMTf4/XK17fjKSG/9y3yD6nml6q9XgQxx9Vf/IkaKdlK0hbC1ds0+8h83PTb9dF3L7hf3Ch/ghvj5++tWJFdFeG+VI7EDuKNA4zL8C5FdYYWFA88YAmM8ndjA5qCjZXIIeZvZ/z9Kpy6DL0QZ8T3NsxRKapEU3nyiIuEAmn8fbnosWcsovw0IS1Hz6HsjYo4bu/gA82LWt3sdRUBZ/7ZsVD3ELip user@example.com
    sudo: ['ALL=(ALL) NOPASSWD:ALL']
    groups: sudo
This will make a transition to a more traditional sudo setup easier. We will show you how to do this at the end of this guide.
Set the Shell Environment
By default, newly created users have their default shell set to the very basic /bin/sh shell.
This is a much more pared down environment than most people are used to, so we want to manually specify a bash shell environment for our new user.
This can be accomplished with the shell directive within the users level item. All we need to do is point it to the full path of the bash executable:
#cloud-config
users:
  - name: demo
    ssh-authorized-keys:
      - ssh-rsa AAAAB3NzaC1yc2EAAAADAQABAAABAQCv60WjxoM39LgPDbiW7ne3gu18q0NIVv0RE6rDLNal1quXZ3nqAlANpl5qmhDQ+GS/sOtygSG4/9aiOA4vXO54k1mHWL2irjuB9XbXr00+44vSd2q/vtXdGXhdSMTf4/XK17fjKSG/9y3yD6nml6q9XgQxx9Vf/IkaKdlK0hbC1ds0+8h83PTb9dF3L7hf3Ch/ghvj5++tWJFdFeG+VI7EDuKNA4zL8C5FdYYWFA88YAmM8ndjA5qCjZXIIeZvZ/z9Kpy6DL0QZ8T3NsxRKapEU3nyiIuEAmn8fbnosWcsovw0IS1Hz6HsjYo4bu/gA82LWt3sdRUBZ/7ZsVD3ELip user@example.com
    sudo: ['ALL=(ALL) NOPASSWD:ALL']
    groups: sudo
    shell: /bin/bash
We have completed our new user configuration. We can now move on to the optional steps that lock down our SSH daemon.
Configure and Lock Down the SSH Daemon (Optional)
The next steps can be useful for increased security. You can implement any or all of them as you see fit. Check out the guide we are automating to get more information about these options. We will show you how to implement each of the items using two different methods.
All of the changes that we need to make will be in the /etc/ssh/sshd_config file. To reiterate, the changes that we are interested in making are:
- (Optional) Change the port the SSH daemon listens on
- (Optional) Restrict root SSH login (especially if you do not include SSH keys through the DigitalOcean interface)
- (Optional) Explicitly permit our new user
These settings can be implemented by making these changes in the sshd_config file, respectively:
- Port 4444
- PermitRootLogin no
- AllowUsers demo
There are two approaches to making these changes. The first is to completely rewrite the file by supplying the entire configuration file within our cloud-config file. The second is to strategically make the changes using common Linux text utilities.
Both of these have their advantages, and both demonstrate different directives in cloud-config. We will cover each in turn.
Configuring the SSH Daemon by Supplying a New Configuration File
The first strategy for making the changes that we want is to completely rewrite the file with the exact contents that we want.
This allows us to have complete control over the file, regardless of what is available there by default. The methodology is straight forward and it is easy to anticipate the results of our actions.
To write a new file to the disk, we can use the write_files directive. This is a top-level directive, so it should be placed outside of the users section we had been working in previously.
We supply a list (represented again by a dash for each item) of files we want to write.
#cloud-config
users:
  - name: demo
    ssh-authorized-keys:
      - ssh-rsa AAAAB3NzaC1yc2EAAAADAQABAAABAQCv60WjxoM39LgPDbiW7ne3gu18q0NIVv0RE6rDLNal1quXZ3nqAlANpl5qmhDQ+GS/sOtygSG4/9aiOA4vXO54k1mHWL2irjuB9XbXr00+44vSd2q/vtXdGXhdSMTf4/XK17fjKSG/9y3yD6nml6q9XgQxx9Vf/IkaKdlK0hbC1ds0+8h83PTb9dF3L7hf3Ch/ghvj5++tWJFdFeG+VI7EDuKNA4zL8C5FdYYWFA88YAmM8ndjA5qCjZXIIeZvZ/z9Kpy6DL0QZ8T3NsxRKapEU3nyiIuEAmn8fbnosWcsovw0IS1Hz6HsjYo4bu/gA82LWt3sdRUBZ/7ZsVD3ELip user@example.com
    sudo: ['ALL=(ALL) NOPASSWD:ALL']
    groups: sudo
    shell: /bin/bash
write_files:
  - item_one
  - item_two
In our case, we will only be writing one file. For each file, we supply details about the chanegs we want to make. For instance, parameters that you can use are path, content, owner, permissions, and even encoding.
By default, the owner of files created with this method is root and the permissions are 644, which is exactly what we want. So we only need to supply the path and content directives.
The path is just the location in the filesystem to write the file.
For the content, we will want to provide the entire contents of the file, to be written as-is. Remember, we can use the pipe character (|) to pass in a block of text that will maintain its formatting.
For the content of our sshd_config file, we will just use the default content, stripped of comments (for brevity), with the changes we wanted to make. The complete section to rewrite our file will look like this:
#cloud-config
users:
  - name: demo
    ssh-authorized-keys:
      - ssh-rsa AAAAB3NzaC1yc2EAAAADAQABAAABAQCv60WjxoM39LgPDbiW7ne3gu18q0NIVv0RE6rDLNal1quXZ3nqAlANpl5qmhDQ+GS/sOtygSG4/9aiOA4vXO54k1mHWL2irjuB9XbXr00+44vSd2q/vtXdGXhdSMTf4/XK17fjKSG/9y3yD6nml6q9XgQxx9Vf/IkaKdlK0hbC1ds0+8h83PTb9dF3L7hf3Ch/ghvj5++tWJFdFeG+VI7EDuKNA4zL8C5FdYYWFA88YAmM8ndjA5qCjZXIIeZvZ/z9Kpy6DL0QZ8T3NsxRKapEU3nyiIuEAmn8fbnosWcsovw0IS1Hz6HsjYo4bu/gA82LWt3sdRUBZ/7ZsVD3ELip user@example.com
    sudo: ['ALL=(ALL) NOPASSWD:ALL']
    groups: sudo
    shell: /bin/bash
write_files:
  - path: /etc/ssh/sshd_config
    content: |
         Port 4444
         Protocol 2
         HostKey /etc/ssh/ssh_host_rsa_key
         HostKey /etc/ssh/ssh_host_dsa_key
         HostKey /etc/ssh/ssh_host_ecdsa_key
         HostKey /etc/ssh/ssh_host_ed25519_key
         UsePrivilegeSeparation yes
         KeyRegenerationInterval 3600
         ServerKeyBits 1024
         SyslogFacility AUTH
         LogLevel INFO
         LoginGraceTime 120
         PermitRootLogin no
         StrictModes yes
         RSAAuthentication yes
         PubkeyAuthentication yes
         IgnoreRhosts yes
         RhostsRSAAuthentication no
         HostbasedAuthentication no
         PermitEmptyPasswords no
         ChallengeResponseAuthentication no
         X11Forwarding yes
         X11DisplayOffset 10
         PrintMotd no
         PrintLastLog yes
         TCPKeepAlive yes
         AcceptEnv LANG LC_*
         Subsystem sftp /usr/lib/openssh/sftp-server
         UsePAM yes
         AllowUsers demo
This will completely replace the contents of /etc/ssh/sshd_config with the new contents that we provided. This is the default sshd_config file for Ubuntu with only the items we mentioned above modified.
This is one method of making the changes to the SSH daemon.
Configuring the SSH Daemon Through Focused Changes
The second way that we could modify the sshd_config file is through focused edits. Linux systems come with a variety of powerful text manipulation tools that we can leverage to make only the changes we need.
To run arbitrary commands, we will use a directive called runcmd, which allows us to run any command on the system. Each command will be a list item under the directive. These can be given either as strings representing the entire command, or as an array with the command and all options as elements.
We will be using the sed command, which is made for string substitutions. Although you can pass multiple operations to a single sed command, we will do a single operation for each sed command. This will allow us to troubleshoot any problems easier. All of our sed commands will edit the sshd_config file in place.
Our first sed command will change the line that configures the listening port. We will identify this by searching for a line that begins with “Port”. We will tell sed to substitute the entire line (specified by the regular expression ^.*$) with our Port 4444 configuration:
#cloud-config
users:
  - name: demo
    ssh-authorized-keys:
      - ssh-rsa AAAAB3NzaC1yc2EAAAADAQABAAABAQCv60WjxoM39LgPDbiW7ne3gu18q0NIVv0RE6rDLNal1quXZ3nqAlANpl5qmhDQ+GS/sOtygSG4/9aiOA4vXO54k1mHWL2irjuB9XbXr00+44vSd2q/vtXdGXhdSMTf4/XK17fjKSG/9y3yD6nml6q9XgQxx9Vf/IkaKdlK0hbC1ds0+8h83PTb9dF3L7hf3Ch/ghvj5++tWJFdFeG+VI7EDuKNA4zL8C5FdYYWFA88YAmM8ndjA5qCjZXIIeZvZ/z9Kpy6DL0QZ8T3NsxRKapEU3nyiIuEAmn8fbnosWcsovw0IS1Hz6HsjYo4bu/gA82LWt3sdRUBZ/7ZsVD3ELip user@example.com
    sudo: ['ALL=(ALL) NOPASSWD:ALL']
    groups: sudo
    shell: /bin/bash
runcmd:
  - sed -i -e '/^Port/s/^.*$/Port 4444/' etc/ssh/sshd_config
Our next sed line will modify the “PermitRootLogin” directive by searching for that string at the beginning of a line. Once again, we will replace the entire line, this time with PermitRootLogin no:
#cloud-config
users:
  - name: demo
    ssh-authorized-keys:
      - ssh-rsa AAAAB3NzaC1yc2EAAAADAQABAAABAQCv60WjxoM39LgPDbiW7ne3gu18q0NIVv0RE6rDLNal1quXZ3nqAlANpl5qmhDQ+GS/sOtygSG4/9aiOA4vXO54k1mHWL2irjuB9XbXr00+44vSd2q/vtXdGXhdSMTf4/XK17fjKSG/9y3yD6nml6q9XgQxx9Vf/IkaKdlK0hbC1ds0+8h83PTb9dF3L7hf3Ch/ghvj5++tWJFdFeG+VI7EDuKNA4zL8C5FdYYWFA88YAmM8ndjA5qCjZXIIeZvZ/z9Kpy6DL0QZ8T3NsxRKapEU3nyiIuEAmn8fbnosWcsovw0IS1Hz6HsjYo4bu/gA82LWt3sdRUBZ/7ZsVD3ELip user@example.com
    sudo: ['ALL=(ALL) NOPASSWD:ALL']
    groups: sudo
    shell: /bin/bash
runcmd:
  - sed -i -e '/^Port/s/^.*$/Port 4444/' /etc/ssh/sshd_config
  - sed -i -e '/^PermitRootLogin/s/^.*$/PermitRootLogin no/' /etc/ssh/sshd_config
The next sed command will add a line to the end of the file since there is not currently an “AllowUsers” directive in the file. We do this by matching the last line (specified by “$”) and appending the line we need.
Afterwards, we will need to restart the SSH daemon so that our changes are propagated. We can do this easily using the Upstart “restart” command:
#cloud-config
users:
  - name: demo
    ssh-authorized-keys:
      - ssh-rsa AAAAB3NzaC1yc2EAAAADAQABAAABAQCv60WjxoM39LgPDbiW7ne3gu18q0NIVv0RE6rDLNal1quXZ3nqAlANpl5qmhDQ+GS/sOtygSG4/9aiOA4vXO54k1mHWL2irjuB9XbXr00+44vSd2q/vtXdGXhdSMTf4/XK17fjKSG/9y3yD6nml6q9XgQxx9Vf/IkaKdlK0hbC1ds0+8h83PTb9dF3L7hf3Ch/ghvj5++tWJFdFeG+VI7EDuKNA4zL8C5FdYYWFA88YAmM8ndjA5qCjZXIIeZvZ/z9Kpy6DL0QZ8T3NsxRKapEU3nyiIuEAmn8fbnosWcsovw0IS1Hz6HsjYo4bu/gA82LWt3sdRUBZ/7ZsVD3ELip user@example.com
    sudo: ['ALL=(ALL) NOPASSWD:ALL']
    groups: sudo
    shell: /bin/bash
runcmd:
  - sed -i -e '/^Port/s/^.*$/Port 4444/' /etc/ssh/sshd_config
  - sed -i -e '/^PermitRootLogin/s/^.*$/PermitRootLogin no/' /etc/ssh/sshd_config
  - sed -i -e '$aAllowUsers demo' /etc/ssh/sshd_config
  - restart ssh
This should be enough to make the edits that we need to our file and restart the service.
Finished Product
We have now accomplished all of our adjusted goals using the cloud-config file. You can either create your server using the control panel, or use the API to spin up a server.
If you choose to use the API, a sample data payload may look like this:
{"name": "your_droplet_name",
"private_networking": true,
"region": "nyc3",
"size": "512mb",
"image": "ubuntu-14-04-x64",
"user-data": "#cloud-config
users:
  - name: demo
    ssh-authorized-keys:
      - ssh-rsa AAAAB3NzaC1yc2EAAAADAQABAAABAQCv60WjxoM39LgPDbiW7ne3gu18q0NIVv0RE6rDLNal1quXZ3nqAlANpl5qmhDQ+GS/sOtygSG4/9aiOA4vXO54k1mHWL2irjuB9XbXr00+44vSd2q/vtXdGXhdSMTf4/XK17fjKSG/9y3yD6nml6q9XgQxx9Vf/IkaKdlK0hbC1ds0+8h83PTb9dF3L7hf3Ch/ghvj5++tWJFdFeG+VI7EDuKNA4zL8C5FdYYWFA88YAmM8ndjA5qCjZXIIeZvZ/z9Kpy6DL0QZ8T3NsxRKapEU3nyiIuEAmn8fbnosWcsovw0IS1Hz6HsjYo4bu/gA82LWt3sdRUBZ/7ZsVD3ELip user@example.com
    sudo: ['ALL=(ALL) NOPASSWD:ALL']
    groups: sudo
    shell: /bin/bash
runcmd:
  - sed -i -e '/^Port/s/^.*$/Port 4444/' /etc/ssh/sshd_config
  - sed -i -e '/^PermitRootLogin/s/^.*$/PermitRootLogin no/' /etc/ssh/sshd_config
  - sed -i -e '$aAllowUsers demo' /etc/ssh/sshd_config
  - restart ssh"}
Troubleshooting
If you are having some issues getting your cloud-config file to work correctly, you can check for clues in the log files.
These are located at:
- /var/log/cloud-init.log: The actual process logs for cloud-init’s processing of the configuration files.
- /var/log/cloud-init-output.log: Any output produced by the processing of the configuration can be found here.
You can usually find some good information about what happened by using grep to search these files.
If you have gotten to the situation where you cannot log into the server you created because of some configuration problems, it is best to destroy the server and start again. For troubleshooting, it sometimes is necessary to temporarily set up a test server with a root password in the cloud-config file so that you can see what’s going wrong.
This can be done by including something like this in your cloud-config:
#cloud-config
chpasswd:
  list: |
    root:yourpassword
  expire: False
. . .
This will allow you to log in using the DigitalOcean console, which does not rely on SSH. Remember, any password that you place here will be readable to every user on your server for the entire life of your system, so destroy this Droplet after you find out what the problem was. You can then start another server using the corrected cloud-config file.
Setting Up Traditional Sudo Access
If you would like to configure more conventional, password authenticated sudo access after your server has been deployed, you can easily take the following steps:
First, you need to set a password for the new account. The only way to do this without having to enter the current password (which does not exist) is through sudo. You will have to specify your new user account’s name at the end of the command in order to not set the root password:
sudo passwd demo
Now that you have a password for your account, verify that you are, in fact, in the sudo group. This can be done by typing:
groups
demo sudo
If you are not already in the sudo group, you can add yourself by typing:
sudo usermod -a -G sudo demo
Now, edit the 90-cloud-init-users file with the visudo command, by passing the file as an argument:
sudo visudo -f /etc/sudoers.d/90-cloud-init-users
Comment out or remove the line associated with you user:
#demo ALL=(ALL) NOPASSWD:ALL
Save and close the file. Your account will now require your password to execute sudo commands.
Conclusion
Using cloud-config files to complete the initial configuration of your servers can be easy and save you time in the long run. The files are easy to tweak and building up a number of different configurations can give you great flexibility in quickly setting up servers.
By combining cloud-config with a more traditional configuration management system after the machine has been brought online, you can quickly and easily bring new machines exactly into the desired state.
Thanks for learning with the DigitalOcean Community. Check out our offerings for compute, storage, networking, and managed databases.
About the author
Former Senior Technical Writer at DigitalOcean, specializing in DevOps topics across multiple Linux distributions, including Ubuntu 18.04, 20.04, 22.04, as well as Debian 10 and 11.
Still looking for an answer?
This textbox defaults to using Markdown to format your answer.
You can type !ref in this text area to quickly search our full set of tutorials, documentation & marketplace offerings and insert the link!
Many thanks for this article, it helped me getting into cloud-init a lot. Unfortunately I am missing one really important aspect: How can I use cloud-init to perform one of the following scenarios:
- If creating a droplet from DO website using “enable user data” field: a) Download additional (more granular) provisioning script from github (public or private repository) b) Download additional (more granular) provisioning script from bitbucket (public or private repository)
- If creating a droplet using the DO API: a) can cloud-init be used to use rsync over ssh to copy a local bootstrap.sh to the new droplet and make it run?
Conditions:
- My system has no static IP (I cant hardcode any fancy copy operations and let the droplet let fetch a file from a defined remote system that got a static IP in scenario 2 above = local macbook that travels a lot)
- SSH port remains on 22 (which you might want to reconsider in your article, also see: http://bit.ly/1Gw9FAT)
Also for security reasons: can you please clarify on the missing PW for the ‘demo’ user? –> ‘root’ is disabled & ‘demo’ created, added to sudo group and no password created at all: How can I secure that ‘demo’ to ensure the only option to login is ssh? –> if it above scenario 2. is possible at all to copy a file to the droplet, would the contents of that file be available as metadata to all users as well? Even if I delete that bootstrap.sh after it was executed?
weird, works well on ubuntu but I can’t get the cloud-config to work on CentOS7 (on AMS2) (and yes: I used service sshd restart to restart ssh daemon on CentOS7).
Any hints are mich appreciated.
using cloud-config on CoreOS, i want to use a different coreos.etcd2.discovery url value.
currently i create a new file in the droplet called cloud-config and run sudo coreos-cloudinit --from-file cloud-config which updates /run/systemd/system/etcd2.service.d/20-cloudinit.conf properly. however, it only applies once, when the droplet reboots, the original (wrong) cloud-config is read in from DO metadata and overwrites the discovery url.
is there a way to change the cloud-config metadata on DO ?
Great overview, after a quick read, I was confident this would be easy. Actually it is not as easy as it seems. Even simple user creation fails. And from log files /var/log/cloud-init.log all that can be seen is that user creation failed …
Is there a way to re-run the script on a newly created droplet? If so, where is the YAML cloud-config file pasted in text-edit on droplet creation located? cloud-init command seems to take some parameters but it’s unclear how to pass a file.
Seems like the workaround is working on a gist and recreating a test server until figured out what went wrong.
I think I’ll need to take some more time to read and learn from examples at: http://cloudinit.readthedocs.org/en/latest/topics/examples.html
I have the same complaint as @erikusaj - I may be a noobie at this, but I followed the basic steps (not including more advanced options) exactly and cannot login as the user I allegedly created. It would be great it you could provide support for this.
Thanks for the informative, well-written tutorial. If possible, would anyone in this thread be able to offer some advice on the following:
-
At times, after provisioning a droplet, I’ve found it helpful to permanently alter its
hostname. -
I use an interactive script to change my droplet’s hostname (here’s the GitHub link).
-
I’d like to accomplish the same task using
cloud-config.
I believe that the following should work:
#cloud-config
runcmd:
  - newhostn="<%newhostn%>"
  - hostn=$(cat /etc/hostname)
  - echo "Exisitng hostname is $hostn"
  - echo "New hostname will be $newhostn"
  - sed -i "s/$hostn/$newhostn/g" /etc/hosts
  - sed -i "s/$hostn/$newhostn/g" /etc/hostname
power_state:
  mode: reboot
If it does, great. If not, why, and what would I need to do differently?
Lastly, I think there’s an easier way to do this, since hostname is among the harvested metadata:
#cloud-config
hostname:
  - hostname: newhostname
but with limited documentation, I’m not sure. Any suggestions? If I can get an answer that works reliably, I’m happy to post it to do_user_scripts on GitHub.
Cheers!
Hello
is it possible to run cloud-init at any time later passing it a YAML file?
thanks
Is this article still correct for Ubuntu 16.04?
I’m asking because I’m even when using the following cloudconfig, my droplet stops accepting ssh request:
#cloud-config
users:
  - name: thibault
    ssh-authorized-keys:
      - ssh-rsa HereGoesMySuperSecretSSHKey
    sudo: ['ALL=(ALL) NOPASSWD:ALL']
    groups: sudo
    shell: /bin/bash
packages:
  - python
  - unzip
  - htop
runcmd:
  - sed -i -e '/^Port/s/^.*$/Port 4512/' /etc/ssh/sshd_config
  - sed -i -e '/^PermitRootLogin/s/^.*$/PermitRootLogin no/' /etc/ssh/sshd_config
  - sed -i -e '$aAllowUsers thibault' /etc/ssh/sshd_config
  - service ssh restart
And this is what my console looks like: http://imgur.com/a/5c7u8
Hi,
In the article it says “Any information passed in your cloud-config is accessible to every user on the system. Do not place anything confidential in your cloud-config files.”
However, we’re passing our SSH Keys in the cloud-config file. How is this any safer?
Thank you
 This work is licensed under a Creative Commons Attribution-NonCommercial- ShareAlike 4.0 International License.
Become a contributor for community
Get paid to write technical tutorials and select a tech-focused charity to receive a matching donation.

DigitalOcean Documentation
Full documentation for every DigitalOcean product.

Resources for startups and AI-native businesses
The Wave has everything you need to know about building a business, from raising funding to marketing your product.
The developer cloud
Scale up as you grow — whether you're running one virtual machine or ten thousand.

Start building today
From GPU-powered inference and Kubernetes to managed databases and storage, get everything you need to build, scale, and deploy intelligent applications.
