
Introduction
When running a web server that is available to the public, striking a balance between making your content accessible and establishing a secure configuration can become difficult. There are many different areas that should be subject to careful scrutiny. One of these is process isolation and visibility.
A project called firejail seeks to assist in this area by providing a lightweight security containerization mechanism that utilizes kernel namespacing to enforce separation policies. This makes the chroot environments extremely lightweight.
In this guide, we will show you how to use firejail in order to isolate processes in their own chroot environment. To demonstrate this with a real example, we’ll be setting up two chroot environments, one with an Nginx web server serving WordPress, and the other with a MySQL database that will handle the site data. These two instances will have their own filesystems and installations and will communicate through a bridged network device.
Prerequisites and Goals
In this guide, we will be using a 64-bit Ubuntu 14.04 server as our base installation. This will allow us to utilize pre-built firejail packages, and will allow us to easily create chroot environments.
To get a good base for the installation, make sure you have completed the initial server setup for Ubuntu 14.04 here.
We will be setting up two chroot environments on our host system. These will actually be Debian stable environments, a selection chosen because the Debian environments are more well tested with the debootstrap tool that we will be using.
Our host machine will be configured with a public IP address and act as the gateway for the bridged network that we will set up to communicate with the jails. The jailed environments will only be configured to utilize the bridge interface and will only be able to access the wider internet through NAT rules on the host.
The three environments that we will be configuring will have the following properties:
| Environment | Public IP Address | Bridge IP Address |
|---|---|---|
| Host | 192.0.2.1 | 10.10.20.1 |
| Web Server | (none) | 10.10.20.10 |
| Database Server | (none) | 10.10.20.20 |
Note that the value in red above should be replaced with the public IP address of your host server. The bridge IP addresses, however, should be used as-is, because we will be setting up this interface and these addresses throughout the guide.
Throughout this guide, all of the commands will be executed as the root user.
Download and Configure the Host Machine Components
To get started, we need to download some of the tools that we will be using to our server.
First, we need to download the .deb package for the firejail program. Find the latest .deb package name on the download page of the site and replace the filename portion of the URL below with that version. The URL below is the direct download link to the package:
cd ~
wget http://downloads.sourceforge.net/project/firejail/firejail/firejail_0.9.8.1_1_amd64.deb
When the file has been downloaded, install it using dpkg:
dpkg -i firejail*
After the firejail program is installed, we need to get some additional packages from Ubuntu’s default repositories. Specifically, we need the debootstrap tool which will help us create our chroot filesystems, and bridge-utils which will allow us to create the network bridge interface that our jails will use to communicate:
apt-get update
apt-get install debootstrap bridge-utils
Configure the Bridge Interface
Before we get going with the actual jails, we will set up the bridged network interface.
We can create the new interface with the brctl command that was a part of the bridge-utils package. Our bridge will be called br0:
brctl addbr br0
Next, we need to bring the interface up. Along with activating the interface, we are assigning a CIDR network range. Our host server will have the address of 10.10.20.1 on this interface:
ifconfig br0 10.10.20.1/24
With the interface up and running, we need to tell the kernel to allow IP forwarding, or routing, between our interfaces. We can enable this feature for this session by typing:
echo "1" > /proc/sys/net/ipv4/ip_forward
Now, we need to set up an iptables rule that will allow traffic destined for port 80 on our host server to be routed to the web server we will be installing within one of our jails. Our web server will have the IP address of 10.10.20.10 on our bridge interface:
iptables -t nat -A PREROUTING -p tcp --dport 80 -j DNAT --to 10.10.20.10:80
This adds a rule to the bottom of the “PREROUTING” chain in the “nat” table. When a TCP package destined for port 80 hits, the traffic is redirected to port 80 on 10.10.20.10 through network address translation.
We also need to set up a series of rules that will allow our database and web server to query the internet so that they can update components from WordPress. We will start by adding a masquerade rule that will allow our br0 interface to route communications successfully through our host machine:
iptables -t nat -A POSTROUTING -o eth0 -j MASQUERADE
We can then lock down the communications between our interfaces by adjusting the rules in the FORWARD chain.
First, we should mirror our previous NAT rule that was established so that we can explicitly allow traffic from port 80 into our br0 network:
iptables -A FORWARD -i eth0 -o br0 -p tcp -m tcp --dport 80 -j ACCEPT
We also want to allow incoming traffic that is related to our established connections:
iptables -A FORWARD -i eth0 -o br0 -m state --state RELATED,ESTABLISHED -j ACCEPT
We want to allow forwarding of all traffic originating on the br0 interface in order for our jails to communicate with each other and the outside world:
iptables -A FORWARD -i br0 -j ACCEPT
Finally, we’ll drop all other forwarding connections so that forwarding is only allowed for outbound connections from the br0 network. The exceptions to this policy have already been established in the preceding rules.
iptables -P FORWARD DROP
Now our host system is configured with the bridge interface that it will use to communicate with the jailed environments.
Create the Chroot Directory Structure
Now, we are ready to create our chroot directory structures.
As we said before, our web server and our database server will operate in completely separate filesystems. We will keep both of these filesystems within a directory called /jails. Create that directory now:
mkdir /jails
Move into the directory you just created:
cd /jails
Now, we need to create the file structures that will be used by our jailed operating systems. To do this, we will use the debootstrap tool. This utility was created to bootstrap Debian environments within an existing filesystem. It does this by pulling down packages from the Debian repositories and “installing” them to the correct location.
Although debootstrap can be used to bootstrap Ubuntu environments, we will be selecting stable Debian installations instead. Since the tool was created to work with Debian, these environments are the most well-tested for this tool.
We will be installing our database environment into a directory called “db”. To create the appropriate directory structure, and download and install the necessary packages, type:
debootstrap --arch=amd64 stable db
Now that we have our filesystem built under the /jails/db directory, we can use rsync to copy the structure to another directory that our web server can use. The new directory will be called “www”. Make sure that you pay attention to the slashes (/) in the command that follows. This will copy the contents of the first directory into the second, instead of copying the directory itself:
rsync -azvh db/ www
Now, we have two chroot directory structures that we can use with our firejail program.
Use Firejail to Set Up the WordPress Database
Now that we have our directory structure, we can use firejail to create a chroot environment within our /jails/db directory structure.
To create a chroot environment and start up a bash session inside, we just need to specify the directory location of the chroot root and the hostname we want to use for the session:
firejail --chroot=/jails/db --name=db
Parent pid 17390, child pid 17391
Interface           IP                  Mask                Status
lo                  127.0.0.1           255.0.0.0           UP
eth0                192.0.2.1           255.255.255.0       UP
eth1                10.128.1.228        255.255.0.0         UP
br0                 10.10.20.1          255.255.255.0       UP

Child process initialized
[root@db ~]$
The command will output the parent pid, the child pid, and the interfaces that are configured within this jail session (we haven’t restricted or configured the interfaces at this point). Afterwards, it will drop you into a command prompt within your jailed environment.
The first thing we need to do is update our package database and install MySQL server within the chroot environment. You can do that by typing:
apt-get update
apt-get install mysql-server
During the update process, you should see that Debian repositories are being checked. This is because our chroot environment is a Debian installation.
During the installation process, you will be asked to select and confirm a password for the root MySQL account.
When the installation is complete, we should generate the MySQL data directory structure by typing:
mysql_install_db
Next, lock down some insecure defaults with an included script:
mysql_secure_installation
You will be asked for the root MySQL password that you set up during installation. Afterwards, you will be asked whether you wish to change the password. Select “No” if you are happy with your selection. For the remainder of the prompts, just hit ENTER to select the default choices.
Create the WordPress Database and User
Next, we want to set up a separate database for WordPress. Log into the MySQL server using the MySQL root account. Enter the password that you selected for that user when prompted:
mysql -u root -p
You will be dropped into a MySQL prompt. Create a new database for WordPress to use:
CREATE DATABASE wordpress;
Next, we will create a user to work with this database from the web server jail. The web server will have an IP address of 10.10.20.10 on the bridge interface, so we need to associate this user with that address. Assign a secure password for this user. We will then grant this user the ability to work on the database we created:
CREATE USER 'wordpressuser'@'10.10.20.10' IDENTIFIED BY 'password';
GRANT ALL PRIVILEGES ON wordpress.* TO 'wordpressuser'@'10.10.20.10';
Now, we just need to flush the privilege table and exit:
FLUSH PRIVILEGES;
exit
Modify the MySQL Settings to Bind to the Bridge Address
Next, we need to modify the MySQL configuration file. Open it with your editor now:
nano /etc/mysql/my.conf
This file is organized into sections. Find the section that begins like this:
[mysqld]
You should see a directive called bind-address that is set to 127.0.0.1 currently. We want to start up our MySQL instance listening on the bridge interface. This jail’s address on that interface will be 10.10.20.20, so we should modify it to look like this:
bind-address = 10.10.20.20
Save and close the file when you are finished.
Now, we can stop the currently running MySQL instance and exit this jail:
service mysql stop
exit
Use Firejail to Set Up the WordPress Web Server
Now that our database is configured, we can move on to our jail that will be used for the web server. Use firejail to start a session in this jail environment now:
firejail --chroot=/jail/www --name=www
The first thing that we need to do is update our local package database and install the Nginx web server and the PHP components. These are necessary to process dynamic requests and connect to the MySQL database:
apt-get update
apt-get install nginx php5-fpm php5-mysql
Configuring PHP
We will start by editing the PHP processor’s configuration file to disable a feature that can be a security problem:
nano /etc/php5/fpm/php.ini
Look for the cgi.fix_pathinfo directive in the file. It will be commented out and set to “1”. We need to uncomment it and change it to “0”:
cgi.fix_pathinfo=0
Save and close the file when you are finished.
Configuring Nginx
Now we need to set up Nginx to serve the WordPress files correctly. This involves establishing a new document root at /var/www/html, setting the server_name to our host system’s public IP address, and configuring PHP processing.
Open the default Nginx configuration file:
vim /etc/nginx/sites-available/default
A summary of the changes we need to make are below:
- Uncomment the
listen 80directive to explicitly specify the port number. - Change the value of the
rootdirective to point to/var/www/html, the location we will be keeping our WordPress files. - Modify the
indexparameter to look for anindex.phpfile before other index files. - Change the value of the
server_namedirective to point to the host server’s IP address or domain - Adjust the last value for the
try_filesdirective to pass requests to theindex.phpfile when they aren’t found as files or directories. This is located inside thelocation /block. - Uncomment all of the error page directives to allow error pages.
- Uncomment the
location ~ \.php$block, the includedfastcgi_split_path_infodirective, thefastcgi_passsocket line, thefastgci_indexandinclude fastcgi_paramsdirectives, and add atry_filesdirective that tries the request as given and returns a 404 otherwise.
When you are finished making the changes above, the file should look similar to the one below (the comments have been removed for brevity):
server {
    listen 80;
    root /var/www/html;
    index index.php index.html index.htm;
    server_name 192.0.2.1;
    location / {
        try_files $uri $uri/ /index.php?q=$uri&$args;
    }
    location /doc/ {
        alias /usr/share/doc/;
        autoindex on;
        allow 127.0.0.1;
        allow ::1;
        deny all;
    }
    error_page 404 /404.html;
    error_page 500 502 503 504 /50x.html;
    location = /50x.html {
        root /usr/share/nginx/www;
    }
    location ~ \.php$ {
        try_files $uri =404;
        fastcgi_split_path_info ^(.+\.php)(/.+)$;
        fastcgi_pass unix:/var/run/php5-fpm.sock;
        fastcgi_index index.php;
        include fastcgi_params;
    }
}
You can paste the entire contents shown here if that is easier. You will only need to adjust the server_name directive to reference your host system’s public IP address or domain name.
Save and close the file when you are finished.
Downloading and Configuring the WordPress Files
Now that Nginx is configured to serve the files correctly, we can download, configure, and install them.
Begin by changing to the root user’s home directory and downloading the latest WordPress tarball:
cd ~
wget http://wordpress.org/latest.tar.gz
Extract the contents of the tarball, creating a directory called ~/wordpress:
tar xzvf latest.tar.gz
Copy the sample configuration file to the valid configuration filename that will be checked:
cd ~/wordpress
cp wp-config-sample.php wp-config.php
Now, open the new configuration file in your text editor:
nano wp-config.php
Inside, we need to change the values that are associated with the database storage. We need to fill in the configuration options with the details of the choices that we made in our MySQL database.
With the exception of the password field, which you should have modified to your own value earlier, you can use the values presented below:
/** The name of the database for WordPress */
define('DB_NAME', 'wordpress');

/** MySQL database username */
define('DB_USER', 'wordpressuser');

/** MySQL database password */
define('DB_PASSWORD', 'password');

/** MySQL hostname */
define('DB_HOST', '10.10.20.20');
When you are finished, save and close the file.
Next, we need to create the /var/www/html directory that we referenced in our Nginx configuration file as the document root. We will then copy all of our WordPress files into that directory:
mkdir -p /var/www/html
cp -r ~/wordpress/* /var/www/html
Now we can give ownership of the files to the web user:
cd /var/www/html
chown -R www-data:www-data /var/www/html/*
Your web server jail is now completely configured. We can shutdown our web server and PHP processes gracefully by typing:
service nginx stop
service php5-fpm stop
Now, exit the jail to return to the host server session:
exit
Starting the Jails
We now have our jails completely configured. We can start them up individually with our network bridge interface.
First, we will start up the database server, since it is simpler. We need to specify the chroot root location as before. This time, we are also going to use the --net parameter to specify the bridge interface. We will use this in conjunction with the --ip parameter to specify the exact address we would like to give this jail (10.10.20.20, if you recall from our configuration).
We will also pass the --private flag to mount new /tmp, /root, and /home/user directories inside the jail. We then need to specify the processes we want to start in the jail, and put it into the background with an ending “&”.
The processes we should start are the MySQL server process, and also a sleep inf process. This will keep the jail running indefinitely instead of exiting when the previous processes complete. In total, the command looks like this:
firejail --chroot=/jails/db --private --net=br0 --ip=10.10.20.20 \
    "/etc/init.d/mysql start; \
    sleep inf" &
The jail will start up and the processes specified will begin to be executed sequentially. You can see the results of this processes by using the --list option for firejail:
firejail --list
21913:root:firejail --chroot=/jails/db --private --net=br0 --ip=10.10.20.20 /etc/init.d/mysql
  21916:root:bash -c /etc/init.d/mysql start; sleep inf
    21970:root:/bin/sh /usr/bin/mysqld_safe
      22322:syslog:/usr/sbin/mysqld --basedir=/usr --datadir=/var/lib/mysql --plugin-dir=/usr/
      22323:root:logger -t mysqld -p daemon.error
    22409:root:sleep inf
As you can see, the process tree is available from our host system. Because we can see the sleep inf running, and see the MySQL processes still up, we can see that the jail has finished booting.
For the web server jail, the same basic setup is required. We will need to specify the chroot root location, the bridged interface and the actual IP address being assigned (10.10.20.10), and the --private flag.
In terms of the process list, we have quite a few additional considerations. To start with, the /var/log directory in the jail is dynamically created at each start. Because of this, the log directives in our Nginx files point to non-existent locations. We can create these locations before trying to boot up Nginx.
Also, the Nginx process relies on a system logger. We will start up the rsyslog process prior to Nginx as well. After starting Nginx, we also need to remember to start up our PHP processor, which will pass requests off to the database jail when necessary. Again, we want to end with sleep inf so that the jail persists past the point where the services have started.
In the end, our command to start up our web server jail will look like this:
firejail --chroot=/jails/www --private --net=br0 --ip=10.10.20.10 \
    "mkdir -p /var/log/nginx; \
    touch /var/log/nginx/error.log; \
    touch /var/log/nginx/access.log; \
    /etc/init.d/rsyslog start; \
    /etc/init.d/nginx start; \
    /etc/init.d/php5-fpm start; \
    sleep inf" &
It may take a moment for the web server jail to boot up, keep checking with firejail --list to see if the process reaches the sleep inf state.
Now, if you go to your host server’s public IP address or domain name in your web browser, you should see the WordPress initial installation page:
http://host_server_domain_or_IP
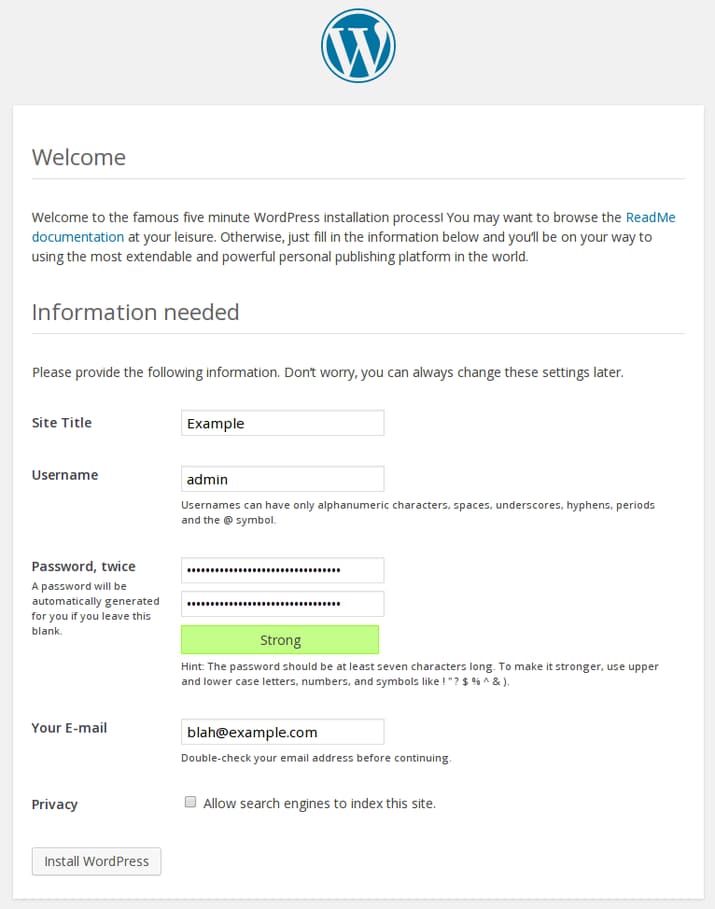
Fill in the appropriate values and click “Install WordPress” at the bottom when you are ready. You will need to log in with your newly created administrative account. Afterwards, you will be taken to the WordPress dashboard:
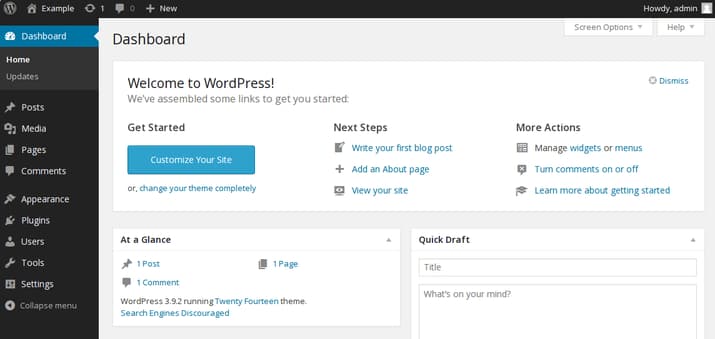
If everything here works as expected, it means that the installation was successful. We can now work on making this configuration repeatable and persistent.
Making the Firejail Instances Services
Now that we have our configuration up and running, we want to make sure we can get back here easily after a reboot. To do this, we have a number of areas that we need to address. These include:
- Configuring the host-to-jail and jail-to-jail networking to come up at boot.
- Making our
iptableschanges persistent. - Configuring our jails to start automatically when the host server is booted.
We can get started on these three right away.
Configuring Networking for Jails at Boot
The first thing we will focus on is getting the bridge network up and running. This is required before we worry about our firewall rules and before we start our jailed environments.
We need to configure the actual bridged connection. To get this connection up and running at boot, we need to modify the /etc/network/interfaces files. Open this file now:
nano /etc/network/interfaces
Inside, you will see some sections that dictate which interfaces are started at boot, and other lines that describe each interface. Begin by appending the br0 network to the end of the second auto line to start the interface we will be defining at boot:
auto eth0 eth1 br0
Next, we need to set up a section that will define the interface. Since this is a bridge interface, and is not functioning like a conventional bridge to combine two networks, we will define our interface manually, meaning that we will give the exact commands that should be used to configure the network.
Start with the section header:
iface br0 inet manual
Under this, we will use the pre-up, up, post-down, and down directives to define the commands that should be run at each stage. For the pre-up and up commands, we want to create the bridge and then bring the interface up the same way we did manually earlier. The $IFACE will be dynamically replaced by br0 when the commands are run, so you shouldn’t modify them here:
iface br0 inet manual
    pre-up brctl addbr $IFACE
    up ifconfig $IFACE 10.10.20.1/24
For the post-down and down commands, we simply want to reverse these commands. We will bring the interface back down and then delete the bridge:
iface br0 inet manual
    pre-up brctl addbr $IFACE
    up ifconfig $IFACE 10.10.20.1/24
    down ifconfig $IFACE down
    post-down brctl delbr $IFACE
Our br0 interface is now defined and we have set it up to automatically start at boot. Save and close the file when you are finished.
Set Up IPTables to Allow Restricted Forwarding to Jails
Next, we need to set up iptables with the rules that we added earlier. Fortunately, this is simple with the help of the iptables-persistent package.
Install the package by typing:
apt-get install iptables-persistent
You will be asked during the installation processes whether you want to save the current set of IPv4 and IPv6 rules. Select yes at these prompts to automatically save the current rule sets. These will be automatically re-applied at boot.
If you ever need to adjust the rules that are applied at boot, make the changes that you would like to use and then type:
/etc/init.d/iptables-persistent save
The current rule set will be updated.
Our iptables rules are now set to be brought back when the server boots. However, there’s one other piece that we haven’t addressed yet: we need to make sure our kernel allows forwarding.
Before, we echoed a “1” into a file in the /proc pseudo filesystem to enable this ability. To make this change happen automatically at next boot, edit the sysctl.conf file:
nano /etc/sysctl.conf
Uncomment the following line:
net.ipv4.ip_forward=1
Save and close the file when you are finished.
Create an Upstart Script to Start the WordPress Jails
To configure our jails to start up at boot, we need to create an upstart script. We will call our script firejail_wp.conf.
Open a file with this name in the /etc/init directory in your text editor:
nano /etc/init/firejail_wp.conf
Inside, we first fill out a brief description of what this service is for:
description "WordPress jail"
Next, we configure the circumstances that must be true for this service to automatically start. We want to make sure that the filesystem is available and we also need to make sure that the br0 network has been established. If the br0 network is down, both of our firejail commands will fail.
To do this, we will use the start on directive and the local-filesystems and net-device-up specifiers to construct our starting conditions. We will also configure our script to stop whenever the machine goes into reboot or shutdown mode (indicated by any runlevel that is not 1-5):
description "WordPress jail"

start on (local-filesystems and net-device-up IFACE=br0)
stop on runlevel [!12345]
Finally, we need to establish the actual command that will be executed when this service is started. Due to the way that services are run, we will be placing the firejail commands in an external script, so we just need to reference the script name here:
description "WordPress jail"

start on (local-filesystems and net-device-up IFACE=br0)
stop on runlevel [!12345]

exec /startjails.sh
When you are finished, save and close the file.
Now, we need to make the actual script file that we just referenced. Use your text editor to open up a file at this location:
nano /startjails.sh
Since this is a bash script, begin with the standard shebang call to bash:
#!/bin/bash
Next, we will add our two firejail commands, with one small modification. For an unknown reason, there is an issue with running the Nginx init script within the jailed environment when started by upstart. This issue is not present when called by any other method.
To get around this, we will simply call the Nginx executable instead of the internal jailed init script. Other than that, the commands are exactly as we used them earlier:
#!/bin/bash

firejail --chroot=/jails/db --private --net=br0 --ip=10.10.20.20 "/etc/init.d/mysql start; sleep inf" &

firejail --chroot=/jails/www --private --net=br0 --ip=10.10.20.10 "mkdir -p /var/log/nginx; touch /var/log/nginx/error.log; touch /var/log/nginx/access.log; /etc/init.d/rsyslog start; /usr/sbin/nginx; /etc/init.d/php5-fpm start; sleep inf" &
One more command is necessary to ensure that this is an ongoing service instead of a task that would end immediately after the jails start. We need to add sleep inf as the last line in the script. This will allow upstart to manage the service correctly:
#!/bin/bash

firejail --chroot=/jails/db --private --net=br0 --ip=10.10.20.20 "/etc/init.d/mysql start; sleep inf" &

firejail --chroot=/jails/www --private --net=br0 --ip=10.10.20.10 "mkdir -p /var/log/nginx; touch /var/log/nginx/error.log; touch /var/log/nginx/access.log; /etc/init.d/rsyslog start; /usr/sbin/nginx; /etc/init.d/php5-fpm start; sleep inf" &

sleep inf
When you are finished, save and close the file.
Now, we just need to make this file executable, so that the upstart script can start it:
chmod +x /startjails.sh
With this step, the WordPress jailed environment is completely configured to start up at boot time.
You can reboot your host server to try this out:
shutdown -r now
If everything has been configured correctly, you will be able to reach your WordPress site after everything has had time to start up.
Conclusion
This guide was simply an example of one of the many things you can do with a tool like firejail. While there are many other ways of setting up isolated components for your servers, firejail is a great solution because of its flexibility and ability to handle so many different scenarios with minimal resources.
Thanks for learning with the DigitalOcean Community. Check out our offerings for compute, storage, networking, and managed databases.
About the author
Former Senior Technical Writer at DigitalOcean, specializing in DevOps topics across multiple Linux distributions, including Ubuntu 18.04, 20.04, 22.04, as well as Debian 10 and 11.
Still looking for an answer?
This textbox defaults to using Markdown to format your answer.
You can type !ref in this text area to quickly search our full set of tutorials, documentation & marketplace offerings and insert the link!
Awesome article! I really enjoyed pulling together all these components.
1 Note: I had to use tee to execute >echo “1” > /proc/sys/net/ipv4/ip_forward like so:
echo “1” | sudo tee /proc/sys/net/ipv4/ip_forward
and 1 question: How will the bridge interface behave with something like varnish? will there be a performance hit at all?
Thanks!
Thanks for the brilliant tutorial Justin! I have a few notes/questions that I’d like to raise:
-
Isn’t the
iptables PREROUTINGrule supposed to haveeth0as anin-interface, like this:iptables -t nat -A PREROUTING -i eth0 -p tcp --dport 80 -j DNAT --to 10.10.20.10:80It seems that the traffic coming out of the jails through port 80 ends up going in a loop without it. -
It’s worth pointing out that the jailed MySQL would fail to start if the host has an active MySQL process. In fact, I had to totally remove the MySQL package from my host to get the jailed MySQL to fire up.
-
There is a typo in the MySQL configuration file path, it should be
/etc/mysql/my.cnf. -
The
firejail --listcommand was renamed tofirejail --treein version 0.9.10 and a “newfirejail --listwas introduced, printing only the main sandbox process data” (Firejail Release Notes).
Keep up the good work mate!
Nice article, but could some one try to explain of how to make the dns lookup work with the Jails? When I try to connect to an already running jail (www) and preform apt-get update an error occurs with message that there was a problem with “Could not resolve ‘ftp.us.debian.org’”.
There is also a problem when running the wordpress as the wordpress fetches some data from external servers. HTTP Error: 0: php_network_getaddresses: getaddrinfo failed: Name or service not known
@jellingwood just tried running through this guide and getting errors on debootstrap and first firejail commands. Debootstrap seems to have issues using default mirrors; do you have a hint on how to use the mirrors on the host system or from DigitalOcean’s mirrors? Firejail fails with errors that no “/dev” is available to mount… odd. The instructions on bridge interface building and iptables forwarding is pritty good, deffenetly goiing to be utilizing this in other ways when debootstrap and firejail play nice Some details about host; identical to one discribed in guide, signed up on D.O. at $10per/month with same Linux flavor, same commands inputed. Version of firejail is latest available from source code host for CPU type in guide.
Additionall tests have been preformed on Kali flavored Linux (on an old Android so ARM hard floating point CPU) running within chroot and debootstrap balks when trying to mount proc to proc… so I’ll be digging into what tricks have to be preformed in order to debootstrap within an exsisting chroot.
Screen dump of debootstrap/firejail error
root@host:~# cd /jails/ root@host:/jails# firejail --chroot=/jails/db_server --name=db_server Error: cannot find /dev in chroot directory Error: invalid chroot root@host:/jails#
Log Dump of ARMfh Kali chroot atempting debootstrapSetcap worked! Ping(6) is not suid! ##… just the tail of where it failed Setting up isc-dhcp-common (4.3.1-6) … Setting up isc-dhcp-client (4.3.1-6) … Setting up tasksel (3.31+kali1) … Setting up tasksel-data (3.31+kali1) … Processing triggers for libc-bin (2.19-18) … Processing triggers for systemd (215-17+deb8u1) …
To recap; following exsact guide from D.O. on a D.O. VPS failed at initalizing firejail and atempting ragular chroot also fails using supplied directions. And following a conglomeration of guidance on ARMhf chroot fails at debootstrap. I’m already in contact with the firejail developer on GitHub about CPU tests preformed but not discribed here for ARM schroot so feel free to check bug reports there for further info on that. Mainly i could use help with filling the missing peaces of this guid such that my VPS can get to hosting content instead of chowing electrons with no binofit to public.
 This work is licensed under a Creative Commons Attribution-NonCommercial- ShareAlike 4.0 International License.
Become a contributor for community
Get paid to write technical tutorials and select a tech-focused charity to receive a matching donation.

DigitalOcean Documentation
Full documentation for every DigitalOcean product.

Resources for startups and AI-native businesses
The Wave has everything you need to know about building a business, from raising funding to marketing your product.
The developer cloud
Scale up as you grow — whether you're running one virtual machine or ten thousand.

Start building today
From GPU-powered inference and Kubernetes to managed databases and storage, get everything you need to build, scale, and deploy intelligent applications.
