Sr Technical Content Strategist and Team Lead
Introduction
SSL (Secure Sockets Layer) verification is a critical security process that ensures the authenticity and integrity of encrypted connections between clients and servers. When properly implemented, SSL verification protects against man-in-the-middle attacks, ensures data privacy, and builds trust with your users.
It is the process of confirming that an SSL certificate is valid, trusted, and matches the domain, ensuring secure communication.
In this tutorial, you’ll learn what SSL verification is, why it’s essential for modern web applications, and how to implement it across different platforms and services. By the end of this guide, you’ll have a working SSL-verified environment and understand how to troubleshoot common SSL verification issues.
Key Takeaways
- SSL verification is essential for secure, trusted connections between clients and servers. It involves a multi-step process, including domain validation, certificate authority validation, and certificate chain verification.
- Let’s Encrypt and Certbot provide free, automated SSL certificates. These tools simplify the SSL setup and renewal process.
- Always configure strong SSL/TLS settings and security headers to enhance security.
- Test your SSL setup with browsers, command-line tools, and online services to ensure it’s working as expected.
- Automate certificate renewal and monitor expiration to prevent service disruptions.
- Troubleshoot common issues like chain errors, mismatches, and firewall blocks to maintain a secure environment.
- Follow best practices for ongoing security and compliance to protect your users and data.
Prerequisites
Before you begin this guide, you’ll need:
- A server running Ubuntu or any other Linux distribution.
- Root or
sudoprivileges on your server. - Basic familiarity with the command line.
- A domain name pointed to your server (for testing SSL configurations).
- Basic understanding of SSL/TLS concepts
What is SSL Verification?
SSL verification is a multi-step process that ensures a secure connection between a client (like a web browser or API client) and a server. Here’s how the process works:
-
Server Presents Certificate: When a client initiates a secure (HTTPS) connection, the server responds by sending its SSL certificate to the client.
-
Certificate Authority (CA) Validation: The client checks whether the certificate was issued by a trusted Certificate Authority (CA) included in its trust store. If the CA is not trusted, the verification fails.
-
Domain Name Matching: The client verifies that the certificate’s Common Name (CN) or Subject Alternative Name (SAN) matches the domain it is trying to reach. This ensures the certificate is intended for the requested website.
-
Certificate Chain Verification: The client examines the entire certificate chain, making sure each certificate in the chain (from the server’s certificate up to the root CA) is valid and properly signed. The chain must be complete and unbroken.
-
Expiration and Revocation Checks: The client checks that the certificate is within its valid date range (not expired or not yet valid) and, if possible, confirms that it has not been revoked by the CA.
If any of these steps fail, the SSL handshake is aborted and the client displays an error (such as SSL: CERTIFICATE_VERIFY_FAILED). Only when all checks pass does the client establish a secure, trusted connection with the server.
Now let’s take a look at each of these steps in more detail.
Certificate Authority (CA) Validation
When a client (such as a browser or API consumer) connects to a server over HTTPS, it receives the server’s SSL certificate. The client then checks whether this certificate was issued by a trusted Certificate Authority (CA). Trusted CAs are organizations that have been vetted and are included in the trust stores of operating systems and browsers. Some well-known examples of trusted CAs include Let’s Encrypt, DigiCert, GlobalSign, Sectigo (formerly Comodo), and Entrust. If the certificate is not signed by a CA in the client’s trust store, the connection will be flagged as insecure, and users may see warnings or errors. This validation step helps prevent attackers from using self-signed or fraudulent certificates to impersonate legitimate sites.
Domain Validation
The client ensures that the SSL certificate presented by the server matches the domain name it is trying to access. This is typically checked against the certificate’s Common Name (CN) and Subject Alternative Name (SAN) fields. If the domain in the URL does not match any of these fields, the client will reject the connection. This prevents attackers from using a certificate issued for one domain to secure another, unrelated domain.
Certificate Chain Validation
SSL certificates are often issued by intermediate CAs, which are themselves trusted by root CAs. The client must verify the entire chain of trust, starting from the server’s certificate (leaf certificate), through any intermediate certificates, up to a trusted root CA. If any link in this chain is missing or invalid, the client will not trust the certificate. Properly configured servers must provide the full certificate chain during the SSL handshake to ensure clients can validate the connection.
Expiration Check
Every SSL certificate has a validity period, defined by its “Not Before” and “Not After” dates. The client checks that the current date falls within this range. If the certificate is expired or not yet valid, the client will refuse the connection. Expired certificates are a common cause of SSL errors and can disrupt secure access until renewed.
Revocation Status
Even if a certificate is valid and signed by a trusted CA, it may be revoked before its expiration date due to compromise or other issues. Clients may check the revocation status of a certificate using mechanisms like Certificate Revocation Lists (CRLs) or the Online Certificate Status Protocol (OCSP). If the certificate is found to be revoked, the client will terminate the connection to prevent potential security risks. Note that not all clients perform revocation checks by default, and network issues can sometimes prevent these checks from completing.
What are the Differences Between SSL Verification and SSL Encryption?
While SSL (Secure Sockets Layer) and its successor TLS (Transport Layer Security) are often discussed as a single concept, it’s important to distinguish between SSL verification and SSL encryption. Both are critical for secure communications, but they serve different purposes in the SSL/TLS protocol.
- SSL Encryption ensures that the data transmitted between a client (like a browser) and a server is encrypted, making it unreadable to anyone who might intercept the traffic. This protects sensitive information such as login credentials, payment details, and personal data from eavesdroppers.
- SSL Verification is the process by which the client checks the authenticity and validity of the server’s SSL certificate. This step ensures that the client is communicating with the legitimate server and not an imposter (preventing “man-in-the-middle” attacks).
Both processes work together to provide a secure and trusted connection. Without verification, encrypted data could be sent to a malicious server. Without encryption, data could be read by anyone on the network.
Key Differences: SSL Verification vs. SSL Encryption
| Aspect | SSL Verification | SSL Encryption |
|---|---|---|
| Purpose | Confirms the server’s identity and certificate validity | Protects data in transit from being read by unauthorized parties |
| When It Happens | During the initial SSL/TLS handshake, before data is exchanged | After a secure connection is established and verified |
| How It Works | Checks certificate chain, domain match, expiration, and revocation status | Uses cryptographic algorithms (e.g., AES, RSA) to encrypt/decrypt |
| Prevents | Man-in-the-middle attacks, impersonation, and fraud | Eavesdropping, data theft, and information leakage |
| Client Role | Validates the server’s certificate using trusted Certificate Authorities (CAs) | Encrypts outgoing data and decrypts incoming data |
| Server Role | Presents a valid certificate for verification | Encrypts outgoing data and decrypts incoming data |
| Common Errors | Certificate not trusted, expired, mismatched domain, incomplete chain | Weak ciphers, protocol downgrade attacks, misconfigured encryption |
| Tools to Test | openssl s_client, browser security warnings, SSL Labs, Certbot |
Wireshark (to confirm encryption), SSL Labs, browser padlock icon |
In summary:
SSL verification establishes trust in the server’s identity, while SSL encryption ensures the privacy and integrity of the data exchanged. Both are essential for secure web communications in modern internet applications.
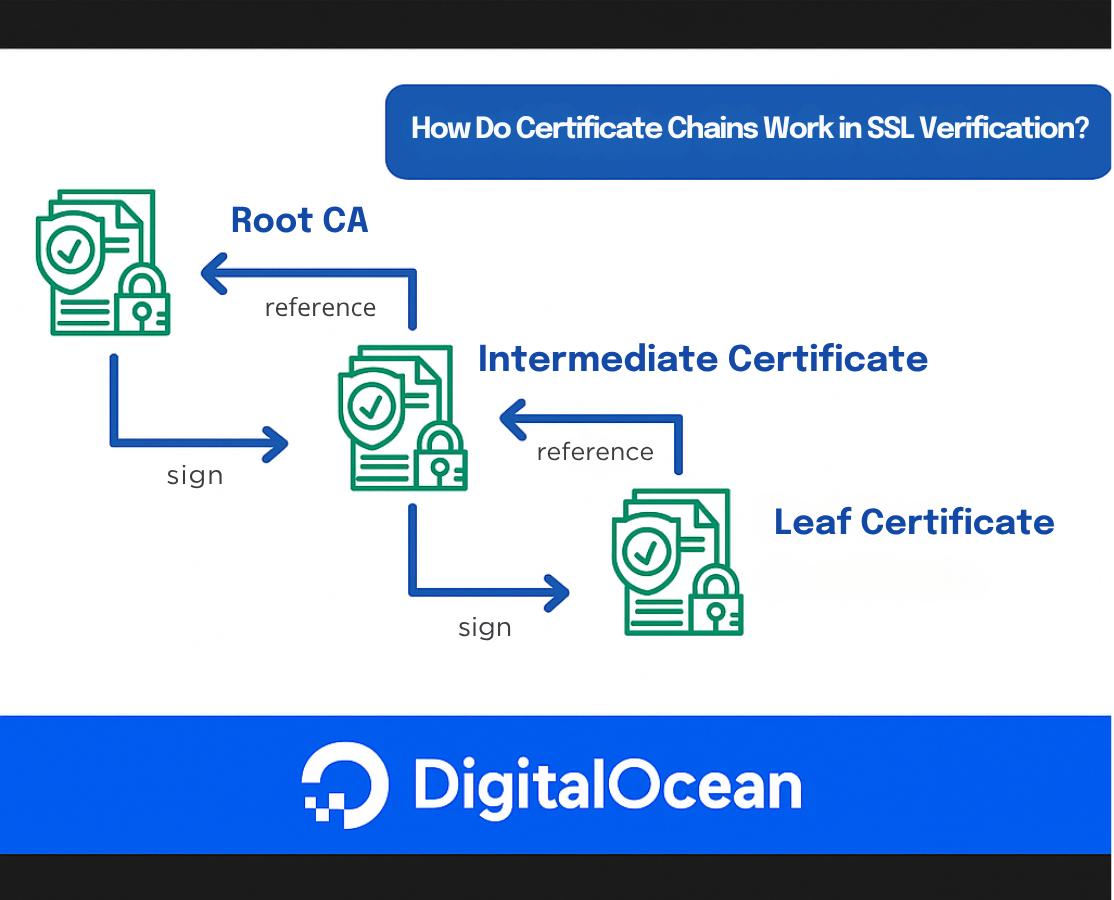
How Do Certificate Chains Work in SSL Verification?
When a client (such as a web browser or API consumer) connects to a server over HTTPS, it needs to verify that the server’s SSL/TLS certificate is trustworthy. This trust is established through a certificate chain—a sequence of certificates that link the server’s certificate to a trusted root authority.
What Is a Certificate Chain?
A certificate chain (also known as a chain of trust) is a hierarchical sequence of digital certificates that allows a client (such as a browser or API consumer) to verify the authenticity of a server’s SSL/TLS certificate. This process is fundamental to establishing trust on the internet, ensuring that the server you’re communicating with is legitimate and not an imposter.
The certificate chain is composed of several layers:
- The server (leaf) certificate: This is the certificate presented by the server you are connecting to. It is issued specifically for the domain you’re visiting (e.g.,
www.example.com). - Intermediate certificate(s): These are certificates issued by trusted Certificate Authorities (CAs) that act as intermediaries between the server certificate and the root certificate. Intermediates help distribute trust and security, allowing root CAs to remain offline and protected. There may be one or more intermediate certificates in a chain.
- The root certificate: This is the anchor of the chain, issued by a root CA. Root certificates are self-signed and are included in the trust stores of operating systems, browsers, and devices. Trust in the root CA is what ultimately allows the client to trust the entire chain.
Why are intermediate certificates used?
Root CAs are highly sensitive and kept offline to minimize risk. Instead of signing server certificates directly, root CAs delegate this responsibility to intermediate CAs. This layered approach improves security and makes it easier to revoke or replace intermediates if needed, without impacting the root CA.
How does the client use the certificate chain?
When a client connects to a server, the server presents its certificate along with any necessary intermediate certificates. The client then attempts to build a chain from the server certificate up to a trusted root certificate in its local trust store. If any link in the chain is missing, invalid, or untrusted, the connection will be considered insecure.
| Layer | Purpose | Example |
|---|---|---|
| Root CA | Anchors trust; pre‑installed in OS/browser | DigiCert Global Root G2 |
| Intermediate CA | Issues end‑entity certificates | Let’s Encrypt R3 |
| Leaf Certificate | Installed on your server | www.example.com |
A typical certificate chain looks like this:
How Do Browsers Perform SSL Verification?
Modern web browsers follow a multi-step process to verify the security and authenticity of an SSL/TLS connection before allowing users to interact with a website. Here’s a detailed breakdown of how this process works:
1. DNS Lookup: Resolving the Domain Name
When you enter a website address (e.g., https://www.example.com) in your browser, the first step is to resolve the human-readable domain name into an IP address using the Domain Name System (DNS). This tells the browser which server to contact.
2. Establishing a TCP Connection and Initiating the TLS Handshake
Once the IP address is known, the browser initiates a TCP connection to the server, typically on port 443 for HTTPS. The browser then begins the TLS handshake, which is a negotiation process to establish a secure, encrypted connection.
During this handshake, the server presents its SSL/TLS certificate chain to the browser. This chain includes the server (leaf) certificate and any intermediate certificates required to link the server certificate to a trusted root certificate authority (CA).
3. Certificate Chain and Trust Validation
The browser examines the certificate chain provided by the server. It attempts to build a path from the server’s certificate up through any intermediates to a root certificate that is already trusted (pre-installed) in the browser’s or operating system’s certificate store.
- If the chain is complete and valid: The browser proceeds to the next step.
- If the chain is incomplete, broken, or contains an untrusted certificate: The browser will halt the process and display a security warning.
4. Hostname Verification
The browser checks that the domain name in the address bar matches the Common Name (CN) or Subject Alternative Name (SAN) fields in the server’s certificate. This ensures that the certificate was issued specifically for the domain you are visiting and not for another site.
- If the hostname matches: The process continues.
- If there is a mismatch: The browser warns the user that the certificate does not match the site, which could indicate a security risk.
5. Certificate Revocation Status Check (OCSP/CRL)
Browsers may optionally check whether the server’s certificate has been revoked before its expiration date. This is done using:
- OCSP (Online Certificate Status Protocol): The browser queries the certificate authority’s OCSP server to check the certificate’s status in real time.
- CRL (Certificate Revocation List): The browser downloads a list of revoked certificates from the CA and checks if the server’s certificate is on the list.
If the certificate is found to be revoked, the browser will block access and display a warning.
6. Secure Page Load or Security Warning
- If all checks pass: The browser completes the TLS handshake, establishes an encrypted connection, and loads the web page securely. You’ll typically see a padlock icon in the address bar.
- If any check fails: The browser interrupts the connection and displays a prominent warning, such as “Your connection is not private” or “This site’s security certificate is not trusted.” Users are strongly discouraged from proceeding.
7. Inspecting Certificate Details
For troubleshooting or verification, you can use your browser’s developer tools (usually found under the “Security” or “Certificate” tab) to view detailed information about the SSL/TLS certificate, including the certificate chain, validity period, and issuer.
In Summary:
Browsers rigorously verify SSL/TLS certificates to protect users from impersonation, eavesdropping, and other security threats. This multi-step process ensures that users only connect to legitimate, secure websites.
Here is a flowchart that summarizes the process:
What are some CLI Tools for Verifying Certificates?
There are several command-line tools that can be used to verify SSL/TLS certificates, including:
openssl s_client: This tool can be used to connect to a server and verify its SSL/TLS certificate.curl --verbose: This tool can be used to download a website and verify its SSL/TLS certificate.openssl verify: This tool can be used to verify the server certificate against the provided certificate chain.
1. openssl s_client
Command: openssl s_client -connect example.com:443 -servername example.com -showcerts
Explanation:
openssl s_client is a command-line tool that allows you to connect to a server using SSL/TLS and verify its certificate. The parameters used in this command are:
-connect example.com:443: This parameter specifies the server to connect to, including its domain name and port number (443 is the default port for HTTPS). In this case, we’re connecting toexample.comon port 443.-servername example.com: This parameter specifies the server name indication (SNI) extension to use during the TLS handshake. SNI allows a server to present multiple certificates on the same IP address and port number, based on the domain name requested by the client. In this case, we’re indicating that we want to connect toexample.com.-showcerts: This parameter tellsopensslto display the entire certificate chain sent by the server, including the server certificate and any intermediate certificates.
Output:
OutputCONNECTED(00000003)
depth=2 C = US, O = DigiCert Inc, OU = www.digicert.com, CN = DigiCert SHA2 Secure Server CA
verify return:1
depth=1 C = US, O = DigiCert Inc, OU = www.digicert.com, CN = RapidSSL TLS DV RSA CA G1
verify return:1
depth=0 C = US, ST = California, L = San Francisco, O = "Facebook, Inc.", CN = example.com
verify return:1
---
Certificate chain
 0 s:/C=US/ST=California/L=San Francisco/O=Facebook, Inc./CN=example.com
   i:/C=US/O=DigiCert Inc/OU=www.digicert.com/CN=RapidSSL TLS DV RSA CA G1
 1 s:/C=US/O=DigiCert Inc/OU=www.digicert.com/CN=RapidSSL TLS DV RSA CA G1
   i:/C=US/O=DigiCert Inc/OU=www.digicert.com/CN=DigiCert SHA2 Secure Server CA
 2 s:/C=US/O=DigiCert Inc/OU=www.digicert.com/CN=DigiCert SHA2 Secure Server CA
   i:/C=US/O=DigiCert Inc/OU=www.digicert.com/CN=DigiCert Global Root CA
---
Server certificate
-----BEGIN CERTIFICATE-----
MIIF...
-----END CERTIFICATE-----
subject=/C=US/ST=California/L=San Francisco/O=Facebook, Inc./CN=example.com
issuer=/C=US/O=DigiCert Inc/OU=www.digicert.com/CN=RapidSSL TLS DV RSA CA G1
---
No client certificate CA names sent
Peer signing digest: SHA256
Server Temp Key: ECDH, P-256, 256 bits
---
SSL handshake has read 3053 bytes and written 305 bytes
---
New, TLSv1/SSLv3, Cipher is ECDHE-RSA-AES256-GCM-SHA384
Server public key is 2048 bit
Secure Renegotiation IS supported
Compression: NONE
Expansion: NONE
No ALPN, server accepted to use http/1.1
---
The output shows the certificate chain, including the server certificate and intermediate certificates, as well as the verification status of each certificate in the chain. The verify return:1 lines indicate that each certificate in the chain was successfully verified. The certificate details, such as the subject and issuer, are also displayed.
2. curl --verbose
Command: curl https://example.com -v
Explanation:
curl is a command-line tool for transferring data to and from a web server using HTTP, HTTPS, SCP, SFTP, TFTP, and more. The parameters used in this command are:
https://example.com: This is the URL of the server we’re connecting to.-v: This parameter increases the output verbosity, allowing us to see more details about the connection process, including SSL/TLS verification.
Output:
* About to connect() to example.com port 443 (#0)
*   Trying 192.0.2.1...
* Connected to example.com (192.0.2.1) port 443 (#0)
* Initializing NPN, negotiated protocol: h2
* ALPN, server accepted to use h2
* Using HTTP2, server supports multi-plexing
> GET / HTTP/2
> Host: example.com
> User-Agent: curl/7.64.0
> Accept: */*
>
< HTTP/2 200
< content-type: text/html; charset=UTF-8
<
<!DOCTYPE html>
...
* Connection #0 to host example.com left intact
The output shows the connection process, including the negotiation of the HTTP/2 protocol and the successful retrieval of the HTML content. If there were any SSL/TLS verification errors, they would be displayed in the output.
3. openssl verify
Command: openssl verify -CAfile chain.pem server.pem
Explanation:
openssl verify is a command-line tool that verifies the certificate chain of a server certificate against a set of trusted certificates. The parameters used in this command are:
-CAfile chain.pem: This parameter specifies the file containing the trusted certificate chain. You can obtain the trusted certificate chain from the Certificate Authority (CA) that issued your server certificate. This file should contain the root certificate and any intermediate certificates in PEM format.server.pem: This is the file containing the server certificate to be verified. You can obtain the server certificate from your Certificate Authority or from your server’s SSL/TLS configuration. This file should contain the server certificate in PEM format.
To get the certificate chain and server certificate, you can follow these steps:
- Check your server’s SSL/TLS configuration files or directories for the server certificate and intermediate certificates. These files are usually named
server.pem,server.crt, orserver.key. - If you have access to your Certificate Authority’s documentation or support, you can request the trusted certificate chain from them. They may provide you with a bundle of certificates in PEM format.
- If you’re using a service like Let’s Encrypt, you can find the trusted certificate chain in the
fullchain.pemfile generated during the certificate issuance process. - Ensure that both the
chain.pemandserver.pemfiles are in PEM format and contain the correct certificates for verification.
Output:
Outputserver.pem: OK
This output indicates that the server certificate was successfully verified against the trusted certificate chain. If the verification fails, an error message will be displayed instead.
Note: The chain.pem file should contain the trusted certificate chain in PEM format, including the root certificate and any intermediate certificates. The server.pem file should contain the server certificate to be verified, also in PEM format.
You can refer to these tutorials for more information on how to install and configure SSL Certificated with Let’s Encrypt with Certbot:
What are Online SSL Testing Tools?
Online SSL testing tools are essential for verifying the security and configuration of your SSL/TLS certificates. These tools provide a comprehensive analysis of your SSL setup, identifying potential vulnerabilities and offering recommendations for improvement. By utilizing these services, you can ensure your website or application is properly secured, maintaining the trust of your users and protecting sensitive data.
Here are two popular online SSL testing tools to verify your configuration:
- SSL Labs: Visit
https://www.ssllabs.com/ssltest/and enter your domain to receive a detailed report on your SSL configuration, including the grade of your SSL implementation, supported protocols, and cipher suites. - SSL Checker: Use online SSL certificate checker from DigiCert is useful to verify the installation and configuration of your SSL certificates. These tools can detect issues such as certificate expiration, incorrect installation, or misconfigured intermediate certificates.
How to Enable SSL Verification in Application Code?
Enabling SSL verification in application code is crucial for ensuring that your application only communicates with trusted servers. This process involves configuring your application to verify the authenticity of the server’s SSL/TLS certificate before establishing a connection. Here’s a step-by-step guide to enable SSL verification in your application code:
Enabling SSL Verification in Python
In Python, you can enable SSL verification using the requests library. The following code snippet demonstrates how to make a GET request to a secure API endpoint (https://api.example.com) with SSL verification enabled:
import requests

# Make a GET request to the API endpoint with a timeout of 10 seconds
resp = requests.get('https://api.example.com', timeout=10)

# Print the status code of the response
print(resp.status_code)
By default, the requests library verifies SSL certificates. This means that if the SSL certificate of the API endpoint is invalid or not trusted, the request will fail with an SSL verification error.
Enabling SSL Verification in Node.js
In Node.js, you can enable SSL verification using the axios library. The following code snippet demonstrates how to make a GET request to a secure API endpoint (https://api.example.com) with SSL verification enabled, handling both successful and failed verification scenarios:
const axios = require('axios');

// Create a new instance of the https.Agent with SSL verification enabled
const agent = new (require('https').Agent)({ rejectUnauthorized: true });

// Define a function to handle the request
function makeSecureRequest() {
  axios.get('https://api.example.com', { httpsAgent: agent })
    .then(response => {
      console.log(`Request successful. Status: ${response.status}`);
      // Handle successful response
    })
    .catch(error => {
      console.error(`Request failed. Error: ${error.message}`);
      // Handle failed request
    });
}

// Call the function to make the request
makeSecureRequest();
This example showcases a more practical approach by encapsulating the request logic within a function, making it reusable and easier to manage. It also includes basic error handling to provide a more comprehensive demonstration of SSL verification in Node.js.
Additionally, you can further enhance this example by adding more advanced error handling, such as distinguishing between SSL verification errors and other types of errors. This can be achieved by checking the error object’s properties, like error.code, to determine the cause of the failure.
For instance, if the SSL verification fails due to an invalid or untrusted certificate, the error object might contain a code like ECONNRESET or ENOTFOUND. You can use this information to provide more specific error messages or take appropriate actions based on the error type.
Here’s an updated example that includes advanced error handling:
const axios = require('axios');

// Create a new instance of the https.Agent with SSL verification enabled
const agent = new (require('https').Agent)({ rejectUnauthorized: true });

// Define a function to handle the request
function makeSecureRequest() {
  axios.get('https://api.example.com', { httpsAgent: agent })
    .then(response => {
      console.log(`Request successful. Status: ${response.status}`);
      // Handle successful response
    })
    .catch(error => {
      if (error.code === 'ECONNRESET' || error.code === 'ENOTFOUND') {
        console.error(`SSL verification failed. Error: ${error.message}`);
        // Handle SSL verification failure
      } else {
        console.error(`Request failed. Error: ${error.message}`);
        // Handle other types of errors
      }
    });
}

// Call the function to make the request
makeSecureRequest();
This example demonstrates a more robust approach to SSL verification in Node.js, including advanced error handling to provide better insights into the cause of request failures.
In this example, we create a new instance of the https.Agent with rejectUnauthorized set to true, which enables SSL verification. We then pass this custom agent to the axios.get method to make the request. If the SSL certificate of the API endpoint is invalid or not trusted, the request will fail with an SSL verification error.
How to Handle Self-Signed Certificates Securely?
Self-signed certificates are certificates that are not issued by a trusted Certificate Authority (CA). They are often used for testing purposes or for internal networks. However, they can pose a security risk if not handled properly.
Here are some best practices for handling self-signed certificates securely:
- Use them only for internal or testing purposes: Self-signed certificates should not be used for public-facing websites or applications that require high security.
- Implement a secure certificate management process: Ensure that self-signed certificates are properly managed, including secure storage, access control, and revocation procedures.
- Use a secure protocol: Ensure that the connection to the server or application using a self-signed certificate is encrypted using a secure protocol like TLS 1.2 or TLS 1.3.
- Inform users about the self-signed certificate: If a self-signed certificate is used for a public-facing application, inform users about the potential security risks and provide them with instructions on how to proceed safely.
- Use a trusted CA for production environments: For production environments, use certificates issued by a trusted Certificate Authority to ensure the highest level of security and trust.
- Regularly review and update self-signed certificates: Regularly review and update self-signed certificates to ensure they are not expired or compromised.
- Use a secure method for certificate distribution: Use a secure method to distribute self-signed certificates to clients or users, such as through a secure network or encrypted channel.
- Monitor for certificate validation errors: Monitor for certificate validation errors and take prompt action to address any issues that arise.
- Document self-signed certificate usage: Document the use of self-signed certificates, including their purpose, scope, and management procedures.
Best Practices for SSL Verification
- Always use certificates from trusted Certificate Authorities (CAs): Ensure that the certificates used are issued by a trusted Certificate Authority (CA) to establish trust with clients and prevent man-in-the-middle attacks.
- Automate certificate renewal and monitor expiration: Implement a process to automatically renew certificates before they expire to prevent service disruptions and ensure continuous encryption.
- Use strong protocols (TLS 1.2/1.3) and ciphers: Utilize the latest Transport Layer Security (TLS) protocols (1.2 and 1.3) and strong ciphers to ensure secure data transmission and protect against known vulnerabilities.
- Implement security headers (HSTS, CSP, etc.): Configure security headers such as HTTP Strict Transport Security (HSTS), Content Security Policy (CSP), and others to enhance the security of your application and protect against common web attacks.
- Regularly test your SSL configuration with tools like SSL Labs: Periodically test your SSL configuration using tools like SSL Labs to identify vulnerabilities, ensure compliance with best practices, and optimize your SSL setup.
- Keep your server and libraries up to date: Regularly update your server and libraries to ensure you have the latest security patches and features, which helps prevent known vulnerabilities and ensures ongoing security.
- Document and inventory all certificates in use: Maintain a record of all certificates used, including their purpose, expiration dates, and revocation status, to ensure easy management and timely renewal or revocation.
What are some Common Mistakes When Enabling SSL Verification?
| Mistake | Impact | How to Avoid |
|---|---|---|
| Disabling verification | Leaves connection open to MITM attacks | Use a trusted CA bundle or pin certificates instead of bypassing verification |
| Incorrect system date/time | Certificates appear expired or not yet valid | Enable NTP or set time manually before troubleshooting |
| Using outdated TLS/SSL versions | Client/server handshake fails, protocol_version errors | Disable SSL 3.0/TLS 1.0 on servers; upgrade clients to TLS 1.2+ |
| Hostname mismatch | Browser shows “Certificate does not match domain” | Regenerate the certificate with correct CN/SAN entries |
| Missing intermediate CA | CERTIFICATE_VERIFY_FAILED on some clients | Always install the full chain (leaf + intermediate) on the server |
| Antivirus HTTPS scanning | Intercepts certificates, causes trust‑store mismatch | Disable HTTPS inspection or add the AV root cert to client trust store |
| Mixing HTTP and HTTPS resources | Mixed‑content warnings or blocked scripts | Serve all assets over HTTPS or use CSP/upgrade‑insecure‑requests |
| Ignoring revocation checks (OCSP/CRL) | Clients may trust a revoked cert | Enable OCSP stapling on servers and keep revocation endpoints reachable |
Tip: Browser messages differ: Chrome shows ERR_CERT_COMMON_NAME_INVALID for hostname issues, while Firefox reports SEC_ERROR_UNKNOWN_ISSUER for untrusted CAs. Always note the exact code when diagnosing.
How to fix SSL: CERTIFICATE_VERIFY_FAILED error?
The SSL: CERTIFICATE_VERIFY_FAILED error occurs when the client (e.g., a web browser or API client) fails to verify the authenticity of the server’s SSL certificate. This error can be caused by various reasons such as:
- The server’s SSL certificate is expired or not yet valid.
- The server’s SSL certificate is not trusted by the client.
- The server’s SSL certificate does not match the domain name of the server.
- The server’s SSL certificate is missing intermediate certificates.
- The server’s SSL certificate has been revoked.
To fix this error, follow these steps:
-
Check the server’s SSL certificate expiration:
- Use tools like OpenSSL to check the certificate’s expiration date:
openssl x509 -in server.crt -noout -dates - If the certificate is expired, renew it with a trusted Certificate Authority (CA) by following their renewal process.
- Use tools like OpenSSL to check the certificate’s expiration date:
-
Verify the server’s SSL certificate trust:
- Check the certificate’s issuer to ensure it is a trusted CA:
openssl x509 -in server.crt -noout -issuer - Verify the certificate is properly configured on the server by checking the server’s SSL configuration files.
- If the certificate is not trusted, consider obtaining a new certificate from a trusted CA by following their issuance process.
- Check the certificate’s issuer to ensure it is a trusted CA:
-
Check the server’s SSL certificate domain name:
- Verify the certificate’s subject to ensure it matches the domain name of the server:
openssl x509 -in server.crt -noout -subject - If the domain name does not match, obtain a new certificate with the correct domain name by following the CA’s issuance process.
- Verify the certificate’s subject to ensure it matches the domain name of the server:
-
Check for missing intermediate certificates:
- Use tools like OpenSSL to verify the certificate chain:
openssl s_client -connect server:443 -servername server - If intermediate certificates are missing, obtain them from the CA and configure them on the server by updating the SSL configuration files.
- Use tools like OpenSSL to verify the certificate chain:
-
Check the server’s SSL certificate revocation status:
- Use tools like OpenSSL to check the certificate’s revocation status:
openssl ocsp -issuer server.crt -cert server.crt -url http://ocsp.example.com - If the certificate is revoked, obtain a new certificate by following the CA’s issuance process.
- Use tools like OpenSSL to check the certificate’s revocation status:
By following these steps, you can identify and resolve the underlying cause of the SSL: CERTIFICATE_VERIFY_FAILED error, ensuring a secure connection between the client and server.
What are some Common SSL Verification Errors & Fixes?
| Error Message | Likely Cause | Quick Fix | Additional Context |
|---|---|---|---|
SSL: CERTIFICATE_VERIFY_FAILED (Python) |
Missing intermediate CA | Install full chain or update certifi | This error occurs when the Python application cannot verify the SSL certificate due to a missing intermediate certificate. Ensure the full certificate chain is installed or update the certifi package to include the intermediate CA. To update certifi, run pip install --upgrade certifi. |
curl: (60) SSL certificate problem |
Expired or self‑signed cert | Renew cert or add --cacert path | This error is triggered by curl when it encounters an SSL certificate problem, such as an expired or self-signed certificate. To resolve this, either renew the certificate or specify the path to a trusted CA certificate using the --cacert option. For example, curl -v --cacert /path/to/trusted/ca/cert.pem https://example.com. |
javax.net.ssl.SSLHandshakeException |
Hostname mismatch | Regenerate cert with correct SAN | This Java-specific error indicates a hostname mismatch between the SSL certificate and the domain name. To fix this, regenerate the SSL certificate with the correct Subject Alternative Names (SAN) to match the domain name. Ensure the SAN includes all necessary domain names and subdomains. |
SSL peer verification failed |
Client trust store outdated | Update OS or add CA bundle | This error occurs when the client’s trust store is outdated, causing SSL peer verification to fail. Update the operating system or add the necessary CA bundle to the trust store to resolve this issue. For example, on Ubuntu, run sudo apt update && sudo apt full-upgrade to update the OS and trust store. |
You can refer to this tutorial on How to Troubleshoot SSL Protocol Errors for more information on how to troubleshoot some common SSL protocol errors.
FAQs
1. What Is SSL Verification?
SSL verification is the process of checking the authenticity of a website’s SSL certificate to ensure it is valid, trusted, and matches the domain name. This verification is crucial for establishing a secure connection between a client (e.g., a web browser) and a server, protecting data from interception and tampering.
To verify SSL verification, you can use tools like OpenSSL to check the certificate’s details. For example, to check the certificate’s expiration date, you can use the following command:
openssl s_client -connect example.com:443 -servername example.com | openssl x509 -noout -dates
This command will display the certificate’s expiration date, helping you determine if the certificate is valid or expired.
2. Why do I get SSL verification failed errors?
SSL verification failed errors occur when the client (e.g., a web browser) cannot verify the authenticity of the server’s SSL certificate. This can happen due to various reasons such as an expired or invalid certificate, a mismatch between the certificate and the domain name, or the certificate not being trusted by the client.
To fix SSL verification errors, you can try the following steps:
- Check the certificate’s expiration date using
openssl x509 -in server.crt -noout -datesand renew it if it’s expired. - Verify the certificate’s domain name matches the server’s domain using
openssl x509 -in server.crt -noout -subjectand obtain a new certificate if there’s a mismatch. - Ensure the certificate is trusted by the client by checking if the Certificate Authority (CA) is included in the client’s trust store. You can use
openssl x509 -in server.crt -noout -issuerto check the certificate’s issuer. - If the certificate is not trusted, consider obtaining a new certificate from a trusted CA by following their issuance process.
- Use tools like OpenSSL to verify the certificate chain and identify any missing intermediate certificates:
openssl s_client -connect server:443 -servername server. If intermediate certificates are missing, obtain them from the CA and configure them on the server by updating the SSL configuration files. - Check the certificate’s revocation status using
openssl ocsp -issuer server.crt -cert server.crt -url http://ocsp.example.comand obtain a new certificate if it’s revoked.
3. Can I disable SSL verification in curl or Python?
Yes, it is technically possible to disable SSL verification in curl or Python, but it is strongly discouraged as it compromises the security of the connection. Disabling SSL verification makes the connection vulnerable to man-in-the-middle attacks, allowing an attacker to intercept and read the data being transmitted. Instead, it is recommended to resolve the underlying SSL verification issues or use a trusted certificate.
Example of how to disable SSL verification in curl (not recommended):
curl -k https://example.com
In this example, the -k flag tells curl to skip SSL verification and proceed with the request regardless of the certificate’s validity. This is not recommended for production use, as it compromises the security of the connection.
Example of how to disable SSL verification in Python (not recommended):
import requests

requests.get('https://example.com', verify=False)
In this example, the verify=False parameter tells the requests library to skip SSL verification and proceed with the request regardless of the certificate’s validity. This is not recommended for production use, as it compromises the security of the connection.
4. How do I verify an SSL certificate manually?
To verify an SSL certificate manually, you can follow these steps:
- Check the certificate’s expiration date to ensure it is not expired.
- Verify the certificate’s issuer to ensure it is a trusted Certificate Authority (CA).
- Check the certificate’s subject to ensure it matches the domain name of the website.
- Use tools like OpenSSL or SSL Labs to scan the website’s SSL configuration and identify any potential issues.
Example of how to verify an SSL certificate using OpenSSL:
openssl s_client -connect example.com:443
This command establishes a connection to the specified server and port (in this case, example.com on port 443) and displays information about the SSL certificate, including the issuer, subject, and expiration date.
5. Is SSL verification required for secure APIs?
Yes, SSL verification is essential for secure APIs. SSL verification ensures that the API endpoint’s SSL certificate is valid, trusted, and matches the domain name, which is critical for protecting sensitive data transmitted between the client and the server. Without SSL verification, the connection is vulnerable to attacks, compromising the security and integrity of the data.
Conclusion
SSL verification is a crucial aspect of securing web traffic, as it not only ensures encryption but also establishes trust between the client and server. By grasping the intricacies of SSL verification, implementing it in your tools and code, and resolving common issues that may arise, you safeguard your applications and users from the risks of man-in-the-middle (MITM) attacks.
- How to Troubleshoot SSL Protocol Errors: This tutorial provides a comprehensive guide on identifying and resolving SSL protocol errors, ensuring secure connections between clients and servers.
- OpenSSL Essentials: Working with SSL Certificates, Private Keys, and CSRs: This tutorial covers the fundamental concepts and practical applications of OpenSSL, including certificate management, key generation, and certificate signing requests.
- Steps to Configure SSL on Tomcat and Setup Auto-Redirect from HTTP to HTTPS: This tutorial outlines the process of configuring SSL/TLS on Apache Tomcat, including setting up automatic redirects from HTTP to HTTPS, ensuring secure communication for web applications.
- How to Create a Self-Signed SSL Certificate for Nginx in Ubuntu: This guide demonstrates the creation and configuration of self-signed SSL certificates for Nginx on Ubuntu, providing a basic level of encryption and authentication for web servers.
These resources will provide you with a comprehensive understanding of SSL verification and its practical applications, enabling you to implement robust security measures in your projects.
Thanks for learning with the DigitalOcean Community. Check out our offerings for compute, storage, networking, and managed databases.
About the author
I help Businesses scale with AI x SEO x (authentic) Content that revives traffic and keeps leads flowing | 3,000,000+ Average monthly readers on Medium | Sr Technical Writer(Team Lead) @ DigitalOcean | Ex-Cloud Consultant @ AMEX | Ex-Site Reliability Engineer(DevOps)@Nutanix
Still looking for an answer?
This textbox defaults to using Markdown to format your answer.
You can type !ref in this text area to quickly search our full set of tutorials, documentation & marketplace offerings and insert the link!
 This work is licensed under a Creative Commons Attribution-NonCommercial- ShareAlike 4.0 International License.
Become a contributor for community
Get paid to write technical tutorials and select a tech-focused charity to receive a matching donation.

DigitalOcean Documentation
Full documentation for every DigitalOcean product.

Resources for startups and AI-native businesses
The Wave has everything you need to know about building a business, from raising funding to marketing your product.
The developer cloud
Scale up as you grow — whether you're running one virtual machine or ten thousand.

Start building today
From GPU-powered inference and Kubernetes to managed databases and storage, get everything you need to build, scale, and deploy intelligent applications.
