Not using Automated Bash?
Choose a different version or distribution.
Introduction
When you first create a new Ubuntu 18.04 server, there are a few configuration steps that you should take early on as part of the basic setup. This will increase the security and usability of your server and will give you a solid foundation for subsequent actions.
While you can complete these steps manually, sometimes it can be easier to script the processes to save time and eliminate human error. This guide explains how to use a script to automate the steps in the initial server setup guide.
What Does the Script Do?
This script is an alternative to manually running through the procedure outlined in the Ubuntu 18.04 initial server setup guide and the guide on setting up SSH keys on Ubuntu 18.04.
The following variables affect how the script is run:
USERNAME: The name of the regular user account to create and grantsudoprivileges to.COPY_AUTHORIZED_KEYS_FROM_ROOT: Whether to copy the SSH key assets from the root account to the newsudoaccount.OTHER_PUBLIC_KEYS_TO_ADD: An array of strings representing other public keys to add to thesudo-enabled account. This can optionally be used in addition to or instead of copying the keys from the root account.
You should update these variables as needed before running the script.
When the script runs, the following actions are performed:
- Create a regular user account with
sudoprivileges using the name specified by theUSERNAMEvariable. - Configure the initial password state for the new account:
- If the server was configured for password authentication, the original, generated administrative password is moved from the root account to the new
sudoaccount. The password for the root account is then locked. - If the server was configured for SSH key authentication, a blank password is set for the
sudoaccount.
- If the server was configured for password authentication, the original, generated administrative password is moved from the root account to the new
- The
sudouser’s password is marked as expired so that it must be changed upon first login. - The
authorized_keysfile from the root account is copied over to thesudouser ifCOPY_AUTHORIZED_KEYS_FROM_ROOTis set totrue. - Any keys defined in
OTHER_PUBLIC_KEYS_TO_ADDare added to thesudouser’sauthorized_keysfile. - Password-based SSH authentication is disabled for the root user.
- The UFW firewall is enabled with SSH connections permitted.
How To Use the Script
The script can be run in two ways: by adding it to the server’s user data field during creation or by logging in as root and executing it after provisioning.
Using User Data
When creating a Droplet on DigitalOcean, you can optionally specify user data, a script to be run during the initial server provisioning to perform additional configuration.
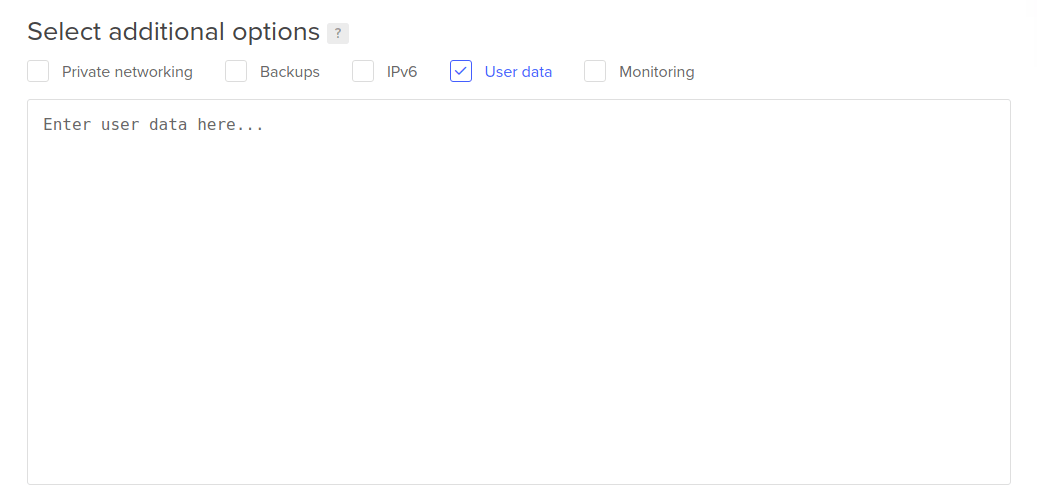
If you are creating a Droplet from the Control Panel, you can select the User data checkbox in the Select additional options section. A text box will appear where you can paste the script:
If you are creating a Droplet using the DigitalOcean API, you can pass in the script using the user_data attribute instead.
If you are creating a Droplet with the doctl command line tool, you can pass in the script using the --user-data-file option:
- doctl compute droplet create ... --user-data-file /path/to/script
Regardless of the method you use to add the user data, the script will be run the first time the new server boots up. You may have to wait a few minutes for the process to complete, but afterwards, you can log into your server with your sudo-enabled user for any further configuration.
The first time you log in, you will be prompted to change your password. The server will terminate the current SSH session once you provide and confirm your new credentials. Afterwards, you can SSH back in again as normal.
Running the Script After Provisioning
If you do not want to use user data, you can also run the script manually over SSH once the server is booted up.
If you have downloaded the script to your local computer, you can pass the script directly to SSH by typing:
- ssh root@servers_public_IP "bash -s" -- < /path/to/script/file
You should now be able to log in using your sudo account for any further configuration.
If you do not have the script downloaded to your local computer, start by logging into the root account on your server:
- ssh root@servers_public_IP
Next, download the raw script to the server:
- curl -L https://raw.githubusercontent.com/do-community/automated-setups/master/Ubuntu-18.04/initial_server_setup.sh -o /tmp/initial_setup.sh
Inspect the script to ensure that it downloaded properly and update any variables that you wish to change:
- nano /tmp/initial_setup.sh
Once satisfied, run the script manually using bash:
- bash /tmp/initial_setup.sh
You should be able to log in using the sudo-enabled user to complete any further configuration.
The Script Contents
You can find the initial server setup script in the automated-setups repository in the DigitalOcean Community GitHub organization. To copy or download the script contents directly, click the Raw button towards the top of the script, or click here to view the raw contents directly.
The full contents are also included here for convenience:
#!/bin/bash
set -euo pipefail

########################
### SCRIPT VARIABLES ###
########################

# Name of the user to create and grant sudo privileges
USERNAME=sammy

# Whether to copy over the root user's `authorized_keys` file to the new sudo
# user.
COPY_AUTHORIZED_KEYS_FROM_ROOT=true

# Additional public keys to add to the new sudo user
# OTHER_PUBLIC_KEYS_TO_ADD=(
#     "ssh-rsa AAAAB..."
#     "ssh-rsa AAAAB..."
# )
OTHER_PUBLIC_KEYS_TO_ADD=(
)

####################
### SCRIPT LOGIC ###
####################

# Add sudo user and grant privileges
useradd --create-home --shell "/bin/bash" --groups sudo "${USERNAME}"

# Check whether the root account has a real password set
encrypted_root_pw="$(grep root /etc/shadow | cut --delimiter=: --fields=2)"

if [ "${encrypted_root_pw}" != "*" ]; then
    # Transfer auto-generated root password to user if present
    # and lock the root account to password-based access
    echo "${USERNAME}:${encrypted_root_pw}" | chpasswd --encrypted
    passwd --lock root
else
    # Delete invalid password for user if using keys so that a new password
    # can be set without providing a previous value
    passwd --delete "${USERNAME}"
fi

# Expire the sudo user's password immediately to force a change
chage --lastday 0 "${USERNAME}"

# Create SSH directory for sudo user
home_directory="$(eval echo ~${USERNAME})"
mkdir --parents "${home_directory}/.ssh"

# Copy `authorized_keys` file from root if requested
if [ "${COPY_AUTHORIZED_KEYS_FROM_ROOT}" = true ]; then
    cp /root/.ssh/authorized_keys "${home_directory}/.ssh"
fi

# Add additional provided public keys
for pub_key in "${OTHER_PUBLIC_KEYS_TO_ADD[@]}"; do
    echo "${pub_key}" >> "${home_directory}/.ssh/authorized_keys"
done

# Adjust SSH configuration ownership and permissions
chmod 0700 "${home_directory}/.ssh"
chmod 0600 "${home_directory}/.ssh/authorized_keys"
chown --recursive "${USERNAME}":"${USERNAME}" "${home_directory}/.ssh"

# Disable root SSH login with password
sed --in-place 's/^PermitRootLogin.*/PermitRootLogin prohibit-password/g' /etc/ssh/sshd_config
if sshd -t -q; then
    systemctl restart sshd
fi

# Add exception for SSH and then enable UFW firewall
ufw allow OpenSSH
ufw --force enable
Conclusion
Automating the initial server setup can save you a bit of time and gives you a good foundation for further configuration. If there are additional steps you’d like to take, you can either log in after the script runs to continue manually, or append the steps to the end of the script to automate the process.
Thanks for learning with the DigitalOcean Community. Check out our offerings for compute, storage, networking, and managed databases.
About the author
Former Senior Technical Writer at DigitalOcean, specializing in DevOps topics across multiple Linux distributions, including Ubuntu 18.04, 20.04, 22.04, as well as Debian 10 and 11.
Still looking for an answer?
This textbox defaults to using Markdown to format your answer.
You can type !ref in this text area to quickly search our full set of tutorials, documentation & marketplace offerings and insert the link!
#!/bin/bash set -euo pipefail
########################
SCRIPT VARIABLES
########################
Name of the user to create and grant sudo privileges
USERNAME=sammy
Whether to copy over the root user’s authorized_keys file to the new sudo
user.
COPY_AUTHORIZED_KEYS_FROM_ROOT=true
Additional public keys to add to the new sudo user
OTHER_PUBLIC_KEYS_TO_ADD=(
“ssh-rsa AAAAB…”
“ssh-rsa AAAAB…”
)
OTHER_PUBLIC_KEYS_TO_ADD=( )
####################
SCRIPT LOGIC
####################
Add sudo user and grant privileges
useradd --create-home --shell “/bin/bash” --groups sudo “${USERNAME}”
Check whether the root account has a real password set
encrypted_root_pw=“$(grep root /etc/shadow | cut --delimiter=: --fields=2)”
if [ “${encrypted_root_pw}” != “*” ]; then # Transfer auto-generated root password to user if present # and lock the root account to password-based access echo “${USERNAME}:${encrypted_root_pw}” | chpasswd --encrypted passwd --lock root else # Delete invalid password for user if using keys so that a new password # can be set without providing a previous value passwd --delete “${USERNAME}” fi
Expire the sudo user’s password immediately to force a change
chage --lastday 0 “${USERNAME}”
Create SSH directory for sudo user
home_directory=“$(eval echo ~${USERNAME})” mkdir --parents “${home_directory}/.ssh”
Copy authorized_keys file from root if requested
if [ “${COPY_AUTHORIZED_KEYS_FROM_ROOT}” = true ]; then cp /root/.ssh/authorized_keys “${home_directory}/.ssh” fi
Add additional provided public keys
for pub_key in “${OTHER_PUBLIC_KEYS_TO_ADD[@]}”; do echo “${pub_key}” >> “${home_directory}/.ssh/authorized_keys” done
Adjust SSH configuration ownership and permissions
chmod 0700 “${home_directory}/.ssh” chmod 0600 “${home_directory}/.ssh/authorized_keys” chown --recursive “${USERNAME}”:“${USERNAME}” “${home_directory}/.ssh”
Disable root SSH login with password
sed --in-place ‘s/^PermitRootLogin.*/PermitRootLogin prohibit-password/g’ /etc/ssh/sshd_config if sshd -t -q; then systemctl restart sshd fi
Add exception for SSH and then enable UFW firewall
ufw allow OpenSSH ufw --force enable
I have made a bash script to automate the setup process for a newly created droplet, hopefully this will be useful to someone else.
In the “Running the Script After Provisioning” section there is a curl call listed as “curl -L https://raw.githubusercontent.com/do-community/automated-setups/master/Ubuntu-18.04/initial_servers_setup.sh -o /tmp/initial_setup.sh” it should be “curl -L https://raw.githubusercontent.com/do-community/automated-setups/master/Ubuntu-18.04/initial_server_setup.sh -o /tmp/initial_setup.sh” You can see it listed correctly under “Script Contents” -> “click here to view the raw contents directly.”
As it currently is you get “404 Not Found” written to the new tmp file.
I would like to change the script to disable root SSH login and password authentication. Would the following change work?
# Disable root SSH login and password authentication
sed --in-place 's/^PermitRootLogin.*/PermitRootLogin no/g' /etc/ssh/sshd_config
sed --in-place 's/^PasswordAuthentication.*/PasswordAuthentication no/g' /etc/ssh/sshd_config
if sshd -t -q; then
   systemctl restart sshd
fi
Wouldn’t it be useful to also include updating to the setup script? Would the following lines – added at the end of the script – work?
apt-get update
apt-get -y upgrade
apt-get -y autoremove
Nice! I’ve made a script of my own with CentOS based on this. The only difference is this line:
useradd --create-home --shell "/bin/bash" --groups wheel "${USERNAME}"
Also, I omitted the firewall part.
There’s a bug in the script.
If OTHER_PUBLIC_KEYS_TO_ADD is left empty, then this line will fail:
chmod 0600 "${home_directory}/.ssh/authorized_keys"
--> chmod: cannot access '/home/sammy/.ssh/authorized_keys': No such file or directory
because .ssh/authorised_keys is created in the previous step ONLY if OTHER_PUBLIC_KEYS_TO_ADD has something:
# Add additional provided public keys
for pub_key in "${OTHER_PUBLIC_KEYS_TO_ADD[@]}"; do
    echo "${pub_key}" >> "${home_directory}/.ssh/authorized_keys"
done
ssh root@165.227.208.217 ssh sammy@165.227.208.217 ssh jane_doe@165.227.208.217
after running the script as is, I don’t understand why I’m having trouble using ssh to log in?
I clicking the checkboxes for IPV6 and adding my pre-existing key, but I can’t imagine either of those making a difference
I keep getting Permission denied (publickey).
Permission denied (publickey).
When checking whether the root password has been set:
if [ "${encrypted_root_pw}" != "*" ]; then
should be
if [ "${encrypted_root_pw}" != "*" -a "${encrypted_root_pw}" != "!" ]; then
This is because if root used to have a password and was later locked it will have ! in the shadow file rather than *.
how does someone call this script using user_data attribute? Ive been searching the API docs and all it says is:
A string containing ‘user data’ which may be used to configure the Droplet on first boot, often a ‘cloud-config’ file or Bash script. It must be plain text and may not exceed 64 KiB in size.
I would like an example if that is possible. I’m trying to test this out in postman.
 This work is licensed under a Creative Commons Attribution-NonCommercial- ShareAlike 4.0 International License.
Become a contributor for community
Get paid to write technical tutorials and select a tech-focused charity to receive a matching donation.

DigitalOcean Documentation
Full documentation for every DigitalOcean product.

Resources for startups and AI-native businesses
The Wave has everything you need to know about building a business, from raising funding to marketing your product.
The developer cloud
Scale up as you grow — whether you're running one virtual machine or ten thousand.

Start building today
From GPU-powered inference and Kubernetes to managed databases and storage, get everything you need to build, scale, and deploy intelligent applications.
