
Introduction
If you are actively developing an application, using Docker can simplify your workflow and the process of deploying your application to production. Working with containers in development offers the following benefits:
- Environments are consistent, meaning that you can choose the languages and dependencies you want for your project without worrying about system conflicts.
- Environments are isolated, making it easier to troubleshoot issues and onboard new team members.
- Environments are portable, allowing you to package and share your code with others.
This tutorial will show you how to set up a development environment for a Node.js application using Docker. You will create two containers — one for the Node application and another for the MongoDB database — with Docker Compose. Because this application works with Node and MongoDB, your setup will do the following:
- Synchronize the application code on the host with the code in the container to facilitate changes during development.
- Ensure that changes to the application code work without a restart.
- Create a user and password-protected database for the application’s data.
- Persist this data.
At the end of this tutorial, you will have a working shark information application running on Docker containers:
Prerequisites
To follow this tutorial, you will need:
- A development server running Ubuntu 18.04, along with a non-root user with
sudoprivileges and an active firewall. For guidance on how to set these up, please see this Initial Server Setup guide. - Docker installed on your server, following Steps 1 and 2 of How To Install and Use Docker on Ubuntu 18.04.
- Docker Compose installed on your server, following Step 1 of How To Install Docker Compose on Ubuntu 18.04.
Step 1 — Cloning the Project and Modifying Dependencies
The first step in building this setup will be cloning the project code and modifying its package.json file, which includes the project’s dependencies. You will add nodemon to the project’s devDependencies, specifying that you will be using it during development. Running the application with nodemon ensures that it will be automatically restarted whenever you make changes to your code.
First, clone the nodejs-mongo-mongoose repository from the DigitalOcean Community GitHub account. This repository includes the code from the setup described in How To Integrate MongoDB with Your Node Application, which explains how to integrate a MongoDB database with an existing Node application using Mongoose.
Clone the repository into a directory called node_project:
- git clone https://github.com/do-community/nodejs-mongo-mongoose.git node_project
Navigate to the node_project directory:
- cd node_project
Open the project’s package.json file using nano or your favorite editor:
- nano package.json
Beneath the project dependencies and above the closing curly brace, create a new devDependencies object that includes nodemon:
...
"dependencies": {
    "ejs": "^2.6.1",
    "express": "^4.16.4",
    "mongoose": "^5.4.10"
  },
  "devDependencies": {
    "nodemon": "^1.18.10"
  }
}
Save and close the file when you are finished editing. If you’re using nano, press CTRL+X, then Y, then ENTER.
With the project code in place and its dependencies modified, you can move on to refactoring the code for a containerized workflow.
Step 2 — Configuring Your Application to Work with Containers
Modifying your application for a containerized workflow means making your code more modular. Containers offer portability between environments, and your code should reflect that by remaining as decoupled from the underlying operating system as possible. To achieve this, you will refactor your code to make greater use of Node’s process.env property. This returns an object with information about your user environment at runtime. You can use this object in your code to dynamically assign configuration information at runtime with environment variables.
Begin with app.js, your main application entrypoint. Open the file:
- nano app.js
Inside, you will see a definition for a port constant, as well a listen function that uses this constant to specify the port the application will listen on:
...
const port = 8080;
...
app.listen(port, function () {
  console.log('Example app listening on port 8080!');
});
Redefine the port constant to allow for dynamic assignment at runtime using the process.env object. Make the following changes to the constant definition and listen function:
...
const port = process.env.PORT || 8080;
...
app.listen(port, function () {
  console.log(`Example app listening on ${port}!`);
});
Your new constant definition assigns port dynamically using the value passed in at runtime or 8080. Similarly, you’ve rewritten the listen function to use a template literal, which will interpolate the port value when listening for connections. Because you will be mapping your ports elsewhere, these revisions will prevent you having to continuously revise this file as your environment changes.
When you are finished editing, save and close the file.
Next, you will modify your database connection information to remove any configuration credentials. Open the db.js file, which contains this information:
- nano db.js
Currently, the file does the following things:
- Imports Mongoose, the Object Document Mapper (ODM) that you’re using to create schemas and models for your application data.
- Sets the database credentials as constants, including the username and password.
- Connects to the database using the
mongoose.connectmethod.
For more information about the file, please see Step 3 of How To Integrate MongoDB with Your Node Application.
Your first step in modifying the file will be redefining the constants that include sensitive information. Currently, these constants look like this:
...
const MONGO_USERNAME = 'sammy';
const MONGO_PASSWORD = 'your_password';
const MONGO_HOSTNAME = '127.0.0.1';
const MONGO_PORT = '27017';
const MONGO_DB = 'sharkinfo';
...
Instead of hardcoding this information, you can use the process.env object to capture the runtime values for these constants. Modify the block to look like this:
...
const {
  MONGO_USERNAME,
  MONGO_PASSWORD,
  MONGO_HOSTNAME,
  MONGO_PORT,
  MONGO_DB
} = process.env;
...
Save and close the file when you are finished editing.
At this point, you have modified db.js to work with your application’s environment variables, but you still need a way to pass these variables to your application. Create an .env file with values that you can pass to your application at runtime.
Open the file:
- nano .env
This file will include the information that you removed from db.js: the username and password for your application’s database, as well as the port setting and database name. Remember to update the username, password, and database name listed here with your own information:
MONGO_USERNAME=sammy
MONGO_PASSWORD=your_password
MONGO_PORT=27017
MONGO_DB=sharkinfo
Note that you have removed the host setting that originally appeared in db.js. You will now define your host at the level of the Docker Compose file, along with other information about your services and containers.
Save and close this file when you are finished editing.
Because your .env file contains sensitive information, you will want to ensure that it is included in your project’s .dockerignore and .gitignore files so that it does not copy to your version control or containers.
Open your .dockerignore file:
- nano .dockerignore
Add the following line to the bottom of the file:
...
.gitignore
.env
Save and close the file when you are finished editing.
The .gitignore file in this repository already includes .env, but feel free to check that it is there:
- nano .gitignore
...
.env
...
At this point, you have successfully extracted sensitive information from your project code and taken measures to control how and where this information gets copied. Now you can add to your database connection code to optimize it for a containerized workflow.
Step 3 — Modifying Database Connection Settings
Your next step will be to make your database connection method more robust by adding code that handles cases where your application fails to connect to your database. Introducing this level of resilience to your application code is a recommended practice when working with containers using Compose.
Open db.js for editing:
- nano db.js
Notice the code that added earlier, along with the url constant for Mongo’s connection URI and the Mongoose connect method:
...
const {
  MONGO_USERNAME,
  MONGO_PASSWORD,
  MONGO_HOSTNAME,
  MONGO_PORT,
  MONGO_DB
} = process.env;

const url = `mongodb://${MONGO_USERNAME}:${MONGO_PASSWORD}@${MONGO_HOSTNAME}:${MONGO_PORT}/${MONGO_DB}?authSource=admin`;

mongoose.connect(url, {useNewUrlParser: true});
Currently, your connect method accepts an option that tells Mongoose to use Mongo’s new URL parser. You can add options to this method to define parameters for reconnection attempts. Do this by creating an options constant that includes the relevant information, in addition to the new URL parser option. Below your Mongo constants, add the following definition for the options constant:
...
const {
  MONGO_USERNAME,
  MONGO_PASSWORD,
  MONGO_HOSTNAME,
  MONGO_PORT,
  MONGO_DB
} = process.env;

const options = {
  useNewUrlParser: true,
  reconnectTries: Number.MAX_VALUE,
  reconnectInterval: 500,
  connectTimeoutMS: 10000,
};
...
The reconnectTries option tells Mongoose to continue trying to connect indefinitely, while reconnectInterval defines the period between connection attempts in milliseconds. connectTimeoutMS defines 10 seconds as the period that the Mongo driver will wait before failing the connection attempt.
You can now use the new options constant in the Mongoose connect method to fine tune your Mongoose connection settings. You will also add a promise to handle potential connection errors.
Currently, the Mongoose connect method looks like this:
...
mongoose.connect(url, {useNewUrlParser: true});
Delete the existing connect method and replace it with the following code, which includes the options constant and a promise:
...
mongoose.connect(url, options).then( function() {
  console.log('MongoDB is connected');
})
  .catch( function(err) {
  console.log(err);
});
In the case of a successful connection, your function logs an appropriate message; otherwise it will catch and log the error, allowing you to troubleshoot.
The finished file will look like this:
const mongoose = require('mongoose');

const {
  MONGO_USERNAME,
  MONGO_PASSWORD,
  MONGO_HOSTNAME,
  MONGO_PORT,
  MONGO_DB
} = process.env;

const options = {
  useNewUrlParser: true,
  reconnectTries: Number.MAX_VALUE,
  reconnectInterval: 500,
  connectTimeoutMS: 10000,
};

const url = `mongodb://${MONGO_USERNAME}:${MONGO_PASSWORD}@${MONGO_HOSTNAME}:${MONGO_PORT}/${MONGO_DB}?authSource=admin`;

mongoose.connect(url, options).then( function() {
  console.log('MongoDB is connected');
})
  .catch( function(err) {
  console.log(err);
});
Save and close the file when you have finished editing.
You have now added resiliency to your application code to handle cases where your application might fail to connect to your database. With this code in place, you can move on to defining your services with Compose.
Step 4 — Defining Services with Docker Compose
With your code refactored, you are ready to write the docker-compose.yml file with your service definitions. A service in Compose is a running container, and service definitions — which you will include in your docker-compose.yml file — contain information about how each container image will run. The Compose tool allows you to define multiple services to build multi-container applications.
Before defining your services, you will add a tool to your project called wait-for to ensure that your application only attempts to connect to your database once the database startup tasks are complete. This wrapper script uses netcat to poll whether a specific host and port are accepting TCP connections. Using it allows you to control your application’s attempts to connect to your database by testing whether the database is ready to accept connections.
Though Compose allows you to specify dependencies between services using the depends_on option, this order is based on whether the container is running rather than its readiness. Using depends_on won’t be optimal for your setup since you want your application to connect only when the database startup tasks, including adding a user and password to the admin authentication database, are complete. For more information on using wait-for and other tools to control startup order, please see the relevant recommendations in the Compose documentation.
Open a file called wait-for.sh:
- nano wait-for.sh
Enter the following code into the file to create the polling function:
#!/bin/sh

# original script: https://github.com/eficode/wait-for/blob/master/wait-for

TIMEOUT=15
QUIET=0

echoerr() {
  if [ "$QUIET" -ne 1 ]; then printf "%s\n" "$*" 1>&2; fi
}

usage() {
  exitcode="$1"
  cat << USAGE >&2
Usage:
  $cmdname host:port [-t timeout] [-- command args]
  -q | --quiet                        Do not output any status messages
  -t TIMEOUT | --timeout=timeout      Timeout in seconds, zero for no timeout
  -- COMMAND ARGS                     Execute command with args after the test finishes
USAGE
  exit "$exitcode"
}

wait_for() {
  for i in `seq $TIMEOUT` ; do
    nc -z "$HOST" "$PORT" > /dev/null 2>&1

    result=$?
    if [ $result -eq 0 ] ; then
      if [ $# -gt 0 ] ; then
        exec "$@"
      fi
      exit 0
    fi
    sleep 1
  done
  echo "Operation timed out" >&2
  exit 1
}

while [ $# -gt 0 ]
do
  case "$1" in
    *:* )
    HOST=$(printf "%s\n" "$1"| cut -d : -f 1)
    PORT=$(printf "%s\n" "$1"| cut -d : -f 2)
    shift 1
    ;;
    -q | --quiet)
    QUIET=1
    shift 1
    ;;
    -t)
    TIMEOUT="$2"
    if [ "$TIMEOUT" = "" ]; then break; fi
    shift 2
    ;;
    --timeout=*)
    TIMEOUT="${1#*=}"
    shift 1
    ;;
    --)
    shift
    break
    ;;
    --help)
    usage 0
    ;;
    *)
    echoerr "Unknown argument: $1"
    usage 1
    ;;
  esac
done

if [ "$HOST" = "" -o "$PORT" = "" ]; then
  echoerr "Error: you need to provide a host and port to test."
  usage 2
fi

wait_for "$@"
Save and close the file when you are finished adding the code.
Make the script executable:
- chmod +x wait-for.sh
Next, open the docker-compose.yml file:
- nano docker-compose.yml
First, define the nodejs application service by adding the following code to the file:
version: '3'

services:
  nodejs:
    build:
      context: .
      dockerfile: Dockerfile
    image: nodejs
    container_name: nodejs
    restart: unless-stopped
    env_file: .env
    environment:
      - MONGO_USERNAME=$MONGO_USERNAME
      - MONGO_PASSWORD=$MONGO_PASSWORD
      - MONGO_HOSTNAME=db
      - MONGO_PORT=$MONGO_PORT
      - MONGO_DB=$MONGO_DB
    ports:
      - "80:8080"
    volumes:
      - .:/home/node/app
      - node_modules:/home/node/app/node_modules
    networks:
      - app-network
    command: ./wait-for.sh db:27017 -- /home/node/app/node_modules/.bin/nodemon app.js
The nodejs service definition includes the following options:
build: This defines the configuration options, including thecontextanddockerfile, that will be applied when Compose builds the application image. If you wanted to use an existing image from a registry like Docker Hub, you could use theimageinstruction instead, with information about your username, repository, and image tag.context: This defines the build context for the image build — in this case, the current project directory.dockerfile: This specifies theDockerfilein your current project directory as the file Compose will use to build the application image. For more information about this file, please see How To Build a Node.js Application with Docker.image,container_name: These apply names to the image and container.restart: This defines the restart policy. The default isno, but you have set the container to restart unless it is stopped.env_file: This tells Compose that you would like to add environment variables from a file called.env, located in your build context.environment: Using this option allows you to add the Mongo connection settings you defined in the.envfile. Note that you are not settingNODE_ENVtodevelopment, since this is Express’s default behavior ifNODE_ENVis not set. When moving to production, you can set this toproductionto enable view caching and less verbose error messages. Also note that you have specified thedbdatabase container as the host, as discussed in Step 2.ports: This maps port80on the host to port8080on the container.volumes: You are including two types of mounts here:- The first is a bind mount that mounts your application code on the host to the
/home/node/appdirectory on the container. This will facilitate rapid development, since any changes you make to your host code will be populated immediately in the container. - The second is a named volume,
node_modules. When Docker runs thenpm installinstruction listed in the applicationDockerfile,npmwill create a newnode_modulesdirectory on the container that includes the packages required to run the application. The bind mount you just created will hide this newly creatednode_modulesdirectory, however. Sincenode_moduleson the host is empty, the bind will map an empty directory to the container, overriding the newnode_modulesdirectory and preventing your application from starting. The namednode_modulesvolume solves this problem by persisting the contents of the/home/node/app/node_modulesdirectory and mounting it to the container, hiding the bind.
- The first is a bind mount that mounts your application code on the host to the
Keep the following points in mind when using this approach:
-
Your bind will mount the contents of the
node_modulesdirectory on the container to the host and this directory will be owned byroot, since the named volume was created by Docker. -
If you have a pre-existing
node_modulesdirectory on the host, it will override thenode_modulesdirectory created on the container. The setup that you’re building in this tutorial assumes that you do not have a pre-existingnode_modulesdirectory and that you won’t be working withnpmon your host. This is in keeping with a twelve-factor approach to application development, which minimizes dependencies between execution environments.
networks: This specifies that your application service will join theapp-networknetwork, which you will define at the bottom of the file.command: This option lets you set the command that should be executed when Compose runs the image. Note that this will override theCMDinstruction that you set in our applicationDockerfile. Here, you are running the application using thewait-forscript, which will poll thedbservice on port27017to test whether the database service is ready. Once the readiness test succeeds, the script will execute the command you have set,/home/node/app/node_modules/.bin/nodemon app.js, to start the application withnodemon. This will ensure that any future changes you make to your code are reloaded without your having to restart the application.
Next, create the db service by adding the following code below the application service definition:
...
  db:
    image: mongo:4.1.8-xenial
    container_name: db
    restart: unless-stopped
    env_file: .env
    environment:
      - MONGO_INITDB_ROOT_USERNAME=$MONGO_USERNAME
      - MONGO_INITDB_ROOT_PASSWORD=$MONGO_PASSWORD
    volumes:
      - dbdata:/data/db
    networks:
      - app-network
Some of the settings defined for the nodejs service remain the same, but you’ve also made the following changes to the image, environment, and volumes definitions:
image: To create this service, Compose will pull the4.1.8-xenialMongo image from Docker Hub. You are pinning a particular version to avoid possible future conflicts as the Mongo image changes. For more information about version pinning, please see the Docker documentation on Dockerfile best practices.MONGO_INITDB_ROOT_USERNAME,MONGO_INITDB_ROOT_PASSWORD: Themongoimage makes these environment variables available so that you can modify the initialization of your database instance.MONGO_INITDB_ROOT_USERNAMEandMONGO_INITDB_ROOT_PASSWORDtogether create arootuser in theadminauthentication database and ensure that authentication is enabled when the container starts. You have setMONGO_INITDB_ROOT_USERNAMEandMONGO_INITDB_ROOT_PASSWORDusing the values from your.envfile, which you pass to thedbservice using theenv_fileoption. Doing this means that yoursammyapplication user will be arootuser on the database instance, with access to all the administrative and operational privileges of that role. When working in production, you will want to create a dedicated application user with appropriately scoped privileges.
Note: Keep in mind that these variables will not take effect if you start the container with an existing data directory in place.
dbdata:/data/db: The named volumedbdatawill persist the data stored in Mongo’s default data directory,/data/db. This will ensure that you don’t lose data in cases where you stop or remove containers.
The db service was also added to the app-network network with the networks option.
As a final step, add the volume and network definitions to the bottom of the file:
...
networks:
  app-network:
    driver: bridge

volumes:
  dbdata:
  node_modules:
The user-defined bridge network app-network enables communication between your containers since they are on the same Docker daemon host. This streamlines traffic and communication within the application, as it opens all ports between containers on the same bridge network, while exposing no ports to the outside world. Thus, your db and nodejs containers can communicate with each other, and you only need to expose port 80 for front-end access to the application.
Your top-level volumes key defines the volumes dbdata and node_modules. When Docker creates volumes, the contents of the volume are stored in a part of the host filesystem, /var/lib/docker/volumes/, that’s managed by Docker. The contents of each volume are stored in a directory under /var/lib/docker/volumes/ and get mounted to any container that uses the volume. In this way, the shark information data that your users will create will persist in the dbdata volume even if you remove and recreate the db container.
The finished docker-compose.yml file will look like this:
version: '3'

services:
  nodejs:
    build:
      context: .
      dockerfile: Dockerfile
    image: nodejs
    container_name: nodejs
    restart: unless-stopped
    env_file: .env
    environment:
      - MONGO_USERNAME=$MONGO_USERNAME
      - MONGO_PASSWORD=$MONGO_PASSWORD
      - MONGO_HOSTNAME=db
      - MONGO_PORT=$MONGO_PORT
      - MONGO_DB=$MONGO_DB
    ports:
      - "80:8080"
    volumes:
      - .:/home/node/app
      - node_modules:/home/node/app/node_modules
    networks:
      - app-network
    command: ./wait-for.sh db:27017 -- /home/node/app/node_modules/.bin/nodemon app.js

  db:
    image: mongo:4.1.8-xenial
    container_name: db
    restart: unless-stopped
    env_file: .env
    environment:
      - MONGO_INITDB_ROOT_USERNAME=$MONGO_USERNAME
      - MONGO_INITDB_ROOT_PASSWORD=$MONGO_PASSWORD
    volumes:
      - dbdata:/data/db
    networks:
      - app-network

networks:
  app-network:
    driver: bridge

volumes:
  dbdata:
  node_modules:
Save and close the file when you are finished editing.
With your service definitions in place, you are ready to start the application.
Step 5 — Testing the Application
With your docker-compose.yml file in place, you can create your services with the docker-compose up command. You can also test that your data will persist by stopping and removing your containers with docker-compose down.
First, build the container images and create the services by running docker-compose up with the -d flag, which will then run the nodejs and db containers in the background:
- docker-compose up -d
The output confirms that your services have been created:
Output...
Creating db ... done
Creating nodejs ... done
You can also get more detailed information about the startup processes by displaying the log output from the services:
- docker-compose logs
If everything has started correctly, the following is the output:
Output...
nodejs    | [nodemon] starting `node app.js`
nodejs    | Example app listening on 8080!
nodejs    | MongoDB is connected
...
db        | 2019-02-22T17:26:27.329+0000 I ACCESS   [conn2] Successfully authenticated as principal sammy on admin
You can also check the status of your containers with docker-compose ps:
- docker-compose ps
The output indicates that your containers are running:
Output Name               Command               State          Ports
----------------------------------------------------------------------
db       docker-entrypoint.sh mongod      Up      27017/tcp
nodejs   ./wait-for.sh db:27017 --  ...   Up      0.0.0.0:80->8080/tcp
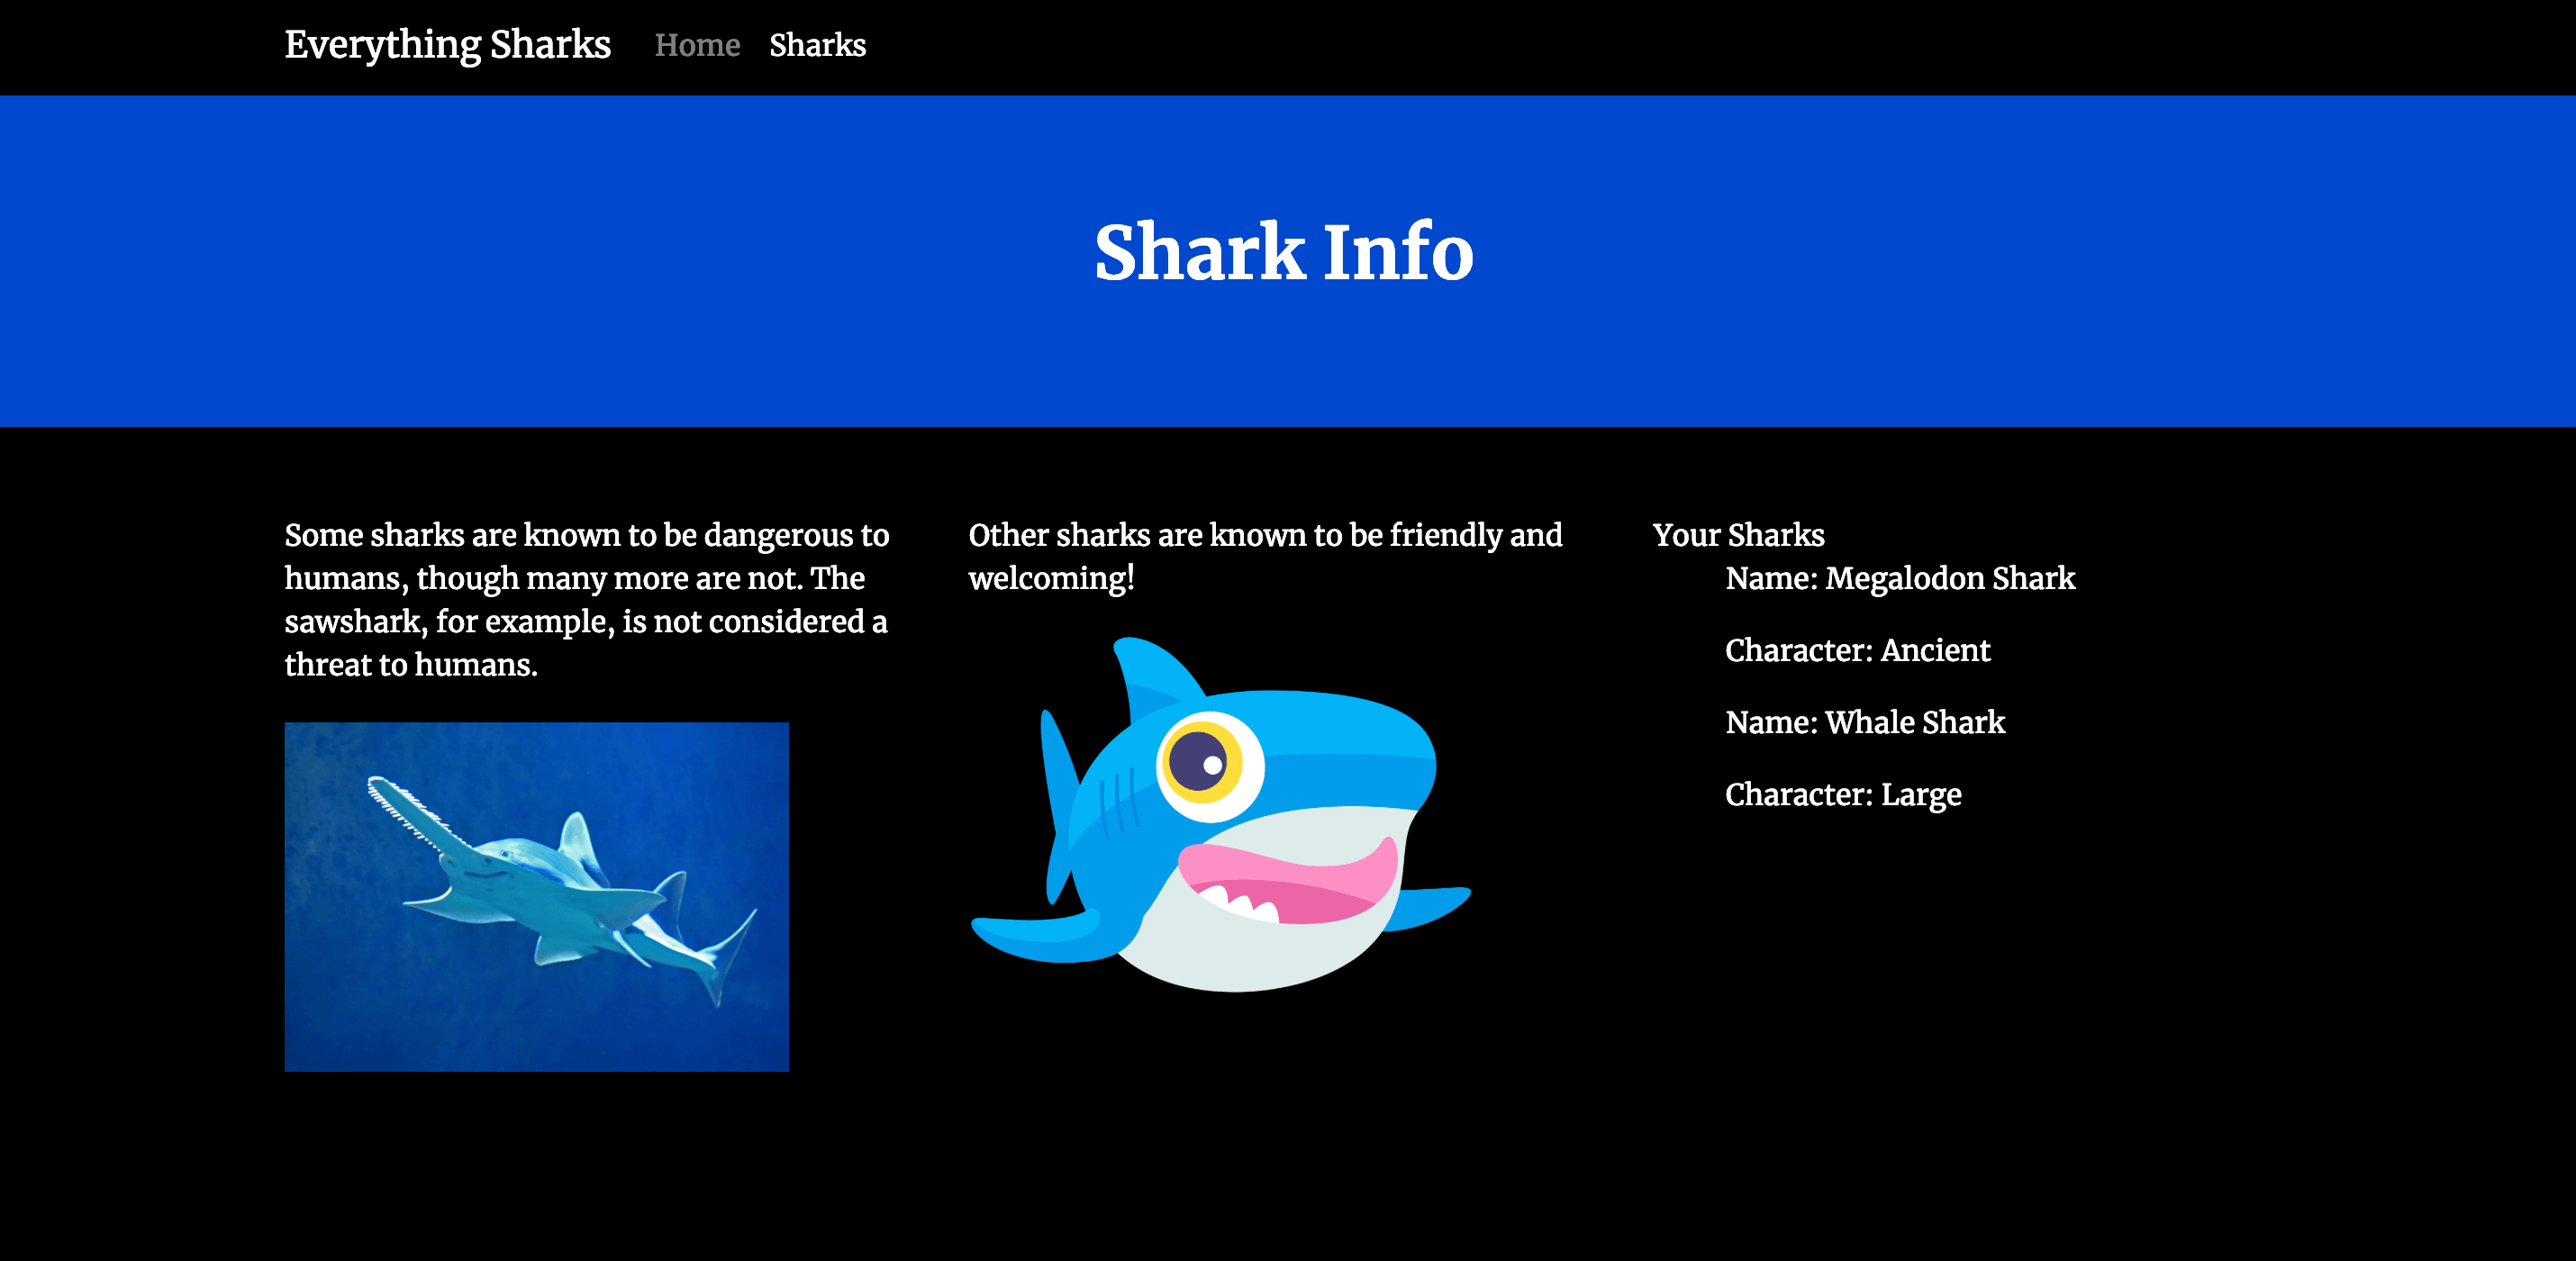
With your services running, you can visit http://your_server_ip in the browser:
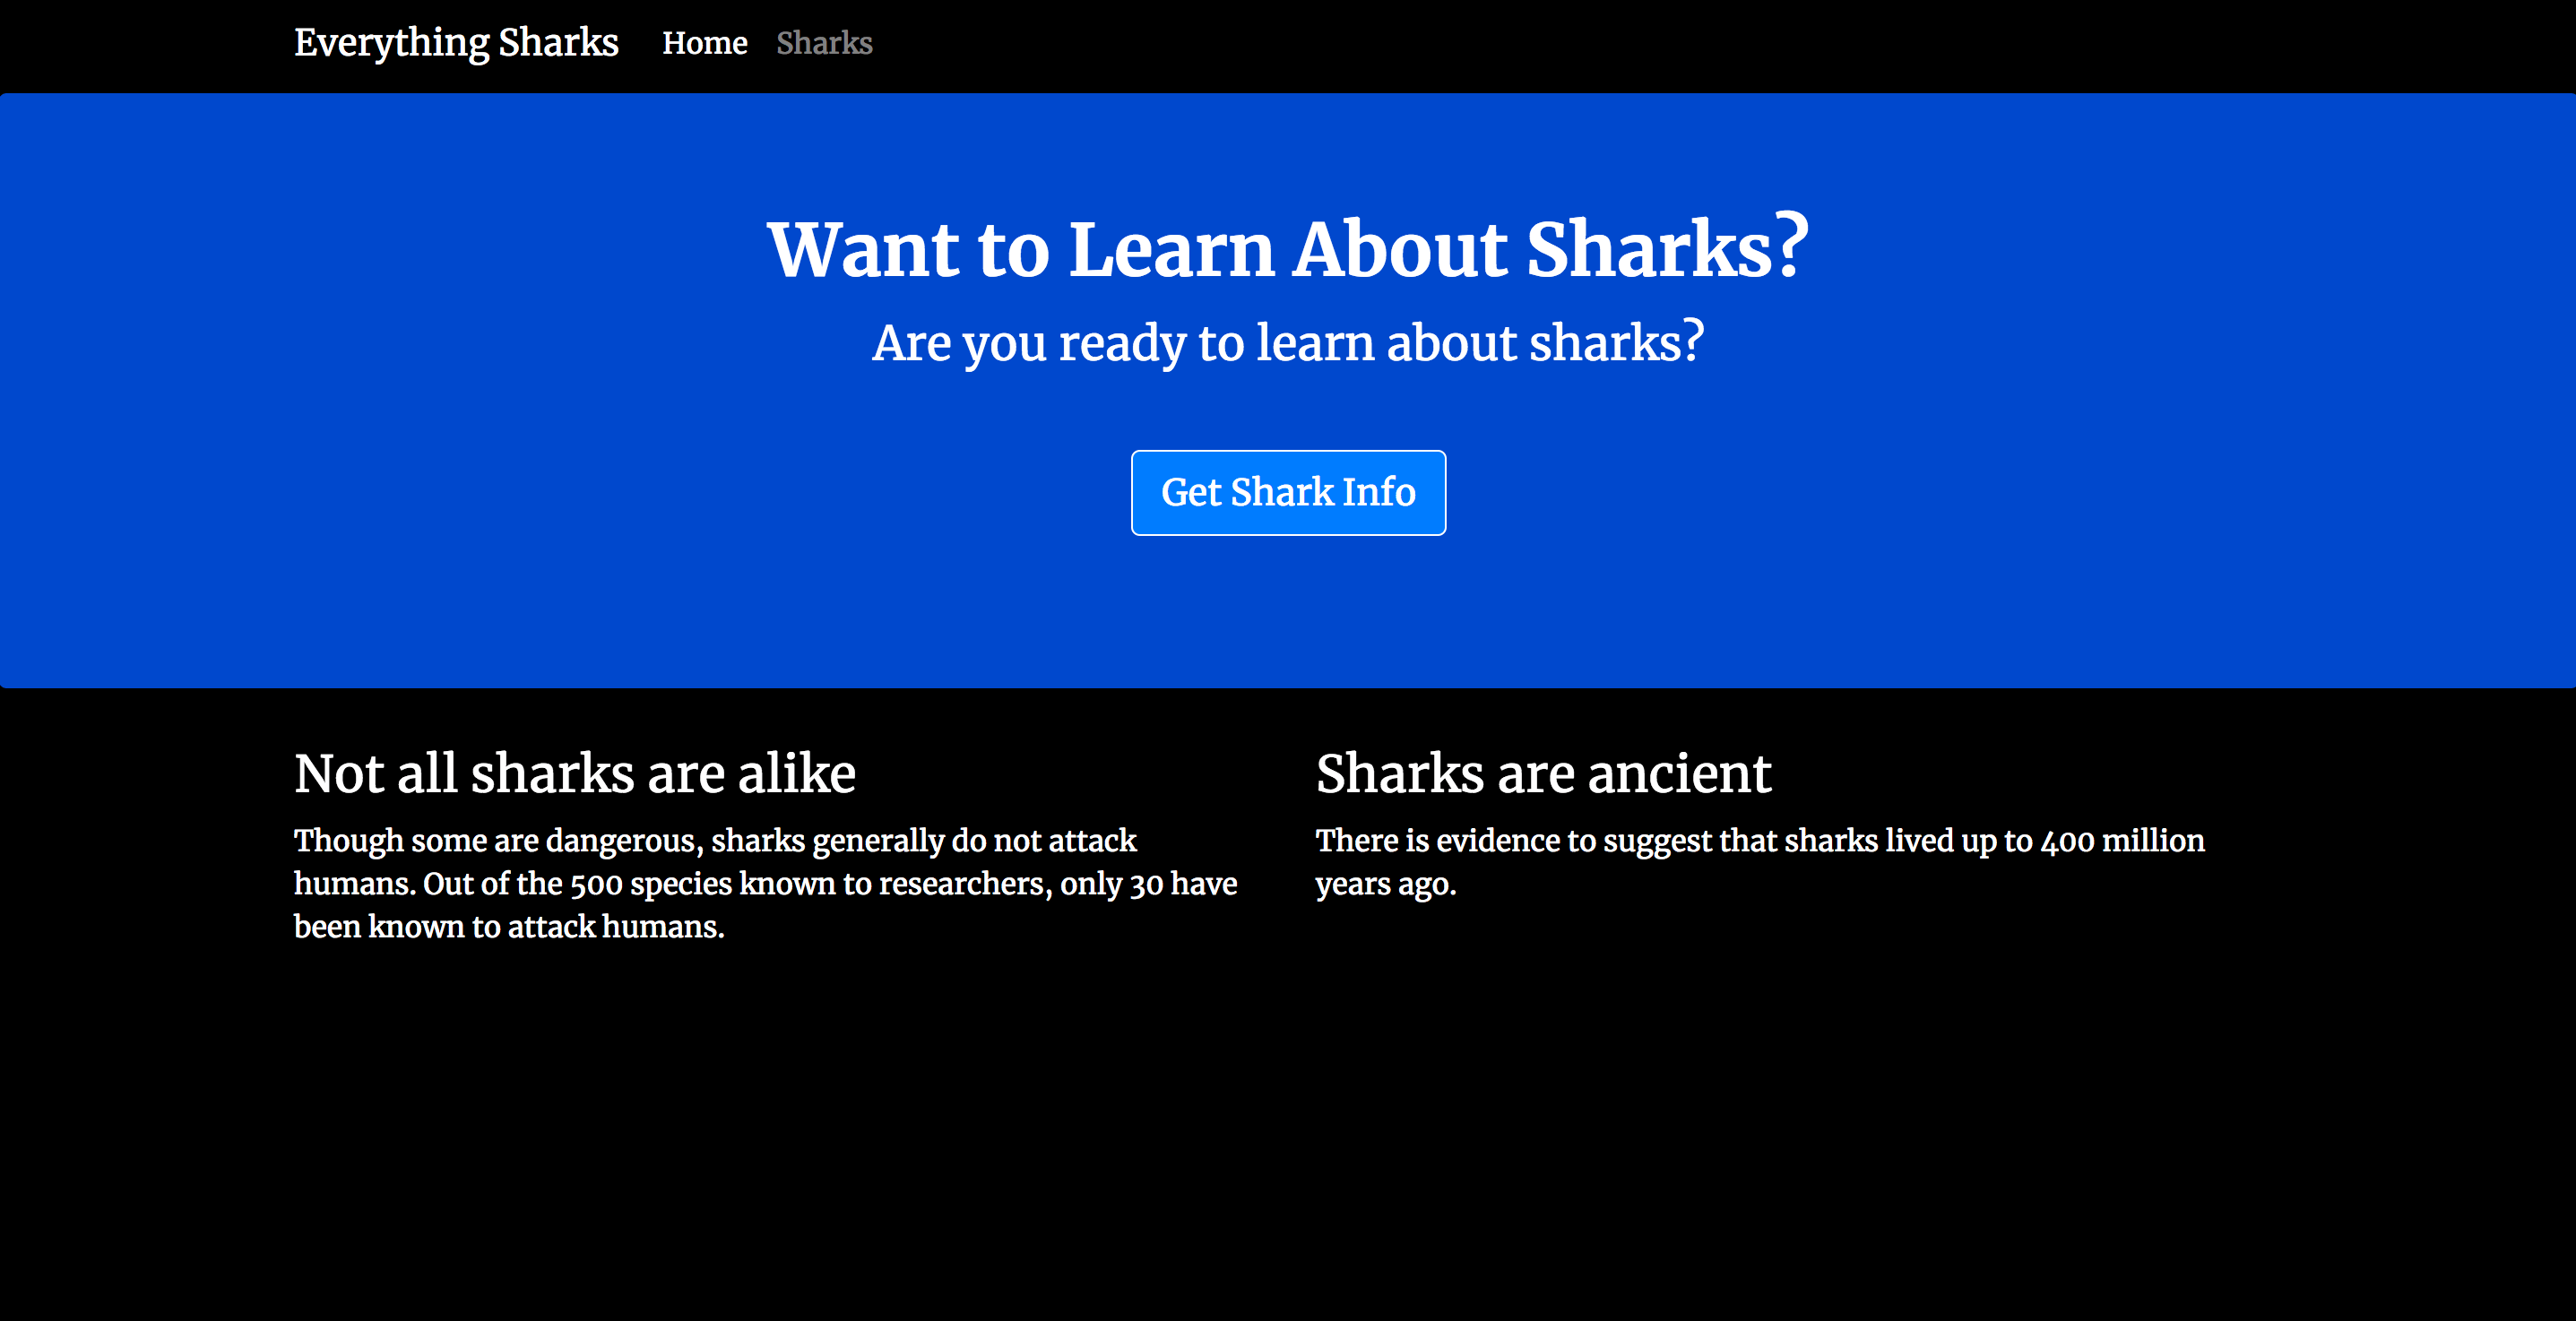
Click on the Get Shark Info button to enter a page with an entry form where you can submit a shark name and a description of that shark’s general character:

In the form, add a shark of your choosing. For the purpose of this demonstration, add Megalodon Shark to the Shark Name field, and Ancient to the Shark Character field:
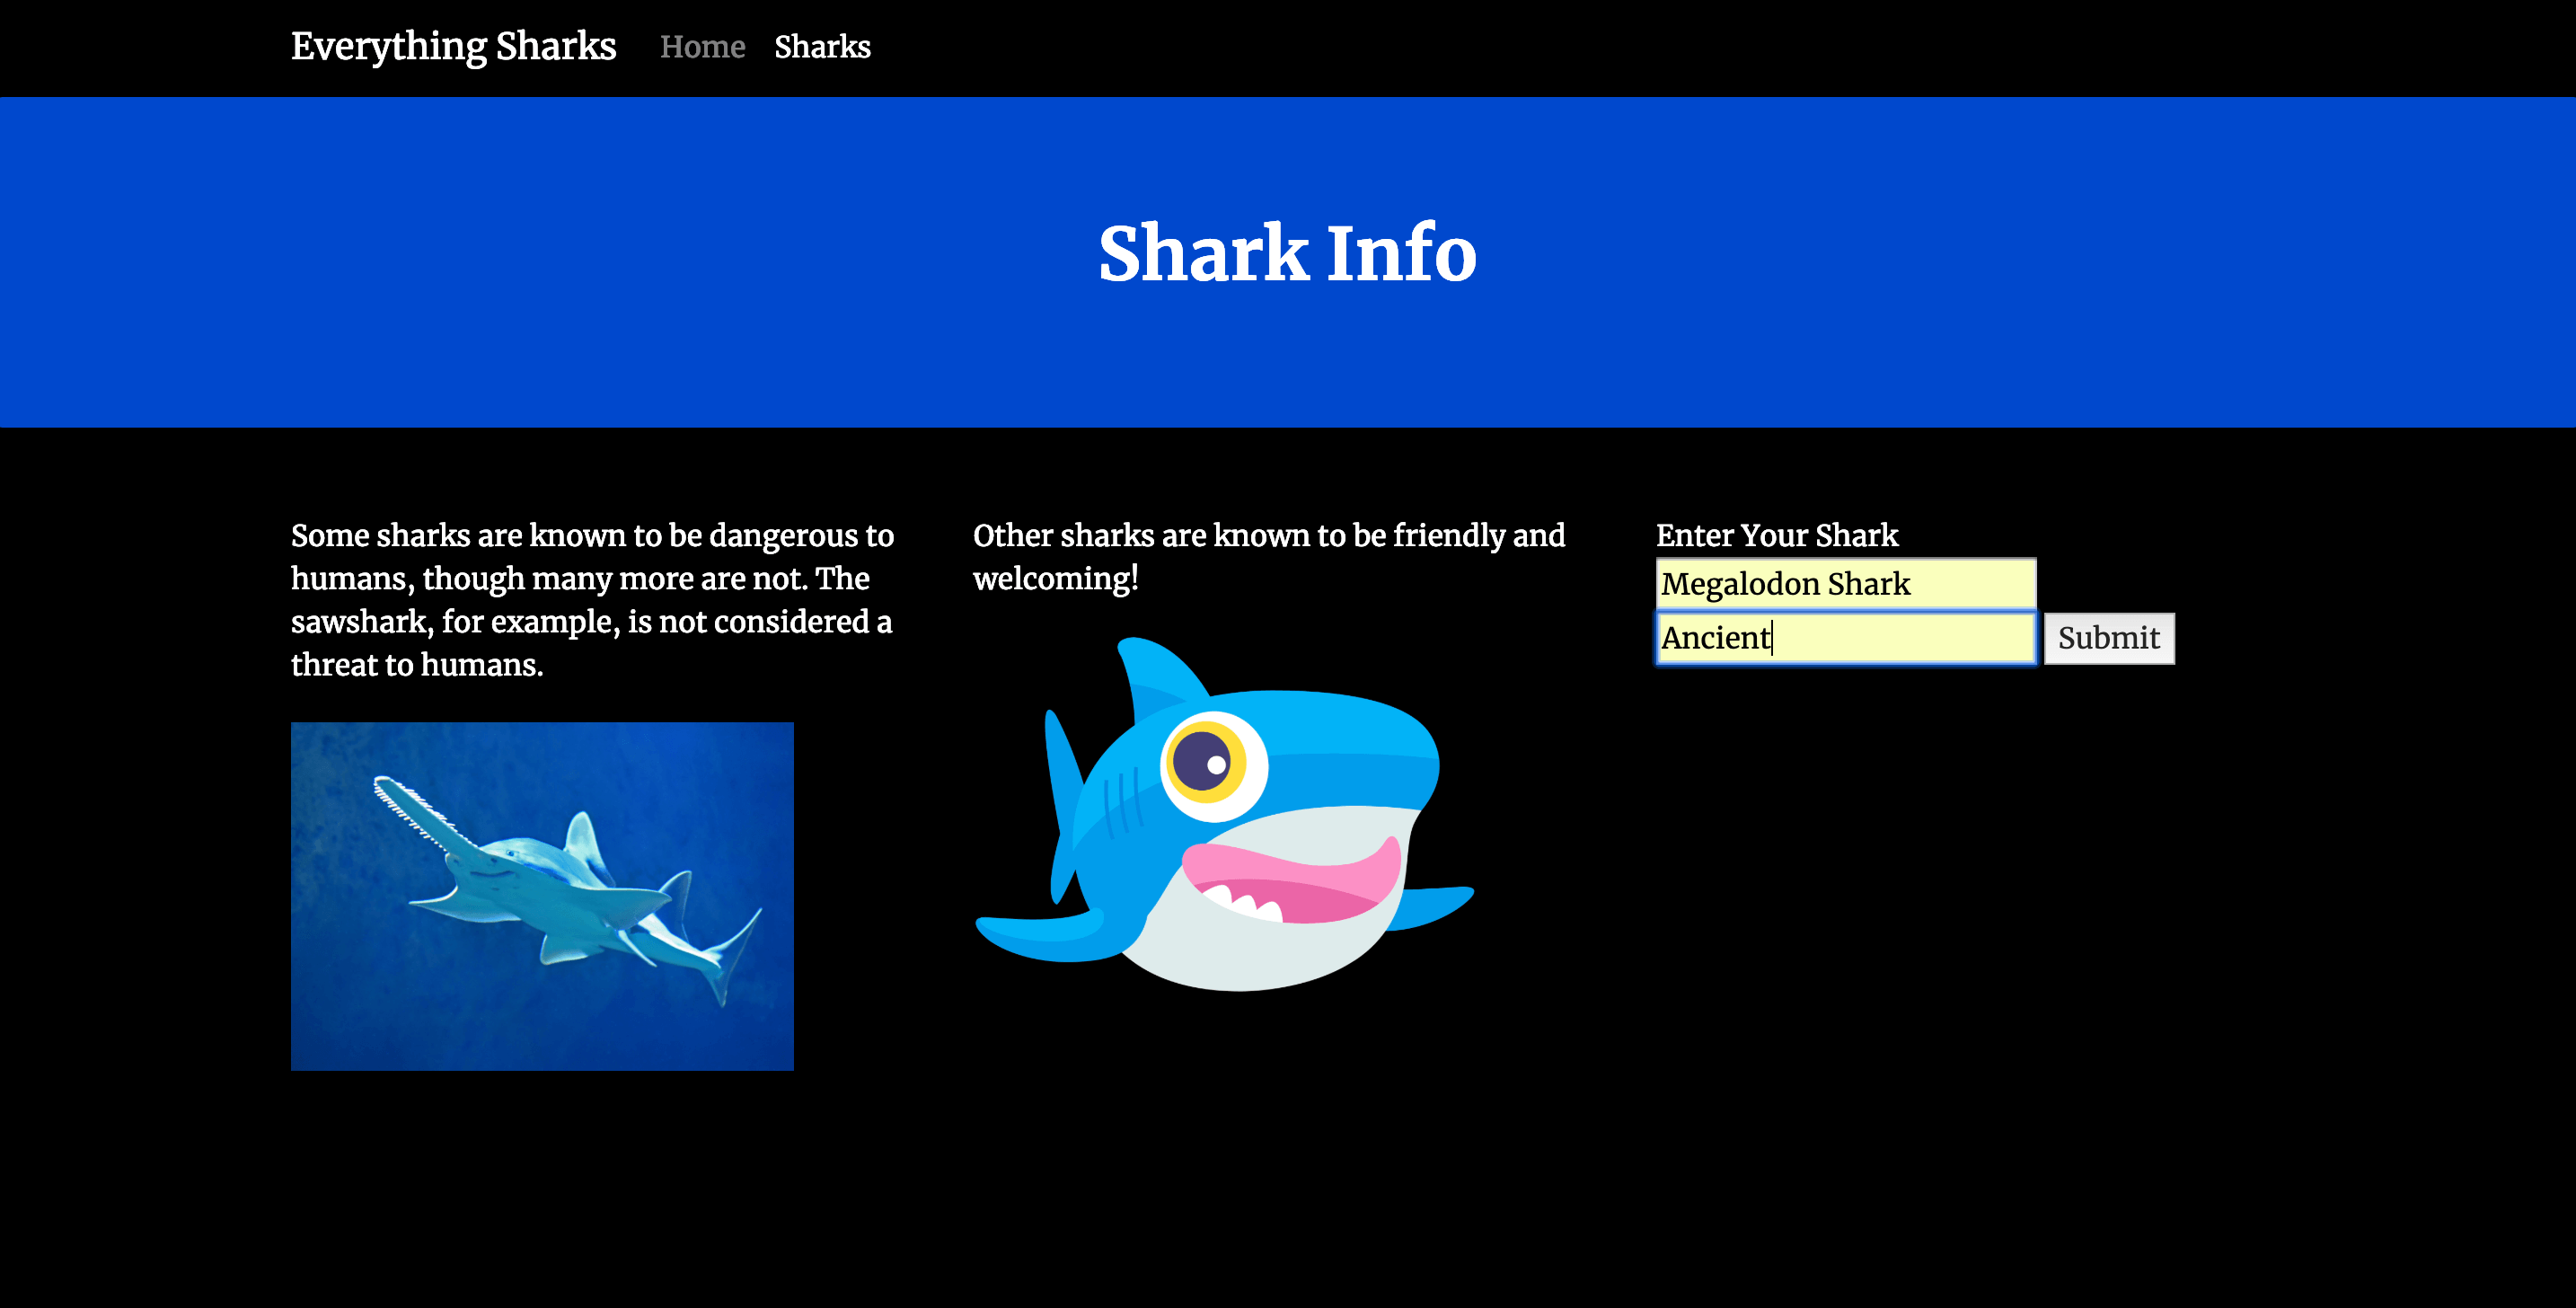
Click on the Submit button and a page with this shark information will be displayed back to you:

As a final step, test that the data you’ve just entered will persist if you remove your database container.
Back at your terminal, type the following command to stop and remove your containers and network:
- docker-compose down
Note that you are not including the --volumes option; hence, your dbdata volume is not removed.
The following output confirms that your containers and network have been removed:
OutputStopping nodejs ... done
Stopping db     ... done
Removing nodejs ... done
Removing db     ... done
Removing network node_project_app-network
Recreate the containers:
- docker-compose up -d
Now head back to the shark information form:
Enter a new shark of your choosing. This example will use Whale Shark and Large:
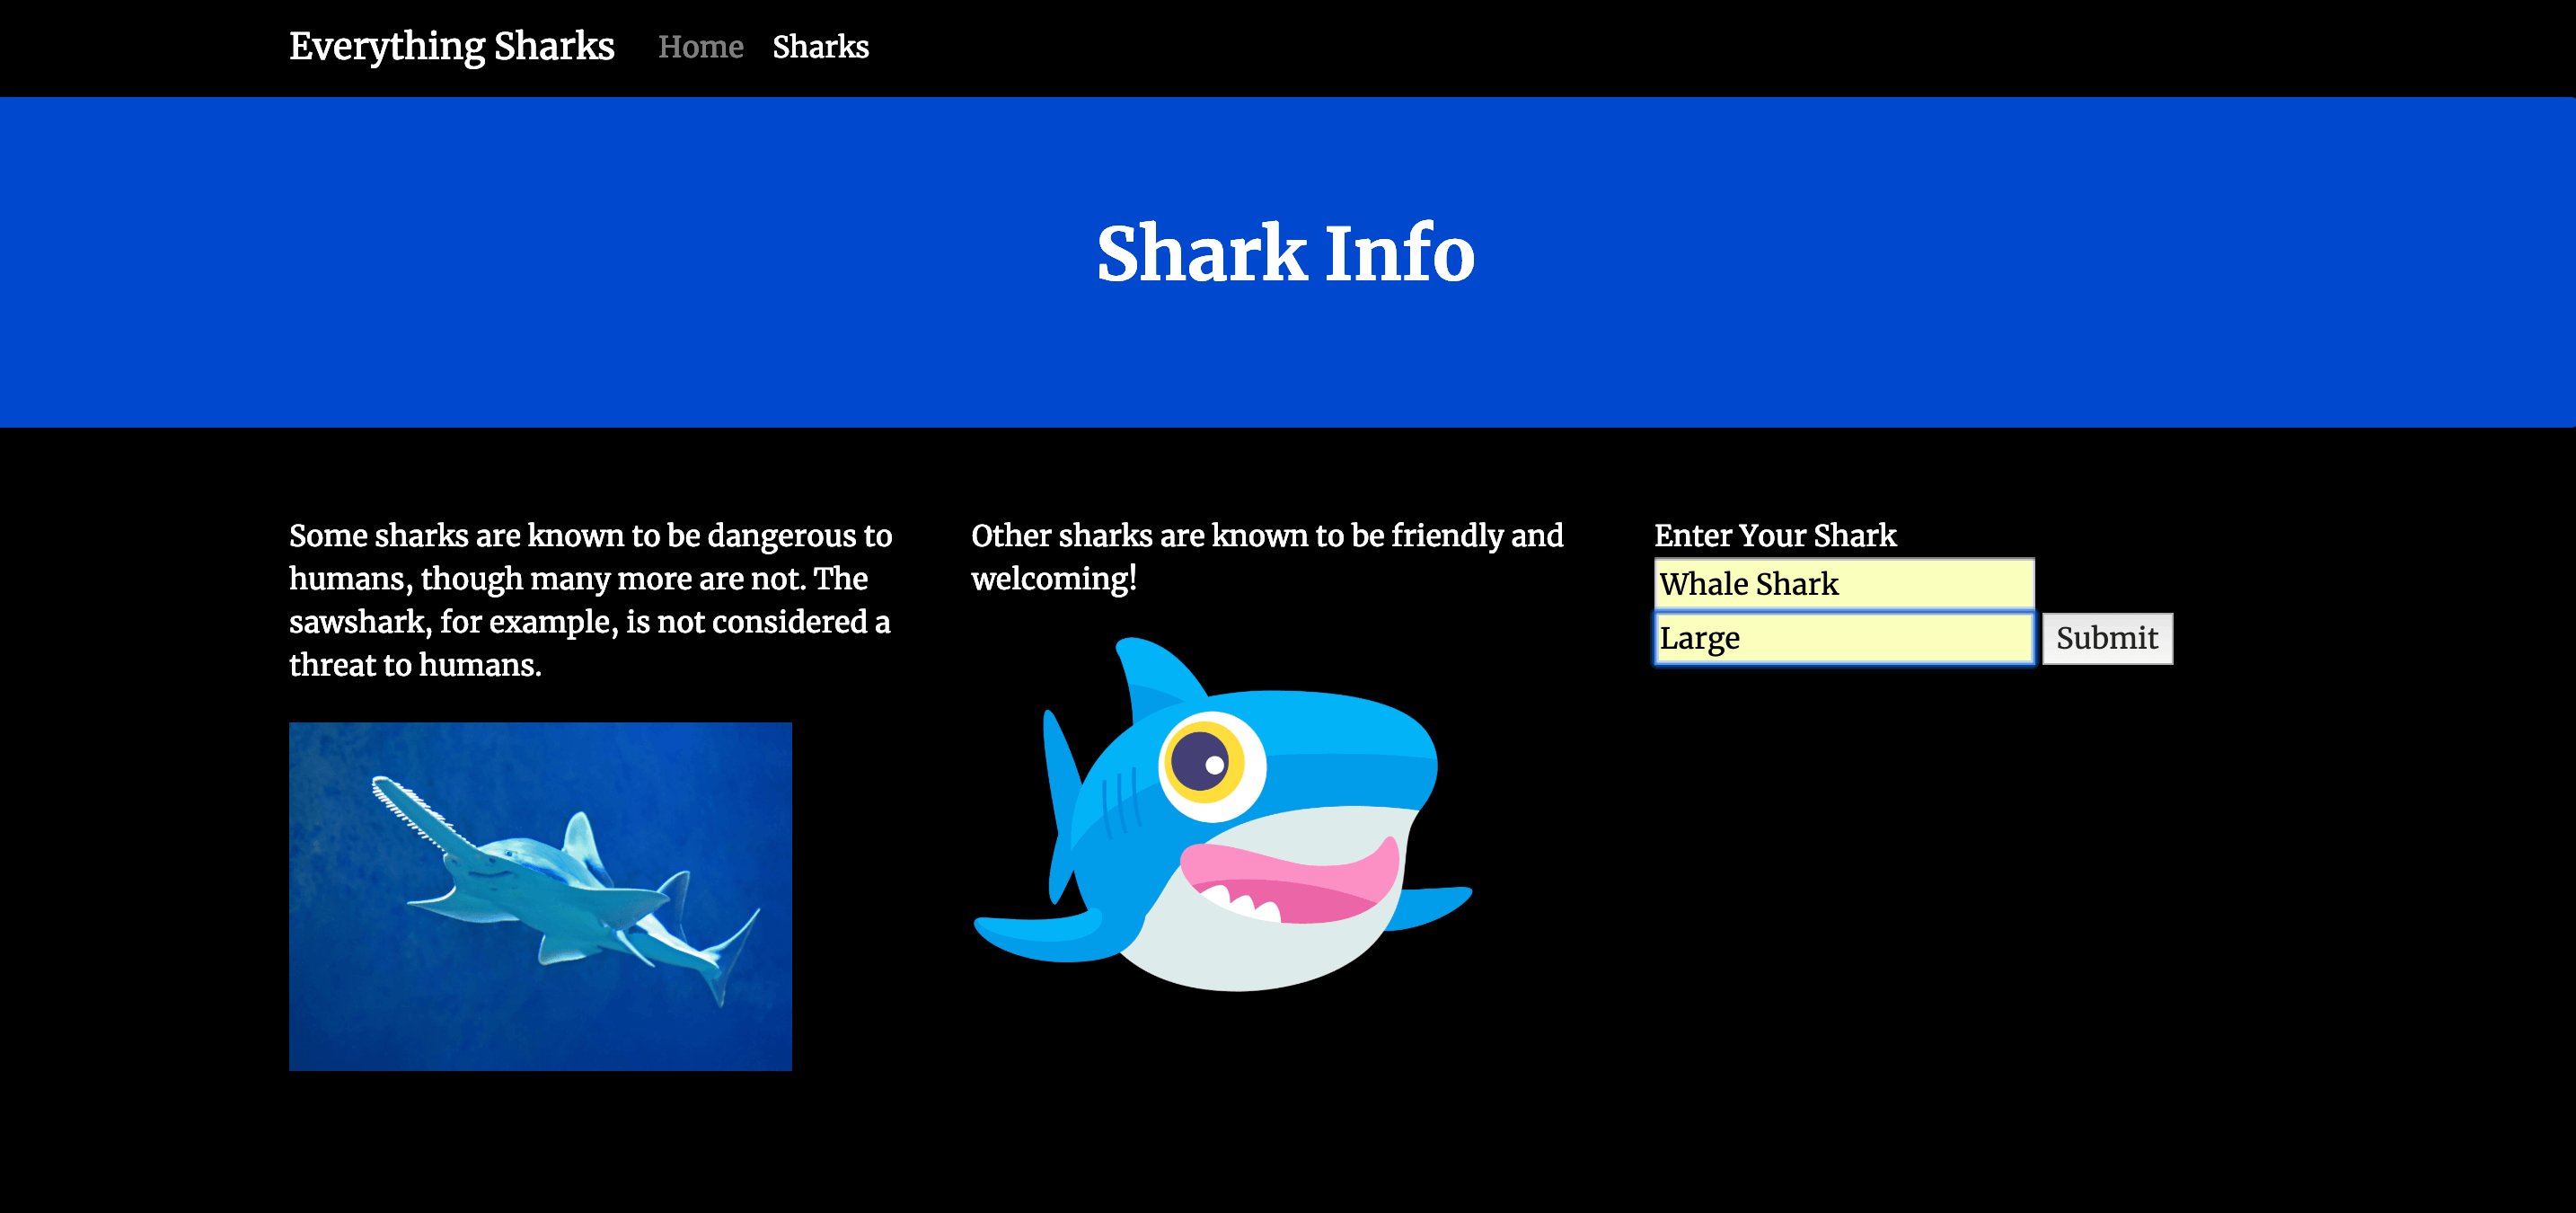
Once you click Submit, you notice that the new shark has been added to the shark collection in your database without the loss of the data you’ve already entered:
Your application is now running on Docker containers with data persistence and code synchronization enabled.
Conclusion
By following this tutorial, you have created a development setup for your Node application using Docker containers. You’ve made your project more modular and portable by extracting sensitive information and decoupling your application’s state from your application code. You have also configured a boilerplate docker-compose.yml file that you can revise as your development needs and requirements change.
As you develop, you may be interested in learning more about designing applications for containerized and Cloud Native workflows. Please see Architecting Applications for Kubernetes and Modernizing Applications for Kubernetes for more information on these topics.
To learn more about the code used in this tutorial, please see How To Build a Node.js Application with Docker and How To Integrate MongoDB with Your Node Application. For information about deploying a Node application with an Nginx reverse proxy using containers, please see How To Secure a Containerized Node.js Application with Nginx, Let’s Encrypt, and Docker Compose.
Thanks for learning with the DigitalOcean Community. Check out our offerings for compute, storage, networking, and managed databases.
Tutorial Series: From Containers to Kubernetes with Node.js
In this series, you will build and containerize a Node.js application with a MongoDB database. The series is designed to introduce you to the fundamentals of migrating an application to Kubernetes, including modernizing your app using the 12FA methodology, containerizing it, and deploying it to Kubernetes. The series also includes information on deploying your app with Docker Compose using an Nginx reverse proxy and Let’s Encrypt.
Browse Series: 7 tutorials
About the author
Former Developer at DigitalOcean community. Expertise in areas including Ubuntu, Docker, Ruby on Rails, Debian, and more.
Still looking for an answer?
This textbox defaults to using Markdown to format your answer.
You can type !ref in this text area to quickly search our full set of tutorials, documentation & marketplace offerings and insert the link!
Nodemon didn’t install correctly for me. Nodemon should be located inside the container after docker-compose up at /home/node/app/node_modules/.bin/nodemon… but that wasn’t the case for me.
I had to change the Dockerfile slightly: … #USER node
RUN npm install -g nodemon …
so I had to install nodemon as root user and inside the docker-compose file I had to changes this line: command: ./wait-for-it.sh db:27017 – /home/node/app/node_modules/.bin/nodemon app.js
to: command: ./wait-for-it.sh db:27017 – nodemon app.js
What did I do wrong?
Hello, Thank you for the step by step guide. I have question, have you created the sharkinfo database in the mongoDB or it be created at a runtime for the first time ? I am little confused here.
Great tutorial, worked on my Mac first time. I had some issues getting it to run on my DO droplet though. In the end I ended up removing the wait-for script as it was constantly timing out. This seemed to fix the problem but does raise the question of wehther there’s another way to ensure one container exists and is running OK before startign another?
Yet again, only Digital Ocean seems to know what they’re doing. Good job.
Hi. I am new to docker , i tried all the steps in
Ubuntu 20.04.1 LTS which comes in Windows 10 .
facing issue with wait-for.sh should Icreate a new folder called app and put wait-for.sh in that I tried different solutions which are suggested in the following comments nothing helped.
please help me. also if i can get working copies of all files it would be great… thanks in advance
in logs i see the following error
nodejs | Error: Cannot find module ‘/home/node/app/wait-for.sh’ nodejs | at Function.Module._resolveFilename (internal/modules/cjs/loader.js:636:15) nodejs | at Function.Module._load (internal/modules/cjs/loader.js:562:25) nodejs | at Function.Module.runMain (internal/modules/cjs/loader.js:831:12) nodejs | at startup (internal/bootstrap/node.js:283:19) nodejs | at bootstrapNodeJSCore (internal/bootstrap/node.js:623:3) nodejs | internal/modules/cjs/loader.js:638 nodejs | throw err;
Please help me resolve this , also
Thank you for this. It was really helpful. I was looking for the wait-for script. I made some modification for mine to work.
My node application is restarting due to a MongoDB connection issue
Also it’s ignoring the env variablese, I don’t know why.
WARNING: The MONGO_USERNAME variable is not set. Defaulting to a blank string.
WARNING: The MONGO_PASSWORD variable is not set. Defaulting to a blank string.
WARNING: The MONGO_HOSTNAME variable is not set. Defaulting to a blank string.
WARNING: The MONGO_PORT variable is not set. Defaulting to a blank string.
WARNING: The MONGO_DB variable is not set. Defaulting to a blank string.
Building app-backend
Sending build context to Docker daemon   25.6kB
Step 1/9 : FROM node:16-alpine3.15
 ---> e5065cc78074
Step 2/9 : RUN mkdir -p /home/node/app/node_modules && chown -R node:node /home/node/app
 ---> Using cache
 ---> aa3c6b63fb61
Step 3/9 : WORKDIR /home/node/app
 ---> Using cache
 ---> 3bf3afc66093
Step 4/9 : COPY package*.json ./
 ---> Using cache
 ---> e79f75aa697d
Step 5/9 : USER node
 ---> Using cache
 ---> fa1b0379903d
Step 6/9 : RUN npm install
 ---> Using cache
 ---> faf760614534
Step 7/9 : COPY --chown=node:node . .
 ---> Using cache
 ---> 8d6757ff9cd2
Step 8/9 : EXPOSE 3001
 ---> Using cache
 ---> 94cb261046d4
Step 9/9 : CMD [ "node", "app.js" ]
 ---> Using cache
 ---> c89a495bd7a3
Successfully built c89a495bd7a3
Successfully tagged nodejs:latest
db is up-to-date
and logs:
db             | {"t":{"$date":"2022-05-17T12:44:55.349+00:00"},"s":"I",  "c":"NETWORK",  "id":22943,   "ctx":"listener","msg":"Connection accepted","attr":{"remote":"172.26.0.2:44121","uuid":"cd846ef4-827d-42cc-bc4d-d2ab10eec75b","connectionId":8,"connectionCount":1}}
db             | {"t":{"$date":"2022-05-17T12:44:55.350+00:00"},"s":"I",  "c":"NETWORK",  "id":22944,   "ctx":"conn8","msg":"Connection ended","attr":{"remote":"172.26.0.2:44121","uuid":"cd846ef4-827d-42cc-bc4d-d2ab10eec75b","connectionId":8,"connectionCount":0}}


db             | {"t":{"$date":"2022-05-17T12:45:09.227+00:00"},"s":"I",  "c":"NETWORK",  "id":22943,   "ctx":"listener","msg":"Connection accepted","attr":{"remote":"172.26.0.2:38405","uuid":"09789a17-4ee5-4974-83e8-6b167026af18","connectionId":9,"connectionCount":1}}
db             | {"t":{"$date":"2022-05-17T12:45:09.228+00:00"},"s":"I",  "c":"NETWORK",  "id":22944,   "ctx":"conn9","msg":"Connection ended","attr":{"remote":"172.26.0.2:38405","uuid":"09789a17-4ee5-4974-83e8-6b167026af18","connectionId":9,"connectionCount":0}}
app-backend exited with code 0
db             | {"t":{"$date":"2022-05-17T12:45:35.831+00:00"},"s":"I",  "c":"NETWORK",  "id":22943,   "ctx":"listener","msg":"Connection accepted","attr":{"remote":"172.26.0.2:38987","uuid":"83b207d0-6320-4bfa-a366-b6abf92cb9cb","connectionId":10,"connectionCount":1}}
db             | {"t":{"$date":"2022-05-17T12:45:35.832+00:00"},"s":"I",  "c":"NETWORK",  "id":22944,   "ctx":"conn10","msg":"Connection ended","attr":{"remote":"172.26.0.2:38987","uuid":"83b207d0-6320-4bfa-a366-b6abf92cb9cb","connectionId":10,"connectionCount":0}}
app-backend    |   Usage: nodemon [nodemon options] [script.js] [args]
app-backend    |
app-backend    |   See "nodemon --help" for more.
app-backend    |
db             | {"t":{"$date":"2022-05-17T12:45:37.291+00:00"},"s":"I",  "c":"STORAGE",  "id":22430,   "ctx":"Checkpointer","msg":"WiredTiger message","attr":{"message":"[1652791537:290911][1:0x7f9052ab0700], WT_SESSION.checkpoint: [WT_VERB_CHECKPOINT_PROGRESS] saving checkpoint snapshot min: 3, snapshot max: 3 snapshot count: 0, oldest timestamp: (0, 0) , meta checkpoint timestamp: (0, 0) base write gen: 146"}}
^CERROR: Aborting.
I had to map to port 3001 if I wanted it to got right
Creating nodejs ...
Creating nodejs ... error

ERROR: for nodejs  Cannot start service nodejs: driver failed programming external connectivity on endpoint nodejs (49bdef517fe513c800c0c2233a4103df9a858a691b4b732e89fd5748f6a4938b): Error starting userland proxy: error while calling PortManager.AddPort(): cannot expose privileged port 80, you can aCreating db     ... done
r port number (>= 1024): listen tcp4 0.0.0.0:80: bind: permission denied

ERROR: for nodejs  Cannot start service nodejs: driver failed programming external connectivity on endpoint nodejs (49bdef517fe513c800c0c2233a4103df9a858a691b4b732e89fd5748f6a4938b): Error starting userland proxy: error while calling PortManager.AddPort(): cannot expose privileged port 80, you can add 'net.ipv4.ip_unprivileged_port_start=80' to /etc/sysctl.conf (currently 1024), or set CAP_NET_BIND_SERVICE on rootlesskit binary, or choose a larger port number (>= 1024): listen tcp4 0.0.0.0:80: bind: permission denied
ERROR: Encountered errors while bringing up the project.
 This work is licensed under a Creative Commons Attribution-NonCommercial- ShareAlike 4.0 International License.
Become a contributor for community
Get paid to write technical tutorials and select a tech-focused charity to receive a matching donation.

DigitalOcean Documentation
Full documentation for every DigitalOcean product.

Resources for startups and AI-native businesses
The Wave has everything you need to know about building a business, from raising funding to marketing your product.
The developer cloud
Scale up as you grow — whether you're running one virtual machine or ten thousand.

Start building today
From GPU-powered inference and Kubernetes to managed databases and storage, get everything you need to build, scale, and deploy intelligent applications.
