By Adrien Payong and Shaoni Mukherjee

Introduction
In many machine learning pipelines, the amount and quality of the training data are the ultimate factor determining the quality of the model. However, it is often expensive and time‑consuming to collect large and diverse datasets, especially when labels require expert annotation. A common and elegant approach to this problem is to create modified versions of the existing data, a process known as data augmentation.
In this article, we aim to provide an expert‑level overview of data augmentation for image, text, and audio data. We will cover transformation methods, automated policy search approaches, synthetic data generation using GANs, and advanced techniques for small or imbalanced datasets. A comparison table of data augmentation Python libraries will help you choose the right tool for the task. The key concepts (color jittering, Gaussian noise, and more) will be highlighted and explained.
Key Takeaways
- Data augmentation is a technique that expands the training dataset using transformed copies, enabling the model to generalize better and reduce overfitting. It is important in deep learning for computer vision, NLP, and audio tasks, where obtaining and annotating data is challenging.
- In image augmentation, simple transformations like flipping, rotation, cropping, color jittering, and adding noise can improve the vision model’s robustness to variations in input data.
- Techniques such as synonym replacement, random insertion, or back-translation can improve NLP performance. Adding noise, time-stretching, or pitch-shifting can help train more robust speech or sound recognition models.
- AutoAugment and RandAugment use reinforcement learning or random search to find augmentation policies. GANs or simulators can generate completely new data samples for tasks where little data is available or you have a highly imbalanced dataset.
- Implementing data augmentation in Python can be more convenient and efficient through specialized libraries such as Albumentations, NLPAug, etc., depending on the type of data and deep learning framework you are using. You can integrate the select augmentation library into the data loading and preprocessing pipeline. That way, each data batch will be automatically transformed on-the-fly during training. Alternatively, you can also pre-generate the augmented data and save it to disk for faster access.
- Monitor the model performance and the impact of data augmentation to find the right balance and combination of augmentations that improve validation accuracy and prevent overfitting.
Why use data augmentation?
- Using data augmentation techniques, you can create a larger and more diverse dataset. Useful if there is limited or imbalanced data.
- It acts as a form of regularization to reduce overfitting by providing more variations to the model.
- It helps your model be more robust to perturbations and noise in the input.
- You can incorporate domain knowledge by simulating real-world transformations (e.g., rotations of objects, paraphrasing text).
Image Augmentation Techniques
Image augmentation has a long history in computer vision tasks like classification, object detection, and segmentation. Below, we explore some basic and more advanced augmentations.
Geometric Transformations
- Flipping and Rotation: Random horizontal or vertical flips and rotations (e.g., ±90°, small random angles) are common as they preserve the object identity while offering orientation diversity.
- Cropping and Rescaling: Random cropping is used to train the model to focus on different parts of an image. Rescaling (zooming in or out) is used to simulate different distances.
- Shearing and Perspective Transformations: Small shears or perspective warps can mimic a slight tilt in the camera or a change in the camera’s point of view.
Photometric Transformations
- Color Jittering: A color jittering operation will randomly adjust brightness, contrast, saturation, and hue.
- Gaussian Noise: Adding noise sampled from a Gaussian distribution can make the models robust to sensor noise or compression artifacts.
- Blur and Sharpening: Applying a Gaussian blur or a sharpening filter can simulate variations in focus.
- Cutout or Random Erasing: Masks out random square patches of the image to encourage the model to focus more on the global context.
Setting Up an Augmentation Pipeline
We usually perform image augmentations in Python using packages such as Albumentations or Torchvision. Albumentations is a fast and flexible library that supports a large number of transforms (rotations, flips, color jitter, advanced methods like CutMix, etc.) and works well with NumPy/PyTorch. Torchvision offers many common transforms from torchvision.transforms and integrates directly with PyTorch dataset objects.
Load a dataset sample
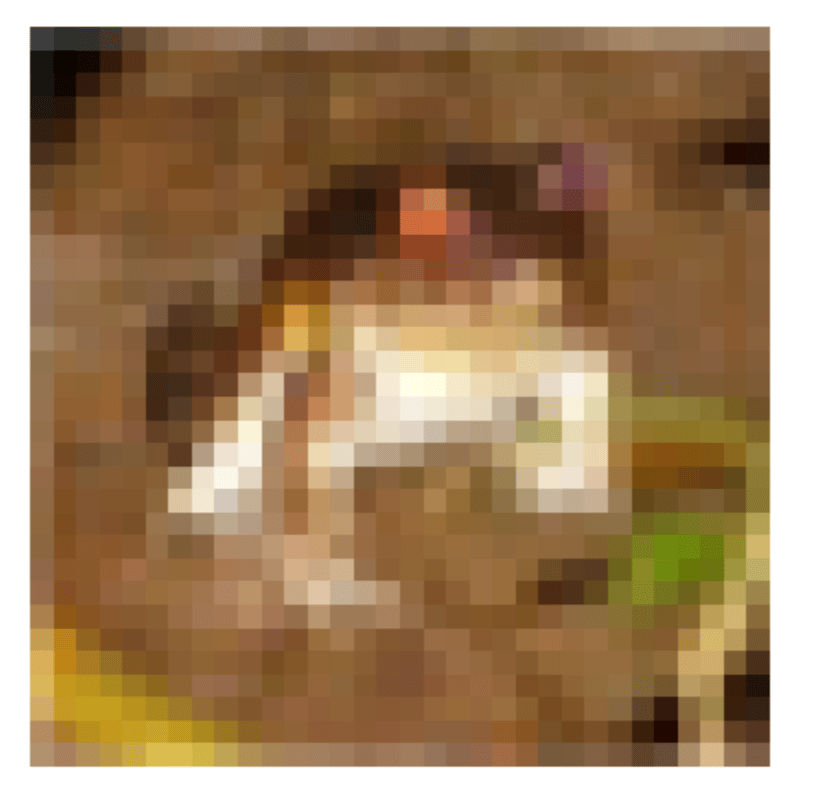
For example, using PyTorch, one can load CIFAR-10 and get an image:
from torchvision import datasets
import matplotlib.pyplot as plt
import numpy as np

# Download CIFAR-10 and get the first image and label
cifar = datasets.CIFAR10(root='./data', download=True)
img, label = cifar[0]  # PIL image and class index

# Display the image inline
plt.imshow(np.array(img))
plt.axis('off')
plt.show()
Output:
Define augmentations We’ll create a transform pipeline. For instance, using Albumentations to compose a random crop, horizontal flip, and color jitter: This pipeline will randomly crop the image to 80-100% of its area, resize to 32×32, sometimes flip it, and randomly adjust brightness/contrast/saturation/hue.
# If needed:
# pip install torchaudio audiomentations
import albumentations as A
from albumentations.pytorch import ToTensorV2

transform = A.Compose([
    A.RandomResizedCrop(size=(32, 32), scale=(0.8, 1.0)),  # random crop & resize
    A.HorizontalFlip(p=0.5),                                    # 50% chance horizontal flip
    A.ColorJitter(brightness=0.3, contrast=0.3, saturation=0.3, hue=0.1, p=0.7),  # random color jitter
    ToTensorV2()  # convert to PyTorch tensor
])
Apply and visualize augmentations. It’s often helpful to see augmented results for sanity-check:
import numpy as np
import matplotlib.pyplot as plt
from PIL import Image

augmented = transform(image=np.array(img))['image']  # apply transforms
aug_img = Image.fromarray(augmented.permute(1,2,0).numpy().astype('uint8'))  # tensor to PIL
# Show side by side
plt.subplot(1,2,1); plt.imshow(img); plt.title("Original")
plt.subplot(1,2,2); plt.imshow(aug_img); plt.title("Augmented")
plt.show()
Output:
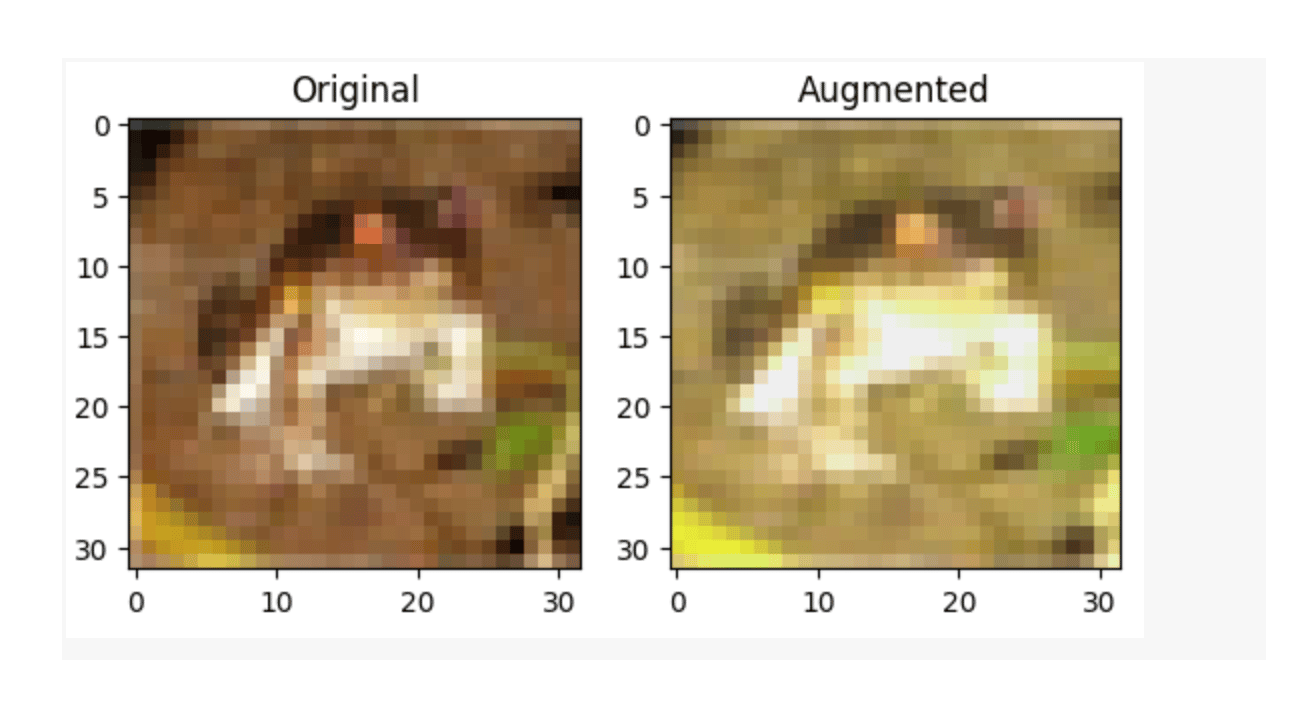
The left image is the raw, unaltered CIFAR-10 training sample, which acts as the ground truth for the model. The right image is a perturbed version of it (augmented using random crop, color jitter, or flip). It has a different spatial arrangement of pixels and color distribution, but preserves the same class label (“frog”).
Adding Gaussian Noise to Images
Deep learning models trained on clean datasets may not generalize well to noisy or low-quality real-world data, which can include effects such as blurriness, poor lighting conditions, or compression artifacts. A simple method to increase a model’s robustness to such conditions is to apply Gaussian noise augmentation to simulate this graininess during training.
Load and Prepare the Data
We’ll again load the first image from CIFAR-10 and convert it to a NumPy array for processing.
# If needed:
# pip install torchaudio audiomentations
from torchvision import datasets
import matplotlib.pyplot as plt
import numpy as np
import albumentations as A

# Download and load the first CIFAR-10 image
cifar = datasets.CIFAR10(root='./data', download=True)
img, label = cifar[0]
img_np = np.array(img)  # Convert PIL image to numpy array
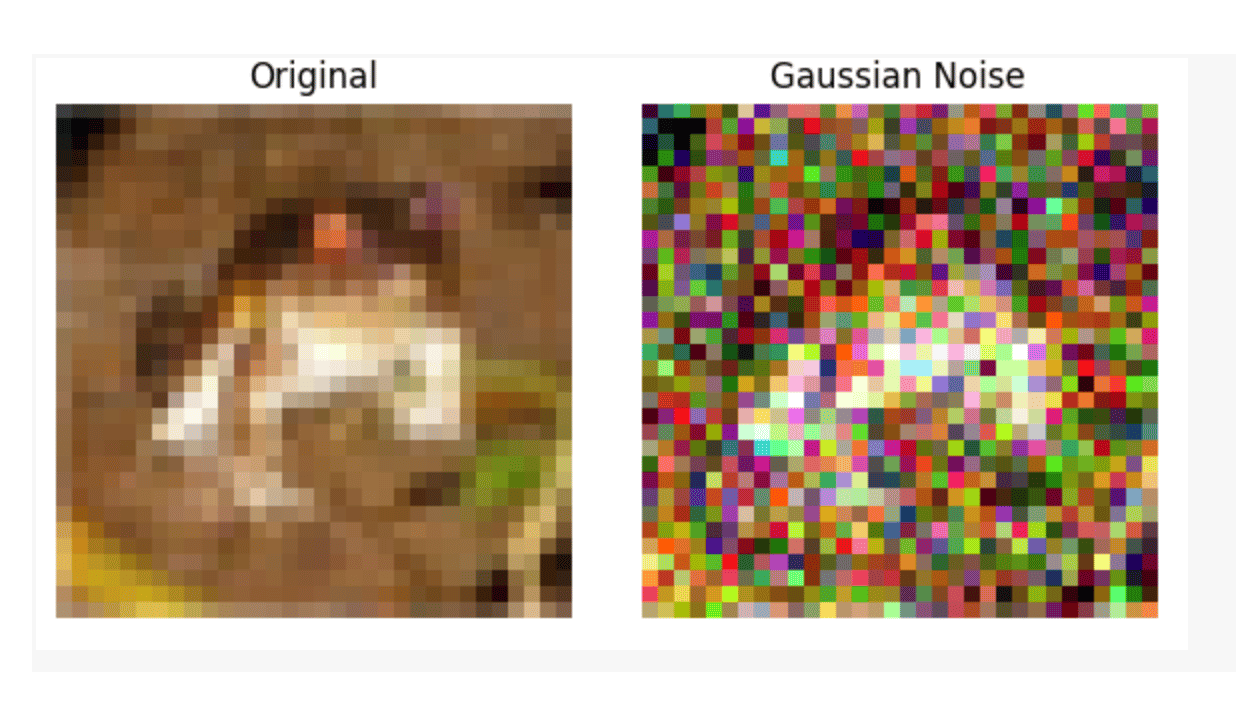
Apply Gaussian Noise Augmentation Albumentations make it easy to inject controlled random noise.
# Define the Gaussian noise augmentation
gauss_noise = A.Compose([
    A.GaussNoise(var_limit=(20.0, 50.0), mean=0, p=1.0)
])
# Apply the augmentation
noisy_img = gauss_noise(image=img_np)['image']
- var_limit=(20.0, 50.0) – This specifies the variance range for the Gaussian noise. The larger the variance, the more noise. In this case, the noise variance will be a random value between 20 and 50.
- mean=0 – The mean for the Gaussian distribution used to sample the noise. A value of 0 centers the noise around zero (equal chance to increase or decrease pixel brightness).
- p=1.0 – The probability of applying the transform. A value of 1.0 means the noise will always be applied to the image.
Display the Results Side-by-Side Let’s visualize the original and noisy images for comparison:
# Show original and noisy images
plt.figure(figsize=(6,3))
plt.subplot(1,2,1)
plt.imshow(img_np)
plt.title('Original')
plt.axis('off')

plt.subplot(1,2,2)
plt.imshow(noisy_img)
plt.title('Gaussian Noise')
plt.axis('off')

plt.tight_layout()
plt.show()
Output:
What’s Happening?
- Original: The original, clean image from CIFAR-10.
- Gaussian Noise: Random noise at the pixel level is added to the image. Think of grainy photos from a low-quality camera or poor lighting conditions.
Why Use Gaussian Noise?
- Improved Robustness: Training with noisy data forces models to learn to ignore irrelevant details, focusing on the essential ones.
- Better Generalization: These models are better at handling real-world, imperfect inputs, not just clean datasets.
Using Torchvision Transforms (Alternative)
Torchvision’s transforms can achieve similar effects using a composition of functions:
import torchvision.transforms as T
torchvision_transform = T.Compose([
    T.RandomResizedCrop(32, scale=(0.8,1.0)),
    T.RandomHorizontalFlip(p=0.5),
    T.ColorJitter(brightness=0.3, contrast=0.3, saturation=0.3, hue=0.1),
    T.ToTensor()
])
It is similar to the Albumentations pipeline above. Albumentations perform well with more powerful transforms (and support PyTorch or TensorFlow). Torchvision provides closer integration with PyTorch datasets and dataloaders.
Summary: Visualizing Data Augmentation on a CIFAR-10 Frog Image
In the following example, we start with a single CIFAR-10 image of a frog, then apply several augmentations (crop, flip, color jitter, noise).
from torchvision import datasets
import matplotlib.pyplot as plt
import numpy as np
import albumentations as A
import random

# Load first 10 images to find a frog
cifar = datasets.CIFAR10(root='./data', download=True)
frog_idx = [i for i, (_, l) in enumerate(cifar) if l == 6][0]  # label 6 is 'frog'
img, label = cifar[frog_idx]
img_np = np.array(img)

# Define several augmentation pipelines
augs = [
    ("Original", lambda x: x),
    ("Random Crop", A.Compose([A.RandomCrop(24, 24, p=1.0), A.Resize(32, 32)])),
    ("Horizontal Flip", A.Compose([A.HorizontalFlip(p=1.0)])),
    ("Color Jitter", A.Compose([A.ColorJitter(brightness=0.8, contrast=0.8, saturation=0.8, hue=0.2, p=1.0)])),
    ("Gaussian Noise", A.Compose([A.GaussNoise(var_limit=(20.0, 50.0), mean=0, p=1.0)])),
]

# Apply augmentations
aug_imgs = []
for name, aug in augs:
    if name == "Original":
        aug_imgs.append((name, img_np))
    else:
        aug_imgs.append((name, aug(image=img_np)['image']))

# Display
plt.figure(figsize=(15,3))
for i, (name, im) in enumerate(aug_imgs):
    plt.subplot(1, len(aug_imgs), i+1)
    plt.imshow(im)
    plt.title(name)
    plt.axis('off')
plt.suptitle('CIFAR-10 "Frog": Original and Augmented Variations\n(Label always: "frog")')
plt.show()
Output:
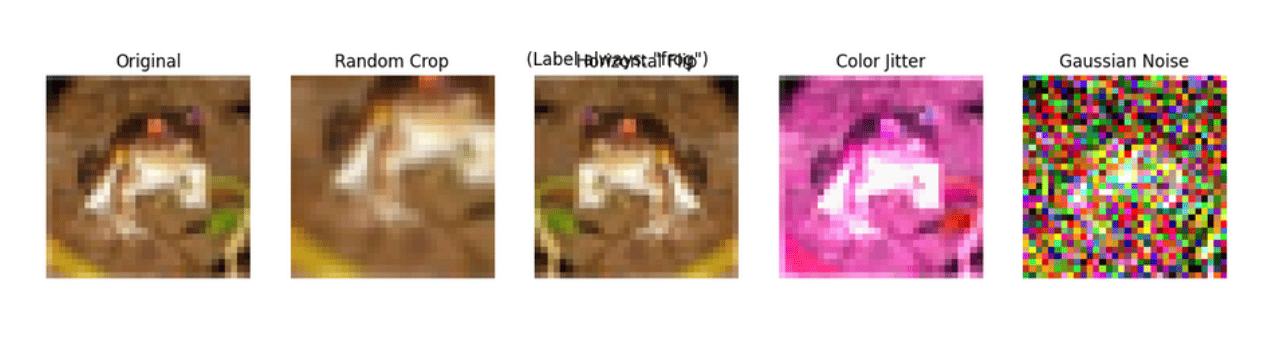
What this does:
- Find a frog image from CIFAR-10.
- Displays it along with several “augmented variations” (crop, flip, color, noise).
- The label is always “frog” - the variations help your model learn to recognize frogs in diverse conditions.
By applying a few variations to each training image (often every epoch), we can increase the dataset size. This was critical even in classic vision models – the original ImageNet CNNs, for example, were trained with random crops/flips to improve their performance.
Specialized Augmentations (Rotation, Shear, etc.)
Standard image classification augmentations (flips, crops) operate under the assumption that the image label remains the same. For tasks such as object detection, transformations like rotation or shearing also need to be applied to bounding box coordinates. Let’s consider that you have an image of a car with a bounding box. If you rotate the image, you must rotate the box coordinates accordingly. Rotation and shearing can help a detection model to identify objects from different angles and perspectives. For a hands-on guide to augmenting images and bounding boxes via rotation/shear, see this tutorial on rotation and shearing for object detection models.
Text Data Augmentation
Augmenting text is more complex than augmenting images because if you change some words, you might get a sentence that means something else or is not grammatically correct. With NLP tasks like sentiment analysis or intent classification, you can improve performance with text augmentation when dealing with small or imbalanced text datasets. Suppose we have a dataset of customer reviews for sentiment analysis. One review in the dataset could be: Original: “The phone case is great and durable. I absolutely love it.”
This is a positive review. We can create augmented versions:
- Synonym Replacement: Replace some words with synonyms of similar sentiment or meaning.
- Random Insertion/Deletion: Add or remove a word that does not change the sentiment to the opposite.
- Back-Translation: Translate to French and back to English (for example), to get a rephrased sentence.
For example, let’s do a synonym replacement on the above sentence. We can use the NLPAug library (works with WordNet-based synonym augmentation) or TextAttack for more advanced augmentation. Using NLPAug:
# import nltk
# nltk.download('averaged_perceptron_tagger_eng')
pip install nlpaug  # (install nlpaug if not already)
import nlpaug.augmenter.word as naw
augmenter = naw.SynonymAug(aug_src='wordnet', stopwords=['I'])  # use WordNet synonyms
text = "The phone case is great and durable. I absolutely love it."
aug_text = augmenter.augment(text)
print("Augmented:", aug_text)
(Stopwords like “I” are excluded from augmentation to preserve sentence structure.)
The augmented sentence might look like:
Augmented: “The telephone set case live neat and durable. I perfectly love it.”
These changes retain the positive sentiment and basic meaning. By generating many such variants, we effectively teach our NLP model that neat*/perfectly* conveys similar sentiment as the original words, making it more robust in understanding varied expressions.
Using TextAttack Framework TextAttack is an adversarial attack framework that also supports data augmentation. It provides augmenters that perform contextual word replacements (such as BERT or other language models), which can result in more fluent augmentations than simple thesaurus replacements. For instance:
# Step 1: Install the library (if not already installed)
pip install textattack

# Step 2: Import the necessary class
from textattack.augmentation import WordNetAugmenter

# Step 3: Instantiate the augmenter
augmenter = WordNetAugmenter()

# Step 4: Define the input text (this was the missing part)
text = "I was billed twice for the service and this is the second time it has happened"

# Step 5: Augment the text and print the result
augmented_texts = augmenter.augment(text)
print(augmented_texts)
Output:
[‘I was billed twice for the service and this is the irregular time it has happened’]
TextAttack also provides EDA (Easy Data Augmentation) methods (random swap, insert, delete) and more, like BackTranslationAugmenter. One key benefit is the ability to leverage language models for contextual augmentation (e.g., replace a word with another that is more appropriate for the context).
We may want to apply augmentation to normalize slang or mistyped words in some inputs. For example, for the tweet `I luv this phone case`, we might generate the augmentations `I love this phone case` (normalizing the spelling) or `I really luv this phone case` (insertion). Augmentations can be used to expose the model to perturbations of the inputs, which include misspellings or other colloquialisms.
For more on NLP augmentation and adversarial training, check out tutorials related to TextAttack for NLP Data Augmentation and Enhancing NLP Models for Robustness Against Adversarial Attacks. They introduce the TextAttack framework and techniques such as adversarial training with augmented text data.
Audio Data Augmentation
Similar to images and text, we can augment audio data (speech, environmental sounds, etc). Common useful augmentations for audio include noise injection, time shift, time stretch, pitch shift, volume perturbation, and more. Suppose we have an audio clip. We can augment it in many ways:
- Background Noise: Add in Gaussian noise (play a quiet background sound) behind the speech signal (simulates a noisy environment).
- Time Shift: Cut a small slice of the beginning of the waveform and append it to the end (or vice versa) to shift the waveform in time.
- Time Stretch: The audio plays faster or slower, without affecting the pitch (or it may change pitch as a side effect, depending on the method).
- Pitch Shift: Alter the pitch of the audio without affecting the duration.
- Volume Perturbation: Increase or decrease the overall volume.
The following code provides an example usage of Gaussian noise, time stretching, and pitch shifting applied to an audio waveform. The sample audio comes from an open-access torchaudio tutorial asset.
# If needed:
# pip install torchaudio audiomentations
from audiomentations import Compose, AddGaussianNoise, TimeStretch, PitchShift, Shift
import numpy as np
import matplotlib.pyplot as plt
import torchaudio
import torch

# ---- Load an open sample (torchaudio tutorial asset) ----
waveform, sample_rate = torchaudio.load(
    torchaudio.utils.download_asset("tutorial-assets/steam-train-whistle-daniel_simon.wav")
)
samples = waveform.numpy()[0]  # mono


# ---- Audiomentations pipeline without Shift ----
augment = Compose([
    AddGaussianNoise(min_amplitude=0.001, max_amplitude=0.015, p=0.5),
    TimeStretch(min_rate=0.8, max_rate=1.25, p=0.5),       # speed change
    PitchShift(min_semitones=-4, max_semitones=4, p=0.5),  # pitch change
])

aug_samples = augment(samples=samples, sample_rate=sample_rate)
## aug_samples = random_time_shift(aug_samples, (-0.1, 0.1))  # apply shift robustly

# ---- Plot waveforms ----
plt.figure(figsize=(12, 4))
plt.subplot(1, 2, 1)
plt.title("Original")
plt.plot(samples)
plt.xlabel("Samples")

plt.subplot(1, 2, 2)
plt.title("Augmented (stretch/pitch + shift)")
plt.plot(aug_samples)
plt.xlabel("Samples")

plt.tight_layout()
plt.show()
# ---- Save WAVs for offline listening ----
torchaudio.save("original.wav", torch.from_numpy(samples).unsqueeze(0), sample_rate)
torchaudio.save("augmented.wav", torch.from_numpy(aug_samples).unsqueeze(0), sample_rate)
Output:
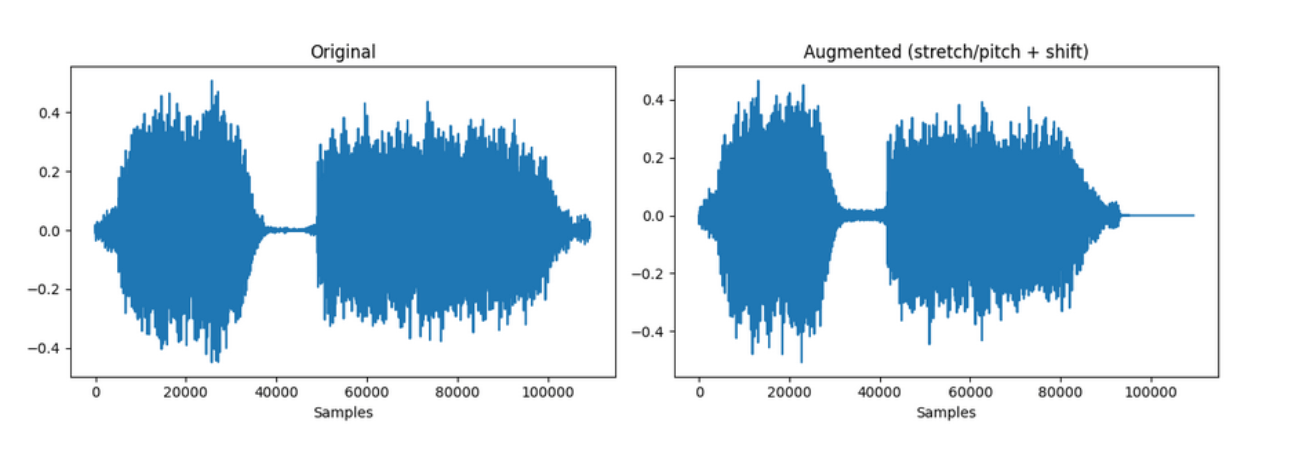
The pipeline applies randomly:
- Gaussian noise - adds random noise with amplitude between 0.001 and 0.015 to the signal (probability 0.5).
- Time stretch - randomly slows down or speeds up the audio by a factor between 0.8× and 1.25× (probability 0.5).
- Pitch shift - randomly shifts the pitch up or down by as much as ±4 semitones (probability 0.5).
On the left, the waveform shows the original audio with consistent amplitude envelopes. On the right, after pitch shifting and time stretching, the envelopes remain similar, but the internal waveform oscillations are altered, reflecting timing and frequency changes from augmentation.
Advanced Data Augmentation Techniques
This section explores some more advanced data augmentation techniques, ranging from automated policy search to generative models and their impact on model performance and practical use cases.
AutoAugment and RandAugment
AutoAugment learns to find the best augmentation policy using reinforcement learning. Rather than manually tuning which augmentations to use, the AutoAugment process algorithmically searches for a set of augmentation operations (including probabilities and magnitudes) that optimize for validation performance on a target dataset. The result is a learned policy (e.g., “apply Rotation 30° 50% of the time, Shear 20% 40% of the time, …” etc.) that can provide superior accuracy. AutoAugment finds policies for CIFAR-10, ImageNet, etc., which, when used to train from scratch, achieved better than the previous state-of-the-art. The tradeoff is that this policy search is expensive. It is possible to train many model variants to evaluate augmentation strategies.
RandAugment is a simplified alternative that doesn’t require the expensive search. It simply samples N transformations randomly from the same set for each image, all with the same magnitude M. The only hyperparameters are N and M. RandAugment’s simplicity can yield comparable or better performance than AutoAugment on many tasks. Applying a few random strong augmentations to each image during training provides a powerful way to improve generalization, without the need for a specific policy. Further simplifications can be made, such as in TrivialAugment, which applies a single random augmentation to each image with a random magnitude (no hyperparameters at all).
Many frameworks have implementations such as torchvision.transforms.AutoAugment (with pre-set policies from the paper) and RandAugment. These can be applied with a few lines of code:
import torchvision.transforms as T
from torchvision.transforms import AutoAugment, AutoAugmentPolicy, RandAugment

transform_auto = T.Compose([
 AutoAugment(policy=AutoAugmentPolicy.CIFAR10),
 T.ToTensor()
])

transform_rand = T.Compose([
 RandAugment(num_ops=3, magnitude=5),
 T.ToTensor()
])
In the above example, AutoAugmentPolicy.CIFAR10 is a pre-derived policy for CIFAR-10 provided in the paper. RandAugment(num_ops=3, magnitude=5) would apply 3 random ops with magnitude 5. This would lead to more aggressive and diverse transformations being applied during training than traditional augmentation.
Test-Time Augmentation (Ensembling at Inference)
Test-Time Augmentation (TTA) is the application of data augmentation done during inference time(not training time). Whenever you predict for a new sample, you can generate several augmented versions of the same input, feed them into your model, and combine the predictions (e.g., average the probabilities).
This is commonly applied to computer vision models. If you have an image classification model, you can take as input an image and its flipped version, and average the model prediction on the original and flipped images. This tends to slightly increase the accuracy because the model prediction is more stable under transformations.
TTA (with flips, multi-crops, rotations, etc.) is a standard trick in Kaggle competitions and production CV systems to improve performance. In many tasks, it was shown to improve over the single-prediction baseline in classification accuracy (by averaging predictions over augmented views of the input). However, it comes at the cost of additional inference time (doing a forward pass for each augmentation).
Generative Augmentation (GANs and Synthesized Data)
It’s possible to use generative models (GANs or other VAEs, Diffusion Models, etc.) to generate new synthetic data. Rather than producing some transformed version of an image, you generate a new one that is not a variation on an image you have, but an entirely new (but still realistic) sample.
GAN-based augmentation has been shown to improve a liver lesion classification model’s performance from 78.6% to 85.7% sensitivity (similar improvement in specificity), outperforming other types of augmentations. Suppose you have only 100 images of an underrepresented disease; it is possible to train a GAN to generate more images of that disease, providing the model with more training data. Beware of artifacts created by generative models; ensure to filter (garbage synthetic data will harm training more than help).
Beyond GANs, another approach to synthetic data is via simulation engines (self-driving car or robot simulation, etc.). Many autonomous driving companies use simulators to generate new driving scenarios and sensor data (camera/LiDAR) to augment real data. Synthetic data can capture corner cases (rare, dangerous situations) that you may not have in real data.
Augmentation for Small or Imbalanced Datasets
For small datasets (in number of samples) or class imbalance (where some classes are much more under-represented than others), augmentation is not only helpful – it’s often essential. Models, especially complex ones, overfit quickly on small datasets. However, augmentation can be used to provide variance to the model, simulating a larger dataset. For imbalanced data, models can be biased to predict the majority class(es), and augmentation will be used to oversample minority classes by generating examples for them.
Strategies:
- Apply heavier augmentation (or synthesize examples) for each minority class to balance the number of datapoints for each class. E.g., if class A has 50 images and class B has 500, apply 10x augmentation to the images of class A using various transforms.
- Use targeted augmentation: Some classes will respond better to distinct transformation techniques. E.g., class A images may be more variable in scale, so we apply random scaling augmentation primarily to that class.
- Consider SMOTE (Synthetic Minority Over-sampling Technique) for tabular data, or its variations for other data like images (mixing of images or feature vectors) and text (applying SMOTE directly on text is not straightforward). Note that in computer vision, methods like Mixup or CutMix (image and label mixing) can also be considered as augmentation. which blends samples to create new ones.
In NLP with an imbalanced intent dataset, you can generate paraphrases of the rare intent with a language model. In an image classification setting, if you have an underrepresented class, you can aggressively augment (rotations, warping, color jitter, etc.) for that class, effectively multiplying the number of examples. It has been found that even simple flips and rotations can significantly benefit a class with few samples.
However, augment with caution: if you only have, for example, 5 images of a class, augmenting those to 500 with strong transforms will probably result in overfitting on the augmented variants (as those 5 originals still limit the true diversity). In those cases, you may have to combine augmentation with other methods (transfer learning, or synthetic data generation via GANs/VAEs).
Comparison of Python Data Augmentation Libraries
We can use many libraries to perform data augmentation. Here is a comparison of some common ones, including images, text, and audio:
| Library | Data Type | Key Features & Transforms |
|---|---|---|
| Albumentations | Images | Huge variety of image transforms: flips, rotations, crops, color jitter, blur, noise, CutOut, CutMix, GridDistortion, etc. Highly optimized (fast, uses OpenCV). |
| torchvision.transforms | Images | Common image ops for PyTorch: compose pipelines of Resize, RandomCrop, ColorJitter, HorizontalFlip, etc. Also supports AutoAugment, RandAugment out of the box. |
| img aug | Images | General-purpose augmentation library. Flexible: weather effects, geometric transforms, keypoints for detection. |
| Keras ImageDataGenerator | Images | Built-in Keras utility for real-time augmentation. Supports rotate, shift, shear, zoom, flip, and brightness. |
| NLPAug | Text, Audio | Broad NLP augmentation: synonym replacement, random swap, contextual embeddings (BERT-based), spelling noise, etc. Also, audio modules (pitch, noise, speed). |
| TextAttack | Text | Advanced NLP augmentation & adversarial toolkit: synonym replacement, paraphrasing, back-translation; easy dataset augmentation; focus on robustness. |
| Audiomentations | Audio | Audio analogue of Albumentations: noise, shifts, pitch/time change, reverb, filters, etc.; easy to chain. |
| torchaudio.transforms | Audio | Native PyTorch audio transforms: TimeStretch (spectrograms), Frequency/Time Masking (SpecAugment), Vol, Resample; SoXEffects (EQ, reverb, pitch). |
| AugLy | Image, Text, Audio, Video | Multimodal augmentation: images (overlays, distortions), text (typos, paraphrase), audio (volume, effects), video (rotations, crops, etc.). |
Pros and Cons of Data Augmentation
Now that we’ve covered techniques, let’s summarize the advantages and disadvantages of using data augmentation:
| Pros | Cons |
|---|---|
| Augmented data helps models generalize better to new, unseen data. Acts as a regularizer, reducing overfitting by diversifying the training distribution. | Not all transformations preserve labels. Unsafe augmentation can introduce label noise (e.g., rotating a ‘6’ into a ‘9’ in digit classification). Care is needed to ensure semantic meaning is retained. |
| Expands small datasets virtually, critical for small or imbalanced datasets. Helps models learn features absent from limited original data. | Augmentation recombines existing data and cannot create truly new features. Example: Flipping a dog image won’t teach about other breeds. |
| Can balance classes by oversampling minority classes with new variants. Prevents models from ignoring rare classes. | Too much augmentation can create unrealistic data, confusing the model. Some augmentations may reduce accuracy (e.g., rotating digits in MNIST). |
| Much cheaper and faster than collecting new data, valuable when data is costly or rare. | On-the-fly augmentation can slow training. Complex policies like AutoAugment are computationally heavy. |
| Improves resilience to real-world perturbations like noise, occlusion, lighting changes. For NLP, makes models robust to varied phrasing. | Augmented data can be grammatically incorrect (text) or semantically changed, requiring manual checks. Biases in original data persist and can be amplified. |
| Handles domain shifts (e.g., color temperature changes help cross-camera generalization). | In large datasets, gains may be marginal, and augmentation may introduce unnecessary noise. |
FAQ SECTION
-
What is the best data augmentation technique for images? It depends on your domain, but flips, jitters, and noise often work well. Consider also more advanced approaches such as AutoAugment or RandAugment, which often lead to state-of-the-art improvements.
-
How does text data augmentation improve NLP models? Data augmentation can introduce lexical and syntactic diversity (e.g., through synonym replacement), leading to better generalization and robustness to paraphrases or rare language constructs.
-
Which libraries are best for data augmentation in Python? Use Albumentations or torchvision for images, NLPAug or AugLy for text, and torchaudio or AugLy for audio.
-
When should I avoid using data augmentation? Avoid aggressive augmentation strategies that may distort the semantic meaning of the class or degrade the quality of the signal, particularly in sensitive domains such as medical imaging, voice biometrics, or when label noise may be introduced.
Conclusion
Data augmentation can be used to transform small, noisy datasets into more robust models for computer vision, natural language processing, and speech processing tasks.
First, consider task-invariant transformations (flipping/cropping, synonym replacement/insertion/deletion, additive noise, time-stretch), and if they reach a performance ceiling, then add algorithmic augmentation policies (e.g., AutoAugment or RandAugment).
For data scarcity or imbalance, consider adding large amounts of carefully filtered synthetic data (GANs, simulated data), and/or test-time augmentation (TTA) during inference for a slight boost.
Choose a framework that integrates with your existing tech stack (Albumentations/torchvision, NLPAug/TextAttack, torchaudio/Audiomentations), implement the transformations to run on-the-fly during training, and watch for label drift.
Finally, perform ablation studies, monitor validation performance, and back off from anything that benefits training loss at the cost of generalization.
References and Resources
- A Complete Guide to Data Augmentation
- Why Automatic Augmentation Matters
- Efficient improvement of classification accuracy via selective test-time augmentation
- Test-time augmentation for deep learning-based cell segmentation on microscopy images
- A survey on Image Data Augmentation for Deep Learning
- Data Augmentation Techniques for Imbalanced Datasets
Thanks for learning with the DigitalOcean Community. Check out our offerings for compute, storage, networking, and managed databases.
About the author(s)
I am a skilled AI consultant and technical writer with over four years of experience. I have a master’s degree in AI and have written innovative articles that provide developers and researchers with actionable insights. As a thought leader, I specialize in simplifying complex AI concepts through practical content, positioning myself as a trusted voice in the tech community.
With a strong background in data science and over six years of experience, I am passionate about creating in-depth content on technologies. Currently focused on AI, machine learning, and GPU computing, working on topics ranging from deep learning frameworks to optimizing GPU-based workloads.
Still looking for an answer?
This textbox defaults to using Markdown to format your answer.
You can type !ref in this text area to quickly search our full set of tutorials, documentation & marketplace offerings and insert the link!
 This work is licensed under a Creative Commons Attribution-NonCommercial- ShareAlike 4.0 International License.
Become a contributor for community
Get paid to write technical tutorials and select a tech-focused charity to receive a matching donation.

DigitalOcean Documentation
Full documentation for every DigitalOcean product.

Resources for startups and AI-native businesses
The Wave has everything you need to know about building a business, from raising funding to marketing your product.
The developer cloud
Scale up as you grow — whether you're running one virtual machine or ten thousand.

Start building today
From GPU-powered inference and Kubernetes to managed databases and storage, get everything you need to build, scale, and deploy intelligent applications.
