By Mason Egger and Matt Abrams

The author selected the Tech Education Fund to receive a donation as part of the Write for DOnations program.
Introduction
Slack is a communication platform designed for workplace productivity. It includes features such as direct messaging, public and private channels, voice and video calls, and bot integrations. A Slackbot is an automated program that can perform a variety of functions in Slack, from sending messages to triggering tasks to alerting on certain events.
In this tutorial you will build a Slackbot in the Python programming language. Python is a popular language that prides itself on simplicity and readability. Slack provides a rich Python Slack API for integrating with Slack to perform common tasks such as sending messages, adding emojis to messages, and much more. Slack also provides a Python Slack Events API for integrating with events in Slack, allowing you to perform actions on events such as messages and mentions.
As a fun proof-of-concept that will demonstrate the power of Python and its Slack APIs, you will build a CoinBot—a Slackbot that monitors a channel and, when triggered, will flip a coin for you. You can then modify your CoinBot to fulfill any number of slightly more practical applications.
Note that this tutorial uses Python 3 and is not compatible with Python 2.
Prerequisites
In order to follow this guide, you’ll need:
-
A Slack Workspace that you have the ability to install applications into. If you created the workspace you have this ability. If you don’t already have one, you can create one on the Slack website.
-
(Optional) A server or computer with a public IP address for development. We recommend a fresh installation of Ubuntu 20.04, a non-root user with
sudoprivileges, and SSH enabled. You can follow this guide to initialize your server and complete these steps.
You may want to test this tutorial on a server that has a public IP address. Slack will need to be able to send events such as messages to your bot. If you are testing on a local machine you will need to port forward traffic through your firewall to your local system. If you are looking for a way to develop on a cloud server, check out this tutorial on How To Use Visual Studio Code for Remote Development via the Remote-SSH Plugin.
Step 1 — Creating the Slackbot in the Slack UI
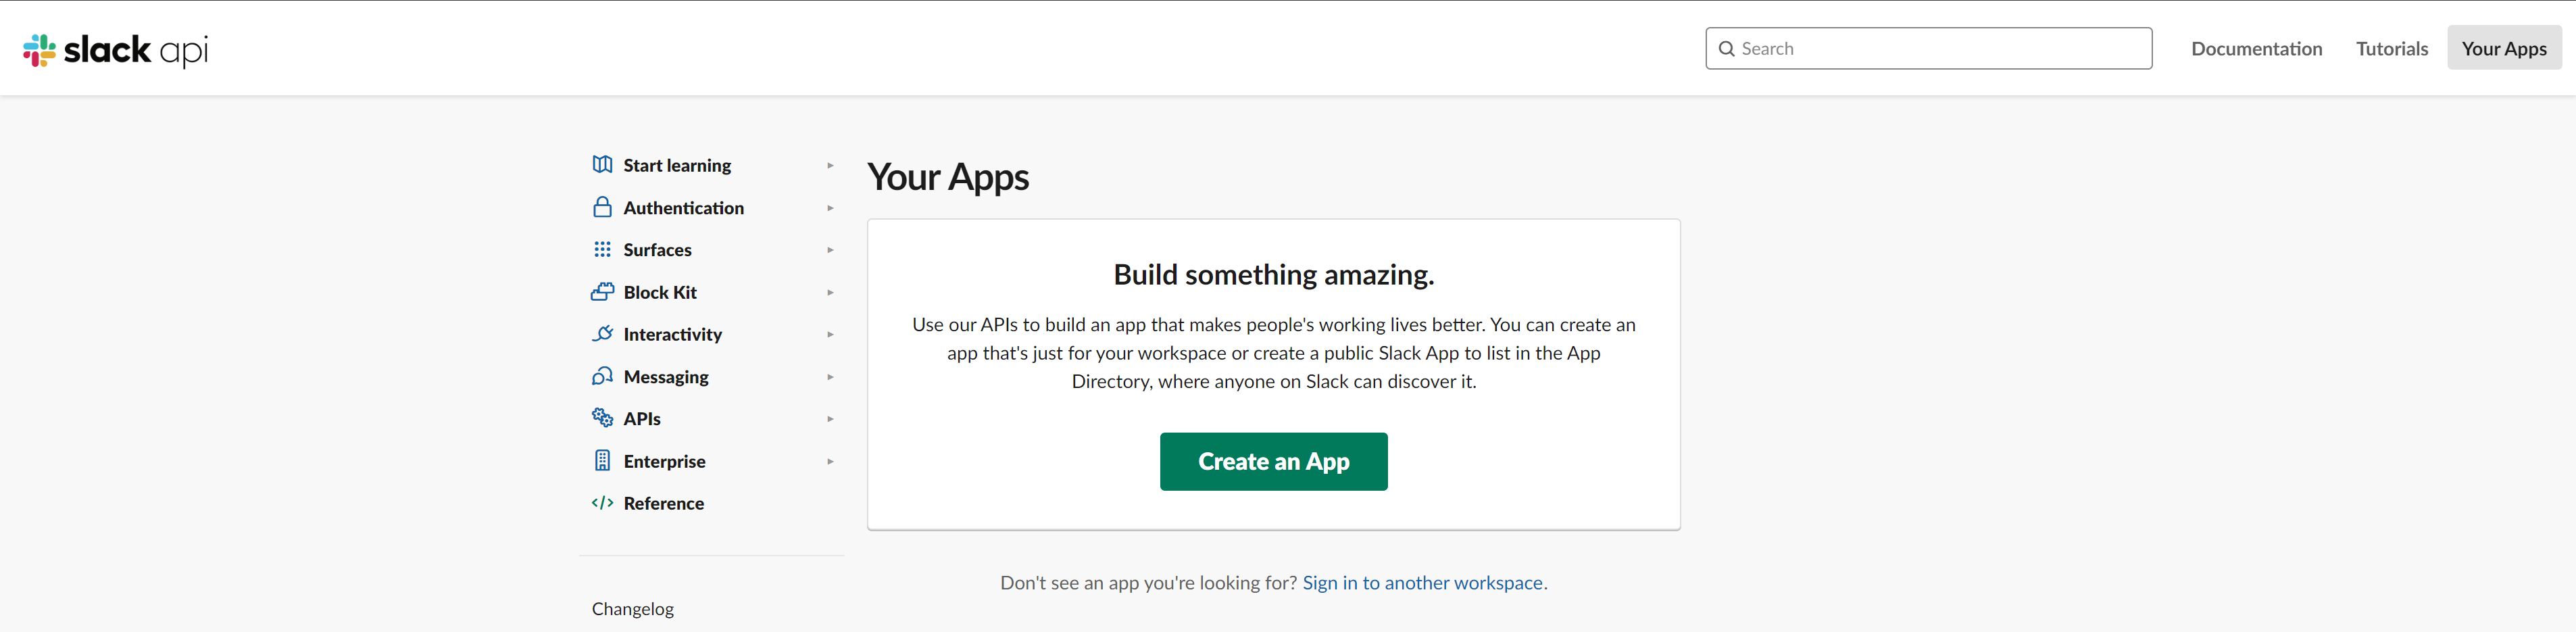
First create your Slack app in the Slack API Control Panel. Log in to your workspace in Slack via a web browser and navigate to the API Control Panel. Now click on the Create an App button.
Next you’ll be prompted for the name of your app and to select a development Slack workspace. For this tutorial, name your app CoinBot and select a workspace you have admin access to. Once you have done this click on the Create App button.

Once your app is created you’ll be presented with the following default app dashboard. This dashboard is where you manage your app by setting permissions, subscribing to events, installing the app into workspaces, and more.
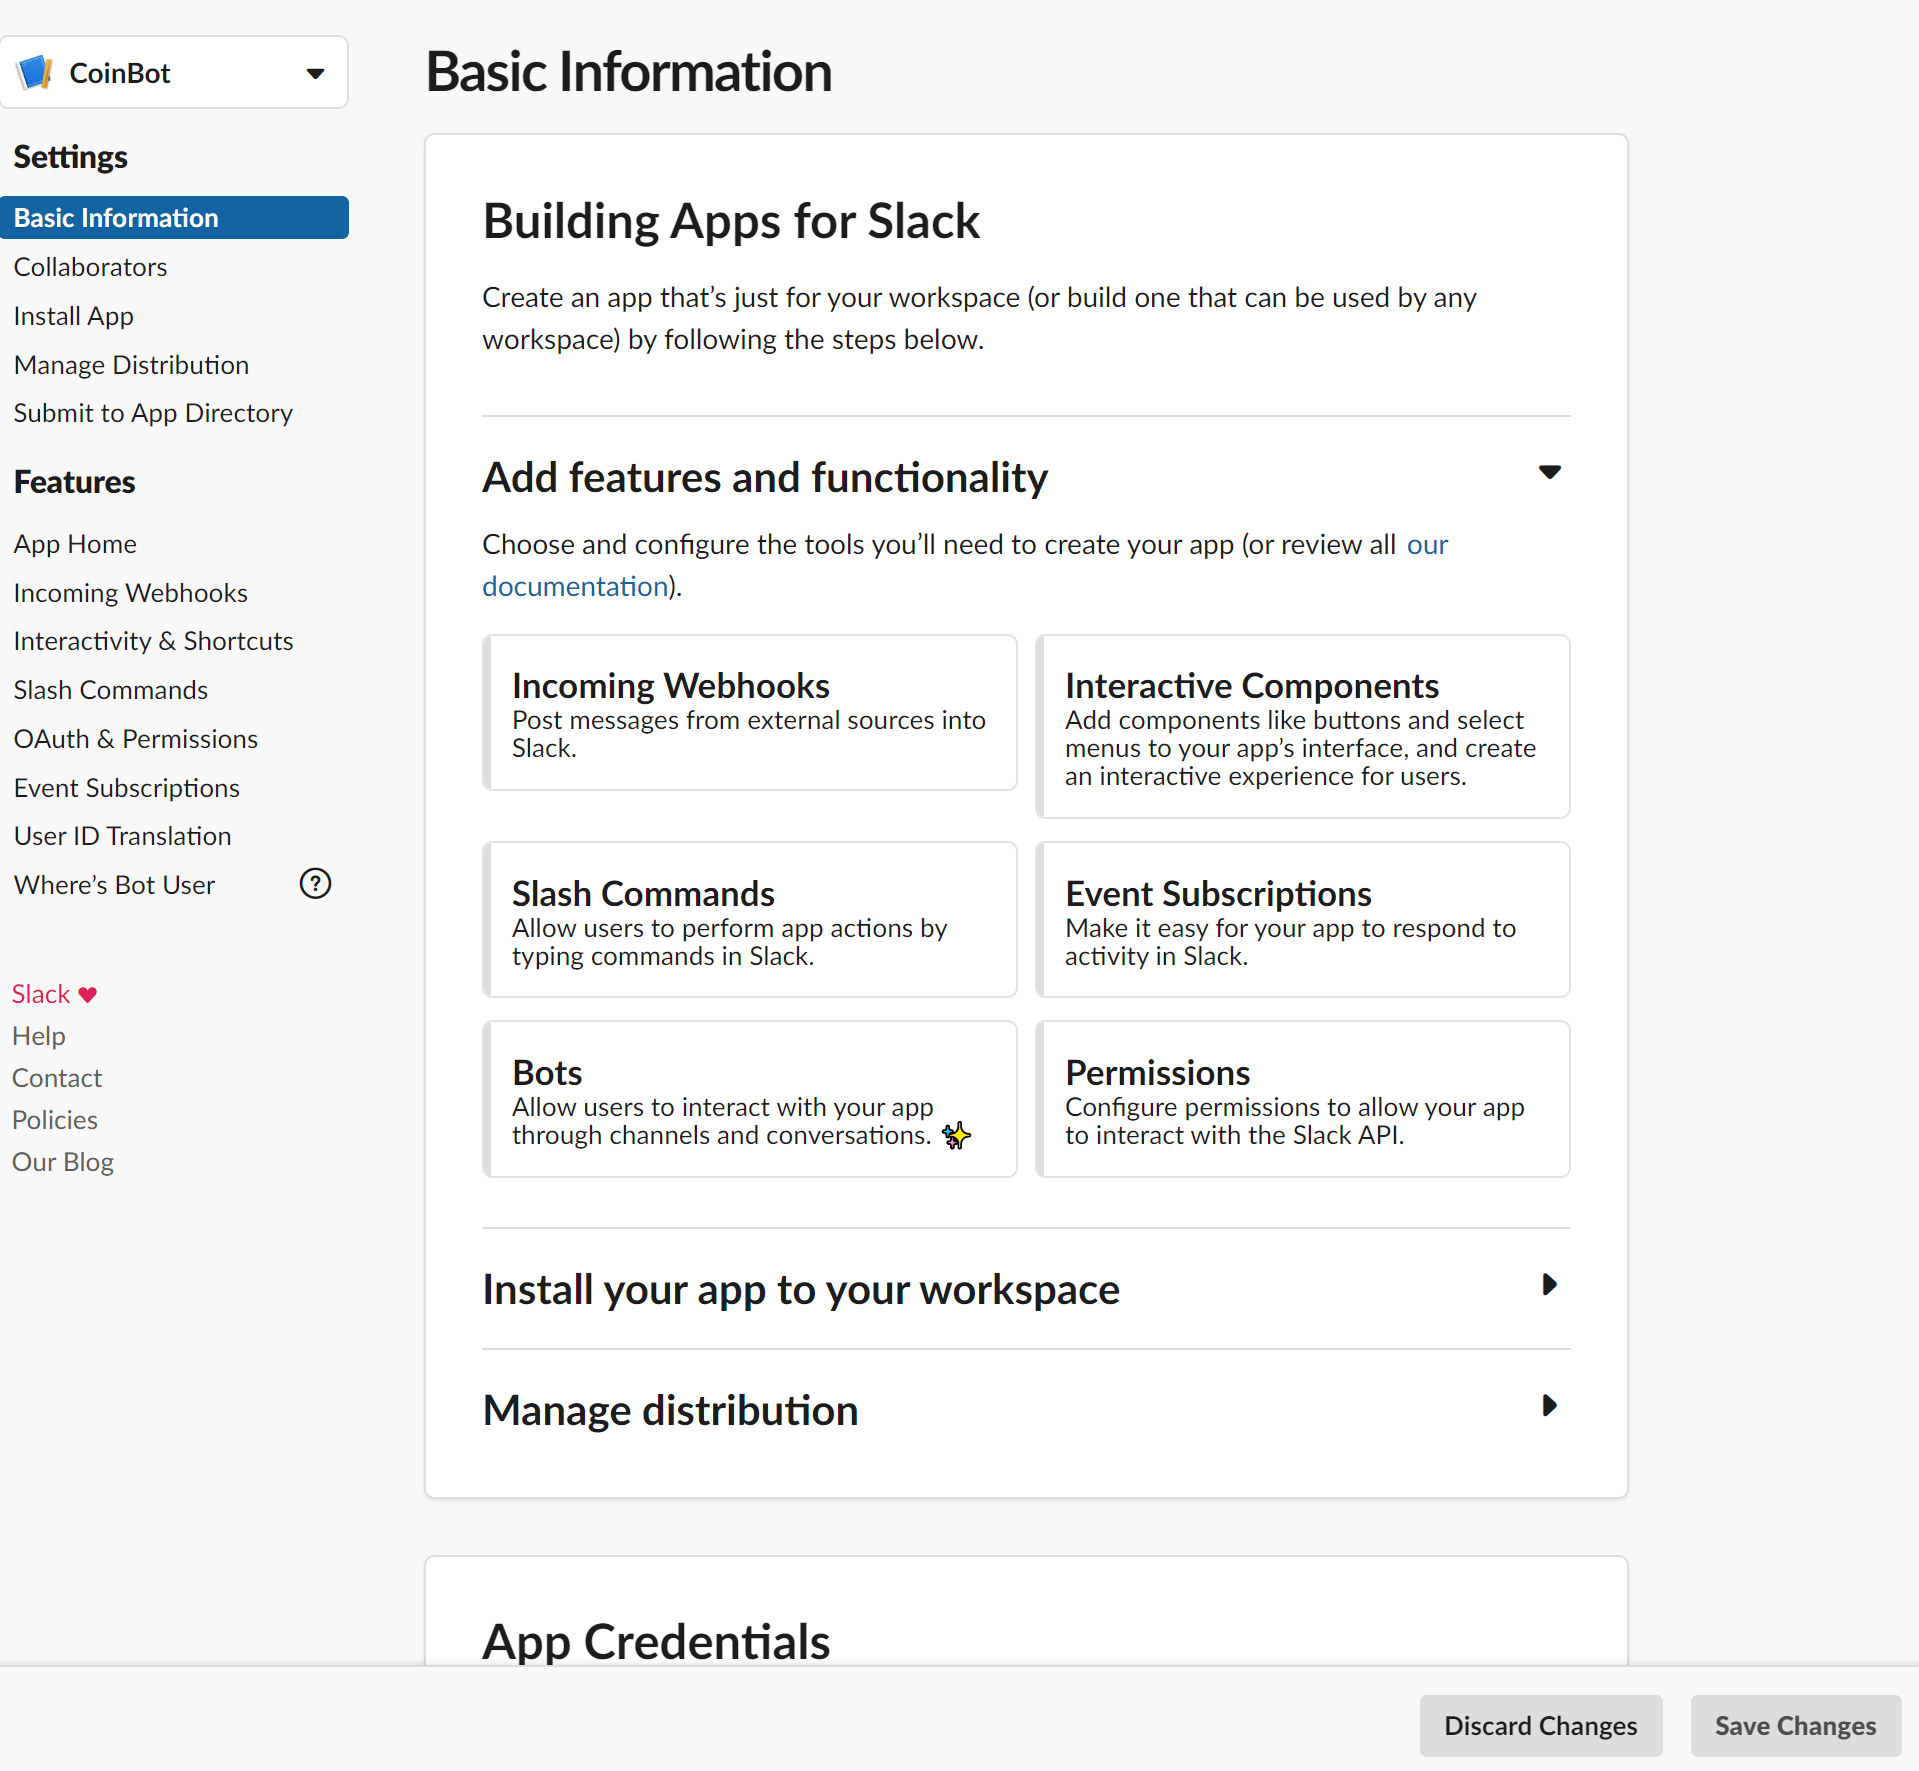
In order for your app to be able to post messages to a channel you need to grant the app permissions to send messages. To do this, click the Permissions button in the control panel.
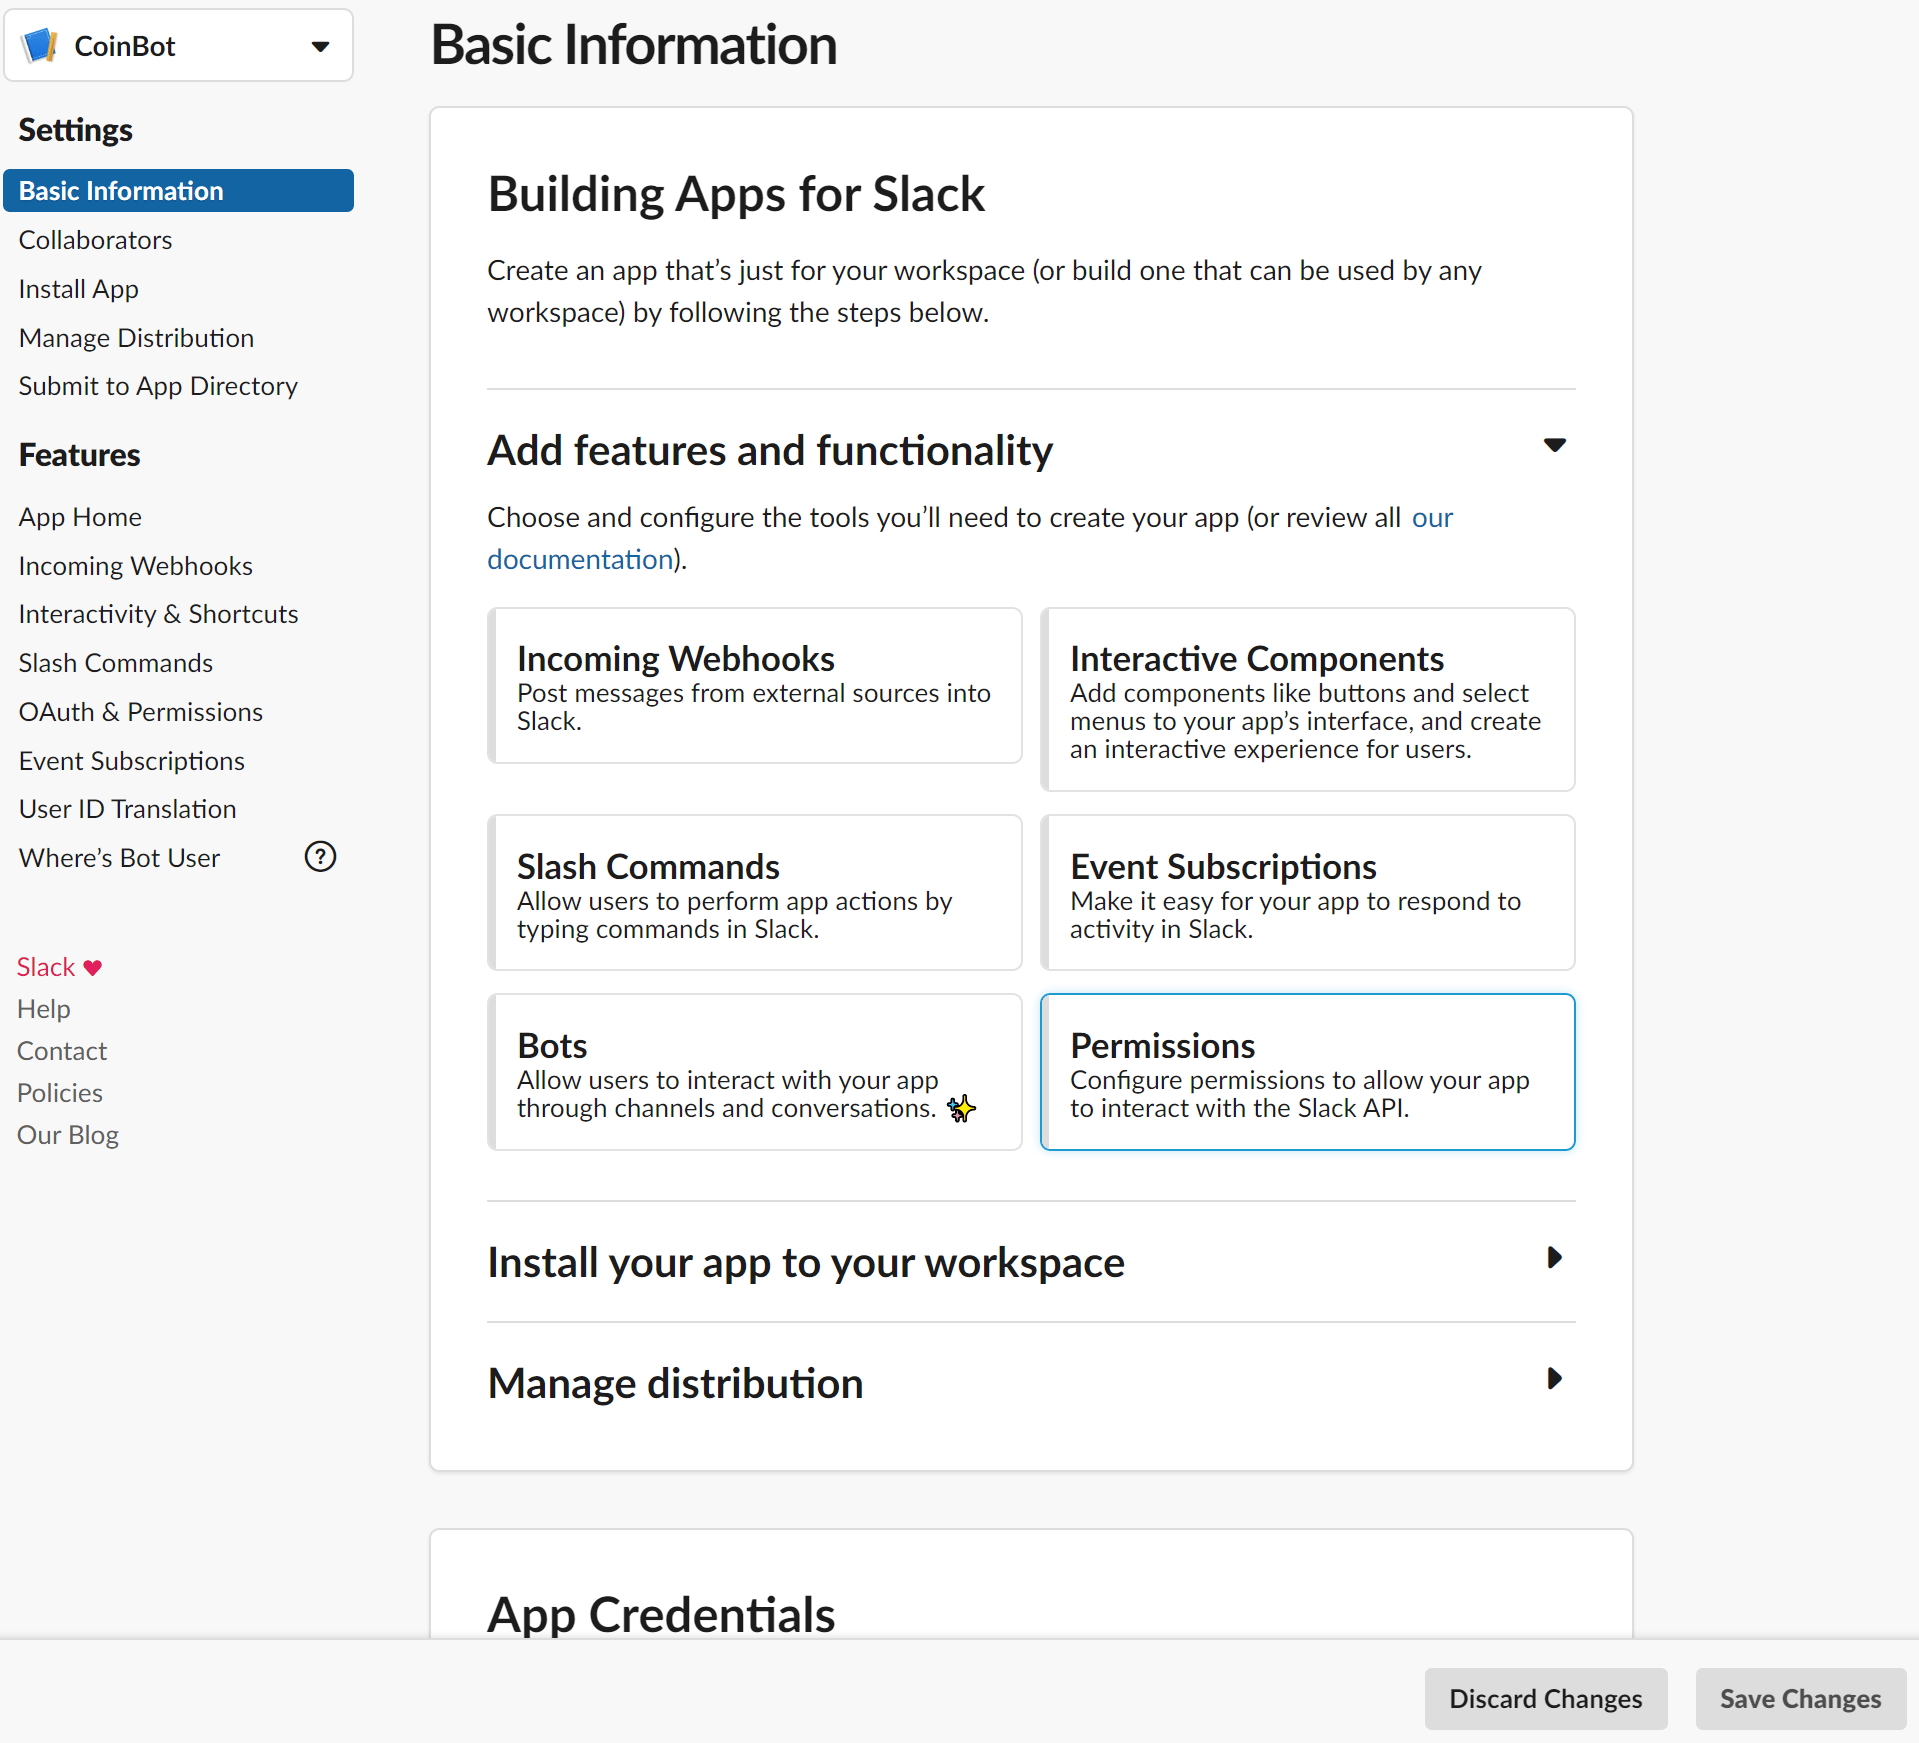
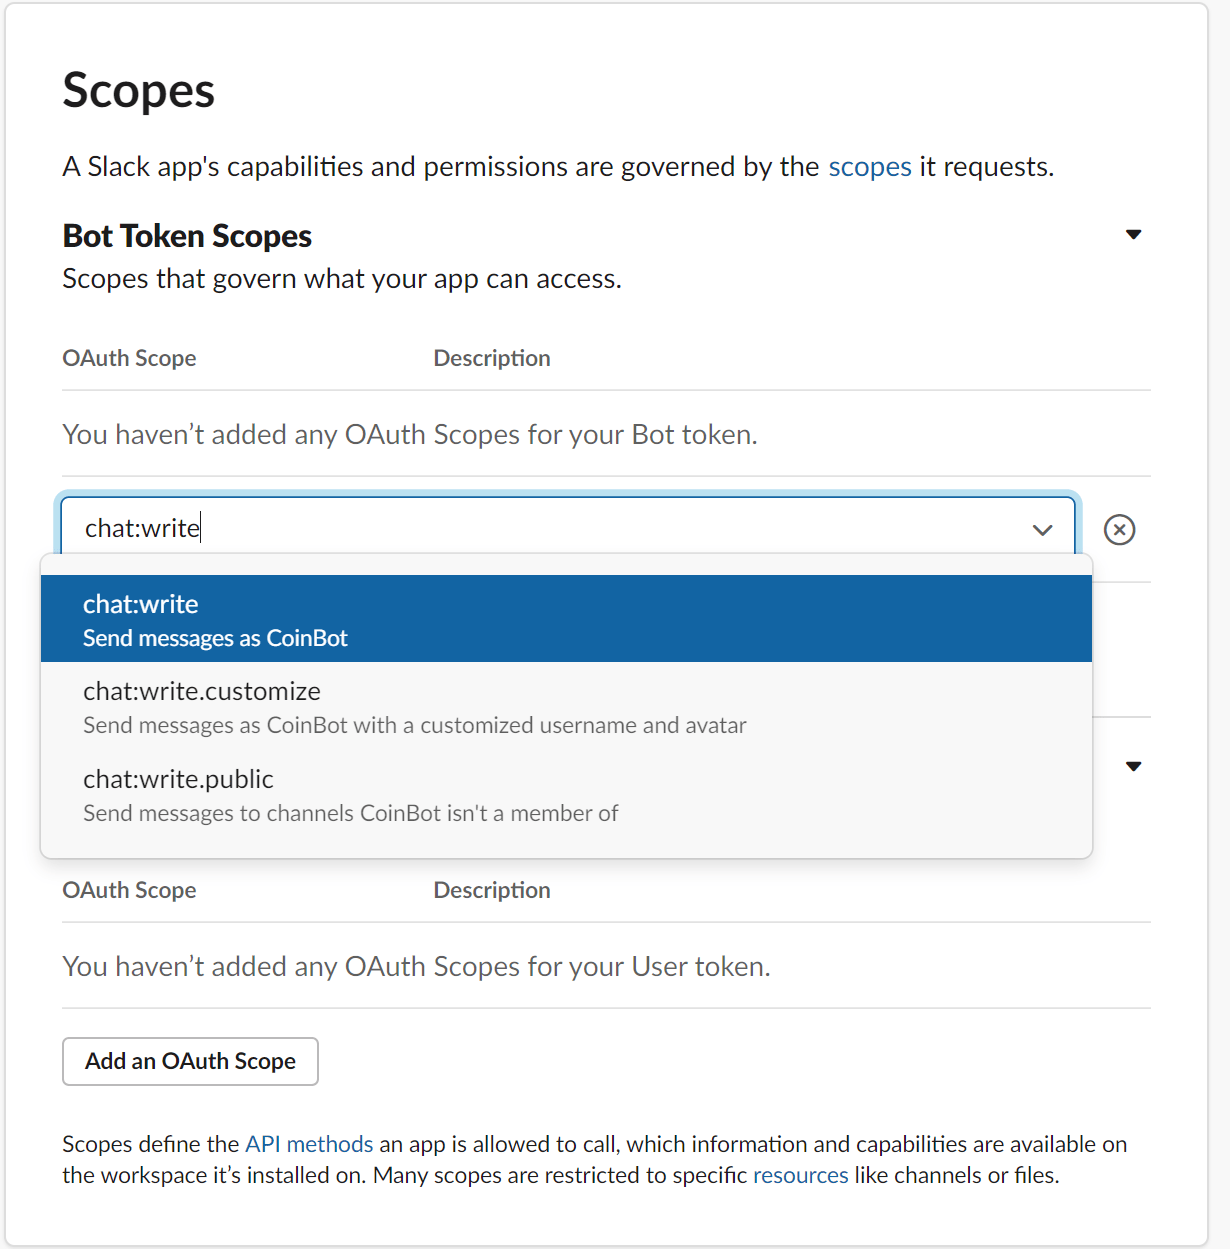
When you arrive at the OAuth & Permissions page, scroll down until you find the Scopes section of the page. Then find the Bot Token Scopes subsection in the scope and click on Add an OAuth Scope button.
Click on that button and then type chat:write. Select that permission to add it to your bot. This will allow the app to post messages to channels that it can access. For more information on the available permissions refer to Slack’s Documentation.
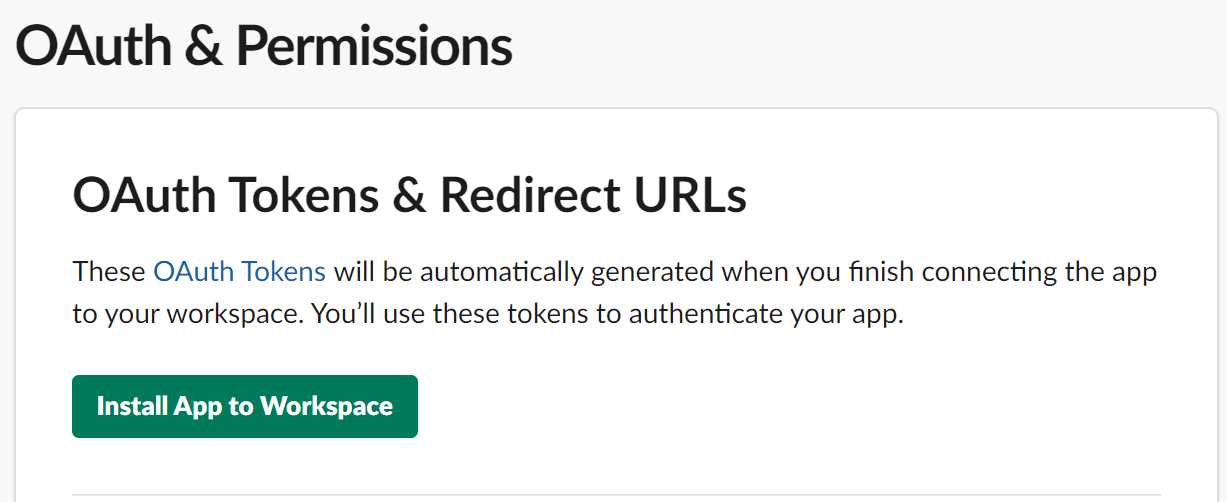
Now that you’ve added the appropriate permission it is time to install your app into your Slack workspace. Scroll back up on the OAuth & Permissions page and click the Install App to Workspace button at the top.
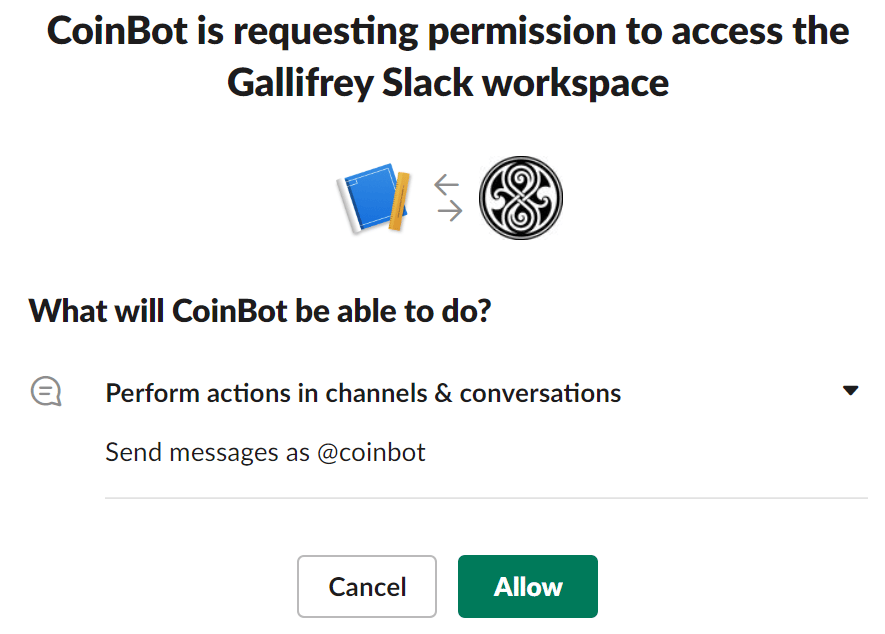
Click this button and review the actions that the app can perform in the channel. Once you are satisfied, click the Allow button to finish the installation.
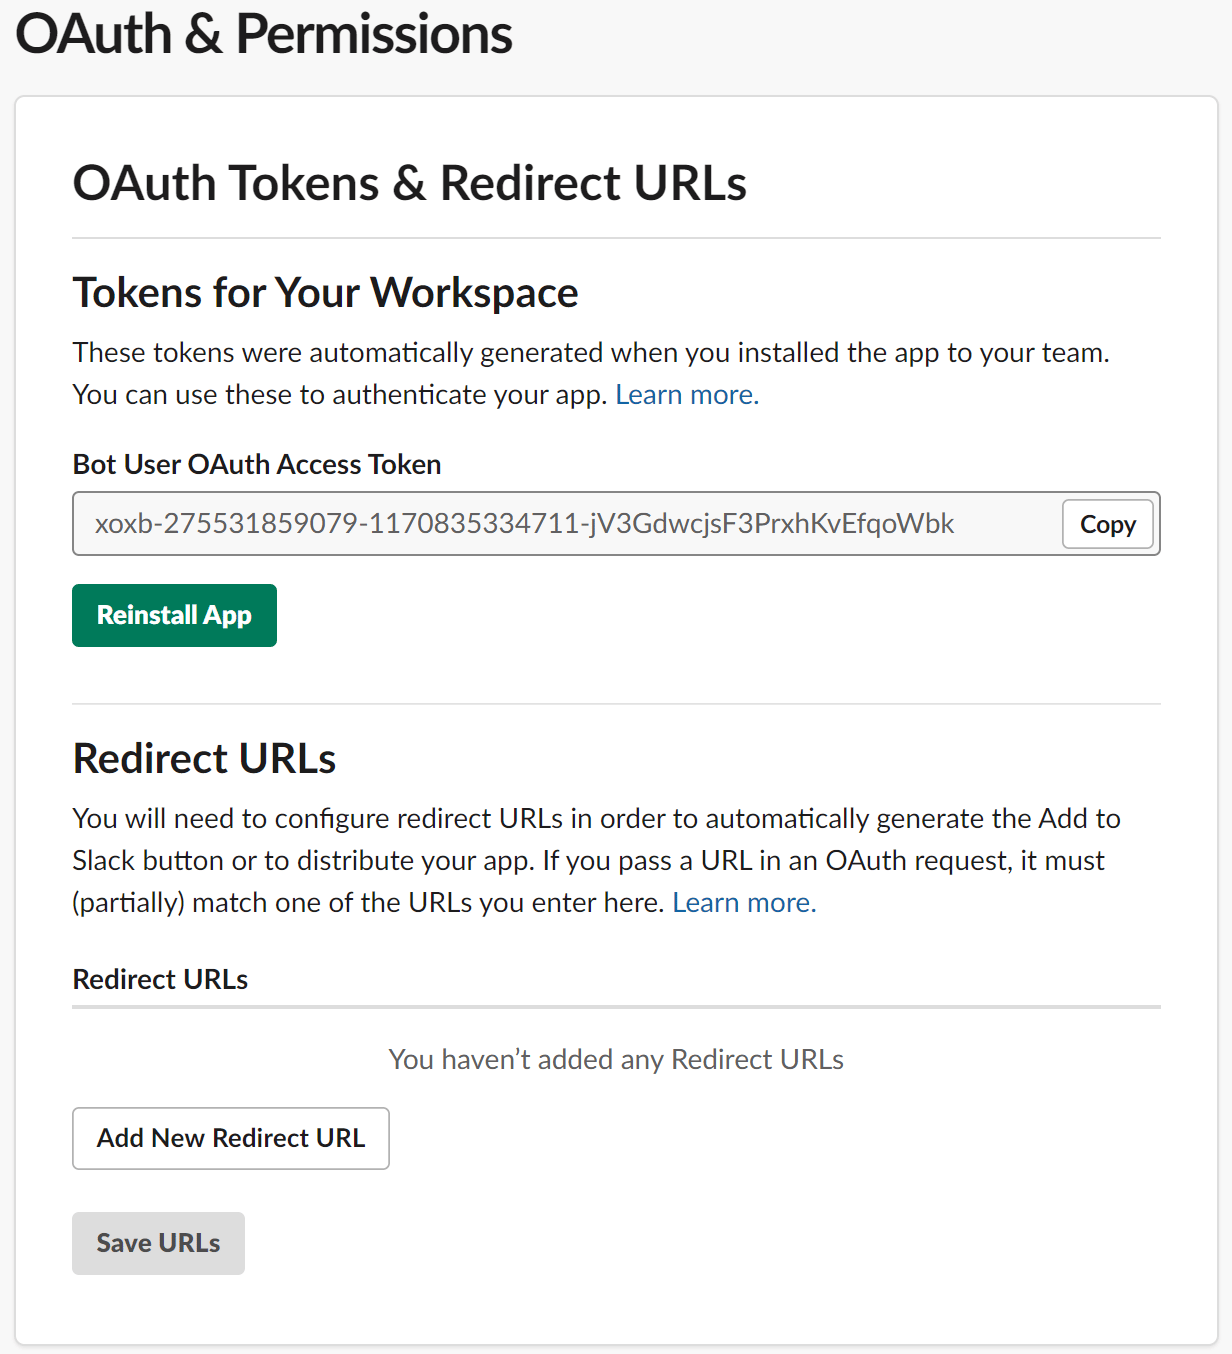
Once the bot is installed you’ll be presented with a Bot User OAuth Access Token for your app to use when attempting to perform actions in the workspace. Go ahead and copy this token; you’ll need it later.
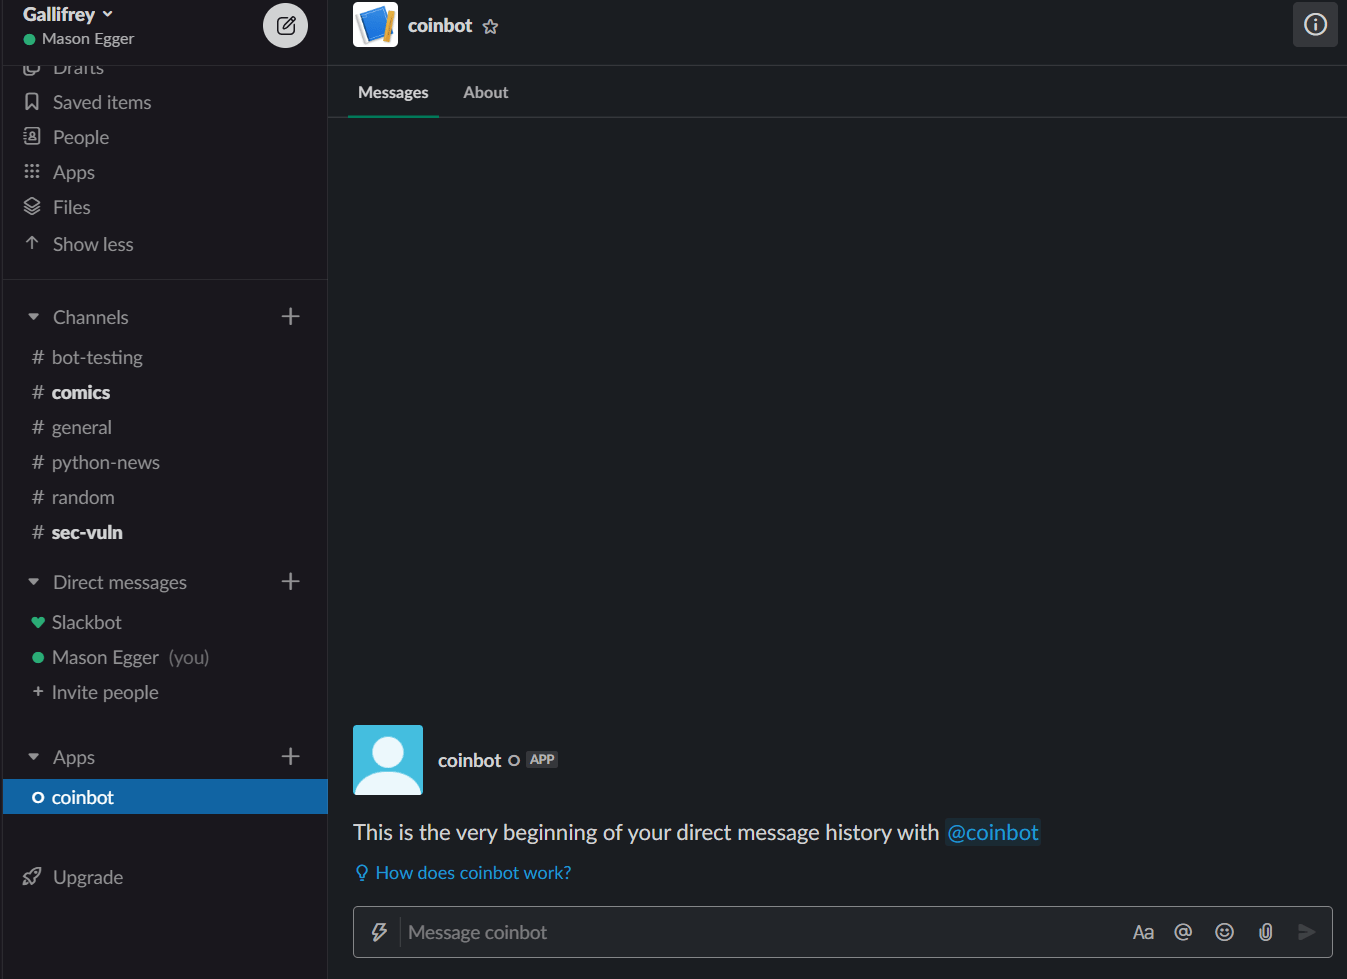
Finally, add your newly installed bot into a channel within your workspace. If you haven’t created a channel yet you can use the #general channel that is created by default in your Slack workspace. Locate the app in the Apps section of the navigation bar in your Slack client and click on it. Once you’ve done that open the Details menu in the top right hand side. If your Slack client isn’t full-screened it will look like an i in a circle.
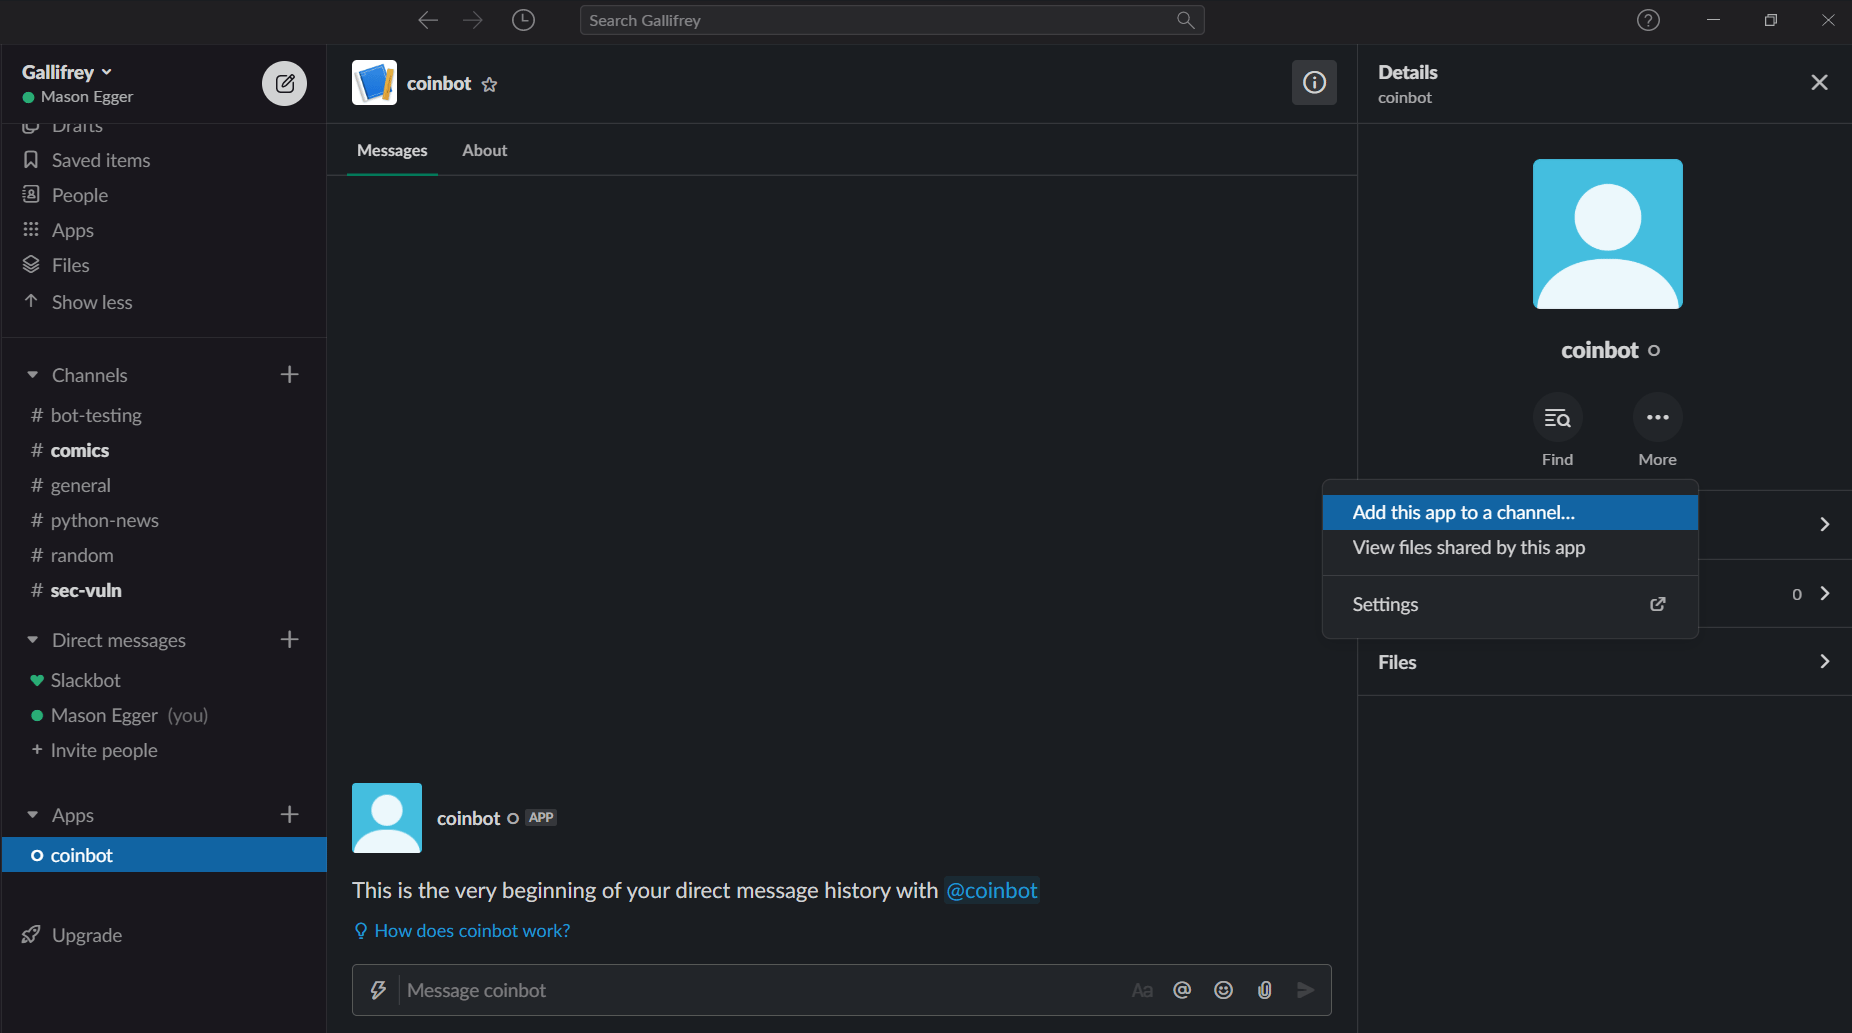
To finish adding your app to a channel, click on the More button represented by three dots in the details page and select Add this app to a channel…. Type your channel into the modal that appears and click Add.
You’ve now successfully created your app and added it to a channel within your Slack workspace. After you write the code for your app it will be able to post messages in that channel. In the next section you’ll start writing the Python code that will power CoinBot.
Step 2 — Setting Up Your Python Developer Environment
First let’s set up your Python environment so you can develop the Slackbot.
Open a terminal and install python3 and the relevant tools onto your system:
- sudo apt install python3 python3-venv
Next you will create a virtual environment to isolate your Python packages from the system installation of Python. To do this, first create a directory into which you will create your virtual environment. Make a new directory at ~/.venvs:
- mkdir ~/.venvs
Now create your Python virtual environment:
- python3 -m venv ~/.venvs/slackbot
Next, activate your virtual environment so you can use its Python installation and install packages:
- source ~/.venvs/slackbot/bin/activate
Your shell prompt will now show the virtual environment in parenthesis. It will look something like this:
-
Now use pip to install the necessary Python packages into your virtual environment:
- pip install slackclient slackeventsapi Flask
slackclient and slackeventsapi facilitate Python’s interaction with Slack’s APIs. Flask is a popular micro web framework that you will use to deploy your app:
Now that you have your developer environment set up, you can start writing your Python Slackbot:
Step 3 — Creating the Slackbot Message Class in Python
Messages in Slack are sent via a specifically formatted JSON payload. This is an example of the JSON that your Slackbot will craft and send as a message:
{
   "channel":"channel",
   "blocks":[
      {
         "type":"section",
         "text":{
            "type":"mrkdwn",
            "text":"Sure! Flipping a coin....\n\n"
         }
      },
      {
         "type":"section",
         "text":{
            "type":"mrkdwn",
            "text":"*flips coin* The result is Tails."
         }
      }
   ]
}
You could manually craft this JSON and send it, but instead let’s build a Python class that not only crafts this payload, but also simulates a coin flip.
First use the touch command to create a file named coinbot.py:
- touch coinbot.py
Next, open this file with nano or your favorite text editor:
- nano coinbot.py
Now add the following lines of code to import the relevant libraries for your app. The only library you need for this class is the random library from the Python Standard Library. This library will allow us to simulate a coin flip.
Add the following lines to coinbot.py to import all of the necessary libraries:
# import the random library to help us generate the random numbers
import random
Next, create your CoinBot class and an instance of this class
to craft the message payload. Add the following lines to coinbot.py to create the CoinBot class:
...
class CoinBot:
Now indent by one and create the constants, constructors, and methods necessary for your class. First let’s create the constant that will hold the base of your message payload. This section specifies that this constant is of the section type and that the text is formatted via markdown. It also specifies what text you wish to display. You can read more about the different payload options in the official Slack message payload documentation.
Append the following lines to coinbot.py to create the base template for the payload:
...
    # Create a constant that contains the default text for the message
    COIN_BLOCK = {
        "type": "section",
        "text": {
            "type": "mrkdwn",
            "text": (
                "Sure! Flipping a coin....\n\n"
            ),
        },
    }
Next create a constructor for your class so that you can create a separate instance of your bot for every request. Don’t worry about memory overhead here; the Python garbage collector will clean up these instances once they are no longer needed. This code sets the recipient channel based on a parameter passed to the constructor.
Append the following lines to coinbot.py to create the constructor:
...
    # The constructor for the class. It takes the channel name as the a
    # parameter and sets it as an instance variable.
    def __init__(self, channel):
        self.channel = channel
Now write the code that simulates to flip a coin. We’ll randomly generate a one or zero, representing heads or tails respectively.
Append the following lines to coinbot.py to simulate the coin flip and return the crafted payload:
...
    # Generate a random number to simulate flipping a coin. Then return the
    # crafted slack payload with the coin flip message.
    def _flip_coin(self):
        rand_int =  random.randint(0,1)
        if rand_int == 0:
            results = "Heads"
        else:
            results = "Tails"

        text = f"The result is {results}"

        return {"type": "section", "text": {"type": "mrkdwn", "text": text}},
Finally, create a method that crafts and returns the entire message payload, including the data from your constructor, by calling your _flip_coin method.
Append the following lines to coinbot.py to create the method that will generate the finished payload:
...
    # Craft and return the entire message payload as a dictionary.
    def get_message_payload(self):
        return {
            "channel": self.channel,
            "blocks": [
                self.COIN_BLOCK,
                *self._flip_coin(),
            ],
        }
You are now finished with the CoinBot class and it is ready for testing. Before continuing, verify that your finished file, coinbot.py, contains the following:
# import the random library to help us generate the random numbers
import random

# Create the CoinBot Class
class CoinBot:

    # Create a constant that contains the default text for the message
    COIN_BLOCK = {
        "type": "section",
        "text": {
            "type": "mrkdwn",
            "text": (
                "Sure! Flipping a coin....\n\n"
            ),
        },
    }

    # The constructor for the class. It takes the channel name as the a
    # parameter and then sets it as an instance variable
    def __init__(self, channel):
        self.channel = channel

    # Generate a random number to simulate flipping a coin. Then return the
    # crafted slack payload with the coin flip message.
    def _flip_coin(self):
        rand_int =  random.randint(0,1)
        if rand_int == 0:
            results = "Heads"
        else:
            results = "Tails"

        text = f"The result is {results}"

        return {"type": "section", "text": {"type": "mrkdwn", "text": text}},

    # Craft and return the entire message payload as a dictionary.
    def get_message_payload(self):
        return {
            "channel": self.channel,
            "blocks": [
                self.COIN_BLOCK,
                *self._flip_coin(),
            ],
        }
Save and close the file.
Now that you have a Python class ready to do the work for your Slackbot, let’s ensure that this class produces a useful message payload and that you can send it to your workspace.
Step 4 — Testing Your Message
Now let’s test that this class produces a proper payload. Create a file named
coinbot_test.py:
- nano coinbot_test.py
Now add the following code. Be sure to change the channel name in the instantiation of the coinbot class coin_bot = coinbot("#YOUR_CHANNEL_HERE"). This code will create a Slack client in Python that will send a message to the channel you specify that you have already installed the app into:
from slack import WebClient
from coinbot import CoinBot
import os

# Create a slack client
slack_web_client = WebClient(token=os.environ.get("SLACK_TOKEN"))

# Get a new CoinBot
coin_bot = CoinBot("#YOUR_CHANNEL_HERE")

# Get the onboarding message payload
message = coin_bot.get_message_payload()

# Post the onboarding message in Slack
slack_web_client.chat_postMessage(**message)
Save and close the file.
Before you can run this file you will need to export the Slack token that you saved in Step 1 as an environment variable:
- export SLACK_TOKEN="your_bot_user_token"
Now test this file and verify that the payload is produced and sent by running the following script in your terminal. Make sure that your virtual environment is activated. You can verify this by seeing the (slackbot) text at the front of your bash prompt. Run this command you will receive a message from your Slackbot with the results of a coin flip:
- python coinbot_test.py
Check the channel that you installed your app into and verify that your bot did indeed send the coin flip message. Your result will be heads or tails.

Now that you’ve verified that your Slackbot can flip a coin, create a message, and deliver the message, let’s create a Flask to perpetually run this app and make it simulate a coin flip and share the results whenever it sees certain text in messages sent in the channel.
Step 5 — Creating a Flask Application to Run Your Slackbot
Now that you have a functioning application that can send messages to your Slack workspace, you need to create a long running process so your bot can listen to messages sent in the channel and reply to them if the text meets certain criteria. You’re going to use the Python web framework Flask to run this process and listen for events in your channel.
In this section you will be running your Flask application from a server with a public IP address so that the Slack API can send you events. If you are running this locally on your personal workstation you will need to forward the port from your personal firewall to the port that will be running on your workstation. These ports can be the same, and this tutorial will be set up to use port 3000.
First adjust your firewall settings to allow traffic through port 3000:
- sudo ufw allow 3000
Now check the status of ufw:
- sudo ufw status
You will see an output like this:
OutputStatus: active

To                         Action      From
--                         ------      ----
OpenSSH                    ALLOW       Anywhere
3000                       ALLOW       Anywhere
OpenSSH (v6)               ALLOW       Anywhere (v6)
3000 (v6)                  ALLOW       Anywhere (v6)
Now create the file for your Flask app. Name this file app.py:
- touch app.py
Next, open this file in your favorite text editor:
- nano app.py
Now add the following import statements. You’ll import the following libraries for the following reasons:
import os- To access environment variablesimport logging- To log the events of the appfrom flask import Flask- To create a Flask appfrom slack import WebClient- To send messages via Slackfrom slackeventsapi import SlackEventAdapter- To receive events from Slack and process themfrom coinbot import CoinBot- To create an instance of your CoinBot and generate the message payload.
Append the following lines to app.py to import all of the necessary libraries:
import os
import logging
from flask import Flask
from slack import WebClient
from slackeventsapi import SlackEventAdapter
from coinbot import CoinBot
Now create your Flask app and register a Slack Event Adapter to your Slack app at the /slack/events endpoint. This will create a route in your Slack app where Slack events will be sent and ingested. To do this you will need to get another token from your Slack app, which you will do later in the tutorial. Once you get this variable you will export it as an environment variable named SLACK_EVENTS_TOKEN. Go ahead and write your code to read it in when creating the SlackEventAdapter, even though you haven’t set the token yet.
Append the following lines to app.py to create the Flask app and register the events adapter into this app:
...
# Initialize a Flask app to host the events adapter
app = Flask(__name__)

# Create an events adapter and register it to an endpoint in the slack app for event ingestion.
slack_events_adapter = SlackEventAdapter(os.environ.get("SLACK_EVENTS_TOKEN"), "/slack/events", app)
Next create a web client object that will allow your app to perform actions in the workspace, specifically to send messages. This is similar to what you did when you tested your coinbot.py file previously.
Append the following line to app.py to create this slack_web_client:
...
# Initialize a Web API client
slack_web_client = WebClient(token=os.environ.get("SLACK_TOKEN"))
Now create a function that can be called that will create an instance of CoinBot, and then use this instance to create a message payload and pass the message payload to the Slack web client for delivery. This function will take in a single parameter, channel, which will specify what channel receives the message.
Append the following lines to app.py to create this function:
...
def flip_coin(channel):
    """Craft the CoinBot, flip the coin and send the message to the channel
    """
    # Create a new CoinBot
    coin_bot = CoinBot(channel)

    # Get the onboarding message payload
    message = coin_bot.get_message_payload()

    # Post the onboarding message in Slack
    slack_web_client.chat_postMessage(**message)
Now that you have created a function to handle the messaging aspects of your app, create one that monitors Slack events for a certain action and then executes your bot. You’re going to configure your app to respond with the results of a simulated coin flip when it sees the phrase “Hey Sammy, Flip a coin”. You’re going to accept any version of this—case won’t prevent the app from responding.
First decorate your function with the @slack_events_adapter.on syntax that allows your function to receive events. Specify that you only want the message events and have your function accept a payload parameter containing all of the necessary Slack information. Once you have this payload you will parse out the text and analyze it. Then, if it receives the activation phrase, your app will send the results of a simulated coin flip.
Append the following code to app.py to receive, analyze, and act on incoming messages:
# When a 'message' event is detected by the events adapter, forward that payload
# to this function.
@slack_events_adapter.on("message")
def message(payload):
    """Parse the message event, and if the activation string is in the text,
    simulate a coin flip and send the result.
    """

    # Get the event data from the payload
    event = payload.get("event", {})

    # Get the text from the event that came through
    text = event.get("text")

    # Check and see if the activation phrase was in the text of the message.
    # If so, execute the code to flip a coin.
    if "hey sammy, flip a coin" in text.lower():
        # Since the activation phrase was met, get the channel ID that the event
        # was executed on
        channel_id = event.get("channel")

        # Execute the flip_coin function and send the results of
        # flipping a coin to the channel
        return flip_coin(channel_id)
Finally, create a main section that will create a logger so you can see the internals of your application as well as launch the app on your external IP address on port 3000. In order to ingest the events from Slack, such as when a new message is sent, you must test your application on a public-facing IP address.
Append the following lines to app.py to set up your main section:
if __name__ == "__main__":
    # Create the logging object
    logger = logging.getLogger()

    # Set the log level to DEBUG. This will increase verbosity of logging messages
    logger.setLevel(logging.DEBUG)

    # Add the StreamHandler as a logging handler
    logger.addHandler(logging.StreamHandler())

    # Run your app on your externally facing IP address on port 3000 instead of
    # running it on localhost, which is traditional for development.
    app.run(host='0.0.0.0', port=3000)
You are now finished with the Flask app and it is ready for testing. Before you move on verify that your finished file, app.py contains the following:
import os
import logging
from flask import Flask
from slack import WebClient
from slackeventsapi import SlackEventAdapter
from coinbot import CoinBot

# Initialize a Flask app to host the events adapter
app = Flask(__name__)
# Create an events adapter and register it to an endpoint in the slack app for event injestion.
slack_events_adapter = SlackEventAdapter(os.environ.get("SLACK_EVENTS_TOKEN"), "/slack/events", app)

# Initialize a Web API client
slack_web_client = WebClient(token=os.environ.get("SLACK_TOKEN"))

def flip_coin(channel):
    """Craft the CoinBot, flip the coin and send the message to the channel
    """
    # Create a new CoinBot
    coin_bot = CoinBot(channel)

    # Get the onboarding message payload
    message = coin_bot.get_message_payload()

    # Post the onboarding message in Slack
    slack_web_client.chat_postMessage(**message)


# When a 'message' event is detected by the events adapter, forward that payload
# to this function.
@slack_events_adapter.on("message")
def message(payload):
    """Parse the message event, and if the activation string is in the text,
    simulate a coin flip and send the result.
    """

    # Get the event data from the payload
    event = payload.get("event", {})

    # Get the text from the event that came through
    text = event.get("text")

    # Check and see if the activation phrase was in the text of the message.
    # If so, execute the code to flip a coin.
    if "hey sammy, flip a coin" in text.lower():
        # Since the activation phrase was met, get the channel ID that the event
        # was executed on
        channel_id = event.get("channel")

        # Execute the flip_coin function and send the results of
        # flipping a coin to the channel
        return flip_coin(channel_id)

if __name__ == "__main__":
    # Create the logging object
    logger = logging.getLogger()

    # Set the log level to DEBUG. This will increase verbosity of logging messages
    logger.setLevel(logging.DEBUG)

    # Add the StreamHandler as a logging handler
    logger.addHandler(logging.StreamHandler())

    # Run our app on our externally facing IP address on port 3000 instead of
    # running it on localhost, which is traditional for development.
    app.run(host='0.0.0.0', port=3000)
Save and close the file.
Now that your Flask app is ready to serve your application let’s test it out.
Step 6 — Running Your Flask App
Finally, bring everything together and execute your app.
First, add your running application as an authorized handler for your Slackbot.
Navigate to the Basic Information section of your app in the Slack UI. Scroll down until you find the App Credentials section.
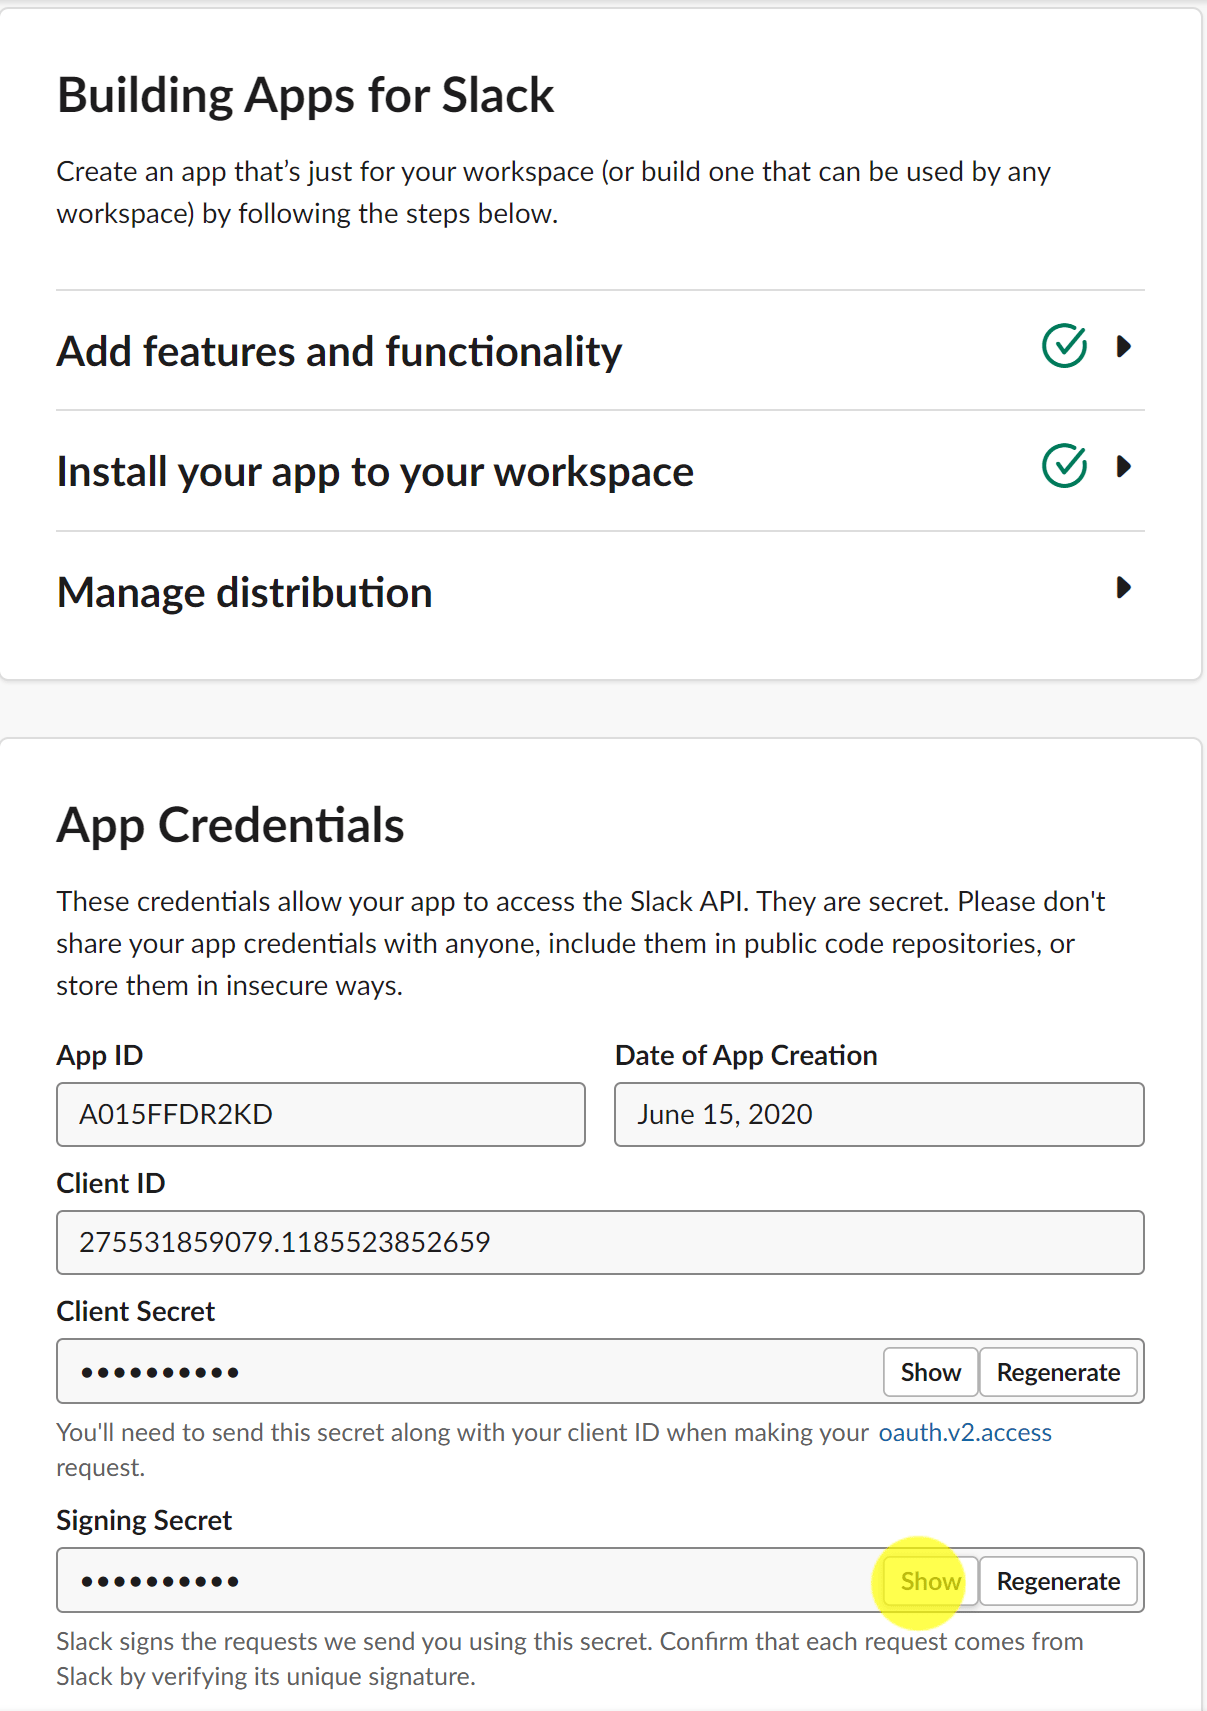
Copy the Signing Secret and export it as the environment variable SLACK_EVENTS_TOKEN:
- export SLACK_EVENTS_TOKEN="MY_SIGNING_SECRET_TOKEN"
With this you have all the necessary API tokens to run your app. Refer to Step 1 if you need a refresher on how to export your SLACK_TOKEN. Now you can start your app and verify that it is indeed running. Ensure that your virtual environment is activated and run the following command to start your Flask app:
- python3 app.py
You will see an output like this:
(slackbot) [20:04:03] sammy:coinbot$ python app.py
 * Serving Flask app "app" (lazy loading)
 * Environment: production
   WARNING: This is a development server. Do not use it in a production deployment.
   Use a production WSGI server instead.
 * Debug mode: off
 * Running on http://0.0.0.0:3000/ (Press CTRL+C to quit)
To verify that your app is up, open a new terminal window and curl the IP address of your server with the correct port at /slack/events:
- curl http://YOUR_IP_ADDRESS:3000/slack/events
curl will return the following:
OutputThese are not the slackbots you're looking for.
Receiving the message These are not the slackbots you're looking for., indicates that your app is up and running.
Now leave this Flask application running while you finish configuring your app in the Slack UI.
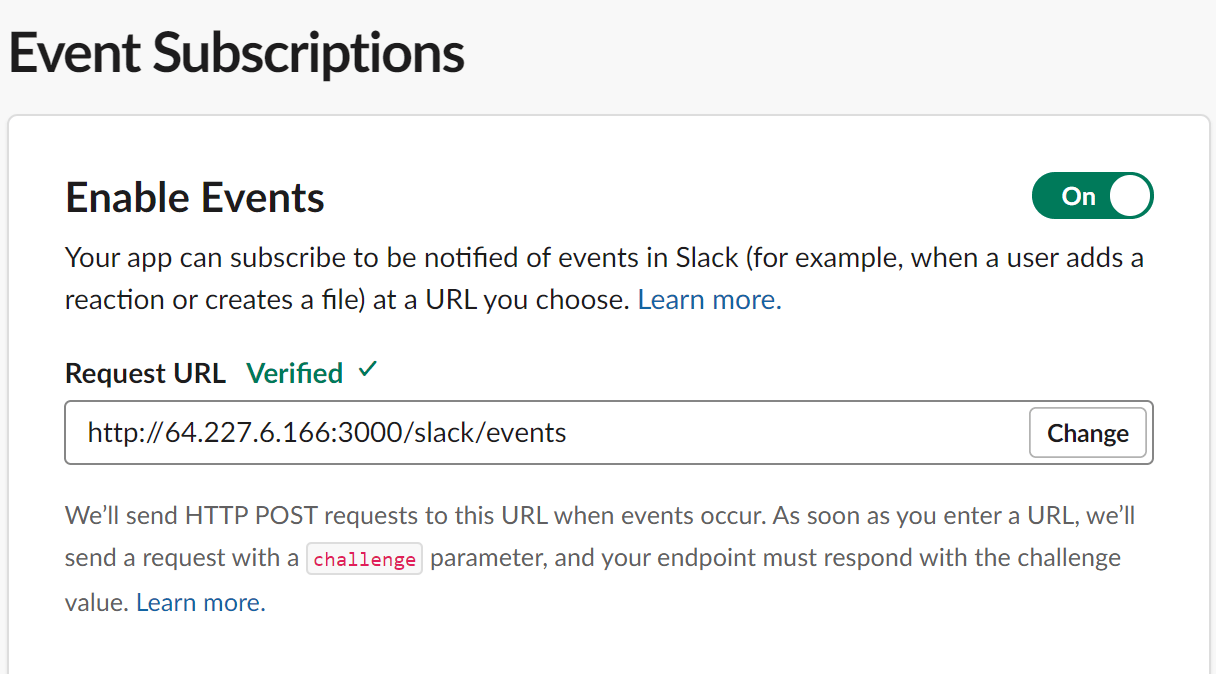
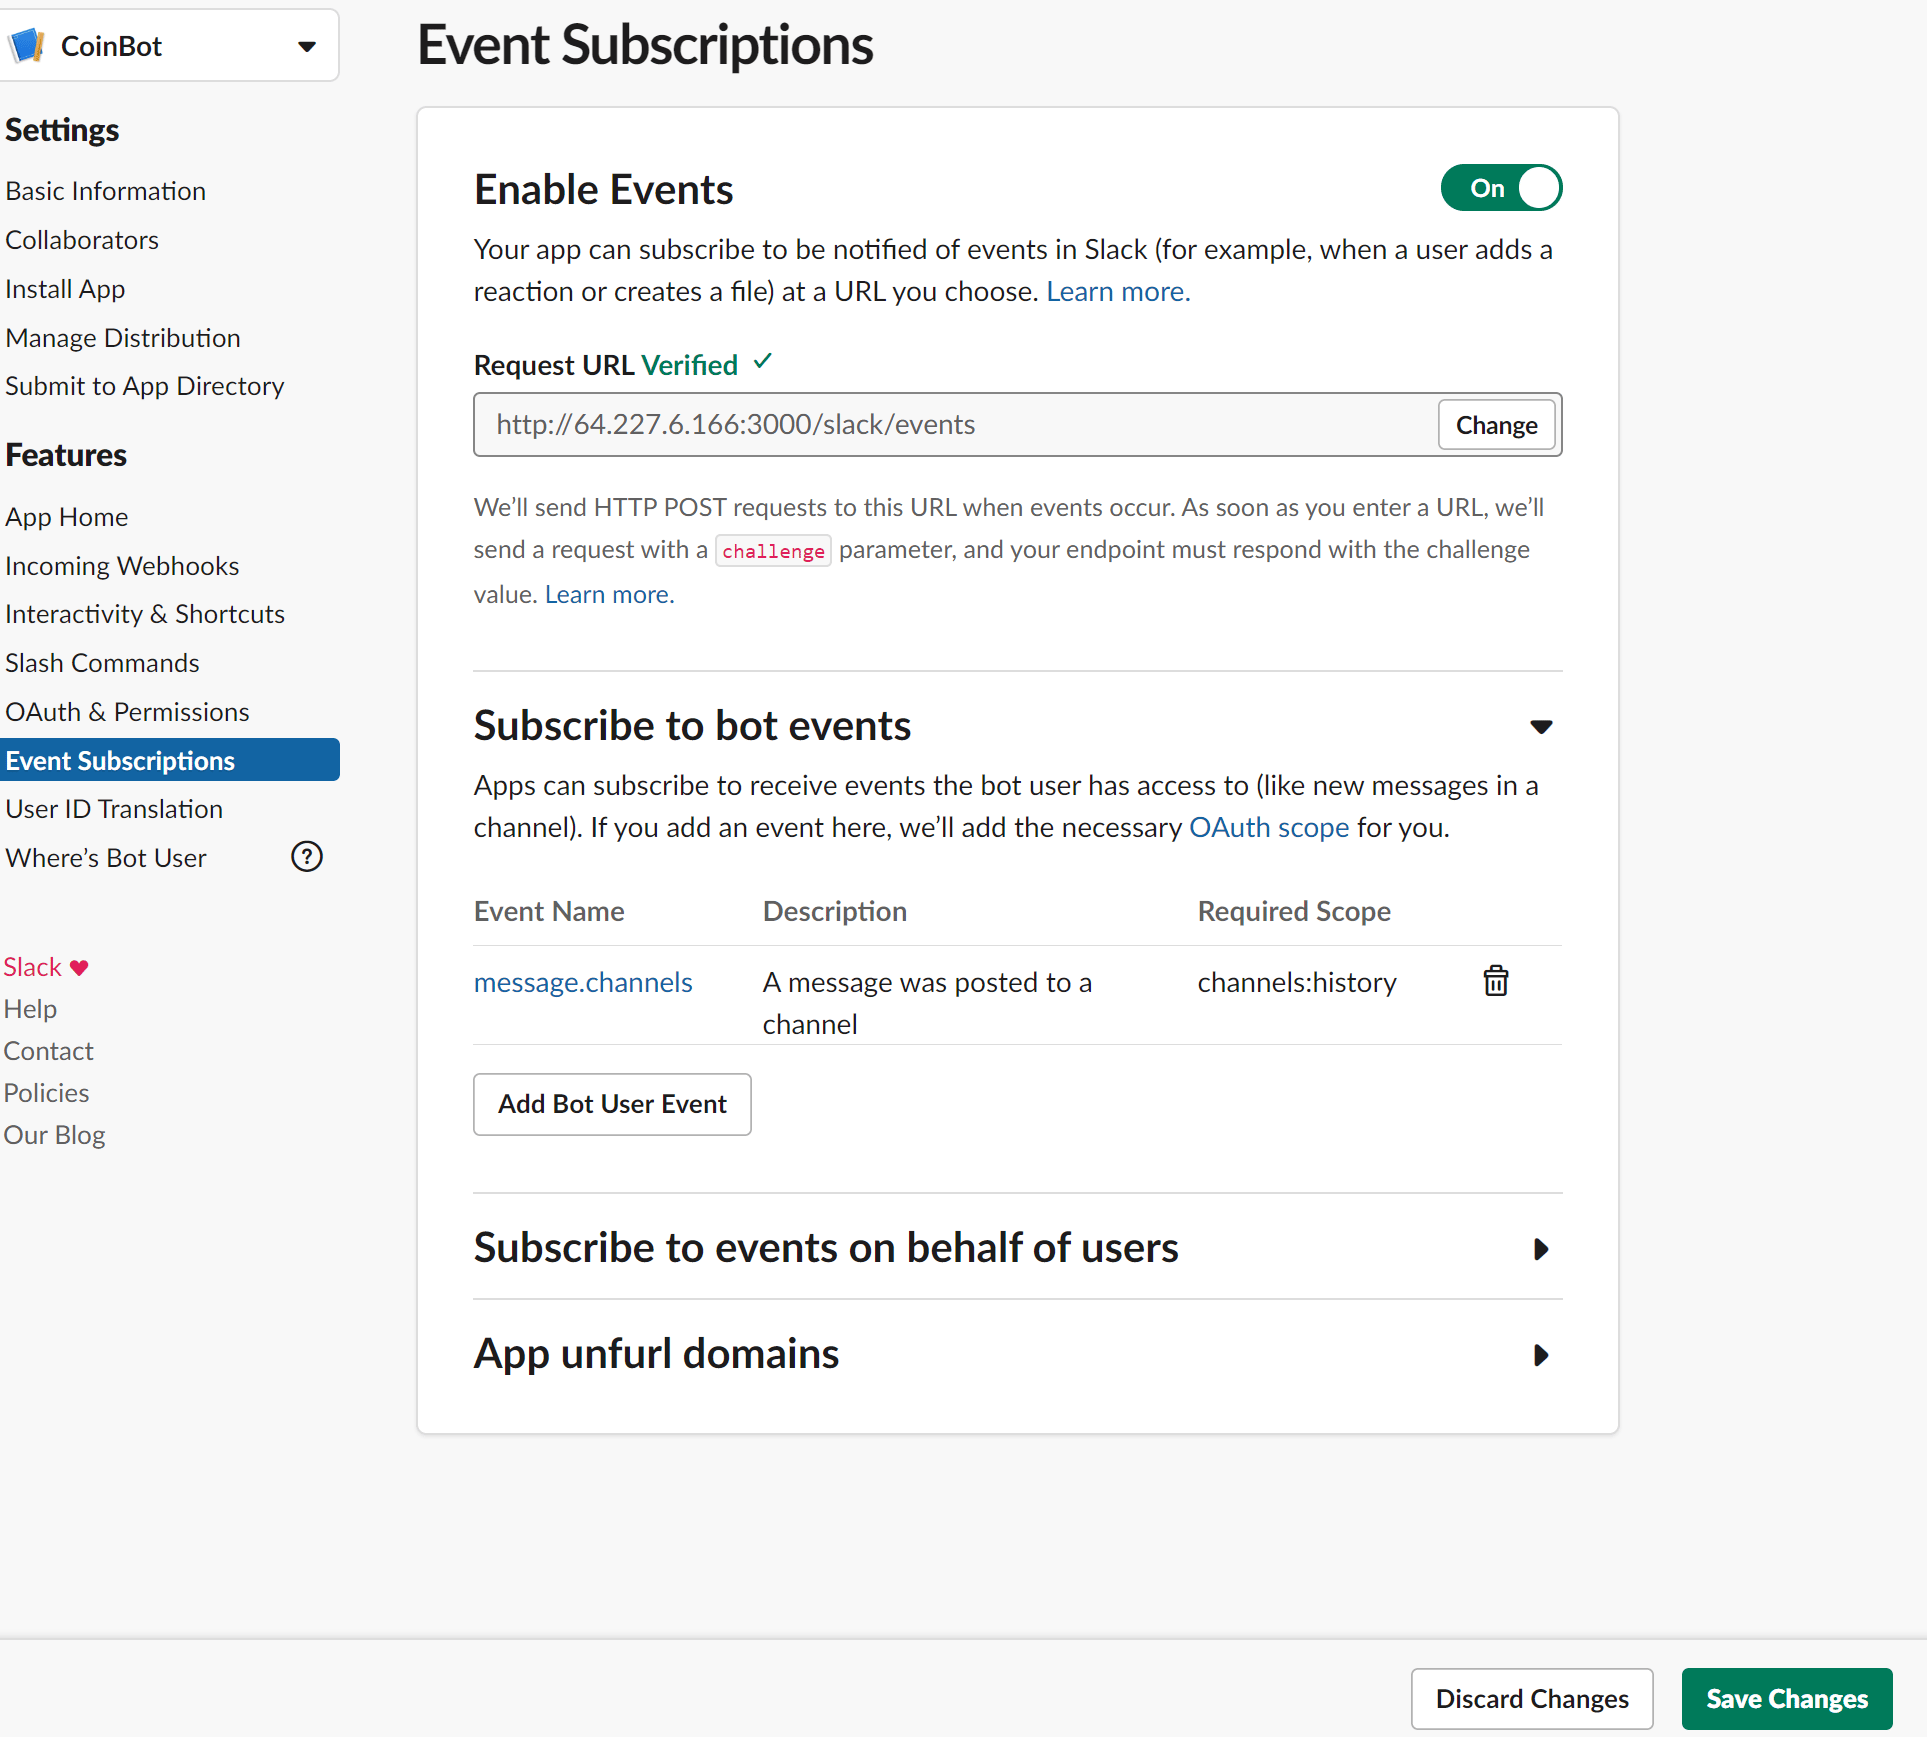
First grant your app the appropriate permissions so that it can listen to messages and respond accordingly. Click on Event Subscriptions in the UI sidebar and toggle the Enable Events radio button.

Once you’ve done that, type in your IP address, port, and /slack/events endpoint into the Request URL field. Don’t forget the HTTP protocol prefix. Slack will make an attempt to connect to your endpoint. Once it has successfully done so you’ll see a green check mark with the word Verified next to it.
Next, expand the Subscribe to bot events and add the message.channels permission to your app. This will allow your app to receive messages from your channel and process them.

Once you’ve done this you will see the event listed in your Subscribe to bot events section. Next click the green Save Changes button in the bottom right hand corner.
Once you do this you’ll see a yellow banner across the top of the screen informing you that you need to reinstall your app for the following changes to apply. Every time you change permissions you’ll need to reinstall your app. Click on the reinstall your app link in this banner to reinstall your app.

You’ll be presented with a confirmation screen summarizing the permissions your bot will have and asking if you want to allow its installation. Click on the green Allow button to finish the installation process.

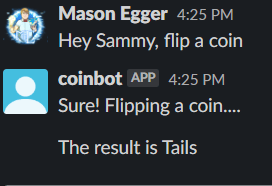
Now that you’ve done this your app should be ready. Go back to the channel that you installed CoinBot into and send a message containing the phrase Hey Sammy, Flip a coin in it. Your bot will flip a coin and reply with the results. Congrats! You’ve created a Slackbot!
Conclusion
Once you are done developing your application and you are ready to move it to production, you’ll need to deploy it to a server. This is necessary because the Flask development server is not a secure production environment. You’ll be better served if you deploy your app using a WSGI and maybe even securing a domain name and giving your server a DNS record. There are many options for deploying Flask applications, some of which are listed below:
- Deploy your Flask application to Ubuntu 20.04 using Gunicorn and Nginx
- Deploy your Flask application to Ubuntu 20.04 using uWSGI and Nginx
- Deploy your Flask Application Using Docker on Ubuntu 18.04
There are many more ways to deploy your application than just these. As always, when it comes to deployments and infrastucture, do what works best for you.
In any case, you now have a Slackbot that you can use to flip a coin to help you make decisions, like what to eat for lunch.
You can also take this base code and modify it to fit your needs, whether it be automated support, resource management, pictures of cats, or whatever you can think of. You can view the complete Python Slack API docs here.
Thanks for learning with the DigitalOcean Community. Check out our offerings for compute, storage, networking, and managed databases.
About the author(s)
Mason is currently a Sr. Developer Advocate at DigitalOcean who specializes in cloud infrastructure, distributed systems, and Python.
Supporting the open-source community one tutorial at a time. Former Technical Editor at DigitalOcean. Expertise in topics including Ubuntu 22.04, Ubuntu 20.04, CentOS, and more.
Still looking for an answer?
This textbox defaults to using Markdown to format your answer.
You can type !ref in this text area to quickly search our full set of tutorials, documentation & marketplace offerings and insert the link!
 This work is licensed under a Creative Commons Attribution-NonCommercial- ShareAlike 4.0 International License.
Become a contributor for community
Get paid to write technical tutorials and select a tech-focused charity to receive a matching donation.

DigitalOcean Documentation
Full documentation for every DigitalOcean product.

Resources for startups and AI-native businesses
The Wave has everything you need to know about building a business, from raising funding to marketing your product.
The developer cloud
Scale up as you grow — whether you're running one virtual machine or ten thousand.

Start building today
From GPU-powered inference and Kubernetes to managed databases and storage, get everything you need to build, scale, and deploy intelligent applications.
