By Dave Berning
Developer and Author

The author selected Open Sourcing Mental Illness to receive a donation as part of the Write for DOnations program.
Introduction
When creating a web application using Vue.js, it’s a best practice to construct your application in small, modular blocks of code. Not only does this keep the parts of your application focused, but it also makes the application easier to update as it grows in complexity. Since an app generated from the Vue CLI requires a build step, you have access to a Single-File Components (SFC) to introduce modularity into your app. SFCs have the .vue extension and contain an HTML <template>, <script>, and <style> tags and can be implemented in other components.
SFCs give the developer a way to create their own HTML tags for each of their components and then use them in their application. In the same way that the <p> HTML tag will render a paragraph in the browser, and hold non-rendered functionality as well, the component tags will render the SFC wherever it is placed in the Vue template.
In this tutorial, you are going to create a SFC and use props to pass data down and slots to inject content between tags. By the end of this tutorial, you will have a general understanding of what SFCs are and how to approach code re-usability.
Prerequisites
- Node.js version
14.16.0or greater installed on your computer. To install this on macOS or Ubuntu 20.04, follow the steps in How To Install Node.js and Create a Local Development Environment on macOS or the Installing Using a PPA section of How To Install Node.js on Ubuntu 20.04 - Vue CLI installed on your machine and a fresh project generated. Since this tutorial uses the Vue 3 Composition API, make sure that you select the
3.x (Preview)option when generating the app. The name of this project will besfc-project, which will act as the root directory. - You will also need a basic knowledge of JavaScript, HTML, and CSS, which you can find in our How To Build a Website With HTML series, How To Build a Website With CSS series, and in How To Code in JavaScript.
Step 1 — Setting Up the Project
In this tutorial, you are going to be creating an airport card component that displays a number of airports and their codes in a series of cards. After following the Prerequisites section, you will have a new Vue project named sfc-project. In this section, you will import data into this generated application. This data will be an array of objects consisting of a few properties that you will use to display information in the browser.
Once the project is generated, open your terminal and cd or change directory into the root src folder:
- cd sfc-project/src
From there, create a new directory named data with the mkdir command, then create a new file with the name us-airports.js using the touch command:
- mkdir data
- touch data/us-airports.js
In your text editor of choice, open this new JavaScript file and add in the following local data:
export default [
  {
    name: 'Cincinnati/Northern Kentucky International Airport',
    abbreviation: 'CVG',
    city: 'Hebron',
    state: 'KY'
  },
  {
    name: 'Seattle-Tacoma International Airport',
    abbreviation: 'SEA',
    city: 'Seattle',
    state: 'WA'
  },
  {
    name: 'Minneapolis-Saint Paul International Airport',
    abbreviation: 'MSP',
    city: 'Bloomington',
    state: 'MN'
  }
]
This data is an array of objects consisting of a few airports in the United States. This will be rendered in a Single-File Component later in the tutorial.
Save and exit the file.
Next, you will create another set of airport data. This data will consist of European airports. Using the touch command, create a new JavaScript file named eu-airports.js:
- touch data/eu-airports.js
Then open the file and add the following data:
export default [
  {
    name: 'Paris-Charles de Gaulle Airport',
    abbreviation: 'CDG',
    city: 'Paris',
    state: 'Ile de France'
  },
  {
    name: 'Flughafen München',
    abbreviation: 'MUC',
    city: 'Munich',
    state: 'Bavaria'
  },
  {
    name: 'Fiumicino "Leonardo da Vinci" International Airport',
    abbreviation: 'FCO',
    city: 'Rome',
    state: 'Lazio'
  }
]
This set of data is for European airports in France, Germany, and Italy, respectively.
Save and exit the file.
Next, in the root directory, run the following command in your terminal to start your Vue CLI application running on a local development server:
- npm run serve
This will open the application in your browser on localhost:8080. The port number may be different on your machine.
Visit the address in your browser. You will find the following start up screen:
Next, start a new terminal and open your App.vue file in your src folder. In this file, delete the img and HelloWorld tags in the <template> and the components section and import statement in the <script>. Your App.vue will resemble the following:
<template>

</template>

<script>
export default {
  name: 'App',
}
</script>

<style>
#app {
  font-family: Avenir, Helvetica, Arial, sans-serif;
  -webkit-font-smoothing: antialiased;
  -moz-osx-font-smoothing: grayscale;
  text-align: center;
  color: #2c3e50;
  margin-top: 60px;
}
</style>
After this, import the us-airports.js file that you created earlier. In order to make this data reactive so you can use it in the <template>, you need to import the ref function from vue. You will need to return the airport reference so the data can be used in the HTML template.
Add the following highlighted lines:
<template>
  <div class="wrapper">
    <div v-for="airport in airports" :key="airport.abbreviation" class="card">
      <p>{{ airport.abbreviation }}</p>
      <p>{{ airport.name }}</p>
      <p>{{ airport.city }}, {{ airport.state }}</p>
    </div>
  </div>
</template>

<script>
import { ref } from 'vue'
import data from '@/data/us-airports.js'

export default {
  name: 'App',
  setup() {
    const airports = ref(data)

    return { airports }
  }
}
</script>
...
In this snippet, you imported the data and rendered it using <div> elements and the v-for directive in the template.
At this point, the data is imported and ready to be used in the App.vue component. But first, add some styling to make the data easier for users to read. In this same file, add the following CSS in the <style> tag:
...
<style>
#app { ... }

.wrapper {
  display: grid;
  grid-template-columns: 1fr 1fr 1fr;
  grid-column-gap: 1rem;
  max-width: 960px;
  margin: 0 auto;
}

.card {
  border: 3px solid;
  border-radius: .5rem;
  padding: 1rem;
  margin-bottom: 1rem;
}

.card p:first-child {
  font-weight: bold;
  font-size: 2.5rem;
  margin: 1rem 0;
}

.card p:last-child {
  font-style: italic;
  font-size: .8rem;
}
</style>
In this case, you are using CSS Grid to compose these cards of airport codes into a grid of three. Notice how this grid is set up in the .wrapper class. The .card class is the card or section that contains each airport code, name, and location. If you would like to learn more about CSS, check out our How To Style HTML with CSS.
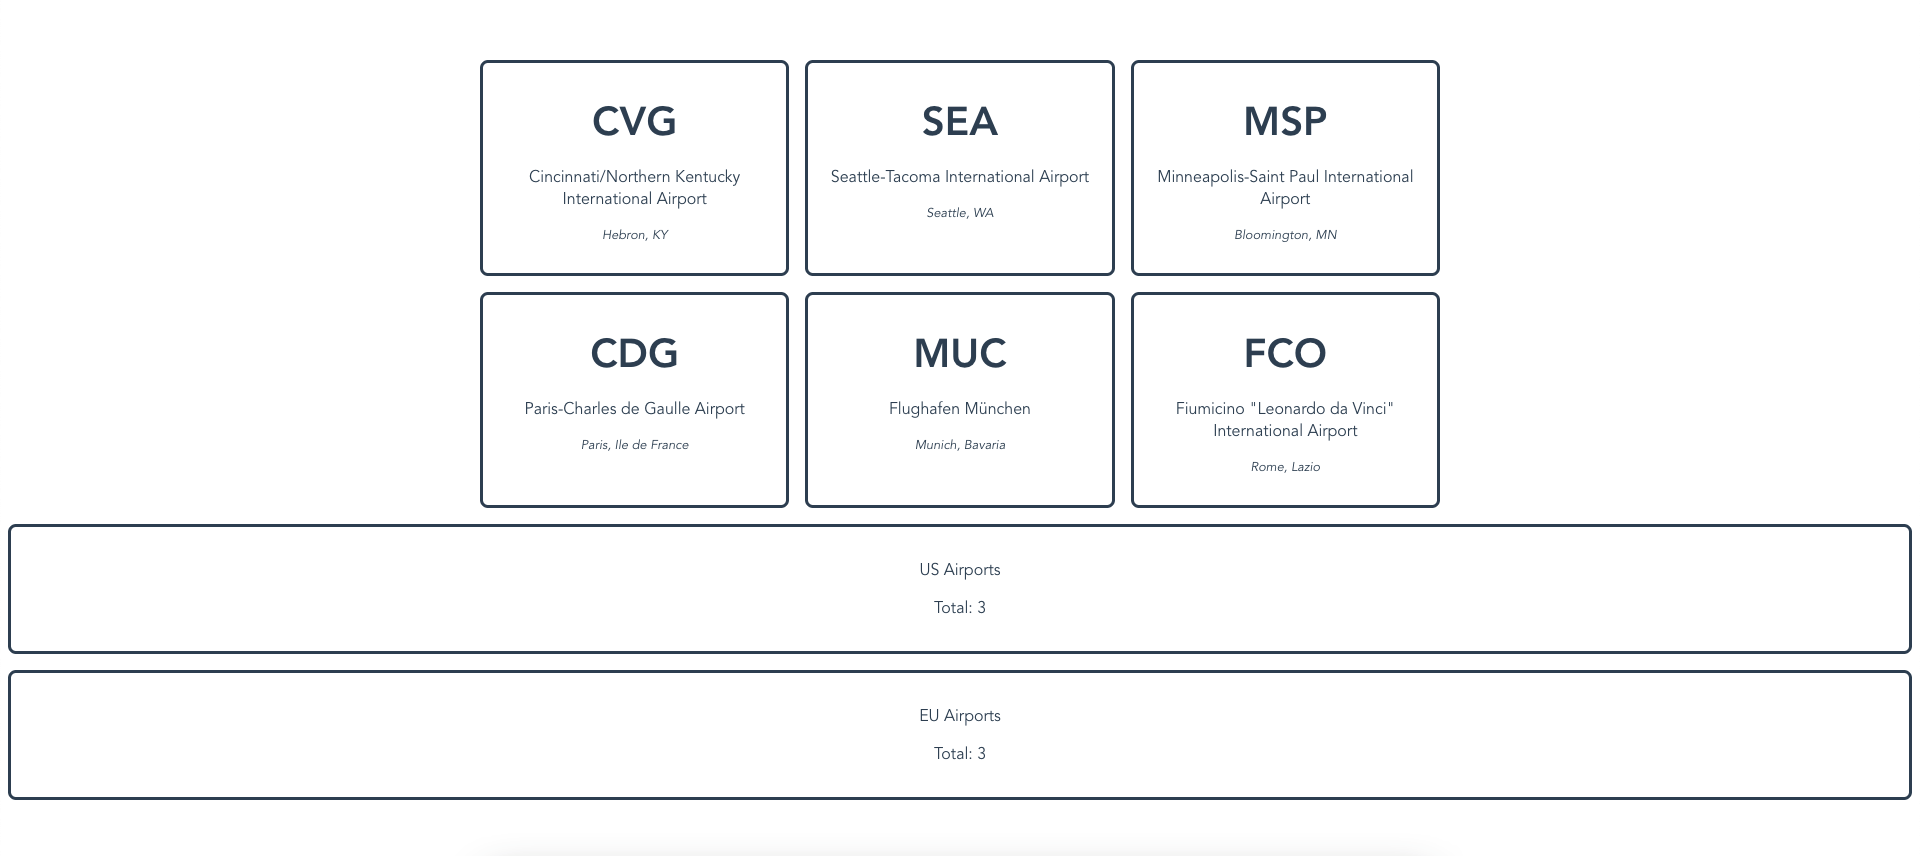
Open your browser and navigate to localhost:8080. You will find a number of cards with airport codes and information:

Now that you have set up your initial app, you can refactor the data into a Single-File Component in the next step.
Step 2 — Creating a Single-File Component
Since Vue CLI uses Webpack to build your app into something the browser can read, your app can use SFCs or .vue files instead of plain JavaScript. These files are a way for you to create small blocks of scalable and reusable code. If you were to change one component, it would be updated everywhere.
These .vue components usually consist of these three things: <template>, <script>, and <style> elements. SFC components can either have scoped or unscoped styles. When a component has scoped styles, that means the CSS between the <style> tags will only affect the HTML in the <template> in the same file. If a component has un-scoped styles, the CSS will affect the parent component as well as its children.
With your project successfully set up, you are now going to break these airport cards into a component called AirportCards.vue. As it stands now, the HTML in the App.vue is not very reusable. You will break this off into its own component so you can import it anywhere else into this app while preserving the functionality and visuals.
In your terminal, create this .vue file in the components directory:
- touch src/components/AirportCards.vue
Open the AiportCards.vue component in your text editor. To illustrate how you can re-use blocks of code using components, move most of the code from the App.vue file to the AirportCards.vue component:
<template>
  <div class="wrapper">
    <div v-for="airport in airports" :key="airport.abbreviation" class="card">
      <p>{{ airport.abbreviation }}</p>
      <p>{{ airport.name }}</p>
      <p>{{ airport.city }}, {{ airport.state }}</p>
    </div>
  </div>
</template>

<script>
import { ref } from 'vue'
import data from '@/data/us-airports.js'

export default {
  name: 'Airports',
  setup() {
    const airports = ref(data)

    return { airports }
  }
}
</script>

<style scoped>
.wrapper {
  display: grid;
  grid-template-columns: 1fr 1fr 1fr;
  grid-column-gap: 1rem;
  max-width: 960px;
  margin: 0 auto;
}

.card {
  border: 3px solid;
  border-radius: .5rem;
  padding: 1rem;
  margin-bottom: 1rem;
}

.card p:first-child {
  font-weight: bold;
  font-size: 2.5rem;
  margin: 1rem 0;
}

.card p:last-child {
  font-style: italic;
  font-size: .8rem;
}
</style>
Save and close the file.
Next, open your App.vue file. Now you can clean up the App.vue component and import AirportCards.vue into it:
<template>
  <AirportCards />
</template>

<script>
import AirportCards from '@/components/Airports.vue'

export default {
  name: 'App',
  components: {
    AirportCards
  }
}
</script>

<style scoped>
#app {
  font-family: Avenir, Helvetica, Arial, sans-serif;
  -webkit-font-smoothing: antialiased;
  -moz-osx-font-smoothing: grayscale;
  text-align: center;
  color: #2c3e50;
  margin-top: 60px;
}
</style>
Now that AirportCards is a standalone component, you have put it in the <template> HTML as you would a <p> tag.
When you open up localhost:8080 in your browser, nothing will change. The same three airport cards will still display, because you are rendering the new SFC in the <AirportCards /> element.
Next, add this same component in the template again to illustrate the re-usability of components:
<template>
  <AirportCards />
  <airport-cards />
</template>
...
You may notice that this new instance of AirportCards.vue is using kebab-case over PascalCase. When referencing components, Vue does not care which one you use. All capitalized words and letters will be separated by a hyphen and will be lower case. The same applies to props as well, which will be explained in the next section.
Note: The case that you use is up to personal preference, but consistency is important. Vue.js recommends using kebab-case as it follows the HTML standard.
Open the browser and visit localhost:8080. You will find the cards duplicated:

This adds modularity to your app, but the data is still static. The row of cards is useful if you want to show the same three airports, but changing the data source would require changing the hard-coded data. In the next step, you are going to expand this component further by registering props and passing data from the parent down to the child component.
Step 3 — Leveraging Props to Pass Down Data
In the previous step, you created an AirportCards.vue component that rendered a number of cards from the data in the us-airports.js file. In addition to that, you also doubled the same component reference to illustrate how you can easily duplicate code by adding another instance of that component in the <template>.
However, leaving the data static will make it difficult to change the data in the future. When working with SFCs, it can help if you think of components as functions. These functions are components that can take in arguments (props) and return something (HTML). For this case, you will pass data into the airports parameter to return dynamic HTML.
Open the AirportCards.vue component in your text editor. You are currently importing data from the us-airports.js file. Remove this import statement, as well as the setup function in the <script> tag:
...
<script>

export default {
  name: 'Airports',
}
</script>
...
Save the file. At this point, nothing will render in the browser.
Next, move forward by defining a prop. This prop can be named anything; it just describes the data coming in and associates it with a name.
To create a prop, add the props property in the component. The value of this is a series of key/value pairs. The key is the name of the prop, and the value is the description of the data. It’s best to provide as much description as you can:
...
<script>

export default {
  name: 'Airports',
  props: {
    airports: {
      type: Array,
      required: true
    }
  }
}
</script>
...
Now, in AirportCard.vue, the property airports refers to the data that is passed in. Save and exit from the file.
Next, open the App.vue component in your text editor. Like before, you will need to import data from the us-airports.js file and import the ref function from Vue to make it reactive for the HTML template:
<template>
  <AirportCards :airports="usAirports" />
  <airport-cards />
</template>

<script>
import { ref } from 'vue'
import AirportCards from '@/components/Airports.vue'
import usAirportData from '@/data/us-airports.js'

export default {
  name: 'App',
  components: {
    AirportCards
  },
  setup() {
    const usAirports = ref(usAirportData)

    return { usAirports }
  }
}
</script>
If you open your browser and visit localhost:8080, you will find the same US airports as before:
There is another AirportCards.vue instance in your template. Since you defined props within that component, you can pass any data with the same structure to render a number of cards from different airports. This is where the eu-airports.js file from the initial setup comes in.
In App.vue, import the eu-airports.js file, wrap it in the ref function to make it reactive, and return it:
<template>
  <AirportCards :airports="usAirports" />
  <airport-cards :airports="euAirports" />
</template>

<script>
...
import usAirportData from '@/data/us-airports.js'
import euAirportData from '@/data/eu-airports.js'

export default {
  ...
  setup() {
    const usAirports = ref(usAirportData)
    const euAirports = ref(euAirportData)

    return { usAirports, euAirports }
  }
}
</script>
...
Open your browser and visit localhost:8080. You will find the European airport data rendered below the US airport data:

You have now successfully passed in a different dataset into the same component. With props, you are essentially re-assigning data to a new name and using that new name to reference data in the child component.
At this point, this application is starting to become more dynamic. But there is still something else that you can do to make this even more focused and re-usable. In Vue.js, you can use something called slots. In the next step, you are going to create a Card.vue component with a default slot that injects the HTML into a placeholder.
Step 4 — Creating a General Card Component Using Slots
Slots are a great way to create re-usable components, especially if you do not know if the HTML in that component will be similar. In the previous step, you created another AirportCards.vue instance with different data. In that example, the HTML is the same for each. It’s a <div> in a v-for loop with paragraph tags.
Open your terminal and create a new file using the touch command. This file will be named Card.vue:
- touch src/components/Card.vue
In your text editor, open the new Card.vue component. You are going to take some of the CSS from AirportCards.vue and add it into this new component.
Create a <style> tag and add in the following CSS:
<style>
.card {
  border: 3px solid;
  border-radius: .5rem;
  padding: 1rem;
  margin-bottom: 1rem;
}
</style>
Next, create the HTML template for this component. Before the <style> tag, add a <template> tag with the following:
<template>
  <div class="card">

  </div>
</template>
...
In between the <div class="card">, add the <slot /> component. This is a component that is provided to you by Vue. There is no need to import this component; it is globally imported by Vue.js:
<template>
  <div class="card">
    <slot />
  </div>
</template>
This slot is a placeholder for the HTML that is between the Card.vue component’s tags when it is referenced elsewhere.
Save and exit the file.
Now go back to the AirportCards.vue component. First, import the new Card.vue SFC you just created:
...
<script>
import Card from '@/components/Card.vue'

export default {
  name: 'Airports',
  props: { ... },
  components: {
    Card
  }
}
</script>
...
Now all that is left is to replace the <div> with <card>:
<template>
  <div class="wrapper">
    <card v-for="airport in airports" :key="airport.abbreviation">
      <p>{{ airport.abbreviation }}</p>
      <p>{{ airport.name }}</p>
      <p>{{ airport.city }}, {{ airport.state }}</p>
    </card>
  </div>
</template>
...
Since you have a <slot /> in your Card.vue component, the HTML between the <card> tags is injected in its place while preserving all styles that have been associated with a card.
Save the file. When you open your browser at localhost:8080, you will find the same cards that you’ve had previously. The difference now is that your AirportCards.vue now reference the Card.vue component:
To show the power of slots, open the App.vue component in your application and import the Card.vue component:
...
<script>
...
import Card from '@/components/Card.vue'

export default {
  ...
  components: {
    AirportCards,
    Card
  },
  setup() { ... }
}
</script>
...
In the <template>, add the following under the <airport-cards /> instances:
<template>
  <AirportCards :airports="usAirports"/>
  <airport-cards :airports="euAirports" />
  <card>
    <p>US Airports</p>
    <p>Total: {{ usAirports.length }}</p>
  </card>
  <card>
    <p>EU Airports</p>
    <p>Total: {{ euAirports.length }}</p>
  </card>
</template>
...
Save the file and visit localhost:8080 in the browser. Your browser will now render additional elements displaying the number of airports in the datasets:
The HTML between the <card /> tags is not exactly the same, but it still renders a generic card. When leveraging slots, you can use this functionality to create small, re-usable components that have a number of different uses.
Conclusion
In this tutorial, you created single-file components and used props and slots to create reusable blocks of code. In the project, you created an AirportCards.vue component that renders a number of airport cards. You then broke up the AirportCards.vue component further into a Card.vue component with a default slot.
You ended up with a number of components that are dynamic and can be used in a number of different uses, all while keeping code maintainable and in keeping with the D.R.Y. software principle.
To learn more about Vue components, it is recommended to ready through the Vue documentation. For more tutorials on Vue, check out the How To Develop Websites with Vue.js series page.
Thanks for learning with the DigitalOcean Community. Check out our offerings for compute, storage, networking, and managed databases.
Tutorial Series: How To Develop Websites with Vue.js
This series provides a starting point for building websites with the front-end JavaScript framework Vue.js. Created in 2014 by Evan You (formally of Google), Vue.js is often described as a combination of React and Angular, borrowing the prop-driven development of React and the templating power of Angular. By the end of this series, you will have the tools to develop websites that focus on traditional HTML and CSS, while still taking advantage of the robustness and scalability of a front-end framework.
About the author
I'm a software engineer from Cincinnati. I work on TypeScript apps with Vue.js. Currently a Senior Front-End Engineer at Enodo, based in Chicago.
Still looking for an answer?
This textbox defaults to using Markdown to format your answer.
You can type !ref in this text area to quickly search our full set of tutorials, documentation & marketplace offerings and insert the link!
 This work is licensed under a Creative Commons Attribution-NonCommercial- ShareAlike 4.0 International License.
Become a contributor for community
Get paid to write technical tutorials and select a tech-focused charity to receive a matching donation.

DigitalOcean Documentation
Full documentation for every DigitalOcean product.

Resources for startups and AI-native businesses
The Wave has everything you need to know about building a business, from raising funding to marketing your product.
The developer cloud
Scale up as you grow — whether you're running one virtual machine or ten thousand.

Start building today
From GPU-powered inference and Kubernetes to managed databases and storage, get everything you need to build, scale, and deploy intelligent applications.
