By Dave Berning
Developer and Author

The author selected Open Sourcing Mental Illness to receive a donation as part of the Write for DOnations program.
Introduction
As a front-end framework, Vue.js can be thought of as a mixture of React and Angular. Vue borrows the prop-driven approach of React, but also uses directives, which were made popular by Angular. In this context, directives are reusable chunks of code or logic that developers can use within an HTML template. These can allow you to manipulate your HTML in many different ways, such as conditionally rendering an element, connecting events to an element, or creating dynamic attributes that depend on your Vue code.
In this tutorial, you will try out some of the most common built-in Vue directives, such as v-if, v-show, v-on, v-bind, v-model, and v-html. For these first sections, the tutorial will lead you through examples that you can follow in an online Vue playground like the Vue Single File Component Playground. In addition to this, you will create a new Vue project to try out custom directives that you can add to HTML elements for additional functionality.
Prerequisites
- For the first sections of this tutorial, you can follow along in your browser using an online Vue playground like the Vue Single File Component Playground.
- To create the project in the Creating Custom Directives section, you will need Node.js version
10.6.0or greater installed on your computer. To install this on macOS or Ubuntu 18.04, follow the steps in How To Install Node.js and Create a Local Development Environment on macOS or the Installing Using a PPA section of How To Install Node.js on Ubuntu 18.04. - You will also need Vue CLI installed on your machine.
- Finally, this tutorial assumes knowledge of JavaScript, HTML, and CSS, which you can find in our How To Build a Website With HTML series, How To Build a Website With CSS series, and in How To Code in JavaScript.
Using the v-if, v-else, and v-else-if Directives
v-if, v-else, and v-else-if DirectivesVue.js comes pre-packaged with a number of directives that developers commonly use when working within the framework. Directives such as v-if, v-show, v-on, v-model, v-bind, v-html, and more are all provided for you out-of-the-box. All of these provided directives start with v-.
The v-if, v-else, and v-else-if directives allow you to create conditionally rendered HTML elements, and work similarly to JavaScript’s if, else if, else conditions. Instead of returning HTML or code like you would in JavaScript, Vue will conditionally render that block of code.
To apply a Vue directive, you will add it to an HTML element in the template section of your Vue single-file component. For example, if you wanted to add a v-if directive to a paragraph element, you would use the following syntax:
<p v-if="condition"></p>
In this case, the highlighted condition is a placeholder for the boolean expression that determines if the paragraph element is rendered or not.
To illustrate how the v-if directives work in a real situation, create the following code for a user welcome page:
<template>
  <p v-if="user.firstName && user.lastName">
    Welcome, {{ user.firstName }} {{ user.lastName }}!
  </p>
  <p v-else-if="user.username">
    Welcome, {{ user.username }}!
  </p>
  <div v-else>
    <button>Login</button>
    <button>Create Account</button>
  </div>
</template>

<script setup>
	const user = {
    firstName: 'Sammy',
    lastName: 'Shark',
    username: 'sammyDO'
  }
</script>
In this code, there are a number of HTML elements, including two <p> tags and a <div> tag with two buttons. However, when this code runs in the browser, only one of these chunks of code will render, depending on the condition that evaluates to true. HTML with false conditions will not render in your DOM (Document Object Model).
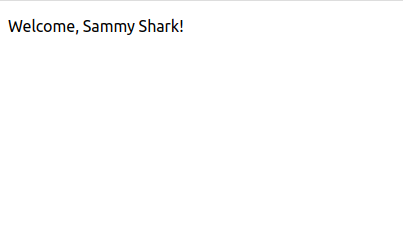
As it is now, since both firstName and lastName have values in the <script> tag, the expression user.firstName && user.lastName will evaluate to true, and the browser will render the paragraph. This will look like the following image in your browser:
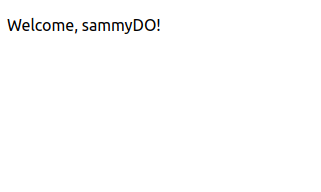
If either firstName or lastName is not defined, the condition will evaluate to false, and Vue will move to the v-else-if directive. This directive is attached to the user.username expression, so if this evaluates to true it will render the attached paragraph element. To try this, delete the firstName in your <script> tag:
...
<script setup>
	const user = {
    lastName: 'Shark',
    username: 'sammyDO'
  }
</script>
Since the condition user.firstName && user.lastName now evaluates to false but user.username evaluates to true, the username will render instead. This is shown in the following image:
Lastly, if all the conidtions evaluate to false, control will pass to the v-else directive, which here renders two buttons to log in or create an account. To try this out, delete the username data in the script element:
...
<script setup>
	const user = {
    lastName: 'Shark',
  }
</script>
Now you will find default buttons rendered in the browser:

It is important to note that you must have an element with a v-if directive directly before a v-else-if or v-else directive. Otherwise it will not work.
As an example, the following code snippet is considered invalid and you will get an error in your browser’s console:
<template>
  <p v-if="user.firstName && user.lastName">
    Welcome, {{ user.firstName }} {{ user.lastName }}!
  </p>
  <p v-else-if="user.username">
    Welcome, {{ user.username }}!
  </p>
  <h1>Some Title</h1>
  <div v-else>
    <button>Login</button>
    <button>Create Account</button>
  </div>
</template>

<script setup>
	const user = {
    firstName: 'Sammy',
    lastName: 'Shark',
    username: 'sammyDO'
  }
</script>
Since the <h1> element after the paragraph with the v-else-if directive has no directive, this code will fail to render and will yield the following syntax error:
OutputSyntaxError: v-else/v-else-if has no adjacent v-if.
With this summary of v-if covered, you can now try out another way to conditionally display HTML elements: the v-show directive.
Using the v-show Directive
v-show DirectiveBeyond the v-if-related directives, there is another directive that you can use to display HTML elements based on a condition. That directive is v-show. It’s similar to v-if, with the exceptions that there are no else-if and else counterparts and the elements are conditionally displayed rather than conditionally rendered.
Take a look at the following code that addresses a similar situation as in the last section:
<template>
  <div v-show="!userIsLoggedIn">
    <button>Login</button>
    <button>Create Account</button>
  </div>
  <div v-show="userIsLoggedIn">
    <p>Welcome!</p>
  </div>
</template>

<script setup>
	const userIsLoggedIn = true
</script>
In this code, you’ve attached v-show to two <div>s, along with conditional expressions. v-show will display the attached HTML if the condition in the quotation marks is met. In this example, userIsLoggedIn evaluates to true, so the browser will display the <div> with the Welcome! paragraph:

Now change the userIsLoggedIn value to false:
...
<script setup>
	const userIsLoggedIn = false
</script>
You will again find the login buttons:
It is worth emphasizing the difference between v-if and v-show. v-if conditionally renders the HTML; if the conditional expression evaluates to false, the DOM will not include it at all. v-show on the other hand will always render the HTML in the DOM. But the element will not appear in the browser because it will be hidden with the display: none CSS style.
With the conditional v-if and v-show directives covered, you can now move on to the v-on directive to tie events to HTML elements.
Using the v-on Directive
v-on DirectiveThe v-on directive executes functions on a specific event. This can be a custom event or a standard JavaScript event, such as click, hover, or mouseenter. When using the v-on directive, you must provide the event type after a colon (:) and the function to be executed. The component’s function name will reside in-between the quotation marks.
As an example of this, examine the following highlighted code:
<template>
  <button v-on:click="handleClick">Click Me</button>
</template>

<script setup>
	function handleClick() {
    alert('You clicked the button!')
  }
</script>
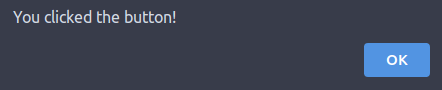
In this example, the component function handleClick will execute when the user clicks on the <button> element that the directive is attached to. If you run this code and click on the button, you will receive an alert that reads You clicked the button!:
Events with the v-on directive can also have event modifiers chained to the event itself. These event modifiers can change how the event is executed, and can save time when writing functionality that would normally take multiple lines of JavaScript. Some modifiers provided by Vue include:
once: Limits the event to fire only once.self: Event will only trigger if the event target is the same element that holds the directive.prevent: Stops the event from happening.stop: Stops the event from propagating.
Next, you will run through an example of the once event modifier to try out the syntax. Add the following highlighted code to the previous snippet:
<template>
  <button v-on:click.once="handleClick">Click Me</button>
</template>
...
With the .once modifier, the function handleClick will only execute one time. Try clicking the Click Me button, and the alert will pop up. Clear the alert, then click it again. The event will not fire because it has already fired once.
The v-on directive also has a shorthand syntax. To use the shorthand syntax, replace v-on: with @.
<template>
  <button @click.once="handleClick">Click Me</button>
</template>
...
This will lead to the same behavior as v-on:click.once.
Now that events have been addressed with v-on, you can move on to binding data to template elements with v-bind and v-model.
Using the v-bind and v-model Directives
v-bind and v-model DirectivesVue.js is a Model-View-ViewModel (MVVM) framework, which means separate data (the model) updates the HTML (view), and the view in turn updates the model. This separation means that view, or what renders in the browser, can operate independently of the data processing.
To enact the MVVM approach, Vue provides ways for data, props, and computed properties to pass into a Vue component. This is done with two-way data binding, which allows for the view and model to interact with each other.
In the following code, you have a <p> element with dynamic content that changes depending on the data values:
<template>
  <p>I am from {{ city }}.</p>
</template>

<script setup>
	const city = 'Cincinnati'
</script>
In this snippet, {{ city }} is a data reference to the city constant in the <script> element after it. As it is now, {{ city }} will evaluate to the string "Cincinnati", and a paragraph element with the words I am from Cincinnati will render in your browser. If you were to change Cincinnati to Seattle, the {{ city }} in the template would update accordingly.
For this dynamic content, you don’t need to use a directive: The template has access to the city constant automatically. However, if you wanted to make an HTML attribute dynamic by referencing the <script> data, you would have to explicitly bind the data with v-bind.
To illustrate this, you will enclose the {{ city }} placeholder in a link (<a>) tag that will dynamically lead to the Wikipedia page for the city assigned to the city constant. First, wrap the {{ city }} in an <a> tag so the user can click on it and get more information on the city itself. After that, create a computed property called wikipediaLink and have it return the appropriate URL. Add the highlighted code:
<template>
  <p>I am from <a href="">{{ city }}</a>.</p>
</template>

<script setup>
  import { computed } from 'vue'

	const city = 'Cincinnati'
  const wikipediaLink = computed(() =>`https://en.wikipedia.org/wiki/${city}`)
</script>
In the <script> element, you imported the computed function from the Vue library, then used it to assign a URL to wikipediaLink. The URL string uses a template literal to change depending on the value of city.
Now that you have your Wikipedia link, go ahead and add the computed property name to the href attribute of the anchor tag you added earlier:
<template>
  <p>I am from <a href="wikipediaLink">{{ city }}</a>.</p>
</template>
...
If you were to view this in a browser at this point, you would recieve a console error. This is because right now Vue.js thinks wikipediaLink is a string literal, which is not a valid URL.
To tell Vue.js to use the returned value of the wikipediaLink computed property, you need to use the v-bind directive. This will bind the reference in the template to the computed property, as shown in the following:
<template>
  <p>I am from <a v-bind:href="wikipediaLink">{{ city }}</a>.</p>
</template>
...
Now, the href value will be the URL for the Cincinnati Wikipedia page. This URL will update if the city property changes to another city, such as Seattle.
Similar to v-on, v-bind also has a shorthand that you can opt to use. To use the shorthand, replace v-bind: with :, as shown in the following:
<template>
  <p>I am from <a :href="wikipediaLink">{{ city }}</a>.</p>
</template>
There is another directive in Vue.js that is used to bind a value to a data property. However, this directive only works for input tags:
<template>
  <input v-model="city" type="text" />
</template>

<script setup>
  const city = 'Cincinnati'
</script>
When using the v-model directive, you are binding the input fields value attribute to the data property in the quotation marks. It is recommended to use the v-model directive over v-bind for form <input /> tags.
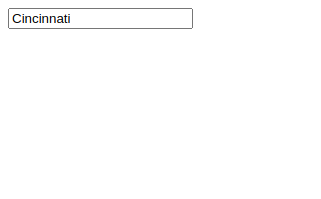
This Vue component will render a text input box with the default text of Cincinnati, as shown in the following image:
This section covered different ways to bind HTML attributes to variable or computed data. Next, you will use the v-html directive to inject HTML into your template.
Using the v-html Directive
v-html DirectiveThe last pre-packaged directive that this tutorial will go over is v-html. This directive converts HTML inside of a string literal into raw HTML for the browser to read, which will allow you more flexibility in how you create and apply your HTML.
In this hypothetical component, you have a <div> that has a v-html directive with a data property as its value:
<template>
  <div v-html="someHtmlCode" />
</template>

<script setup>
  const someHtmlCode = `<p>Some <span>HTML</span> in this string</p>`
</script>
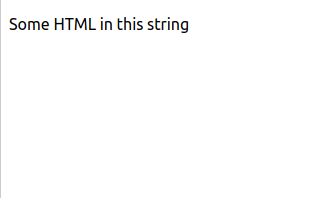
The v-html directive is telling Vue.js to inject the string of the someHtmlCode data reference into the <div /> in the template. When compiled by Vue, you will find the following in your DOM:
<div>
  <p>Some <span>HTML</span> in this string</p>
</div>
The HTML will also render in your browser:
This directive is useful if you need to render HTML that comes from a REST API service or large HTML from an external JavaScript file.
At this point in the tutorial, you’ve tried out the directives that are provided to you by Vue.js. However, there may be times when you will need a directive that Vue doesn’t provide. In cases such as these, you can create a custom directive to handle specific logic in your HTML template.
Creating a Custom Directive
In the Vue.js framework, you have the ability to create custom directives to suit the individual needs for your project. In this section, for example, you will create a v-theme directive that applies a specific style to an element of your template.
Up to this point, you did not have to follow along with a stand-alone Vue project. However, in this section, you will create a fresh project generated from the Vue CLI.
Open your terminal and generate a new project with the following command. The name of this project will be custom-directive, which will also be the name of the root directory:
- vue create custom-directive
For this tutorial, select Vue 3x for Choose Vue Version. Once the app has been created, open your generated project in your text editor of choice. Then open the main.js file in the src directory.
First, you will get this file set up. Store createApp(App) into a const so you can reference it later:
import { createApp } from 'vue'
import App from './App.vue'

const app = createApp(App)

app.mount('#app')
Now with that createApp function in its own const, you can extend this app by adding a directive:
import { createApp } from 'vue'
import App from './App.vue'

const app = createApp(App)

app.directive("theme", {})

app.mount('#app')
In this code, you are leveraging the directive() function on the Vue instance. This function accepts two arguments: the directive name (theme in this case) and an object with lifecycle hooks.
You will set this code up so that it executes when the component is mounted. This mounted hook accepts two arguments: el, the HTML element, and binding, the value passed into the directive. With this information, you can construct the following:
const app = createApp(App)

app.directive("theme", {
  mounted(el, binding) {

  }
})

app.mount('#app')
For this theme directive, you will pass in a string to determine the element’s styling. This string will either be primary, secondary, or tertiary, each of which corresponds to a color in a hypothetical colorscheme.
Now that the directive code is in place, you can add the logic. To access the value inside of the quotaion marks of the directive, you can use binding.value. To change the color of the element’s text, you will use JavaScript to access the el properties:
const app = createApp(App)

app.directive("theme", {
  mounted(el, binding) {
    if (binding.value === 'primary') {
      el.style.color = 'red'
    } else if (binding.value === 'secondary') {
      el.style.color = 'green'
    } else if (binding.value === 'tertiary') {
      el.style.color = 'blue'
    } else {
      el.style.color = 'black'
    }
  }
})

app.mount('#app')
The highlighted section of this snippet is a series of if/else statements. If the value passed into the directive is primary, the text color will be red, secondary will be green, tertiary will be blue, and no value will revert to the default black.
Close and save your main.js file.
At this point, you have created a custom directive that you can use in your Vue.js application. Vue will automatically prefix the directive name with v-, so the template can access your directive as v-theme.
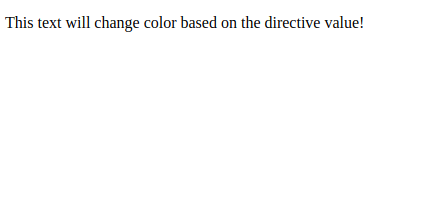
Open your App.vue file in your text editor of choice. In the template, add a <p> tag with some text in it:
<template>
  <p>This text will change color based on the directive value!</p>
</template>
Save this file, then start the application with npm run serve. This will run your project on the :8080 port on your localhost:
- npm run serve
To view your generated project, open your browser of choice and visit localhost:8080 in the URL bar. You will find your paragraph element rendered in black:
Next, change the color by adding your directive to the HTML:
<template>
  <p v-theme="`primary`">This text will change color based on the directive value!</p>
</template>
Save this file and open it in your web browser. The value inside the quotation marks is a raw value and automatically bound to Vue, so inside the quotation marks you will need to wrap primary using back ticks to convert it to a string.
Save your file and the text on your rendered site will turn red:
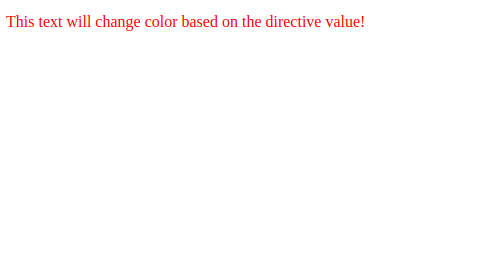
The directive reads the value in the binding object and executes the code accordingly. Since the value is primary, JavaScript will change the color of the text to red.
In this section, you created a custom directive, registered it, and executed its logic. You also added your new custom directive and assigned it to an HTML element in the template.
Conclusion
In this tutorial, you ran through exercises to test out what directives are and how to use them. Specifically, you used the most common built-in directives, including v-if, v-on, v-show, and v-html. In addition to this, you registered and created your own custom directive. This directive, v-theme, can now be used on any HTML element to execute a JavaScript function.
While you went over a number of directives, there are many more made available to you by Vue.js. For more information regarding directives, it is recommended to review the official Vue.js Documentation. For more tutorials on Vue, check out the How To Develop Websites with Vue.js series page.
Thanks for learning with the DigitalOcean Community. Check out our offerings for compute, storage, networking, and managed databases.
Tutorial Series: How To Develop Websites with Vue.js
This series provides a starting point for building websites with the front-end JavaScript framework Vue.js. Created in 2014 by Evan You (formally of Google), Vue.js is often described as a combination of React and Angular, borrowing the prop-driven development of React and the templating power of Angular. By the end of this series, you will have the tools to develop websites that focus on traditional HTML and CSS, while still taking advantage of the robustness and scalability of a front-end framework.
About the author
I'm a software engineer from Cincinnati. I work on TypeScript apps with Vue.js. Currently a Senior Front-End Engineer at Enodo, based in Chicago.
Still looking for an answer?
This textbox defaults to using Markdown to format your answer.
You can type !ref in this text area to quickly search our full set of tutorials, documentation & marketplace offerings and insert the link!
 This work is licensed under a Creative Commons Attribution-NonCommercial- ShareAlike 4.0 International License.
Become a contributor for community
Get paid to write technical tutorials and select a tech-focused charity to receive a matching donation.

DigitalOcean Documentation
Full documentation for every DigitalOcean product.

Resources for startups and AI-native businesses
The Wave has everything you need to know about building a business, from raising funding to marketing your product.
The developer cloud
Scale up as you grow — whether you're running one virtual machine or ten thousand.

Start building today
From GPU-powered inference and Kubernetes to managed databases and storage, get everything you need to build, scale, and deploy intelligent applications.
