By Dave Berning
Developer and Author

The author selected Open Sourcing Mental Illness to receive a donation as part of the Write for DOnations program.
Introduction
Most websites or applications have multiple HTML pages that are either static or dynamically generated. With more traditional websites, there is one Document Object Model (DOM) and one page per URL route. With single-page applications however, every “page” or view is rendered within one HTML page. User interface (UI) frameworks like Vue.js render these pages and components when needed through the use of a Virtual DOM. This Virtual DOM is a JavaScript representation of the original DOM and is much easier for the client to update.
When the user visits a single-page application, that application will compare itself to the Virtual DOM and re-render only the parts of the web page that are changed. This technique prevents the page from flashing white when clicking through links. Let’s say you have three sections on a web page: a header, content, and a footer. When you navigate to another URL, Vue will only render the content area of the application that has changed between pages.
In Vue.js, you can create several views using the first-party library Vue Router. This router makes an association with a view to a URL. In this tutorial, you are going to learn how to add the Vue Router library, integrate it into your project, and create dynamically generated routes. You will also learn the different types of routes available to you as a developer. When completed, you will have an application that you can navigate using a variety of methods.
To illustrate these concepts, you’ll create a small application that displays airport information. When the user clicks on an airport card, the application will navigate to a dynamic view of the airport’s details. To do this, the program will read a URL parameter and filter out data based on that parameter.
Prerequisites
To complete this tutorial, you will need:
- Node.js version
10.6.0or greater installed on your computer. To install this on macOS or Ubuntu 18.04, follow the steps in How To Install Node.js and Create a Local Development Environment on macOS or the Installing Using a PPA section of How To Install Node.js on Ubuntu 18.04. - Vue CLI installed on your machine and a fresh project generated. For the purpose of this tutorial, do not select Vue Router when creating your app. You will be installing this manually in the first step of this tutorial. The name of this project will be
airport-codes, which will act as the root directory. - You will also need a basic knowledge of JavaScript, HTML, and CSS, which you can find in our How To Build a Website With HTML series, How To Build a Website With CSS series, and in How To Code in JavaScript.
Step 1 — Setting Up the Sample Application
The application that you are going to build to learn Vue Router will require some initial data. In this step, you will create and structure this data to be accessible to your Vue app later in the tutorial.
To add this dataset, you need to create a data directory and create a JavaScript file with the name airports.js. If you are not in the src directory, cd into it first:
- cd src
Then make a data directory:
- mkdir data
Now create a data/airports.js file and open it in your text editor.
Add the following to create data for your application:
export default [
  {
    name: 'Cincinnati/Northern Kentucky International Airport',
    abbreviation: 'CVG',
    city: 'Hebron',
    state: 'KY',
	  destinations: {
      passenger: [ 'Toronto', 'Seattle/Tacoma', 'Austin', 'Charleston', 'Denver', 'Fort Lauderdale', 'Jacksonville', 'Las Vegas', 'Los Angeles', 'Baltimore', 'Chicago', 'Detroit', 'Dallas', 'Tampa' ],
	    cargo: [ 'Anchorage', 'Baltimore', ' Chicago' , 'Indianapolis', 'Phoenix', 'San Francisco', 'Seattle', 'Louisville', 'Memphis' ]
	  }
  },
  {
    name: 'Seattle-Tacoma International Airport',
    abbreviation: 'SEA',
    city: 'Seattle',
    state: 'WA',
	  destinations: {
      passenger: [ 'Dublin', 'Mexico City', 'Vancouver', 'Albuquerque', 'Atlanta', 'Frankfurt', 'Amsterdam', 'Salt Lake City', 'Tokyo', 'Honolulu' ],
	    cargo: [ 'Spokane', 'Chicago', 'Dallas', ' Shanghai', 'Cincinnati', 'Luxenbourg', 'Anchorage', 'Juneau', 'Calgary', 'Ontario' ]
	  }
  },
  {
    name: 'Minneapolis-Saint Paul International Airport',
    abbreviation: 'MSP',
    city: 'Bloomington',
    state: 'MN',
	  destinations: {
      passenger: [ 'Dublin', 'Paris', 'Punta Cana', 'Winnipeg', 'Tokyo', 'Denver', 'Tulsa', 'Washington DC', 'Orlando', 'Mexico City' ],
	    cargo: [ 'Cincinnati', 'Omaha', 'Winnipeg', 'Chicago', 'St. Louis', 'Portland', 'Philadelphia', 'Milwaukee', 'Ontario' ]
	  }
  }
]
This data is an array of objects consisting of a few airports in the United States. In this application, you are going to iterate through this data to generate cards consisting of the name , abbreviation, city, and state properties. When the user clicks on a card, you will route them to a dynamic view with Vue Router and read from one of these properties. From there, you will create a nested route to display information stored in the destination property.
Save and exit from the file.
Next, create a Home.vue component inside of a directory called views. You can create this directory and component by opening your terminal and using the mkdir and touch commands.
Run the following command to make the directory:
- mkdir views
Then create the Home.vue file:
- touch views/Home.vue
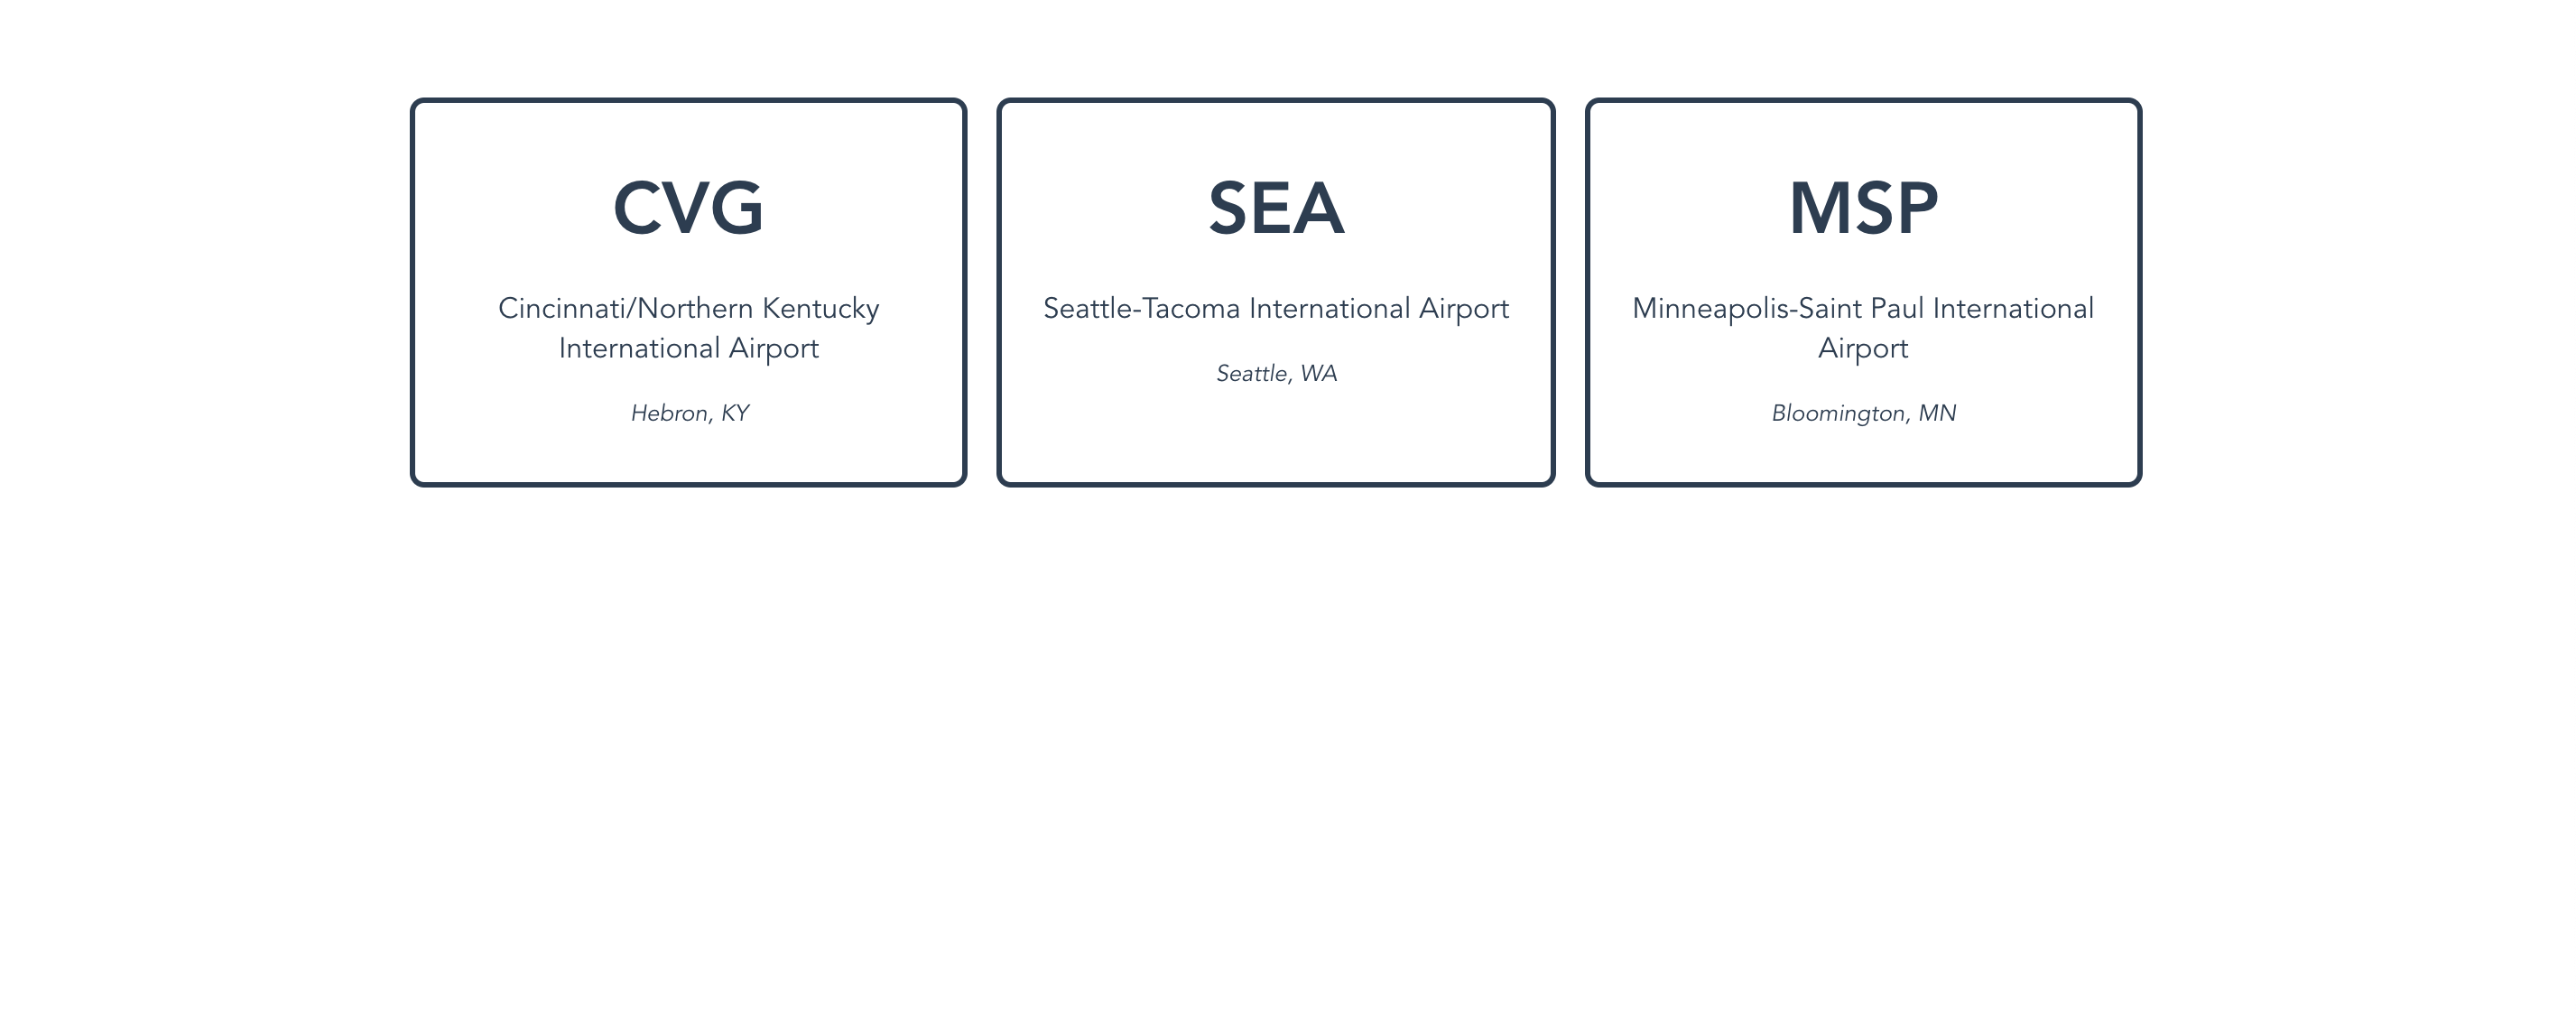
This Home.vue component will act as this application’s homepage. In it, you will leverage the v-for directive to iterate through the airports.js dataset and show each airport in a card.
Add the following code to Home.vue:
<template>
  <div class="wrapper">
    <div v-for="airport in airports" :key="airport.abbreviation" class="airport">
      <p>{{ airport.abbreviation }}</p>
      <p>{{ airport.name }}</p>
      <p>{{ airport.city }}, {{ airport.state }}</p>
    </div>
  </div>
</template>

<script>
import { ref } from 'vue'
import allAirports from '@/data/airports.js'

export default {
  setup() {
    const airports = ref(allAirports)
		return { airports }
	}
}
</script>

<style>
#app {
  font-family: Avenir, Helvetica, Arial, sans-serif;
  -webkit-font-smoothing: antialiased;
  -moz-osx-font-smoothing: grayscale;
  text-align: center;
  color: #2c3e50;
  margin-top: 60px;
}
.wrapper {
  display: grid;
  grid-template-columns: 1fr 1fr 1fr;
  grid-column-gap: 1rem;
  max-width: 960px;
  margin: 0 auto;
}
.airport {
  border: 3px solid;
  border-radius: .5rem;
  padding: 1rem;
}
.airport p:first-child {
  font-weight: bold;
  font-size: 2.5rem;
  margin: 1rem 0;
}
.airport p:last-child {
  font-style: italic;
  font-size: .8rem;
}
</style>
You may notice that there is some CSS included in this code snippet. In the Home.vue component, you are iterating through a collection of airports, each of which is assigned a CSS class of airport. This CSS adds some styling to the generated HTML by making borders to give each airport the apperance of a card. :first-child and :last-child are pseudo selectors that apply different styling to the first and last p tags in the HTML inside of the div with the class of airport.
Save and close the file.
Now that you have this initial view created along with the local dataset, you will install Vue Router in the next step.
Step 2 — Installing Vue Router
There are a few ways you can install Vue Router. If you are creating a new project from scratch with the Vue CLI, you can select Vue Router in the prompt; Vue CLI will then install and configure it for you. For the sake of this tutorial, however, it is assumed that you did not select the Vue Router option in the CLI setup. You will instead install Vue Router via npm.
To install Vue Router, first move from the src directory back to the root of your project directory:
- cd ..
Then run the following in your terminal window in the root directory of your project:
- npm i vue-router@next
You may notice the @next in this command. Since this project is using Vue 3 and the Composition API, you are telling npm to download the latest experimental version of this library. If you would like more information on current releases, check out the Vue Router release page on GitHub.
This will download the vue-router library from npm and add it to your package.json file, so that it automatically downloads the next time you run npm install.
The next step is to create your routes file. This file will contain all the possible routes that the user can navigate to. When a certain route is visited in the URL bar, the component that is associated with a URL route will mount.
In your terminal, in the src directory, move into the src directory and create a router directory:
- cd src
- mkdir router
Next, create an index.js file inside the router directory:
- touch router/index.js
Open the file you just created into an editor of your choice. The first thing to do is import the Vue Router library. You actually don’t need to access everything in this library in order to create routes. You can opt to destructure or import only what you need to minimize the bundle size. In this case, you need two functions from vue-router: createWebHistory and createRouter. These functions create a history that a user can go back to and construct a router object for Vue, respectively.
Add the following code to router/index.js:
import { createWebHistory, createRouter } from "vue-router"
Next, add the following highlighted lines to create and export your router:
import { createWebHistory, createRouter } from "vue-router"

const router = createRouter({
  history: createWebHistory(),
})

export default router
This file will export a router object that is returned from the createRouter function. The object you pass in has two properties: history and routes. The history property contains the generated history from createWebHistory and routes is an array of objects. You will add routes later in this tutorial.
Next, import the Home view and create an array of objects, storing them into a const called routes:
import { createWebHistory, createRouter } from "vue-router"
import Home from "@/views/Home.vue"

const routes = [
  {
    path: "/",
    name: "Home",
    component: Home,
  },
]

const router = createRouter({ ... })

export default router
Each route is an object with three properties:
path: The URL addressname: An assigned name to reference a route in your projectcomponent: The component that gets mounted when thepathis entered in the URL bar of the browser
Now that your routes array as been created, you will need to add it to the exported router object.
After the history key/value pair, add routes. This is shorthand for routes: routes in JavaScript:
import { createWebHistory, createRouter } from "vue-router"

const routes = [ ... ]

const router = createRouter({
  history: createWebHistory(),
  routes
})

export default router
At this point, Vue Router is integrated into your project, and you have a route registered. Save and exit the file.
In another terminal, run the following command to start a development server on your local machine:
- npm run serve
If you visit localhost:8080/ in your browser window, you will not see the Home.vue component just yet. The last step in this integration process is to tell Vue to listen to this router/index.js file and inject the mounted component where <router-view /> is referenced. To do this, you need to reference it in the src/main.js file of your application.
First, open src/main.js. Then add the following highlighted lines:
import { createApp } from 'vue'
import App from './App.vue'
import router from './router'

createApp(App).use(router).mount('#app')
With this .use() function that is chained to createApp, Vue.js is now listening to route changes and leveraging your src/router/index.js file. However, Vue Router has no way to display the mounted Home.vue component. To do this, you need to add the router-view component inside your App.vue file. This component tells Vue Router to mount any component associated with a route where <router-view /> is.
Save and exit the main.js file.
Next, open the App.vue file. Delete the default contents and replace it with the following:
<template>
  <router-view />
</template>
Save and exit the file.
Now visit localhost:8080/ in your browser. You will find the Home.vue component rendered, as shown in the following screenshot:
Vue Router has now been downloaded and integrated with a registered route. In the next section, you are going to create additional routes, including two internal pages and a default 404 page if no route was detected.
Step 3 — Creating Internal Pages
At this point, your App.vue can render any component configured in your src/router/index.js file. When working with a Vue CLI-generated project, one of the directories that is created for you is views. This directory contains any .vue component that is directly mapped to a route in the router/index.js file. It’s important to note that this isn’t done automatically. You will need to create a .vue and import it into your router file to register it, as detailed earlier.
Before you have all of your other routes defined, you can create a default route. In this tutorial, this default route will act as a 404 - Not Found page—a fallback in the case no route is found.
First, create the view that will act as the 404 page. Change into the views directory:
- cd views
Then create a file called PageNotFound.vue:
- touch PageNotFound.vue
In your text editor, open this PageNotFound.vue file that you just created. Add the following HTML code to give the view something to render:
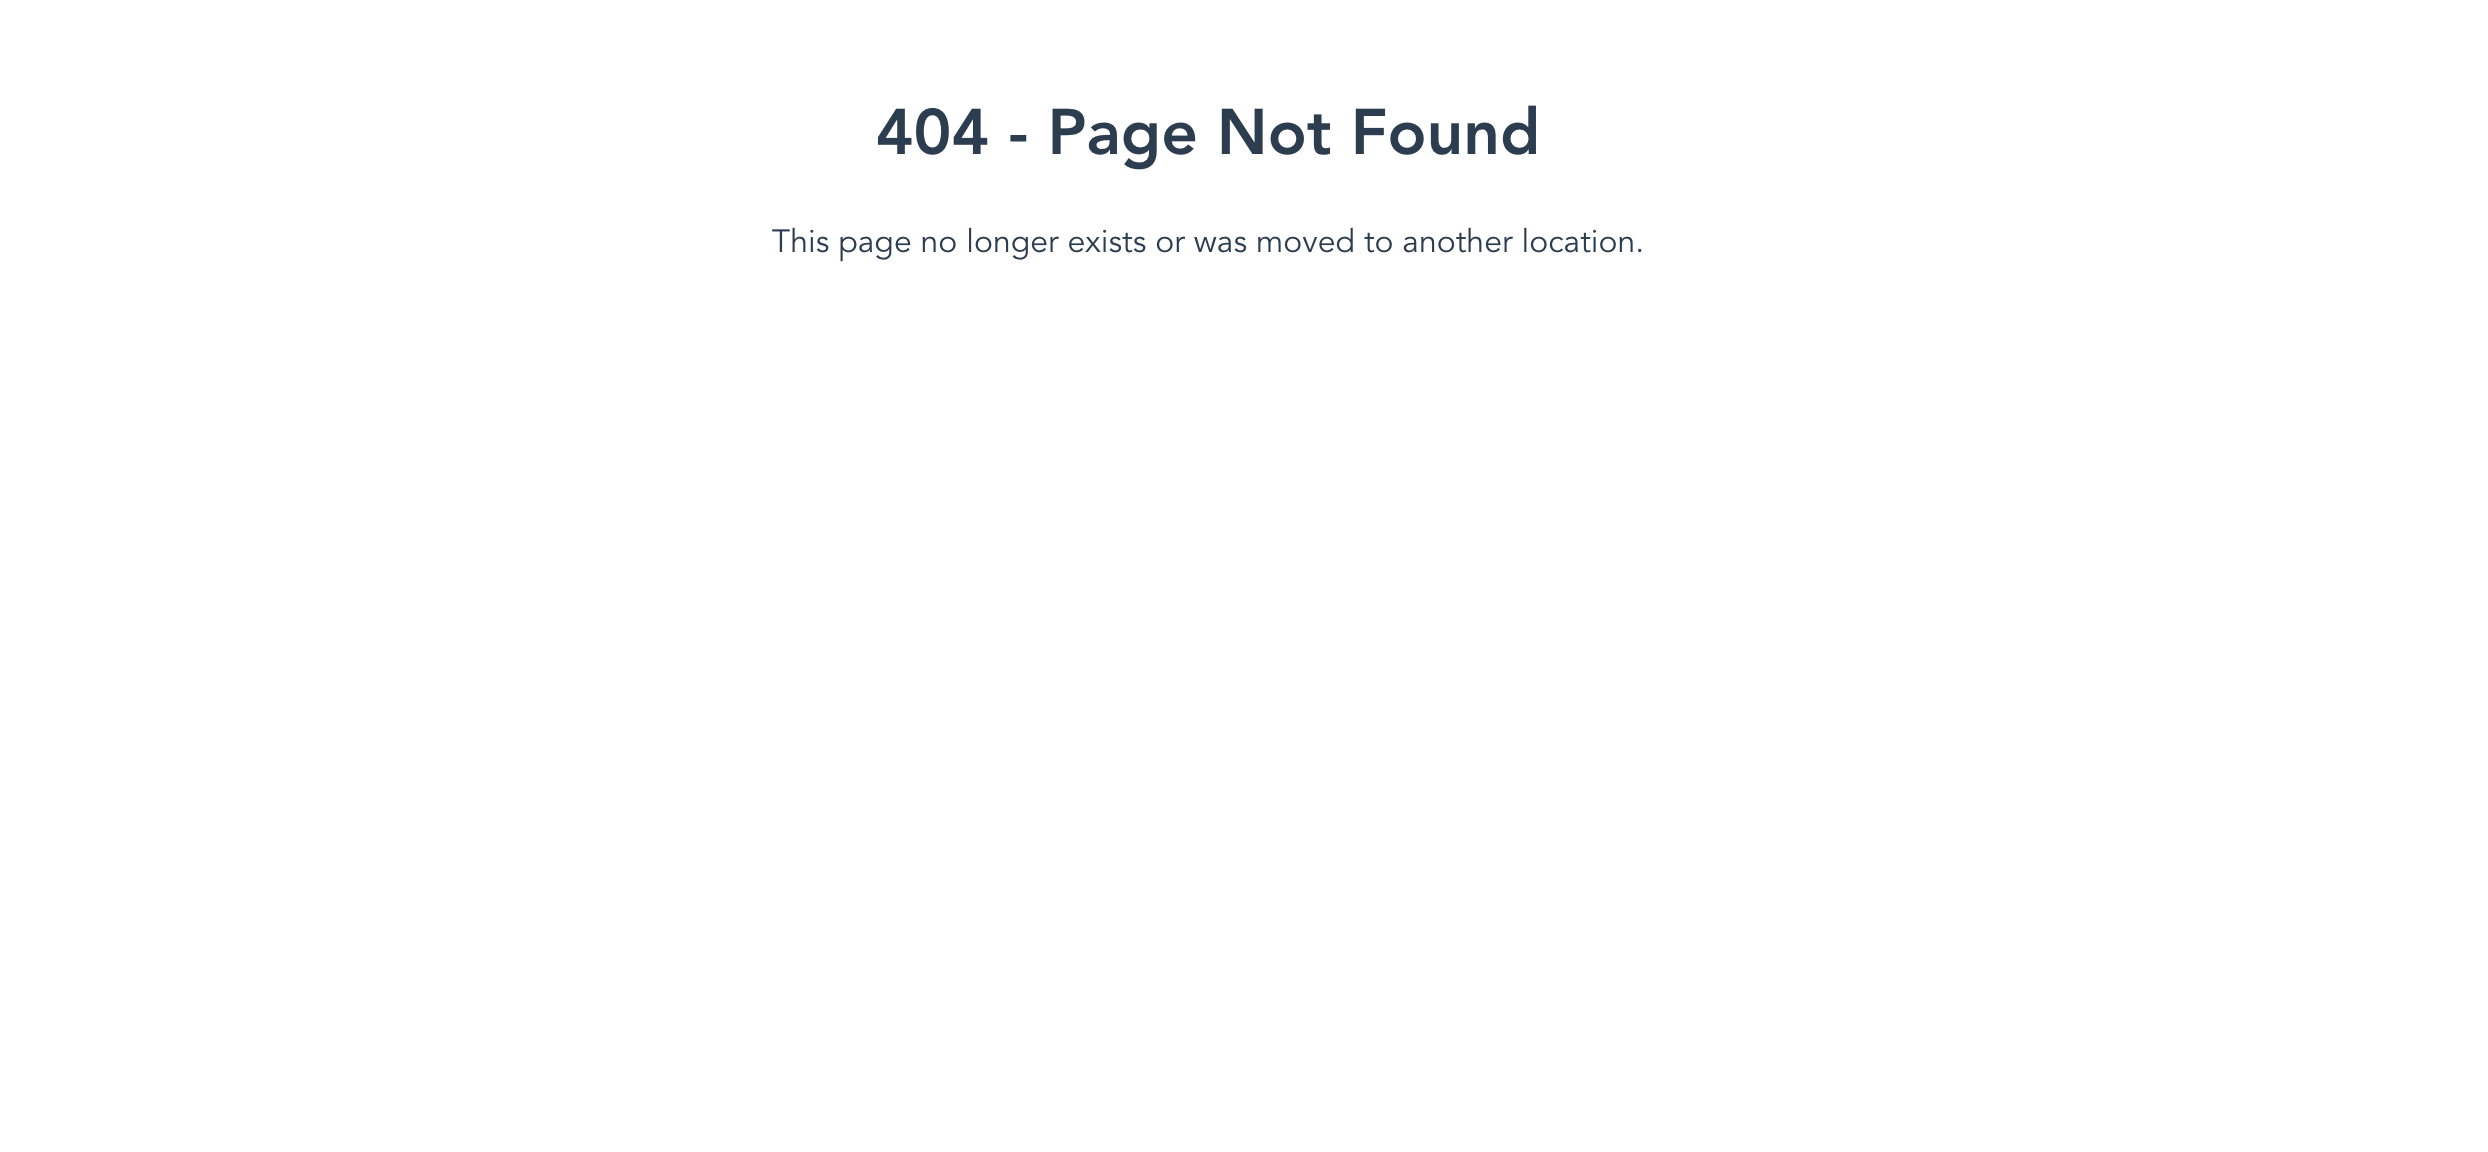
<template>
  <div>
    <h1>404 - Page Not Found</h1>
    <p>This page no longer exists or was moved to another location.</p>
  </div>
</template>
Save and close the file.
Now that the PageNotFound.vue component has been created, it’s time to create a catch-all route for your application. Open up the src/router/index.js file in your text editor and add the following highlighted code:
import { createWebHistory, createRouter } from "vue-router"
import Home from "@/views/Home.vue"
import PageNotFound from '@/views/PageNotFound.vue'

const routes = [
  {
    path: "/",
    name: "Home",
    component: Home,
  },
  {
    path: '/:catchAll(.*)*',
    name: "PageNotFound",
    component: PageNotFound,
  },
]
...
Vue Router for Vue 3 uses a custom RegEx. The value of path contains this new RegEx, which is telling Vue to render PageNotFound.vue for every route, unless the route is already defined. The catchAll in this route refers to a dynamic segment within Vue Router, and (.*) is a regular expression that captures any string.
Save this file and visit your application in your browser window at localhost:8080/not-found. You will find the PageNotFound.vue component rendered in your browser, as shown in the following image:
Feel free to change this URL to anything else; you will get the same result.
Before moving on, create another route for your application. This route will be an about page.
Open your terminal of choice and create the file in the views directory:
- touch About.vue
In your text editor, open this About.vue file that you just created. Add the following HTML to create more information about your site:
<template>
  <div>
    <h1>About</h1>
    <p>This is an about page used to illustrate mapping a view to a router with Vue Router.</p>
  </div>
</template>
Save and close the file.
With that view created, open the src/router/index.js file in your text editor, import the About.vue component, and register a new route with a path of /about:
import { createWebHistory, createRouter } from "vue-router"
import Home from '@/views/Home.vue'
import About from '@/views/About.vue'
import PageNotFound from '@/views/PageNotFound.vue'

...
const routes = [
  {
    path: "/",
    name: "Home",
    component: Home,
  },
  {
    path: '/about',
    name: "About",
    component: About,
  },
  {
    path: '/:catchAll(.*)*',
    name: "PageNotFound",
    component: PageNotFound,
  },
]
...
Save and close the file.
At this point, you have three different routes:
localhost:8080/, which routes toHome.vuelocalhost:8080/about, which routes toAbout.vue- Any other route, which by default goes to
PageNotFound.vue
Once you save this file, open your browser and first visit localhost:8080/. Once the application loads, you will find the contents of Home.vue: the collection of airport cards.
Continue testing these routes by visiting localhost:8080/about. This is a static route, so you will find the contents of the About.vue component, which at this point contains a heading and a paragraph.

Next, you can test the PageNotFound.vue component by visiting anything else in your browser. For example, if you visit, localhost:8080/some-other-route, Vue Router will default to that catchAll route since that route is not defined.
As this step illustrates, Vue Router is a handy first-party library that renders a component that is associated with a specific route. In this step, this library was downloaded and integrated globally through the main.js file and was configured in your src/router/index.js file.
So far, most of your routes are exact routes. This means a component will only mount if the URL fragment matches the path of the router exactly. However, there are other types of routes that have their own purpose and can dynamically generate content. In the next step, you are going to implement the different types of routes and learn when to use one or the other.
Step 4 — Creating Routes With Parameters
At this point, you have created two exact routes and a dynamic route to a 404 page. But Vue Router has more than these types of routes. You can use the following routes in Vue Router:
- Dynamic Routes: Routes with dynamic parameters that your application can reference to load unique data.
- Named Routes: Routes that can be accessed using the
nameproperty. All the routes created at this point have anameproperty. - Nested Routes: Routes with children associated with them.
- Static or Exact Routes: Routes with a static
pathvalue.
In this section, you will create a dynamic route displaying individual airport information and a nested route for airport destinations.
Dynamic Routes
A dynamic route is useful when you want to reuse a view to display different data depending on the route. For example, if you wanted to create a view that displays airport information depending on the airport code in the URL bar, you could use a dynamic route. In this example, if you were to visit a route of localhost:8080/airport/cvg, your application would display data from the airport with the code cvg, the Cincinnati/Northern Kentucky International Airport. Next, you will create this view as described.
Open up your terminal and create a new .vue file with the touch command. If src is your current working directory, the command will look like this:
- touch views/AirportDetail.vue
After that is created, open this file in your text editor of choice. Go ahead and create your template and script tags to set up this component:
<template>
  <div>

  </div>
</template>

<script>
export default {
  setup() { }
}
</script>
Save and close this file.
Next, you need to register this view in the src/router/index.js file. Open up this file in your text editor, then add the following highlighted lines:
import Home from '@/views/Home.vue'
import About from '@/views/About.vue'
import AirportDetail from '@/views/AirportDetail.vue'
import PageNotFound from '@/views/PageNotFound.vue'

...
const routes = [
  {
    path: "/",
    name: "Home",
    component: Home,
  },
  {
    path: '/about',
    name: "About",
    component: About,
  },
  {
    path: '/airport/:code',
    name: "AirportDetail",
    component: AirportDetail,
  },
  {
   path: '/:catchAll(.*)*',
   name: "PageNotFound",
   component: PageNotFound,
  },
]
...
The :code in this new route is called a parameter. A parameter is any value that can be accessed in your application via this name. In this case, you have a parameter named code. Next, you will display the information associated with this abbreviation by leveraging this parameter.
Save and close this file.
Now that you have some data, open the AirportDetail.vue component again. Import the airport data in this component:
...
<script>
import airports from '@/data/airports.js'

export default {
  setup() { }
}
</script>
Next, create a computed property that returns one object from the array if the abbreviation property of that object matches the :code parameter in the URL. In Vue 3, you need to destructure computed from the vue library:
...
<script>
import { computed } from 'vue'
import { useRoute } from 'vue-router'
import airports from '@/data/airports.js'

export default {
  setup() {
  const route = useRoute()
	const airport = computed(() => {
		return airports.filter(a => a.abbreviation === route.params.code.toUpperCase())[0]
	})

	return { airport }
  }
}
</script>
This computed property uses the filter array method in JavaScript to return an array of objects if the condition is met. Since you only want one object, the code will always return the first object, which it will access with the [0] index syntax. The route.params.code is how you access the parameter that was defined in your router file. In order to access the route’s properties, you will need to import a function from vue-router named useRoute. Now when visiting a route, you have immediate access to all of the route’s properties. You are using dot notation to access this code param and retrieve its value.
At this point, this computed property will return a single airport object if the code in the URL matches the abbreviation property. This means that you have access to all of the object properties of an airport and can construct the template of this component.
Continue editing the AirportDetail.vue file in your text editor and build out your template to display the information of the airport:
<template>
 <div>
   <p>{{ airport.name }} ({{ airport.abbreviation }})</p>
   <p>Located in {{ airport.city }}, {{ airport.state }}</p>
 </div>
</template>
...
Open your browser and visit localhost:8080/airport/sea. Information related to the Seattle-Tacoma International Airport will render in your browser, as shown in the following image:

Nested Routes
As your application grows, you may find that you have a number of routes that are related to a parent. A good illustration of this could be a series of routes associated with a user. If there is a user named foo, you could have multiple nested routes for the same user, each starting with /user/foo/. When the user is on the /user/foo/profile route, the user would be viewing a profile page associated with them. A posts page for the user might have a route of /user/foo/posts. This nesting can give you the ability to organize your routes along with your components. For more information on this, check out the Vue Router documentation.
You can apply this same pattern to the application you’ve built throughout this tutorial. In this section, you’re going to add a view to display the destinations that each airport supports.
Open your terminal and, in the src directory, create a new file with the name AirportDestinations.vue:
- touch views/AirportDestinations.vue
Next, open your text editor and add the following:
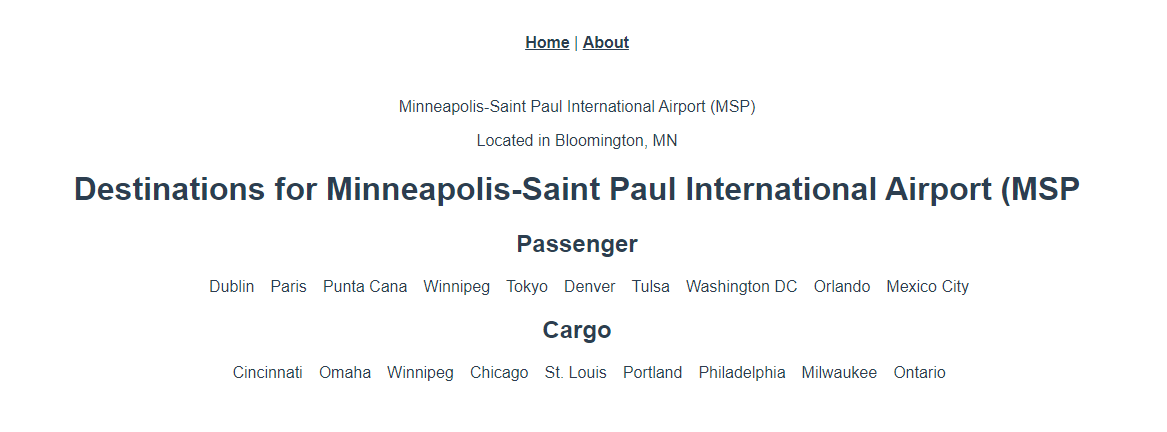
<template>
  <h1>Destinations for {{ airport.name }} ({{ airport.abbreviation }}</h1>
  <h2>Passenger</h2>
  <ul>
    <li v-for="(destination, i) in airport.destinations.passenger" :key="i">
      {{ destination }}
    </li>
  </ul>
  <h2>Cargo</h2>
  <ul>
    <li v-for="(destination, i) in airport.destinations.cargo" :key="i">
      {{ destination }}
    </li>
  </ul>
</template>

<script>
  import { computed } from 'vue'
  import { useRoute } from 'vue-router'
  import airports from '@/data/airports.js'

  export default {
    setup() {
      const route = useRoute()
      const airport = computed(() => {
        return airports.filter(a => a.abbreviation === route.params.code.toUpperCase())[0]
      })
    return { airport }
  }
}
</script>
This view will render all of the destinations for each airport from the airports.js file. In this view, you are using the v-for directive to iterate through the destinations. Much like the AirportDetail.vue view, you are creating a computed property called airport to get the airport that matches the :code parameter in the URL bar.
Save and close the file.
To create a nested route, you need to add the children property to your route object in the src/router/index.js file. The child (nested) route object contains the same properties as its parent.
Open up router/index.js and add the following highlighted lines:
import Home from '@/views/Home.vue'
import About from '@/views/About.vue'
import AirportDetail from '@/views/AirportDetail.vue'
import AirportDestinations from '@/views/AirportDestinations.vue'
import PageNotFound from '@/views/PageNotFound.vue'

...
const routes = [
	...
  {
    path: '/airport/:code',
    name: "AirportDetail",
    component: AirportDetail,
		children: [
			{
			  path: 'destinations',
				name: 'AirportDestinations',
				component: AirportDestinations
			}
		]
  },
	...
]
...
The path for this child route is short compared to its parent. That is because, with nested routes, you do not need to add the entire route. The child inherits its parent’s path and will prepend it to the child path.
Open your browser window, and visit localhost:8080/airport/msp/destinations. Nothing appears to be different from the parent, AirportDetails.vue. That is because when using nested routes, you need to include the <router-view /> component in the parent. When visiting the child route, Vue will inject the content from the child view into the parent:
<template>
 <div>
   <p>{{ airport.name }} ({{ airport.abbreviation }})</p>
   <p>Located in {{ airport.city }}, {{ airport.state }}</p>
	 <router-view />
 </div>
</template>
In this case, when visiting the destinations route in the browser, AirportDestinations.vue will display an unordered list of the destinations that the Minneapolis-Saint Paul International Airport supports, for both passenger and cargo flights.
In this step, you created dynamic and nested routes and learned how to use a computed property that checks against the :code parameter in the URL bar. Now that all the routes have been created, in the final step, you are going to navigate between the different types of routes by creating links with the <router-link /> component.
Step 5 — Navigating Between Routes
When working with single-page applications, there are a few caveats you need to be aware off. Since every page is bootstrapped into a single HTML page, navigating between internal routes using the standard anchor (<a />) will not work. Instead, you will need to use the <router-link /> component provided by Vue Router.
Unlike the standard anchor tag, router-link provides a number of different ways to link to other routes in your application, including using named routes. Named routes are routes that have a name property associated with them. Every link that you have created up to this point has a name already associated with it. Later in this step, you’ll learn how to navigate using name rather than the path.
Using the <router-link /> Component
The <router-link /> component was globally imported when you initially integrated Vue Router into your application. To use this component, you will add it to your template and provide it with a prop value.
Open the Home.vue component within the views directory in your editor. This view displays every airport that you have in the airports.js file. You can use router-link to replace the containing div tag in order to make each card clickable to their respective detail view.
Add the following highlighted lines to Home.vue:
<template>
	<div class="wrapper">
		<router-link v-for="airport in airports" :key="airport.abbreviation" class="airport">
			<p>{{ airport.abbreviation }}</p>
			<p>{{ airport.name }}</p>
			<p>{{ airport.city }}, {{ airport.state }}</p>
		</router-link>
	</div>
</template>
...
At the bare minimum, router-link requires one prop called to. This to prop accepts an object with a number of key/value pairs. Since this card uses the v-for directive, these cards are data driven. You’ll need to be able to navigate to the AirportDetail.vue component. If you review the path for that component, it is accessible via /airports/:code.
When navigating via the path property, it is a one-to-one match. Add the following highlighted segments:
<template>
	<div class="wrapper">
		<router-link :to="{ path: `/airports/${airport.abbreviation}` }" v-for="airport in airports" :key="airport.abbreviation" class="airport">
			...
		</router-link>
	</div>
</template>
...
In this code, you are using JavaScript string interpolation to insert the airport code dynamically as the value for the path property. However, as your applications grows in scale, you may find that navigating to a different route via the path is not the best method. In fact, it is generally considered best practice to navigate using named routes.
To implement a named route, use the name of the route over the path. If you reference src/router/index.js you will find that AirportDetail.vue has a name of AirportDetail:
<template>
	<div class="wrapper">
		<router-link :to="{ name: 'AirportDetail' }" v-for="airport in airports" :key="airport.abbreviation" class="airport">
			...
		</router-link>
	</div>
</template>
...
The benefit of using named routes over exact routes is that named routes are not dependent on the path of the route. URL structures will always change in development, but the name of the route will seldom change.
You might notice that you cannot pass in the airport code as you did earlier with the exact route. If you need to pass in parameters into a named route, you will need to add the params property containing an object that represents your parameter:
<template>
	<div class="wrapper">
		<router-link :to="{ name: 'AirportDetail', params: { code: airport.abbreviation } }" v-for="airport in airports" :key="airport.abbreviation" class="airport">
			...
		</router-link>
	</div>
</template>
...
Save this file and view it in your browser at localhost:8080. Clicking on the Seattle-Tacoma airport card will now navigate you to localhost:8080/airport/sea.
Programmatic Navigation
The <router-link /> component is great to use when you need to navigate to another view within your HTML template. But what about those cases when you need to navigate between routes within a JavaScript function? Vue Router offers a solution to this problem called programmatic navigation.
Earlier in this tutorial, you created a catch-all route called PageNotFound. It would be a good user experience to always navigate to that page if the airport computed property returned undefined in the AirportDetail.vue and AirportDestinations.vue components. In this section, you will implement this feature.
In your text editor, open the AirportDetail.vue component. To achieve this, detect if airport.value is undefined. This function will be called when the component is first mounted, which means you will need to use Vue’s lifecycle methods.
Add the following highlighted lines:
<template>
  <div v-if="airport">
   <p>{{ airport.name }} ({{ airport.abbreviation }})</p>
   <p>Located in {{ airport.city }}, {{ airport.state }}</p>
   <router-view />
  </div>
</template>

<script>
    import { computed, onMounted } from 'vue'
    import { useRoute } from 'vue-router'
    import airports from '@/data/airports.js'
    import router from '@/router'

    export default {
			setup() {
        const route = useRoute()
				const airport = computed(() => {
					return airports.filter(a => a.abbreviation === route.params.code.toUpperCase())[0]
				})

				onMounted(() => {
					if (!airport.value) {
						// Navigate to 404 page here
					}
				})

				return { airport }
			}
    }
</script>
In this onMounted function, you are checking if airport.value is a falsy value. If it is, then you route to PageNotFound. You can handle programmatic routing similarly to how you handled the router-link component. Since you cannot use a component in JavaScript functions, you need to use router.push({ ... }). This push method of the router object accepts the value of the to prop when using the link component:
<script>
	...
  onMounted(() => {
		if (!airport.value) {
			router.push({ name: 'PageNotFound' })
		}
  })
	...
</script>
If the route doesn’t exist, or if the data is not returned properly, this will protect the user from the broken web page.
Save the file and navigate to localhost:8080/airport/ms. Since ms is not an airport code in the data, the airport object will be undefined, and the router will redirect you to the 404 page.
Conclusion
In this tutorial, you used Vue Router to create a web application that routes between different views. You learned the different types of routes, including exact, named, and nested, as well as created links with parameters using the router-link component. In the final step, you provided programmatic navigation using JavaScript by leveraging the router’s push() function.
For more information on Vue Router, it’s recommended to read through their documentation. The CLI tool specifically has many additional features that weren’t covered in this tutorial. For more tutorials on Vue, check out the Vue Topic Page.
Thanks for learning with the DigitalOcean Community. Check out our offerings for compute, storage, networking, and managed databases.
Tutorial Series: How To Develop Websites with Vue.js
This series provides a starting point for building websites with the front-end JavaScript framework Vue.js. Created in 2014 by Evan You (formally of Google), Vue.js is often described as a combination of React and Angular, borrowing the prop-driven development of React and the templating power of Angular. By the end of this series, you will have the tools to develop websites that focus on traditional HTML and CSS, while still taking advantage of the robustness and scalability of a front-end framework.
About the author
I'm a software engineer from Cincinnati. I work on TypeScript apps with Vue.js. Currently a Senior Front-End Engineer at Enodo, based in Chicago.
Still looking for an answer?
This textbox defaults to using Markdown to format your answer.
You can type !ref in this text area to quickly search our full set of tutorials, documentation & marketplace offerings and insert the link!
Nice tutorial! But when and where did you implement the navigation that is shown in the About page? Also, a github repo would be nice. Thank you!
This comment has been deleted
For Vue History-mode on Static Apps on DigitalOcean (using VueRouter):
Go to Settings -> Custom Pages
Write index.html in the CatchAll option.
That will allow to access /example.com/mypath directly.
For Vue History-mode on Static Apps on DigitalOcean (using VueRouter):
Go to Settings -> Custom Pages
Write index.html in the CatchAll option.
That will allow to access /example.com/mypath directly.
 This work is licensed under a Creative Commons Attribution-NonCommercial- ShareAlike 4.0 International License.
Become a contributor for community
Get paid to write technical tutorials and select a tech-focused charity to receive a matching donation.

DigitalOcean Documentation
Full documentation for every DigitalOcean product.

Resources for startups and AI-native businesses
The Wave has everything you need to know about building a business, from raising funding to marketing your product.
The developer cloud
Scale up as you grow — whether you're running one virtual machine or ten thousand.

Start building today
From GPU-powered inference and Kubernetes to managed databases and storage, get everything you need to build, scale, and deploy intelligent applications.
