By Dave Berning
Developer and Author

The author selected Open Sourcing Mental Illness to receive a donation as part of the Write for DOnations program.
Introduction
In Vue.js development, a client’s web browser reads HTML and JavaScript and renders web pages based off of the instructions that the developer writes for it. But the web page or application not only needs to process data; it also needs to process user interactions. To do this, developers use events in JavaScript that execute code when the user interacts with HTML elements.
An event can capture any user interaction with a user interface button or a physical keyboard or mouse. In JavaScript, you would create event listeners that wait for that event to occur and then execute a block of code. In Vue.js, you are not required to listen for an event; that is done automatically with the v-on: directive.
In this tutorial, you will use events in Vue to create an application of airport codes. When the user selects an airport code, the app will add that airport to a “favorites” collection. By following along with this project, you will learn what events are, how to use Vue’s built-in events, and how to create your own custom events.
Prerequisites
To complete this tutorial, you will need:
- Node.js version
14.17.0or greater installed on your computer. To install this on macOS or Ubuntu 20.04, follow the steps in How To Install Node.js and Create a Local Development Environment on macOS or the Installing Using a PPA section of How To Install Node.js on Ubuntu 20.04. - Vue CLI installed on your machine by following Step 1 of How To Generate a Vue.js Single Page App With the Vue CLI. You will use this to create your Vue application in the first step of this tutorial.
- You will also need a basic knowledge of JavaScript, HTML, and CSS, which you can find in our How To Build a Website With HTML series, How To Build a Website With CSS series, and in How To Code in JavaScript.
Step 1 — Setting Up the Project
The first step in this tutorial will be to set up a demo project with some data to display in the view. This will include an array of JavaScript objects that contain airport data and a Vue component to iterate over and render the data.
First, generate a project using Vue CLI:
- vue create favorite-airports
This will create a project named favorite-airports. This tutorial will use Vue 3, so when prompted, select the option Default (Vue 3) ([Vue 3] babel, eslint):
OutputVue CLI v4.5.6
? Please pick a preset:
  Default ([Vue 2] babel, eslint)
❯ Default (Vue 3) ([Vue 3] babel, eslint)
  Manually select features
Once you have created the project, make a directory to hold all of your local data for this project. First, make the new project folder your working directory:
- cd favorite-airports
Next, make a data directory in the src directory:
- mkdir src/data
In your text editor of choice, open a file called src/data/airports.js. Add the following data to the file:
export default [
  {
    name: 'Cincinnati/Northern Kentucky International Airport',
    abbreviation: 'CVG',
    city: 'Hebron',
    state: 'KY',
  },
  {
    name: 'Seattle-Tacoma International Airport',
    abbreviation: 'SEA',
    city: 'Seattle',
    state: 'WA',
  },
  {
    name: 'Minneapolis-Saint Paul International Airport',
    abbreviation: 'MSP',
    city: 'Bloomington',
    state: 'MN',
  },
  {
    name: 'Louis Armstrong New Orleans International Airport',
    abbreviation: 'MSY',
    city: 'New Orleans',
    state: 'LA',
  },
  {
    name: `Chicago O'hare International Airport`,
    abbreviation: 'ORD',
    city: 'Chicago',
    state: 'IL',
  },
  {
    name: `Miami International Airport`,
    abbreviation: 'MIA',
    city: 'Miami',
    state: 'FL',
  }
]
This data is an array of objects consisting of a few airports in the United States. Next, you are going to iterate through this data to generate cards consisting of the name , abbreviation, city, and state properties. When the user clicks on a card, the app will emit an event up to the parent, which will add that airport to a collection of data that will represent your favorite airports.
Save and close the airport.js file.
To render the data, create a single-file component (SFC) with the name src/components/AirportCard.vue and open it in your text editor. This component will contain all of the styles and logic for the airport card.
Add the following contents to the file:
<template>
  <div class="airport">
    <p>{{ airport.abbreviation }}</p>
    <p>{{ airport.name }}</p>
    <p>{{ airport.city }}, {{ airport.state }}</p>
  </div>
</template>

<script>
export default {
  props: {
    airport: {
      type: Object,
      required: true
    }
  }
}
</script>

<style scoped>
.airport {
  border: 3px solid;
  border-radius: .5rem;
  padding: 1rem;
}

.airport p:first-child {
  font-weight: bold;
  font-size: 2.5rem;
  margin: 1rem 0;
}

.airport p:last-child {
  font-style: italic;
  font-size: .8rem;
}
</style>
This component contains a prop, which in Vue.js is a way to pass data down from a parent component to a child component. The template section then renders this data. For more on single-file components, check out the How To Create Reusable Blocks of Code with Vue Single-File Components tutorial.
You may notice that there is some CSS included in the code snippet. In the AirportCard.vue component, the wrapper <div> contains the class of airport. This CSS adds some styling to the generated HTML by adding borders to give each airport the appearance of a card. :first-child and :last-child are pseudo-selectors that apply different styling to the first and last p tags in the HTML inside of the div with the class of airport.
Save the file and exit from your text editor.
Next, modify the existing App.vue component to iterate through the airports.js data and render a series of AirportCards.vue components. Open src/App.vue in your text editor and replace the contents with the following highlighted code:
<template>
  <div class="wrapper">
    <div v-for="airport in airports" :key="airport.abbreviation">
      <airport-card :airport="airport" />
    </div>
  </div>
</template>

<script>
import { ref } from 'vue'
import allAirports from '@/data/airports.js'
import AirportCard from '@/components/AirportCard.vue'

export default {
  components: {
    AirportCard
  },
  setup() {
    const airports = ref(allAirports)
    return { airports }
  }
}
</script>

<style>
#app {
  font-family: Avenir, Helvetica, Arial, sans-serif;
  -webkit-font-smoothing: antialiased;
  -moz-osx-font-smoothing: grayscale;
  text-align: center;
  color: #2c3e50;
  margin-top: 60px;
}

.wrapper {
  display: grid;
  grid-template-columns: 1fr 1fr 1fr;
  grid-column-gap: 1rem;
  max-width: 960px;
  margin: 0 auto;
}
</style>
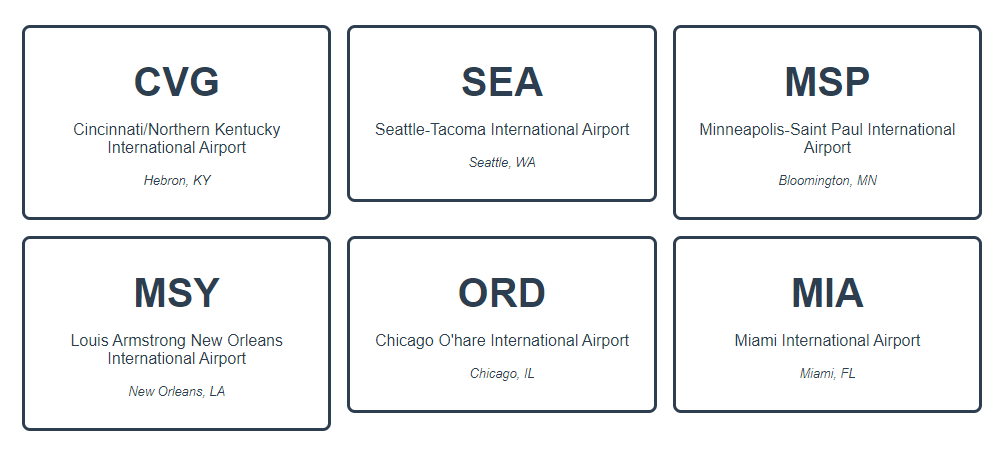
This imports the data and the SFC, then uses the v-for directive to iterate over the data, creating an airport card for each object in the airport.js array. It also adds additional CSS targeted to the wrapper class, which uses CSS grid to manage the layout of the cards.
Save and exit the file. With the project now set up, run a local development server with the following command:
- npm run serve
This will start a server on your localhost, usually on port :8080. Open your web browser of choice and visit localhost:8080 to find the following:
Now that you have your sample project set up, you’ll next explore built-in events using the v-on directive. When this event is fired, an alert pop-up box will appear with the airport code of the airport associated with that event.
Step 2 — Listening for Events With the v-on Directive
v-on DirectiveAs stated earlier, events are a way to execute functions when the user interacts with HTML elements in the DOM (Document Object Model). When writing vanilla JavaScript, to execute a function on an event, you may write something called an event listener. An event listener is a function that waits for that interaction to occur, then executes some code. With Vue, however, you can use the v-on directive for this purpose. A directive is a piece of re-useable code that a developer can use in order to manipulate the DOM. The v-on directive is provided by Vue.js out of the box.
In this step, you will create a function in your application that runs when a user clicks on a card. Open the src/components/AirportCard.vue component in your text editor of choice.
Create a function that alerts the user of the airport that they clicked on by adding the following highlighted code:
...
<script>
export default {
  props: {
    airport: {
      type: Object,
      required: true
    }
  },
  setup() {
    function selectAirport(airport) {
      alert(`You clicked on ${airport.abbreviation}. It's located in ${airport.city}, ${airport.state}.`)
    }

    return { selectAirport }
  }
}
</script>
...
In Vue.js 3, reactive functions need to be defined and exported in the setup component method. This tells Vue that it can execute the selectAirport function in the <template>.
With the function defined, you’ll now attach it to an event on an HTML element. As stated before, you can use the v-on directive and attach an event with the name of click; this is an event provided by Vue.js. In the AirportCard.vue component, add the v-on directive to the wrapper <div>:
<template>
  <div class="airport" v-on:click="selectAirport(airport)">
    <p>{{ airport.abbreviation }}</p>
    <p>{{ airport.name }}</p>
    <p>{{ airport.city }}, {{ airport.state }}</p>
  </div>
</template>
...
Once you have added this code, save and exit the file.
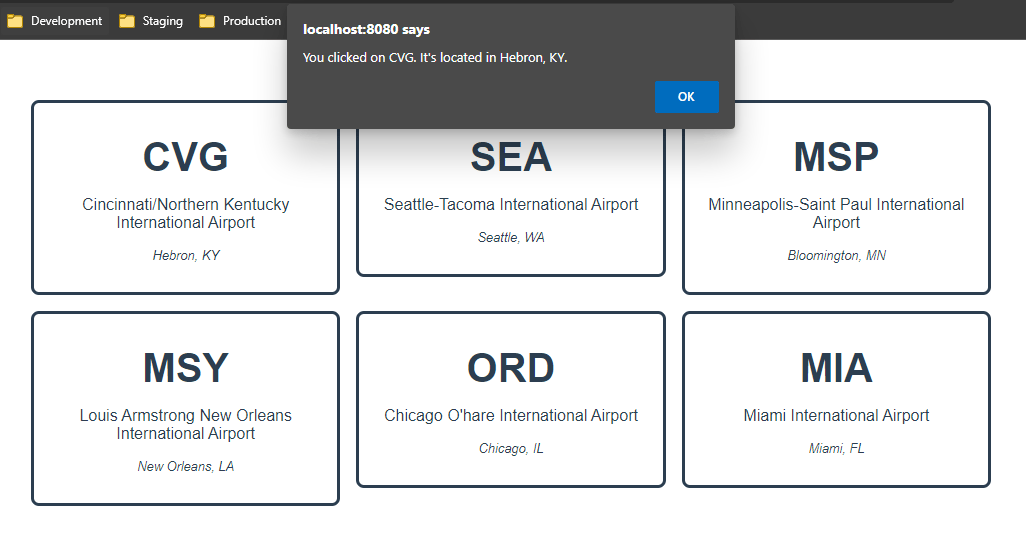
Now, when you click on a card, an alert will pop-up with the message provided. If you click on CVG for example, you will find the following:
The click event is not the only event that is provided to you out-of-the-box by Vue.js. In fact, you can use v-on any native JavaScript event, like:
keyupmouseoverfocusmouseenterchange
Next, you will change this v-on:click listener to mouseover to illustrate how Vue.js listens for events. mouseover is an event that fires whenever a mouse cursor moves over an HTML element.
Open up src/components/AirportCard.vue again and update your file with the following highlighted code:
<template>
  <div class="airport" @mouseover="selectAirport(airport)">
    <p>{{ airport.abbreviation }}</p>
    <p>{{ airport.name }}</p>
    <p>{{ airport.city }}, {{ airport.state }}</p>
  </div>
</template>
As shown here, Vue also has shorthand syntax for v-on: events. To use the shorthand syntax, you replaced v-on with @. Save and exit the file.
Now when you visit localhost:8080 and hover over a card, that function will execute and display a native alert.
This functionality is good for testing purposes, but may be undesired since it displays the alert every time a user hovers over it. A better experience might be to only display it the first time a user hovers over that card. In vanilla JavaScript, you may track the amount of times a user hovers over a card, then prevent further executions. Vue.js has event modifiers that you can leverage to accomplish the same thing with less code.
In the next section, you are going to explore event modifiers and use them for a better user experience.
Step 3 — Using Event and Key Modifiers
In the previous section, you executed a function on the click and mouseover events. You also learned about the Vue.js shorthand for v-on events. Now you will expand on this further by attaching a modifier to this mouseover event so your function executes only once.
Vue.js provides a number of event modifiers for you. Some of these include:
.stop: stops event propagation.prevent: prevents the HTML element’s default behavior.capture: handles an event targeting an inner element before the selected element.self: only triggers the handler ifevent.targetis the element itself.once: only executes the function once.passive: enables the element’s default behavior to happen immediately instead of waiting for the event, which can be used for optimizing performance for scroll on mobile devices
In this case, you’ll use the .once modifier. In your text editor, open the AirportCard.vue component and add the modifier to the existing mouseover event:
<template>
  <div class="airport" @mouseover.once="selectAirport(airport)">
    <p>{{ airport.abbreviation }}</p>
    <p>{{ airport.name }}</p>
    <p>{{ airport.city }}, {{ airport.state }}</p>
  </div>
</template>
Save the file. Visit your application in the browser and you’ll find that the event only fires once on the first mouseover event.
Next, you’ll continue exploring modifiers by using key modifiers. These key modifiers are associated with keystroke events, such as keyup. For this next part, imagine that you want to make this clicking action a little more explicit. One way you can do that is by adding a key modifier to the @click event on the .airport <div> in your template.
To do that, change the @mouseover to @click and add the .shift modifier:
<template>
  <div class="airport" @click.shift="selectAirport(airport)">
    <p>{{ airport.abbreviation }}</p>
    <p>{{ airport.name }}</p>
    <p>{{ airport.city }}, {{ airport.state }}</p>
  </div>
</template>
Save the changes and open the application in your browser. If you click on a card without holding the SHIFT key, the alert does nothing. Now, try holding down the SHIFT key when clicking on a card. Your function will now execute, and you will receive an alert.
In this section, you learned about Vue’s built-in events and the modifiers associated with those events. You can get a lot done with these built-in events, but there will be times when you’ll need to have a custom event. In the next section, you’re going to use custom events to emit an action up to a parent so that it will execute a function.
Step 4 — Creating Custom Events
When developing applications in Vue.js, there will be times when you need to pass data up to a parent component via a custom event. Props are read-only data that are passed down to a child from the parent, but a custom action via an $emit is the opposite of that. To create the most reusable components, it’s best to think of these as functions. You pass data down through props (arguments), and emit values back up to the parent (a return value).
To emit an event from the child component to the parent, you use the $emit function. Before implementing this, this tutorial will guide you through an example to demonstrate how this works.
The $emit function accepts two arguments: the action name (a string), and the value to pass up to the parent. In the following example, when the user clicks on the button, you are sending the value CVG to the parent component under the action favoriteAirport:
<template>
  <button @click="$emit('favoriteAirport', 'CVG')">A button</button>
</template>
In the parent component, you would use the v-on directive and listen for the favoriteAirport event. When this custom event is fired, the code will do something with the value:
<template>
  <child-component @favoriteAirport="favoriteAirport = $event" />
</template>

<script>
import { ref } from 'vue'
export default {
  setup() {
    const favoriteAirport = ref('')

    return { favoriteAirport }
  }
}
</script>
The value of the event will be $event. In this case, $event is actually CVG, which you then store in a reactive data property called favoriteAirport.
Now that you know what a custom event looks like, you will put it into practice by implementing this custom event into your application.
Open the AirportCards.vue component in your text editor. In the @click event, remove the reference to the function and replace it with $emit("favoriteAirport", airport). Remember, the first arugment is the name of the event and the second is the value that you are emitting:
<template>
  <div class="airport" @click="$emit('favoriteAirport', airport)">
    <p>{{ airport.abbreviation }}</p>
    <p>{{ airport.name }}</p>
    <p>{{ airport.city }}, {{ airport.state }}</p>
  </div>
</template>
...
Save the file. Now, when the user clicks on the airport card, a custom event will fire and pass up that airport object.
Next, open src/App.vue to add some HTML to the template. You will show the favorite airports list after the six cards that are already present:
<template>
  <div class="wrapper">
    <div v-for="airport in airports" :key="airport.abbreviation">
      <airport-card :airport="airport" />
    </div>
    <h1 v-if="favoriteAirports.length">Favorite Airports</h1>
    <div v-for="airport in favoriteAirports" :key="airport.abbreviation">
      <airport-card :airport="airport" />
   </div>
  </div>
</template>

<script>
import { ref } from 'vue'
import allAirports from '@/data/airports.js'
import AirportCard from '@/components/AirportCard.vue'

export default {
  components: {
    AirportCard
  },
  setup() {
    const airports = ref(allAirports)
    const favoriteAirports = ref([])

    return { airports, favoriteAirports }
  }
}
</script>
...
In this code snippet, you are creating a reactive data property called favoriteAirports, which is an empty array. In the <template>, you iterate through the empty array to render the <airport-card /> components, much like you did in an earlier step.
Now you need to add the v-on event for your custom event:
<template>
  <div class="wrapper">
    <div v-for="airport in airports" :key="airport.abbreviation">
      <airport-card :airport="airport" @favoriteAirport="favoriteAirports.push($event)" />
    </div>
    <h1 v-if="favoriteAirports.length">Favorite Airports</h1>
    <div v-for="airport in favoriteAirports" :key="airport.abbreviation">
      <airport-card :airport="airport" />
   </div>
  </div>
</template>
...
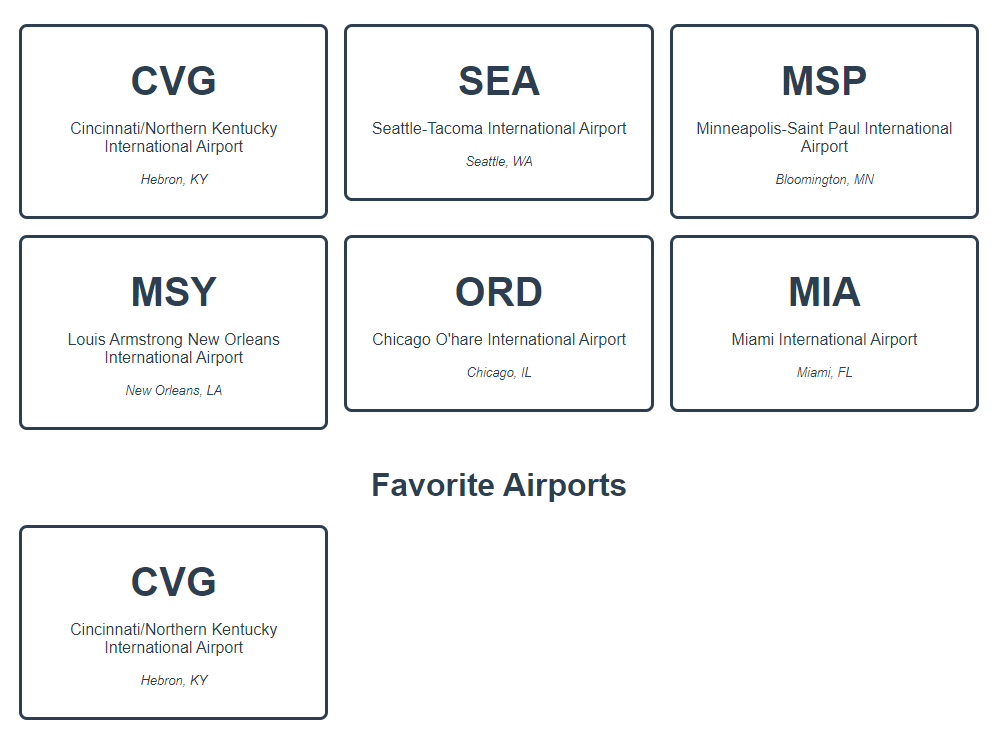
In the @favoriteAiport custom event, you used the JavaScript push() method to add the airport from the child ($event) to the favoriteAirports reactive data property.
Open you browser and navigate to your project at localhost:8080. When you click on one of the airport cards, that card will appear under Favorite Airports.
In this section, you learned about custom events, what they are, and how to use them. A custom event is a way to pass data up to a parent component through the $emit function provided by Vue. Once that data has been emitted, you can further manipulate it in the parent component, like adding it to an array.
Conclusion
In this tutorial, you learned how Vue.js listens for a number of built-in events, such as click and mouseover. In addition to that, you tried out event and key modifiers, small pieces of code that you appended to your event to provide additional functionality. With this, you set up your app to execute the function once with the .once modifier and to only fire when holding down the SHIFT key using the .shift modifier.
Vue provides an efficient way to listen for events that lets you focus on manipulating data over manually setting up event listeners. In addition to that, Vue allows you to think of components as functions: They accept data props and can return a value with $emit.
To learn more about Vue components, it is recommended to read through the Vue documentation. For more tutorials on Vue, check out the How To Develop Websites with Vue.js series page.
Thanks for learning with the DigitalOcean Community. Check out our offerings for compute, storage, networking, and managed databases.
Tutorial Series: How To Develop Websites with Vue.js
This series provides a starting point for building websites with the front-end JavaScript framework Vue.js. Created in 2014 by Evan You (formally of Google), Vue.js is often described as a combination of React and Angular, borrowing the prop-driven development of React and the templating power of Angular. By the end of this series, you will have the tools to develop websites that focus on traditional HTML and CSS, while still taking advantage of the robustness and scalability of a front-end framework.
About the author
I'm a software engineer from Cincinnati. I work on TypeScript apps with Vue.js. Currently a Senior Front-End Engineer at Enodo, based in Chicago.
Still looking for an answer?
This textbox defaults to using Markdown to format your answer.
You can type !ref in this text area to quickly search our full set of tutorials, documentation & marketplace offerings and insert the link!
 This work is licensed under a Creative Commons Attribution-NonCommercial- ShareAlike 4.0 International License.
Become a contributor for community
Get paid to write technical tutorials and select a tech-focused charity to receive a matching donation.

DigitalOcean Documentation
Full documentation for every DigitalOcean product.

Resources for startups and AI-native businesses
The Wave has everything you need to know about building a business, from raising funding to marketing your product.
The developer cloud
Scale up as you grow — whether you're running one virtual machine or ten thousand.

Start building today
From GPU-powered inference and Kubernetes to managed databases and storage, get everything you need to build, scale, and deploy intelligent applications.
