
Introduction
HAProxy, which stands for High Availability Proxy, is a popular open source software TCP/HTTP Load Balancer and proxying solution which can be run on Linux, Solaris, and FreeBSD. Its most common use is to improve the performance and reliability of a server environment by distributing the workload across multiple servers (e.g. web, application, database). It is used in many high-profile environments, including: GitHub, Imgur, Instagram, and Twitter.
In this tutorial, we will go over how to use HAProxy for SSL termination, for traffic encryption, and for load balancing your web servers. We will also show you how to use HAProxy to redirect HTTP traffic to HTTPS.
Native SSL support was implemented in HAProxy 1.5.x, which was released as a stable version in June 2014.
Prerequisites
To complete this tutorial, you must have or obtain the following:
- At least one web server, with private networking, listening on HTTP (port 80)
- Root access to an additional VPS on which we will install HAProxy. Instructions to set up root access can be found here (steps 3 and 4): Initial Server Setup with Ubuntu 14.04.
- An SSL certificate and private key pair with a “common name” that matches your domain name or IP address
If you do not already have an SSL certificate and private key pair, please obtain one before continuing. Here are a few tutorials that contain steps that cover creating SSL certificates:
- Create an StartSSL Certificate (private.key and ssl.crt)
- Create a Self-Signed SSL Certificate on Ubuntu 14.04 (Step 2–apache.key and apache.crt)
Creating a Combined PEM SSL Certificate/Key File
To implement SSL termination with HAProxy, we must ensure that your SSL certificate and key pair is in the proper format, PEM. In most cases, you can simply combine your SSL certificate (.crt or .cer file provided by a certificate authority) and its respective private key (.key file, generated by you). Assuming your certificate file is called example.com.crt, and your private key file is called example.com.key, here is an example of how to combine the files:
cat example.com.crt example.com.key > example.com.pem
sudo cp example.com.pem /etc/ssl/private/
This creates the combined PEM file, called example.com.pem and copies it to /etc/ssl/private. As always, be sure to secure any copies of your private key file, including the PEM file (which contains the private key).
In some cases, you may need to copy your CA root certificate and CA intermediate certificates into your PEM file.
Our Starting Environment
Here is the environment that we are starting with:
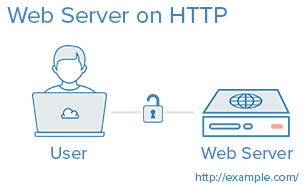
If your environment differs from the example, like if you are already using SSL on the web server or you have a separate database server, you should be able to adapt this tutorial to work with your environment.
If you are unfamiliar with basic load-balancing concepts or terminology, like layer 7 load balancing or backends or ACLs, here is an article that explains the basics: An Introduction to HAProxy and Load Balancing Concepts.
Our Goal
By the end of this tutorial, we want to have an environment that looks like this:
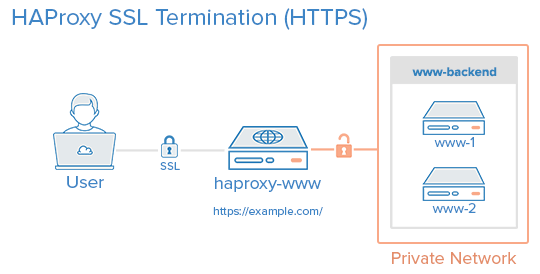
That is, your users will access your website by connecting to your HAProxy server via HTTPS, which will decrypt the SSL session and forward the unencrypted requests to your web servers (i.e. the servers in www-backend) via their private network interfaces on port 80. Your web servers will then send their responses to your HAProxy server, which will encrypt the responses and send them back to the user that made the original request.
You can set up your www-backend with as many web servers as you want, as long as they serve identical content. In other words, you can set this up with a single server then scale it out later by adding as many servers as you want. Remember, as your traffic increases, your HAProxy server may become a performance bottleneck if it does not have enough system resources to handle your user traffic.
Note: This tutorial does not cover how to ensure that your web/application servers serve the same content because that is often application or web server dependent.
Install HAProxy 1.6.x
Create a new VPS with private networking. For this tutorial, we will call it haproxy-www, but you may call it whatever you want.
In our haproxy-www VPS, add the dedicated PPA to apt-get:
sudo add-apt-repository ppa:vbernat/haproxy-1.6
Then update your apt cache:
sudo apt-get update
Then install HAProxy 1.6 with apt-get with the following command:
sudo apt-get install haproxy
Now that HAProxy 1.6 is installed, let’s configure it!
HAProxy Configuration
HAProxy’s configuration file is located at /etc/haproxy/haproxy.cfg and is divided into two major sections:
- Global: sets process-wide parameters
- Proxies: consists of defaults, listen, frontend, and backend sections
Again, if you are unfamiliar with HAProxy or basic load-balancing concepts and terminology, please refer to this link: An Introduction to HAProxy and Load Balancing Concepts.
HAProxy Configuration: Global
All of the HAProxy configuration should be done on your HAProxy VPS, haproxy-www.
Open haproxy.cfg in an editor:
sudo vi /etc/haproxy/haproxy.cfg
You will see that there are two sections already defined: global and defaults.
The first thing you will want to do is set maxconn to a reasonable number. This setting affects how many concurrent connections HAProxy will allow, which can affect QoS and prevent your web servers from crashing from trying to serve too many requests. You will need to play around with it to find what works for your environment. Add the following line (with a value you think is reasonable) to the global section of the configuration
maxconn 2048
Add this line, to configure the maximum size of temporary DHE keys that are generated:
tune.ssl.default-dh-param 2048
Next, in the defaults section, add the following lines under the line that says mode http:
   option forwardfor
   option http-server-close
The forwardfor option sets HAProxy to add X-Forwarded-For headers to each request, and the http-server-close option reduces latency between HAProxy and your users by closing connections but maintaining keep-alives.
HAProxy Configuration: Stats
Using HAProxy stats can be useful in determining how HAProxy is handling incoming traffic. If you would like to enable the HAProxy stats page, add the following lines in the defaults section (substitute user and password with secure values):
   stats enable
   stats uri /stats
   stats realm Haproxy\ Statistics
   stats auth user:password
This will allow you to look at the HAProxy stats page by going to your domain on /stats (e.g. https://example.com/stats).
Do not close the config file yet! We will add the proxy configuration next.
HAProxy Configuration: Proxies
Frontend Configuration
The first thing we want to add is a frontend to handle incoming HTTP connections. At the end of the file, let’s add a frontend called www-http. Be sure to replace haproxy_www_public_IP with the public IP of your haproxy-www VPS:
frontend www-http
   bind haproxy_www_public_IP:80
   reqadd X-Forwarded-Proto:\ http
   default_backend www-backend
Here is an explanation of what each line in the frontend config snippet above means:
- frontend www-http: specifies a frontend named “www-http”
- bind haproxy_www_public_IP:80: replace
haproxy_www_public_IPwith haproxy-www’s public IP address. This tells HAProxy that this frontend will handle the incoming network traffic on this IP address and port 80 (HTTP) - reqadd X-Forwarded-Proto:\ http: Adds http header to end of end of the HTTP request
- default_backend www-backend: this specifies that any traffic that this frontend receives will be forwarded to www-backend, which we will define in a following step
Next, we will add a frontend to handle incoming HTTPS connections. At the end of the file, let’s add a frontend called www-https. Be sure to replace haproxy_www_public_IP with the public IP of your haproxy-www VPS:
frontend www-https
   bind haproxy_www_public_IP:443 ssl crt /etc/ssl/private/example.com.pem
   reqadd X-Forwarded-Proto:\ https
   default_backend www-backend
- frontend www-https: specifies a frontend named “www-https”
- bind haproxy_www_public_IP:443 ssl crt …: replace
haproxy_www_public_IPwith haproxy-www’s public IP address, andexample.com.pemwith your SSL certificate and key pair in combined pem format. This tells HAProxy that this frontend will handle the incoming network traffic on this IP address and port 443 (HTTPS). - reqadd X-Forwarded-Proto:\ https: Adds https header to end of end of the HTTPS request
- default_backend www-backend: this specifies that any traffic that this frontend receives will be forwarded to www-backend, which we will define in a following step
Backend Configuration
After you are finished configuring the frontends, continue adding your backend by adding the following lines. Be sure to replace the highlighted words with the respective private IP addresses of your web servers:
backend www-backend
   redirect scheme https if !{ ssl_fc }
   server www-1 www_1_private_IP:80 check
   server www-2 www_2_private_IP:80 check
Here is an explanation of what each line in the backend config snippet above means:
- backend www-backend: specifies a backend named www-backend
- redirect scheme https if !{ ssl_fc }: this line redirects HTTP requests to HTTPS, which makes your site HTTPS-only. If you want to allow both HTTP and HTTPS, remove this line
- server www-1 …: specifies a backend server named www-1, the private IP (which you must substitute) and port that it is listening on, 80. The check option makes the load balancer periodically perform a health check on this server
- server www-2 …: similar to the previous line. Add additional lines like this, with appropriate names and IP addresses to add more servers to the load balancer
Now save and exit haproxy.cfg. HAProxy is now ready to be started, but let’s enable logging first.
Enable HAProxy Logging
Enabling logging in HAProxy is very simple. First edit the rsyslog.conf file:
sudo vi /etc/rsyslog.conf
Then find the following two lines, and uncomment them to enable UDP syslog reception. It should look like the following when you are done:
$ModLoad imudp
$UDPServerRun 514
$UDPServerAddress 127.0.0.1
Now restart rsyslog to enable the new configuration:
sudo service rsyslog restart
HAProxy logging is is now enabled! The log file will be created at /var/log/haproxy.log once HAProxy is started.
Start HAProxy
On haproxy-www, start HAProxy to put your configuration changes into effect:
sudo service haproxy restart
HAProxy is now performing SSL termination and load balancing your web servers! Your load balanced server is now accessible to your user via the public IP address or domain name of your load balancer, haproxy-www! There are a few things that you will want to check, to make sure everything is set up correctly.
Things to Check
- If you haven’t already, update your nameservers to point your domain to your haproxy-www server’s public IP address
- If you want your servers to use only HTTPS, you will want to make sure that your web servers (e.g. www-1, www-2, etc.) are only listening on their private IP addresses on port 80. Otherwise, users will be able to access your web servers via HTTP (unencrypted) on their public IP addresses.
- Visit haproxy-www via HTTPS and ensure that it works
- Visit haproxy-www via HTTP and ensure that it redirects to HTTPS (unless you configured it to allow both HTTP and HTTPS)
Note: If you’re using an application that needs to know its own URL, like WordPress, you need to change your URL setting from “http” to https". To follow the WordPress example, you would go to your WordPress General Settings, then change the WordPress Address (URL) and the Site Address (URL) from “http” to “https”.
Conclusion
Now you have a load balancer solution that handles your SSL connections and can be used to horizontally scale out your server environment. Feel free to combine what you have learned in this guide with other HAProxy guides to improve your environment even further!
Thanks for learning with the DigitalOcean Community. Check out our offerings for compute, storage, networking, and managed databases.
Tutorial Series: Load Balancing WordPress with HAProxy
Adding a load balancer to your server environment is a great way to increase reliability and performance. The first tutorial in this series will introduce you to load balancing concepts and terminology, followed by two tutorials that will teach you how to use HAProxy to implement layer 4 or layer 7 load balancing in your own WordPress environment. The last tutorial covers SSL termination with HAProxy.
About the author
Software Engineer @ DigitalOcean. Former Señor Technical Writer (I no longer update articles or respond to comments). Expertise in areas including Ubuntu, PostgreSQL, MySQL, and more.
Still looking for an answer?
 This work is licensed under a Creative Commons Attribution-NonCommercial- ShareAlike 4.0 International License.
Become a contributor for community
Get paid to write technical tutorials and select a tech-focused charity to receive a matching donation.

DigitalOcean Documentation
Full documentation for every DigitalOcean product.

Resources for startups and AI-native businesses
The Wave has everything you need to know about building a business, from raising funding to marketing your product.
The developer cloud
Scale up as you grow — whether you're running one virtual machine or ten thousand.

Start building today
From GPU-powered inference and Kubernetes to managed databases and storage, get everything you need to build, scale, and deploy intelligent applications.
