By Wayne Hartmann and Sharon Campbell

Status: Deprecated
This article covers a version of CentOS that is no longer supported. If you are currently operating a server running CentOS 6, we highly recommend upgrading or migrating to a supported version of CentOS.
Reason: CentOS 6 reached end of life (EOL) on November 30th, 2020 and no longer receives security patches or updates. For this reason, this guide is no longer maintained.
See Instead: This guide might still be useful as a reference, but may not work on other CentOS releases. If available, we strongly recommend using a guide written for the version of CentOS you are using.
Introduction
OpenShift is Red Hat’s Platform-as-a-Service (PaaS) that allows developers to quickly develop, host, and scale applications in a cloud environment. OpenShift Origin is the open source upstream of OpenShift. It has built-in support for a variety of languages, runtimes, and data layers, including Java EE6, Ruby, PHP, Python, Perl, MongoDB, MySQL, and PostgreSQL. You can add new runtimes and frameworks to OpenShift with custom or community cartridges.
Easily scaling your web applications is a primary reason to run them on OpenShift Origin.
NOTE: Throughout this tutorial user input will be highlighted in red.
How OpenShift Works
OpenShift Roles
There are four roles used on the OpenShift platform. While it is not significantly important you know what the roles do for this tutorial, if you wish to deploy a cluster of servers to offer high availability, load-balancing, etc., you will need to understand the functions these roles provide.
In our tutorial, we’ll be configuring a single server to run all of these roles.
Broker
The Broker role consists of the OpenShift Broker RPMs and an MCollective client. The Broker serves as a central hub of the OpenShift deployment, and provides a web interface where users can manage their hosted applications.
DBServer
This role consists of the MongoDB database that the Broker uses to track users and applications.
MsgServer
The MsgServer role includes the ActiveMQ server plus an MCollective client.
Node
The Node role is assigned to any host that will actually be used to store and serve OpenShift-hosted applications. oo-install supports the deployment of Nodes as part of an initial installation and as part of a workflow to add a new Node to an existing OpenShift deployment.
The OpenShift Architecture
OpenShift is designed to be a high-availability, scalable application platform. When configured properly, a large OpenShift deployment can offer an easy way to scale your application when demands increase, while providing zero downtime. With a cluster of OpenShift hosts in multiple data center locations, you can survive an entire data center going down. In this tutorial we will set up our first OpenShift host running all the roles required by OpenShift.
How it works from a client’s perspective
- A client wants to visit the site app-owner.apps.example.com.
- The client’s browser requests the DNS record for the domain.
- The DNS server responds with the IP Address of a Node hosting the application.
- The clients browser sends a GET request to the Node.
- The Node maps the request to the desired Application.
- The Application itself responds to the request directly.
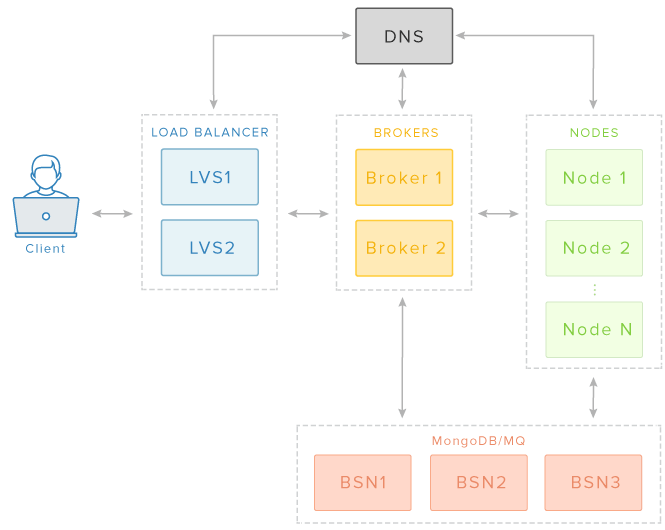
How did the DNS server know which Node is running the application?
The developer connects to a Broker to create/manage an application. When the owner modifies an application, the Broker will send a message to the DNS server with the new information. This information includes the domain(s) being used for the application, and which Nodes are hosting the application. Because of this automation, it is a requirement for OpenShift to have control over the DNS Zone of the domain or subdomain used for apps.
OpenShift uses the Bind DNS Server. If you have an existing Bind DNS server, you can configure OpenShift to work with it. However, in this tutorial, we will cover the process of using a new DNS server configured automatically by the OpenShift Origin installer.
If you would prefer to use an existing BIND DNS server, you can read instructions for setting up DNS in the OpenShift Origin Comprehensive Deployment Guide.
DNS Configuration
For the remainder of this tutorial we will be using the following domains. Substitute these with your own, and feel free to use a personalized naming convention.
- example-dns.com - Used for our nameservers
- example.com
- apps.example.com - Used for OpenShift applications
- openshift.example.com - Used for OpenShift Hosts
- master.openshift.example.com - The host name of our Droplet
Prerequisites
Droplet Requirements
- 1GB Droplet or larger
The Installation of OpenShift is fairly resource intensive, and some packages can exceed 512 MB of RAM usage. You should use a 1 GB or larger Droplet. If you have any issues registering the cartridges at the end of the installer, chances are some packages failed to install do to the lack of memory. This can be confirmed by examining the installation logs.
To check the installation log:
cat /tmp/openshift-deploy.log
Supported Operating Systems
- CentOS 6.5 64-bit (standard DigitalOcean image)
OpenShift Origin 4 is supported on 64-bit versions of Red Hat Enterprise Linux (RHEL) 6.4 or higher and CentOS 6.4 or higher. It is not supported on Fedora, RHEL 7.x, or CentOS 7.x. A minimal installation of RHEL / CentOS is recommended to avoid package incompatibilities with OpenShift. This tutorial will use the standard Digital Ocean CentOS 6.5 x64 image on a 1 GB Droplet.
Installer Dependencies
The following utilities are required by the OpenShift Origin installer. This tutorial will show you how to install Ruby. The other packages are already installed by default with the DigitalOcean CentOS 6.5 image.
- curl
- ruby - 1.8.7 or greater
- ssh - If you are deploying to systems other than the installer host
Root Access
The rest of this tutorial will assume you are connected to your server with the root user account, or a user account with sudo privileges.
To enter the root shell from another account:
sudo su
Step One — Install Updates
Before proceeding, it is always a good idea to make sure you have the latest updates installed.
To install updates:
yum update
Step Two — Install Preferred Text Editor
You can use your favorite text editor throughout this tutorial; however, the examples will use Nano.
Install Nano with:
yum install nano
When you are done editing a file in Nano, press Ctrl+X, press Y to save, and press Enter to overwrite the existing file.
Step Three — Install Ruby
Ruby is not installed by default on a minimal CentOS 6.5 installation.
To install Ruby:
yum install ruby
Step Four — Set Your Hostname
We need to make sure our hostname is configured correctly and resolves to our local machine. If this is configured incorrectly, Puppet will not be able to deploy some required services.
To check the current hostname:
hostname
It should show the URL you want to use for the OpenShift control panel. In our case, this is master.openshift.example.com.
Open the file /etc/sysconfig/network:
nano /etc/sysconfig/network
Edit the file to suit your needs:
NETWORKING=yes
HOSTNAME=master.openshift.example.com
Upon next reboot your hostname will be updated. We will reboot after a few more steps.
Step Five — Make Hostname Resolve to localhost
This will ensure that puppet can resolve the hostname correctly during the installation.
Next, open the file /etc/hosts:
nano /etc/hosts
Add your hostname to the 127.0.0.1 line:
127.0.0.1   master.openshift.example.com localhost localhost.localdomain
::1         localhost6 localhost6.localdomain6
Step Six — Enable SELinux
SELinux (Security-Enhanced Linux) is a Linux kernel security module that provides a mechanism for supporting access control security policies, including United States Department of Defense–style mandatory access controls (MAC). This kernel module is a requirement for OpenShift to isolate applications securely.
For more information on SELinux, and advanced configurations that should be done before using OpenShift in a production environment, please see the series linked below. While the series is based on CentOS 7, the principles and deployment process are the same.
For the purposes of this tutorial we will enable SELinux by setting it to enforcing mode.
Open /etc/sysconfig/selinux:
nano /etc/sysconfig/selinux
Change SELinux to enforcing:
# This file controls the state of SELinux on the system.
# SELINUX= can take one of these three values:
#       enforcing - SELinux security policy is enforced.
#       permissive - SELinux prints warnings instead of enforcing.
#       disabled - SELinux is fully disabled.
SELINUX=enforcing
# SELINUXTYPE= type of policy in use. Possible values are:
#       targeted - Only targeted network daemons are protected.
#       strict - Full SELinux protection.
SELINUXTYPE=targeted

# SETLOCALDEFS= Check local definition changes
SETLOCALDEFS=0
Then reboot to enable our settings:
reboot
If using SSH, you will have to reconnect after the reboot is complete.
Step Seven — Install OpenShift Origin
Now we’ll install OpenShift Origin.
We have three options to install OpenShift: curl-to-shell, a portable installer, or installing from source. In this article we will be using the curl-to-shell method for installing OpenShift Origin.
This configuration will take a few minutes, and the installation itself can take up to an hour, although you don’t have to babysit the server for that part.
To start the installer:
sh <(curl -s https://install.openshift.com/)
(Optional) Installation Options
The command line options are useful for larger and Enterprise deployments. If you have predefined configuration files or have an existing Puppet installation, you can use these options to speed up the installation process. Since this is our first deployment on a single server, we will not be using any of the options listed below. However, it’s useful to know what functions these options provide if you need to scale your Openshift deployment in the future.
For more information you can check the official documentation.
-a	--advanced-mode				Enable access to message server and db server customization
-c	--config-file FILEPATH		The path to an alternate config file
-w	--workflow WORKFLOW_ID		The installer workflow for unattended deployment
	--force						Ignore workflow warnings and automatically install missing RPMs
-l	--list-workflows			List the workflow IDs for use with unattended deployment
-e	--enterprise-mode			Show OpenShift Enterprise options (ignored in unattended mode)
-s	--subscription-type TYPE	The software source for installation packages
-u	--username USERNAME			Login username
-p	--password PASSWORD			Login password
	--use-existing-puppet		For Origin; do not attempt to install the Puppet module
-d	--debug						Enable debugging messages
Step Eight — Answer Installer Questions
OpenShift Origin uses an interactive installation process. There are quite a few questions to answer, so pay attention! The questions are shown below, with the user input in red.
Welcome to OpenShift.

This installer will guide you through a basic system deployment, based
on one of the scenarios below.

Select from the following installation scenarios.
You can also type '?' for Help or 'q' to Quit:
1. Install OpenShift Origin
2. Add a Node to an OpenShift Origin deployment
3. Generate a Puppet Configuration File
Type a selection and press <return>: 1
The installer will prompt you for an installation scenario. Enter 1 and press Enter.
DNS — Install a new DNS Server
----------------------------------------------------------------------
DNS Configuration
----------------------------------------------------------------------

First off, we will configure some DNS information for this system.

Do you want me to install a new DNS server for OpenShift-hosted
applications, or do you want this system to use an existing DNS
server? (Answer 'yes' to have me install a DNS server.) (y/n/q/?) y
For this tutorial we want to deploy a new DNS server, so enter y and press Enter.
DNS — Application Domain
All of your hosted applications will have a DNS name of the form:
<app_name>-<owner_namespace>.<all_applications_domain>

What domain name should be used for all the hosted apps in your
OpenShift system? |example.com| apps.example.com
Enter the domain you would like to use for your hosted applications, which in this example is apps.example.com, and press Enter.
DNS — OpenShift Hosts Domain
Do you want to register DNS entries for your OpenShift hosts with the
same OpenShift DNS service that will be managing DNS records for the
hosted applications? (y/n/q) y

What domain do you want to use for the OpenShift hosts? openshift.example.com
Enter the domain you would like to use for your OpenShift Hosts, which in this example is openshift.example.com, and press Enter.
DNS — FQDN of the Name Server
Hostname (the FQDN that other OpenShift hosts will use to connect to
the host that you are describing): master.openshift.example.com
Since we are hosting the DNS on the same Droplet, we will use this machine’s Fully Qualified Domain Name. Enter your host’s FQDN, which in this example is master.openshift.example.com, and press Enter.
DNS — SSH Host Name
Hostname / IP address for SSH access to master.openshift.example.com
from the host where you are running oo-install. You can say
'localhost' if you are running oo-install from the system that you are
describing: |master.openshift.example.com| localhost
Using current user (root) for local installation.
This is the hostname used to perform the installation of OpenShift. Since we are installing to the same Droplet running the installer, we can use localhost. Enter localhost, and press Enter.
DNS — IP Address Configuration
If you have private networking enabled, you will need to use the WAN interface/IP Address for any host you wish to assign the Node Role. Since we are only installing to a single host in this tutorial, make sure you use eth0 as your interface for this host. In a large setup with multiple Brokers and DBServers, you would use the private networking interface for those hosts only. Attempting to use the private interface on a Node will cause an IP address error during deployment.
Detected IP address 104.131.174.112 at interface eth0 for this host.
Do you want Nodes to use this IP information to reach this host?
(y/n/q/?) y

Normally, the BIND DNS server that is installed on this host will be
reachable from other OpenShift components using the host's configured
IP address (104.131.174.112).

If that will work in your deployment, press <enter> to accept the
default value. Otherwise, provide an alternate IP address that will
enable other OpenShift components to reach the BIND DNS service on
this host: |104.131.174.112| 104.131.174.112

That's all of the DNS information that we need right now. Next, we
need to gather information about the hosts in your OpenShift
deployment.
For the purposes of this tutorial we will use the default settings, as shown in the image above.
Broker Configuration
----------------------------------------------------------------------
Broker Configuration
----------------------------------------------------------------------
Do you already have a running Broker? (y/n/q) n

Okay. I'm going to need you to tell me about the host where you want
to install the Broker.

Do you want to assign the Broker role to master.openshift.example.com?
(y/n/q/?) y

Okay. Adding the Broker role to master.openshift.example.com.

That's everything we need to know right now for this Broker.

Do you want to configure an additional Broker? (y/n/q) n

Moving on to the next role.
The installer will now ask us to set up a Broker. In this example we do not have any Brokers yet, so we will install the role on master.openshift.example.com.
Node Configuration
----------------------------------------------------------------------
Node Configuration
----------------------------------------------------------------------
Do you already have a running Node? (y/n/q) n

Okay. I'm going to need you to tell me about the host where you want
to install the Node.

Do you want to assign the Node role to master.openshift.example.com?
(y/n/q/?) y

Okay. Adding the Node role to master.openshift.example.com.

That's everything we need to know right now for this Node.

Do you want to configure an additional Node? (y/n/q) n
The installer will now ask us to set up a Node. In this example we do not have any Nodes yet, so we will install the role on master.openshift.example.com. At this point the installer will also ask you to configure the user accounts. In this example we chose to have the installer generate the credentials for us.
Username and Password Configuration
Do you want to manually specify usernames and passwords for the
various supporting service accounts? Answer 'N' to have the values
generated for you (y/n/q) n
If you would like to manually configure the usernames and passwords used for your deployment, you can do that here. In our example we decided to have them automatically generated for us. Enter n, and press Enter.
Pay attention to the output. You will need the values in the “Account Settings” table later in the tutorial, specifically the OpenShift Console User and the OpenShift Console Password.
Account Settings
+----------------------------+------------------------+
| OpenShift Console User     | demo                   |
| OpenShift Console Password | S94XXXXXXXXXXXXXXXH8w  |
...
Finish Deployment
Host Information
+------------------------------+------------+
| Hostname                     | Roles      |
+------------------------------+------------+
| master.openshift.example.com | Broker     |
|                              | NameServer |
|                              | Node       |
+------------------------------+------------+

Choose an action:
1. Change the deployment configuration
2. View the full host configuration details
3. Proceed with deployment
Type a selection and press <return>: 3
When you are satisfied with the configuration, enter 3, and press Enter.
Repository Subscriptions
Do you want to make any changes to the subscription info in the
configuration file? (y/n/q/?) n

Do you want to set any temporary subscription settings for this
installation only? (y/n/q/?) n
For the purposes of this tutorial we will use the default mirrors. Enter n and press Enter, for both questions.
Pre-Flight Check
The following RPMs are required, but not installed on this host:
* puppet
* bind
Do you want to want me to try to install them for you? (y/n/q) y
The installer will now perform a pre-flight check. If you need any packages installed, such as Puppet and BIND in our example, enter y and press Enter.
Note: Once you answer this question, Puppet will run for up to an hour on your server to configure OpenShift Origin.
Here’s some example output:
master.openshift.example.com: Running Puppet deployment for host
<^>Error: Could not uninstall module 'openshift-openshift_origin'
  Module 'openshift-openshift_origin' is not installed
master.openshift.example.com: Puppet module removal failed. This is expected if the module was not installed.<^>
master.openshift.example.com: Attempting Puppet module installation (try #1)
<^>Warning: Symlinks in modules are unsupported. Please investigate symlink duritong-sysctl-0.0.5/spec/fixtures/modules/sysctl/manifests->../../../../manifests.
Warning: Symlinks in modules are unsupported. Please investigate symlink duritong-sysctl-0.0.5/spec/fixtures/modules/sysctl/lib->../../../../lib.<^>
master.openshift.example.com: Puppet module installation succeeded.
master.openshift.example.com: Cleaning yum repos.
master.openshift.example.com: Running the Puppet deployment. This step may take up to an hour.
NOTE: Red text in the output is used to highlight errors and warnings.
The installer will now perform the rest of the deployment. You may see some warnings during this process (see the image above). These are normal and will not affect the deployment. This process can take upwards of an hour to complete.
Redeploying
If Puppet did not configure everything correctly the first time, you can re-run the Puppet deployment without running the entire configuration again. If you see an error when you first access the OpenShift Origin dashboard, you’ll probably want to do this.
Run the installer again:
sh <(curl -s https://install.openshift.com/)
This time, you’ll selection the third option, to generate a new Puppet configuration file. Not all of the output is shown below - just the questions and answers.
Select from the following installation scenarios.
You can also type '?' for Help or 'q' to Quit:
1. Install OpenShift Origin
2. Add a Node to an OpenShift Origin deployment
3. Generate a Puppet Configuration File
Type a selection and press <return>: 3

Choose an action:
1. Change the deployment configuration
2. View the full host configuration details
3. Proceed with deployment
Type a selection and press <return>: 3

Do you want to make any changes to the subscription info in the
configuration file? (y/n/q/?) n

Do you want to set any temporary subscription settings for this
installation only? (y/n/q/?) n
Make a note of the file name shown in the output:
Puppt template created at /root/oo_install_configure_master.openshift.example.com.pp
To run it, copy it to its host and invoke it with puppet: `puppet
apply <filename>`.

All tasks completed.
oo-install exited; removing temporary assets.
Run the Puppet configuration, using the file name you were given:
puppet apply /root/oo_install_configure_master.openshift.example.com.pp
Step Nine — Test Your OpenShift Deployment
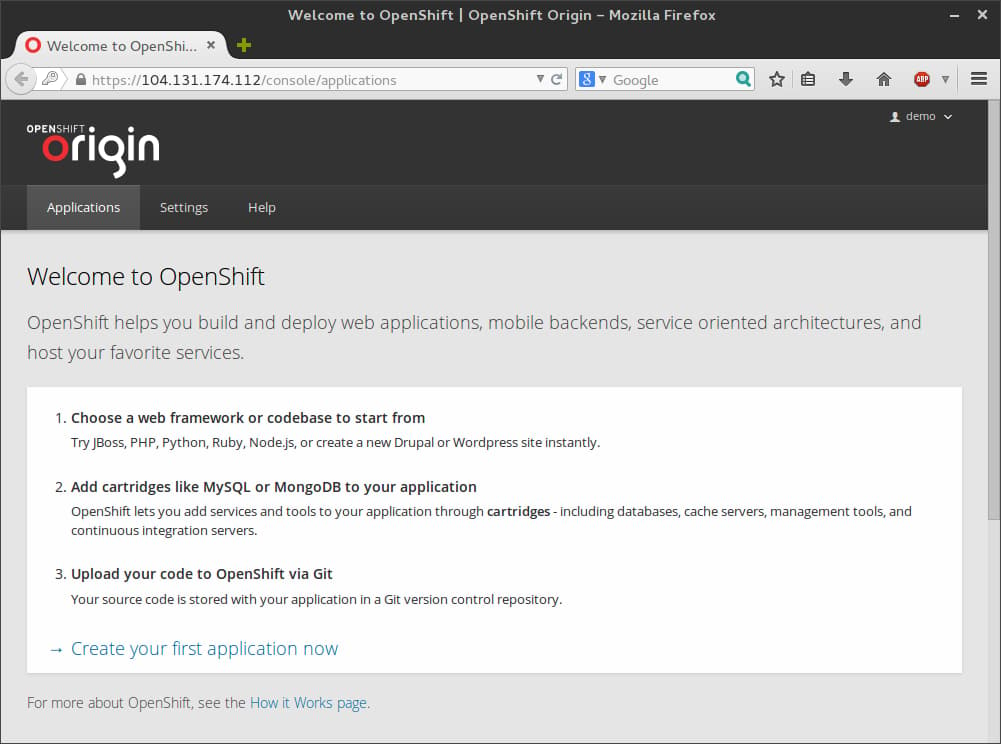
Your OpenShift installation is now complete. You can test your OpenShift Deployment by visiting the following url in a web browser.
https://104.131.174.112/
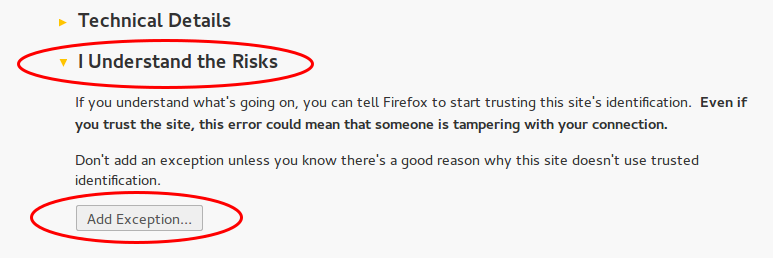
OpenShift will be using a self-signed certificate, so you will have to add an exception for this in your web browser.
If you didn’t note the credentials before, scroll back up to the “Account Settings” output section, and use the OpenShift Console User and OpenShift Console Password to log in.
Account Settings
+----------------------------+------------------------+
| OpenShift Console User     | demo                   |
| OpenShift Console Password | tARvXXXXXXXmm5g        |
| MCollective User           | mcollective            |
| MCollective Password       | dtdRNs8i1pWi3mL9JsNotA |
| MongoDB Admin User         | admin                  |
| MongoDB Admin Password     | RRgY8vJd2h5v4Irzfi8kkA |
| MongoDB Broker User        | openshift              |
| MongoDB Broker Password    | 28pO0rU8ohJ0KXgpqZKw   |
+----------------------------+------------------------+
If you can log into the console but see an error, you may need to redeploy the Puppet configuration. See the previous section for details.
Step Ten — Configure Your Domains for OpenShift
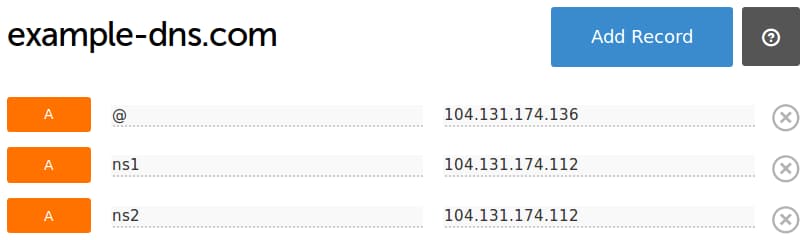
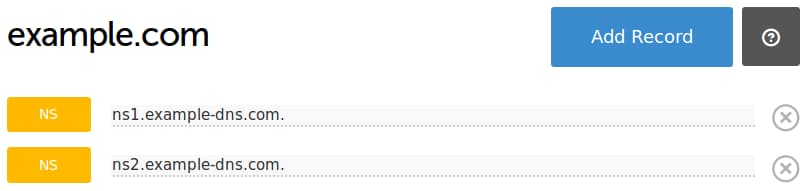
In general you will want to follow your domain registrar’s documentation for creating your DNS entries. We have provided images below for illustrative purposes. For the nameserver domains, you will want to substitute the IP address of your OpenShift host or BIND DNS server. In our example we created two name server records that point to the same IP. This is because most domain registrars will require a minimum of two NS records. In this tutorial we did not setup a Secondary Bind DNS server.
example-dns.com A Record | ns1.example-dns.com => 104.131.174.112 A Record | ns2.example-dns.com => 104.131.174.112
Direct the application domain to use the OpenShift DNS servers you just set up.
example.com NS Record | ns1.example.com. NS Record | ns2.example.com.
Note: For testing purposes, you can also just point your app domain or subdomain to the OpenShift server’s IP address, since we’re deploying only a single OpenShift Origin server at this time.
Now you will be able to access the OpenShift Console from the domain name of your Broker. In our example we used master.openshift.example.com. You will have to add an exception for the self-signed certificate again with the new domain.
For in-depth information on configuring your DNS records, please see the tutorials listed below.
How To Create Vanity or Branded Nameservers with DigitalOcean Cloud Servers
How To Set Up and Test DNS Subdomains with DigitalOcean’s DNS Panel
How to Point to DigitalOcean Nameservers From Common Domain Registrars
Step Eleven — Create Your First Application
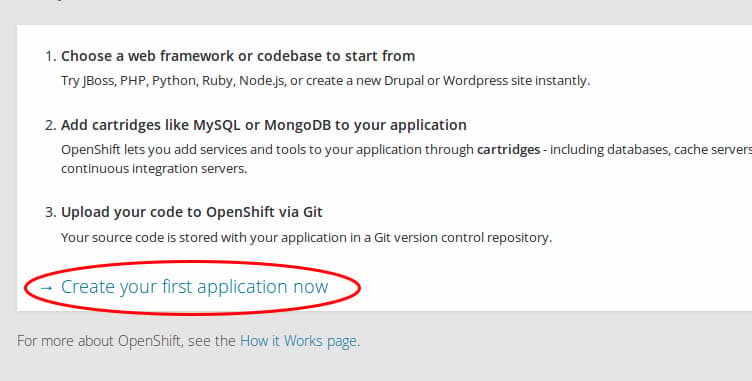
In the OpenShift Origin console, click Create your first application now on the Applications page.
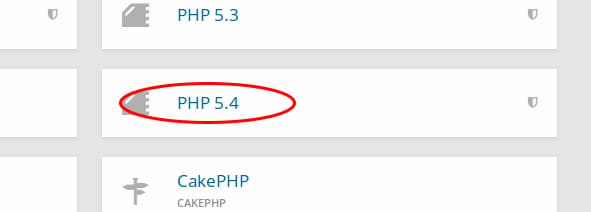
Click PHP 5.4 to select it as your cartridge.
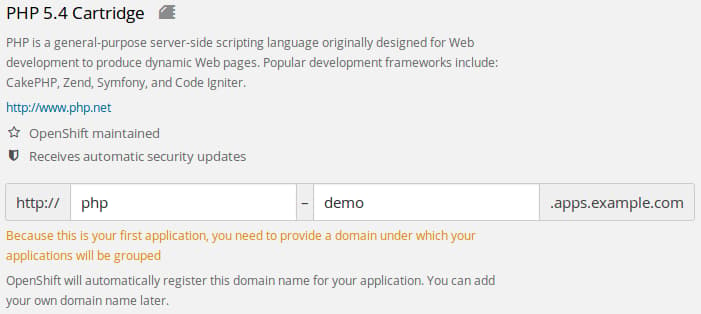
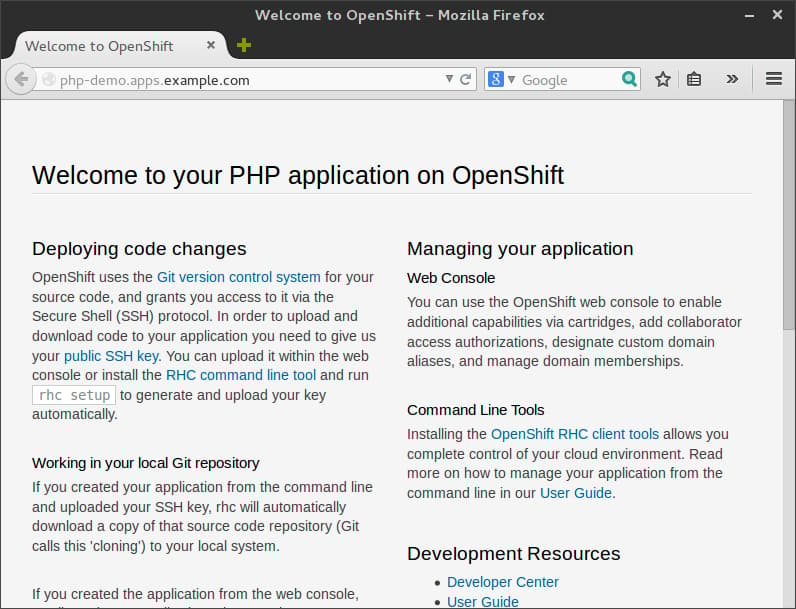
Since this is your first application, you will also have to specify a domain name. In our example we used demo.apps.example.com with the application name of php. The final URL will be php-demo.apps.example.com.
Leave the rest of the default settings.
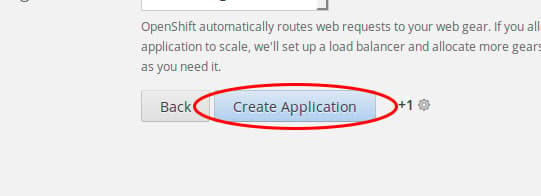
Click Create Application. It may take a couple minutes to initialize the application. Once this process is complete, you can click visit app in the browser to see the test application. You be presented with the default PHP cartridge page. This page will also give you useful information on how to edit and deploy applications using OpenShift.
Conclusion
We have successfully deployed a single-server Openshift Origin environment. This server has all four OpenShift roles applied to it. It is also configured to be a DNS server. We configured one domain (example-dns.com) used for our nameserver pointers. We configured a second domain (example.com) used to resolve applications and OpenShift hosts.
Thanks for learning with the DigitalOcean Community. Check out our offerings for compute, storage, networking, and managed databases.
About the author(s)
Current fan and former Editorial Manager at DigitalOcean. Hi! Expertise in areas including Ubuntu, Docker, Rails, and more.
Still looking for an answer?
This textbox defaults to using Markdown to format your answer.
You can type !ref in this text area to quickly search our full set of tutorials, documentation & marketplace offerings and insert the link!
For latest technical reference documentation and the latest releases of OpenShift Origin, see: http://openshift.github.io
By the end of step 8, I get the following error: ** Failed to create district ‘Default’**
Is this normal?
I got stuck at Puppet deployment for 5 hours and gave up. Has anyone experienced the same?
Here is what I see:
master.openshift.example.com: Cleaning yum repos. Repository ‘jenkins-repo’ is missing name in configuration, using id Repository ‘openshift-optional’ is missing name in configuration, using id master.openshift.example.com: Running the Puppet deployment. This step may take up to an hour.
Cheers
pleaaase help i’m stuck in the step nine when i run the puppet and wont to connect in my ip it show me an error
here the error at the terminal:
[root@master cloud]# puppet apply /root/oo_install_configure_master.openshift.cloud.com.pp warning: Scope(Class[Openshift_origin::Plugins::Dns::Nsupdate]): Generate the Key file with ‘/usr/sbin/dnssec-keygen -a HMAC-MD5 -b 512 -n USER -r /dev/urandom -K /var/named apps.cloud.com’ warning: Scope(Class[Openshift_origin::Plugins::Dns::Nsupdate]): Use the last field in the generated key file /var/named/Kapps.cloud.com*.key bind_key is required. at /etc/puppet/modules/openshift_origin/manifests/plugins/dns/nsupdate.pp:30 on node master.openshift.cloud.com
Excuse me… I’ve done following every step in this tutorial, but in step “puppet apply” i have trouble like this :
[root@master ardidaffandi]# puppet apply --verbose oo_install_configure_master.openshift.example.com.pp Info: Loading facts Info: Loading facts Info: Loading facts Info: Loading facts Warning: Config file /etc/puppet/hiera.yaml not found, using Hiera defaults Warning: Variable access via ‘fqdn’ is deprecated. Use ‘@fqdn’ instead. template[inline]:1 (at /usr/lib/ruby/site_ruby/1.8/puppet/parser/templatewrapper.rb:76:in `method_missing’) Warning: Scope(Class[Openshift_origin::Plugins::Dns::Nsupdate]): Generate the Key file with ‘/usr/sbin/dnssec-keygen -a HMAC-MD5 -b 512 -n USER -r /dev/urandom -K /var/named apps.example.com’ Warning: Scope(Class[Openshift_origin::Plugins::Dns::Nsupdate]): Use the last field in the generated key file /var/named/Kapps.example.com*.key Error: bind_key is required. at /etc/puppet/modules/openshift_origin/manifests/plugins/dns/nsupdate.pp:30 on node master.openshift.example.com Error: bind_key is required. at /etc/puppet/modules/openshift_origin/manifests/plugins/dns/nsupdate.pp:30 on node master.openshift.example.com
please help me master :) thankyou
Error: Puppet::Parser::AST::Resource failed with error ArgumentError: Could not find declared class openshiftorigin at /root/ooinstallconfiguremaster.openshift.tass.com.pp:65 on node master.openshift.tass.com
Error: Puppet::Parser::AST::Resource failed with error ArgumentError: Could not find declared class openshiftorigin at /root/ooinstallconfigure_master.openshift.tass.com.pp:65 on node master.openshift.tass.com

can anyone give me a solution please??*
***ardidaffandi *** you have to rinstall your openshift but first before you begin every thing you need to have a clean OS then in terminal put this command:
yum install -y http://dl.fedoraproject.org/pub/epel/6/x86_64/epel-release-6-8.noarch.rpm
Configure the openshift-dependencies RPM repository:
cat <<EOF> /etc/yum.repos.d/openshift-origin-deps.repo [openshift-origin-deps] name=openshift-origin-deps baseurl=https://mirror.openshift.com/pub/origin-server/release/4/rhel-6/dependencies/x86_64/ gpgcheck=0 enabled=1 EOF
Configure the openshift-origin RPM repository:
cat <<EOF> /etc/yum.repos.d/openshift-origin.repo [openshift-origin] name=openshift-origin baseurl=https://mirror.openshift.com/pub/origin-server/release/4/rhel-6/packages/x86_64/ gpgcheck=0 enabled=1 EOF
Install the latest epel-release package.
yum install -y --nogpgcheck ${url_of_the_latest_epel-release_rpm}
Update the EPEL repository definition to exclude mcollective and nodejs packages as these are provided in the origin dependencies.
nano /etc/yum.repos.d/epel.repo
[epel] name=Extra Packages for Enterprise Linux 6 - $basearch #baseurl=http://download.fedoraproject.org/pub/epel/6/$basearch mirrorlist=https://mirrors.fedoraproject.org/metalink?repo=epel-6&arch=$basearch exclude=passenger nodejs* //Add this line manually failovermethod=priority enabled=1 gpgcheck=1 gpgkey=file:///etc/pki/rpm-gpg/RPM-GPG-KEY-EPEL-6
Via yum config manager:
yum-config-manager --enable rhel-6-server-optional-rpms
yum install -y ntpdate ntp ntpdate clock.redhat.com chkconfig ntpd on service ntpd start
Uninstall firewalld and install lokkit to manage firewall rules.
yum erase -y firewalld yum install -y lokkit
scl enable ruby193 v8314 “<your command here>”
Finally procede to steps of this tutoriel. I hope that it will help you. Please informe me of your news after that.
it’s normal to show this error because you didn’t make the step of installation of puppet who take one hour
Put this command scl enable ruby193 “puppet module install openshift/openshift_origin”
so redeply your openshift by ./oo-install-origin or the other command
choices: choose 1 than finish the deployement by taping 3
now it will take one hour to install puppet
so let me know.
just a question. Are you using a static adress ip or dhcp?
 This work is licensed under a Creative Commons Attribution-NonCommercial- ShareAlike 4.0 International License.
Become a contributor for community
Get paid to write technical tutorials and select a tech-focused charity to receive a matching donation.

DigitalOcean Documentation
Full documentation for every DigitalOcean product.

Resources for startups and AI-native businesses
The Wave has everything you need to know about building a business, from raising funding to marketing your product.
The developer cloud
Scale up as you grow — whether you're running one virtual machine or ten thousand.

Start building today
From GPU-powered inference and Kubernetes to managed databases and storage, get everything you need to build, scale, and deploy intelligent applications.
