
Status: Deprecated
This article covers a version of Ubuntu that is no longer supported. If you are currently operate a server running Ubuntu 12.04, we highly recommend upgrading or migrating to a supported version of Ubuntu:
- Upgrade to Ubuntu 14.04.
- Upgrade from Ubuntu 14.04 to Ubuntu 16.04
- Migrate the server data to a supported version
Reason: Ubuntu 12.04 reached end of life (EOL) on April 28, 2017 and no longer receives security patches or updates. This guide is no longer maintained.
See Instead: This guide might still be useful as a reference, but may not work on other Ubuntu releases. If available, we strongly recommend using a guide written for the version of Ubuntu you are using. You can use the search functionality at the top of the page to find a more recent version.
Introduction
Hosting your files and sharing content between team members can be accomplished in quite a few ways. Services like DropBox are very popular for this purpose, and have gained traction over time, both for personal and business use.
However, many users prefer to have more ownership over their data. Instead of placing their files in a black box on a server operated by a company, setting up a self-hosted solution is sometimes more ideal.
Seafile is one elegant solution to this problem. We can set up a seafile server on our VPS in order to act as a central location to sync data with multiple clients and share files across an organization.
In this guide, we will walk through setting up a seafile server on an Ubuntu 12.04 VPS instance. We can then use this to upload and interact with files through a web interface, or configure syncing local directories.
Configure the Prerequisites
Before we begin, we need to acquire some of the dependencies that seafile needs in order to run.
Seafile uses an *SQL database to store some of its information. Because of this, we are going to install MySQL from Ubuntu’s repositories.
SQLite is another option, but is not as robust as a real database, so we’ll set up MySQL from the start in order to accommodate growth in the future. PostgreSQL is another option that would work just as well, but we won’t be covering that in this guide.
We will also have to acquire some Python libraries. Luckily, these are all found in the default repositories. Update the package cache and install them now:
sudo apt-get update
sudo apt-get install mysql-server python-imaging python-mysqldb
You will be asked to select an administrative password for your MySQL database upon installation. Remember you choice, as you will need it later.
We can do a bit of MySQL housekeeping before we begin installing our service. First, initialize the MySQL data directory:
sudo mysql_install_db
Next, we can run a security script that asks us some questions in order to lock down some settings:
sudo mysql_secure_installation
You will be asked to enter the administrative password that you set up during the database installation.
Afterwards, you will be asked a series of questions. Press “enter” to accept the defaults at each of the prompts except for the question about changing the root password.
You should now have all of the required dependencies and be ready to continue with the installation.
Download the Seafile Components
We will be getting the seafile components from their website. This link has the required tarballs that we will use to install the software.
Go to that page, and scroll down until you get to the “Server” section. Under “Server for generic Linux”, right-click on the link that is associated with the architecture of your droplet. Click “Copy link address” or whatever similar option is available.
On your droplet, you’ll want to make a new directory to house the seafile files. After the configuration step, more directories are created, which can clutter your home directory.
mkdir seafile
Change into the directory and type wget, a space, and then paste the link that you copied from the website. In my case, it looked like this:
cd seafile
wget https://bitbucket.org/haiwen/seafile/downloads/seafile-server_2.1.5_x86-64.tar.gz
Extract the tarball into the current directory:
tar xzvf seafile-server*
Move into the directory that has been extracted:
cd seafile-server*
Configure the Seafile Service
Now that we have all of the project’s files, we can run a simple script to configure our database and set up our server.
In the extracted directory, run the setup script by typing:
./setup-seafile-mysql.sh
It will check that you have the proper prerequisites installed and available. Since we already took care of this in the first stage, this should pass without a problem. Type “enter” to begin running the script:
What is the name of the server? It will be displayed on the client.
3 - 15 letters or digits
[ server name ]
First, you will be asked to select a name for your server. This is completely personal preference and you can name it whatever you’d like.
What is the ip or domain of the server?
For example: www.mycompany.com, 192.168.1.101
[ This server's ip or domain ]
Enter the domain name that you have set up for your VPS, or enter the IP address that you’ve been given.
The next four questions are about the default ports of various components and the default directory to store your files. It’s safe to press “enter” to accept the default values if you don’t have a good reason to change them.
----------------------------------------
Now let's create the admin account
----------------------------------------

What is the email for the admin account?
[ admin email ]
Select an email and password for your first administrator account.
-------------------------------------------------------
Please choose a way to initialize seafile databases:
-------------------------------------------------------

[1] Create new ccnet/seafile/seahub databases
[2] Use existing ccnet/seafile/seahub databases
Since we did not set up our databases manually, we will select 1 in order to create new databases. You will be asked for the host and port of the MySQL server. Select the defaults unless you modified them in the MySQL configuration files.
Enter the administrator password of the MySQL root user.
Enter the name for mysql user of seafile. It would be created if not exists.
[ default "root" ]
Next, select a username that will be used to administer the seafile databases. You should select a new name, which is separate from the root account for best security.
We will use “seafile” for ease of use here, but it can be anything that isn’t already used for another purpose. Select an associated password as well.
Press enter to the questions asking about the name for each database because the defaults should be fine.
You now should have a summary of your selections printed to the screen:
---------------------------------
This is your configuration
---------------------------------

    server name:            DigitalOcean
    server ip/domain:       111.111.111.111
    ccnet port:             10001

    seafile data dir:       /home/demouser/seafile/seafile-data
    seafile port:           12001
    httpserver port:        8082

    admin email:            user@example.com
    admin password:         ******

    database:               create new
    ccnet database:         ccnet-db
    seafile database:       seafile-db
    seahub database:        seahub-db
    database user:          seafile


---------------------------------
Press ENTER to continue, or Ctrl-C to abort
---------------------------------
Press “enter” if this looks correct. The script will execute, making the changes that you’ve configured.
Starting the Seafile Services
The services are now configured and ready to start.
First, we will start the seafile service. This daemon controls the file transfers and data sharing functionality.
We can start it like this:
./seafile.sh start
Afterwards, we’ll want to start up the “seahub” daemon as well. This will provide us with a web interface to interact with our new software. We can start it like this:
./seahub.sh start
A simple Python web server will be started at port 8000. In your web browser, you can access the interface by visiting:
<pre> <span class=“highlight”>your_ip_or_domain</span>:8000 </pre>
You will be presented with the default login page:
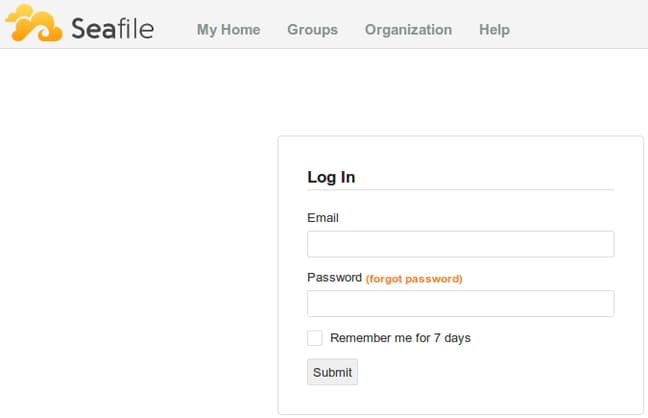
Enter the administrator email address and password that you chose during the configuration stage. You will be presented with main sharing page for your user:
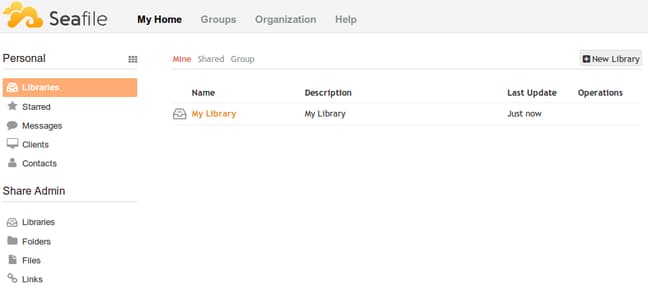
From here, you can click on “My Library” to get started on uploading files to your server.
If you wish to set up syncing, there are client applications available on all major platforms, including mobile. You can find and install them here.
Conclusion
You should now have a server configured with file sharing capabilities for you and your team. The seafile client-server model provides an easy way to keep everybody’s information connected and available. You can easily transfer repositories between users, add and remove team members from projects, etc. Explore the system to see what options are available.
<div class=“author”>By Justin Ellingwood</div>
Thanks for learning with the DigitalOcean Community. Check out our offerings for compute, storage, networking, and managed databases.
About the author
Former Senior Technical Writer at DigitalOcean, specializing in DevOps topics across multiple Linux distributions, including Ubuntu 18.04, 20.04, 22.04, as well as Debian 10 and 11.
Still looking for an answer?
This textbox defaults to using Markdown to format your answer.
You can type !ref in this text area to quickly search our full set of tutorials, documentation & marketplace offerings and insert the link!
Great guide, thanks. One question though, how would you set the seafile server to launch at boot?
@marcuspratley: Take a look at <a href=“https://github.com/haiwen/seafile/wiki/Start-seafile-server-at-system-bootup”>https://github.com/haiwen/seafile/wiki/Start-seafile-server-at-system-bootup</a>. Let me know how it goes.
Hey Guys, thanks for this awesome tutorial! But I have some problems setting up seafile. I get this error message after executing the changes I have made in the setup script: Generating ccnet configuration …
Traceback (most recent call last): File “setup-seafile-mysql.py”, line 1256, in <module> main() File “setup-seafile-mysql.py”, line 1207, in main ccnet_config.generate() File “setup-seafile-mysql.py”, line 748, in generate if Utils.run_argv(argv, env=env_mgr.get_binary_env()) != 0: File “setup-seafile-mysql.py”, line 82, in run_argv env=env) File “/usr/lib/python2.7/subprocess.py”, line 679, in init errread, errwrite) File “/usr/lib/python2.7/subprocess.py”, line 1249, in _execute_child raise child_exception OSError: [Errno 2] No such file or directory
What can I do? Thanks from Germany!
@d.neufeld
Are you running a 32bit or 64bit dropplet? Did you download the correct version of Seafile for your server’s architecture?
32 bit: https://bitbucket.org/haiwen/seafile/downloads/seafile-server_2.1.5_i386.tar.gz 64 bit: https://bitbucket.org/haiwen/seafile/downloads/seafile-server_2.1.5_x86-64.tar.gz
Let me know if that was the problem!
not expected such a quick answer :)
I am sure that I downloaded the right version, i am running 64bit vserver. But not from digitalocean.
Can it be a problem that I used the 3.0.0.0. beta version?
@d.neufeld
I just ran through the install steps using the 3.0.0.0. beta version, and was able to get it up and running on a Ubuntu 12.04.3 x64 dropplet.
Someone else had a similar error and reported it on Seafile’s GitHub page:
https://github.com/haiwen/seafile/issues/347
They were accidentally trying to run 64bit Seafile on a 32bit server.
uname - a gives me this: x86_64
So the server is 64bit. An I downloaded this: seafile-server_3.0.0.beta_x86-64.tar.gz
@d.neufeld: What version of Ubuntu are you using? <pre>lsb_release -a</pre>It could be that the install steps are different on other OS versions.
Ok, the setup worked after I recreate the vserver. Both seafile services started correctly, but I cannot open the webinterface? I open the same url as shown in the config file of seafile. What should I do?
 This work is licensed under a Creative Commons Attribution-NonCommercial- ShareAlike 4.0 International License.
Become a contributor for community
Get paid to write technical tutorials and select a tech-focused charity to receive a matching donation.

DigitalOcean Documentation
Full documentation for every DigitalOcean product.

Resources for startups and AI-native businesses
The Wave has everything you need to know about building a business, from raising funding to marketing your product.
The developer cloud
Scale up as you grow — whether you're running one virtual machine or ten thousand.

Start building today
From GPU-powered inference and Kubernetes to managed databases and storage, get everything you need to build, scale, and deploy intelligent applications.
