Not using Ubuntu 20.04?
Choose a different version or distribution.
Introduction
OpenLiteSpeed is an optimized, open-source web server that can be used to manage and serve sites. OpenLiteSpeed has some useful features that make it a solid choice for many installations, including Apache-compatible rewrite rules, a built-in web-based administration interface, and customized PHP processing optimized for the server.
In this tutorial, you will install and configure OpenLiteSpeed on an Ubuntu 20.04 server.
Prerequisites
To complete this tutorial, you will need an Ubuntu 20.04 server with a sudo-enabled, non-root user and the ufw firewall enabled, which you can set up by following the Initial Server Setup with Ubuntu 20.04.
Step 1 – Installing OpenLiteSpeed
Before using OpenLiteSpeed, you will need to install it. OpenLiteSpeed provides a software repository that you can use to download and install the server with Ubuntu’s standard apt command.
Begin by updating the package manager cache:
- sudo apt update
Then install any pending upgrades:
- sudo apt upgrade
If prompted, enter your password, then confirm the installation with Y.
To enable this repository for your Ubuntu system, download and add the developer’s software signing key:
- sudo wget -O - https://rpms.litespeedtech.com/debian/enable_lst_debian_repo.sh | sudo bash
wget fetches a shell script located on OpenLitespeed’s server that will automatically perform the necessary steps to add the Litespeed repository to Ubuntu’s apt package manager. The content of the shell script is passed to a new bash shell via the | pipe.
The output of this command will be:
Output--2022-10-01 13:12:00--  https://rpms.litespeedtech.com/debian/enable_lst_debian_repo.sh
Resolving rpms.litespeedtech.com (rpms.litespeedtech.com)... 52.55.120.73
Connecting to rpms.litespeedtech.com (rpms.litespeedtech.com)|52.55.120.73|:443... connected.
HTTP request sent, awaiting response... 200 OK
Length: 3457 (3.4K) [application/x-sh]
Saving to: ‘STDOUT’

-                          0%[                                   ]       0  --.-KB/s                detecting OS type :
detected OS: ubuntu - 20.04
 now enable the LiteSpeed Debian Repo
-                        100%[==================================>]   3.38K  --.-KB/s    in 0s

2022-10-01 13:12:01 (136 MB/s) - written to stdout [3457/3457]

 register LiteSpeed GPG key
--2022-10-01 13:12:01--  http://rpms.litespeedtech.com/debian/lst_debian_repo.gpg
Resolving rpms.litespeedtech.com (rpms.litespeedtech.com)... 52.55.120.73
Connecting to rpms.litespeedtech.com (rpms.litespeedtech.com)|52.55.120.73|:80... connected.
HTTP request sent, awaiting response... 200 OK
Length: 1198 (1.2K) [application/octet-stream]
Saving to: ‘/etc/apt/trusted.gpg.d/lst_debian_repo.gpg’

/etc/apt/trusted.gpg.d/l 100%[==================================>]   1.17K  --.-KB/s    in 0s

2022-10-01 13:12:02 (101 MB/s) - ‘/etc/apt/trusted.gpg.d/lst_debian_repo.gpg’ saved [1198/1198]

--2022-10-01 13:12:02--  http://rpms.litespeedtech.com/debian/lst_repo.gpg
Resolving rpms.litespeedtech.com (rpms.litespeedtech.com)... 52.55.120.73
Connecting to rpms.litespeedtech.com (rpms.litespeedtech.com)|52.55.120.73|:80... connected.
HTTP request sent, awaiting response... 200 OK
Length: 2336 (2.3K) [application/octet-stream]
Saving to: ‘/etc/apt/trusted.gpg.d/lst_repo.gpg’

/etc/apt/trusted.gpg.d/l 100%[==================================>]   2.28K  --.-KB/s    in 0s

2022-10-01 13:12:02 (312 MB/s) - ‘/etc/apt/trusted.gpg.d/lst_repo.gpg’ saved [2336/2336]

 update the repo
Hit:1 http://mirrors.digitalocean.com/ubuntu focal InRelease
Hit:2 http://mirrors.digitalocean.com/ubuntu focal-updates InRelease
Hit:3 https://repos-droplet.digitalocean.com/apt/droplet-agent main InRelease
Hit:4 http://mirrors.digitalocean.com/ubuntu focal-backports InRelease
Hit:5 http://security.ubuntu.com/ubuntu focal-security InRelease
Ign:6 http://rpms.litespeedtech.com/debian focal InRelease
Hit:7 https://repos.insights.digitalocean.com/apt/do-agent main InRelease
Get:8 http://rpms.litespeedtech.com/debian focal Release [1652 B]
Get:9 http://rpms.litespeedtech.com/debian focal Release.gpg [836 B]
Get:10 http://rpms.litespeedtech.com/debian focal/main amd64 Packages [19.0 kB]
Fetched 21.5 kB in 1s (14.8 kB/s)
Reading package lists... Done
 All done, congratulations and enjoy !
To install the OpenLitespeed server and the corresponding LS-PHP interpreter, run the command:
- sudo apt install openlitespeed lsphp81
If prompted, enter your password, then confirm the installation with Y.
This command installs the Openlitespeed server package and LSPHP 8.1. The LiteSpeed PHP (LSPHP) is a PHP interpreter that is integrated with the LiteSpeed Server Application Programming Interface (LSAPI).
Now that the OpenLiteSpeed server is installed, you will secure it by updating the default administrator account.
Step 2 – Setting the Administrative Password
Before testing the server, you will set a new administrative password for OpenLiteSpeed. You can do this by running a script provided by OpenLiteSpeed:
- sudo /usr/local/lsws/admin/misc/admpass.sh
You will be asked to provide a username for the administrative user. If you press ENTER without choosing a new username, the default of admin will be used. You can use whatever administrative username you prefer. Then you will be prompted to create and confirm a new password for the account. Put in the administrative password you prefer, then press ENTER again. The script will confirm a successful update:
OutputAdministrator's username/password is updated successfully!
You have now secured the admin account. Next, you will test the server to ensure it’s running properly.
Step 3 – Connecting to the Server
In this step, you will connect to your server.
OpenLiteSpeed should have started automatically after it was installed. You can verify if it started with the systemctl status command:
- sudo systemctl status lsws
This command will print the following output:
Output● lshttpd.service - OpenLiteSpeed HTTP Server
     Loaded: loaded (/etc/systemd/system/lshttpd.service; enabled; vendor preset: enabled)
     Active: active (running) since Sat 2022-10-01 13:22:01 UTC; 5min ago
    Process: 5805 ExecStart=/usr/local/lsws/bin/lswsctrl start (code=exited, status=0/SUCCESS)
   Main PID: 5843 (litespeed)
     CGroup: /system.slice/lshttpd.service
             ├─5843 openlitespeed (lshttpd - main)
             ├─5852 openlitespeed (lscgid)
             └─5881 openlitespeed (lshttpd - #01)

Oct 01 13:21:58 ubuntu-s-1vcpu-1gb-blr1-01 systemd[1]: Starting OpenLiteSpeed HTTP Server...
Oct 01 13:21:59 ubuntu-s-1vcpu-1gb-blr1-01 lswsctrl[5805]: [OK] litespeed: pid=5843.
Oct 01 13:22:01 ubuntu-s-1vcpu-1gb-blr1-01 systemd[1]: Started OpenLiteSpeed HTTP Server.
The active (running) message indicates that OpenLiteSpeed is running.
If your server is not running, you can start the server using systemctl:
- sudo systemctl start lsws
The systemctl start command will print the following output:
Output[OK] litespeed: pid=5137.
The server should now be running. Press CTRL+C to exit the service output.
Before visiting it in your browser, you will need to open some ports on your firewall, which you can achieve with the ufw command:
- sudo ufw allow 8088,7080,443,80/tcp
The first port, 8088, is the default port for OpenLiteSpeed’s example site. After allowing it with ufw, it should now be accessible to the public. In your web browser, navigate to your server’s domain name or IP address, followed by :8088 to specify the port:
http://server_domain_or_IP:8088
Your browser will load the default OpenLiteSpeed web page, which will match the following image:
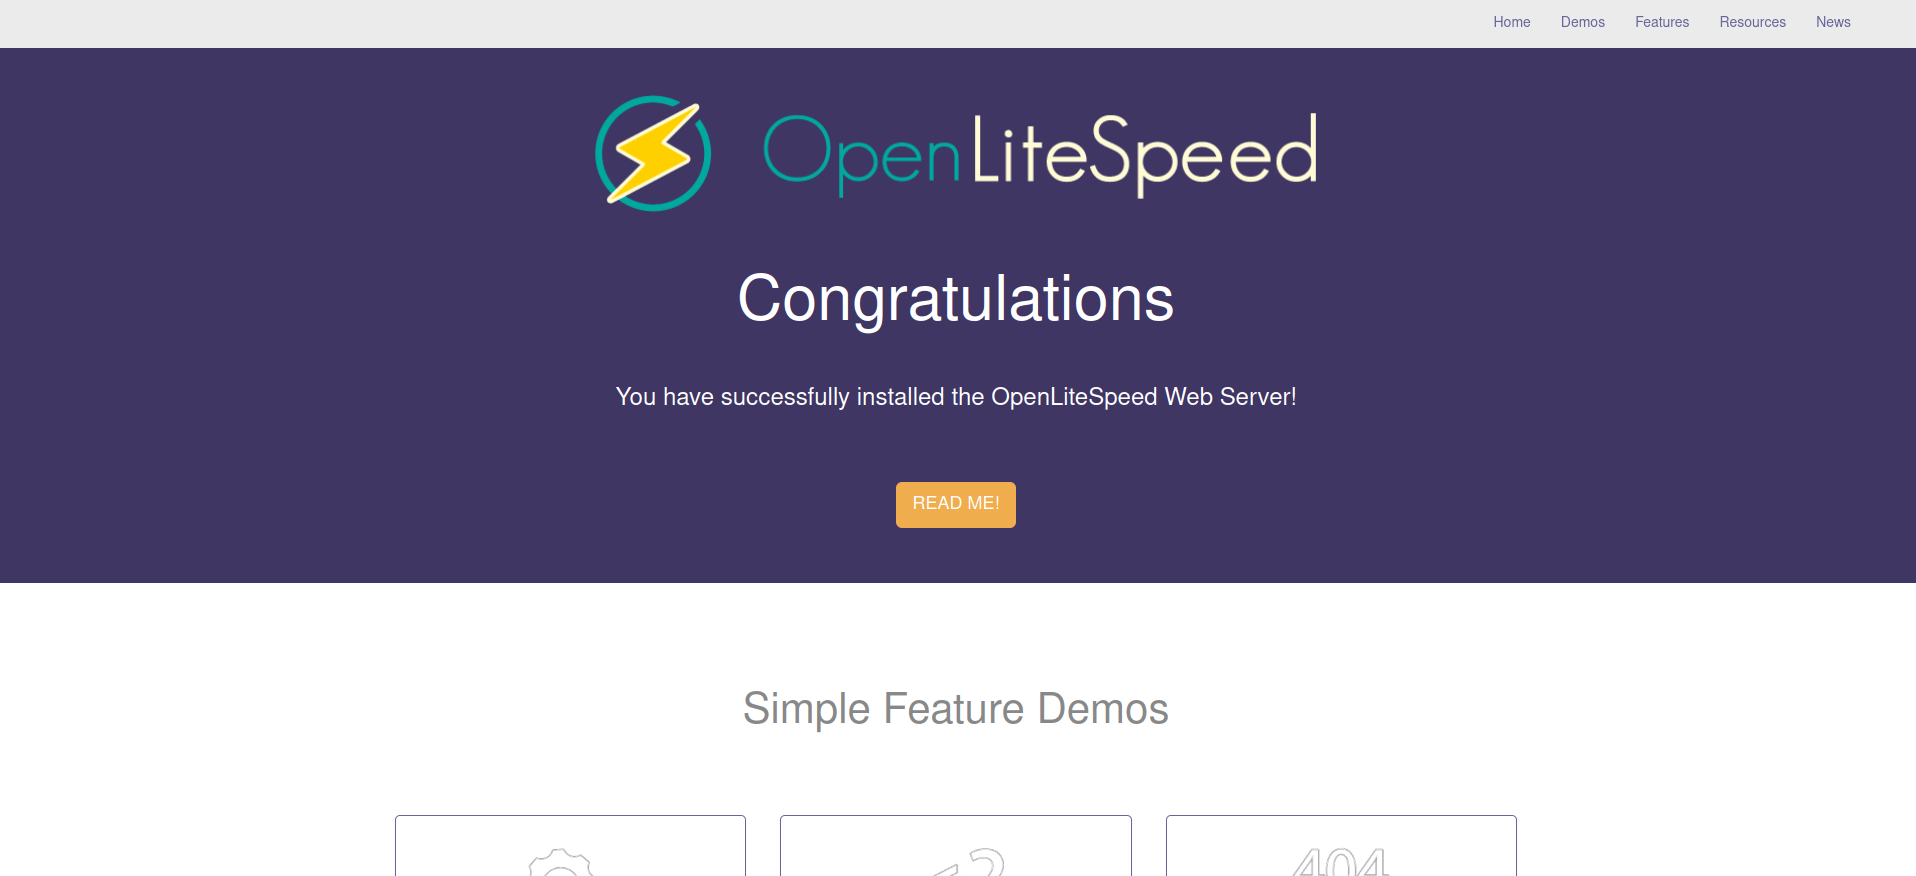
The links at the bottom of the page demonstrate various features of the server. If you click through them, you may notice that these features are already installed and properly configured, including an example CGI script that is available, a customized PHP instance that is up and running, and custom error pages and authentication gates that are configured.
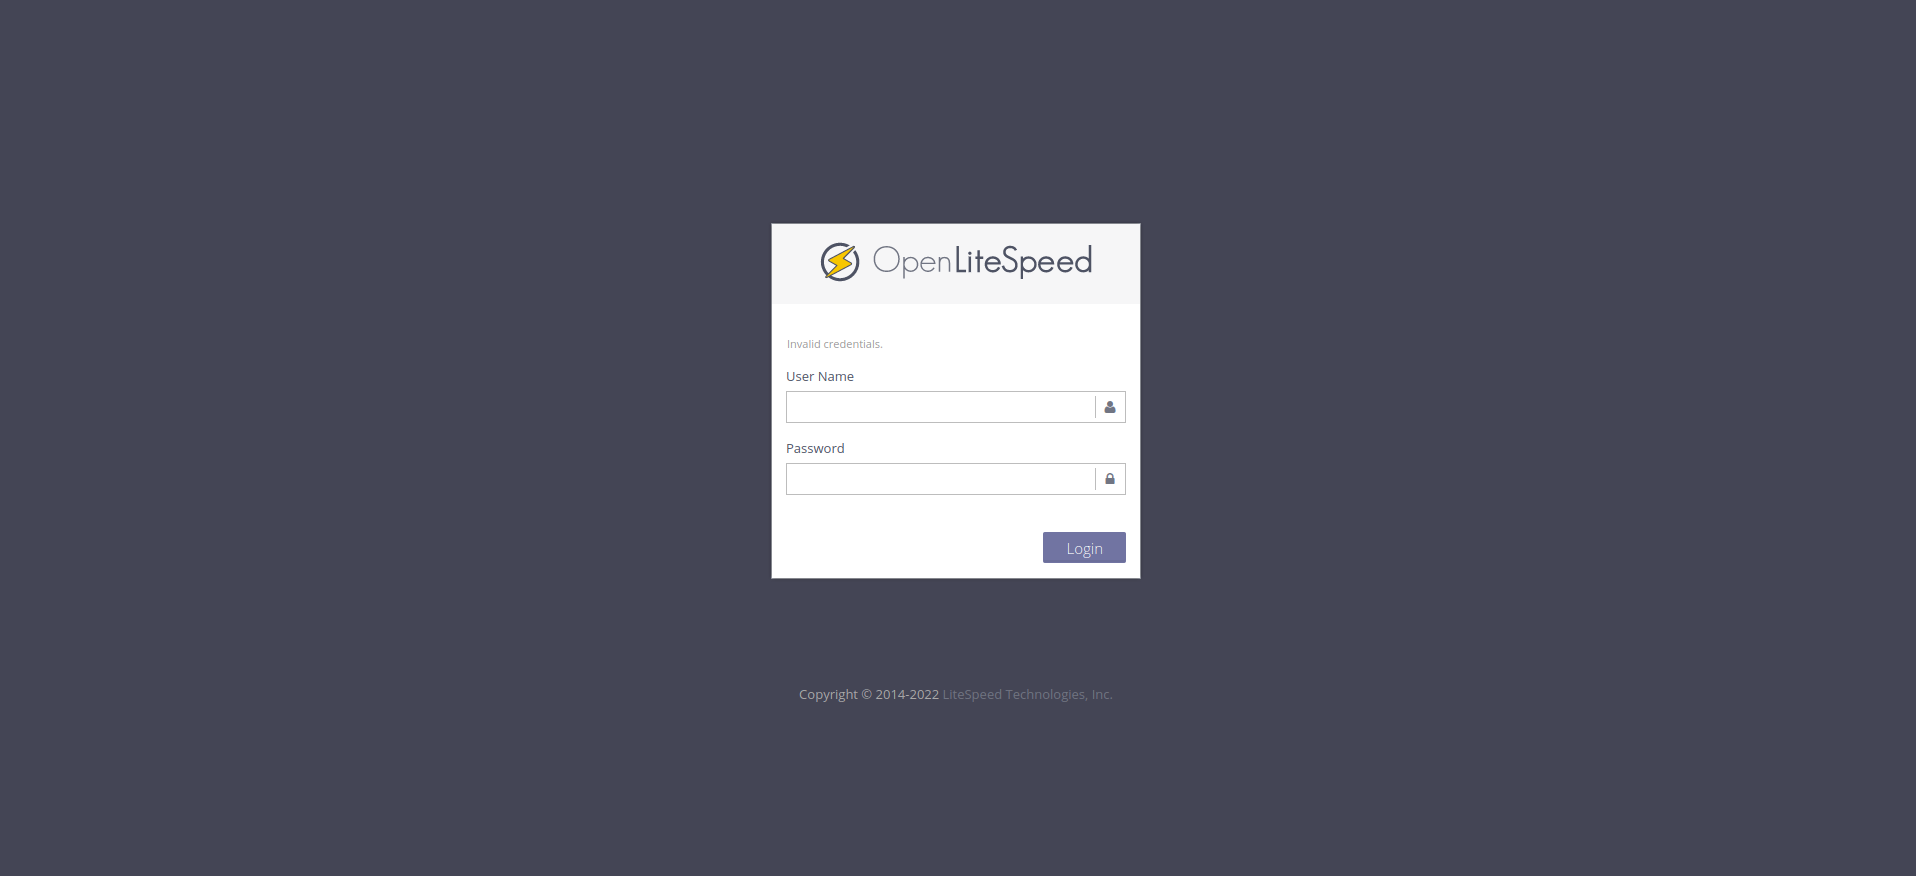
When you are satisfied with the default site, you can move on to the administrative interface. In your web browser, navigate to your server’s domain name or IP address using HTTPS and followed by :7080 to specify the port:
https://server_domain_or_IP:7080
You will likely see a page warning you that the SSL certificate from the server cannot be validated. Because this is a self-signed certificate, this message is expected. Click through the available options to proceed to the site. In Chrome, you must click Advanced and then Proceed to….
You will be prompted to enter the administrative username and password that you selected with the admpass.sh script in the previous step:
Once authenticated, you will be presented with the OpenLiteSpeed administration interface:
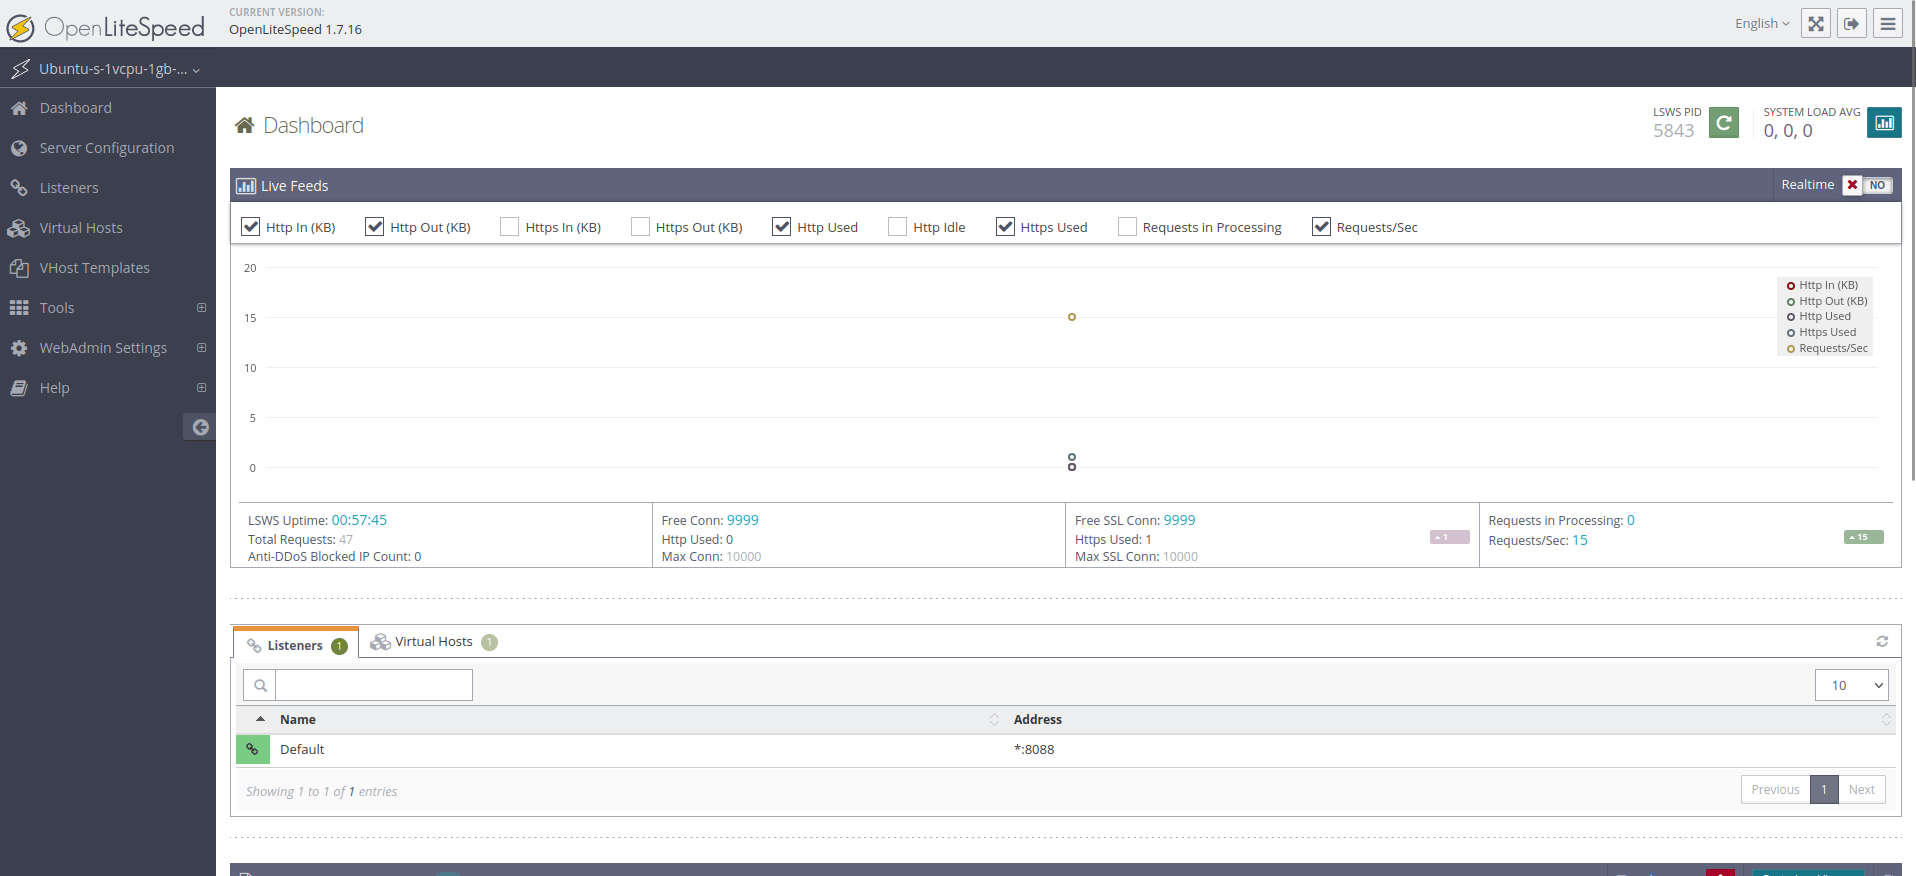
The majority of your configuration for the web server will take place via this dashboard.
In this step, you connected to the server via newly opened ports. Next, you will update the port used by the default page.
Step 4 – Changing the Port for the Default Page
To demonstrate how to configure options through the web interface, you will change the port that the default site uses from 8088 to the conventional HTTP port (80).
Start by pressing Listeners in the list of options on side navigation bar. A list of all available listeners will load.
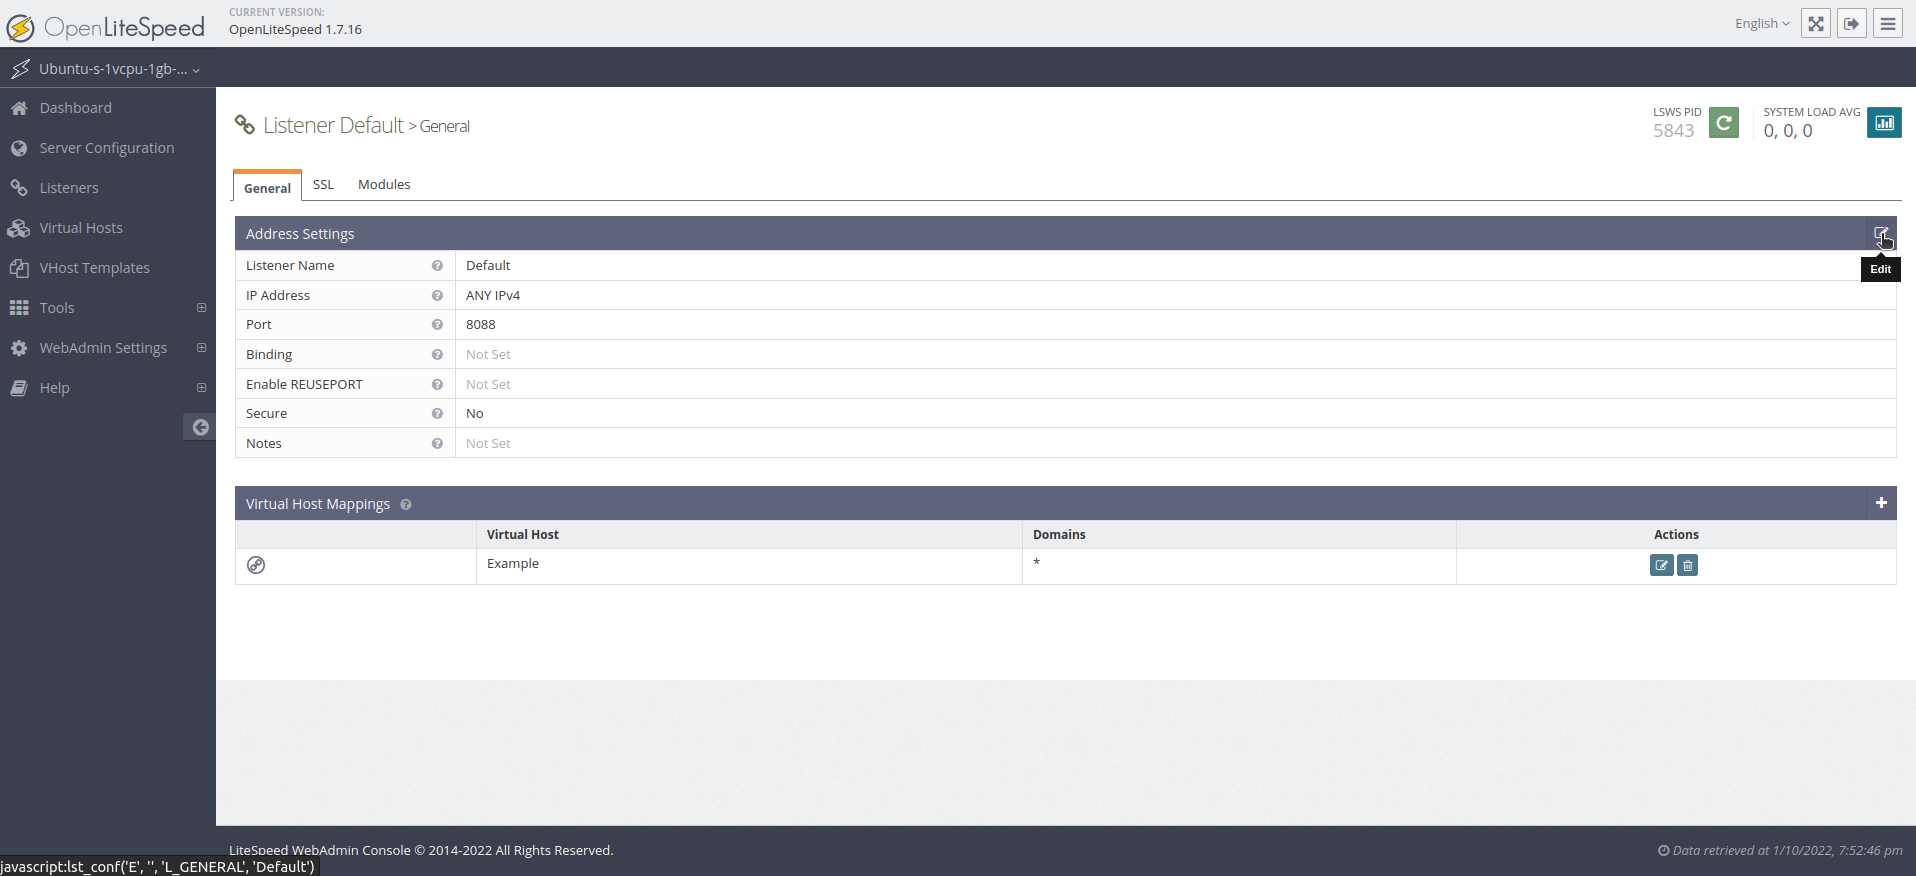
From this list, click the magnifying glass, which is the View button, for the Default listener:
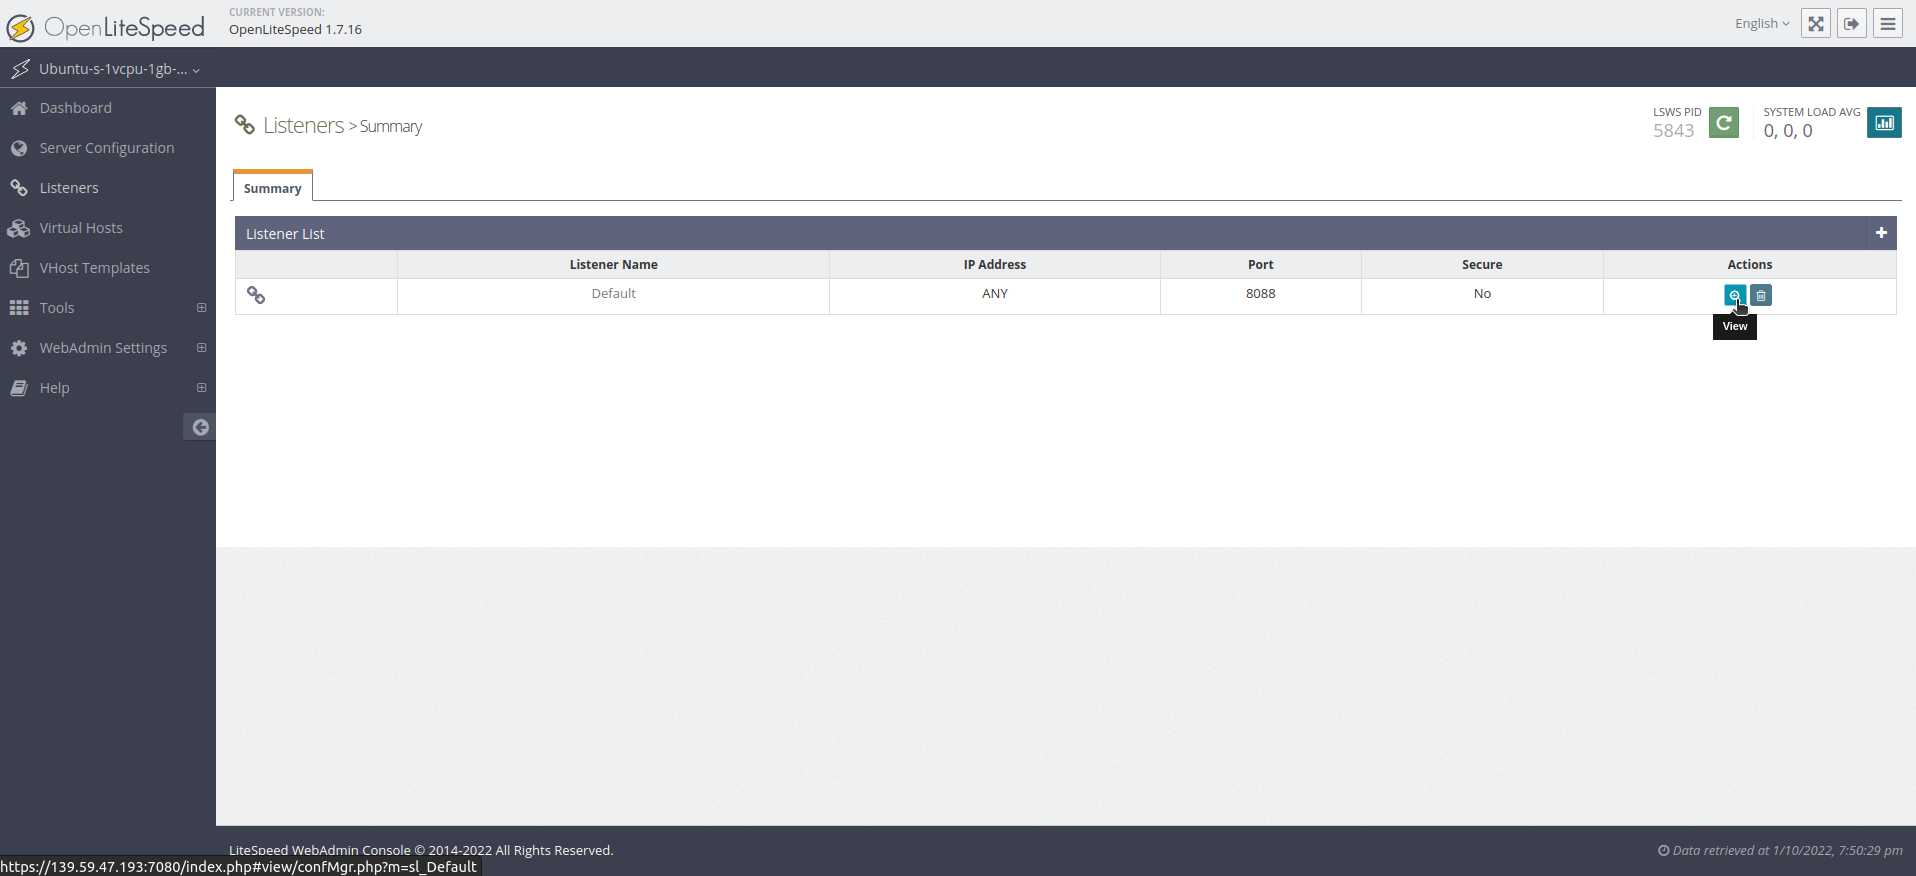
This action will load a page with more details about the Default listener. Click the edit button (the pen and paper symbol) in the top-right corner of the Address Settings table to modify its values:
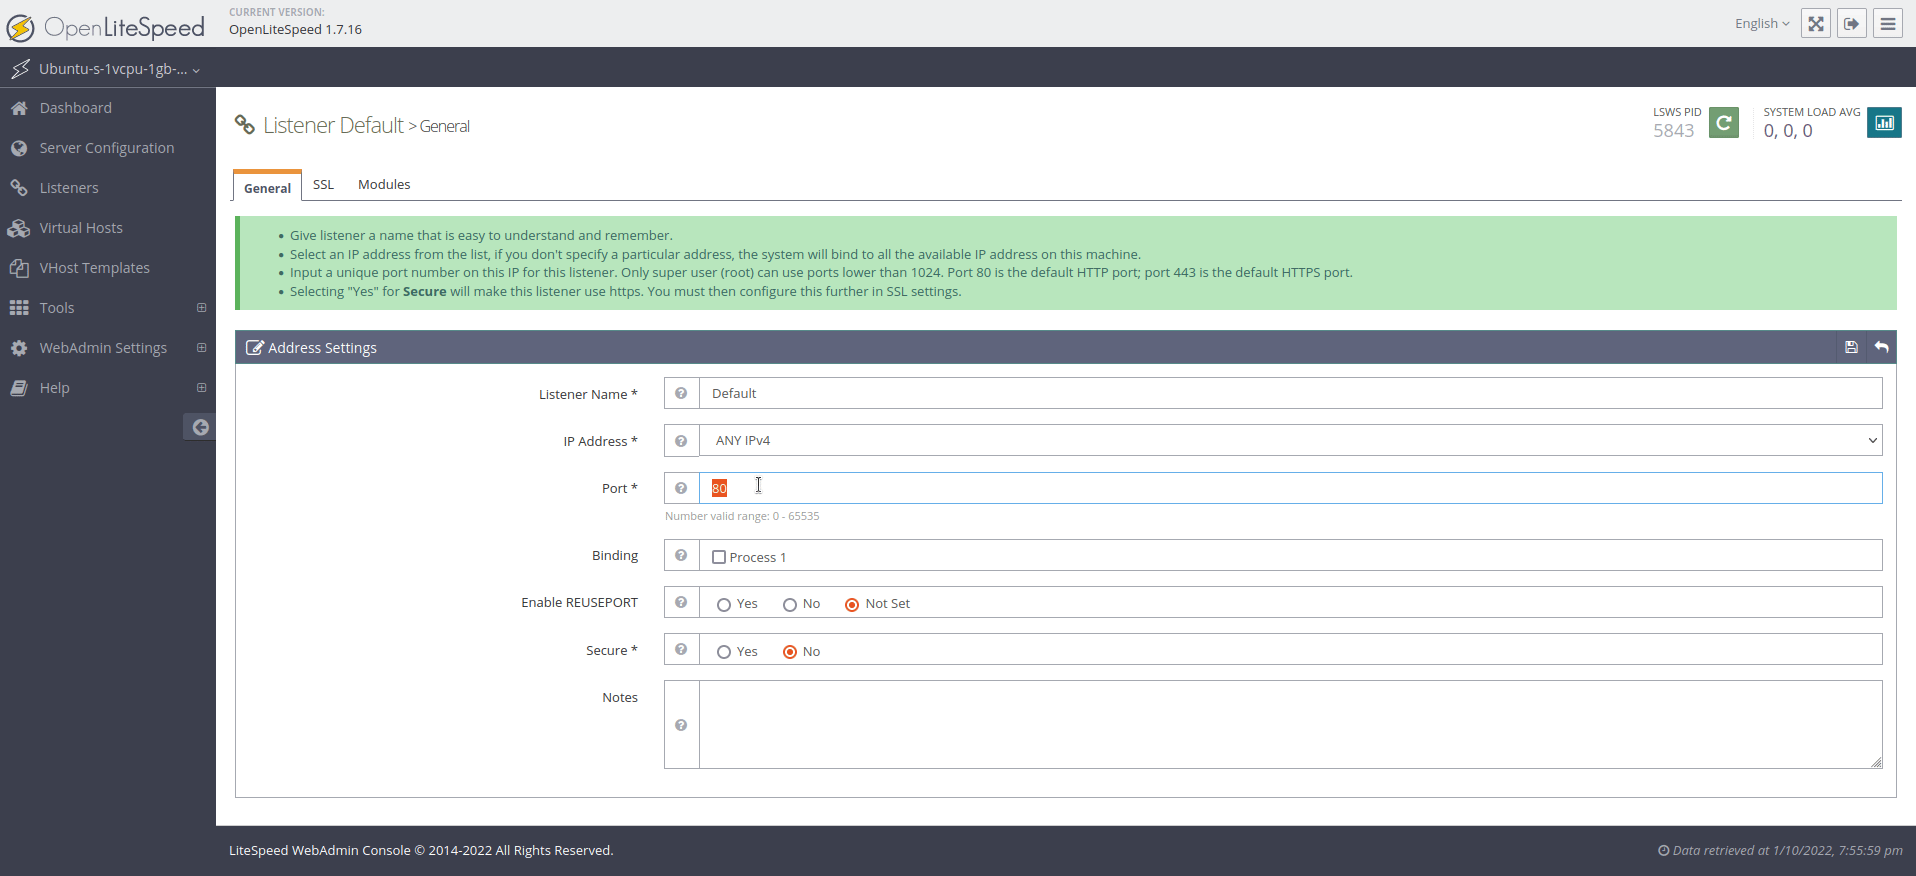
This button will open a new screen. Change port 8088 to port 80, then click the Save button (the floppy disk symbol):
After saving the modification, you will need to restart the server. Click the arrow icon for the Graceful Restart action that will restart OpenLiteSpeed:
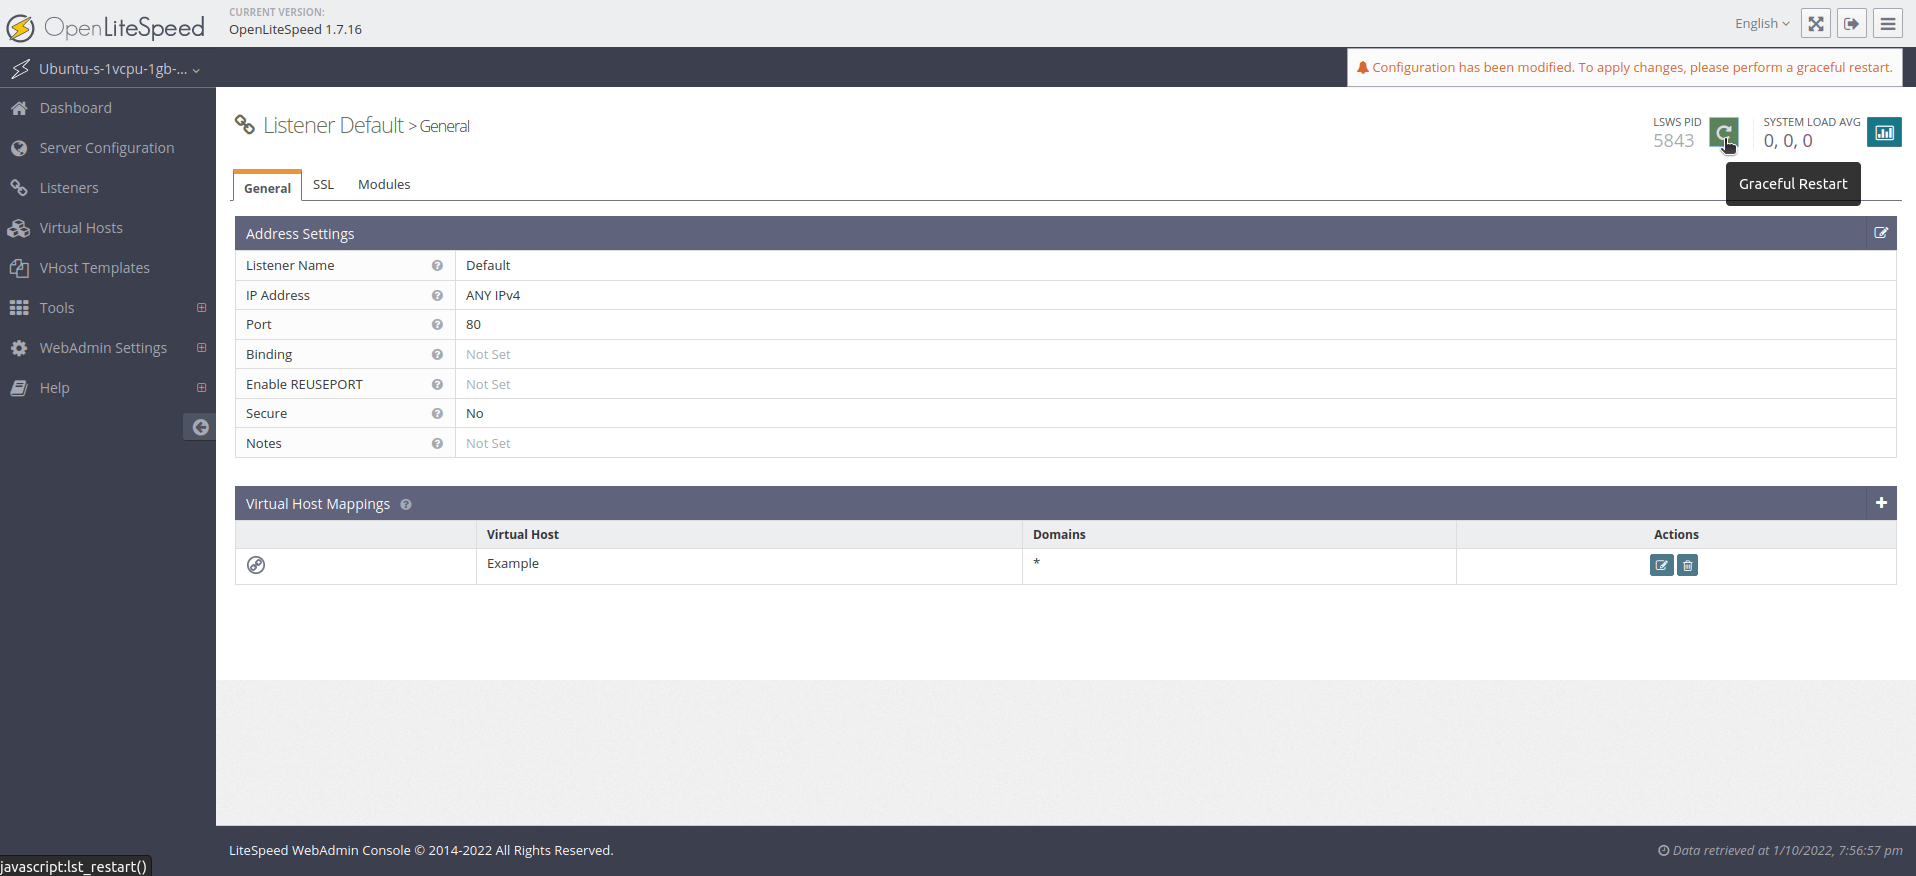
If you are prompted to restart LiteSpeed, press the Go button.
The default web page should now be accessible in your browser on port 80 instead of port 8088. Visiting your server’s domain name or IP address without providing a port number will now display the site.
You can now add any HTML, CSS, JS or other files that you wish to feature on your website to the directory located at /usr/local/lsws/Example/html.
Conclusion
OpenLiteSpeed is a fully-featured web server that is primarily managed through the administrative web interface.
You can continue to configure your interface with some of the following information:
- Everything associated with OpenLiteSpeed will be found under the
/usr/local/lswsdirectory. - The document root (where your files will be served from) for the default virtual host is located at
/usr/local/lsws/Example/html. The configuration and logs for this virtual host can be found under the/usr/local/lsws/Exampledirectory. - You can create new virtual hosts for different sites using the admin interface. However, all the directories that you reference when setting up your configuration must be created ahead of time. OpenLiteSpeed is not able to create the directories.
- You can set up virtual host templates for virtual hosts that share the same general format.
- You might consider using the default virtual host’s directory structure and configuration as a starting point for new configurations.
- The admin interface has a built-in tooltip help system for almost all fields. There is also a Help menu option in the navigation menu that links to the server documentation. Consult these sources of information during configuration if you need more help.
- To secure your OpenLiteSpeed installation with HTTPS, see the official documentation on SSL Setup.
At this point, you have OpenLiteSpeed and PHP installed and running on an Ubuntu 20.04 server. OpenLiteSpeed offers great performance, a web-based configuration interface, and pre-configured options for script handling.
Thanks for learning with the DigitalOcean Community. Check out our offerings for compute, storage, networking, and managed databases.
About the author(s)
Still looking for an answer?
This textbox defaults to using Markdown to format your answer.
You can type !ref in this text area to quickly search our full set of tutorials, documentation & marketplace offerings and insert the link!
 This work is licensed under a Creative Commons Attribution-NonCommercial- ShareAlike 4.0 International License.
Become a contributor for community
Get paid to write technical tutorials and select a tech-focused charity to receive a matching donation.

DigitalOcean Documentation
Full documentation for every DigitalOcean product.

Resources for startups and AI-native businesses
The Wave has everything you need to know about building a business, from raising funding to marketing your product.
The developer cloud
Scale up as you grow — whether you're running one virtual machine or ten thousand.

Start building today
From GPU-powered inference and Kubernetes to managed databases and storage, get everything you need to build, scale, and deploy intelligent applications.
