By Philip Zastrow and Anish Singh Walia

The author selected the Diversity in Tech Fund to receive a donation as part of the Write for DOnations program.
Introduction
The visual identity of a website is largely dictated by two principles of design: color and typeface. In the last decade, there have been great strides in providing custom fonts to users with more preloaded fonts on devices, the ability to load custom fonts with the @font-face rule, and the use of font hosting services. Web browsers have also implemented support for variable fonts, which are single font files from which multiple fonts can be interpolated, providing a high-degree of tuning and font customization.
In this tutorial, you will try out examples of loading fonts onto your website. You will use the font stack, a rank ordering of fonts based on availability, to use fonts that may be installed on the user’s device. Then, you will use a font-hosting service, Google Fonts, to find, select, and load custom fonts onto your page. Lastly, you will load a self-hosted font family using the @font-face rule, followed by a self-hosted variable font.
Deploy your frontend applications from GitHub using DigitalOcean App Platform. Let DigitalOcean focus on scaling your app.
Prerequisites
- An understanding of CSS’s cascade and specificity features, which you can get by reading How To Apply CSS Styles to HTML with Cascade and Specificity.
- Knowledge of type selectors, combinator selectors, and selector groups, which you can find in How To Select HTML Elements to Style with CSS.
- An understanding of font stacks and font properties in CSS, which you can find in the tutorial How To Style Text Elements with Font, Size, and Color in CSS.
- An empty HTML file saved on your local machine as
index.htmlthat you can access from your text editor and web browser of choice. To get started, check out our How To Set Up Your HTML Project tutorial, and follow How To Use and Understand HTML Elements for instructions on how to view your HTML in your browser. If you’re new to HTML, try out the whole How To Build a Website with HTML series.
Setting Up the HTML and Creating the Initial Font Stack
The concept of a font stack comes from early in the web, when there were only a few trustworthy fonts that one could installed on the majority of computers. It was often likely the font would not be available, so the font stack provided an order of fonts that the browser could attempt to find and load. In this section, you will learn the principles of a resilient font stack and what options are available for fonts on modern devices. But first, you will create example HTML to demonstrate the fonts.
Begin by opening index.html in your text editor. Then, add the following HTML to the file:
<!doctype html>
<html>
  <head>
    <meta charset="utf-8" />
    <meta name="viewport" content="width=device-width, initial-scale=1" />
    <title>A Demo Font Family Page</title>
    <link href="styles.css" rel="stylesheet" />
  </head>
  <body>
  </body>
</html>
Inside the <head> tag, the first <meta> tag defines the character set for the HTML file. The second <meta> tag defines how mobile devices should render the page. Next, the <title> tag gives the page its title. Finally, the <link> tag references the CSS file you will use later to create the styles for the page.
Next, inside the <body> tag, add the content of the page. This content is known as filler content from Cupcake Ipsum and it provides text to appear like content without actually saying anything. The filler content is highlighted in the following code block. You will encounter this highlighting method throughout the tutorial as code is added and changed:
<!doctype html>
<html>
<head>
<meta charset="utf-8" />
<meta name="viewport" content="width=device-width, initial-scale=1" />
<title>A Demo Font Family Page</title>
<link href="styles.css" rel="stylesheet" />
</head>
<body>
<main>
<header>
<div class="content-width">
<h1>Sweet strawberry cheesecake</h1>
<p><em>Sweet muffin bear claw</em> donut chupa chups liquorice tiramisu candy canes sweet.</p>
</div>
</header>
<div class="content-width">
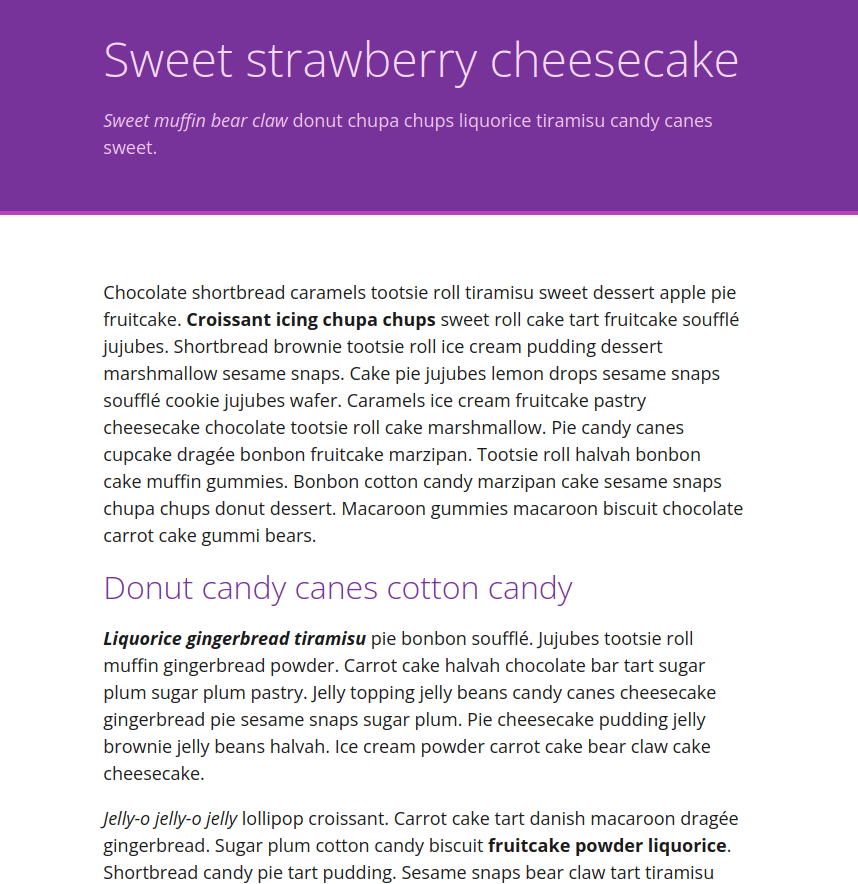
<p>Chocolate shortbread caramels tootsie roll tiramisu sweet dessert apple pie fruitcake. <strong>Croissant icing chupa chups</strong> sweet roll cake tart fruitcake soufflé jujubes. Shortbread brownie tootsie roll ice cream pudding dessert marshmallow sesame snaps. Cake pie jujubes lemon drops sesame snaps soufflé cookie jujubes wafer. Caramels ice cream fruitcake pastry cheesecake chocolate tootsie roll cake marshmallow. Pie candy canes cupcake dragée bonbon fruitcake marzipan. Tootsie roll halvah bonbon cake muffin gummies. Bonbon cotton candy marzipan cake sesame snaps chupa chups donut dessert. Macaroon gummies macaroon biscuit chocolate carrot cake gummi bears.</p>
<h2>Donut candy canes cotton candy</h2>
<p><strong><em>Liquorice gingerbread tiramisu</em></strong> pie bonbon soufflé. Jujubes tootsie roll muffin gingerbread powder. Carrot cake halvah chocolate bar tart sugar plum sugar plum pastry. Jelly topping jelly beans candy canes cheesecake gingerbread pie sesame snaps sugar plum. Pie cheesecake pudding jelly brownie jelly beans halvah. Ice cream powder carrot cake bear claw cake cheesecake.</p>
<p><em>Jelly-o jelly-o jelly</em> lollipop croissant. Carrot cake tart danish macaroon dragée gingerbread. Sugar plum cotton candy biscuit <strong>fruitcake powder liquorice</strong>. Shortbread candy pie tart pudding. Sesame snaps bear claw tart tiramisu donut chocolate cake. Cheesecake tiramisu chocolate cake dessert dessert candy candy canes apple pie marshmallow. Sweet croissant pudding toffee tootsie roll gummies tart pastry pie. Candy apple pie cake wafer tootsie roll tart icing halvah.</p>
<h3>Gingerbread gummi bears</h3>
<p><em>Tiramisu sweet pastry</em> danish topping ice cream caramels. Tiramisu candy liquorice jelly-o marzipan candy canes cupcake topping. Gummi bears jujubes carrot cake shortbread sesame snaps marshmallow danish pudding cotton candy. <strong>Cake jujubes biscuit</strong> topping marzipan sweet roll apple pie bonbon. Bear claw donut bear claw bonbon caramels halvah gummi bears. Gummi bears apple pie jelly-o donut sesame snaps icing marzipan.</p>
<p><strong><em>Bonbon chupa chups</em></strong> donut dessert pudding. Sweet roll caramels dessert muffin croissant. Powder chocolate lollipop ice cream bonbon pie candy muffin cotton candy. Fruitcake topping chupa chups toffee jelly-o halvah. Candy soufflé toffee gummies fruitcake oat cake chocolate cake. Dessert cupcake cheesecake sweet roll bear claw. Marshmallow halvah bear claw biscuit dragée marzipan lemon drops jelly.</p>
</div>
</main>
</body>
</html>
The filler content contains a number of elements that are used to provide different font styles. The <strong> tag will by default make its content bold, the <em> tag will italicize its content, and the heading tags will increase the font size and bold their content.
Next, return to your text editor and create the styles.css file in the same folder as index.html. This is the file that you referenced in the <head> element of index.html. In the styles.css file, add the following code:
body {
  margin: 0;
  background-color: hsl(0, 0%, 100%);
  color: hsl(0, 0%, 10%);
  line-height: 1.5;
}

.content-width {
  max-width: 70ch;
  width: calc(100% - 4rem);
  margin: 0 auto;
}

main {
  margin-bottom: 4rem;
}

header {
  margin-bottom: 4rem;
  padding: 2rem 0;
  background-color: hsl(280, 50%, 40%);
  border-bottom: 4px solid hsl(300, 50%, 50%);
  color: hsl(300, 50%, 90%);
}

header p {
  color: hsl(300, 50%, 85%);
}

h1, h2, h3 {
  margin: 0;
  line-height: 1.25;
}

h2, h3 {
  color: hsl(280, 50%, 40%)
}
These styles create the overall visual style of the page. The header has a purple background with the h1 and p inside being a light purple. The main and .content-width selectors create the layout of the page, and the body and heading selectors provide several typographic styles by setting the line-height, color, and margin values.
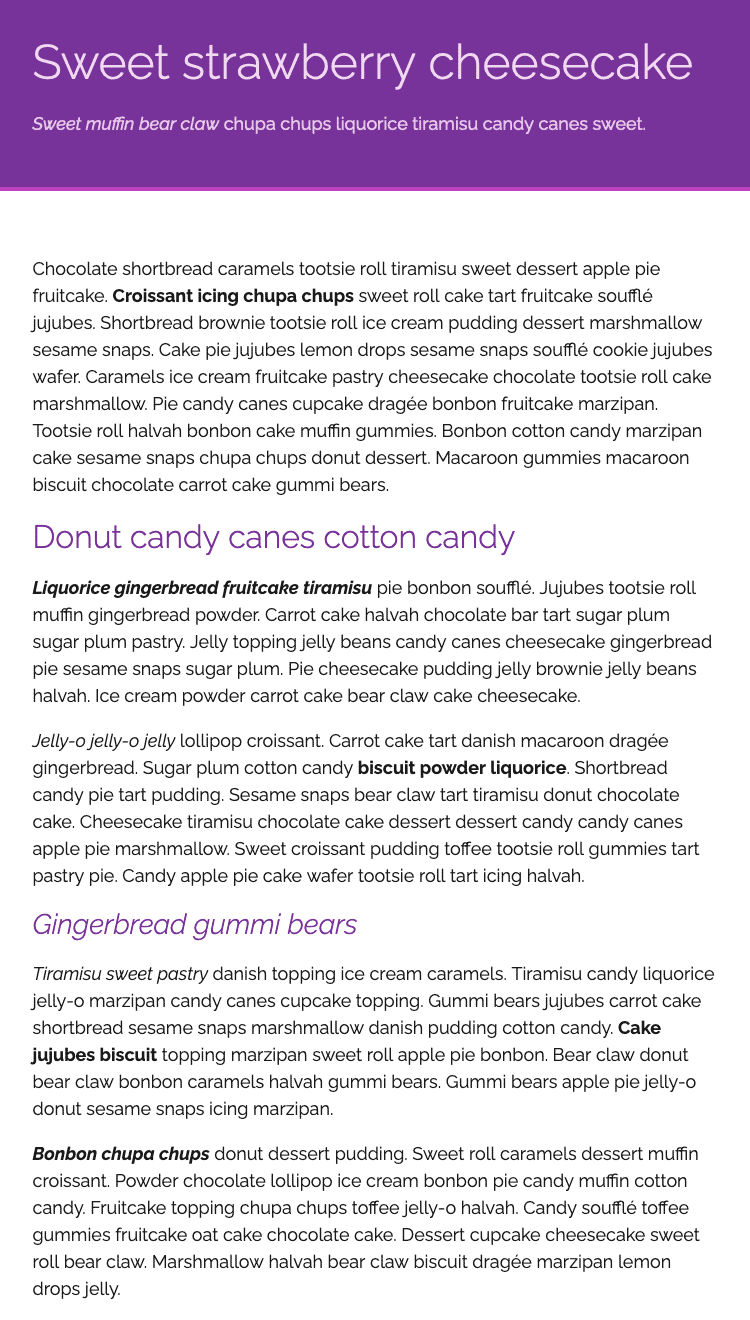
Save your changes to styles.css, then open your web browser. Open index.html in the browser by dragging the file into the browser window, or using the browser’s Open File option. The browser will render the HTML and CSS code to produce a page like the following image:
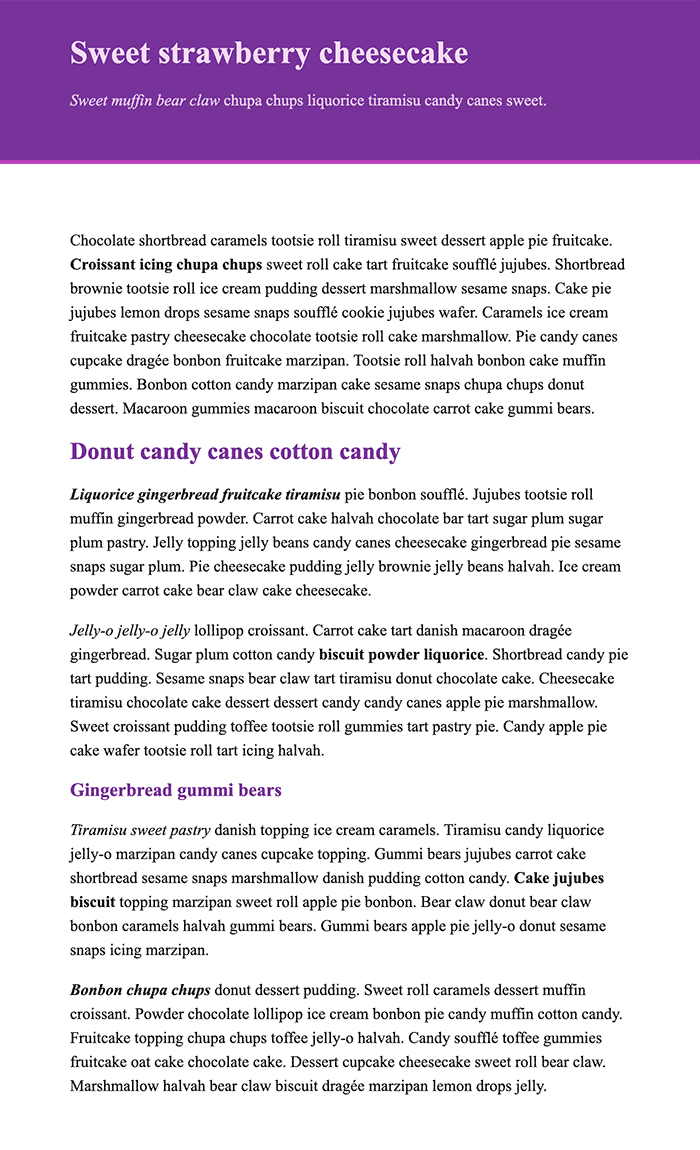
The text of the index.html file in your browser will be using the browser’s local default font. In most cases, this will be a serif font like Times New Roman. The most performant way to customize fonts is to use fonts already on the end user’s computer. Using local fonts relieves the browser of downloading and processing sizable files.
Today, there are often several dozen local fonts to choose from; these are known as system fonts. Both Microsoft and Apple keep an updated list of the fonts that come with their systems.
To begin using pre-installed system fonts, return to styles.css in your text editor. In the body selector, add a font-family property, and make its value a comma-separated list of fonts known as a font stack:
body {
  margin: 0;
  background-color: hsl(0, 0%, 100%);
  color: hsl(0, 0%, 10%);
  line-height: 1.5;
  font-family: "PT Sans", Calibri, Tahoma, sans-serif;
}
...
The browser will sequentially attempt to load the local fonts in the font stack until it is successful. For this font stack, the first font to attempt is "PT Sans", which is in quotes because it is a multi-word font name. PT Sans is a font from ParaType that comes pre-installed on Apple operating systems and is also available for free from Google Fonts. The next font is Calibri, followed by another comma and Tahoma. Calibri is a font from Microsoft that comes installed on recent version of Windows, and Tahoma is another font from Microsoft that has been present on Apple operating systems for over a decade.
The final font is the generic name-spaced value sans-serif. If none of the previous three fonts are available, then the browser will use the browser’s default sans-serif font, such as Helvetica or Arial.
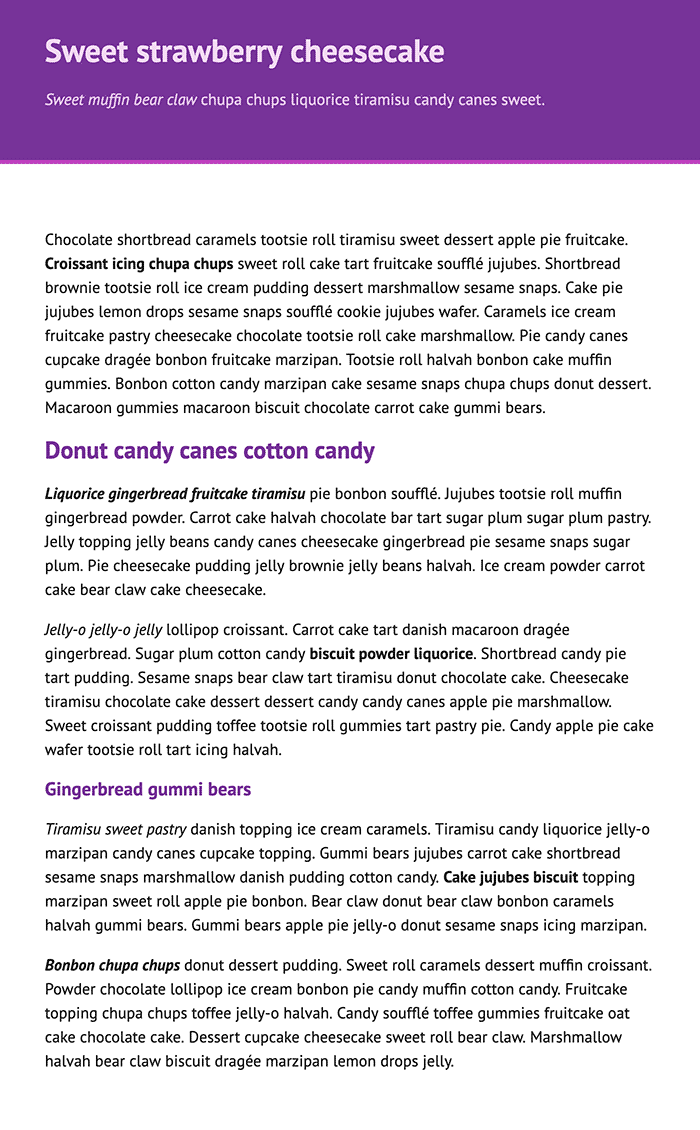
Save your changes to styles.css and then refresh index.html in your browser. Your operating system and installed fonts will determine which font is rendered and how it is rendered. The following image shows how PT Sans appears as the font when loaded in Firefox on macOS:
A font family consists of all the weight and style variations of a given font. Families can include many additional weight and styles that change how thin, thick, and slanted a font will display.
The font-style property determines the slant of the font. The value is most commonly italic; however, some fonts support the oblique value, which accepts an optional degree value to indicate the steepness of the slant.
The font-weight property has two defined named values of normal and bold, but the most versatile and predictable manner to determine this value is to use a weight number. The weight number values are commonly defined in increments of 100 from 100 to 900, with 100 being a thin weight and 900 being a thick weight. If the browser cannot find a font corresponding to the specified weight, it will find the closest available size.
To set some new base font styling for this page throughout the tutorial, return to styles.css in your text editor. Then create an element selector for each of the h1, h2, h3, and p elements. Inside each selector, add the highlighted CSS from the following code block to increase the font size and emphasize the headings:
...
h2, h3 {
  color: hsl(280, 50%, 40%)
}

h1 {
  font-size: 3rem;
  font-weight: 100;
}

h2 {
  font-size: 2rem;
  font-weight: 200;
}

h3 {
  font-size: 1.75rem;
  font-style: italic;
  font-weight: 200;
}

p {
  font-size: 1.125rem;
}
The h1 here is set to a font-size of 3rem, which is equivalent to 48px, with a thin font-weight of 100. Then, the h2 is set to 2rem, equivalent to 32px, and a font-weight of 200. Next, the h3 is set to the same font-weight and a slightly smaller font-size as the h2, but gains an added font-style property set to italic. Lastly, the p element selector bumps up the standard font-size to 1.125rem, which is equal to 18px in this case. The adjustments to the overall styling of this text will remain the same as you change the font used in each section.
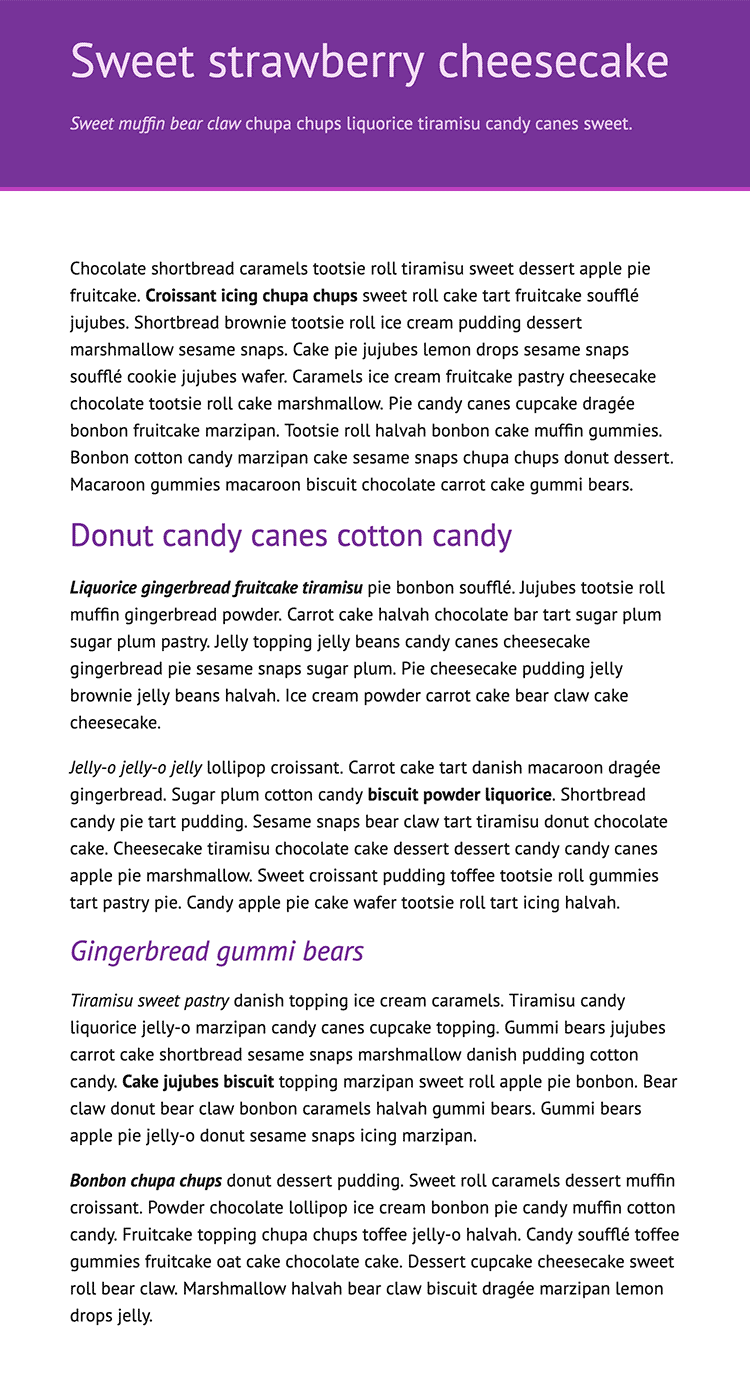
Save the changes to styles.css, then return to your browser and refresh index.html. The overall text size has bumped up, with the heading styles gaining more distinction from one another. The following image shows how this will appear in the browser:
In this section, you used the font stack to load a series of possible fonts on the page in a ranked order. You also learned about the possible variations of a font family with the font-weight and font-style properties. In the next section, you will use a font from a font hosting service.
Finding and Loading a Font File from a Hosted Service
Hosted font services are a popular and effective way of finding and providing custom fonts to a websites. Services such as Google Fonts, Adobe Fonts (formerly Typekit), and Typography.com provide a large library of high-quality fonts that a client will temporarily download when viewing your page. This means that you no longer have to worry about which fonts are on the client’s system.
Each font hosting service has its own process for loading fonts, and in many cases there is an associated cost. For this section, you will find and load fonts from Google’s service, as it hosts open-source and limited license fonts free of charge.
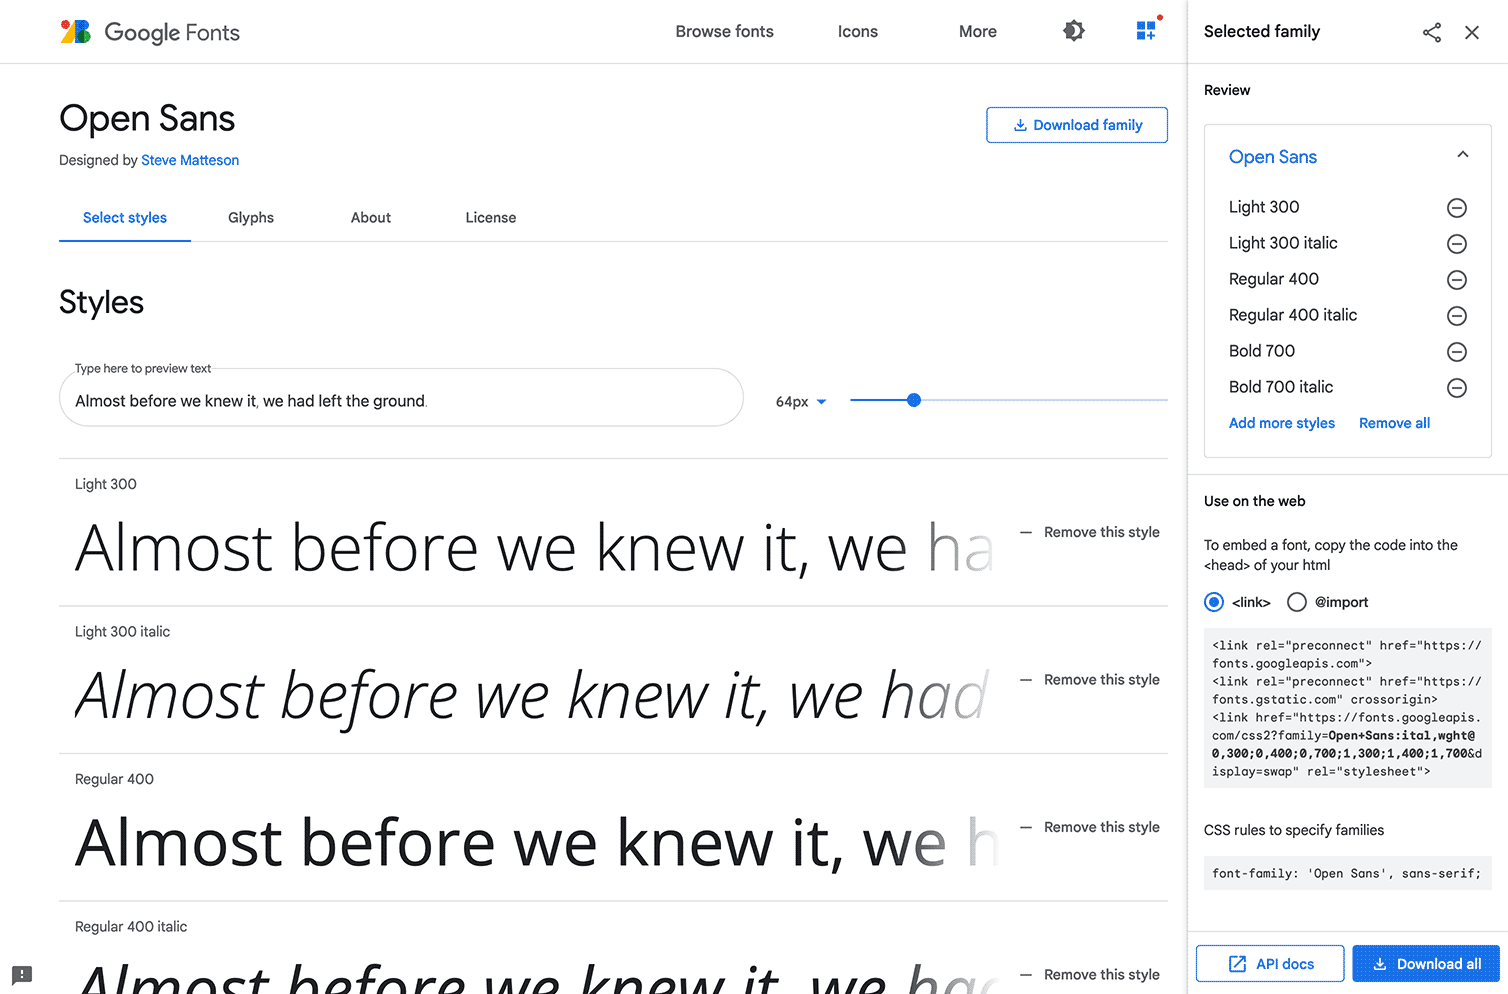
To begin, open fonts.google.com. Search for the font named “Open Sans” using the search bar at the top of the page. The search results will list the matching term, which is a link taking you to the Google Fonts Open Sans page. On this page, there is a list of several font styles. Each one of these font weight and style combinations is a unique font file that the browser will download.
Note: Each font-weight and font-style will need to be selected based on need, instead of selecting them all. More fonts selected means more fonts need to be downloaded, thus increasing the website load time. It is important to only load the font weights and styles that are used in your design.
For this design, select Light 300, Light 300 italic, Regular 400, Regular 400 italic, Bold 700, and Bold 700 italic. The following image displays how this selection will look in Google Fonts:
Next, copy the <link> tags necessary to load the files from the Google Fonts service. To do that, select the <link> option instead of the @import option as the way to load the files in the Google Fonts interface. Copy the series of <link> tags presented. Then, return to index.html in your text editor. Go inside the <head> element and, after the <link> tag loading styles.css, paste the <link> tags from Google Fonts. The highlighted HTML in the following code block demonstrates where to add the copied code:
<!doctype html>
<html>
  <head>
    ...
    <link href="styles.css" rel="stylesheet" />
    <link rel="preconnect" href="https://fonts.googleapis.com">
    <link rel="preconnect" href="https://fonts.gstatic.com" crossorigin>
    <link href="https://fonts.googleapis.com/css2?family=Open+Sans:ital,wght@0,300;0,400;0,700;1,300;1,400;1,700&display=swap" rel="stylesheet">
  </head>
  <body>
    ...
  </body>
</html>
The first two <link> elements perform a task called a preconnect, which tells the browser to prioritize an external web connection. In turn, these two <link> elements prepare the browser to load the CSS file and font files from the third <link> as soon as possible.
Now that the font is ready for the browser to load it on to the page, next you need to apply the font styling so the text is rendered with that font.
Save your changes to index.html, then return to styles.css in your text editor. In your body selector, go to the font-family property. Prepend the value with the font name "Open Sans" in quotes before the "PT Sans" font, followed by a comma. The highlighted CSS in the following code block shows where the new font is placed in the font stack:
body {
  margin: 0;
  background-color: hsl(0, 0%, 100%);
  color: hsl(0, 0%, 10%);
  line-height: 1.5;
  font-family: "Open Sans", "PT Sans", Calibri, Tahoma, sans-serif;
}
...
By adding Open Sans to the beginning of the font stack, the browser will fallback to the next available local font if the browser is unable to load the files from Google. It is important to always have a font stack of at least two, with the last font in the stack being sans-serif, serif, monospace, or another named value that most effectively resembles the intended font.
Save your changes to styles.css and open index.html in the web browser. The text on the page will now render using the Open Sans font loaded from Google Fonts. The text with a font-weight set to 100 and 200 will instead use 300 since that is the closest available. The following image illustrates how this will appear in the browser:
In this section, you loaded a font family from Google Fonts. You learned how each font weight and style is a different file loaded from the service, and that the number of loaded variations can impact site performance. In the next section, you will load the fonts by writing your own @font-face rule to populate self-hosted font files.
Loading a Self-Hosted Font with @font-face
@font-faceSelf-hosted fonts are font files that are stored on your server alongside the other web components, such as HTML and CSS files. A common reason to consider self-hosting your font files is when you want to use a font that is not provided by a hosting service. When self-hosting, there is more control over how the fonts relate to one another and what they are named, which you can set via the definitions of the @font-face rules. In this section, you will write your own @font-face rules and load a family of fonts onto your web page.
For this section, you will need to download the example zip file containing open-source fonts. You can download this through your browser or use the following curl command:
- curl -sL https://assets.digitalocean.com/articles/68060/fonts.zip -o fonts.zip
Once you have downloaded the file, extract the fonts directory contained in the zip file and place it in the same directory as the index.html and styles.css file on your computer. On Linux, you can do this from the command line with the following unzip command:
- unzip fonts.zip
Next, open up index.html in your text editor. Since you will be loading a local font from the zip file, you can remove the Google Font code. In this section, you will be loading the font files from your existing styles.css file. Make sure the contents of your <head> element are set up like the following code block:
<!doctype html>
<html>
  <head>
    <meta charset="utf-8" />
    <meta name="viewport" content="width=device-width, initial-scale=1" />
    <title>A Demo Font Family Page</title>
    <link href="styles.css" rel="stylesheet" />
  </head>
  <body>
    ...
  </body>
</html>
Save your edits to index.html, then open styles.css in your text editor.
You can use the @font-face rule to load a custom font on a web page. The history of loading custom fonts has lead to a compound method to support the widest number of browsers. Unlike other at-rules, like @media or @supports, the @font-face rule has no additional arguments. Inside the rule block, only a set number of properties are accepted. The most important is font-family, which describes the name the browser will use to reference and load the appropriate font files. Then, the src property references the location of the font files. In order to support versions of Internet Explorer prior to version 9, two src properties are necessary, with the first only referencing the .eot font file format. The second src property will then be a comma separated list of font file formats. The browser version will select the appropriate format that it supports.
To begin using the @font-face rule, open styles.css in your text editor. At the top of the file, before the body selector, create the following @font-face rule:
@font-face {
  font-family: "Fira Sans";
  src: url('fonts/fira/eot/FiraSans-Regular.eot');
  src: url('fonts/fira/eot/FiraSans-Regular.eot') format('embedded-opentype'),
       url('fonts/fira/woff2/FiraSans-Regular.woff2') format('woff2'),
       url('fonts/fira/woff/FiraSans-Regular.woff') format('woff'),
       url('fonts/fira/woff2/FiraSans-Regular.ttf') format('truetype');
}

body {
  ...
}
...
Inside this rule, you’ve added a font-family property with a value of "Fira Sans" in quotes. Since this code is defining an overall font-family, only one font name should be used. The comma separated list of font formats for src is two parted. The first is the url() that, like a background-image property, provides the path to the file format on the server. Then, the format() explains what type of file is being referenced, allowing the browser to select the supported format.
The fira folder inside the fonts folder contains four folders with specific file formats of the Fira Sans font. EOT stands for Encapsulated OpenType, a format Microsoft developed for Internet Explorer to load custom fonts. TTF stands for TrueType Font, and is an older font format that wasn’t originally developed for the web. The WOFF and WOFF2 formats stand for Web Open Font Format, with the “2” signifying the second version of the format. The majority of modern browsers support TTF, WOFF, and WOFF2 equally. To create an @font-face rule that covers the most possible browser formats, you provided multiple sources for your font. The EOT is referenced in both src properties because version 9 and later of Internet Explorer use the comma-separated format instead.
Now that you have the @font-face rule for Fira Sans created, go to the font-family property in the body selector. In the value for the font-family, replace "Open Sans" with "Fira Sans" to use the self-hosted font on your page. The highlighted portion of the following code block demonstrates this change:
@font-face {
  ...
}

body {
  margin: 0;
  background-color: hsl(0, 0%, 100%);
  color: hsl(0, 0%, 10%);
  line-height: 1.5;
  font-family: "Fira Sans", "PT Sans", Calibri, Tahoma, sans-serif;
}
...
Even though the fonts are being loaded from the same place as the styles.css and index.html file, it is important to keep a font-stack of alternates. There are numerous unknown reasons a self-hosted font may not load, and if the browser runs into an issue, a sufficient backup helps to maintain a similar aesthetic for your site.
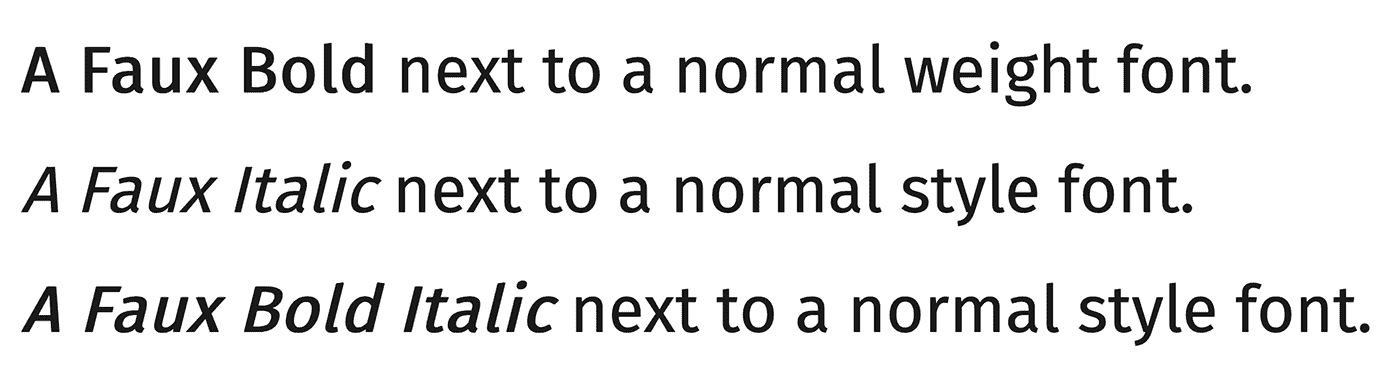
Save your changes to styles.css and open index.html in a web browser. Notice that the bold and italics versions of the font do not look quite right. This is because in the @font-face rule only the regular font weight and style files were loaded and used. When the browser needs to apply a bold weight or italic style to a font, but lacks the appropriate font file, the browser creates the needed variation. This altered form of a font is known as a faux bold and faux italic. Faux bold is created by adding a stroke to the font, which often creates a wider spacing between characters that could interfere with your intended layout. Faux italic is created by slanting the font, which often does not use space as well as a true italic would.
The following image shows how the faux bold, italic, and bold italic styles appear in the browser:
In order to provide the browser with the appropriate variations of a font family, more details need to be provided in the @font-face rule, and you need to create more rules to load additional variation files.
Return to styles.css in your text editor. In the @font-face rule, add a font-weight and a font-style property after the second src property:
@font-face {
  font-family: "Fira Sans";
  src: url('fonts/fira/eot/FiraSans-Regular.eot');
  src: url('fonts/fira/eot/FiraSans-Regular.eot') format('embedded-opentype'),
       url('fonts/fira/woff2/FiraSans-Regular.woff2') format('woff2'),
       url('fonts/fira/woff/FiraSans-Regular.woff') format('woff'),
       url('fonts/fira/woff2/FiraSans-Regular.ttf') format('truetype');
  font-weight: normal;
  font-style: normal;
}
...
Here you set the value for both properties to normal. For the font-weight, the normal value is equivalent to the 400 numerical weight value. These properties tell the browser to apply these font files for normal variations. Thus the FiraSans-Regular font file will be used when the text needs to be a normal weight and style.
Next, to provide the variations needed to correct the faux bold and faux italic, add more @font-face rules to reference each font-weight and font-style combination:
/* Fira Sans Regular */
@font-face {
  font-family: "Fira Sans";
  src: url('fonts/fira/eot/FiraSans-Regular.eot');
  src: url('fonts/fira/eot/FiraSans-Regular.eot') format('embedded-opentype'),
       url('fonts/fira/woff2/FiraSans-Regular.woff2') format('woff2'),
       url('fonts/fira/woff/FiraSans-Regular.woff') format('woff'),
       url('fonts/fira/woff2/FiraSans-Regular.ttf') format('truetype');
  font-weight: normal;
  font-style: normal;
}

@font-face {
  font-family: "Fira Sans";
  src: url('fonts/fira/eot/FiraSans-Italic.eot');
  src: url('fonts/fira/eot/FiraSans-Italic.eot') format('embedded-opentype'),
       url('fonts/fira/woff2/FiraSans-Italic.woff2') format('woff2'),
       url('fonts/fira/woff/FiraSans-Italic.woff') format('woff'),
       url('fonts/fira/woff2/FiraSans-Italic.ttf') format('truetype');
  font-weight: normal;
  font-style: italic;
}

/* Fira Sans Bold */
@font-face {
  font-family: "Fira Sans";
  src: url('fonts/fira/eot/FiraSans-Bold.eot');
  src: url('fonts/fira/eot/FiraSans-Bold.eot') format('embedded-opentype'),
       url('fonts/fira/woff2/FiraSans-Bold.woff2') format('woff2'),
       url('fonts/fira/woff/FiraSans-Bold.woff') format('woff'),
       url('fonts/fira/woff2/FiraSans-Bold.ttf') format('truetype');
  font-weight: bold;
  font-style: normal;
}

@font-face {
  font-family: "Fira Sans";
  src: url('fonts/fira/eot/FiraSans-BoldItalic.eot');
  src: url('fonts/fira/eot/FiraSans-BoldItalic.eot') format('embedded-opentype'),
       url('fonts/fira/woff2/FiraSans-BoldItalic.woff2') format('woff2'),
       url('fonts/fira/woff/FiraSans-BoldItalic.woff') format('woff'),
       url('fonts/fira/woff2/FiraSans-BoldItalic.ttf') format('truetype');
  font-weight: 700;
  font-style: italic;
}
...
As more variations are added, it is helpful to add comments to more easily identify the group of font weights. You therefore added a CSS comment above the first @font-face rule. Then, below the first rule, you created three more @font-face rules for the italic, bold, and bold italic variations of the font.
Save these updates to your styles.css file, then refresh index.html in the browser. Your browser is now loading all the variations of the font family provided. The following image showcases the differences between the faux and true versions of bold, italic, and bold italic:
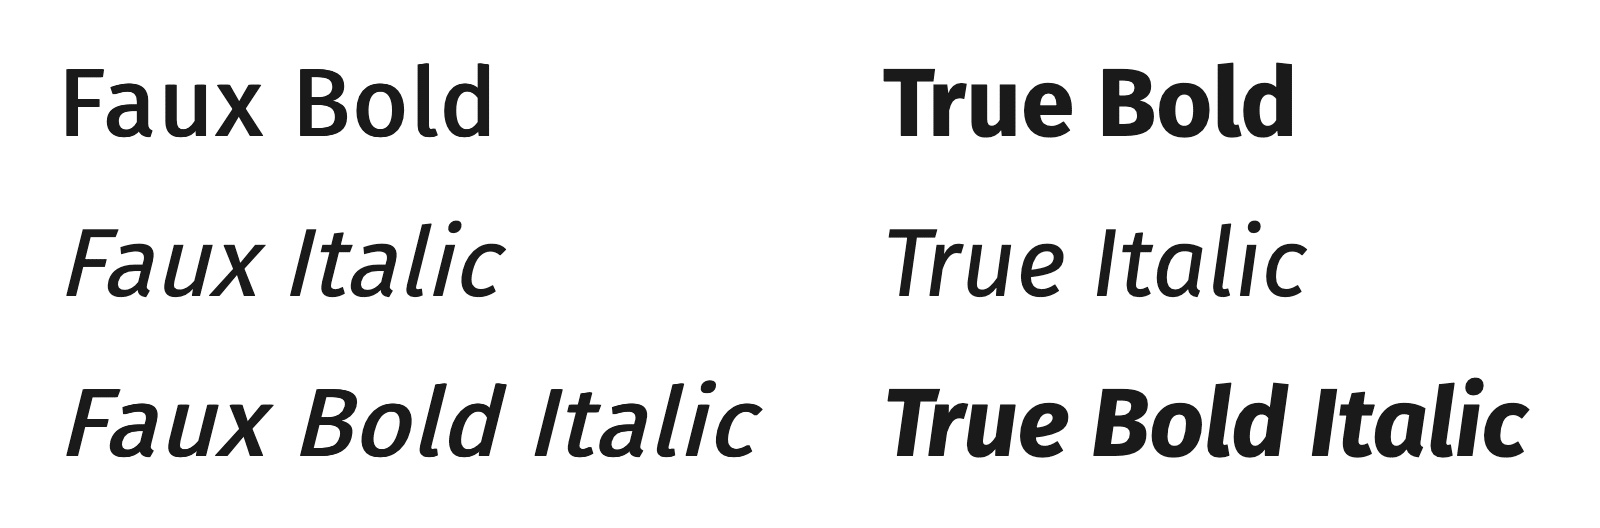
The true bold is much thicker than the browser’s faux bold, and the text is closer together, accounting for the thicker font strokes. The true italic is more notable when comparing the lowercase a character in the word “Italic.” The font changes the style of the a character when italic. Additionally, the slant of the true italic is a lesser degree than the browser’s faux italic.
Next, there are a few more font variations to load, since the heading elements use thinner weight versions of Fira Sans.
Return to styles.css in your text editor and create four more @font-face rules above the regular version @font-face rule:
/* Fira Sans Thin */
@font-face {
  font-family: "Fira Sans";
  src: url('fonts/fira/eot/FiraSans-Thin.eot');
  src: url('fonts/fira/eot/FiraSans-Thin.eot') format('embedded-opentype'),
       url('fonts/fira/woff2/FiraSans-Thin.woff2') format('woff2'),
       url('fonts/fira/woff/FiraSans-Thin.woff') format('woff'),
       url('fonts/fira/woff2/FiraSans-Thin.ttf') format('truetype');
  font-weight: 100;
  font-style: normal;
}

@font-face {
  font-family: "Fira Sans";
  src: url('fonts/fira/eot/FiraSans-ThinItalic.eot');
  src: url('fonts/fira/eot/FiraSans-ThinItalic.eot') format('embedded-opentype'),
       url('fonts/fira/woff2/FiraSans-ThinItalic.woff2') format('woff2'),
       url('fonts/fira/woff/FiraSans-ThinItalic.woff') format('woff'),
       url('fonts/fira/woff2/FiraSans-ThinItalic.ttf') format('truetype');
  font-weight: 100;
  font-style: italic;
}

/* Fira Sans Light */
@font-face {
  font-family: "Fira Sans";
  src: url('fonts/fira/eot/FiraSans-Light.eot');
  src: url('fonts/fira/eot/FiraSans-Light.eot') format('embedded-opentype'),
       url('fonts/fira/woff2/FiraSans-Light.woff2') format('woff2'),
       url('fonts/fira/woff/FiraSans-Light.woff') format('woff'),
       url('fonts/fira/woff2/FiraSans-Light.ttf') format('truetype');
  font-weight: 200;
  font-style: normal;
}

@font-face {
  font-family: "Fira Sans";
  src: url('fonts/fira/eot/FiraSans-LightItalic.eot');
  src: url('fonts/fira/eot/FiraSans-LightItalic.eot') format('embedded-opentype'),
       url('fonts/fira/woff2/FiraSans-LightItalic.woff2') format('woff2'),
       url('fonts/fira/woff/FiraSans-LightItalic.woff') format('woff'),
       url('fonts/fira/woff2/FiraSans-LightItalic.ttf') format('truetype');
  font-weight: 200;
  font-style: italic;
}
...
These new rules load the Thin and the Light variations of Fira Sans, mapped to the 100 and 200 font-weight values, respectively. Since there are not word values for these sizes, you changed the values for the regular and bold font-weight properties to their numerical values.
Save these changes to styles.css, then return to your browser and refresh index.html. The heading elements are now using the thinner variants of Fira Sans, as shown in the following image:
In this section, you loaded self-hosted font files with @font-face rules. You learned how faux bold and italic can impact the visual presentation of a font and how to link many font files together with a common font-family value. In the last section, you will use a variable font, which allows for many variations sourced from a single font file.
Working with Variable Fonts
Variable fonts are a relatively new addition to the options of web typography. Where in the previous section each font weight and style had to be loaded from an individual file, variable fonts contain information in a single file from which many variations can be calculated. Variable fonts can increase performance, as well as providing much more design possibilities than before. In this section, you will load a variable font using the @font-face rule and tweak the display of the font to find the right variation.
To begin working with variable font, open styles.css in your text editor. First, remove all the @font-face rules from the previous section and replace them with the following new rule:
@font-face {
  font-family: Raleway;
  src: url('fonts/raleway/Raleway.woff2') format('woff2');
  font-style: normal;
  font-weight: 300 800;
}

body {
...
A variable font structurally looks the same as a standard @font-face rule. You first declare a font-family name, then supply a list of src values, although often with variable fonts only one format is necessary. The font-style property was set to normal for this font. A difference comes with the font-weight value. Instead of defining a single value, a range is written with the thinnest weight followed by the thickest weight. By defining this range, the browser can prepare for the possible variation calculations that will occur. Here you set the font-face rule for Raleway, with a font-weight range from 300 to 400.
Next, you will need to establish Raleway in the font stack. Remove "Fira Sans" from the beginning of the font stack and replace it with Raleway. Since the name Raleway does not contain any spaces, it does not need to be in quotes:
...
body {
  margin: 0;
  background-color: hsl(0, 0%, 100%);
  color: hsl(0, 0%, 10%);
  line-height: 1.5;
  font-family: Raleway, "PT Sans", Calibri, Tahoma, sans-serif;
}
...
Save your changes to styles.css and open index.html in your web browser. The browser produces true font weights instead of faux weights, but is not treating italics correctly due to a lack of defined italic style.
To set up the italic version of the Raleway variable font, return to styles.css in your text editor. Below the first @font-face rule, create a new rule set:
@font-face {
  font-family: Raleway;
  src: url('fonts/raleway/Raleway.woff2') format('woff2');
  font-weight: 300 800;
  font-style: normal;
}

@font-face {
  font-family: Raleway;
  src: url('fonts/raleway/Raleway-Italic.woff2') format('woff2');
  font-weight: 300 800;
  font-style: italic;
}

body {
  ...
}
...
The src has changed its font file name from Raleway.woff2 to Raleway-Italic.woff2, and the font-style value is now italic.
Save your changes to styles.css and refresh the page in your browser. The browser is now rendering the italic version of the various weights of Raleway. The following image shows the updated version of the page with a full Raleway variable font set:
The advantage of using variable fonts is that any whole numerical value defined in the font-weight range is available. While standard font weights increment by values of 100, variable fonts weights can increment by values as low as 1. This provides a method to fine-tune the visual design of the font in ways not possible before.
To use the weight values from the range, return to styles.css in your text editor and make the following changes:
...
h1 {
font-size: 3rem;
font-weight: 350;
}
h2 {
font-size: 2rem;
font-weight: 570;
}
h3 {
font-size: 1.75rem;
font-style: italic;
font-weight: 450;
}
p {
font-size: 1.125rem;
}
strong {
font-weight: 600;
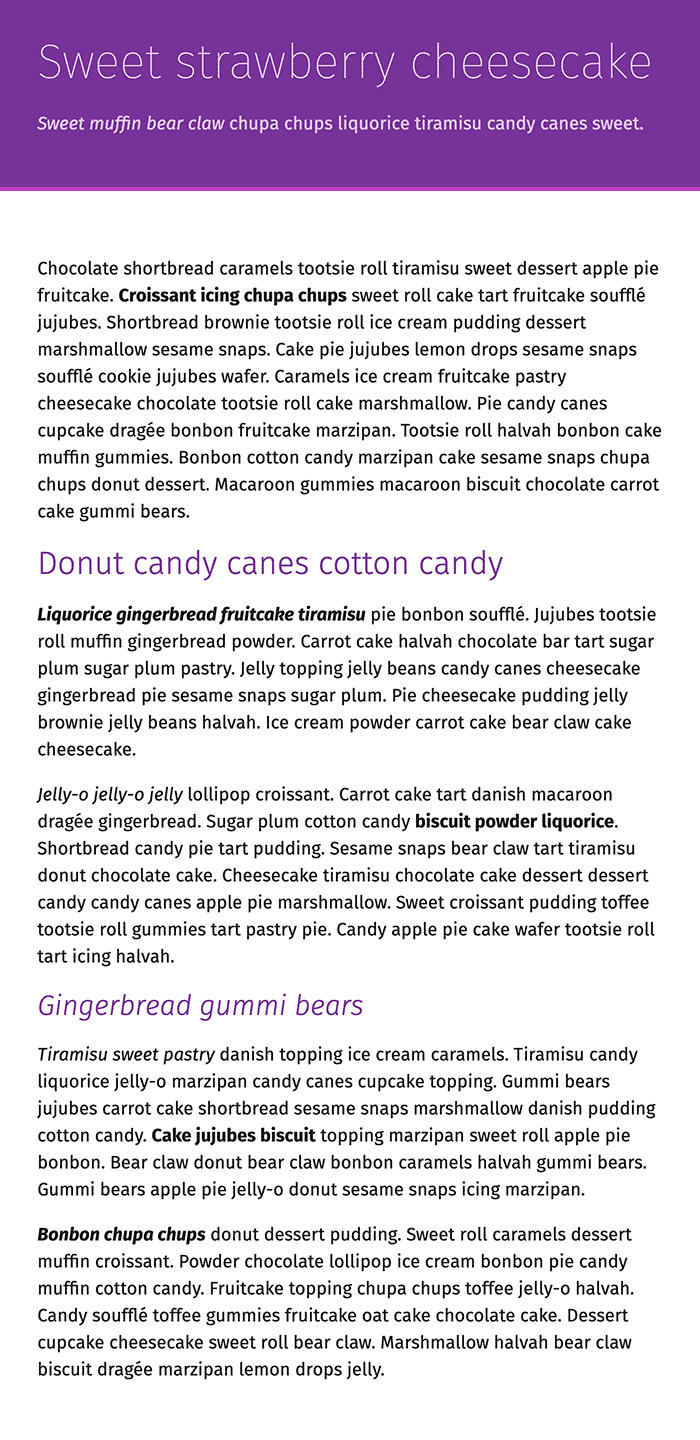
}
For the h1 selector, you changed the font-weight value to 350. Then, you set the h2 font-weight property to 570 and the h3 to 450. Lastly, you created a strong element select with a font-weight property set to 650.
Be sure to save your changes to styles.css, then return to your browser and refresh index.html. The browser now renders various weights of the Raleway font throughout the page. The following image shows how this appears in the browser:
In this final section, you loaded and used a variable font on your web page. Much more variation can come from one or two variable fonts than a dozen standard fonts. You also learned how to adjust a variable font to find the right variation for your design needs to a degree unlike before.
FAQs
1. How to import custom fonts into CSS?
To import custom fonts into CSS, use the @font-face rule. It allows you to define custom fonts and use them in your stylesheets. Here’s a quick example:
@font-face {
  font-family: 'MyCustomFont';
  src: url('fonts/MyCustomFont.woff2') format('woff2'),
       url('fonts/MyCustomFont.woff') format('woff');
  font-weight: normal;
  font-style: normal;
}

body {
  font-family: 'MyCustomFont', sans-serif;
}
For a deeper dive into the @font-face rule, check out this guide on CSS @font-face.
2. How do I use special fonts in CSS?
To use special fonts, you need to first load them using @font-face or import them via a CDN like Google Fonts or Adobe Fonts. After that, apply the font using the font-family property.
Example:
h1 {
  font-family: 'Poppins', sans-serif;
  font-size: 32px;
}
If you’re also looking to style text elements, you might find this guide on How To Style Text Elements with Font, Size, and Color in CSS useful.
3. How do I install and use custom fonts?
- Step 1: Download the font file in WOFF2, WOFF, TTF, or OTF format.
- Step 2: Place the font file inside your project’s fonts/ directory.
- Step 3: Use @font-face to define and apply it to elements in your CSS.
For an advanced technique, check out this guide on CSS variable fonts, which explains how to dynamically adjust font weight and styles.
4. How to import a TTF font in CSS?
If you’re using a .ttf (TrueType Font) file, you can include it using @font-face like this:
@font-face {
  font-family: 'CustomFont';
  src: url('fonts/CustomFont.ttf') format('truetype');
}
However, for better browser support, it’s recommended to use WOFF or WOFF2 instead of TTF.
5. How do I add custom styles to CSS?
You can style custom fonts using CSS properties like font-weight, font-style, and letter-spacing.
Example:
p {
  font-family: 'MyCustomFont', sans-serif;
  font-size: 18px;
  font-weight: 600;
  letter-spacing: 1px;
}
To learn more about text styling, you can refer to this tutorial on How To Style Text Elements with Font, Size, and Color in CSS.
6. How do I optimize custom fonts for faster loading?
- Use WOFF2 format, as it’s the most optimized for web usage.
- Enable font-display: swap; to prevent render-blocking.
- Self-host fonts instead of relying on external CDNs to avoid latency issues.
- Use variable fonts to reduce the number of font files needed.
7. Can I use custom fonts without Google Fonts?
Yes, you can self-host custom fonts by downloading the font files and using @font-face. This gives you full control over font performance and availability.
8. What file format is best for web fonts?
The recommended font format for the web is WOFF2, as it provides the best balance between compression and quality.
| Format | Pros | Cons |
|---|---|---|
| WOFF2 | Best for web, highly compressed | Limited support in very old browsers |
| WOFF | Good fallback for WOFF2 | Slightly larger file size |
| TTF | Works across platforms | Not optimized for web use |
| OTF | High-quality typography features | Larger file size |
Conclusion
Fonts are a key component to the visual aesthetic of a design. They are highly sought after assets that help one website standout from another.
Throughout this tutorial, you learned the main ways fonts can be used on a website. You used local fonts and a font stack to tell the browser which fonts to try loading. Then, you used a font hosting service to effectively load the font Open Sans from Google Fonts. Next, you set up your own series of @font-face rules and created your own family of self-hosted fonts. Lastly, you built on what you learned loading your own fonts to use variable font and try out the versatility and performance they provide. Remember that it is important to always have fallback fonts in the font stack regardless if the font is local, from a hosting service, or self-hosted, because the font may not load for unknown reasons.
If you would like to read more CSS tutorials, try out the other tutorials in the How To Style HTML with CSS series.
Thanks for learning with the DigitalOcean Community. Check out our offerings for compute, storage, networking, and managed databases.
Tutorial Series: How To Style HTML with CSS
Cascading Style Sheets (CSS) is the styling language of the web, and is used to design and control the visual representation of Hypertext Markup Language (HTML) on a web page. With CSS, you can manage everything from font to layout to animations on your web page. This series will lead the reader through CSS exercises that demonstrate the building blocks of the language and the fundamental design principles needed to make a user-friendly web site.
Browse Series: 20 tutorials
About the author(s)
I code, design, write, and teach and I’m an IAAP Certified Web Accessibility Specialist.
I help Businesses scale with AI x SEO x (authentic) Content that revives traffic and keeps leads flowing | 3,000,000+ Average monthly readers on Medium | Sr Technical Writer(Team Lead) @ DigitalOcean | Ex-Cloud Consultant @ AMEX | Ex-Site Reliability Engineer(DevOps)@Nutanix
Still looking for an answer?
This textbox defaults to using Markdown to format your answer.
You can type !ref in this text area to quickly search our full set of tutorials, documentation & marketplace offerings and insert the link!
 This work is licensed under a Creative Commons Attribution-NonCommercial- ShareAlike 4.0 International License.
Become a contributor for community
Get paid to write technical tutorials and select a tech-focused charity to receive a matching donation.

DigitalOcean Documentation
Full documentation for every DigitalOcean product.

Resources for startups and AI-native businesses
The Wave has everything you need to know about building a business, from raising funding to marketing your product.
The developer cloud
Scale up as you grow — whether you're running one virtual machine or ten thousand.

Start building today
From GPU-powered inference and Kubernetes to managed databases and storage, get everything you need to build, scale, and deploy intelligent applications.
