By Philip Zastrow and Timothy Nolan

The author selected the Diversity in Tech Fund to receive a donation as part of the Write for DOnations program.
Introduction
The core functionality of CSS is performed by two features: cascade and specificity. Cascade deals with how CSS properties are read and applied to elements. Specificity directs a browser to find the correct element and apply the styles. The starting point of specificity is a selector, which tells the browser what element to find. When it comes to styling, the larger a web page or website, the greater the need for more specific, or higher specificity, selectors.
Selecting the right element and providing the right visual styles is the basis of writing CSS code. Whenever you need to adjust how an element on a webpage looks, using selectors is key.
This tutorial will build your skill set and help you develop visually rich websites by showing you how to select the right element in a given scenario. You will begin by using the type selector to select HTML elements to style. Then, you will combine selectors to identify and apply styles more precisely. Lastly, you will group several selectors to apply the same styles to different elements.
Prerequisites
-
Familiarity with the concepts of cascade and specificity as they apply to CSS.
-
An empty HTML file saved on your local machine as
index.htmlthat you can access from your text editor and web browser of choice. To get started, check out our How To Set Up Your HTML Project tutorial, and follow How To Use and Understand HTML Elements for instructions on how to view your HTML in your browser. If you’re new to HTML, try out the whole How To Build a Website in HTML series. -
An empty CSS file called
styles.csssaved on your local machine in the same directory asindex.html.
Setting Up the HTML
In this first step, you will set up the HTML that you will style throughout the rest of the tutorial. The purpose of the HTML in this tutorial is to provide various elements and situations to style.
Open up the index.html file in your editor and add the following boilerplate HTML to give the file necessary baseline code:
<!doctype html>
<html>
  <head>
    <link href="styles.css" rel="stylesheet" />
  </head>
  <body>
  </body>
</html>
The <link /> element already loads in the styles.css file, so be sure to have that file ready as well.
Now, you need some content. Start by adding in <header> and <article> elements inside the <body> element. In the following code block, highlighted sections will help you identify what is new or has changed:
<!doctype html>
<html>
  ...
  <body>
    <header></header>
    <article></article>
  </body>
</html>
The relationship between the <body> and the <header> elements is referred to as parent and child, since the <header> element is nested inside the <body> tags. This also means the <header> and <article> tag have a sibling relationship, since they are at the same nesting level within the parent <body> tags.
Next, you will add a child element within the <header> to give the page a title:
...
<header>
  <h1>About Coral Reefs</h1>
</header>
...
Inside <article>, add four children: one <header> element and three <section> elements. The <article> element provides what is called a landmark, a designation for a browser to aid those using assistive technologies. There should only be one <header> within a landmark. In this case the <header> will contain the title for this article of the page. The <section> elements will contain different information blocks:
...
<article>
  <header></header>
  <section></section>
  <section></section>
  <section></section>
</article>
...
Now, provide a title in the <header> for the <article>. Use an <h2> here since it logically works as a second-level heading beneath the <body>’s <header> with a top-level heading. Add in <strong> tags around the word “Biodiversity” to strongly emphasize the text. When you load index.html in your browser, this text won’t look any different due to the browser defaults. You will style this later to distinguish between the heading and the <strong> text.
...
<article>
  <header>
    <h2>Coral Reef <strong>Biodiversity</strong></h2>
  </header>
  ...
</article>
...
Next, add in the first section content. This will be two paragraphs, contained in <p> tags giving some details about coral reefs. In the first paragraph, add an <em> tag and a <strong> tag around some phrases to emphasize that content:
...
<article>
  <header>
    ...
  </header>
  <section>
    <p>Coral reefs are teeming with life. They are known as the <em>rainforests of the sea</em> with how many various speieces live within their waters. The defining feature of these ecosystems are the plant-like coral, which are really colonies of tiny invertabrates called <strong>polyps</strong>.</p>
    <p>Sadly, many reefs around the world are in danger due to rising ocean temperatures, pollution, and overfishing.</p>
  </section>
  ...
</article>
...
In the second section, add an <h3> tag for a heading for this section of the article. Like the <h2> before, this is set as an <h3> since it is a subset of content. In the <h3>, add a <strong> tag around a phrase in the heading like in the <h2>. Then write out an unordered list using the <ul> tag to define the list and <li> to define each item in the list. In one of the list items, wrap the content in a <strong> tag:
...
<article>
  <header>
    ...
  </header>
  <section>
    ...
  </section>
  <section>
    <h3><strong>Animal Life</strong> in a Coral Reef</h3>
    <ul>
      <li>Angelfish</li>
      <li>Clownfish</li>
      <li>Octopus</li>
      <li><strong>Sharks</strong></li>
      <li>Barracuda</li>
    </ul>
  </section>
  ...
</article>
...
With the last section, set up content similar to the second section with an <h3> section title and a <strong> element around a word in the title. Instead of an unordered list, make an ordered list with an <ol> tag to define the list, but still define each item with the <li> tag. Once again, in one of the list items, add a <strong> element around the content:
...
<article>
  <header>
    ...
  </header>
  <section>
    ...
  </section>
  <section>
    ...
  </section>
  <section>
    <h3>Sammy's <strong>Favorite</strong> Reef Food</h3>
    <ol>
      <li>Sea Grass</li>
      <li><strong>Kelp</strong></li>
      <li>Sea Grapes</li>
      <li>Sea Lettuce</li>
    </ol>
  </section>
</article>
...
Save your file.
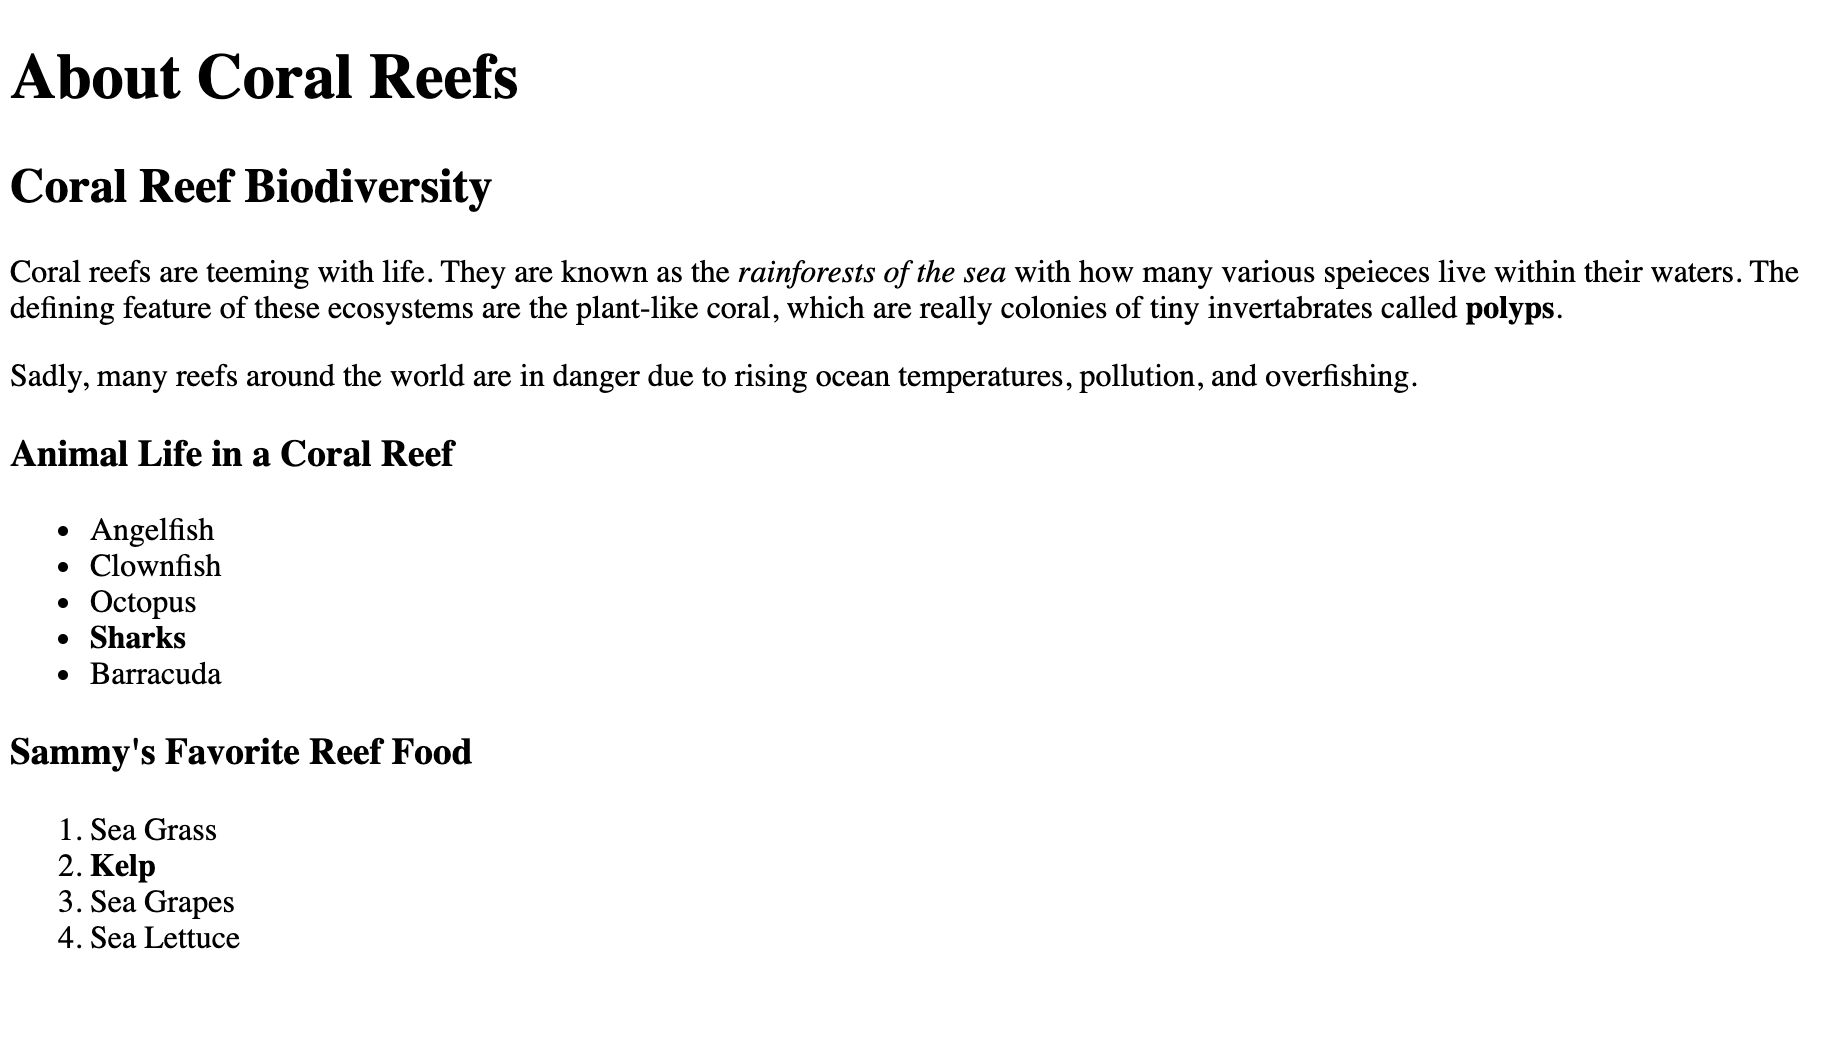
That covers the HTML for this tutorial and provides elements for which you can begin to write styles. Now that you have finished with index.html, leave it open in your editor for reference as needed. Then open index.html in your browser to see the default styles of your browser, which will appear similar to the following image:
Next, you’ll apply styles to the HTML page you created.
Selecting Elements With the Type Selector
In this section, you will work with the type selector, more commonly referred to as the element selector. The type selector finds elements on the page by tag name, making it broadest in terms of specificity. You will write several selectors to learn the breadth of this selector throughout the index.html page.
First, take a look at index.html in the browser. This what the page looks like using browser defaults. These are predefined styles provided by the browser to give visual information to the content of the page. This is a helpful starting place for the styles; in the examples ahead you will only modify a couple of properties to customize the look of the page.
Next, open the styles.css file in your editor. The default browser font is typically a serif font, a typography term referring to the decorative ends on the characters, like those found in Times New Roman. To change the font across the whole page, you can make a change in one place.
Create a type selector for the HTML <body> element by typing out the word in the tag, body, followed by an opening and closing curly brace. Inside the curly braces, add a new line and then add the CSS property font-family with a value of sans-serif. This addition of the font-family will change the font for the whole document to a sans serif font. Unlike a serif font, a sans serif font lacks decorative ends on the characters, such as in Helvetica or Arial:
body {
  font-family: sans-serif;
}
Once you have made these changes, save styles.css and refresh your browser to verify the text has all changed to the browser’s default sans-serif font. The reason the font changed throughout the whole page is due to a feature of CSS called inheritance. Inheritance is when a child element inherits property values from the parent element, unless otherwise specified. This feature does not affect all CSS properties or elements, but it is most notable among properties that affect text.
Next, adjust the font-weight of the <h2> and <h3> elements on the page. By default, the browser applies styles to make these elements a bold font. Create an h2 and an h3 type selector and in each add the font-weight property with a value of normal. This will change the default from bold to a normal weight:
body {
  font-family: sans-serif;
}

h2 {
  font-weight: normal;
}

h3 {
  font-weight: normal;
}
Save and return to your browser and refresh the index.html page. The content of the <h2> and <h3> elements have changed from a bold to a normal font weight, except for the text in the <strong> elements. This is a case where an explicit value is set for the font-weight in the browser defaults, so the <strong> element does not inherit the change to its parent element.
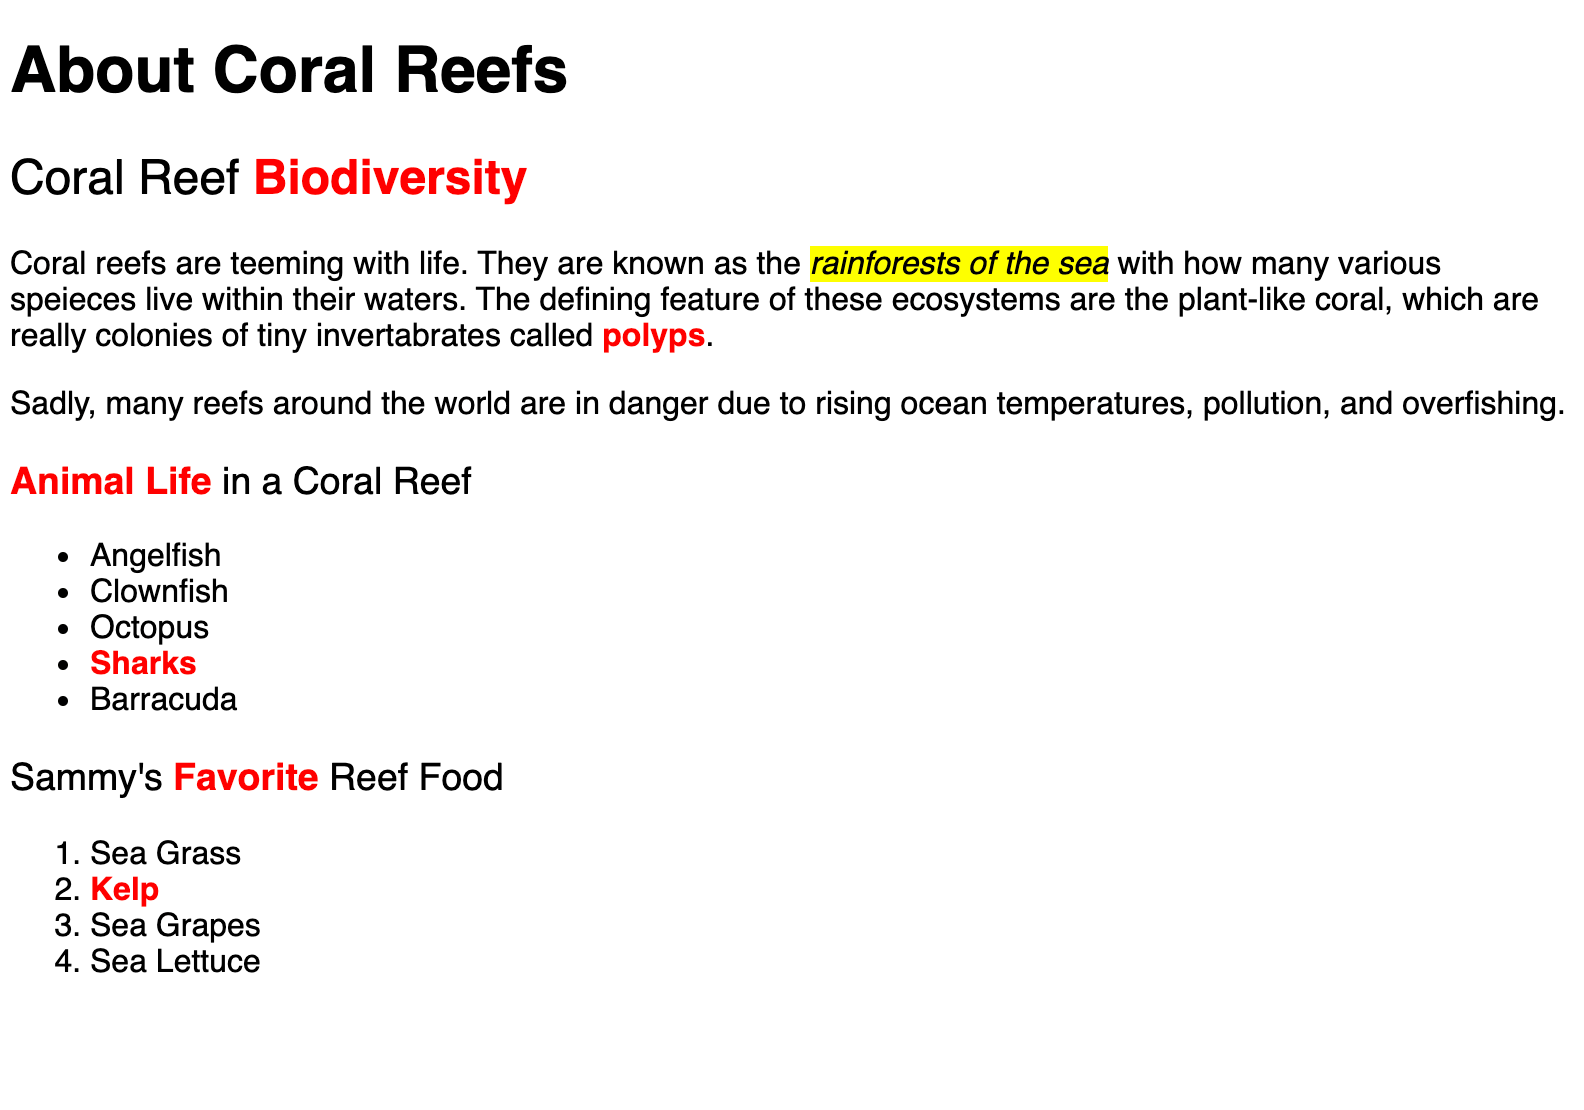
The primary purpose with any design is to aid in communication. In this case, the design is working to emphasize a particular part of the content through contrasts in font weight. Next, you will apply color to help encourage this contrast. Start with an em type selector and apply a background-color of yellow to give it a highlighter effect. Next, to help draw further attention to the <strong> content, create a strong type selector with a color property set to red:
...
h3 {
  font-weight: normal;
}

em {
  background-color: yellow;
}

strong {
  color: red;
}
Save styles.css and refresh index.html in your browser to find the changes you have made to the design of the website. As shown in the following image, the whole of the text on the page has changed to a sans-serif font, the <h2> and <h3> content headings are no longer bold, all the <strong> element content is now red, and the <em> element content has a yellow highlighter background:
In this step you worked with multiple type selectors to create specific styles for each selector. The type selector tells the browser to find an element by the element’s name and is the broadest in specificity. Next, you will learn about simplifying your CSS through the use of selector groups.
Selecting Elements With the Combinator Selector
In this section, you will work with the combinator selector to make more specific element selection. This selector uses the nested relationship of HTML elements to select the appropriate element. You will use this selector to make the same element type look different when contained in other element types.
Open up index.html in the browser. As you look over the styles, there are pops of red every so often due to the strong selector that is applying color: red; to all instances of <strong> on the page. In this step you will work through to change the color value on <strong> elements when they meet certain criteria, based on their ancestry, a series of parent and child element relationships.
A combinator selector is defined by a space character between selectors, with the HTML ancestry reading left to right. The right-most selector is the intended target. This can be as complex or as simple as necessary to scope, or provide sufficient specificity, to the intended element. To understand how combinator selectors work, open styles.css and add at the bottom of the file a p type selector followed by a space, then a strong type selector followed by an open and close curly bracket:
...
p strong {
}
This is a combinator selector that is targeting <strong> elements that are ancestrally descendent of a <p> element. This means the <p> element does not have to be the direct parent of the <strong> element in order for this combinator selector to be true. Now change the color of <strong> elements that meet this criteria by placing a color property within the combinator selector:
...
p strong {
  color: coral;
}
Save the changes and return to the browser to refresh index.html.
Next, add more variety of color to the <strong> elements throughout the file. Start with the <strong> element that is a descendant of an <h3> and turn those blue:
...
p strong {
  color: coral;
}

h3 strong {
  color: blue;
}
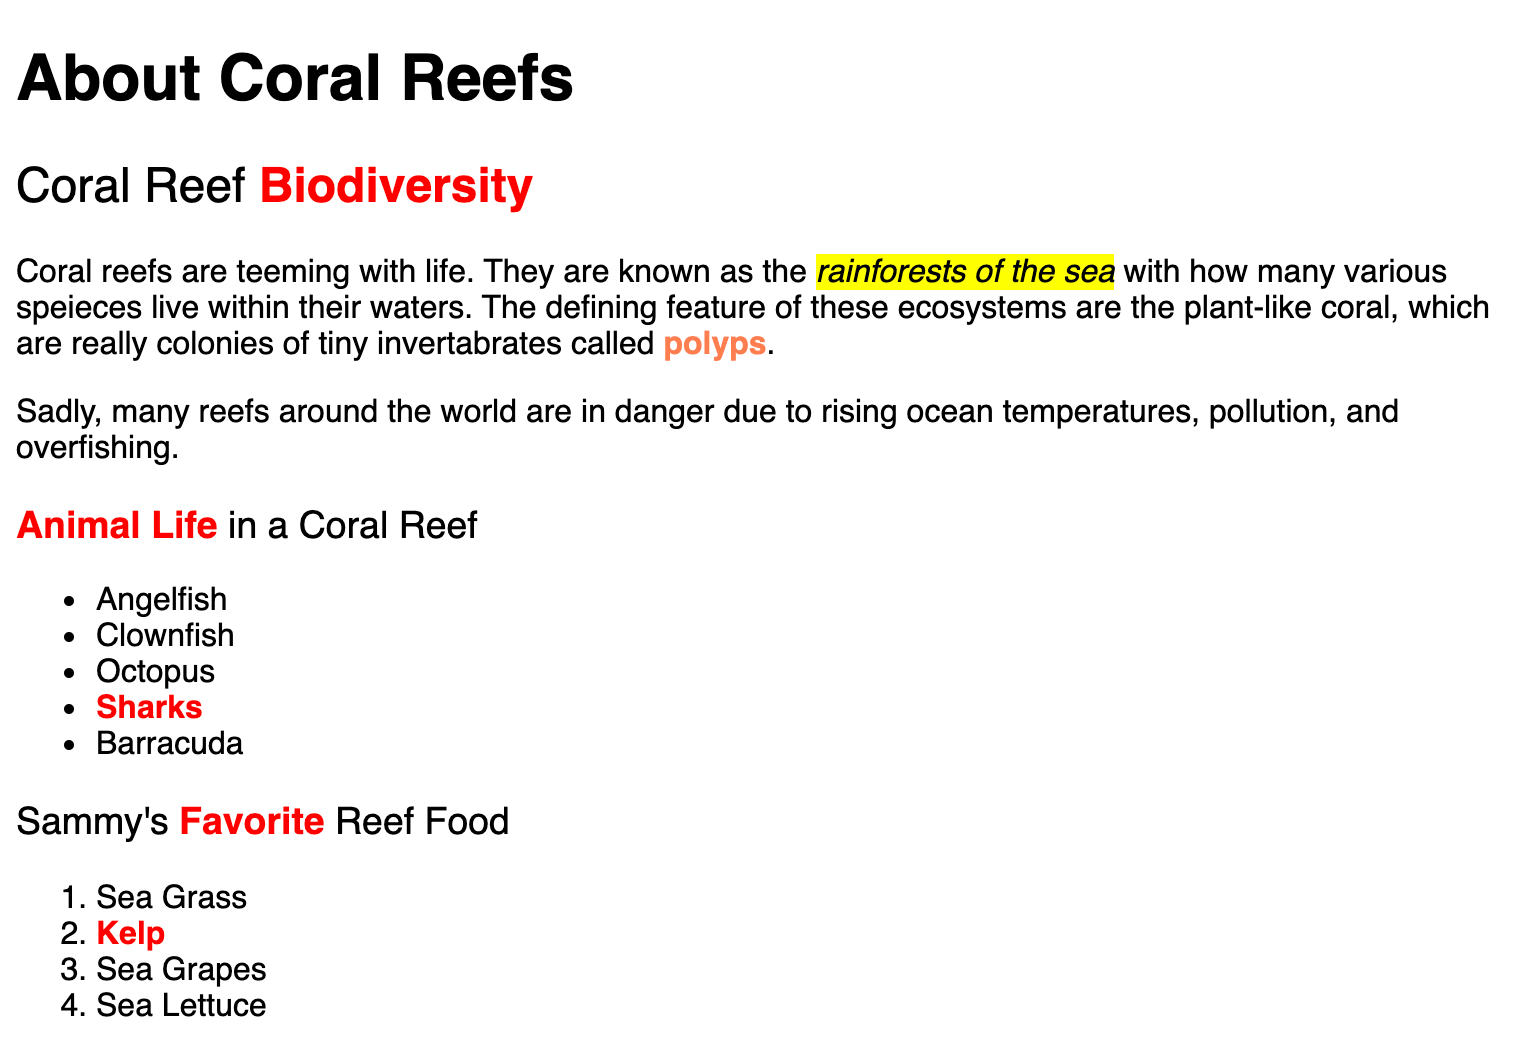
Finally, to add some more color, change the color for <strong> elements in an unordered list to dodgerblue, which is a rich light blue, and the color for <strong> elements in an ordered list to green. Here is where it is helpful to understand ancestry requirements of a combinator selector. You may think you would need to write out ul li strong and ol li strong to target these elements correctly. But this can be simplified to ul strong and ol strong since the ul and ol are specific enough:
...
h3 strong {
  color: blue;
}

ul strong {
  color: dodgerblue;
}

ol strong {
  color: green;
}
Return to your browser and hit refresh. The <strong> element in the unordered list is now a rich light blue color and the <strong> element in the ordered list is now a green, as seen in the following image:
In this section, you learned about the combinator selector. You used the selector with two type selectors multiple times to create custom colors for various instances of <strong> elements. The next section will look at how to simplify your CSS by applying similar styles to multiple element types with the selector group.
Selecting Multiple Elements With the Selector Group
In this section, you will select HTML elements using a selector group. There is a principle of programming called Don’t Repeat Yourself, or DRY. The purpose of DRY code is to write code that is more maintainable. Using the selector group is one of the quickest ways to put the DRY principle in practice when writing CSS.
Open up styles.css in your editor. Earlier in the tutorial you wrote out two styles to change a browser default weight from bold to normal:
...
h2 {
  font-weight: normal;
}

h3 {
  font-weight: normal;
}
...
Since the h2 and h3 type selectors have the same property and value in the selector block, this can be consolidated with a selector group. A selector group is done by putting a comma between selectors. In this case, you can remove the h3 selector block, then add a comma then the h3 type selector after the h2 type selector. It can be helpful to put each selector on a new line to help legibility of the list.
...
h2,
h3 {
  font-weight: normal;
}
...
Open up the browser and reload index.html to verify nothing has changed. Both the h2 and the h3 now share the same styles thanks to the selector block. However, you are not limited to keeping the styles looking the same. You can still have individual h2 and h3 type selectors to provide specific styles to each element. Create each of these type selectors, then add a different color to each selector block:
...
h2,
h3 {
  font-weight: normal;
}

h2 {
  color: maroon;
}

h3 {
  color: navy
}
...
Refresh index.html in your browser to find that the h2 and h3 still have the same shared style of a normal font-weight, yet have their individual color properties.
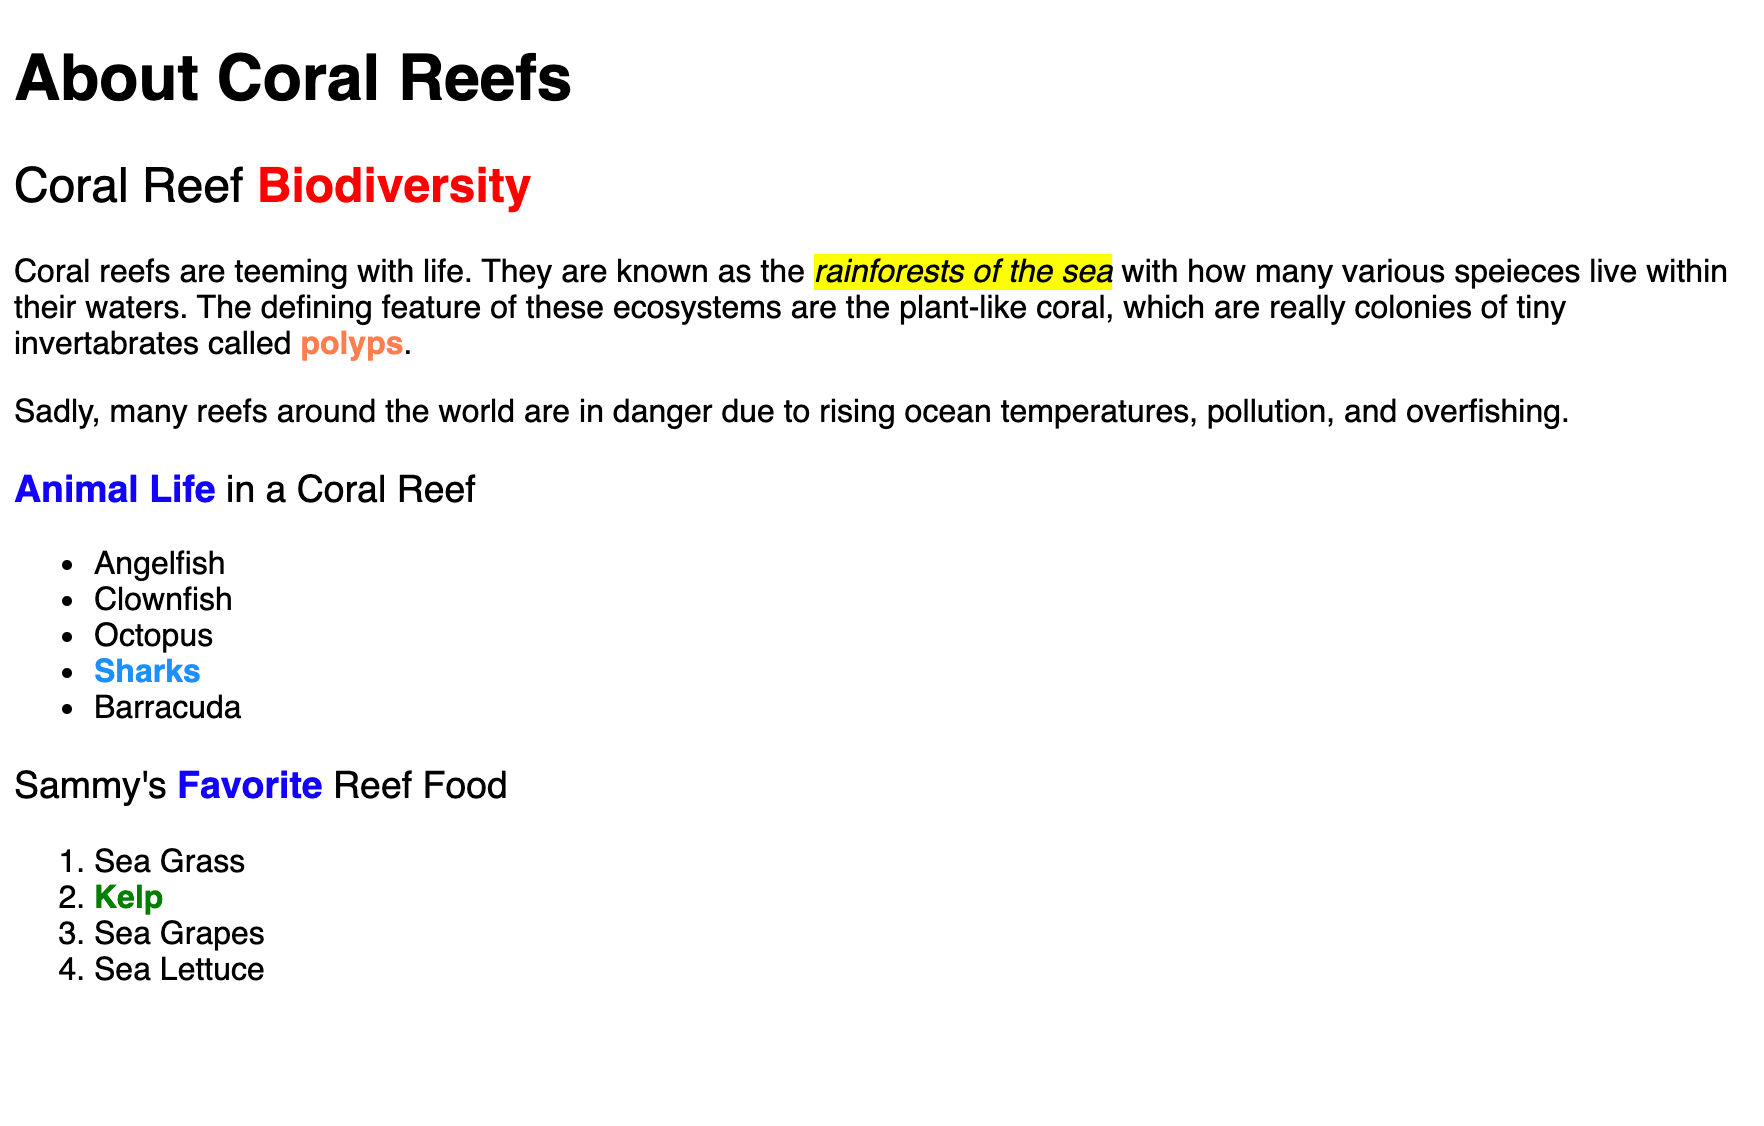
Selector groups are not limited to a particular kind of selector and can bring together various kinds of selectors to have the same style. This feature of grouping could be used in any number of ways. To bring in the selectors discussed already, add one of the combinator selectors to the h2, h3 selector group.
...
h2,
h3,
ol strong {
  font-weight: normal;
}
...
After refreshing index.html in your browser, the <strong> element in the ordered list will no longer be bold and instead will have a normal font-weight, as in the following image:

Note With the selector group, you can bring different styles together into one selector block. But there is a balance to be struck between DRY CSS and human-readable CSS, with a best practice that errs on the side of human-readable. As an extreme example, it is possible to write several large group selectors so no single property is repeated, but that will be harder for developers to understand. In this case, developer readability is preferred.
In this section, you worked with the group selector and turned repetitive CSS properties into a single selector block. You also added in a combinator selector with a selector group to write reusable properties with high specificity.
Conclusion
In this tutorial, you learned about the baseline selectors needed to write CSS. You can now effectively find an element on a page with CSS that is nested deep in HTML and give it specific styles. You also learned about the DRY programming principle, which is helpful to write concise and manageable CSS. These selectors can be paired with many other CSS selectors to get to the exact element and situation you wish to style.
If you would like to read more CSS tutorials, check out our CSS topic page.
Thanks for learning with the DigitalOcean Community. Check out our offerings for compute, storage, networking, and managed databases.
Tutorial Series: How To Style HTML with CSS
Cascading Style Sheets (CSS) is the styling language of the web, and is used to design and control the visual representation of Hypertext Markup Language (HTML) on a web page. With CSS, you can manage everything from font to layout to animations on your web page. This series will lead the reader through CSS exercises that demonstrate the building blocks of the language and the fundamental design principles needed to make a user-friendly web site.
Browse Series: 20 tutorials
About the author(s)
I code, design, write, and teach and I’m an IAAP Certified Web Accessibility Specialist.
Former Senior Technical Editor at DigitalOcean, fiction writer and podcaster elsewhere, always searching for the next good nautical pun! Areas of expertise include Node.js, PostgreSQL, CSS, JavaScript.
Still looking for an answer?
This textbox defaults to using Markdown to format your answer.
You can type !ref in this text area to quickly search our full set of tutorials, documentation & marketplace offerings and insert the link!
 This work is licensed under a Creative Commons Attribution-NonCommercial- ShareAlike 4.0 International License.
Become a contributor for community
Get paid to write technical tutorials and select a tech-focused charity to receive a matching donation.

DigitalOcean Documentation
Full documentation for every DigitalOcean product.

Resources for startups and AI-native businesses
The Wave has everything you need to know about building a business, from raising funding to marketing your product.
The developer cloud
Scale up as you grow — whether you're running one virtual machine or ten thousand.

Start building today
From GPU-powered inference and Kubernetes to managed databases and storage, get everything you need to build, scale, and deploy intelligent applications.
