Developer

The author selected the Diversity in Tech Fund to receive a donation as part of the Write for DOnations program.
Introduction
Selectors are what web browsers use to find and apply specific styles to an element via CSS. You can apply these styles broadly with type selectors that select many elements of the same kind. In addition to targeting specific attributes of an element like id or class, it is possible to select an element based on its relationship or proximity to another element. For example, you can select an HTML element that follows a preceding element or the first element in a series.
In this tutorial, you will use several CSS-relationship-based approaches to select and style elements on an HTML page. You will create a page of content with different styling scenarios for each relationship selector. You will use the descendant combinator, child combinator, general sibling combinator, and adjacent sibling combinator, as well as the first-, last-, only-, and nth-child pseudo-class selectors. These selectors apply styles based on the relative conditions of surrounding elements, as opposed to the direct method of traditional selectors.
Prerequisites
- An understanding of CSS’s cascade and specificity features, which you can get by reading How To Apply CSS Styles to HTML with Cascade and Specificity.
- Knowledge of type selectors, combinator selectors, and selector groups, which you can find in How To Select HTML Elements to Style with CSS.
- An empty HTML file saved on your local machine as
index.htmlthat you can access from your text editor and web browser of choice. To get started, check out our How To Set Up Your HTML Project tutorial, and follow How To Use and Understand HTML Elements for instructions on how to view your HTML in your browser. If you’re new to HTML, try out the whole How To Build a Website with HTML series.
Setting Up the Initial HTML and CSS
To start, you will set up the HTML and CSS code that you will work on throughout the rest of the tutorial.
Begin by opening index.html in your text editor. Then, add the following HTML to the file:
<!doctype html>
<html>
  <head>
  </head>
  <body>
  </body>
</html>
Next, go to the <head> tag and add a <meta> tag to define the character set for the HTML file. Then set the title of the page, add a <meta> tag defining how mobile devices should render the page, and finally load the CSS file that you will make later with a <link> tag. These additions are highlighted in the following code block. You will encounter this highlighting method throughout the tutorial as code is added and changed:
<!doctype html>
<html>
  <head>
    <meta charset="utf-8">
    <meta name="viewport" content="width=device-width, initial-scale=1">
    <title>Relationship Selectors</title>
    <link rel="stylesheet" href="styles.css">
  </head>
  <body>
  </body>
</html>
After adding the <head> content, move to the <body> element, where you will add content for a page talking about CSS selectors. Add the highlighted section from this code block to your index.html file in your text editor:
<!doctype html>
<html>
  <head>
    <meta charset="utf-8">
    <meta name="viewport" content="width=device-width, initial-scale=1">
    <title>Relationship Selectors</title>
    <link rel="stylesheet" href="styles.css" />
  </head>
  <body>
    <h1>Relationship Selectors</h1>
    <main class="content-width">
    </main>
  </body>
</html>
Be sure to save these additions to index.html. The <h1> element displays the title of the page. The <main> element with a class attribute of content-width will contain the contents of the page, which you will add throughout the tutorial.
Next, create a new file called styles.css in the same directory as your index.html file, then open the new file in your text editor. This file will load the styles that the browser will then apply to the content of index.html. Add the following CSS code to your styles.css file:
body {
  font-family: system-ui, sans-serif;
  color: #333;
}

.content-width {
  width: 90%;
  margin: 2rem auto;
  max-width: 70ch;
}

section{
  margin: 4rem 0;
}

h1 {
  text-align: center;
}

h2 {
  color: mediumblue;
}
In this code, the body type selector defines new defaults for the font-family and color values on the page. The .content-width class selector is set up to be 90% of the page’s width and to grow to a maximum width of 70 character widths of the current font-size. 70 characters is the ideal maximum length of a line of text. The margin on the .content-width property keeps space above and below the element and keeps the container horizontally centered. There will be several <section> elements on this page, so the section type selector applies a margin to give ample space between each grouping. Lastly, the h1 and h2 type selectors set the <h1> content to be centered and the <h2> content to have a color of mediumblue.
In this section you, set up the starting points for your HTML and CSS files. In the next section, you will add some more content to index.html, then use the descendant combinator to apply styles with CSS.
Descendant Combinators
When working with relationship-based selectors, you will come across familial terminology, such as parent, child, ancestor, and in this case, descendant. The descendant combinator is a space-separated list of selectors that matches the HTML structure in order to apply styles to elements that have a particular ancestor. The last selector in the list is the one that receives the styles, and is the descendant of the previous selectors in the list.
The descendant combinator is the quickest way to scope a style. Scoping is the method of providing additional details to increase the specificity of a selector. The descendant combinator aids scoping by prepending the selector with an ancestor selector. For example, the a type selector will get all the <a> tags on a page, but the header a descendant selector will select only the <a> tags inside of a <header> element.
To begin using the descendant combinator, open index.html in your text editor. Create a <section> element with a class attribute of descendant. Inside the <section> element, add an <h2> element containing Descendant Combinator Selector, then add two <p> elements and fill them with content from Cupcake Ipsum. Wrap the second <p> element in a <blockquote>. The highlighted HTML in the following code block demonstrates how this will be set up:
...
<main class="content-width">
<section class="descendant">
<h2>Descendant Combinator Selector</h2>
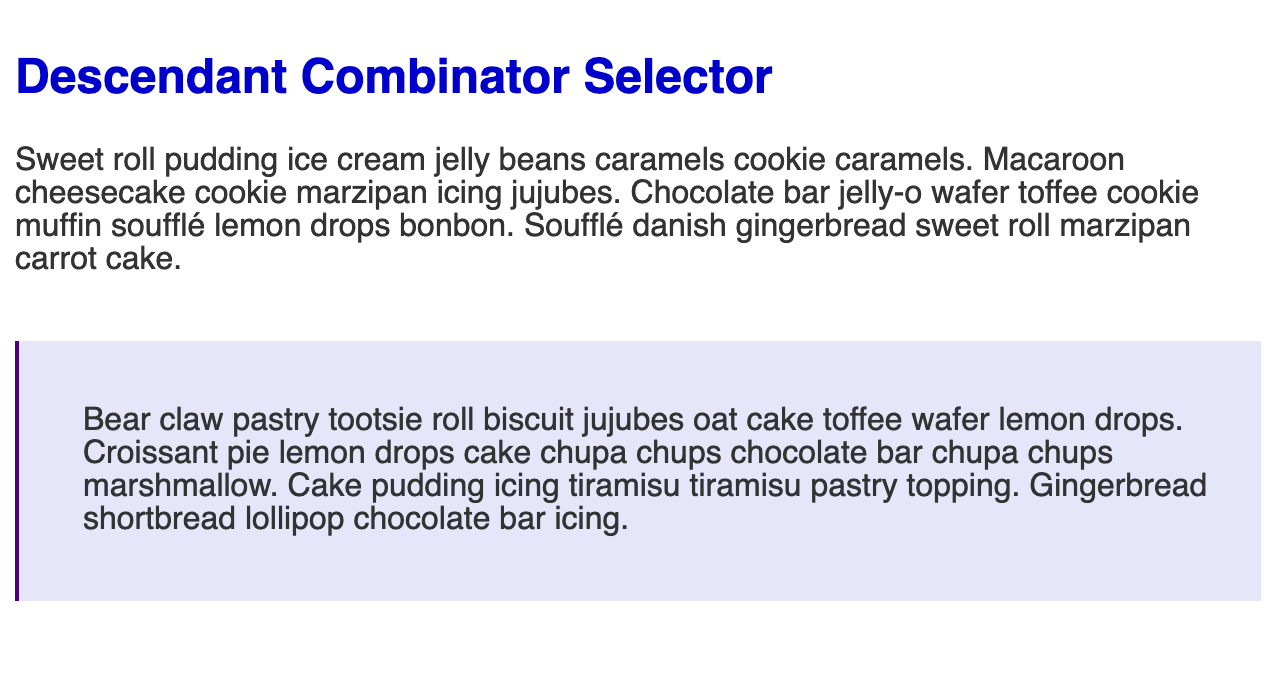
<p>Sweet roll pudding ice cream jelly beans caramels cookie caramels. Macaroon cheesecake cookie marzipan icing jujubes. Chocolate bar jelly-o wafer toffee cookie muffin soufflé lemon drops bonbon. Soufflé danish gingerbread sweet roll marzipan carrot cake.</p>
<blockquote>
<p>Bear claw pastry tootsie roll biscuit jujubes oat cake toffee wafer lemon drops. Croissant pie lemon drops cake chupa chups chocolate bar chupa chups marshmallow. Cake pudding icing tiramisu tiramisu pastry topping. Gingerbread shortbread lollipop chocolate bar icing.</p>
</blockquote>
</section>
</main>
...
Save your changes to index.html then open styles.css in your text editor. Add a .descendant class selector followed by a space, then a blockquote type selector. This will create a selector that only applies styles to a blockquote element that is inside an element with a class attribute containing descendant. The highlighted CSS in the following code block demonstrates this selector with styles for the blockquote element:
...
h2 {
  color: mediumblue;
}

.descendant blockquote {
  margin: 2rem 0;
  padding: 1rem 1rem 1rem 2rem;
  border-left: 0.125rem indigo solid;
  background-color: lavender;
}
Save your changes to styles.css and open index.html in your browser. The properties used on this blockquote element provide additional spacing above and below with the margin property. Then, the padding property gives the content space inside the container. Lastly, the container is visually defined by a combination of the border-left property creating a solid indigo line and a lavender backdrop applied with the background-color property. The following screenshot shows how this code will render in the browser:
You can also apply descendant combinator selectors to a descendant element regardless of how deep in the HTML that element is relative to the ancestor selector. Similar to how the previous code set styles to the <blockquote> element inside of the .descendant class selector, you will next apply styles to all <p> elements, regardless of the element they are contained in.
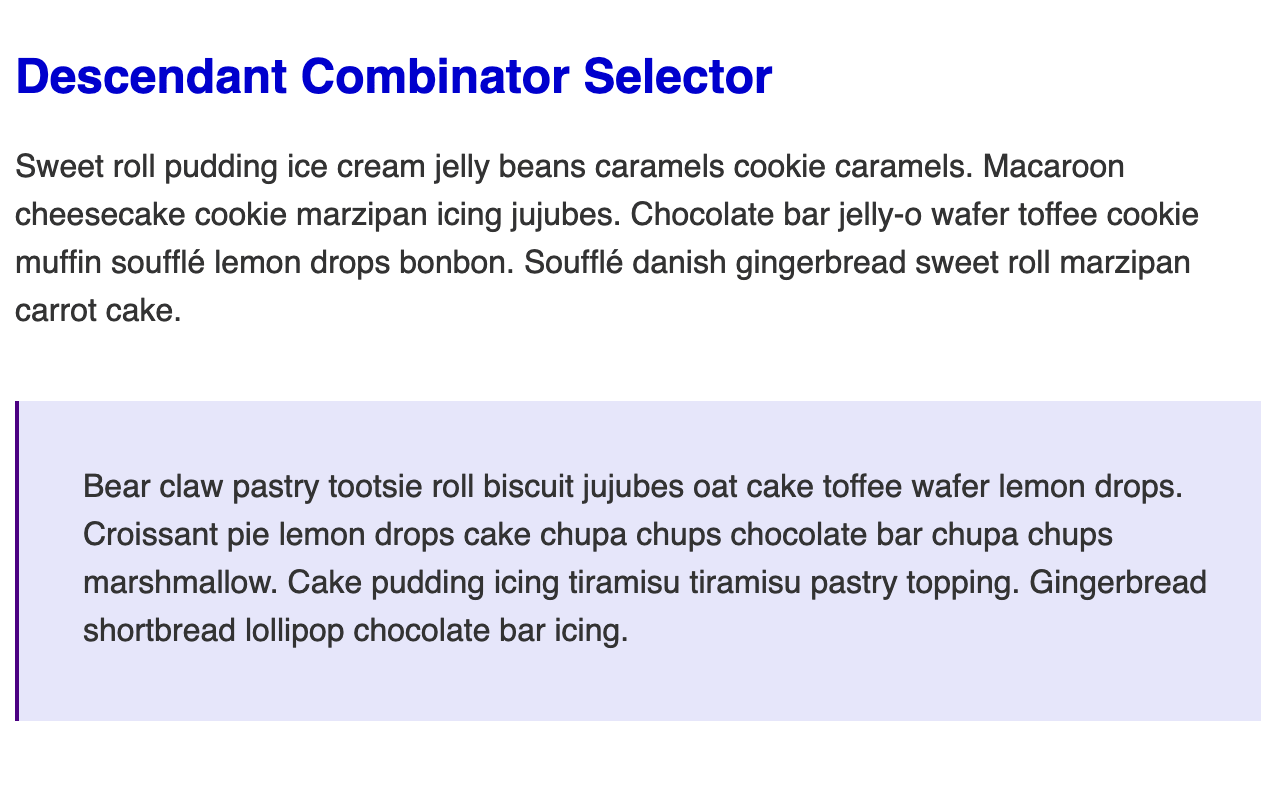
Return to your styles.css file in your text editor. Then, add a new descendant combinator selector for a p element selector with an ancestor of .descendant. Inside the selector block, set the line-height property to a value of 1.5. The highlighted CSS in the following code block shows how this will look:
...
.descendant blockquote {
  margin: 2rem 0;
  padding: 1rem 1rem 1rem 2rem;
  border-left: 0.125rem indigo solid;
  background-color: lavender;
}

.descendant p {
  line-height: 1.5;
}
Save your changes to styles.css and open index.html in your browser. The lines of text for both <p> elements are now larger, despite one of those <p> elements being inside the <blockquote> element. The following image illustrates how this will render in the browser:
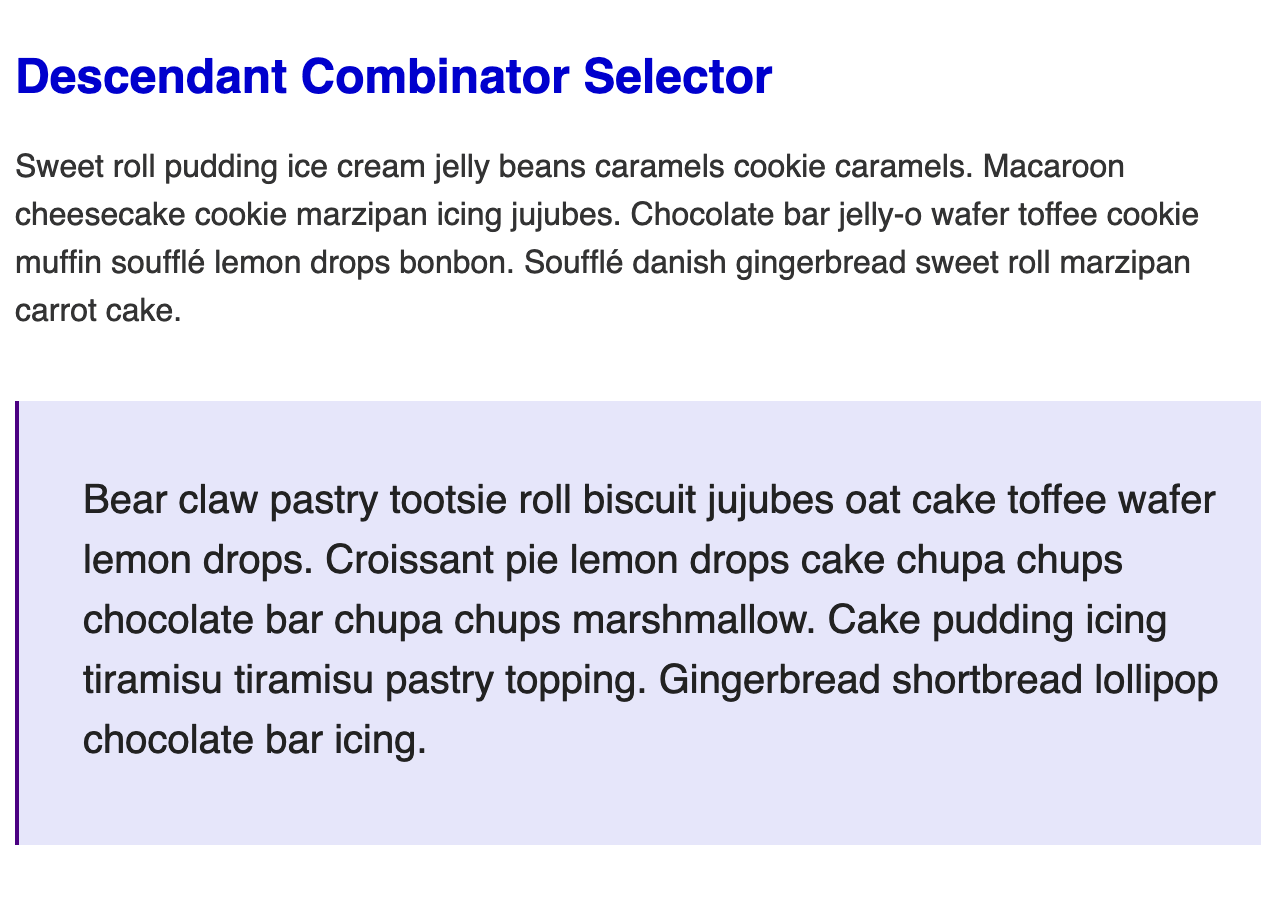
Finally, return to your styles.css file in your text editor. You will create a new descendant selector to apply styles directly to the <p> element inside the <blockquote> element. Start by writing out .descendant blockquote p, which will tell the browser to find the <p> elements on the page that is somewhere inside a <blockquote> element, which in turn is inside an element with a class attribute of descendant. Then in the selector block, add a font-size property set to 1.25rem and a color property with #222 as the value. The highlighted CSS in the following code block demonstrates the necessary structure:
...
.descendant p {
  line-height: 1.5;
}

.descendant blockquote p {
  font-size: 1.25rem;
  color: #222;
}
Save your changes to styles.css and open index.html in your browser. The font-size of the <p> element’s content inside the <blockquote> will now be much larger and have a slightly softer gray color, as shown in the following image:
In this section, you used the descendant combinator selector to scope styles to elements that are found inside of another element to apply styles. In the next section, you will use the child combinator selector to select only the first-level children of an element.
Child Combinator Selectors
When scoping styles, there are times that you don’t want all elements within an ancestor selector, just those immediately inside the element. For example, you might want to style all the top-level links in a navigation bar, and not any links that are contained in any sub navigation elements. For these moments when only the children of a given parent need to be styled, you can use the child combinator selector.
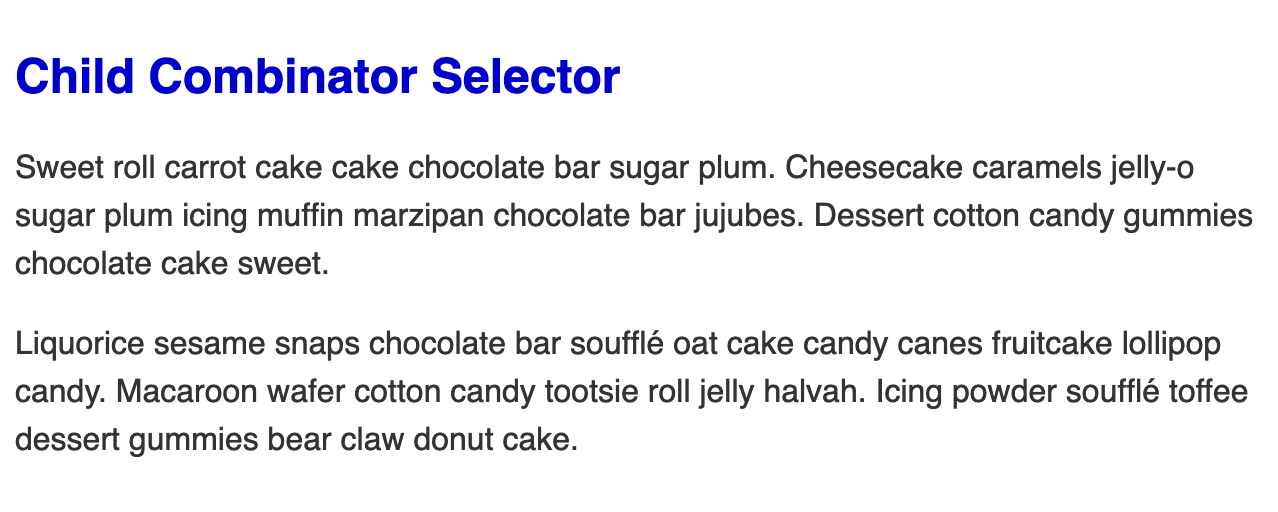
Before working with this new selector, return to index.html in your text editor and add the highlighted HTML from the following code block inside the <main> element and after the previous <section> element:
...
<main class="content-width">
  ...
  <section class="child">
    <h2>Child Combinator Selector</h2>

    <p>Sweet roll carrot cake cake chocolate bar sugar plum. Cheesecake caramels jelly-o sugar plum icing muffin marzipan chocolate bar jujubes. Dessert cotton candy gummies chocolate cake sweet.</p>

    <div>
      <p>Liquorice sesame snaps chocolate bar soufflé oat cake candy canes fruitcake lollipop candy. Macaroon wafer cotton candy tootsie roll jelly halvah. Icing powder soufflé toffee dessert gummies bear claw donut cake.</p>
    </div>
  </section>
</main>
...
Save your changes to index.html then open styles.css in your text editor.
First, you will extend the .descendant p selector with a line-height property to include the <p> elements found inside the <section> with the child class. You will accomplish by using a general combinator, which allows multiple selectors to share the same styles. A comma is needed between each selector to apply the styles. Add a comma after the .descendant p selector, then add a .child p descendant combinator, as demonstrated in the following highlighted code:
...
.descendant p,
.child p {
  line-height: 1.5;
}
...
Save your changes to styles.css and open index.html in your browser. The content in the new section will now have a larger space between each line of text. The following image depicts how this will appear in the browser:
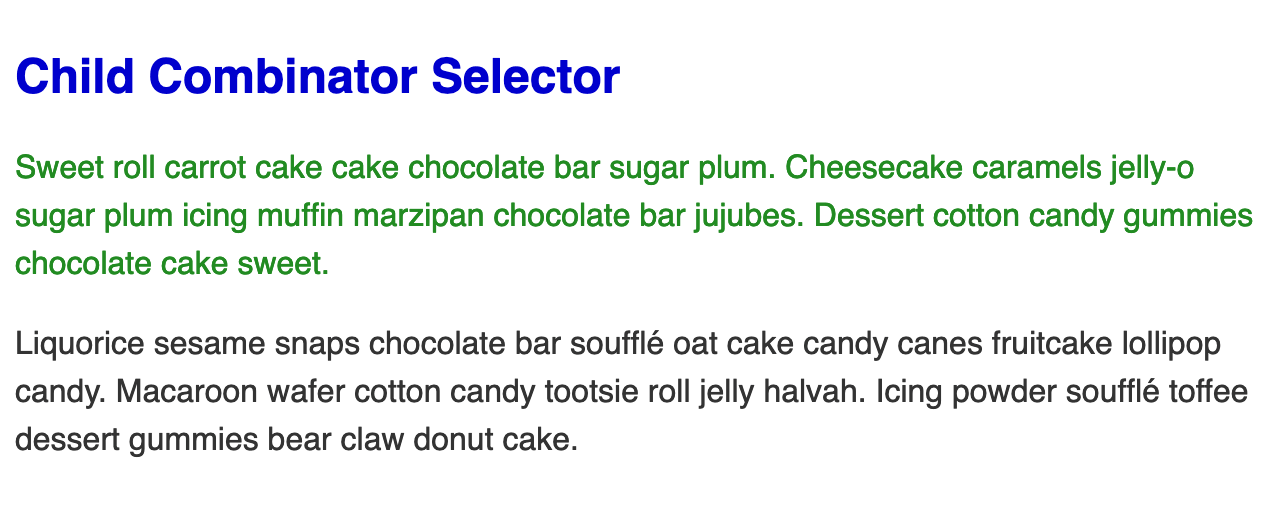
Next, to select only the <p> element, which is the direct child of the <section class="child"> element, you will use the child combinator selector. This is constructed by writing the parent selector followed by the greater-than sign (>) and then the child selector.
Return to styles.css in your text editor and go to the end of the file. Create a child combinator selector by setting the parent selector as .child and the child selector as p. Then inside the selector block set the color property to a named value of forestgreen. The highlighted CSS in the following code block shows how this is written:
...
.descendant blockquote p {
  font-size: 1.25rem;
  color: #222;
}

.child > p {
  color: forestgreen;
}
Save your changes to styles.css and open index.html in your browser. Only the first <p> element has text set to the forestgreen color. The <div> element wrapping the second <p> element changes the relationship to the <section> element from a child to a grandchild. Because of this, that <p> element is invalid for the child combinator selector. The following image illustrates how this is rendered in the browser:
In this section, you used the child combinator selector to select and apply styles to the immediate children of a parent element. In the next section, you will work with relationships of sibling elements to apply styles to elements when they have a common parent.
Sibling Combinator Selectors
The general sibling combinator provides a way to scope styling to elements that come after a specific element and have the same parent element, but which may not be next to each other. Often this will occur when the HTML is generally known but not predictable, such as dynamically generated content.
First, you will need HTML siblings to use the selector. Return to index.html in your text editor. Then, add the highlighted HTML from the following code block before the closing </main> tag:
...
<main class="content-width">
  ...
  <section class="general-sibling">
    <h2>General Sibling Combinator Selector</h2>

    <p>Donut dessert jelly-o pie gingerbread jelly-o gummies biscuit gummies. Fruitcake jelly bonbon croissant carrot cake gummies. Candy canes apple pie liquorice gummi bears shortbread lemon drops jelly-o marzipan halvah. Jujubes chocolate bar tart bear claw sweet.</p>

    <div>
      <p>Carrot cake soufflé oat cake gummies marzipan sugar plum pastry jujubes. Tootsie roll pastry danish cake cake cake jelly sesame snaps. Donut pastry brownie brownie pie croissant</p>
    </div>

    <p>Gummies apple pie gingerbread cheesecake chupa chups cookie jelly beans. Tootsie roll dessert liquorice jujubes apple pie biscuit gummies biscuit jelly-o. Cake candy canes danish sugar plum biscuit lemon drops icing.</p>

    <p>Jelly beans candy candy cookie cotton candy. Liquorice gummies biscuit dragée sesame snaps oat cake tiramisu. Powder sweet dessert chupa chups ice cream sweet.</p>
  </section>
</main>
...
Save your changes to index.html, then open styles.css in your text editor.
Next, you will extend the grouping selector with a line-height property to include the <p> elements found inside the <section> with the general-sibling class. Again, this is accomplished by adding a comma after the .child p selector and adding a .general-sibling p descendant combinator, as shown in the following highlighted CSS:
...
.descendant p,
.child p,
.general-sibling p {
  line-height: 1.5;
}
...
Save your changes to styles.css and refresh index.html in your browser. The content in the new section will now have a larger space between each line of text. The following image depicts how this will appear in the browser:

Next, you will write the styles for the sibling <p> elements that come after another <p> element of the same parent. This is done by writing a selector, followed by a tilde (~), followed by the selector of the sibling you wish to style.
Return to styles.css in your text editor and add a new selector for .general-sibling p. This will find the <p> elements with a parent that has a class attribute with general-sibling. Then add the tilde symbol followed by a p element selector. Inside the selector block, set the color property to the named value of lightseagreen, as shown in the highlighted CSS of the following code block:
...
.child > p {
  color: forestgreen;
}

.general-sibling p ~ p {
  color: lightseagreen;
}
Save your changes to styles.css and return to your browser to refresh index.html. The following image showcases how this code will render in the browser:
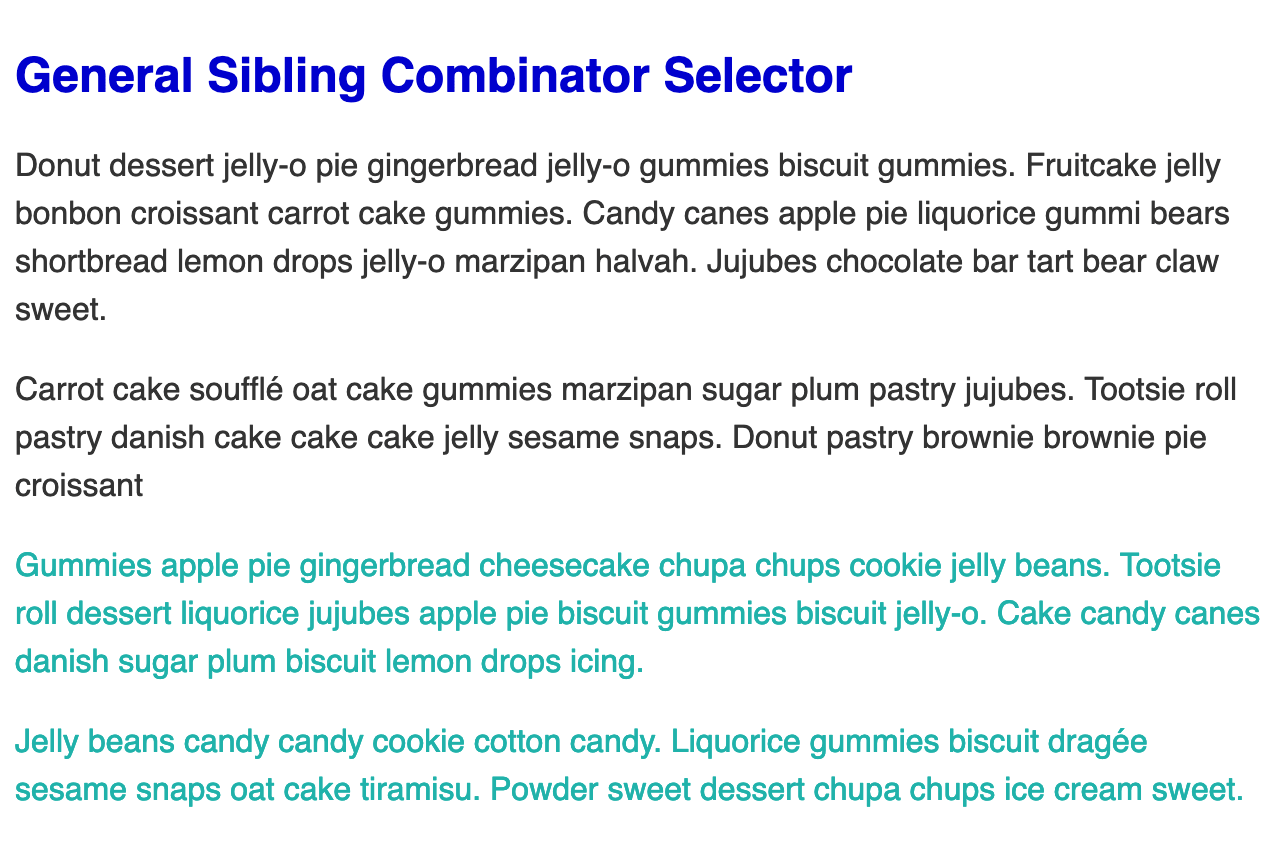
Only the last two of the four paragraphs will have the lightseagreen color. This is because the first paragraph is the initializing selector, the .general-sibling p part of the combinator, meaning the subsequent <p> elements will receive the styling. The second paragraph of text is inside a <p> element, but because it is nested inside a <div> element it is no longer a sibling of the initializing selector.
Sibling selectors do not have to be of the same element type. To demonstrate this, return to the styles.css file in your text editor and change the first p in the selector to a div instead, as highlighted in the following code block:
...
.general-sibling div ~ p {
  color: lightseagreen;
}
Save that small change to styles.css and refresh index.html in your browser. Visually nothing changed, but the way the styles are applied by the browser did change. The elements receiving the styles must be <p> elements that are sibling subsequents to the selector before the tilde. Since the order of the HTML is <p />, <div />, <p />, then <p />, the results of both general sibling selectors are the same. The first <p> element does not receive the styles because, though it is a sibling, it comes before the initializing .general-sibling div selector.
In this section, you used the general sibling combinator to apply styles to any sibling elements of a certain kind. In the next section, you will use the adjacent sibling combinator to apply styles to the sibling immediately after an element.
Adjacent Sibling Combinator Selectors
If you only need to apply a style when two particular elements are next to each other in the HTML, the adjacent sibling combinator will help select the appropriate element. This can be useful when applying additional space between a heading text and a body text, or to add a divider between elements.
To start working with the adjacent sibling combinator, first open index.html in your text editor. Then, inside the <main> element, add the highlighted HTML from the following code block:
...
<main class="content-width">
  ...
  <section class="adjacent-sibling">
    <h2>Adjacent Sibling Combinator Selector</h2>

    <p>Donut dessert jelly-o pie gingerbread jelly-o gummies biscuit gummies. Fruitcake jelly bonbon croissant carrot cake gummies. Candy canes apple pie liquorice gummi bears shortbread lemon drops jelly-o marzipan halvah. Jujubes chocolate bar tart bear claw sweet.</p>

    <div>
      <p>Carrot cake soufflé oat cake gummies marzipan sugar plum pastry jujubes. Tootsie roll pastry danish cake cake cake jelly sesame snaps. Donut pastry brownie brownie pie croissant</p>
    </div>

    <p>Gummies apple pie gingerbread cheesecake chupa chups cookie jelly beans. Tootsie roll dessert liquorice jujubes apple pie biscuit gummies biscuit jelly-o. Cake candy canes danish sugar plum biscuit lemon drops icing.</p>

    <p>Jelly beans candy candy cookie cotton candy. Liquorice gummies biscuit dragée sesame snaps oat cake tiramisu. Powder sweet dessert chupa chups ice cream sweet.</p>
  </section>
</main>
Save your changes to index.html, then open styles.css in your text editor. Extend the selector grouping of the line-height with .adjacent-sibling p, as highlighted in the following code block:
...
.descendant p,
.child p,
.general-sibling p,
.adjacent-sibling p {
  line-height: 1.5;
}
...
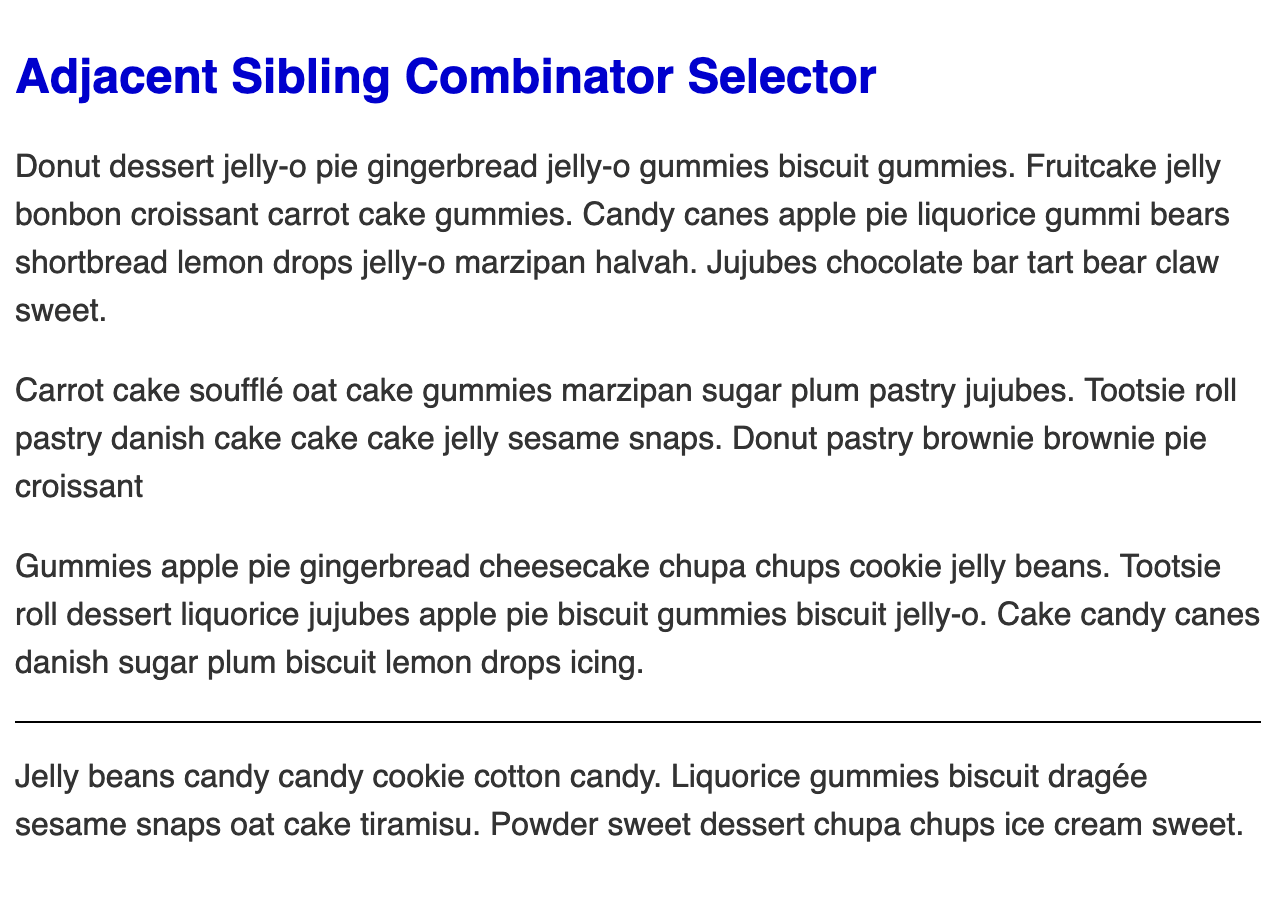
Next, go to the last line of the styles.css file. Here, you will write an adjacent sibling combinator selector to apply a top border and extra padding to a <p> element that is preceded by another <p> element. The highlighted CSS in the following code block displays how this is written:
...
.general-sibling div ~ p {
  color: lightseagreen;
}

.adjacent-sibling p + p {
  border-top: 1px solid black;
  padding-top: 1em;
}
Since this style should only be applied to a <p> element inside the <section class="adjacent-sibling"> element, the first selector must use a descendant combinator. The second element in the selector only needs to use an element selector, since that is the adjacent element to the sibling.
Note: It is important to remember when working with the sibling selectors that the last selector in the sequence is the element that is selected. Let’s say an adjacent sibling combinator was written as .adjacent-sibling p + .adjacent-sibling p. The intent of this code may be to select the <p> after a <p> inside an ancestor of .adjacent-sibling. But instead, this adjacent sibling selector will try to target the <p> inside an ancestor of .adjacent-sibling that comes immediately after a <p> sibling, which in turn is a descendant of another element with a class of adjacent-sibling.
Save your changes to styles.css and refresh index.html in your browser. The border will be rendered above the last paragraph, since this is where a <p> is next to a <p>. The extra padding on top visually compensates for the margin so there is equal spacing above and below the line, as shown in the following image:
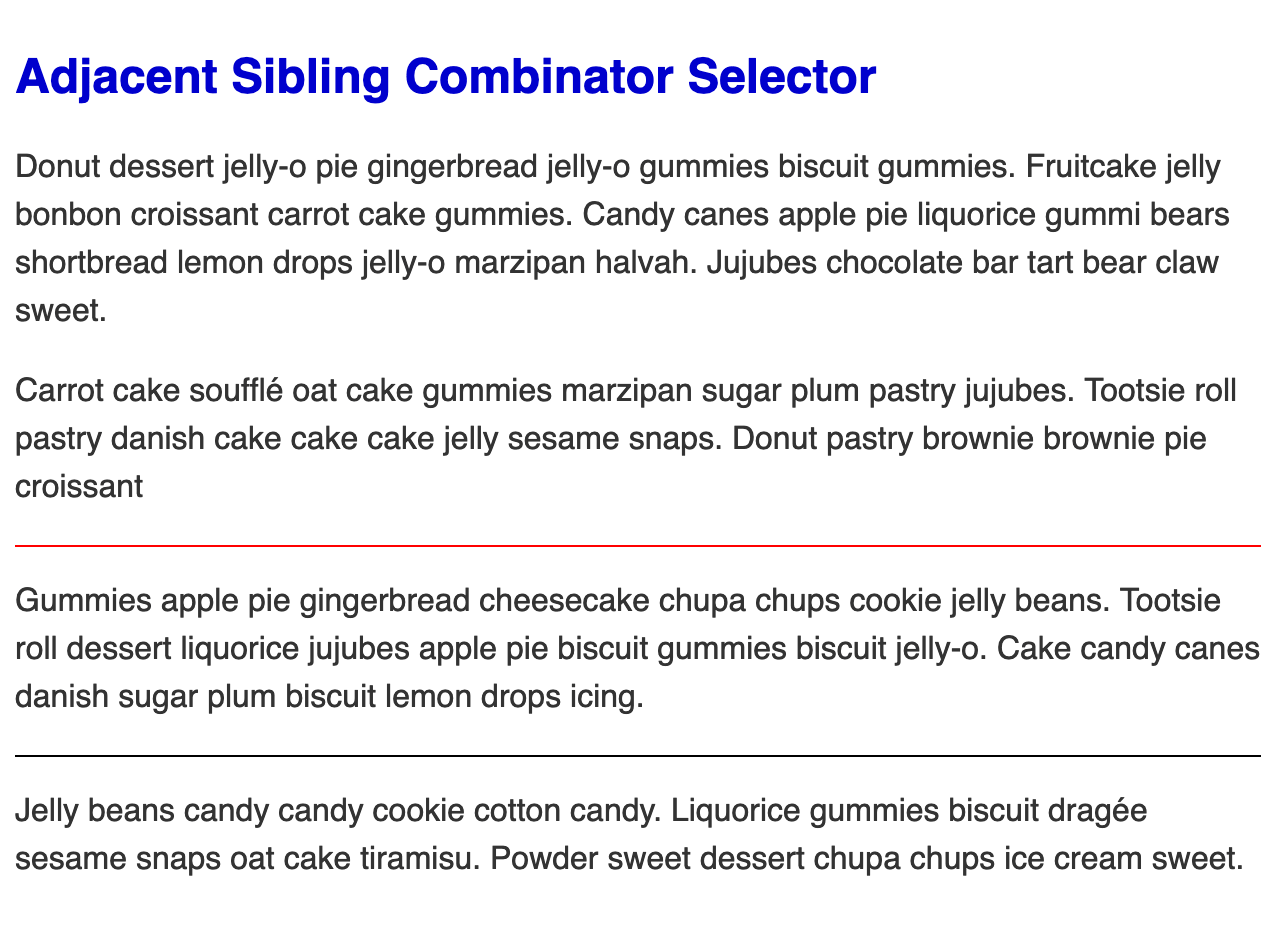
This selector is not limited to like siblings; it can be a sibling selector of any kind. Return to styles.css and create a new adjacent sibling selector to add a red border between the <div> element and the adjacent <p> element, along with some extra top padding. The highlighted CSS in the following code block demonstrates how this will be set up:
...
.adjacent-sibling p + p {
  border-top: 1px solid black;
  padding-top: 1em;
}

.adjacent-sibling div + p {
  border-top: 1px solid red;
  padding-top: 1em;
}
Save your changes to styles.css and open index.html in your browser. There is now a red line between the second and third paragraphs, since this is where a <div> element is next to a <p> element. The following image shows how this will be rendered in the browser:
In this section, you used the adjacent sibling combinator to apply styles to the element immediately following a sibling element. In the next section, you will use the first child pseudo-class to apply styles to the first element of a parent.
first-child Pseudo-Class Selector
first-child Pseudo-Class SelectorWhen it comes to working with specific child elements, CSS provides pseudo-class selectors to refine the selection process. A pseudo-class selector is a state related to the condition of the selector. In this section, you will target elements that are the first child, meaning the first nested element, of a specified or unspecified parent element.
To begin, open index.html in your text editor. Then, inside the <main> element, add the highlighted HTML from the following code block:
...
<main class="content-width">
  ...
  <section>
    <h2>First and Last Child Pseudo-Class Selector</h2>
    <ul>
      <li>Sugar plum gingerbread</li>
      <li>Sesame snaps sweet ice cream</li>
      <li>Jelly beans macaroon dessert</li>
      <li>Chocolate cheesecake</li>
      <li>Sweet roll pastry carrot cake</li>
      <li>Sugar plum tart cake</li>
      <li>Pudding soufflé</li>
      <li>Marshmallow oat cake</li>
    </ul>
  </section>
</main>
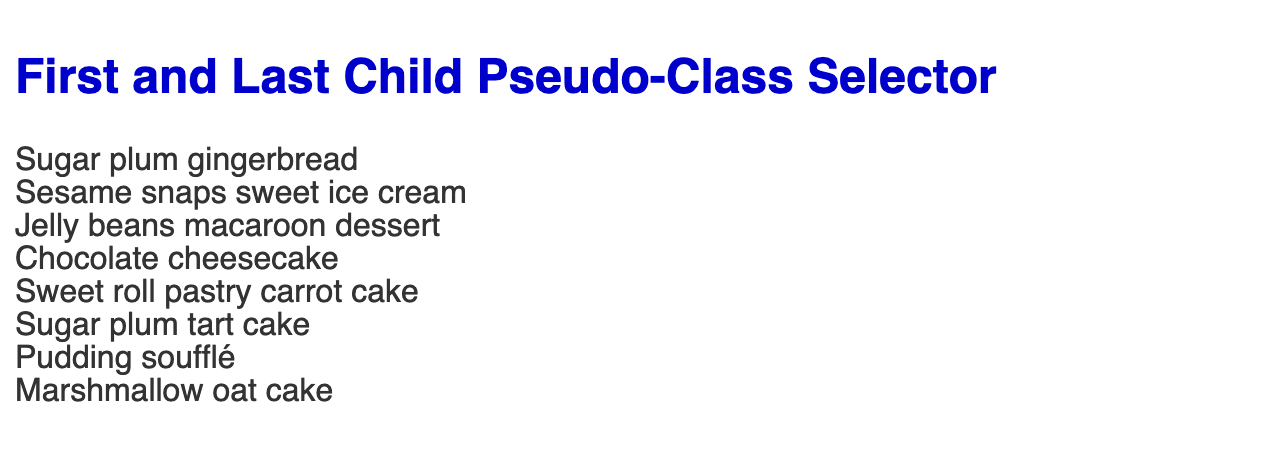
This HTML creates an unordered list, as defined by the <ul> element, with eight list items (<li>) nested inside. This will create a bulleted list of content by default in the browser.
Save these changes to index.html then open styles.css in your text editor.
In your CSS file, add a ul element selector. This section will not require any class-related scoping. Then inside the selector block add the property list-style with a value of none, which will remove the bulleted list styling. Set the margin property to 1rem 0 and the padding property to 0, which will override the browser default styles. The highlighted CSS in the following code block demonstrates how to set this up:
...
.adjacent-sibling div + p {
  border-top: 1px solid red;
  padding-top: 1em;
}

ul {
  list-style: none;
  margin: 1rem 0;
  padding: 0;
}
Save your changes to styles.css and open index.html in your browser. The unordered list will no longer have bullets and will be aligned with the heading text, as shown in the following image:
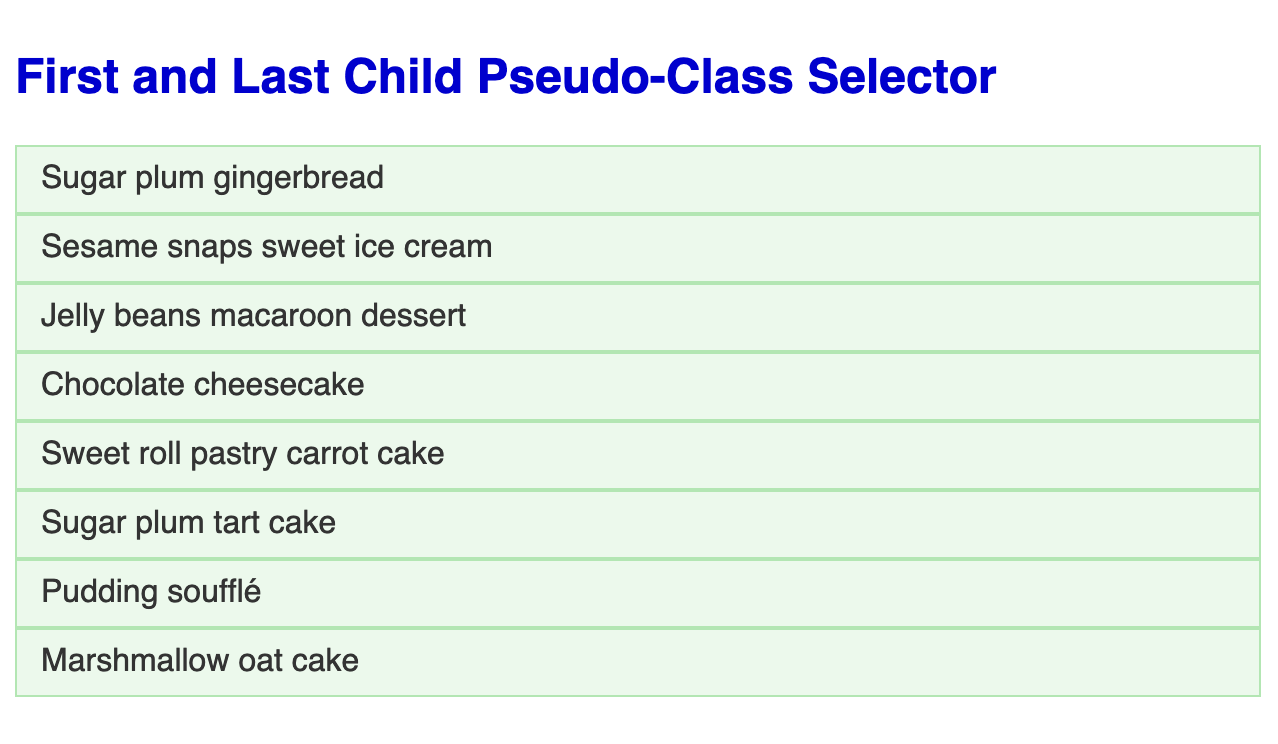
Next, to provide some default styling to the list items, create a li element selector. Apply a padding property in the selector block with a value of 0.5rem 0.75rem. Then, add a light green background-color property with hsl(120, 50%, 95%) as the value. Lastly, add a border property set to 1px and solid with a slightly darker green color using hsl(120, 50%, 80%), as highlighted in the following code block:
...
ul {
  list-style: none;
  margin: 1rem 0;
  padding: 0;
}

ul li {
  padding: 0.5rem 0.75rem;
  background-color: hsl(120, 50%, 95%);
  border: 1px solid hsl(120, 50%, 80%);
}
Save these changes to styles.css and open index.html in your browser. Each list item now has a light green background color with a darker green border, with text inset by the padding property. The following image shows how this will render in the browser:
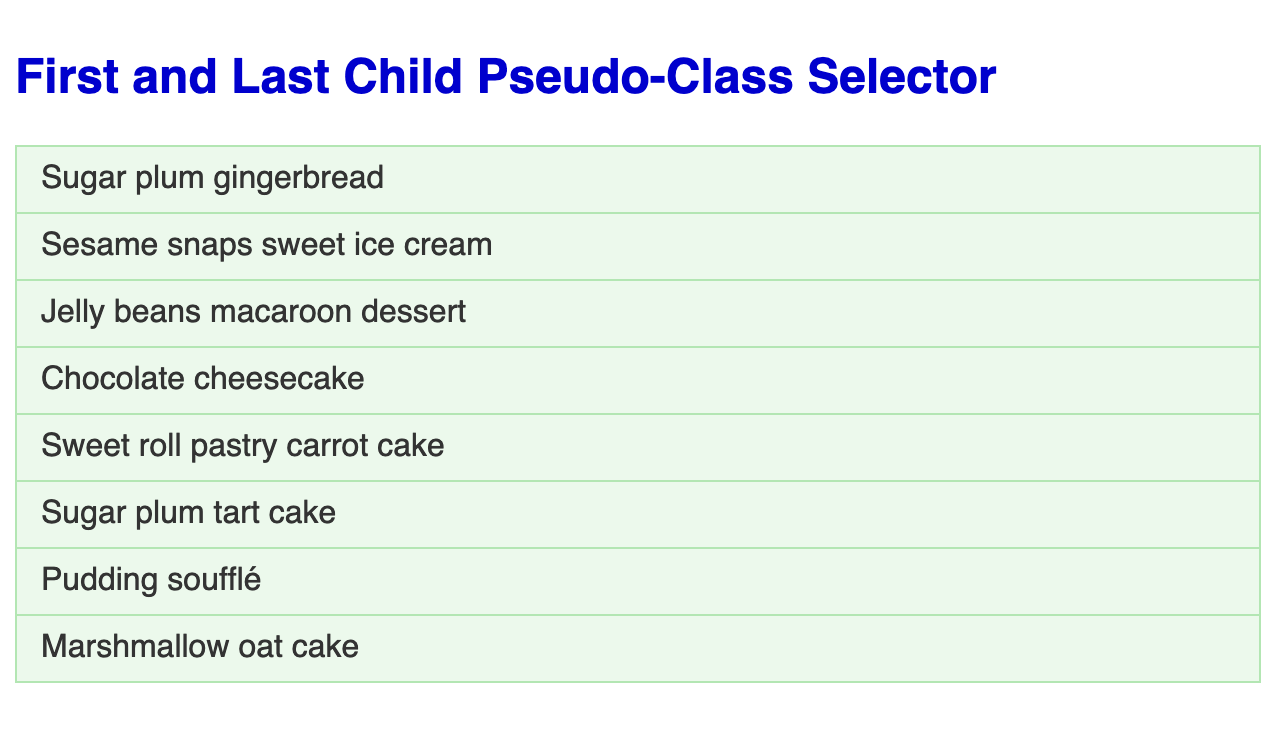
The top and bottom borders of the list items double up the thickness of the border between items, making the border thickness inconsistent. To address this situation, return to styles.css in your text editor. Then, add a new adjacent sibling combinator to select an <li> element that comes after an <li> element inside a <ul> element, as depicted in the following code block:
...
ul li {
  padding: 0.5rem 0.75rem;
  background-color: hsl(120, 50%, 95%);
  border: 1px solid hsl(120, 50%, 80%);
}

ul li + li {
  border-top: none;
}
Save that addition to styles.css and refresh index.html in your browser. The extra thick line between list items has been addressed by removing the border from the top of any list item that comes after another list item. The following image showcases how this will appear in the browser:
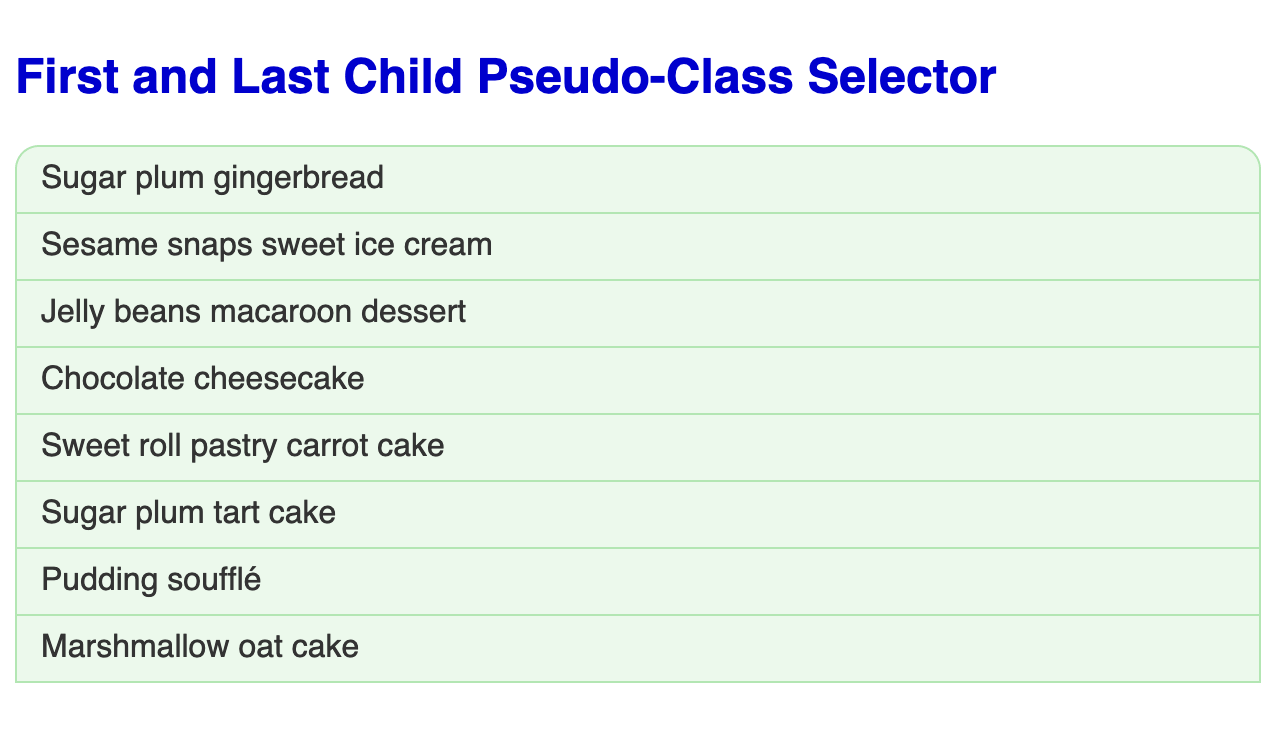
Now, return to styles.css to apply rounded corners to the top of the first list item. Since this needs to apply to only the first list item of an unordered list, you can use the child combinator selector. This will ensure that only the first direct child of the unordered list is selected. After the li element selector, append :first-child immediately without a space. For the rounded corner style on the top use the border-radius property with the value set to 0.75rem 0.75rem 0 0, which will add the rounded corners to the top left and top right corners. The highlighted CSS in the following code block shows how this is written:
...
ul li + li {
  border-top: none;
}

ul > li:first-child {
  border-radius: 0.75rem 0.75rem 0 0;
}
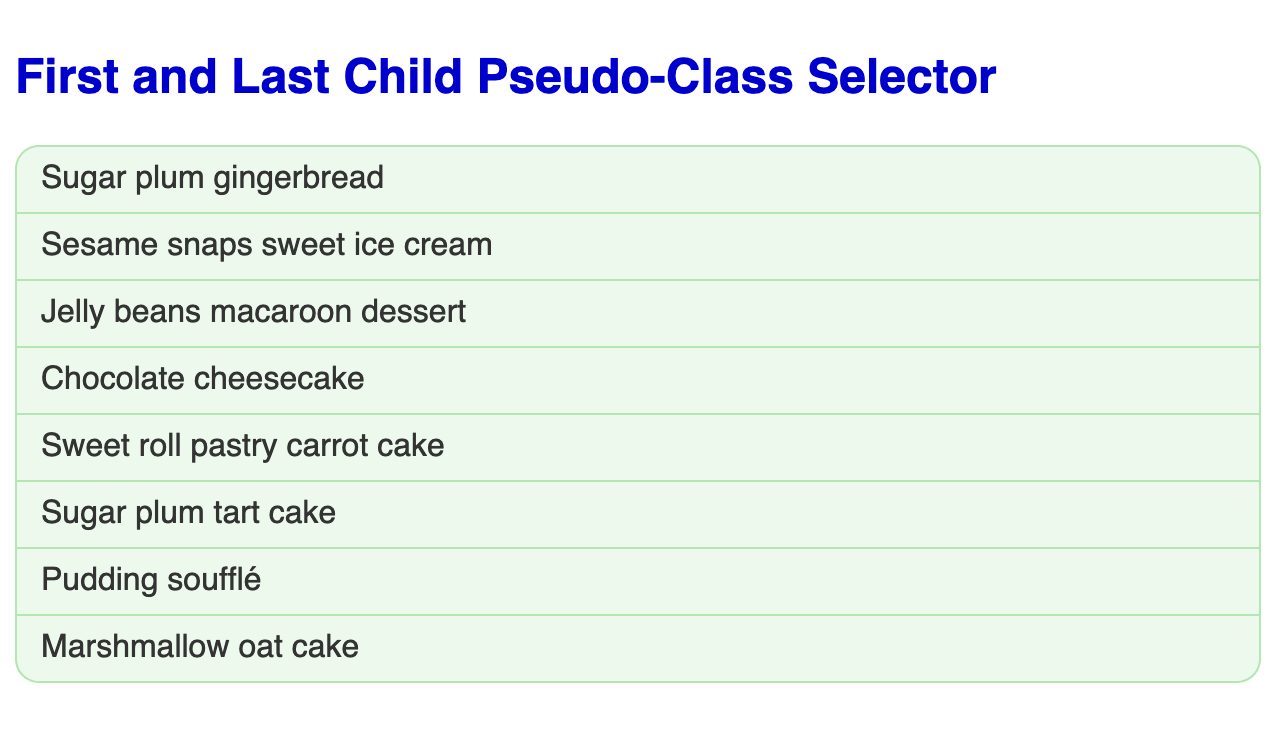
Save this change to styles.css and return to the browser to refresh index.html. The first item in the unordered list now has rounded corners on the top side of the element. The following image illustrates how this is rendered in the browser:
In this section, you created styles for a list and applied rounded corners to the first child <li> element of the <ul> parent element. In the next section, you will style the <li> at the end of the list with the last-child pseudo-class selector.
last-child Pseudo-Class Selector
last-child Pseudo-Class SelectorIn the same way that the first-child pseudo-class selector captures the first element of a parent, the last-child pseudo-class selector captures the last element of a parent element. In the previous section, you added rounded corners to the top of the first list item. In this section, you will add rounded corners to the bottom of the last item.
To begin, return to styles.css in your text editor. After the selector block for the :first-child, add a similarly formatted child combinator with a :last-child on the li element selector. In the selector block, add a border-radius property and then for the value use 0 0 0.75rem 0.75rem. This value will set the top values to 0 and the bottom right and bottom left curve values to 0.75rem. The highlighted CSS in the following code block show how this is composed:
...
ul > li:first-child {
  border-radius: 0.75rem 0.75rem 0 0;
}

ul > li:last-child {
  border-radius: 0 0 0.75rem 0.75rem;
}
Save your changes to styles.css and open index.html in your browser. The whole unordered list now looks like a box with equal rounded corners. The following images demonstrates how this is rendered in the browser:
In this section, you used the last-child pseudo-class to apply styles to the last <li> element in an unordered list. In the next, section you will write styles for when there is only one child element.
only-child Pseudo-Class Selector
only-child Pseudo-Class SelectorWhen applying styles to contents that can change or update, there may be instances when there is only one child element. In those instances, the element is both the first and the last child, which can cause the pseudo-classes to overwrite each other’s styles. For this scenario there is another pseudo-class selector specifically for the only child scenario.
To start, open index.html in your text editor and add the highlighted HTML from the following code block inside the <main> element and after the previous <section> element:
...
<main class="content-width">
  ...
  <section>
    <h2>Only Child Pseudo-Class Selector</h2>
    <ul>
      <li>Sweet roll pastry carrot cake</li>
    </ul>
  </section>
</main>
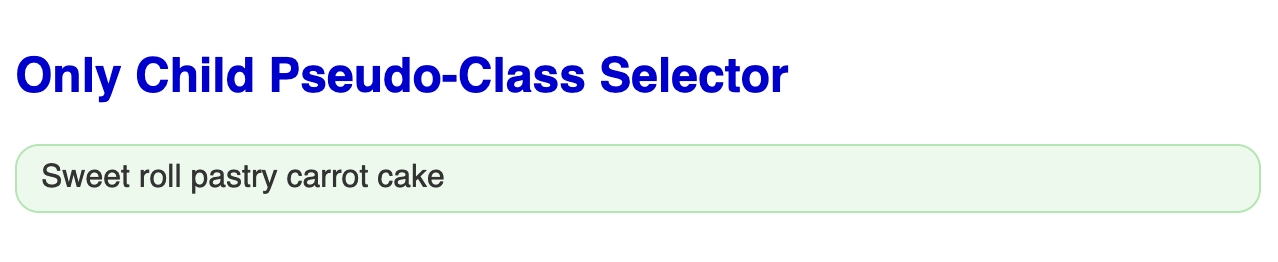
Save the changes to index.thml then return to your browser and refresh the page. The browser is applying the :first-child rounded corners on the top, but then the :last-child rounded corner property overwrites the first. This results in the single list item having sharp corners on top and rounded corners on the bottom. The following image shows the browser rendering of the code:

Return to your text editor and open styles.css. To address this scenario, you will use the :only-child pseudo-class selector on the li portion of a child combinator. Then, for the border-radius property, set the value to a single 0.75rem, which will apply the curve to all four corners. The highlighted CSS in the following code block shows how this is written:
...
ul > li:last-child {
  border-radius: 0 0  0.75rem 0.75rem;
}

ul > li:only-child {
  border-radius: 0.75rem;
}
Save these additions to styles.css, return to your browser, and refresh index.html. The single list item now has rounded corners on all sides, as shown in the following image:
In this section, you used the only-child pseudo-class selector to apply styles to a single <li> element in an unordered list. In the next section, you will use a pseudo-class selector to apply styles to any specific child element based on its numerical count within the parent.
nth-child Pseudo-Class Selector
nth-child Pseudo-Class SelectorThe nth-child pseudo-class selector allows you to set patterns for the selection of child elements. Other selectors use characteristics of an element, such as an attribute value, to find matching HTML elements. The nth-child pseudo-class selector targets HTML elements by a given numerical position within their parent. The term nth is a mathematical phrase referring to an unidentified number in a series. This particular selector enables the selection of even and odd numbered children and specific numbered elements in the sequence.
To set up the HTML for this selector, open index.html in your text editor. Then, add the highlighted portion from the following code block after the last </section> tag:
...
<main class="content-width">
  ...
  <section>
    <h2>Nth Child Pseudo-Class Selector</h2>
    <ol>
      <li>Caramel marshmallows</li>
      <li>Gummi bears</li>
      <li>pudding donut</li>
      <li>Chocolate bar</li>
      <li>Lemon drops</li>
      <li>Lollipop</li>
      <li>Danish soufflé</li>
    </ol>
  </section>
</main>
This code sets up an ordered list, as defined by the <ol> element. Unlike the <ul>, which marks each list item with a bullet point, the <ol> marks each item with a number in sequence.
Be sure to save those changes to index.html. Then return to styles.css in your text editor. You will set up some adjusted stlyes for the ordered list and the list items. Create an ol element selector with a padding property set to 0. Next, add a list-style-position property with a value of inside; this will move the generated number to be inside the <li> element’s box model. Lastly, create an ol li descendant combinator with a padding property set to 0.25rem. Reference the highlighted CSS of the following code block for how this is to be written:
...
ul > li:only-child {
  border-radius: 0.75rem;
}

ol {
  padding: 0;
  list-style-position: inside;
}

ol li {
  padding: 0.25rem;
}
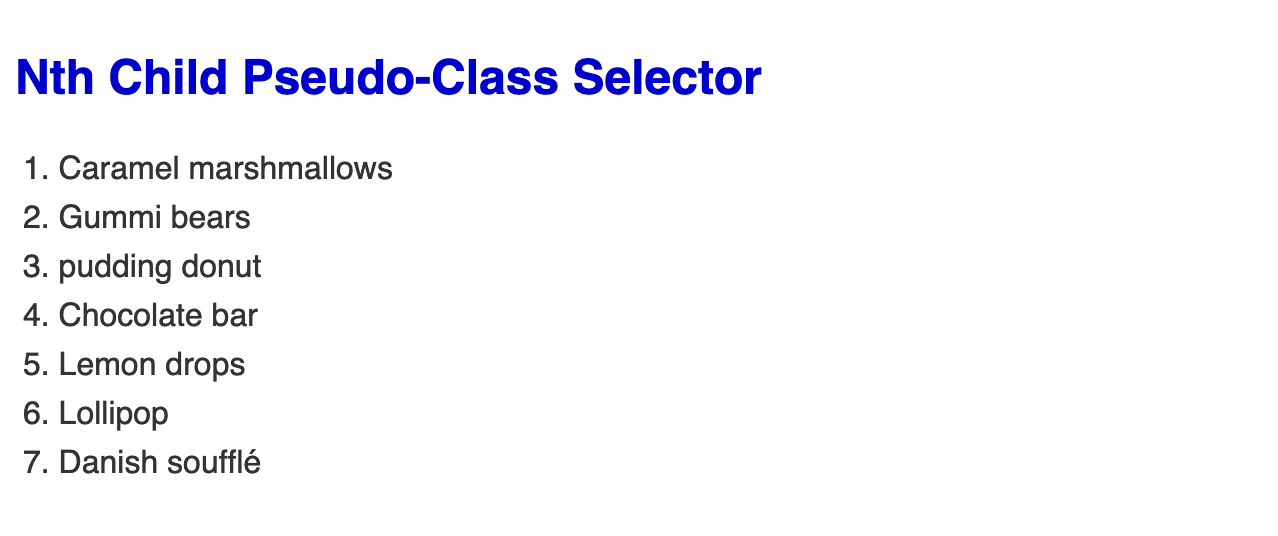
Save your changes to styles.css, then open a web browser and load your index.html file. The new section will be rendered with a list of seven items, each beginning with their numerical value in the sequence, as illustrated in the following image:
To begin working with the nth-child pseudo-class, return to styles.css in your text editor. The selector is set up like the previous pseudo-classes, but with a parenthesis at the end. This parenthesis contains the word value or numeric value to select the elements. To select all the even numbered list items, create a descendant combinator for ol and li. Then, add :nth-child() and inside the parenthesis add the word even. In the selector block, set the background-color property to aliceblue, as highlighted in the following code block:
...
ol li {
  padding: 0.25rem;
}

ol li:nth-child(even) {
  background-color: aliceblue;
}
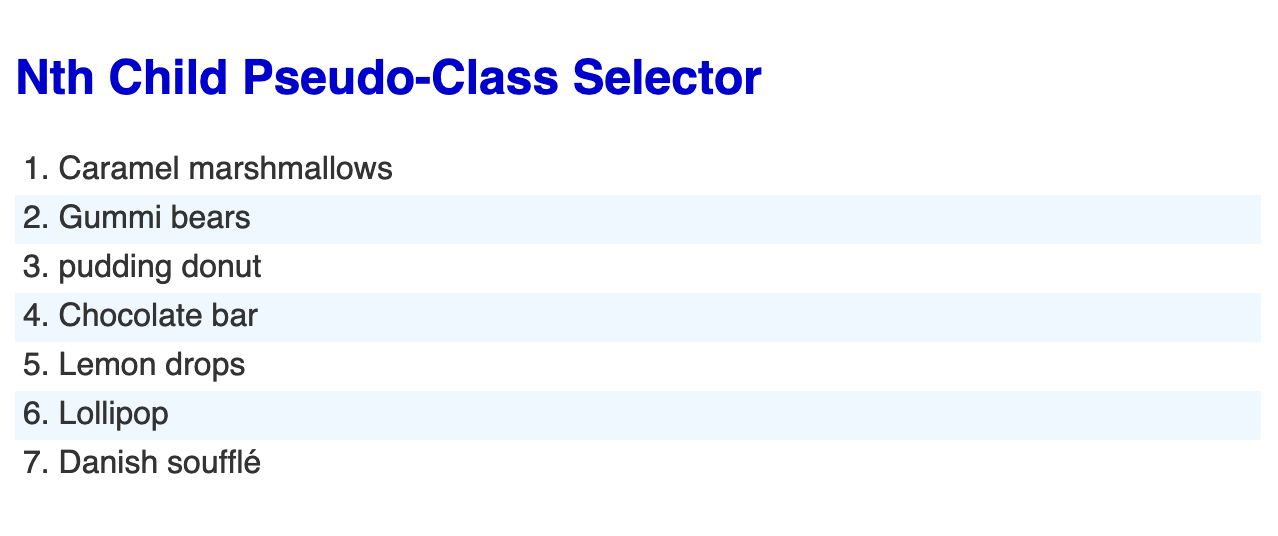
Save your changes to styles.css and open index.html in your browser. The second, fourth, and sixth items in the list now have a light blue background. This is how to create a style known as zebra stripes, which helps legibility with long lists of information. The following image demonstrates how this is rendered in the browser:
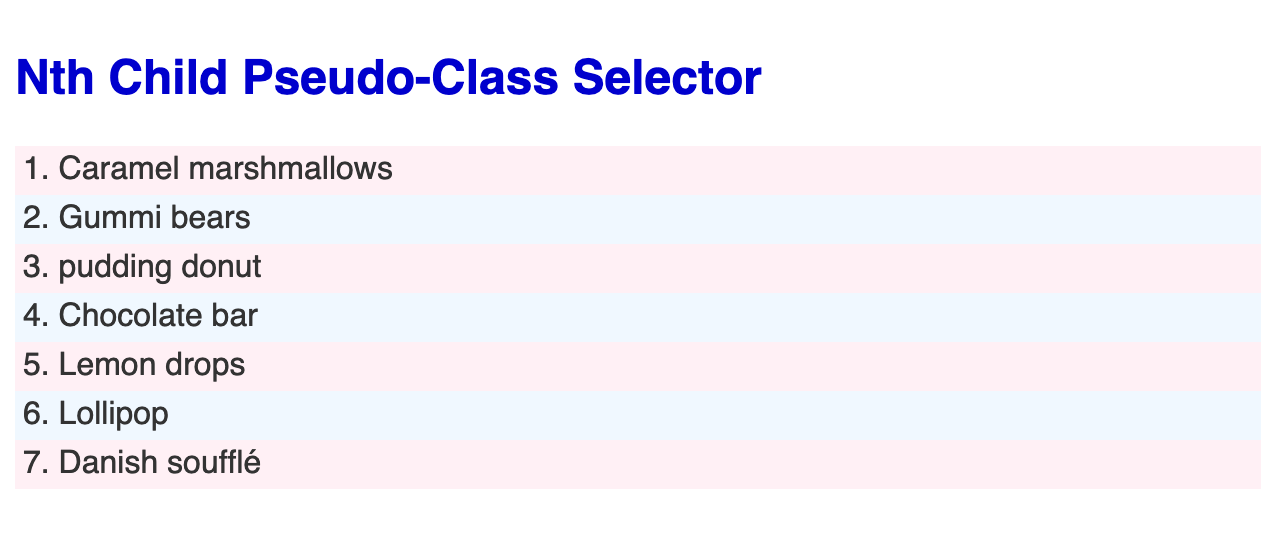
Next, return to styles.css in the text editor and do the same thing for the odd-numbered list items. Create another descendant combinator with the :nth-child() pseudo-class selector. This time, inside the parenthesis add the word value odd. Then in the selector block set the background-color property to lavenderblush, a light pink color. The following highlighted code shows how to set this up:
...
ol li:nth-child(even) {
  background-color: aliceblue;
}

ol li:nth-child(odd) {
  background-color: lavenderblush;
}
Save that change to styles.css and reload index.html in the browser. The list now alternates between lavenderblush and aliceblue, with the new color on the first, third, fifth, and seventh list items. The following image shows how this will appear:
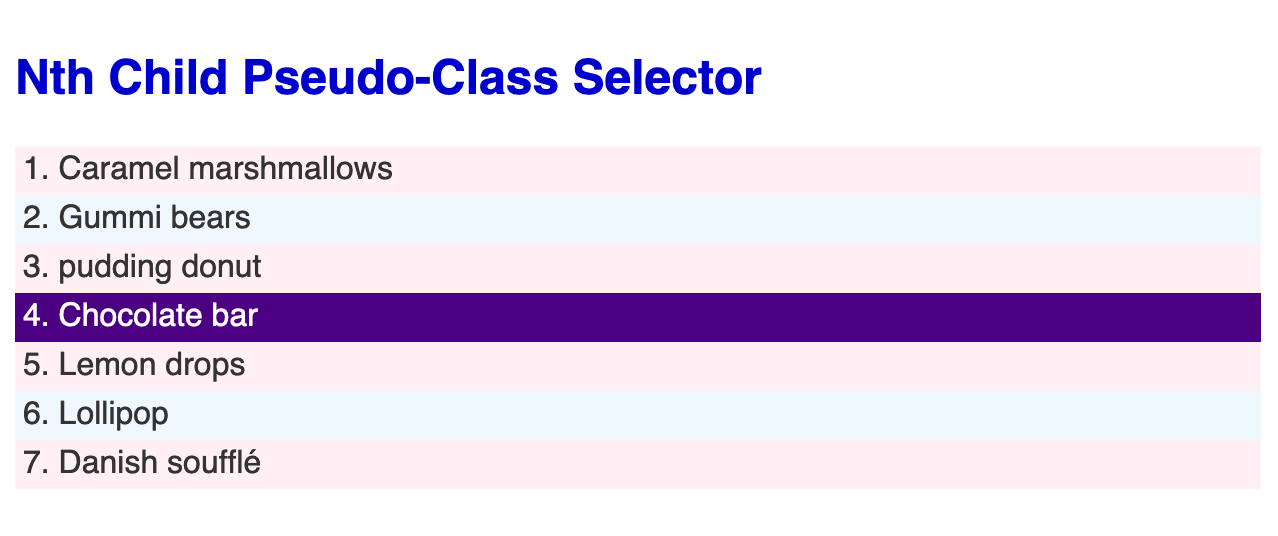
Lastly, a numeric value can be inserted instead of a word value. Return to styles.css and add another ol li:nth-child() selector, this time with a 4 inside the parentheses. This will select the fourth item in the list. To make that item stand out, add a color property set to white and a background-color property set to indigo, as highlighted in the following code block:
...
ol li:nth-child(odd) {
  background-color: lavenderblush;
}

ol li:nth-child(4) {
  color: white;
  background-color: indigo;
}
Save your changes to styles.css and open index.html in your browser. The odd and even items retain their alternating zebra stripe styling, but the fourth item now has a purple-colored background with white text. The following image shows how this is rendered in the browser:
Note: The :nth-child() pseudo-class is able to also use algebric equations, such as 3n to select every third item in a list. CSS Tricks has a nth-child testing tool to test nth-child values to help understand the complex versatility of this pseudo-class selector.
In this last section, you used the :nth-child() pseudo-class selector to apply styles to even-numbered elements, odd-numbered elements, and specifically the fourth element in the list.
Conclusion
In this tutorial, you have used many new selectors based on the concept of relationships. You used the descendant combinator and child combinator selectors to select elements inside other elements. Then, you used the general sibling combinator and adjacent sibling combinator to select elements that have a shared parent and apply styles based on proximity. Lastly, you used a series of pseudo-class selectors to style the first, last, and only child elements, along with every nth element in between. These selectors will help you hone and scope the styles of your projects.
If you would like to read more CSS tutorials, try out the other tutorials in the How To Style HTML with CSS series.
Thanks for learning with the DigitalOcean Community. Check out our offerings for compute, storage, networking, and managed databases.
Tutorial Series: How To Style HTML with CSS
Cascading Style Sheets (CSS) is the styling language of the web, and is used to design and control the visual representation of Hypertext Markup Language (HTML) on a web page. With CSS, you can manage everything from font to layout to animations on your web page. This series will lead the reader through CSS exercises that demonstrate the building blocks of the language and the fundamental design principles needed to make a user-friendly web site.
Browse Series: 20 tutorials
About the author
I code, design, write, and teach and I’m an IAAP Certified Web Accessibility Specialist.
Still looking for an answer?
This textbox defaults to using Markdown to format your answer.
You can type !ref in this text area to quickly search our full set of tutorials, documentation & marketplace offerings and insert the link!
 This work is licensed under a Creative Commons Attribution-NonCommercial- ShareAlike 4.0 International License.
Become a contributor for community
Get paid to write technical tutorials and select a tech-focused charity to receive a matching donation.

DigitalOcean Documentation
Full documentation for every DigitalOcean product.

Resources for startups and AI-native businesses
The Wave has everything you need to know about building a business, from raising funding to marketing your product.
The developer cloud
Scale up as you grow — whether you're running one virtual machine or ten thousand.

Start building today
From GPU-powered inference and Kubernetes to managed databases and storage, get everything you need to build, scale, and deploy intelligent applications.
