By Joe Morgan and Timothy Nolan

The author selected Creative Commons to receive a donation as part of the Write for DOnations program.
Introduction
In React, state refers to a structure that keeps track of how data changes over time in your application. Managing state is a crucial skill in React because it allows you to make interactive components and dynamic web applications. State is used for everything from tracking form inputs to capturing dynamic data from an API. In this tutorial, you’ll run through an example of managing state on class-based components.
As of the writing of this tutorial, the official React documentation encourages developers to adopt React Hooks to manage state with functional components when writing new code, rather than using class-based components. Although the use of React Hooks is considered a more modern practice, it’s important to understand how to manage state on class-based components as well. Learning the concepts behind state management will help you navigate and troubleshoot class-based state management in existing code bases and help you decide when class-based state management is more appropriate. There’s also a class-based method called componentDidCatch that is not available in Hooks and will require setting state using class methods.
This tutorial will first show you how to set state using a static value, which is useful for cases where the next state does not depend on the first state, such as setting data from an API that overrides old values. Then it will run through how to set a state as the current state, which is useful when the next state depends on the current state, such as toggling a value. To explore these different ways of setting state, you’ll create a product page component that you’ll update by adding purchases from a list of options.
Prerequisites
-
You will need a development environment running Node.js; this tutorial was tested on Node.js version 10.20.1 and npm version 6.14.4. To install this on macOS or Ubuntu 18.04, follow the steps in How to Install Node.js and Create a Local Development Environment on macOS or the Installing Using a PPA section of How To Install Node.js on Ubuntu 18.04.
-
In this tutorial, you will create apps with Create React App. You can find instructions for installing an application with Create React App at How To Set Up a React Project with Create React App.
-
You will also need a basic knowledge of JavaScript, which you can find in How To Code in JavaScript, along with a basic knowledge of HTML and CSS. A good resource for HTML and CSS is the Mozilla Developer Network.
Step 1 — Creating an Empty Project
In this step, you’ll create a new project using Create React App. Then you will delete the sample project and related files that are installed when you bootstrap the project. Finally, you will create a simple file structure to organize your components. This will give you a solid basis on which to build this tutorial’s sample application for managing state on class-based components.
To start, make a new project. In your terminal, run the following script to install a fresh project using create-react-app:
- npx create-react-app state-class-tutorial
After the project is finished, change into the directory:
- cd state-class-tutorial
In a new terminal tab or window, start the project using the Create React App start script. The browser will auto-refresh on changes, so leave this script running while you work:
- npm start
You will get a running local server. If the project did not open in a browser window, you can open it with http://localhost:3000/. If you are running this from a remote server, the address will be http://your_domain:3000.
Your browser will load with a simple React application included as part of Create React App:

You will be building a completely new set of custom components, so you’ll need to start by clearing out some boilerplate code so that you can have an empty project.
To start, open src/App.js in a text editor. This is the root component that is injected into the page. All components will start from here. You can find more information about App.js at How To Set Up a React Project with Create React App.
Open src/App.js with the following command:
- nano src/App.js
You will see a file like this:
import React from 'react';
import logo from './logo.svg';
import './App.css';

function App() {
  return (
    <div className="App">
      <header className="App-header">
        <img src={logo} className="App-logo" alt="logo" />
        <p>
          Edit <code>src/App.js</code> and save to reload.
        </p>
        <a
          className="App-link"
          href="https://reactjs.org"
          target="_blank"
          rel="noopener noreferrer"
        >
          Learn React
        </a>
      </header>
    </div>
  );
}

export default App;
Delete the line import logo from './logo.svg';. Then replace everything in the return statement to return a set of empty tags: <></>. This will give you a valid page that returns nothing. The final code will look like this:
import React from 'react';
import './App.css';

function App() {
  return <></>;
}

export default App;
Save and exit the text editor.
Finally, delete the logo. You won’t be using it in your application and you should remove unused files as you work. It will save you from confusion in the long run.
In the terminal window type the following command:
- rm src/logo.svg
If you look at your browser, you will see a blank screen.
Now that you have cleared out the sample Create React App project, create a simple file structure. This will help you keep your components isolated and independent.
Create a directory called components in the src directory. This will hold all of your custom components.
- mkdir src/components
Each component will have its own directory to store the component file along with the styles, images, and tests.
Create a directory for App:
- mkdir src/components/App
Move all of the App files into that directory. Use the wildcard, *, to select any files that start with App. regardless of file extension. Then use the mv command to put them into the new directory:
- mv src/App.* src/components/App
Next, update the relative import path in index.js, which is the root component that bootstraps the whole process:
- nano src/index.js
The import statement needs to point to the App.js file in the App directory, so make the following highlighted change:
import React from 'react';
import ReactDOM from 'react-dom';
import './index.css';
import App from './components/App/App';
import * as serviceWorker from './serviceWorker';

ReactDOM.render(
  <React.StrictMode>
    <App />
  </React.StrictMode>,
  document.getElementById('root')
);

// If you want your app to work offline and load faster, you can change
// unregister() to register() below. Note this comes with some pitfalls.
// Learn more about service workers: https://bit.ly/CRA-PWA
serviceWorker.unregister();
Save and exit the file.
Now that the project is set up, you can create your first component.
Step 2 — Using State in a Component
In this step, you’ll set the initial state of a component on its class and reference the state to display a value. You’ll then make a product page with a shopping cart that displays the total items in the cart using the state value. By the end of the step, you’ll know the different ways to hold a value and when you should use state rather than a prop or a static value.
Building the Components
Start by creating a directory for Product:
- mkdir src/components/Product
Next, open up Product.js in that directory:
- nano src/components/Product/Product.js
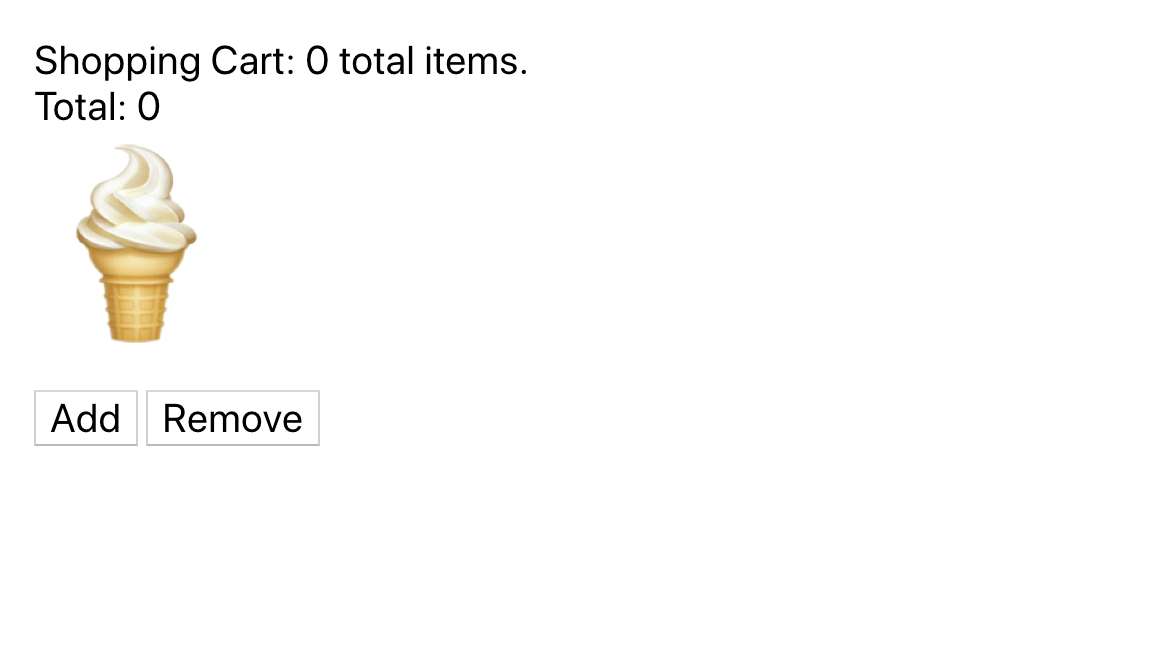
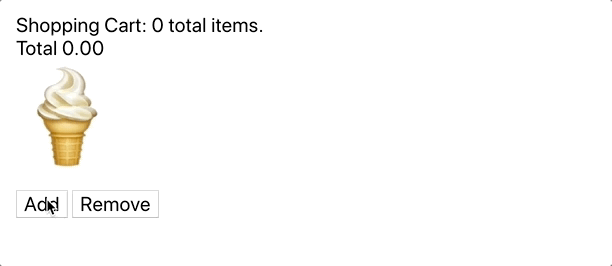
Start by creating a component with no state. The component will have two parts: The cart, which has the number of items and the total price, and the product, which has a button to add and remove an item. For now, the buttons will have no actions.
Add the following code to Product.js:
import React, { Component } from 'react';
import './Product.css';

export default class Product extends Component {
  render() {
    return(
      <div className="wrapper">
        <div>
          Shopping Cart: 0 total items.
        </div>
        <div>Total: 0</div>

        <div className="product"><span role="img" aria-label="ice cream">🍦</span></div>
        <button>Add</button> <button>Remove</button>
      </div>
    )
  }
}
You have also included a couple of div elements that have JSX class names so you can add some basic styling.
Save and close the file, then open Product.css:
- nano src/components/Product/Product.css
Give some light styling to increase the font-size for the text and the emoji:
.product span {
    font-size: 100px;
}

.wrapper {
    padding: 20px;
    font-size: 20px;
}

.wrapper button {
    font-size: 20px;
    background: none;
}
The emoji will need a much larger font size than the text, since it’s acting as the product image in this example. In addition, you are removing the default gradient background on buttons by setting the background to none.
Save and close the file.
Now, render the Product component in the App component so you can see the results in the browser. Open App.js:
- nano src/components/App/App.js
Import the component and render it. You can also delete the CSS import since you won’t be using it in this tutorial:
import React from 'react';
import Product from '../Product/Product';

function App() {
  return <Product />
}

export default App;
Save and close the file. When you do, the browser will refresh and you’ll see the Product component.
Setting the Initial State on a Class Component
There are two values in your component values that are going to change in your display: total number of items and total cost. Instead of hard coding them, in this step you’ll move them into an object called state.
The state of a React class is a special property that controls the rendering of a page. When you change the state, React knows that the component is out-of-date and will automatically re-render. When a component re-renders, it modifies the rendered output to include the most up-to-date information in state. In this example, the component will re-render whenever you add a product to the cart or remove it from the cart. You can add other properties to a React class, but they won’t have the same ability to trigger re-rendering.
Open Product.js:
- nano src/components/Product/Product.js
Add a property called state to the Product class. Then add two values to the state object: cart and total. The cart will be an array, since it may eventually hold many items. The total will be a number. After assigning these, replace references to the values with this.state.property:
import React, { Component } from 'react';
import './Product.css';

export default class Product extends Component {

  state = {
    cart: [],
    total: 0
  }

  render() {
    return(
      <div className="wrapper">
        <div>
          Shopping Cart: {this.state.cart.length} total items.
        </div>
        <div>Total {this.state.total}</div>

        <div className="product"><span role="img" aria-label="ice cream">🍦</span></div>
        <button>Add</button> <button>Remove</button>
      </div>
    )
  }
}
Notice that in both cases, since you are referencing JavaScript inside of your JSX, you need to wrap the code in curly braces. You are also displaying the length of the cart array to get a count of the number of items in the array.
Save the file. When you do, the browser will refresh and you’ll see the same page as before.
The state property is a standard class property, which means that it is accessible in other methods, not just the render method.
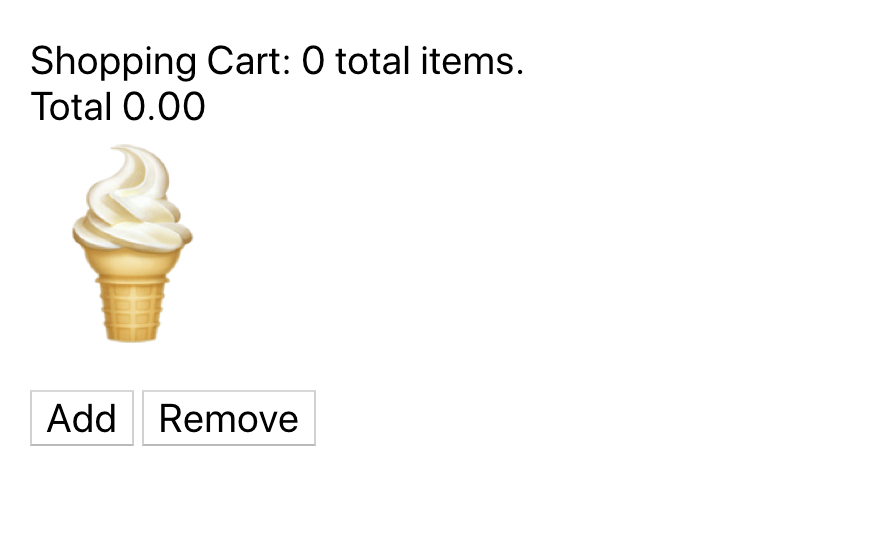
Next, instead of displaying the price as a static value, convert it to a string using the toLocaleString method, which will convert the number to a string that matches the way numbers are displayed in the browser’s region.
Create a method called getTotal() that takes the state and converts it to a localized string using an array of currencyOptions. Then, replace the reference to state in the JSX with a method call:
import React, { Component } from 'react';
import './Product.css';

export default class Product extends Component {

  state = {
    cart: [],
    total: 0
  }

  currencyOptions = {
    minimumFractionDigits: 2,
    maximumFractionDigits: 2,
  }

  getTotal = () => {
    return this.state.total.toLocaleString(undefined, this.currencyOptions)
  }

  render() {
    return(
      <div className="wrapper">
        <div>
          Shopping Cart: {this.state.cart.length} total items.
        </div>
        <div>Total {this.getTotal()}</div>

        <div className="product"><span role="img" aria-label="ice cream">🍦</span></div>
        <button>Add</button> <button>Remove</button>
      </div>
    )
  }
}
Since total is a price for goods, you are passing currencyOptions that set the maximum and minimum decimal places for your total to two. Note that this is set as a separate property. Often, beginner React developers will put information like this in the state object, but it is best to only add information to state that you expect to change. This way, the information in state will be easier to keep strack of as your application scales.
Another important change you made was to create the getTotal() method by assigning an arrow function to a class property. Without using the arrow function, this method would create a new this binding, which would interfere with the current this binding and introduce a bug into our code. You’ll see more on this in the next step.
Save the file. When you do, the page will refresh and you’ll see the value converted to a decimal.
You’ve now added state to a component and referenced it in your class. You also accessed values in the render method and in other class methods. Next, you’ll create methods to update the state and show dynamic values.
Step 3 — Setting State from a Static Value
So far you’ve created a base state for the component and you’ve referenced that state in your functions and your JSX code. In this step, you’ll update your product page to modify the state on button clicks. You’ll learn how to pass a new object containing updated values to a special method called setState, which will then set the state with the updated data.
To update state, React developers use a special method called setState that is inherited from the base Component class. The setState method can take either an object or a function as the first argument. If you have a static value that doesn’t need to reference the state, it’s best to pass an object containing the new value, since it’s easier to read. If you need to reference the current state, you pass a function to avoid any references to out-of-date state.
Start by adding an event to the buttons. If your user clicks Add, then the program will add the item to the cart and update the total. If they click Remove, it will reset the cart to an empty array and the total to 0. For example purposes, the program will not allow a user to add an item more then once.
Open Product.js:
- nano src/components/Product/Product.js
Inside the component, create a new method called add, then pass the method to the onClick prop for the Add button:
import React, { Component } from 'react';
import './Product.css';

export default class Product extends Component {

  state = {
    cart: [],
    total: 0
  }

  add = () => {
    this.setState({
      cart: ['ice cream'],
      total: 5
    })
  }

  currencyOptions = {
    minimumFractionDigits: 2,
    maximumFractionDigits: 2,
  }

  getTotal = () => {
    return this.state.total.toLocaleString(undefined, this.currencyOptions)
  }

  render() {
    return(
      <div className="wrapper">
        <div>
          Shopping Cart: {this.state.cart.length} total items.
        </div>
        <div>Total {this.getTotal()}</div>

        <div className="product"><span role="img" aria-label="ice cream">🍦</span></div>
        <button onClick={this.add}>Add</button>
        <button>Remove</button>
      </div>
    )
  }
}
Inside the add method, you call the setState method and pass an object containing the updated cart with a single item ice cream and the updated price of 5. Notice that you again used an arrow function to create the add method. As mentioned before, this will ensure the function has the proper this context when running the update. If you add the function as a method without using the arrow function, the setState would not exist without binding the function to the current context.
For example, if you created the add function this way:
export default class Product extends Component {
...
  add() {
    this.setState({
      cart: ['ice cream'],
      total: 5
    })
  }
...
}
The user would get an error when they click on the Add button.
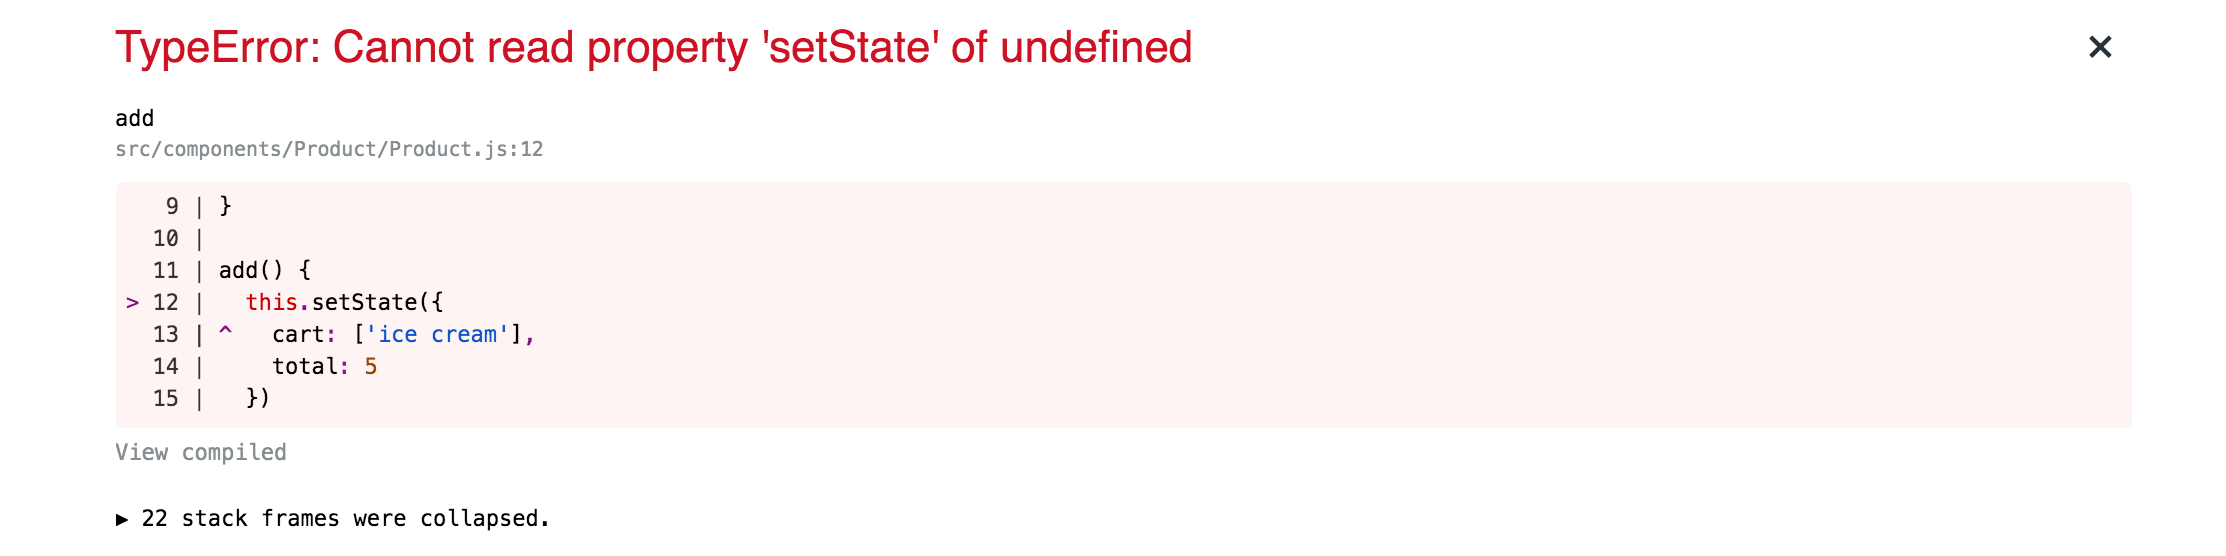
Using an arrow function ensures that you’ll have the proper context to avoid this error.
Save the file. When you do, the browser will reload, and when you click on the Add button the cart will update with the current amount.
With the add method, you passed both properties of the state object: cart and total. However, you do not always need to pass a complete object. You only need to pass an object containing the properties that you want to update, and everything else will stay the same.
To see how React can handle a smaller object, create a new function called remove. Pass a new object containing just the cart with an empty array, then add the method to the onClick property of the Remove button:
import React, { Component } from 'react';
import './Product.css';

export default class Product extends Component {

  ...
  remove = () => {
    this.setState({
      cart: []
    })
  }

  render() {
    return(
      <div className="wrapper">
        <div>
          Shopping Cart: {this.state.cart.length} total items.
        </div>
        <div>Total {this.getTotal()}</div>

        <div className="product"><span role="img" aria-label="ice cream">🍦</span></div>
        <button onClick={this.add}>Add</button>
        <button onClick={this.remove}>Remove</button>
      </div>
    )
  }
}
Save the file. When the browser refreshes, click on the Add and Remove buttons. You’ll see the cart update, but not the price. The total state value is preserved during the update. This value is only preserved for example purposes; with this application, you would want to update both properties of the state object. But you will often have components with stateful properties that have different responsibilities, and you can make them persist by leaving them out of the updated object.
The change in this step was static. You knew exactly what the values would be ahead of time, and they didn’t need to be recalculated from state. But if the product page had many products and you wanted to be able to add them multiple times, passing a static object would provide no guarantee of referencing the most up-to-date state, even if your object used a this.state value. In this case, you could instead use a function.
In the next step, you’ll update state using functions that reference the current state.
Step 4 — Setting State Using Current State
There are many times when you’ll need to reference a previous state to update a current state, such as updating an array, adding a number, or modifying an object. To be as accurate as possible, you need to reference the most up-to-date state object. Unlike updating state with a predefined value, in this step you’ll pass a function to the setState method, which will take the current state as an argument. Using this method, you will update a component’s state using the current state.
Another benefit of setting state with a function is increased reliability. To improve performance, React may batch setState calls, which means that this.state.value may not be fully reliable. For example, if you update state quickly in several places, it is possible that a value could be out of date. This can happen during data fetches, form validations, or any situation where several actions are occurring in parallel. But using a function with the most up-to-date state as the argument ensures that this bug will not enter your code.
To demonstrate this form of state management, add some more items to the product page. First, open the Product.js file:
- nano src/components/Product/Product.js
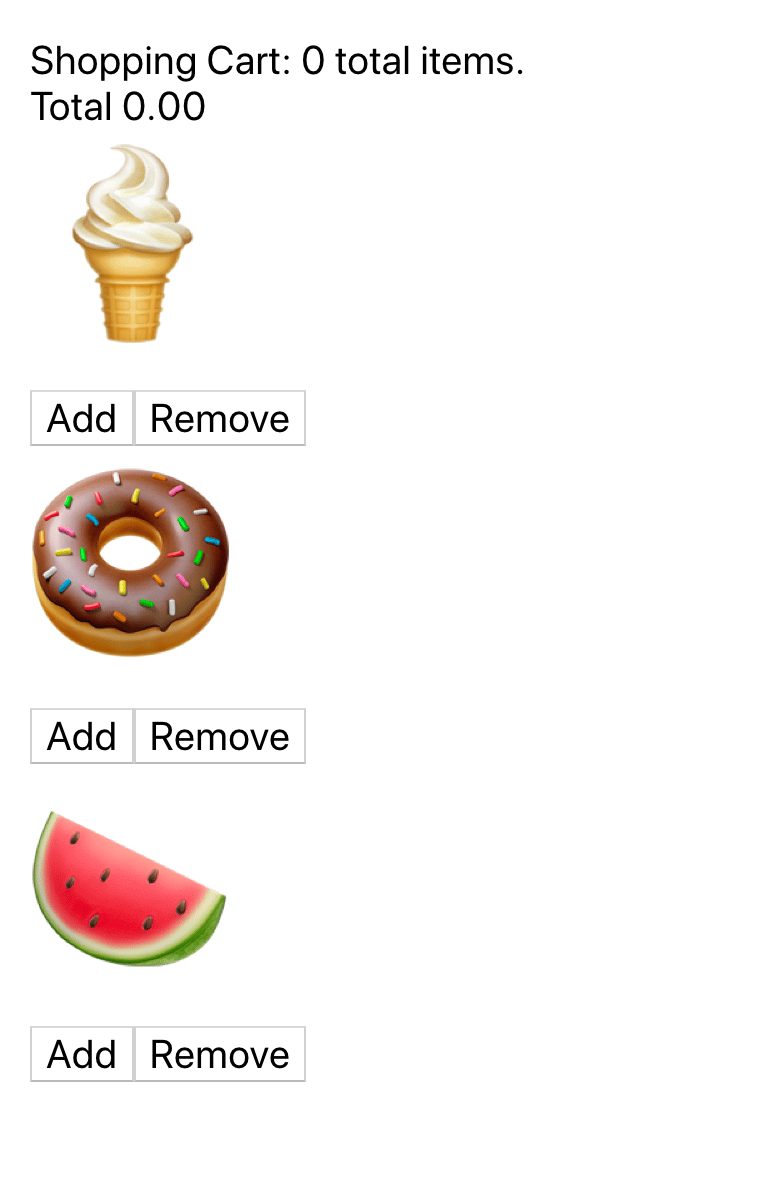
Next, create an array of objects for different products. The array will contain the product emoji, name, and price. Then loop over the array to display each product with an Add and Remove button:
import React, { Component } from 'react';
import './Product.css';

const products = [
  {
    emoji: '🍦',
    name: 'ice cream',
    price: 5
  },
  {
    emoji: '🍩',
    name: 'donuts',
    price: 2.5,
  },
  {
    emoji: '🍉',
    name: 'watermelon',
    price: 4
  }
];

export default class Product extends Component {

  ...


  render() {
    return(
      <div className="wrapper">
        <div>
          Shopping Cart: {this.state.cart.length} total items.
        </div>
        <div>Total {this.getTotal()}</div>
        <div>
          {products.map(product => (
            <div key={product.name}>
              <div className="product">
                <span role="img" aria-label={product.name}>{product.emoji}</span>
              </div>
              <button onClick={this.add}>Add</button>
              <button onClick={this.remove}>Remove</button>
            </div>
          ))}
        </div>
      </div>
    )
  }
}
In this code, you are using the map() array method to loop over the products array and return the JSX that will display each element in your browser.
Save the file. When the browser reloads, you’ll see an updated product list:
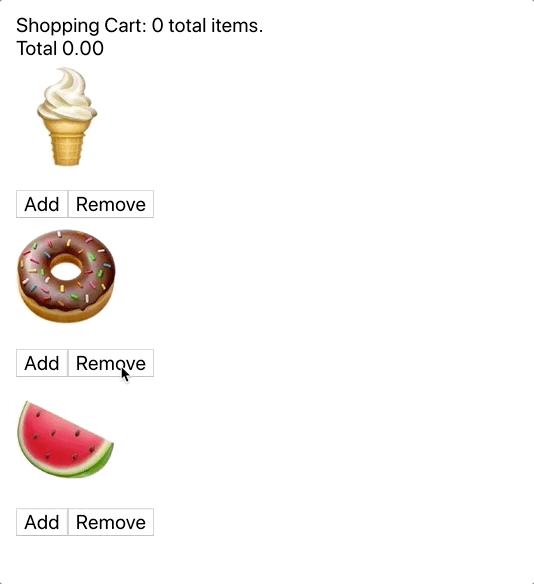
Now you need to update your methods. First, change the add() method to take the product as an argument. Then instead of passing an object to setState(), pass a function that takes the state as an argument and returns an object that has the cart updated with the new product and the total updated with the new price:
import React, { Component } from 'react';
import './Product.css';

...

export default class Product extends Component {

  state = {
    cart: [],
    total: 0
  }

  add = (product) => {
    this.setState(state => ({
      cart: [...state.cart, product.name],
      total: state.total + product.price
    }))
  }

  currencyOptions = {
    minimumFractionDigits: 2,
    maximumFractionDigits: 2,
  }

  getTotal = () => {
    return this.state.total.toLocaleString(undefined, this.currencyOptions)
  }

  remove = () => {
    this.setState({
      cart: []
    })
  }

  render() {
    return(
      <div className="wrapper">
        <div>
          Shopping Cart: {this.state.cart.length} total items.
        </div>
        <div>Total {this.getTotal()}</div>

        <div>
          {products.map(product => (
            <div key={product.name}>
              <div className="product">
                <span role="img" aria-label={product.name}>{product.emoji}</span>
              </div>
              <button onClick={() => this.add(product)}>Add</button>
              <button onClick={this.remove}>Remove</button>
            </div>
          ))}
        </div>
      </div>
    )
  }
}
Inside the anonymous function that you pass to setState(), make sure you reference the argument—state—and not the component’s state—this.state. Otherwise, you still run a risk of getting an out-of-date state object. The state in your function will be otherwise identical.
Take care not to directly mutate state. Instead, when adding a new value to the cart, you can add the new product to the state by using the spread syntax on the current value and adding the new value onto the end.
Finally, update the call to this.add by changing the onClick() prop to take an anonymous function that calls this.add() with the relevant product.
Save the file. When you do, the browser will reload and you’ll be able to add multiple products.

Next, update the remove() method. Follow the same steps: convert setState to take a function, update the values without mutating, and update the onChange() prop:
import React, { Component } from 'react';
import './Product.css';

...

export default class Product extends Component {

...

  remove = (product) => {
    this.setState(state => {
      const cart = [...state.cart];
      cart.splice(cart.indexOf(product.name))
      return ({
        cart,
        total: state.total - product.price
      })
    })
  }

  render() {
    return(
      <div className="wrapper">
        <div>
          Shopping Cart: {this.state.cart.length} total items.
        </div>
        <div>Total {this.getTotal()}</div>
        <div>
          {products.map(product => (
            <div key={product.name}>
              <div className="product">
                <span role="img" aria-label={product.name}>{product.emoji}</span>
              </div>
              <button onClick={() => this.add(product)}>Add</button>
              <button onClick={() => this.remove(product)}>Remove</button>
            </div>
          ))}
        </div>
      </div>
    )
  }
}
To avoid mutating the state object, you must first make a copy of it using the spread operator. Then you can splice out the item you want from the copy and return the copy in the new object. By copying state as the first step, you can be sure that you will not mutate the state object.
Save the file. When you do, the browser will refresh and you’ll be able to add and remove items:

There is still a bug in this application: In the remove method, a user can subtract from the total even if the item is not in the cart. If you click Remove on the ice cream without adding it to your cart, your total will be -5.00.
You can fix the bug by checking for an item’s existence before subtracting, but an easier way is to keep your state object small by only keeping references to the products and not separating references to products and total cost. Try to avoid double references to the same data. Instead, store the raw data in state— in this case the whole product object—then perform the calculations outside of the state.
Refactor the component so that the add() method adds the whole object, the remove() method removes the whole object, and the getTotal method uses the cart:
import React, { Component } from 'react';
import './Product.css';

...

export default class Product extends Component {

  state = {
    cart: [],
  }

  add = (product) => {
    this.setState(state => ({
      cart: [...state.cart, product],
    }))
  }

  currencyOptions = {
    minimumFractionDigits: 2,
    maximumFractionDigits: 2,
  }

  getTotal = () => {
    const total = this.state.cart.reduce((totalCost, item) => totalCost + item.price, 0);
    return total.toLocaleString(undefined, this.currencyOptions)
  }

  remove = (product) => {
    this.setState(state => {
      const cart = [...state.cart];
      const productIndex = cart.findIndex(p => p.name === product.name);
      if(productIndex < 0) {
        return;
      }
      cart.splice(productIndex, 1)
      return ({
        cart
      })
    })
  }

  render() {
    ...
  }
}
The add() method is similar to what it was before, except that reference to the total property has been removed. In the remove() method, you find the index of the product with findByIndex. If the index doesn’t exist, you’ll get a -1. In that case, you use a conditional statement toreturn nothing. By returning nothing, React will know the state didn’t change and won’t trigger a re-render. If you return state or an empty object, it will still trigger a re-render.
When using the splice() method, you are now passing 1 as the second argument, which will remove one value and keep the rest.
Finally, you calculate the total using the reduce() array method.
Save the file. When you do, the browser will refresh and you’ll have your final cart:
The setState function you pass can have an additional argument of the current props, which can be helpful if you have state that needs to reference the current props. You can also pass a callback function to setState as the second argument, regardless of if you pass an object or function for the first argument. This is particularly useful when you are setting state after fetching data from an API and you need to perform a new action after the state update is complete.
In this step, you learned how to update a new state based on the current state. You passed a function to the setState function and calculated new values without mutating the current state. You also learned how to exit a setState function if there is no update in a manner that will prevent a re-render, adding a slight performance enhancement.
Conclusion
In this tutorial, you have developed a class-based component with a dynamic state that you’ve updated statically and using the current state. You now have the tools to make complex projects that respond to users and dynamic information.
React does have a way to manage state with Hooks, but it is helpful to understand how to use state on components if you need to work with components that must be class-based, such as those that use the componentDidCatch method.
Managing state is key to nearly all components and is necessary for creating interactive applications. With this knowledge you can recreate many common web components, such as sliders, accordions, forms, and more. You will then use the same concepts as you build applications using hooks or develop components that pull data dynamically from APIs.
If you would like to look at more React tutorials, check out our React Topic page, or return to the How To Code in React.js series page.
Thanks for learning with the DigitalOcean Community. Check out our offerings for compute, storage, networking, and managed databases.
Tutorial Series: How To Code in React.js
React is a popular JavaScript framework for creating front-end applications, such as user interfaces that allow users to interact with programs. Originally created by Facebook, it has gained popularity by allowing developers to create fast applications using an intuitive programming paradigm that ties JavaScript with an HTML-like syntax known as JSX.
In this series, you will build out examples of React projects to gain an understanding of this framework, giving you the knowledge you need to pursue front-end web development or start out on your way to full stack development.
Browse Series: 21 tutorials
About the author(s)
Author of Simplifying JavaScript. Writing featured in Slate, FreeCodeCamp, and here! I like to break things and put them back together. 🛠
Former Senior Technical Editor at DigitalOcean, fiction writer and podcaster elsewhere, always searching for the next good nautical pun! Areas of expertise include Node.js, PostgreSQL, CSS, JavaScript.
Still looking for an answer?
This textbox defaults to using Markdown to format your answer.
You can type !ref in this text area to quickly search our full set of tutorials, documentation & marketplace offerings and insert the link!
Hi! Just wanted to let you know I’m very grateful for this mini tutorial. Wanting to build a web app after living in databases for 15 years and my app development skills are massively out of date. The learning curve is very steep for this old hand, and this tutorial is the first one I found that clearly tells me how to deal with data inside the react code. Much appreciated.
 This work is licensed under a Creative Commons Attribution-NonCommercial- ShareAlike 4.0 International License.
Become a contributor for community
Get paid to write technical tutorials and select a tech-focused charity to receive a matching donation.

DigitalOcean Documentation
Full documentation for every DigitalOcean product.

Resources for startups and AI-native businesses
The Wave has everything you need to know about building a business, from raising funding to marketing your product.
The developer cloud
Scale up as you grow — whether you're running one virtual machine or ten thousand.

Start building today
From GPU-powered inference and Kubernetes to managed databases and storage, get everything you need to build, scale, and deploy intelligent applications.
