By Joe Morgan and Timothy Nolan

The author selected Creative Commons to receive a donation as part of the Write for DOnations program.
Introduction
React is a popular JavaScript framework for creating front-end applications. Originally created by Facebook, it has gained popularity by allowing developers to create fast applications using an intuitive programming paradigm that ties JavaScript with an HTML-like syntax known as JSX.
Starting a new React project used to be a complicated multi-step process that involved setting up a build system, a code transpiler to convert modern syntax to code that is readable by all browsers, and a base directory structure. But now, Create React App includes all the JavaScript packages you need to run a React project, including code transpiling, basic linting, testing, and build systems. It also includes a server with hot reloading that will refresh your page as you make code changes. Finally, it will create a structure for your directories and components so you can jump in and start coding in just a few minutes.
In other words, you don’t have to worry about configuring a build system like Webpack. You don’t need to set up Babel to transpile you code to be cross-browser usable. You don’t have to worry about most of the complicated systems of modern front-end development. You can start writing React code with minimal preparation.
By the end of this tutorial, you’ll have a running React application that you can use as a foundation for any future applications. You’ll make your first changes to React code, update styles, and run a build to create a fully minified version of your application. You’ll also use a server with hot reloading to give you instant feedback and will explore the parts of a React project in depth. Finally, you will begin writing custom components and creating a structure that can grow and adapt with your project.
Prerequisites
To follow this tutorial, you’ll need the following:
-
Node.js version 10.16.0 installed on your computer. To install this on macOS or Ubuntu 18.04, follow the steps in How to Install Node.js and Create a Local Development Environment on macOS or the Installing Using a PPA section of How To Install Node.js on Ubuntu 18.04.
-
It will also help to have a basic understanding of JavaScript, which you can find in the How To Code in JavaScript series, along with a basic knowledge of HTML and CSS.
Step 1 — Creating a New Project with Create React App
In this step, you’ll create a new application using the npm package manager to run a remote script. The script will copy the necessary files into a new directory and install all dependencies.
When you installed Node, you also installed a package managing application called npm. npm will install JavaScript packages in your project and also keep track of details about the project. If you’d like to learn more about npm, take a look at our How To Use Node.js Modules with npm and package.json tutorial.
npm also includes a tool called npx, which will run executable packages. What that means is you will run the Create React App code without first downloading the project.
The executable package will run the installation of create-react-app into the directory that you specify. It will start by making a new project in a directory, which in this tutorial will be called digital-ocean-tutorial. Again, this directory does not need to exist beforehand; the executable package will create it for you. The script will also run npm install inside the project directory, which will download any additional dependencies.
To install the base project, run the following command:
- npx create-react-app digital-ocean-tutorial
This command will kick off a build process that will download the base code along with a number of dependencies.
When the script finishes you will see a success message that says:
Output...
Success! Created digital-ocean-tutorial at your_file_path/digital-ocean-tutorial
Inside that directory, you can run several commands:

  npm start
    Starts the development server.

  npm run build
    Bundles the app into static files for production.

  npm test
    Starts the test runner.

  npm run eject
    Removes this tool and copies build dependencies, configuration files
    and scripts into the app directory. If you do this, you can’t go back!

We suggest that you begin by typing:

  cd digital-ocean-tutorial
  npm start

Happy hacking!
your_file_path will be your current path. If you are a macOS user, it will be something like /Users/your_username; if you are on an Ubuntu server, it will say something like /home/your_username.
You will also see a list of npm commands that will allow you to run, build, start, and test your application. You’ll explore these more in the next section.
Note: There is another package manager for JavaScript called yarn. It’s supported by Facebook and does many of the same things as npm. Originally, yarn provided new functionality such as lock files, but now these are implemented in npm as well. yarn also includes a few other features such as offline caching. Further differences can be found on the yarn documentation.
If you have previously installed yarn on your system, you will see a list of yarn commands such as yarn start that work the same as npm commands. You can run npm commands even if you have yarn installed. If you prefer yarn, just replace npm with yarn in any future commands. The results will be the same.
Now your project is set up in a new directory. Change into the new directory:
- cd digital-ocean-tutorial
You are now inside the root of your project. At this point, you’ve created a new project and added all of the dependencies. But you haven’t take any actions to run the project. In the next section, you’ll run custom scripts to build and test the project.
Step 2 — Using react-scripts
react-scriptsIn this step, you will learn about the different react-scripts that are installed with the repo. You will first run the test script to execute the test code. Then you will run the build script to create a minified version. Finally, you’ll look at how the eject script can give you complete control over customization.
Now that you are inside the project directory, take a look around. You can either open the whole directory in your text editor, or if you are on the terminal you can list the files out with the following command:
- ls -a
The -a flag ensures that the output also includes hidden files.
Either way, you will see a structure like this:
Outputnode_modules/
public/
src/
.gitignore
README.md
package-lock.json
package.json
Let’s explain these one by one:
-
node_modules/contains all of the external JavaScript libraries used by the application. You will rarely need to open it. -
The
public/directory contains some base HTML, JSON, and image files. These are the roots of your project. You’ll have an opportunity to explore them more in Step 4. -
The
src/directory contains the React JavaScript code for your project. Most of the work you do will be in that directory. You’ll explore this directory in detail in Step 5. -
The
.gitignorefile contains some default directories and files that git—your source control—will ignore, such as thenode_modulesdirectory. The ignored items tend to be larger directories or log files that you would not need in source control. It also will include some directories that you’ll create with some of the React scripts. -
README.mdis a markdown file that contains a lot of useful information about Create React App, such as a summary of commands and links to advanced configuration. For now, it’s best to leave theREADME.mdfile as you see it. As your project progresses, you will replace the default information with more detailed information about your project.
The last two files are used by your package manager. When you ran the initial npx command, you created the base project, but you also installed the additional dependencies. When you installed the dependencies, you created a package-lock.json file. This file is used by npm to ensure that the packages match exact versions. This way if someone else installs your project, you can ensure they have identical dependencies. Since this file is created automatically, you will rarely edit this file directly.
The last file is a package.json. This contains metadata about your project, such as the title, version number, and dependencies. It also contains scripts that you can use to run your project.
Open the package.json file in your favorite text editor:
- nano package.json
When you open the file, you will see a JSON object containing all the metadata. If you look at the scripts object, you’ll find four different scripts: start, build, test, and eject.
These scripts are listed in order of importance. The first script starts the local development environment; you’ll get to that in the next step. The second script will build your project. You’ll explore this in detail in Step 4, but it’s worth running now to see what happens.
The build Script
To run any npm script, you just need to type npm run script_name in your terminal. There are a few special scripts where you can omit the run part of the command, but it’s always fine to run the full command. To run the build script, type the following in your terminal:
- npm run build
You will immediately see the following message:
Output> digital-ocean-tutorial@0.1.0 build your_file_path/digital-ocean-tutorial
> react-scripts build

Creating an optimized production build...
...
This tells you that Create React App is compiling your code into a usable bundle.
When it’s finished, you’ll see the following output:
Output...
Compiled successfully.

File sizes after gzip:

  39.85 KB  build/static/js/9999.chunk.js
  780 B      build/static/js/runtime-main.99999.js
  616 B     build/static/js/main.9999.chunk.js
  556 B     build/static/css/main.9999.chunk.css

The project was built assuming it is hosted at the server root.
You can control this with the homepage field in your package.json.
For example, add this to build it for GitHub Pages:

  "homepage" : "http://myname.github.io/myapp",

The build folder is ready to be deployed.
You may serve it with a static server:

  serve -s build

Find out more about deployment here:

  bit.ly/CRA-deploy
List out the project contents and you will see some new directories:
- ls -a
Outputbuild/
node_modules/
public/
src/
.gitignore
README.md
package-lock.json
package.json
You now have a build directory. If you opened the .gitignore file, you may have noticed that the build directory is ignored by git. That’s because the build directory is just a minified and optimized version of the other files. There’s no need to use version control since you can always run the build command. You’ll explore the output more later; for now, it’s time to move on to the test script.
The test Script
The test script is one of those special scripts that doesn’t require the run keyword, but works even if you include it. This script will start up a test runner called Jest. The test runner looks through your project for any files with a .spec.js or .test.js extension, then runs those files.
To run the test script, type the following command:
- npm test
After running this script your terminal will have the output of the test suite and the terminal prompt will disappear. It will look something like this:
Output PASS  src/App.test.js
  ✓ renders learn react link (67ms)

Test Suites: 1 passed, 1 total
Tests:       1 passed, 1 total
Snapshots:   0 total
Time:        4.204s
Ran all test suites.

Watch Usage
 › Press f to run only failed tests.
 › Press o to only run tests related to changed files.
 › Press q to quit watch mode.
 › Press p to filter by a filename regex pattern.
 › Press t to filter by a test name regex pattern.
 › Press Enter to trigger a test run.
There are a few things to notice here. First, as noted before, it automatically detects any files with test extensions including .test.js and .spec.js. In this case, there is only one test suite—that is, only one file with a .test.js extension—and that test suite contains only one test. Jest can detect tests in your code hierarchy, so you can nest tests in a directory and Jest will find them.
Second, Jest doesn’t run your test suite once and then exit. Rather, it continues running in the terminal. If you make any changes in the source code, it will rerun the tests again.
You can also limit which tests you run by using one of the keyboard options. If you type o, for example, you will only run the tests on files that have changed. This can save you lots of time as your test suites grow.
Finally, you can exit the test runner by typing q. Do this now to regain your command prompt.
The eject Script
The final script is npm eject. This script copies your dependencies and configuration files into your project, giving you full control over your code but ejecting the project from the Create React App integrated toolchain. You will not run this now because, once you run this script, you can’t undo this action and you will lose any future Create React App updates.
The value in Create React App is that you don’t have to worry about a significant amount of configuration. Building modern JavaScript applications requires a lot of tooling from build systems, such as Webpack, to compilation tools, such as Babel. Create React App handles all the configuration for you, so ejecting means dealing with this complexity yourself.
The downside of Create React App is that you won’t be able to fully customize the project. For most projects that’s not a problem, but if you ever want to take control of all aspects of the build process, you’ll need to eject the code. However, as mentioned before, once you eject the code you will not be able to update to new versions of Create React App, and you’ll have to manually add any enhancements on your own.
At this point, you’ve executed scripts to build and test your code. In the next step, you’ll start the project on a live server.
Step 3 — Starting the Server
In this step, you will initialize a local server and run the project in your browser.
You start your project with another npm script. Like npm test, this script does not need the run command. When you run the script you will start a local server, execute the project code, start a watcher that listens for code changes, and open the project in a web browser.
Start the project by typing the following command in the root of your project. For this tutorial, the root of your project is the digital-ocean-tutorial directory. Be sure to open this in a separate terminal or tab, because this script will continue running as long as you allow it:
- npm start
You’ll see some placeholder text for a brief moment before the server starts up, giving this output:
OutputCompiled successfully!

You can now view digital-ocean-tutorial in the browser.

  http://localhost:3000

Note that the development build is not optimized.
To create a production build, use npm run build.
If you are running the script locally, it will open the project in your browser window and shift the focus from the terminal to the browser.
If that doesn’t happen, you can visit http://localhost:3000/ to see the site in action. If you already happen to have another server running on port 3000, that’s fine. Create React App will detect the next available port and run the server with that. In other words, if you already have one project running on port 3000, this new project will start on port 3001.
If you are running this from a remote server you can still see your site without any additional configuration. The address will be http://your_server_ip:3000. If you have a firewall configured, you’ll need to open up the port on your remote server.
In the browser, you will see the following React template project:

As long as the script is running, you will have an active local server. To stop the script, either close the terminal window or tab or type CTRL+C or ⌘-+c in the terminal window or tab that is running your script.
At this point, you have started the server and are running your first React code. But before you make any changes to the React JavaScript code, you will see how React renders to the page in the first place.
Step 4 — Modifying the Homepage
In this step, you will modify code in the public/ directory. The public directory contains your base HTML page. This is the page that will serve as the root to your project. You will rarely edit this directory in the future, but it is the base from which the project starts and a crucial part of a React project.
If you cancelled your server, go ahead and restart it with npm start, then open public/ in your favorite text editor in a new terminal window:
- nano public/
Alternatively, you can list the files with the ls command:
- ls public/
You will see a list of files such as this:
Outputfavicon.ico
logo192.png
manifest.json
index.html
logo512.png
robots.txt
favicon.ico, logo192.png, and logo512.png are icons that a user would see either in the tab of their browser or on their phone. The browser will select the proper-sized icons. Eventually, you’ll want to replace these with icons that are more suited to your project. For now, you can leave them alone.
The manifest.json is a structured set of metadata that describes your project. Among other things, it lists which icon will be used for different size options.
The robots.txt file is information for web crawlers. It tells crawlers which pages they are or are not allowed to index. You will not need to change either file unless there is a compelling reason to do so. For instance, if you wanted to give some users a URL to special content that you do not want easily accessible, you can add it to robots.txt and it will still be publicly available, but not indexed by search engines.
The index.html file is the root of your application. This is the file the server reads, and it is the file that your browser will display. Open it up in your text editor and take a look.
If you are working from the command line, you can open it with the following command:
- nano public/index.html
Here’s what you will see:
<!DOCTYPE html>
<html lang="en">
  <head>
    <meta charset="utf-8" />
    <link rel="icon" href="%PUBLIC_URL%/favicon.ico" />
    <meta name="viewport" content="width=device-width, initial-scale=1" />
    <meta name="theme-color" content="#000000" />
    <meta
      name="description"
      content="Web site created using create-react-app"
    />
    <link rel="apple-touch-icon" href="%PUBLIC_URL%/logo192.png" />
    <!--
      manifest.json provides metadata used when your web app is installed on a
      user's mobile device or desktop. See https://developers.google.com/web/fundamentals/web-app-manifest/
    -->
    <link rel="manifest" href="%PUBLIC_URL%/manifest.json" />
    <!--
      Notice the use of %PUBLIC_URL% in the tags above.
      It will be replaced with the URL of the `public` folder during the build.
      Only files inside the `public` folder can be referenced from the HTML.

      Unlike "/favicon.ico" or "favicon.ico", "%PUBLIC_URL%/favicon.ico" will
      work correctly both with client-side routing and a non-root public URL.
      Learn how to configure a non-root public URL by running `npm run build`.
    -->
    <title>React App</title>
  </head>
  <body>
    <noscript>You need to enable JavaScript to run this app.</noscript>
    <div id="root"></div>
    <!--
      This HTML file is a template.
      If you open it directly in the browser, you will see an empty page.

      You can add webfonts, meta tags, or analytics to this file.
      The build step will place the bundled scripts into the <body> tag.

      To begin the development, run `npm start` or `yarn start`.
      To create a production bundle, use `npm run build` or `yarn build`.
    -->
  </body>
</html>
The file is pretty short. There are no images or words in the <body>. That’s because React builds the entire HTML structure itself and injects it with JavaScript. But React needs to know where to inject the code, and that’s the role of index.html.
In your text editor, change the <title> tag from React App to Sandbox:
<!DOCTYPE html>
<html lang="en">
  <head>
    <meta charset="utf-8" />
    <link rel="icon" href="%PUBLIC_URL%/favicon.ico" />
    <meta name="viewport" content="width=device-width, initial-scale=1" />
    <meta name="theme-color" content="#000000" />
    ...
    <title>Sandbox</title>
  </head>
  <body>
    <noscript>You need to enable JavaScript to run this app.</noscript>
    <div id="root"></div>
    <!--
      This HTML file is a template.
      If you open it directly in the browser, you will see an empty page.

      You can add webfonts, meta tags, or analytics to this file.
      The build step will place the bundled scripts into the <body> tag.

      To begin the development, run `npm start` or `yarn start`.
      To create a production bundle, use `npm run build` or `yarn build`.
    -->
  </body>
</html>
Save and exit your text editor. Check your browser. The title is the name located on the browser tab. It will update automatically. If not, refresh the page and notice the change.
Now go back to your text editor. Every React project starts from a root element. There can be multiple root elements on a page, but there needs to be at least one. This is how React knows where to put the generated HTML code. Find the element <div id="root">. This is the div that React will use for all future updates. Change the id from root to base:
<!DOCTYPE html>
<html lang="en">
  <head>
    <meta charset="utf-8" />
    ...
  <body>
    <noscript>You need to enable JavaScript to run this app.</noscript>
    <div id="base"></div>
    <!--
      This HTML file is a template.
      If you open it directly in the browser, you will see an empty page.

      You can add webfonts, meta tags, or analytics to this file.
      The build step will place the bundled scripts into the <body> tag.

      To begin the development, run `npm start` or `yarn start`.
      To create a production bundle, use `npm run build` or `yarn build`.
    -->
  </body>
</html>
Save the changes.
You will see an error in your browser:
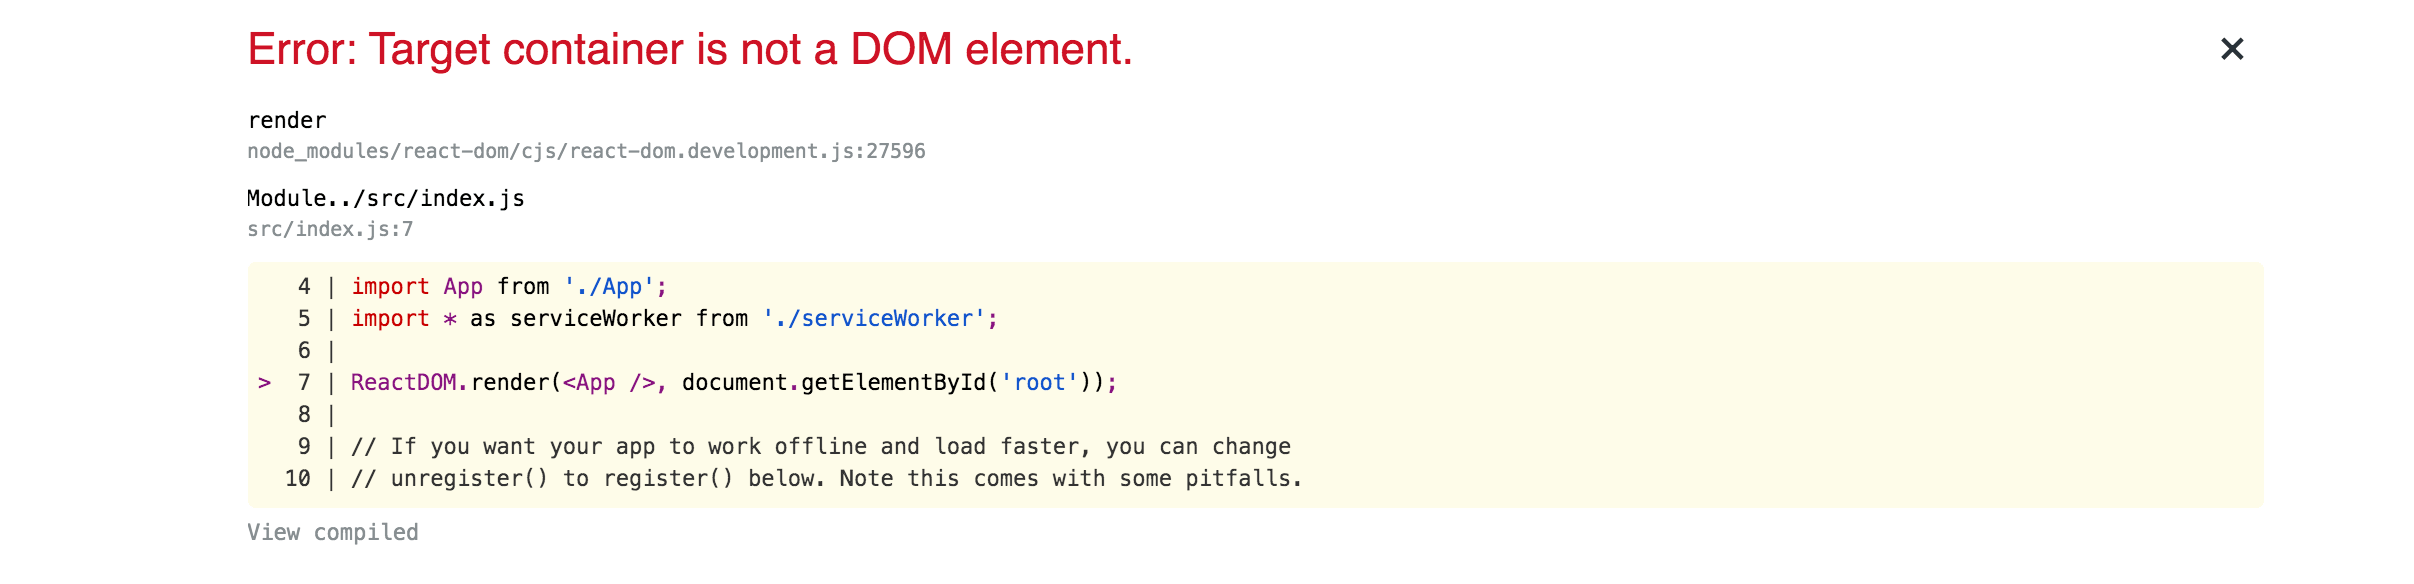
React was looking for an element with an id of root. Now that it is gone, React can’t start the project.
Change the name back from base to root:
<!DOCTYPE html>
<html lang="en">
  <head>
    <meta charset="utf-8" />
    ...
  <body>
    <noscript>You need to enable JavaScript to run this app.</noscript>
    <div id="root"></div>
    <!--
      This HTML file is a template.
      If you open it directly in the browser, you will see an empty page.

      You can add webfonts, meta tags, or analytics to this file.
      The build step will place the bundled scripts into the <body> tag.

      To begin the development, run `npm start` or `yarn start`.
      To create a production bundle, use `npm run build` or `yarn build`.
    -->
  </body>
</html>
Save and exit index.html.
At this point, you’ve started the server and made a small change to the root HTML page. You haven’t yet changed any JavaScript code. In the next section, you will update the React JavaScript code.
Step 5 — Modifying the Heading Tag and Styling
In this step, you will make your first change to a React component in the src/ directory. You’ll make a small change to the CSS and the JavaScript code that will automatically update in your browser using the built-in hot reloading.
If you stopped the server, be sure to restart it with npm start. Now, take some time to see the parts of the src/ directory. You can either open the full directory in your favorite text editor, or you can list out the project in a terminal with the following command:
- ls src/
You will see the following files in your terminal or text editor.
OutputApp.css
App.js
App.test.js
index.css
index.js
logo.svg
serviceWorker.js
setupTests.js
Let’s go through these files one at a time.
You will not spend much time with the serviceWorker.js file at first, but it can be important as you start to make progressive web applications. The service worker can do many things including push notifications and offline caching, but for now it’s best to leave it alone.
The next files to look at are setupTests.js and App.test.js. These are used for test files. In fact, when you ran npm test in Step 2, the script ran these files. The setupTests.js file is short; all it includes is a few custom expect methods. You’ll learn more about these in future tutorials in this series.
Open App.test.js:
- nano src/App.test.js
When you open it, you’ll see a basic test:
import React from 'react';
import { render } from '@testing-library/react';
import App from './App';

test('renders learn react link', () => {
  const { getByText } = render(<App />);
  const linkElement = getByText(/learn react/i);
  expect(linkElement).toBeInTheDocument();
});
The test is looking for the phrase learn react to be in the document. If you go back to the browser running your project, you’ll see the phrase on the page. React testing is different from most unit tests. Since components can include visual information, such as markup, along with logic for manipulating data, traditional unit tests do not work as easily. React testing is closer to a form of functional or integration testing.
Next, you’ll see some styling files: App.css, index.css, and logo.svg. There are multiple ways of working with styling in React, but the easiest is to write plain CSS since that requires no additional configuration.
There are multiple CSS files because you can import the styles into a component just like they were another JavaScript file. Since you have the power to import CSS directly into a component, you might as well split the CSS to only apply to an individual component. What you are doing is separating concerns. You are not keeping all the CSS separate from the JavaScript. Instead you are keeping all the related CSS, JavaScript, markup, and images grouped together.
Open App.css in your text editor. If you are working from the command line, you can open it with the following command:
- nano src/App.css
This is the code you’ll see:
.App {
  text-align: center;
}

.App-logo {
  height: 40vmin;
  pointer-events: none;
}

@media (prefers-reduced-motion: no-preference) {
  .App-logo {
    animation: App-logo-spin infinite 20s linear;
  }
}

.App-header {
  background-color: #282c34;
  min-height: 100vh;
  display: flex;
  flex-direction: column;
  align-items: center;
  justify-content: center;
  font-size: calc(10px + 2vmin);
  color: white;
}

.App-link {
  color: #61dafb;
}

@keyframes App-logo-spin {
  from {
    transform: rotate(0deg);
  }
  to {
    transform: rotate(360deg);
  }
}
This is a standard CSS file with no special CSS preprocessors. You can add them later if you want, but at first, you only have plain CSS. Create React App tries to be unopinionated while still giving an out-of-the-box environment.
Back to App.css, one of the benefits of using Create React App is that it watches all files, so if you make a change, you’ll see it in your browser without reloading.
To see this in action make a small change to the background-color in App.css. Change it from #282c34 to blue then save the file. The final style will look like this:
.App {
  text-align: center;
}
...
.App-header {
  background-color: blue
  min-height: 100vh;
  display: flex;
  flex-direction: column;
  align-items: center;
  justify-content: center;
  font-size: calc(10px + 2vmin);
  color: white;
}
...

@keyframes App-logo-spin {
  from {
    transform: rotate(0deg);
  }
  to {
    transform: rotate(360deg);
  }
}
Check out your browser. Here’s how it looked before:
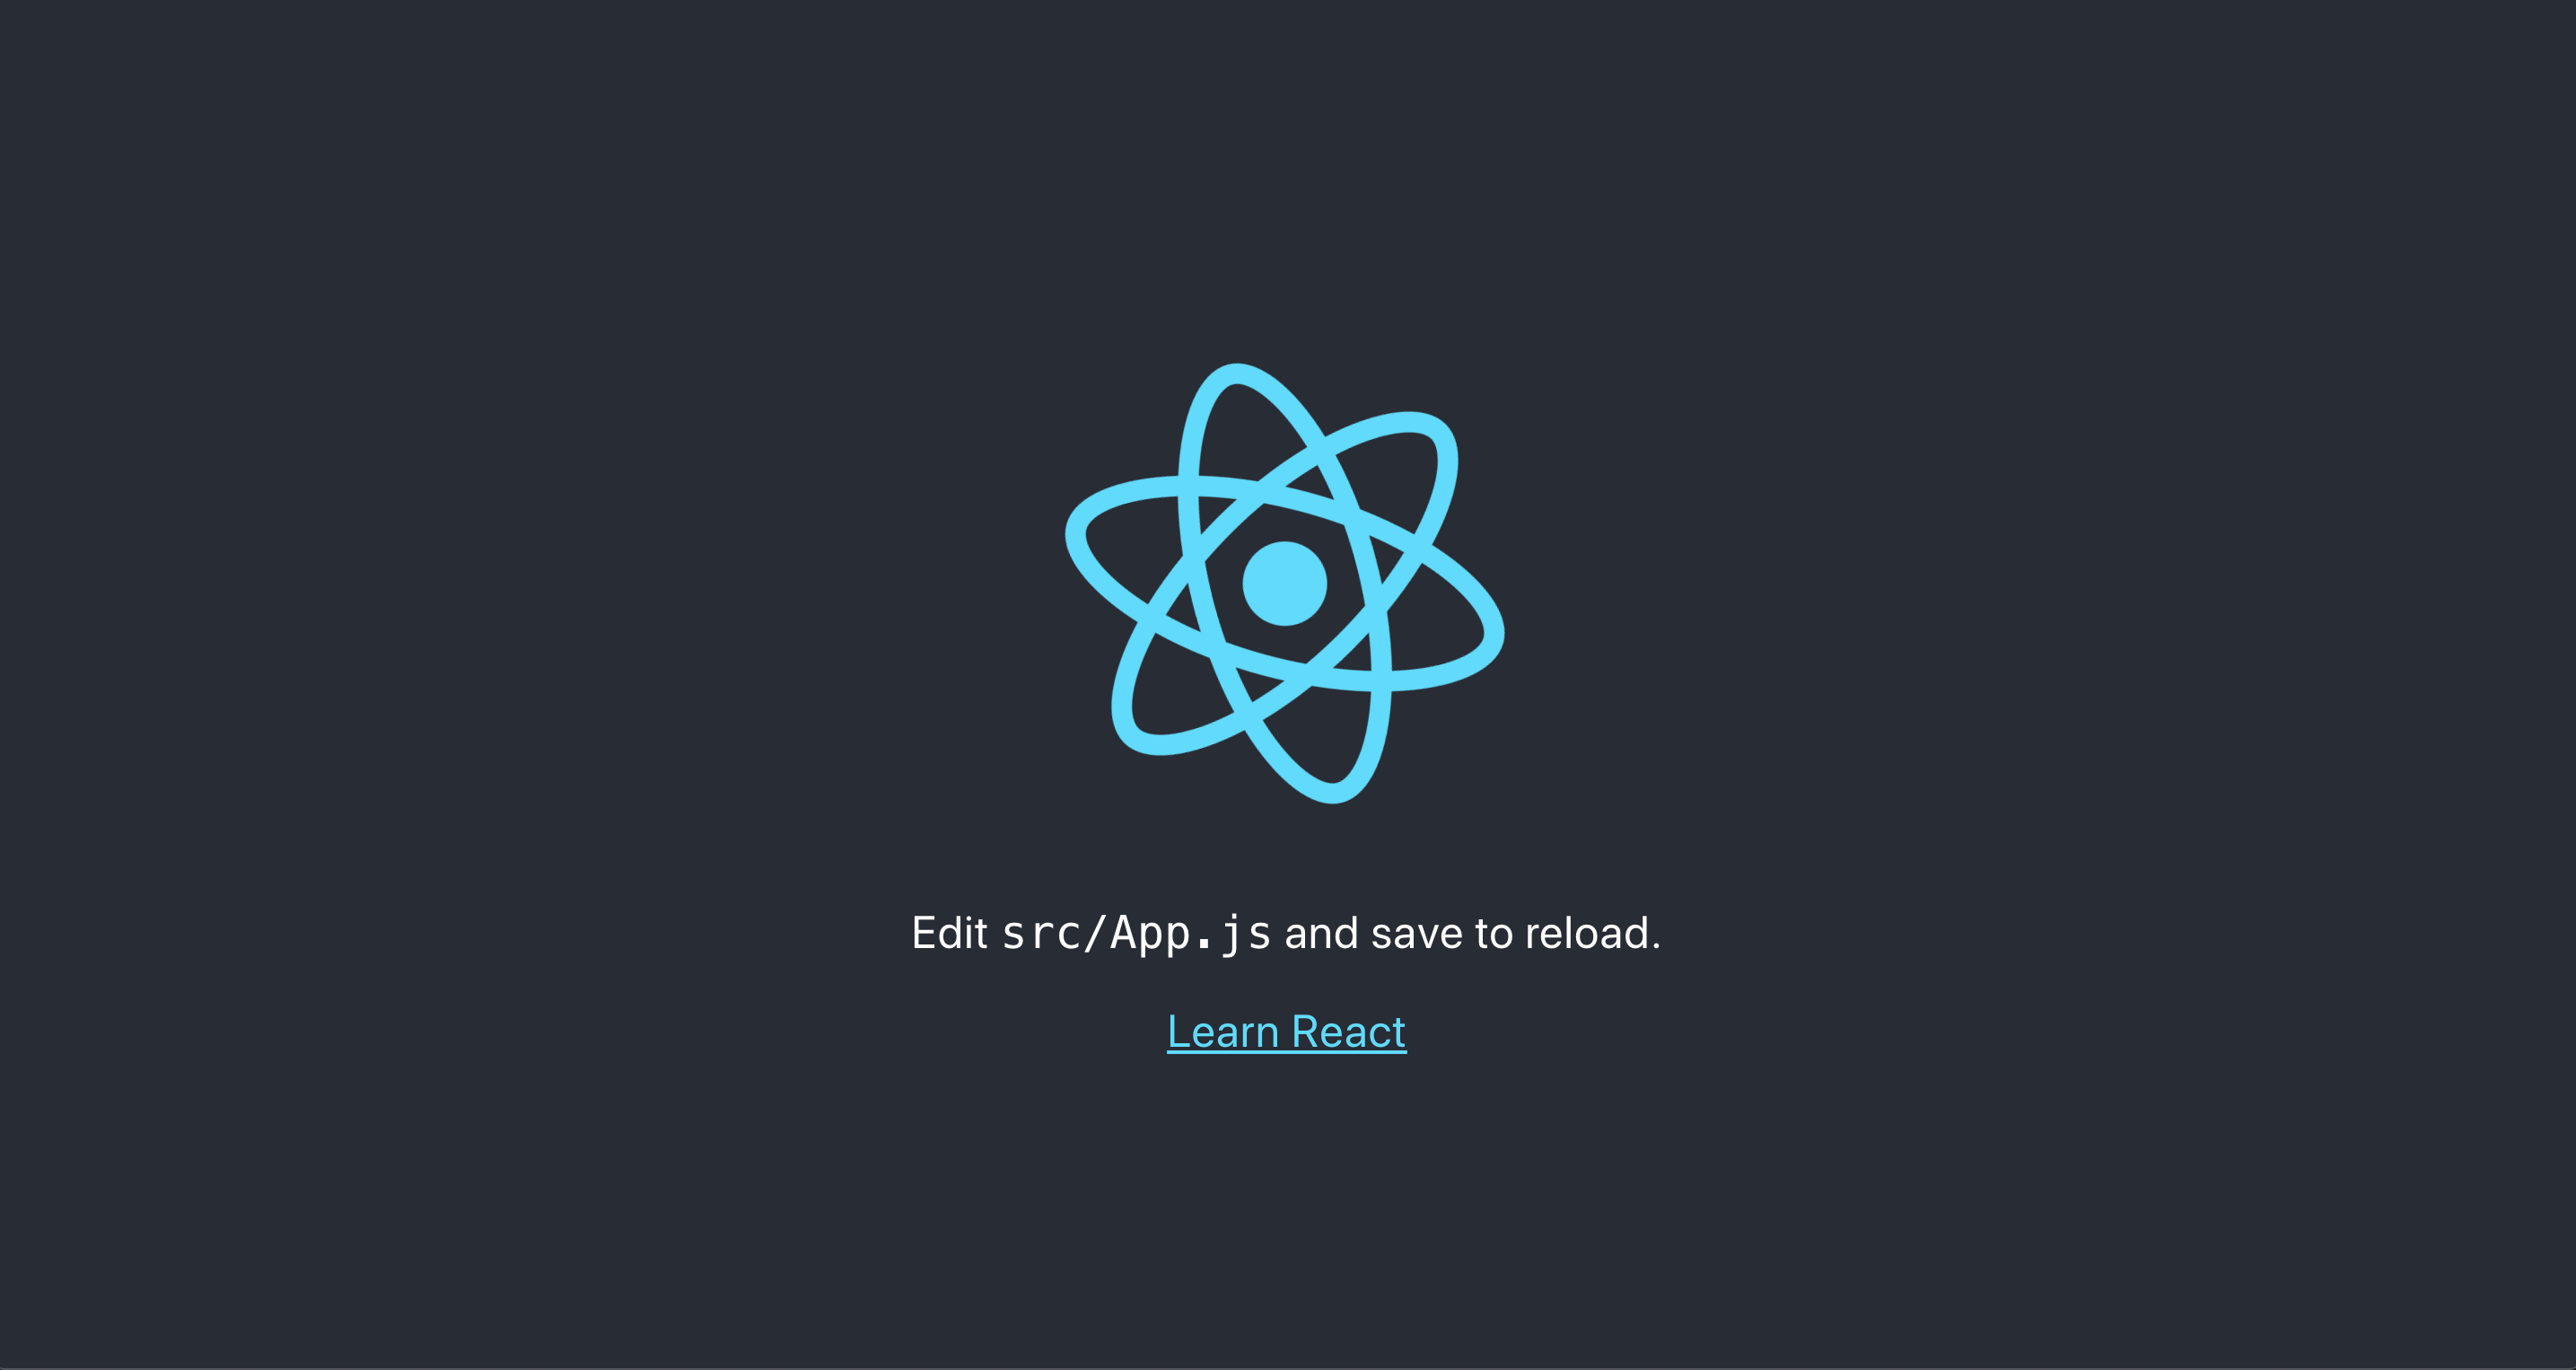
Here’s how it will look after the change:
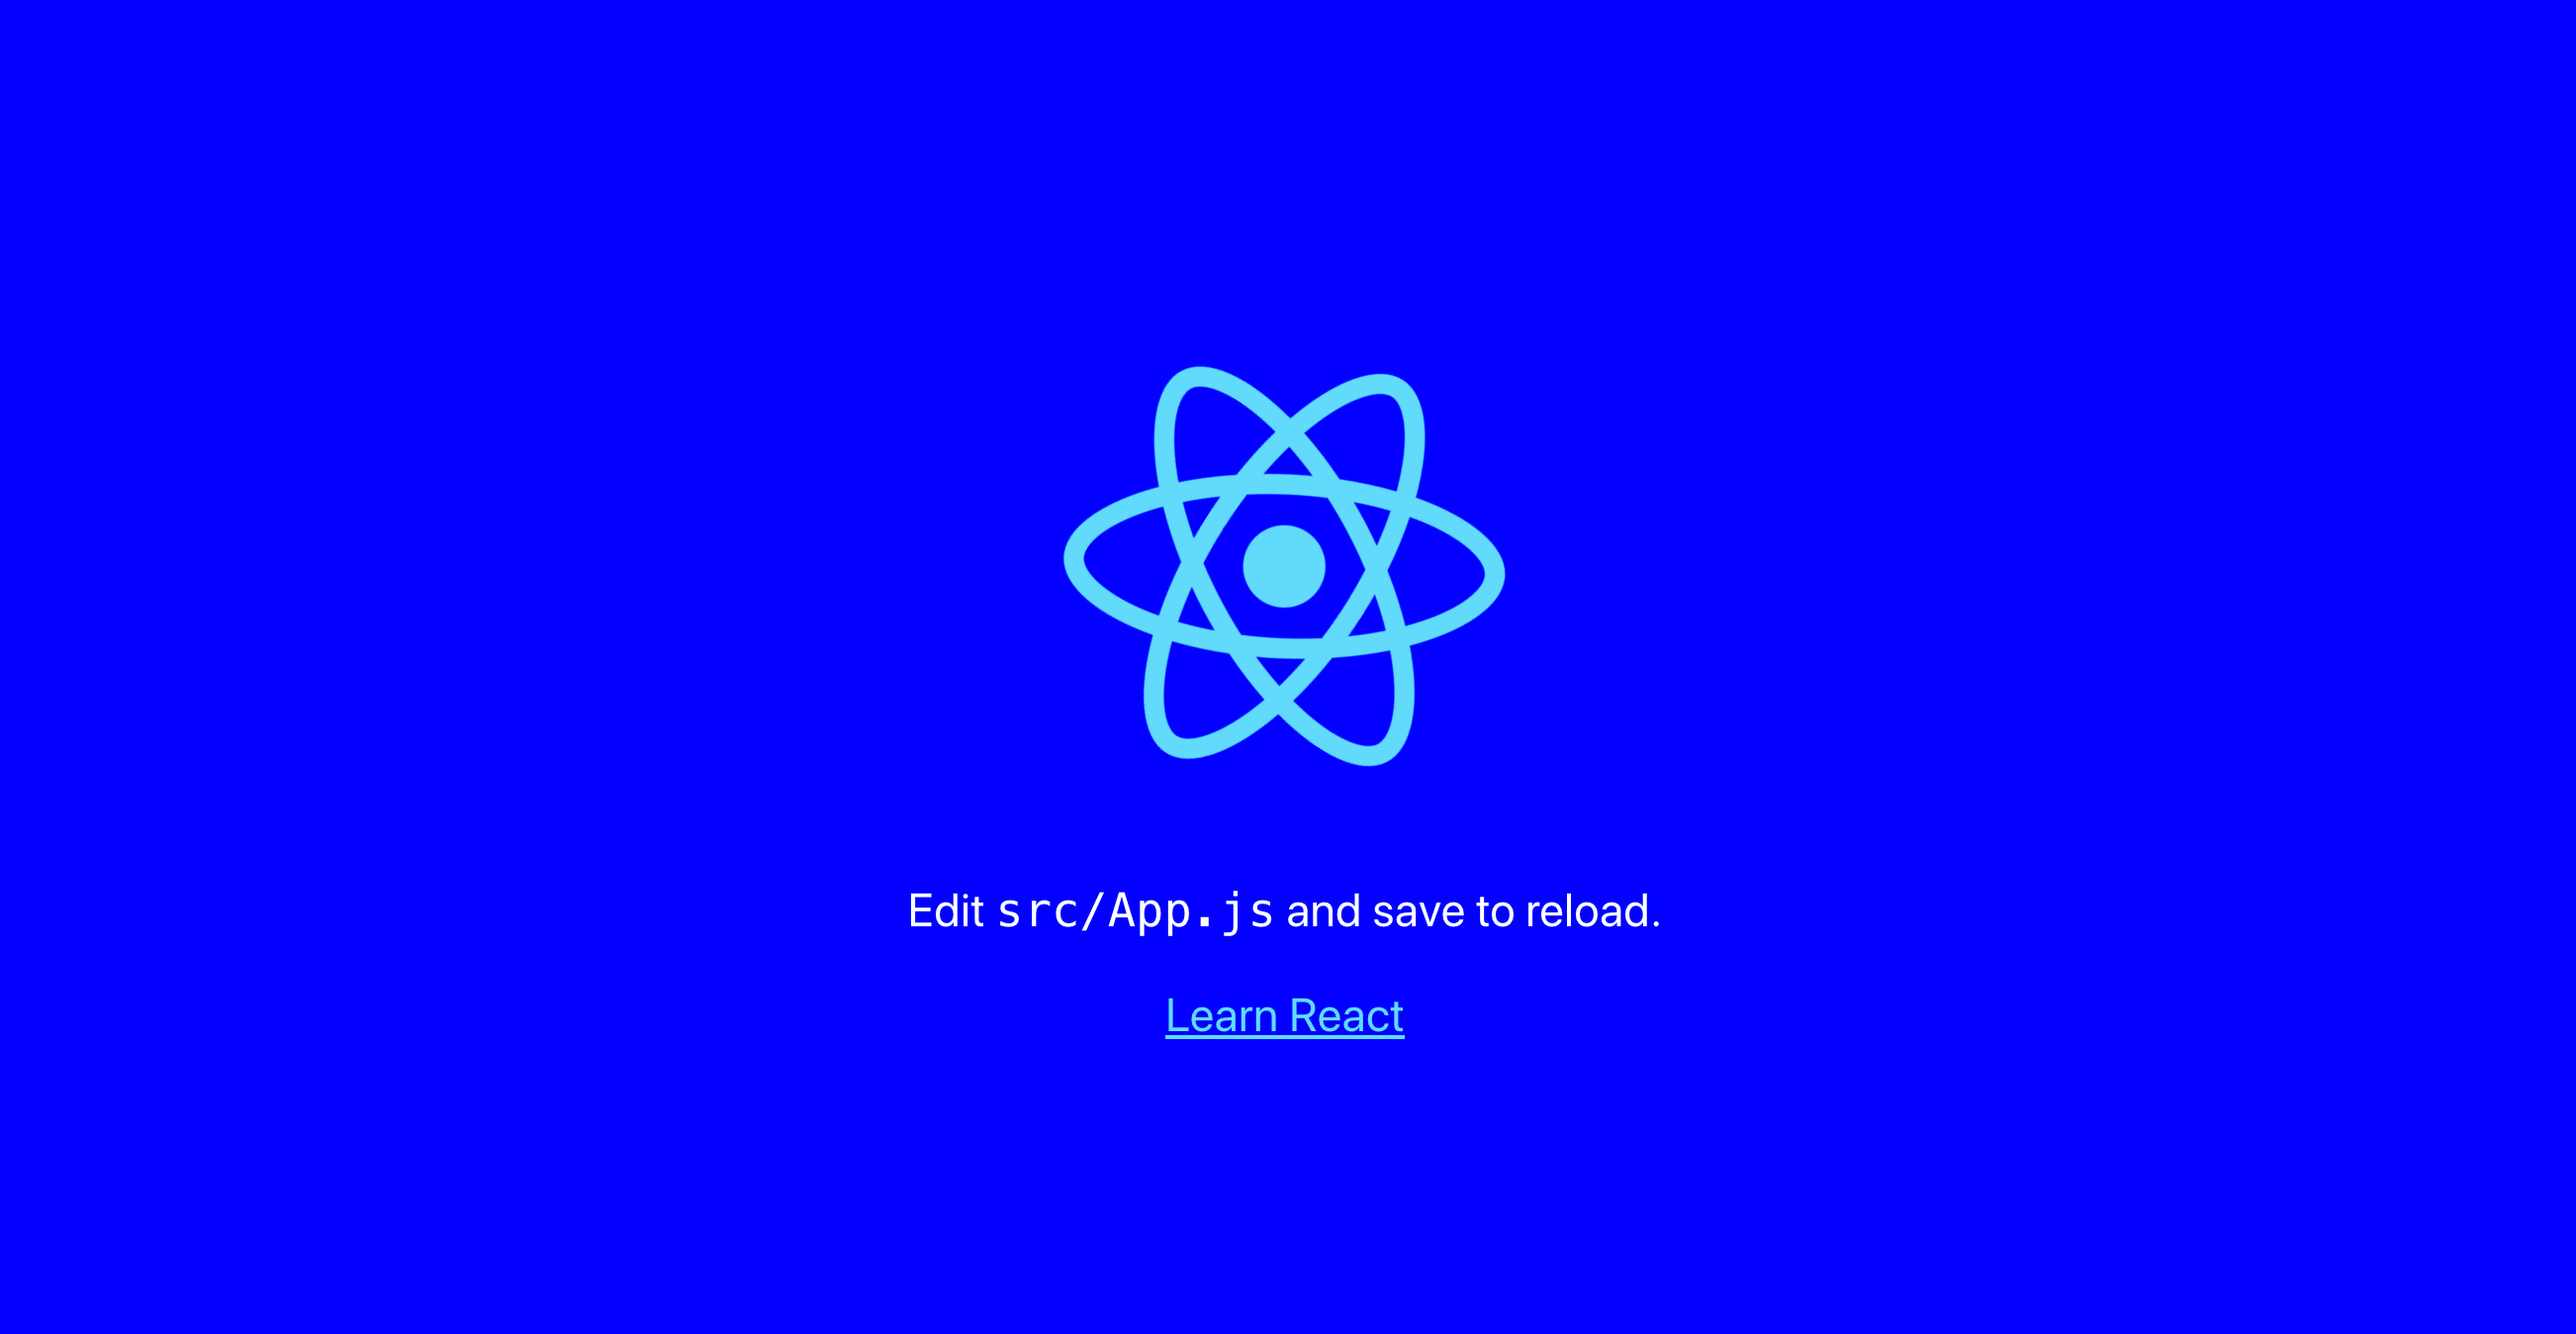
Go ahead and change background-color back to #282c34.
.App {
  text-align: center;

...

.App-header {
  background-color: #282c34
  min-height: 100vh;
  display: flex;
  flex-direction: column;
  align-items: center;
  justify-content: center;
  font-size: calc(10px + 2vmin);
  color: white;
}

...

@keyframes App-logo-spin {
  from {
    transform: rotate(0deg);
  }
  to {
    transform: rotate(360deg);
  }
}
Save and exit the file.
You’ve made a small CSS change. Now it’s time to make changes to the React JavaScript code. Start by opening index.js.
- nano src/index.js
Here’s what you’ll see:
import React from 'react';
import ReactDOM from 'react-dom';
import './index.css';
import App from './App';
import * as serviceWorker from './serviceWorker';

ReactDOM.render(<App />, document.getElementById('root'));

// If you want your app to work offline and load faster, you can change
// unregister() to register() below. Note this comes with some pitfalls.
// Learn more about service workers: https://bit.ly/CRA-PWA
serviceWorker.unregister();
At the top, you are importing React, ReactDOM, index.css, App, and serviceWorker. By importing React, you are actually pulling in code to convert JSX to JavaScript. JSX are the HTML-like elements. For example, notice how when you use App, you treat it like an HTML element <App />. You’ll explore this more in future tutorials in this series.
ReactDOM is the code that connects your React code to the base elements, like the index.html page you saw in public/. Look at the following highlighted line:
...
import * as serviceWorker from './serviceWorker';

ReactDOM.render(<App />, document.getElementById('root'));
...
serviceWorker.unregister();
This code instructs React to find an element with an id of root and inject the React code there. <App/> is your root element, and everything will branch from there. This is the beginning point for all future React code.
At the top of the file, you’ll see a few imports. You import index.css, but don’t actually do anything with it. By importing it, you are telling Webpack via the React scripts to include that CSS code in the final compiled bundle. If you don’t import it, it won’t show up.
Exit from src/index.js.
At this point, you still haven’t seen anything that you are viewing in your browser. To see this, open up App.js:
- nano src/App.js
The code in this file will look like a series of regular HTML elements. Here’s what you’ll see:
import React from 'react';
import logo from './logo.svg';
import './App.css';

function App() {
  return (
    <div className="App">
      <header className="App-header">
        <img src={logo} className="App-logo" alt="logo" />
        <p>
          Edit <code>src/App.js</code> and save to reload.
        </p>
        <a
          className="App-link"
          href="https://reactjs.org"
          target="_blank"
          rel="noopener noreferrer"
        >
          Learn React
        </a>
      </header>
    </div>
  );
}

export default App;
Change the contents of the <p> tag from Edit <code>src/App.js</code> and save to reload. to Hello, world and save your changes.
...

function App() {
  return (
    <div className="App">
      <header className="App-header">
        <img src={logo} className="App-logo" alt="logo" />
        <p>
            Hello, world
        </p>
        <a
          className="App-link"
          href="https://reactjs.org"
          target="_blank"
          rel="noopener noreferrer"
        >
          Learn React
        </a>
      </header>
    </div>
  );
}
...
Head over to your browser and you’ll see the change:
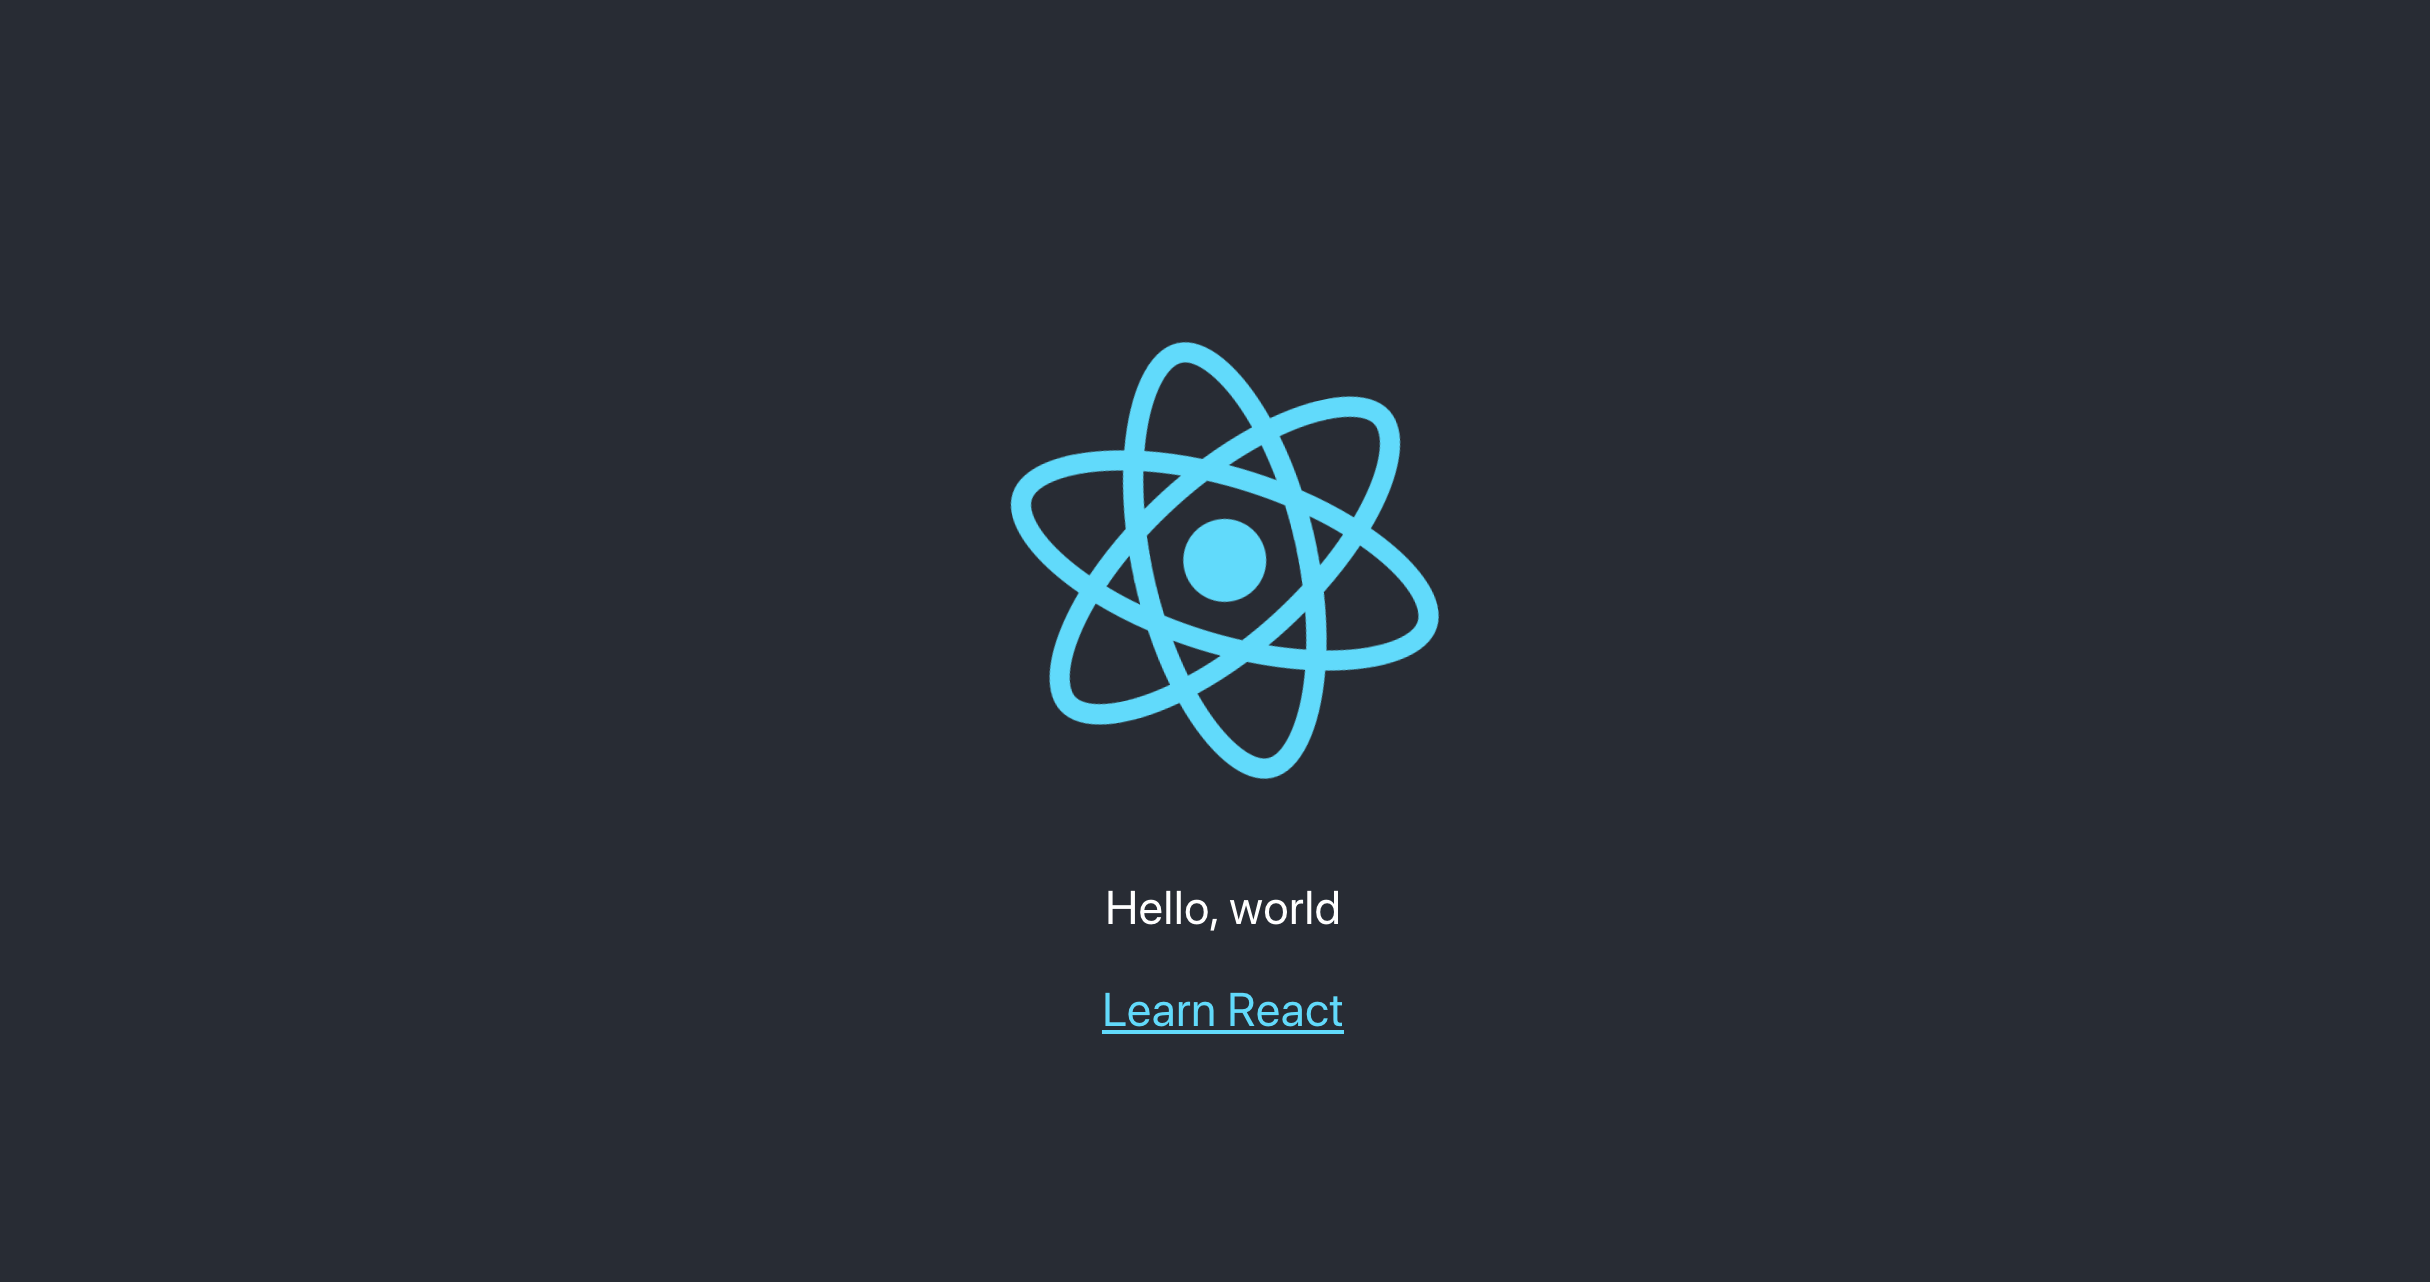
You’ve now made your first update to a React component.
Before you go, notice a few more things. In this component, you import the logo.svg file and assign it to a variable. Then in the <img> element, you add that code as the src.
There are a few things going on here. Look at the img element:
...
function App() {
  return (
    <div className="App">
      <header className="App-header">
        <img src={logo} className="App-logo" alt="logo" />
        <p>
            Hello, world
        </p>
...
Notice how you pass the logo into curly braces. Anytime you are passing attributes that are not strings or numbers, you need to use the curly braces. React will treat those as JavaScript instead of strings. In this case, you are not actually importing the image; instead you are referencing the image. When Webpack builds the project it will handle the image and set the source to the appropriate place.
Exit the text editor.
If you look at the DOM elements in your browser, you’ll see it adds a path. If you are using Chrome, you can inspect the element by right-clicking the element and selecting Inspect.
Here’s how it would look in the browser:
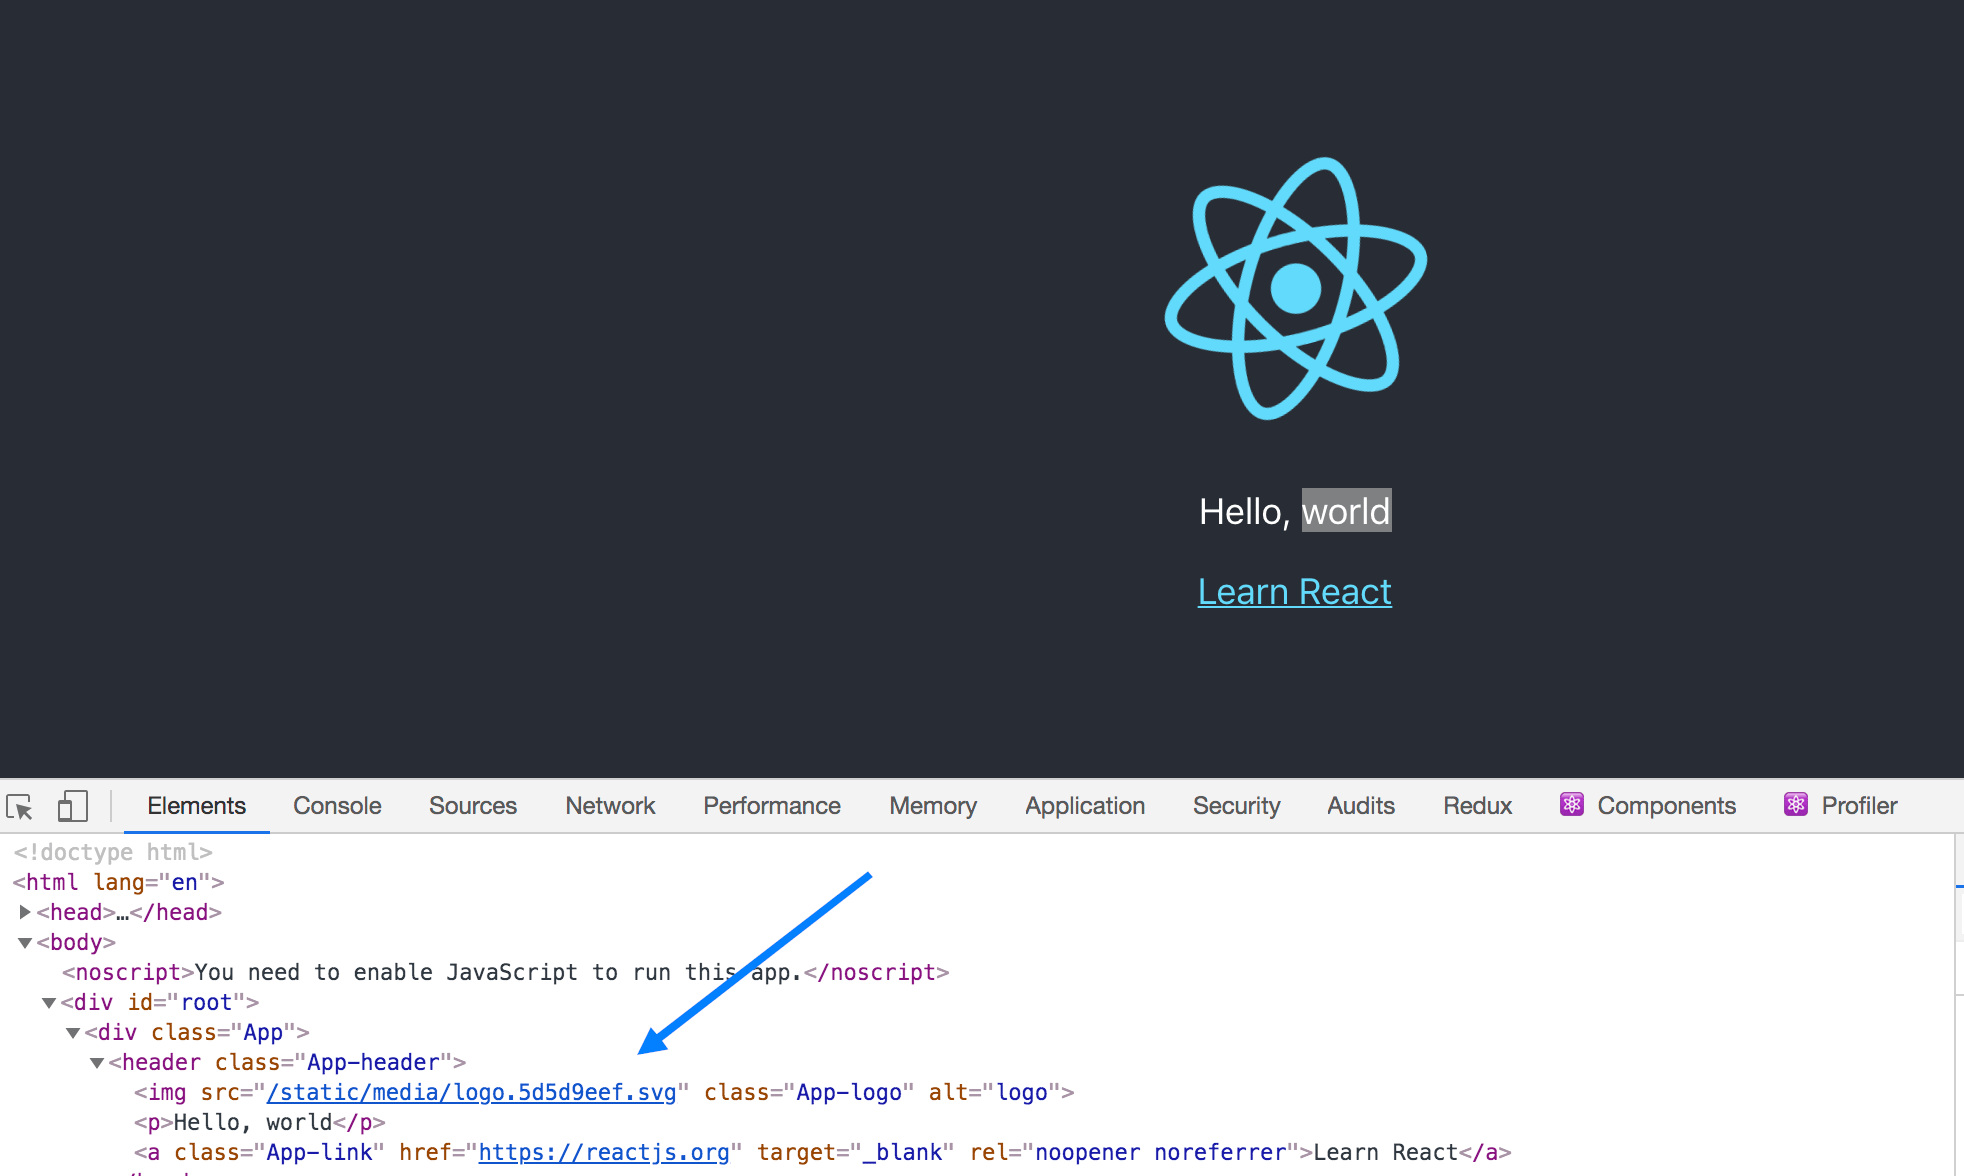
The DOM has this line:
<img src="/static/media/logo.5d5d9eef.svg" class="App-logo" alt="logo">
Your code will be slightly different since the logo will have a different name. Webpack wants to make sure the image path is unique. So even if you import images with the same name, they will be saved with different paths.
At this point, you’ve made a small change to the React JavaScript code. In the next step, you’ll use the build command to minify the code into a small file that can be deployed to a server.
Step 6 — Building the Project
In this step, you will build the code into a bundle that can be deployed to external servers.
Head back to your terminal and build the project. You ran this command before, but as a reminder, this command will execute the build script. It will create a new directory with the combined and minified files. To execute the build, run the following command from the root of your project:
- npm run build
There will be a delay as the code compiles and when it’s finished, you’ll have a new directory called build/.
Open up build/index.html in a text editor.
- nano build/index.html
You will see something like this:
<!doctype html><html lang="en"><head><meta charset="utf-8"/><link rel="icon" href="/favicon.ico"/><meta name="viewport" content="width=device-width,initial-scale=1"/><meta name="theme-color" content="#000000"/><meta name="description" content="Web site created using create-react-app"/><link rel="apple-touch-icon" href="/logo192.png"/><link rel="manifest" href="/manifest.json"/><title>React App</title><link href="/static/css/main.d1b05096.chunk.css" rel="stylesheet"></head><body><noscript>You need to enable JavaScript to run this app.</noscript><div id="root"></div><script>!function(e){function r(r){for(var n,a,p=r[0],l=r[1],c=r[2],i=0,s=[];i<p.length;i++)a=p[i],Object.prototype.hasOwnProperty.call(o,a)&&o[a]&&s.push(o[a][0]),o[a]=0;for(n in l)Object.prototype.hasOwnProperty.call(l,n)&&(e[n]=l[n]);for(f&&f(r);s.length;)s.shift()();return u.push.apply(u,c||[]),t()}function t(){for(var e,r=0;r<u.length;r++){for(var t=u[r],n=!0,p=1;p<t.length;p++){var l=t[p];0!==o[l]&&(n=!1)}n&&(u.splice(r--,1),e=a(a.s=t[0]))}return e}var n={},o={1:0},u=[];function a(r){if(n[r])return n[r].exports;var t=n[r]={i:r,l:!1,exports:{}};return e[r].call(t.exports,t,t.exports,a),t.l=!0,t.exports}a.m=e,a.c=n,a.d=function(e,r,t){a.o(e,r)||Object.defineProperty(e,r,{enumerable:!0,get:t})},a.r=function(e){"undefined"!=typeof Symbol&&Symbol.toStringTag&&Object.defineProperty(e,Symbol.toStringTag,{value:"Module"}),Object.defineProperty(e,"__esModule",{value:!0})},a.t=function(e,r){if(1&r&&(e=a(e)),8&r)return e;if(4&r&&"object"==typeof e&&e&&e.__esModule)return e;var t=Object.create(null);if(a.r(t),Object.defineProperty(t,"default",{enumerable:!0,value:e}),2&r&&"string"!=typeof e)for(var n in e)a.d(t,n,function(r){return e[r]}.bind(null,n));return t},a.n=function(e){var r=e&&e.__esModule?function(){return e.default}:function(){return e};return a.d(r,"a",r),r},a.o=function(e,r){return Object.prototype.hasOwnProperty.call(e,r)},a.p="/";var p=this["webpackJsonpdo-create-react-app"]=this["webpackJsonpdo-create-react-app"]||[],l=p.push.bind(p);p.push=r,p=p.slice();for(var c=0;c<p.length;c++)r(p[c]);var f=l;t()}([])</script><script src="/static/js/2.c0be6967.chunk.js"></script><script src="/static/js/main.bac2dbd2.chunk.js"></script></body></html>
The build directory takes all of your code and compiles and minifies it into the smallest usable state. It doesn’t matter if a human can read it, since this is not a public-facing piece of code. Minifying like this will make the code take up less space while still allowing it to work. Unlike some languages like Python, the whitespace doesn’t change how the computer interprets the code.
Conclusion
In this tutorial, you have created your first React application, configuring your project using JavaScript build tools without needing to go into the technical details. That’s the value in Create React App: you don’t need to know everything to get started. It allows you to ignore the complicated build steps so you can focus exclusively on the React code.
You’ve learned the commands to start, test, and build a project. You’ll use these commands regularly, so take note for future tutorials. Most importantly, you updated your first React component.
If you would like to see React in action, try our How To Display Data from the DigitalOcean API with React tutorial.
Thanks for learning with the DigitalOcean Community. Check out our offerings for compute, storage, networking, and managed databases.
Tutorial Series: How To Code in React.js
React is a popular JavaScript framework for creating front-end applications, such as user interfaces that allow users to interact with programs. Originally created by Facebook, it has gained popularity by allowing developers to create fast applications using an intuitive programming paradigm that ties JavaScript with an HTML-like syntax known as JSX.
In this series, you will build out examples of React projects to gain an understanding of this framework, giving you the knowledge you need to pursue front-end web development or start out on your way to full stack development.
Browse Series: 21 tutorials
About the author(s)
Author of Simplifying JavaScript. Writing featured in Slate, FreeCodeCamp, and here! I like to break things and put them back together. 🛠
Former Senior Technical Editor at DigitalOcean, fiction writer and podcaster elsewhere, always searching for the next good nautical pun! Areas of expertise include Node.js, PostgreSQL, CSS, JavaScript.
Still looking for an answer?
This textbox defaults to using Markdown to format your answer.
You can type !ref in this text area to quickly search our full set of tutorials, documentation & marketplace offerings and insert the link!
Nice article , but the important part of run the build folder has omitted:
npm install -g serve serve -s build
(from the root of the project after U did npm run build)
As of Jan 2021, some of the idiosyncrasies of create-react-app have changed. It no longer creates a service worker, and there are a few other small changes.
It’s a good intro! Maybe I’m nitpicking here but the quote “Anytime you are passing attributes that are not strings or numbers” seems incorrect. Since numbers also should be wrapped with bracers e.g. someAttr={42} instead of someAttr=42.
 This work is licensed under a Creative Commons Attribution-NonCommercial- ShareAlike 4.0 International License.
Become a contributor for community
Get paid to write technical tutorials and select a tech-focused charity to receive a matching donation.

DigitalOcean Documentation
Full documentation for every DigitalOcean product.

Resources for startups and AI-native businesses
The Wave has everything you need to know about building a business, from raising funding to marketing your product.
The developer cloud
Scale up as you grow — whether you're running one virtual machine or ten thousand.

Start building today
From GPU-powered inference and Kubernetes to managed databases and storage, get everything you need to build, scale, and deploy intelligent applications.
