By Joe Morgan and Timothy Nolan

The author selected Creative Commons to receive a donation as part of the Write for DOnations program.
Introduction
In React, routers help create and navigate between the different URLs that make up your web application. They allow your user to move between the components of your app while preserving user state, and can provide unique URLs for these components to make them more shareable. With routers, you can improve your app’s user experience by simplifying site navigation.
React Router is one of the most popular routing frameworks for React. The library is designed with intuitive components to let you build a declarative routing system for your application. This means that you can declare exactly which of your components has a certain route. With declarative routing, you can create intuitive routes that are human-readable, making it easier to manage your application architecture.
In this tutorial, you’ll install and configure React Router, build a set of routes, and connect to them using the <Link> component. You’ll also build dynamic routes that collect data from a URL that you can access in your component. Finally, you’ll use Hooks to access data and other routing information and create nested routes that live inside components that are rendered by parent routes.
By the end of this tutorial, you’ll be able to add routes to any React project and read information from your routes so that you can create flexible components that respond to URL data.
Deploy your React applications from GitHub using DigitalOcean App Platform. Let DigitalOcean focus on scaling your app.
Prerequisites
-
You will need a development environment running Node.js; this tutorial was tested on Node.js version 10.22.0 and npm version 6.14.6. To install this on macOS or Ubuntu 18.04, follow the steps in How to Install Node.js and Create a Local Development Environment on macOS or the Installing Using a PPA section of How To Install Node.js on Ubuntu 18.04.
-
A React development environment set up with Create React App, with the non-essential boilerplate removed. To set this up, follow Step 1 — Creating an Empty Project of the How To Manage State on React Class Components tutorial. This tutorial will use
router-tutorialas the project name. -
You will be using React components and custom Hooks throughout the tutorial. You can learn about components in How To Create Custom Components in React and Hooks in How To Manage State with Hooks on React Components.
-
You will also need a basic knowledge of JavaScript, HTML, and CSS, which you can find in our How To Build a Website With HTML series, How To Build a Website With CSS series, and in How To Code in JavaScript.
Step 1 — Installing React Router
In this step, you’ll install React Router into your base project. In this project, you are going to make a small website about marine mammals. Each mammal will need a separate component that you’ll render with the router. After installing the library, you’ll create a series of components for each mammal. By the end of this step, you’ll have a foundation for rendering different mammals based on route.
To start, install the React Router package. There are two different versions: a web version and a native version for use with React Native. You will install the web version.
In your terminal, use npm to install the package:
- npm install react-router-dom
The package will install and you’ll receive a message such as this one when the installation is complete. Your message may vary slightly:
Output...
+ react-router-dom@5.2.0
added 11 packages from 6 contributors and audited 1981 packages in 24.897s

114 packages are looking for funding
  run `npm fund` for details

found 0 vulnerabilities
You now have the package installed. For the remainder of this step, you’ll create a series of components that will each have a unique route.
To start, make a directory for three different mammals: manatees, narwhals, and whales. Run the following commands:
- mkdir src/components/Manatee
- mkdir src/components/Narwhal
- mkdir src/components/Whale
Next, create a component for each animal. Add an <h2> tag for each mammal. In a full application, the child components can be as complex as you want. They can even import and render their own child components. For this tutorial, you’ll render only the <h2> tag.
Begin with the manatee component. Open Manatee.js in your text editor:
- nano src/components/Manatee/Manatee.js
Then add the basic component:
import React from 'react';

export default function Manatee() {
  return <h2>Manatee</h2>;
}
Save and close the file.
Next, create a component for the narwhal:
- nano src/components/Narwhal/Narwhal.js
Add the same basic component, changing the <h2> to Narwhal:
import React from 'react';

export default function Narwhal() {
  return <h2>Narwhal</h2>;
}
Save and close the file.
Finally, create a file for Whale:
- nano src/components/Whale/Whale.js
Add the same basic component, changing the <h2> to Whale:
import React from 'react';

export default function Whale() {
  return <h2>Whale</h2>;
}
Save and close the file. In the next step, you’ll start connecting routes; for now, render the basic component in your application.
Open App.js:
- nano src/components/App/App.js
Add an <h1> tag with the name of the website (Marine Mammals) inside of a <div> with a className of wrapper. This will serve as a template. The wrapper and <h1> tag will render on every page. In full applications, you might add a navigation bar or a header component that you’d want on every page.
Add the following highlighted lines to the file:
import React from 'react';
import './App.css';
function App() {
  return (
    <div className="wrapper">
      <h1>Marine Mammals</h1>
    </div>
  );
}

export default App;
Next, import Manatee and render inside the <div>. This will serve as a placeholder until you add more routes:
import React from 'react';
import './App.css';

import Manatee from '../Manatee/Manatee';

function App() {
  return (
    <div className="wrapper">
      <h1>Marine Mammals</h1>
      <Manatee />
    </div>
  );
}

export default App;
Save and close the file.
Now that you have all of the components, add some padding to give the application a little space.
Open App.css:
- nano src/components/App/App.css
Then replace the contents with the following code that adds a padding of 20px to the .wrapper class:
.wrapper {
    padding: 20px;
}
Save and close the file. When you do, the browser will refresh to show your basic component:
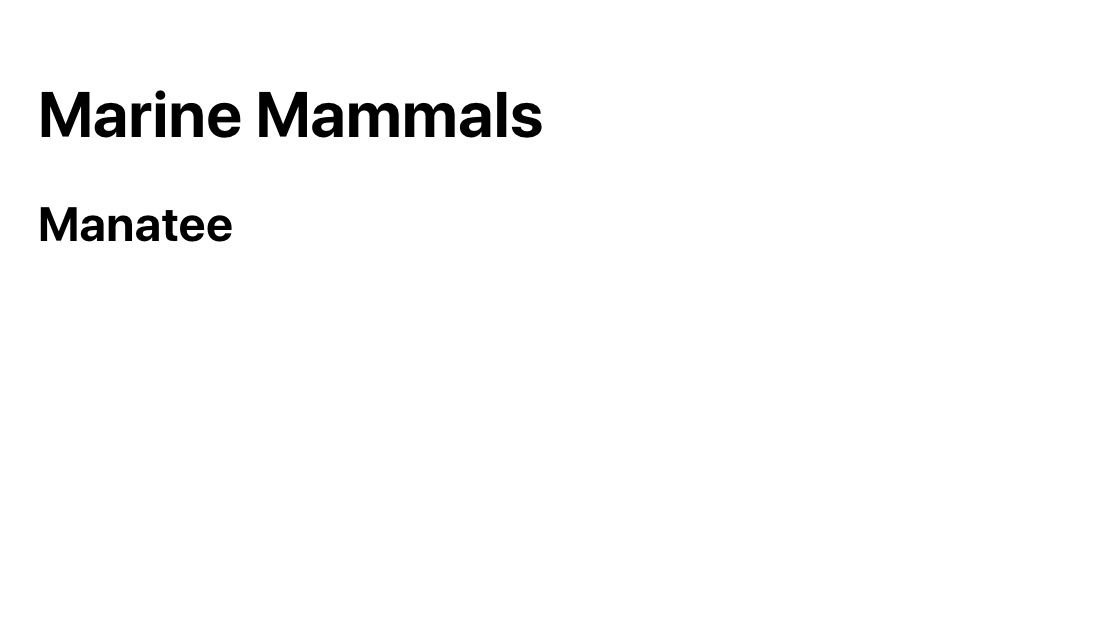
Now you have a basic root component that you will use to display other components. If you didn’t have a router, you could conditionally display components using the useState Hook. But this wouldn’t offer a great experience for your users. Anytime a user refreshes the page, the user’s selection would disappear. Further, they wouldn’t be able to bookmark or share specific states of the application. A router will solve all these problems. The router will preserve the user state and will give the user a clear URL that they can save or send to others.
In this step, you installed React Router and created basic components. The components are going to be individual pages that you’ll display by route. In the next step, you’ll add routes and use the <Link> component to create performant hyperlinks.
Step 2 — Adding Routes
In this step, you’ll create a base router with individual routes for each page. You’ll order your routes to ensure that components are rendered correctly and you’ll use the <Link> component to add hyperlinks to your project that won’t trigger a page refresh.
By the end of this step, you’ll have an application with a navigation that will display your components by route.
React Router is a declarative routing framework. That means that you will configure the routes using standard React components. There are a few advantages to this approach. First, it follows the standard declaractive nature of React code. You don’t need to add a lot of code in componentDidMount methods or inside a useEffect Hook; your routes are components. Second, you can intuitively place routes inside of a component with other components serving as a template. As you read the code, you’ll find exactly where the dynamic components will fit in relation to the global views such as navigation or footers.
To start adding routes, open App.js:
- nano src/components/App/App.js
The <h1> tag is going to serve as a global page title. Since you want it to appear on every page, configure the router after the tag.
Import BrowserRouter, Route, and Switch from react-router-dom. BrowserRouter will be the base configuration. Switch will wrap the dynamic routes and the Route component will configure specific routes and wrap the component that should render:
import React from 'react';
import { BrowserRouter, Route, Switch } from 'react-router-dom';
import './App.css';

import Manatee from '../Manatee/Manatee';

function App() {
  return (
    <div className="wrapper">
      <h1>Marine Mammals</h1>
      <Manatee />
    </div>
  );
}

export default App;
Add the BrowserRouter component to create a base router. Anything outside of this component will render on every page, so place it after your <h1> tag. In addition, if you have site-wide context that you want to use, or some other store such as Redux, place those components outside the router. This will make them available to all components on any route:
import React from 'react';
import { BrowserRouter, Route, Switch } from 'react-router-dom';
import './App.css';

import Manatee from '../Manatee/Manatee';

function App() {
  return (
    <div className="wrapper">
      <h1>Marine Mammals</h1>
      <BrowserRouter>
        <Manatee />
      </BrowserRouter>
    </div>
  );
}

export default App;
Next, add the Switch component inside BrowserRouter. This component will activate the correct route, much like the JavaScript switch statement. Inside of Switch, add a Route component for each route. In this case, you’ll want the following routes: /manataee, /narwhal, and /whale. The Route component will take a path as a parameter and surround a child component. The child component will display when the route is active.
Create a route for the path / and render the Manatee component:
import React from 'react';
import { BrowserRouter, Route, Switch } from 'react-router-dom';
import './App.css';

import Manatee from '../Manatee/Manatee';

function App() {
  return (
    <div className="wrapper">
      <h1>Marine Mammals</h1>
      <BrowserRouter>
        <Switch>
          <Route path="/">
            <Manatee />
          </Route>
        </Switch>
      </BrowserRouter>
    </div>
  );
}

export default App;
Save the file. When you do the browser will reload and you’ll find the information for the manatee component:
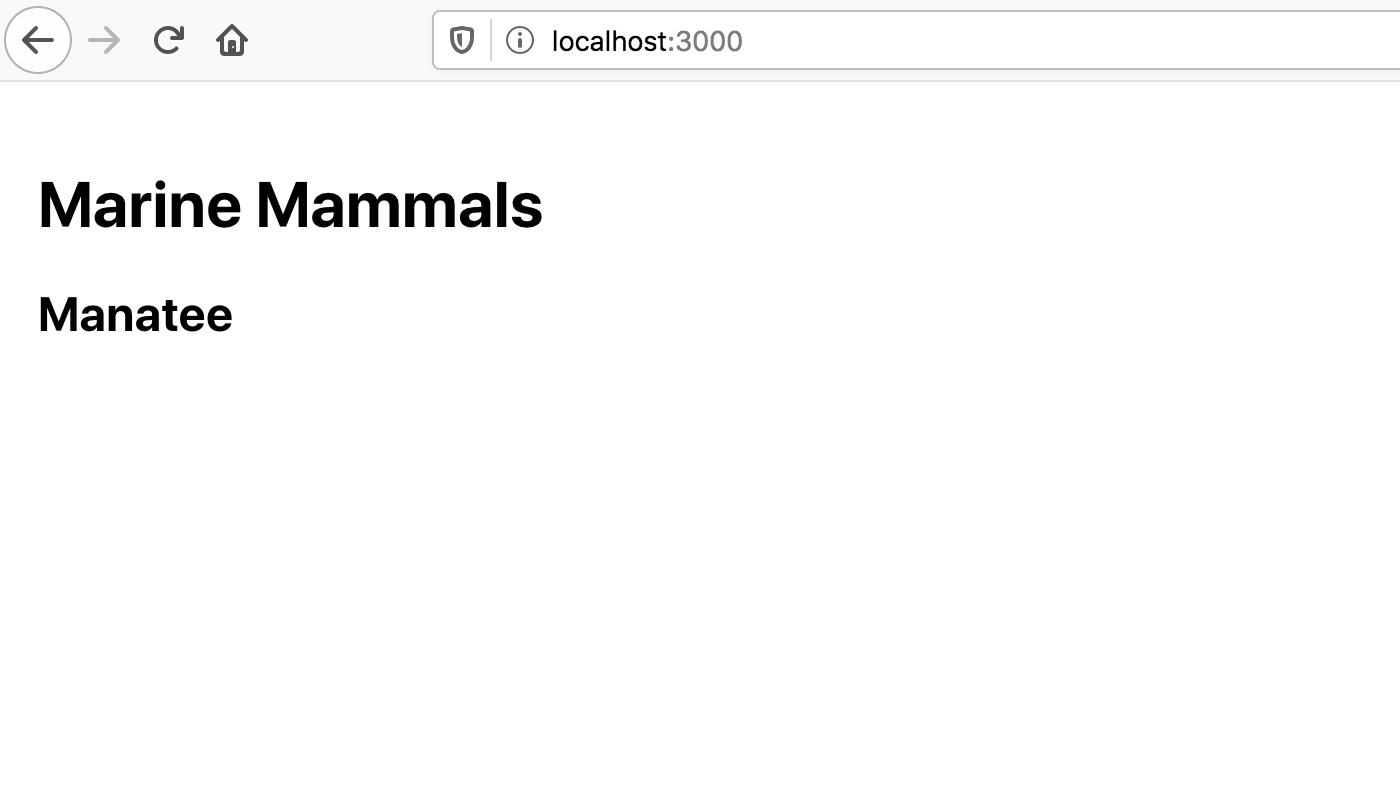
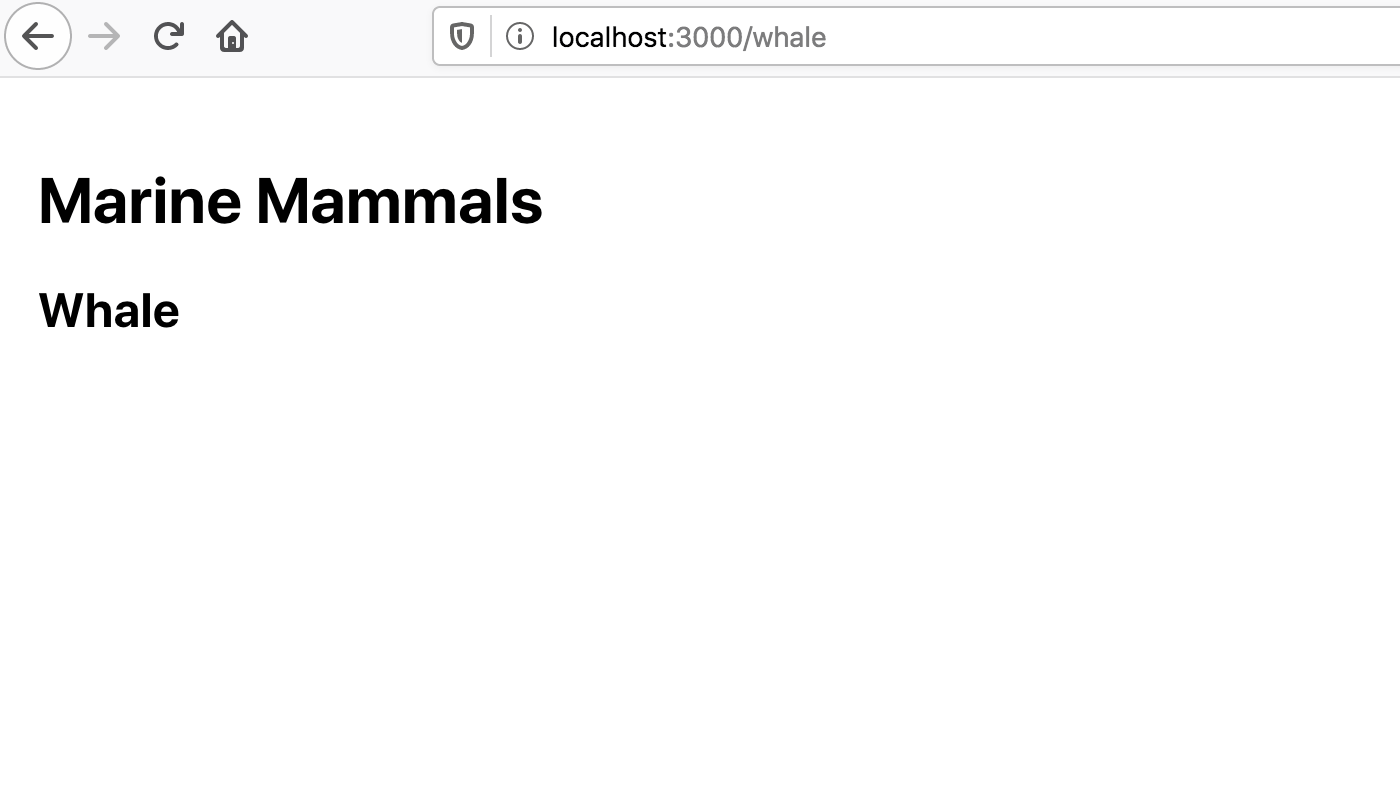
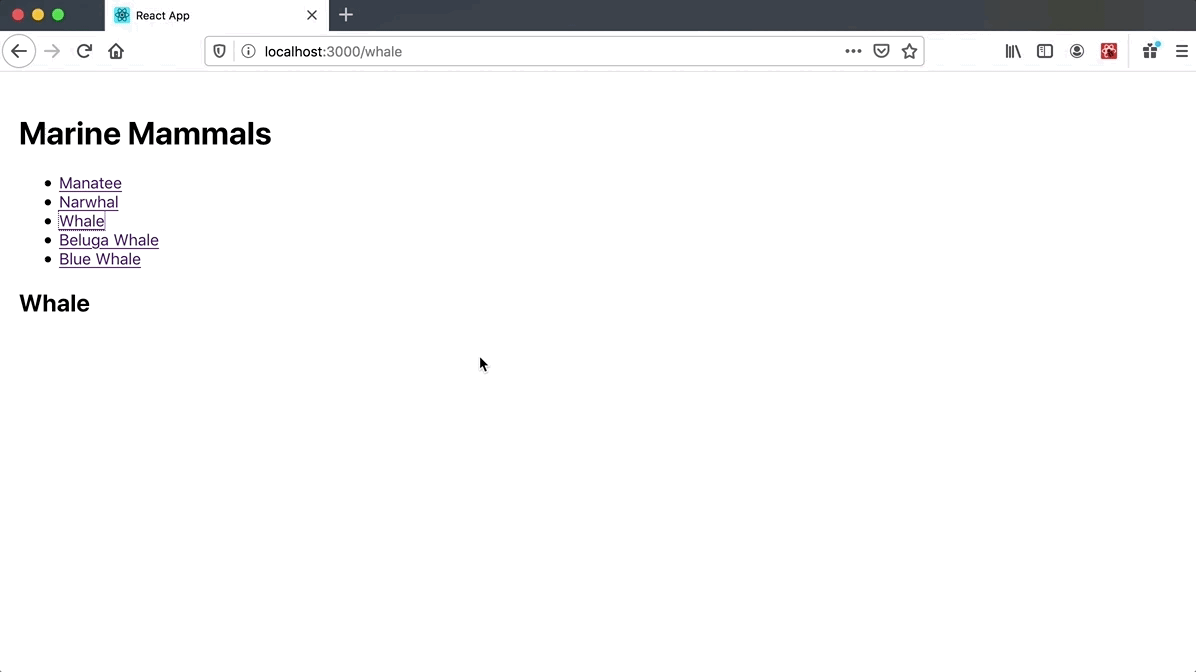
If you try a different route such as http://localhost:3000/whale, you’ll still find the manatee component.
The Switch component will render the first route that matches that pattern. Any route will match /, so it will render on every page. That also means that order is important. Since the router will exit as soon as it finds a match, always put a more specific route before a less specific route. In other words, /whale would go before / and /whale/beluga would go before /whale.
If you want the route to match only the route as written and not any child routes, you can add the exact prop. For example, <Route exact path="/manatee"> would match /manatee, but not /manatee/african.
Update the route for the Manatee component to /manatee, then import the remaining components and create a route for each:
import React from 'react';
import { BrowserRouter, Route, Switch } from 'react-router-dom';
import './App.css';

import Manatee from '../Manatee/Manatee';
import Narwhal from '../Narwhal/Narwhal';
import Whale from '../Whale/Whale';

function App() {
  return (
    <div className="wrapper">
      <h1>Marine Mammals</h1>
      <BrowserRouter>
        <Switch>
          <Route path="/manatee">
            <Manatee />
          </Route>
          <Route path="/narwhal">
            <Narwhal />
          </Route>
          <Route path="/whale">
            <Whale />
          </Route>
        </Switch>
      </BrowserRouter>
    </div>
  );
}

export default App;
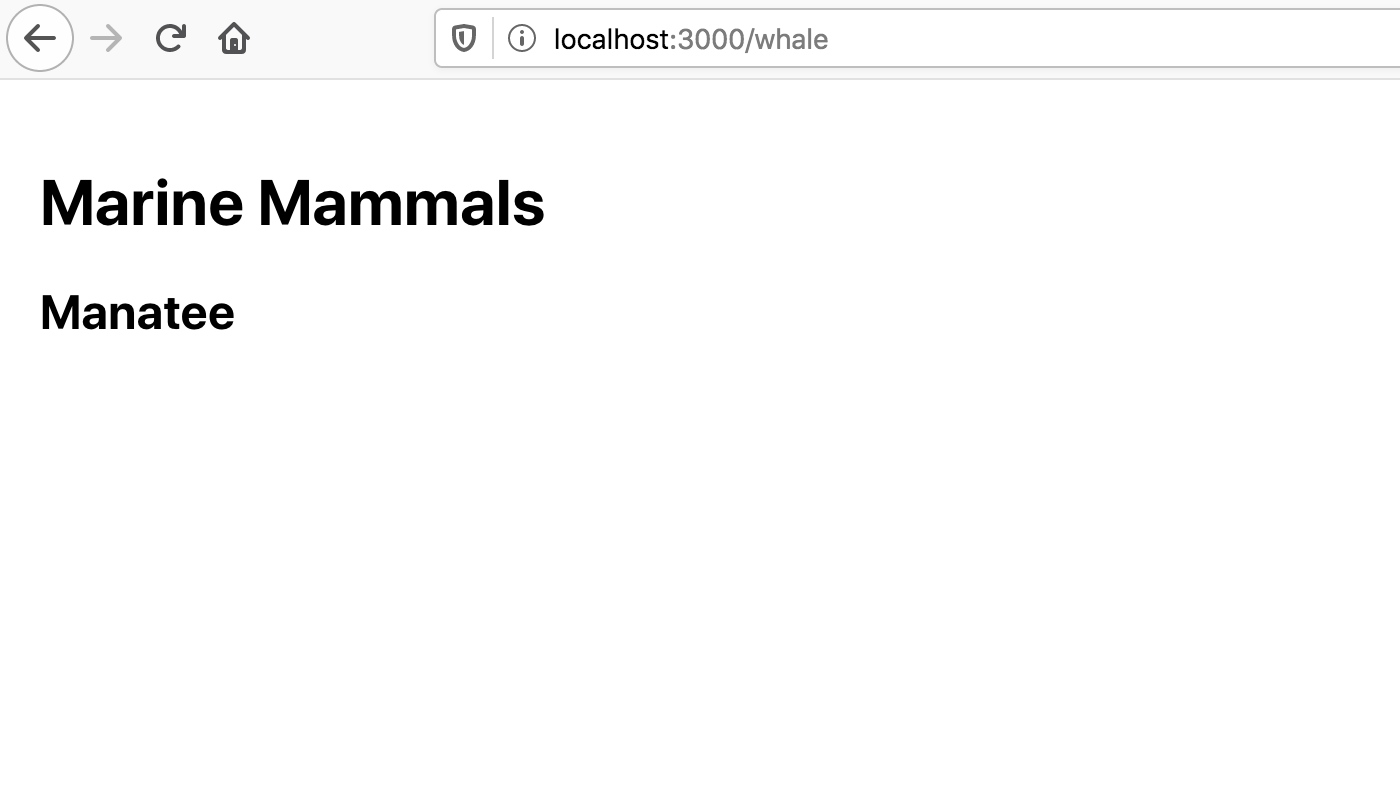
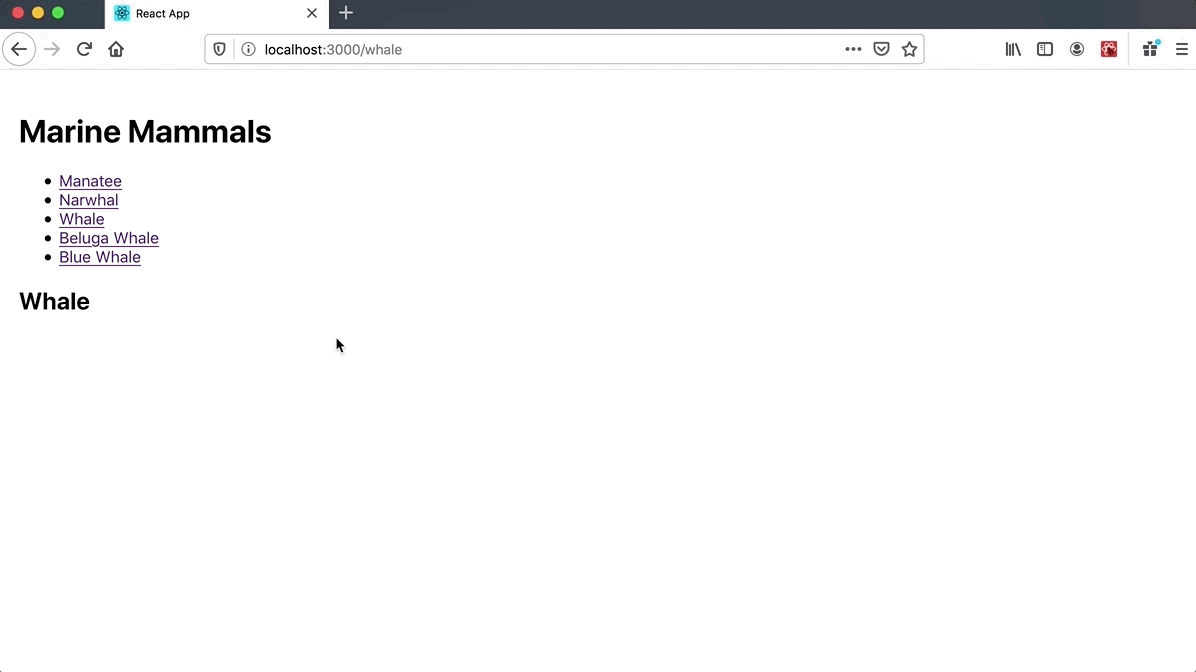
Save the file. When you do, the browser will refresh. If you visit http://localhost:3000/, only the <h1> tag will render, because no routes match any of the Route components:
If you visit http://localhost:3000/whale, you’ll find the Whale component:
Now that you have some components, create navigation for a user to move between pages.
Use the <nav> element to denote that you are creating a navigation portion of the page. Then add an unordered list (<ul>) with a list item (<li>) and a hyperlink (<a>) for each mammal:
import React from 'react';
import { BrowserRouter, Route, Switch } from 'react-router-dom';
import './App.css';

import Manatee from '../Manatee/Manatee';
import Narwhal from '../Narwhal/Narwhal';
import Whale from '../Whale/Whale';

function App() {
  return (
    <div className="wrapper">
      <h1>Marine Mammals</h1>
      <nav>
        <ul>
          <li><a href="/manatee">Manatee</a></li>
          <li><a href="/narwhal">Narwhal</a></li>
          <li><a href="/whale">Whale</a></li>
        </ul>
      </nav>
      <BrowserRouter>
        ...
      </BrowserRouter>
    </div>
  );
}

export default App;
Save the file. When you do, the browser will refresh, but there will be a problem. Since you are using the native browser links—<a> tags—you will get the default browser behavior any time you click on a link. That means any time you click on a link, you’ll trigger a full page refresh.
Notice that the network will reload all of the JavaScript files when you click a link. That’s a big performance cost for your users.
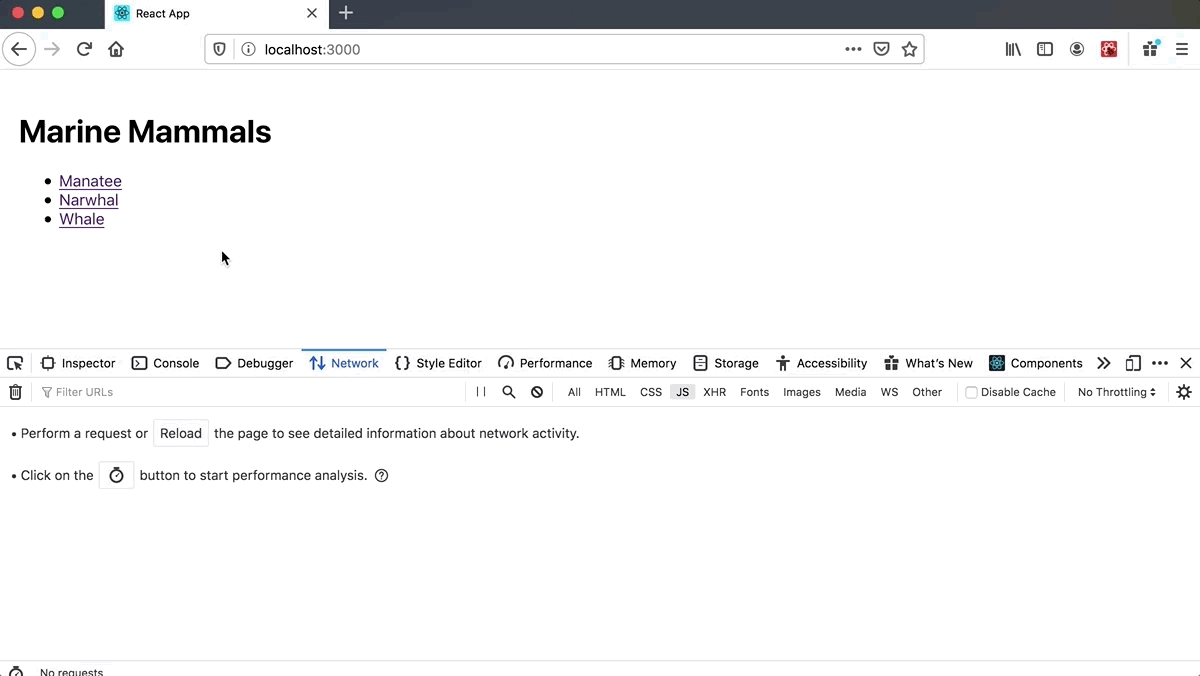
At this point, you could add a click event handler on each link and prevent the default action. That would be a lot of work. Instead, React Router has a special component called Link that will handle the work for you. It will create a link tag, but prevent the default brower behavior while pushing the new location.
In App.js, import Link from react-router-dom. Then replace each <a> with a Link. You’ll also need to change the href attribute to the to prop.
Finally, move the <nav> component inside of the BrowserRouter. This ensures that the Link component is controlled by react-router:
import React from 'react';
import { BrowserRouter, Link, Route, Switch } from 'react-router-dom';
import './App.css';

import Manatee from '../Manatee/Manatee';
import Narwhal from '../Narwhal/Narwhal';
import Whale from '../Whale/Whale';

function App() {
  return (
    <div className="wrapper">
      <h1>Marine Mammals</h1>
      <BrowserRouter>
        <nav>
          <ul>
            <li><Link to="/manatee">Manatee</Link></li>
            <li><Link to="/narwhal">Narwhal</Link></li>
            <li><Link to="/whale">Whale</Link></li>
          </ul>
        </nav>
        <Switch>
          <Route path="/manatee">
            <Manatee />
          </Route>
          <Route path="/narwhal">
            <Narwhal />
          </Route>
          <Route path="/whale">
            <Whale />
          </Route>
        </Switch>
      </BrowserRouter>
    </div>
  );
}

export default App;
Save the file. When you do, the browser will refresh. When you click links, the page will not refresh and the browser will not reload the JavaScript code:
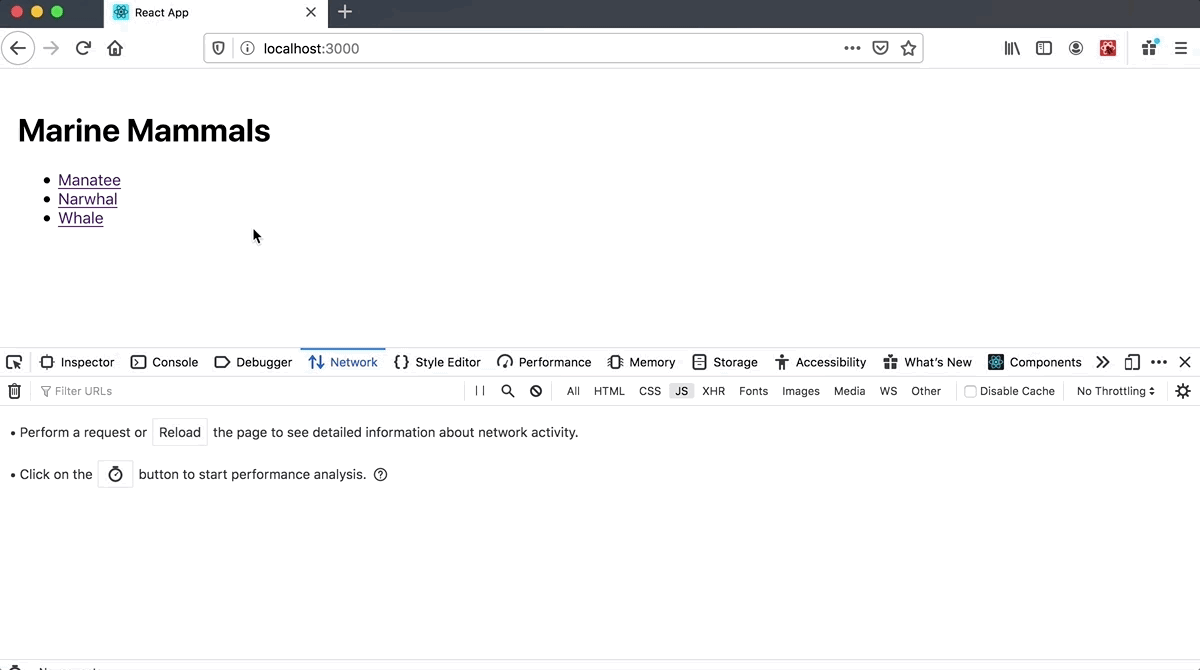
In this step you added React Router to your current project. You created a route for each component and you added a navigation using the Link component to switch between routes without a page refresh.
In the next step, you’ll add more complex routes that render different components using URL parameters.
Step 3 — Accessing Route Data with Hooks
In this step, you’ll use URL queries and parameters to create dynamic routes. You’ll learn how to pull information from search parameters with the useLocation Hook and how to read information from dynamic URLs using the useParams Hook.
By the end of this step, you’ll know how to access route information inside of your components and how you can use that information to dynamically load components.
Suppose you wanted to add another level to your marine mammal application. There are many types of whales, and you could display information about each one. You have two choices of how to accomplish this: You could use the current route and add a specific whale type with search parameters, such as ?type=beluga. You could also create a new route that includes the specific name after the base URL, such as /whale/beluga. This tutorial will start with search parameters, since they are flexible and can handle multiple, different queries.
First, make new components for different whale species.
Open a new file Beluga.js in your text editor:
- nano src/components/Whale/Beluga.js
Add an <h3> tag with the name Beluga:
import React from 'react';

export default function Beluga() {
  return(
    <h3>Beluga</h3>
  );
}
Do the same thing for a blue whale. Open a new file Blue.js in your text editor:
- nano src/components/Whale/Blue.js
Add an <h3> tag with the name Blue:
import React from 'react';

export default function Blue() {
  return(
    <h3>Blue</h3>
  );
}
Save and close the file.
Passing Additional Information with Search Parameters
Next, you are going to pass the whale information as a search parameter. This will let you pass information without needing to create a new URL.
Open App.js so you can add new links:
- nano src/components/App/App.js
Add two new links, one to /whale?type=beluga and one for /whale?type=blue:
import React from 'react';
import { BrowserRouter, Link, Route, Switch } from 'react-router-dom';
import './App.css';

import Manatee from '../Manatee/Manatee';
import Narwhal from '../Narwhal/Narwhal';
import Whale from '../Whale/Whale';

function App() {
  return (
    <div className="wrapper">
      <h1>Marine Mammals</h1>
      <BrowserRouter>
        <nav>
          <ul>
            <li><Link to="/manatee">Manatee</Link></li>
            <li><Link to="/narwhal">Narwhal</Link></li>
            <li><Link to="/whale">Whale</Link></li>
            <li><Link to="/whale?type=beluga">Beluga Whale</Link></li>
            <li><Link to="/whale?type=blue">Blue Whale</Link></li>
          </ul>
        </nav>
        <Switch>
          ...
        </Switch>
      </BrowserRouter>
    </div>
  );
}

export default App;
Save and close the file.
If you click on the links, you’ll still see the regular whale page. This shows that the standard route is still working correctly:
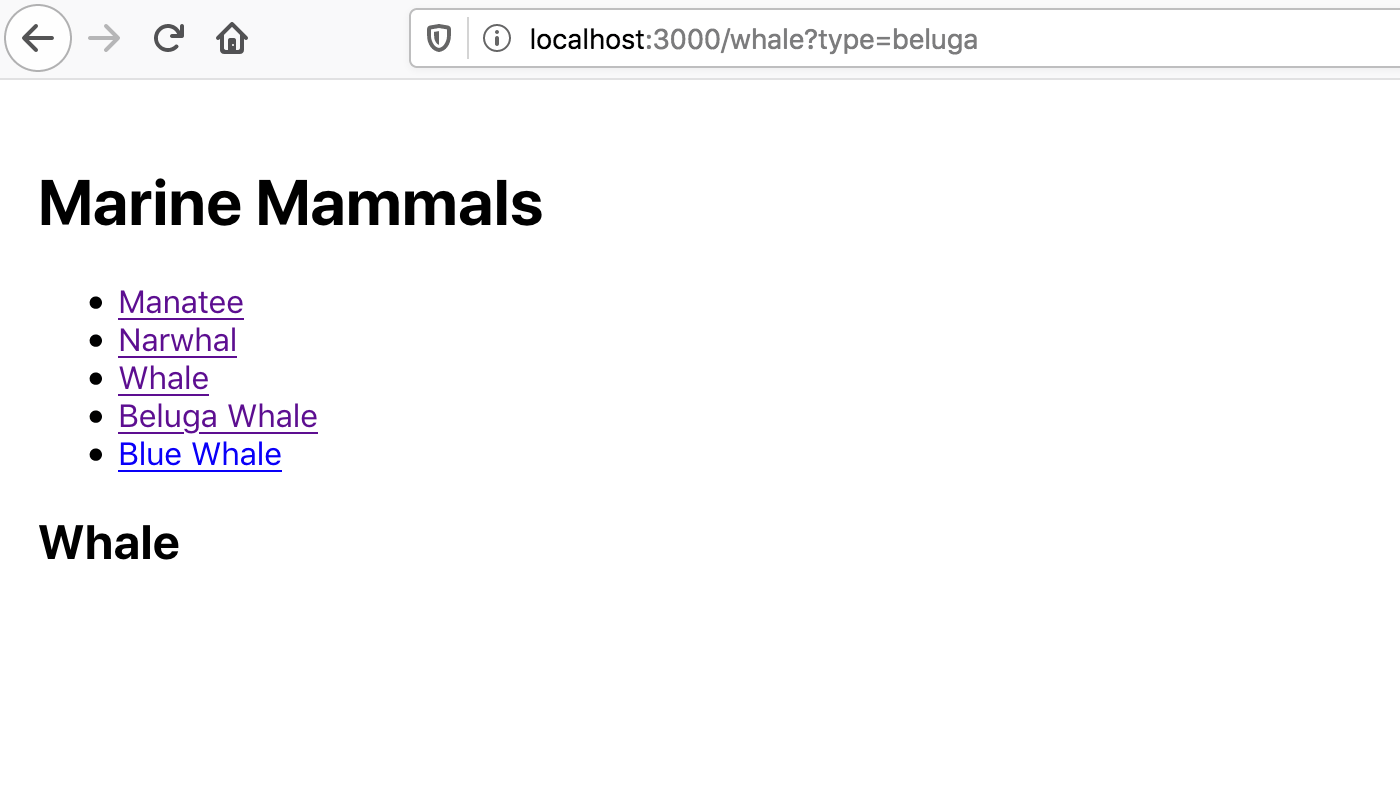
Since you are correctly rendering the Whale component, you’ll need to update the component to pull the search query out of the URL and use it to render the correct child component.
Open Whale.js:
- nano src/components/Whale/Whale.js
First, import the Beluga and Blue components. Next, import a Hook called useLocation from react-router-dom:
import React from 'react';
import { useLocation } from 'react-router-dom';
import Beluga from './Beluga';
import Blue from './Blue';

export default function Whale() {
  return <h2>Whale</h2>;
}
The useLocation Hook pulls the location information from your page. This is not unique to React Router. The location object is a standard object on all browsers. If you open your browser console and type window.location, you’ll get an object with information about your URL.
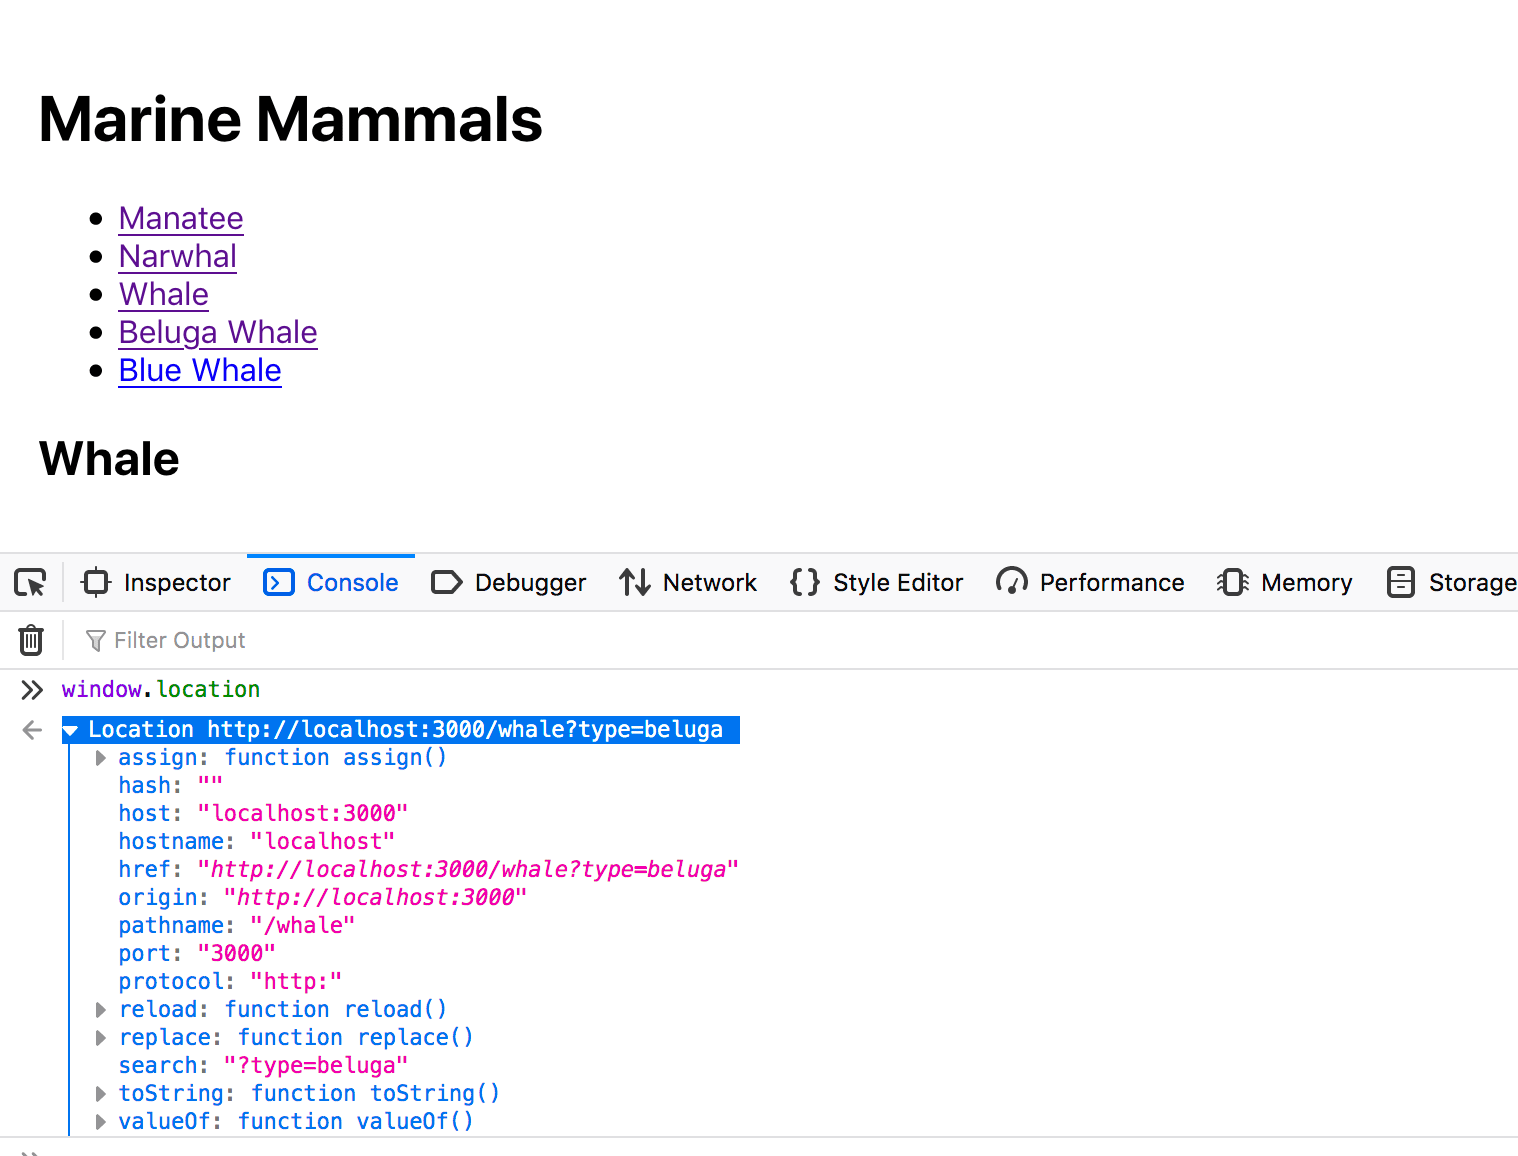
Notice that the location information includes search, but also includes other information, such as the pathname and the full href. The useLocation Hook will provide this information for you. Inside of Whale.js, call the useLocation Hook. Destructure the result to pull out the search field. This will be a parameter string, such as ?type=beluga:
import React from 'react';
import { useLocation } from 'react-router-dom';
import Beluga from './Beluga';
import Blue from './Blue';

export default function Whale() {
  const { search } = useLocation();
  return <h2>Whale</h2>;
}
There are a number of libraries, such as query-string, that can parse the search for you and convert it into an object that is easier to read and update. In this example, you can use a regular expression to pull out the information about the whale type.
Use the .match method on the search string to pull out the type: search.match(/type=(.*)/). The parentheses inside the regular expression will capture the match into a results array. The first item in the array is the full match: type=beluga. The second item is the information from the parentheses: beluga.
Use the data from the .match method to render the correct child component:
import React from 'react';
import { useLocation } from 'react-router-dom';
import Beluga from './Beluga';
import Blue from './Blue';

export default function Whale() {
  const { search } = useLocation();
  const match = search.match(/type=(.*)/);
  const type = match?.[1];

  return (
    <>
      <h2>Whale</h2>
      {type === 'beluga' && <Beluga />}
      {type === 'blue' && <Blue />}
    </>
  );
}
The symbol ?. is called optional chaining. If the value exists, it returns the value. Otherwise, it will return undefined. This will protect your component in instances where the search parameter is empty.
Save the file. When you do, the browser will refresh and will render different whales:
Accessing URL Parameters
Search parameters work, but they aren’t the best solution in this case. Generally, you’d use search parameters to refine a page: toggling information or loading specific data. In this case, you are not refining a page; you are creating a new static page. Fortunately, React Router provides a way to create dynamic URLs that preserve variable data called URL Parameters.
Open App.js:
- nano src/components/App/App.js
Instead of passing the whale information as a search, you will add it directly to the URL itself. That means that you will move the seach into the URL instead of adding it after a ?. For example, the query/whale?type=blue will now be /whale/blue:
import React from 'react';
import { BrowserRouter, Link, Route, Switch } from 'react-router-dom';
import './App.css';

import Manatee from '../Manatee/Manatee';
import Narwhal from '../Narwhal/Narwhal';
import Whale from '../Whale/Whale';

function App() {
  return (
    <div className="wrapper">
      <h1>Marine Mammals</h1>
      <BrowserRouter>
        <nav>
          <ul>
            <li><Link to="/manatee">Manatee</Link></li>
            <li><Link to="/narwhal">Narwhal</Link></li>
            <li><Link to="/whale">Whale</Link></li>
            <li><Link to="/whale/beluga">Beluga Whale</Link></li>
            <li><Link to="/whale/blue">Blue Whale</Link></li>
          </ul>
        </nav>
        <Switch>
          <Route path="/manatee">
            <Manatee />
          </Route>
          <Route path="/narwhal">
            <Narwhal />
          </Route>
          <Route path="/whale">
            <Whale />
          </Route>
        </Switch>
      </BrowserRouter>
    </div>
  );
}

export default App;
Now you need to create a new route that can capture both /whale/beluga and /whale/blue. You could add them by hand, but this wouldn’t work in situations where you don’t know all the possibilities ahead of time, such as when you have a list of users or other dynamic data.
Instead of making a route for each one, add a URL param to the current path. The URL param is a keyword prefaced with a colon. React Router will use the parameter as a wildcard and will match any route that contains that pattern.
In this case, create a keyword of :type. The full path will be /whale/:type. This will match any route that starts with /whale and it will save the variable information inside a parameter variable called type. This route will not match /whale, since that does not contain an additional parameter.
You can either add /whale as a route after the new route or you can add it before the route of /whale/:type with the exact keyword.
Add a new route of /whale/:type and add an exact property to the current route:
import React from 'react';
import { BrowserRouter, Link, Route, Switch } from 'react-router-dom';
import './App.css';

import Manatee from '../Manatee/Manatee';
import Narwhal from '../Narwhal/Narwhal';
import Whale from '../Whale/Whale';

function App() {
  return (
    <div className="wrapper">
      <h1>Marine Mammals</h1>
      <BrowserRouter>
        <nav>
          <ul>
            <li><Link to="/manatee">Manatee</Link></li>
            <li><Link to="/narwhal">Narwhal</Link></li>
            <li><Link to="/whale">Whale</Link></li>
            <li><Link to="/whale/beluga">Beluga Whale</Link></li>
            <li><Link to="/whale/blue">Blue Whale</Link></li>
          </ul>
        </nav>
        <Switch>
          <Route path="/manatee">
            <Manatee />
          </Route>
          <Route path="/narwhal">
            <Narwhal />
          </Route>
          <Route exact path="/whale">
            <Whale />
          </Route>
          <Route path="/whale/:type">
            <Whale />
          </Route>
        </Switch>
      </BrowserRouter>
    </div>
  );
}

export default App;
Save and close the file. Now that you are passing new information, you need to access it and use the information to render dynamic components.
Open Whale.js:
- nano src/components/Whale/Whale.js
Import the useParams Hook. This will connect to your router and pull out any URL parameters into an object. Destructure the object to pull out the type field. Remove the code for parsing the search and use the parameter to conditionally render child components:
import React from 'react';
import { useParams } from 'react-router-dom';
import Beluga from './Beluga';
import Blue from './Blue';

export default function Whale() {
  const { type } = useParams();

  return (
    <>
      <h2>Whale</h2>
      {type === 'beluga' && <Beluga />}
      {type === 'blue' && <Blue />}
    </>
  );
}
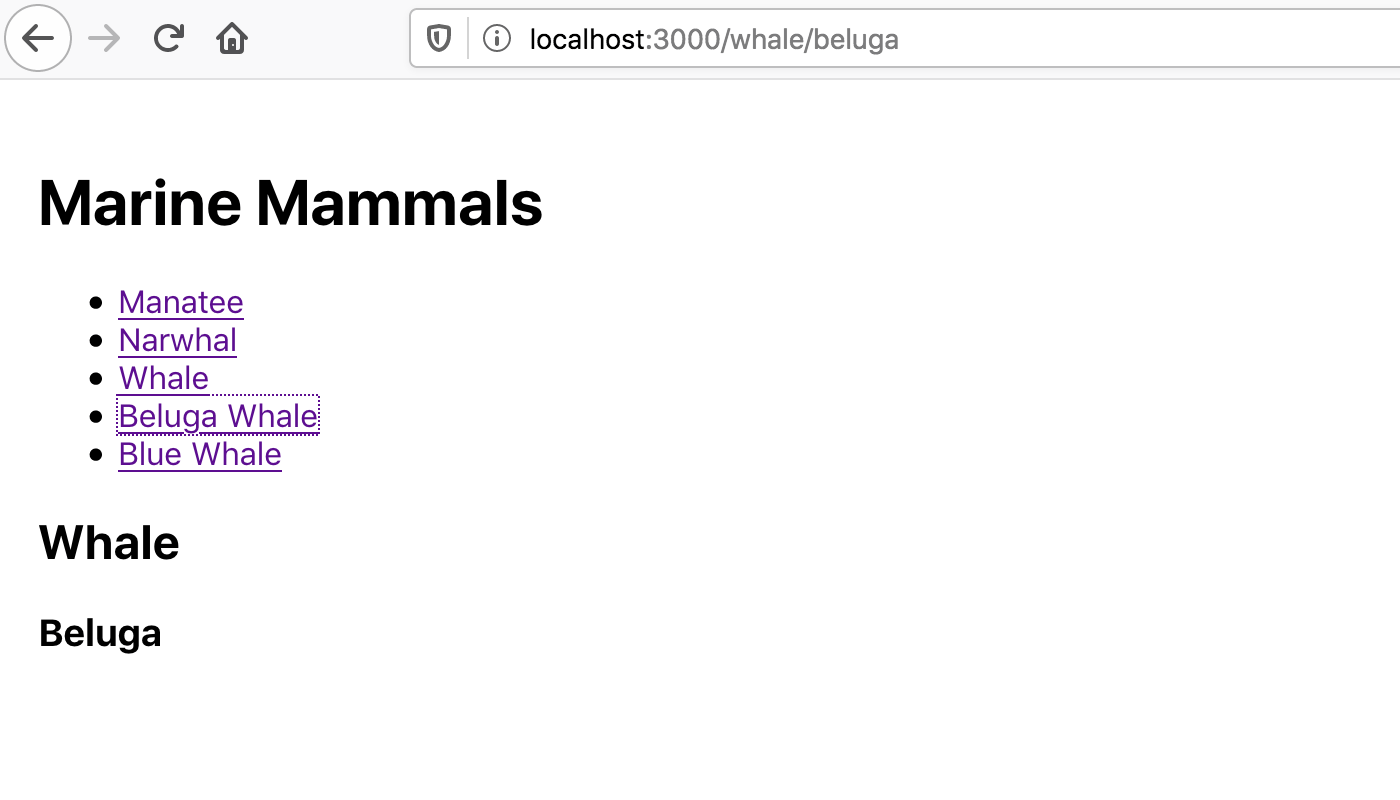
Save and close the file. When you do, the browser will refresh and you’ll be able to use the new URLs, such as http://localhost:3000/whale/beluga:
URL parameters are a clear way to pass conditional data. They are not as flexible as search parameters, which can be combined or reordered, but they are more clear and easier for search engines to index.
In this step you passed variable data using search parameters and URL parameters. You also used the useLocation and useParams Hooks to pull information out and to render conditional components.
But there is one problem: The list of routes is getting long and you are starting to get near duplicates with the /whale and /whale/:type routes. React Router lets you split out child routes directly in the component, which means you don’t need to have the whole list in a single component. In the next step, you’ll render routes directly inside of child components.
Step 4 — Nesting Routes
Routes can grow and become more complex. React Router uses nested routes to render more specific routing information inside of child components. In this step, you’ll use nested routes and add routes in different components. By the end of this step, you’ll have different options for rendering your information.
In the last step, you added routes inside of App.js. This has some advantages: It keeps all routes in one place, essentially creating a site map for your application. But it can easily grow and be difficult to read and maintain. Nested routes group your routing information directly in the components that will render other components, giving you the ability to create mini-templates throughout your application.
Open App.js:
- nano src/components/App/App.js
Remove the /whale/:type route and remove the exact prop so you only have a whale route:
import React from 'react';
import { BrowserRouter, Link, Route, Switch } from 'react-router-dom';
import './App.css';

import Manatee from '../Manatee/Manatee';
import Narwhal from '../Narwhal/Narwhal';
import Whale from '../Whale/Whale';

function App() {
  return (
    <div className="wrapper">
      <h1>Marine Mammals</h1>
      <BrowserRouter>
        <nav>
          <ul>
            <li><Link to="/manatee">Manatee</Link></li>
            <li><Link to="/narwhal">Narwhal</Link></li>
            <li><Link to="/whale">Whale</Link></li>
            <li><Link to="/whale/beluga">Beluga Whale</Link></li>
            <li><Link to="/whale/blue">Blue Whale</Link></li>
          </ul>
        </nav>
        <Switch>
          <Route path="/manatee">
            <Manatee />
          </Route>
          <Route path="/narwhal">
            <Narwhal />
          </Route>
          <Route path="/whale">
            <Whale />
          </Route>
        </Switch>
      </BrowserRouter>
    </div>
  );
}

export default App;
Save and close the file.
Next, open Whale.js. This is where you will add the nested route.
- nano src/components/Whale/Whale.js
You will need to do two things. First, get the current path with the useRouteMatch Hook. Next, render the new <Switch> and <Route> components to display the correct components.
Import useRouteMatch. This will return an object that contains the path and the url. Destructure the object to get the path. You’ll use this as the basis for your new routes:
import React from 'react';
import { useRouteMatch } from 'react-router-dom';
import Beluga from './Beluga';
import Blue from './Blue';

export default function Whale() {
  const { path } = useRouteMatch();

  return (
    <>
      <h2>Whale</h2>
      {type === 'beluga' && <Beluga />}
      {type === 'blue' && <Blue />}
    </>
  );
}
Next, import Switch and Route so you can add in new routes. Your new routes will be the same as you made in App.js, but you do not need to wrap them with BrowserRouter. Add the new routes, but prefix the route with the path. The new component will render exactly where you place them, so add the new routes after the <h2>:
import React from 'react';
import { Switch, Route, useRouteMatch } from 'react-router-dom';
import Beluga from './Beluga';
import Blue from './Blue';

export default function Whale() {
  const { path } = useRouteMatch();
  return (
    <>
      <h2>Whale</h2>
      <Switch>
        <Route path={`${path}/beluga`}>
          <Beluga />
        </Route>
        <Route path={`${path}/blue`}>
          <Blue />
        </Route>
      </Switch>
    </>
  );
}
Save the file. When you do, the browser will refresh and you’ll be able to visit the child routes.
This is a little extra code, but it keeps the child routes situated with their parent. Not all projects use nested routes: some prefer having an explicit list. It is a matter of team preference and consistency. Choose the option that is best for your project, and you can always refactor later.
In this step, you added nested routes to your project. You pulled out the current path with the useRouteMatch Hook and added new routes in a component to render the new components inside of a base component.
Conclusion
React Router is an important part of any React project. When you build single page applications, you’ll use routes to separate your application into usable pieces that users can access easily and consistently.
As you start to separate your components into routes, you’ll be able to take advantage of code splitting, preserving state via query parameters, and other tools to improve the user experience.
If you would like to read more React tutorials, check out our React Topic page, or return to the How To Code in React.js series page.
Thanks for learning with the DigitalOcean Community. Check out our offerings for compute, storage, networking, and managed databases.
Tutorial Series: How To Code in React.js
React is a popular JavaScript framework for creating front-end applications, such as user interfaces that allow users to interact with programs. Originally created by Facebook, it has gained popularity by allowing developers to create fast applications using an intuitive programming paradigm that ties JavaScript with an HTML-like syntax known as JSX.
In this series, you will build out examples of React projects to gain an understanding of this framework, giving you the knowledge you need to pursue front-end web development or start out on your way to full stack development.
Browse Series: 21 tutorials
About the author(s)
Author of Simplifying JavaScript. Writing featured in Slate, FreeCodeCamp, and here! I like to break things and put them back together. 🛠
Former Senior Technical Editor at DigitalOcean, fiction writer and podcaster elsewhere, always searching for the next good nautical pun! Areas of expertise include Node.js, PostgreSQL, CSS, JavaScript.
Still looking for an answer?
This textbox defaults to using Markdown to format your answer.
You can type !ref in this text area to quickly search our full set of tutorials, documentation & marketplace offerings and insert the link!
Thank you very much Joe Morgan (author)! Your React tutorial series is really good! You explain all the details, step by step, very easy to understand! All the best!
You can use a smarter regex so that you don’t inadvertently parse other parameters in the location search. This is more succinct and reliable than optional chaining.
const [match, type] = search.match(/type=([^&]*)/);
Alternatively, you could use the built-in URLSearchParams API.
const type = new URLSearchParams(search).get('type');
Thank you very much for this great tutorial. But I think in nested route path should be like this: path={`${path}beluga`}
not like this: path={`${path}/beluga`}
 This work is licensed under a Creative Commons Attribution-NonCommercial- ShareAlike 4.0 International License.
Become a contributor for community
Get paid to write technical tutorials and select a tech-focused charity to receive a matching donation.

DigitalOcean Documentation
Full documentation for every DigitalOcean product.

Resources for startups and AI-native businesses
The Wave has everything you need to know about building a business, from raising funding to marketing your product.
The developer cloud
Scale up as you grow — whether you're running one virtual machine or ten thousand.

Start building today
From GPU-powered inference and Kubernetes to managed databases and storage, get everything you need to build, scale, and deploy intelligent applications.
