By Joe Morgan and Timothy Nolan

The author selected Creative Commons to receive a donation as part of the Write for DOnations program.
Introduction
Redux is a popular data store for JavaScript and React applications. It follows a central principle that data binding should flow in one direction and should be stored as a single source of truth. Redux gained popularity because of the simplicity of the design concept and the relatively small implementation.
Redux operates according to a few concepts. First, the store is a single object with fields for each selection of data. You update the data by dispatching an action that says how the data should change. You then interpret actions and update the data using reducers. Reducers are functions that apply actions to data and return a new state, instead of mutating the previous state.
In small applications, you may not need a global data store. You can use a mix of local state and context to manage state. But as your application scales, you may encounter situations where it would be valuable to store information centrally so that it will persist across routes and components. In that situation, Redux will give you a standard way to store and retrieve data in an organized manner.
In this tutorial, you’ll use Redux in a React application by building a bird watching test application. Users will be able to add birds they have seen and increment a bird each time they see it again. You’ll build a single data store, and you’ll create actions and reducers to update the store. You’ll then pull data into your components and dispatch new changes to update the data.
Prerequisites
-
You will need a development environment running Node.js; this tutorial was tested on Node.js version 10.22.0 and npm version 6.14.6. To install this on macOS or Ubuntu 18.04, follow the steps in How to Install Node.js and Create a Local Development Environment on macOS or the Installing Using a PPA section of How To Install Node.js on Ubuntu 18.04.
-
A React development environment set up with Create React App, with the non-essential boilerplate removed. To set this up, follow Step 1 — Creating an Empty Project of the How To Manage State on React Class Components tutorial. This tutorial will use
redux-tutorialas the project name. -
You will be using React components, Hooks, and forms in this tutorial, including the
useStateHook and custom Hooks. You can learn about components and Hooks in our tutorials How To Manage State with Hooks on React Components and How To Build Forms in React. -
You will also need a basic knowledge of JavaScript, HTML, and CSS, which you can find in our How To Build a Website With HTML series, How To Build a Website With CSS series, and in How To Code in JavaScript.
Step 1 — Setting Up a Store
In this step, you’ll install Redux and connect it to your root component. You’ll then create a base store and show the information in your component. By the end of this step, you’ll have a working instance of Redux with information displaying in your components.
To start, install redux and react-redux. The package redux is framework agnostic and will connect your actions and reducers. The package react-redux contains the bindings to run a Redux store in a React project. You’ll use code from react-redux to send actions from your components and to pull data from the store into your components.
Use npm to install the two packages with the following command:
- npm install --save redux react-redux
When the component is finished installing, you’ll receive output like this. Your output may be slightly different:
Output...
+ redux@4.0.5
+ react-redux@7.2.1
added 2 packages from 1 contributor, updated 1 package and audited 1639 packages in 20.573s
Now that you have the packages installed, you need to connect Redux to your project. To use Redux, you’ll need to wrap your root components with a Provider to ensure that the store is available to all child components in the tree. This is similar to how you would add a Provider using React’s native context.
Open src/index.js:
- nano src/index.js
Import the Provider component from the react-redux package. Add the Provider to your root component around any other components by making the following highlighted changes to your code:
import React from 'react';
import ReactDOM from 'react-dom';
import './index.css';
import App from './components/App/App';
import * as serviceWorker from './serviceWorker';
import { Provider } from 'react-redux';

ReactDOM.render(
  <React.StrictMode>
    <Provider>
      <App />
    </Provider>
  </React.StrictMode>,
  document.getElementById('root')
);

// If you want your app to work offline and load faster, you can change
// unregister() to register() below. Note this comes with some pitfalls.
// Learn more about service workers: https://bit.ly/CRA-PWA
serviceWorker.unregister();
Now that you have wrapped your components, it’s time to add a store. The store is your central collection of data. In the next step, you’ll learn to create reducers that will set the default values and update your store, but for now you will hard-code the data.
Import the createStore function from redux, then pass a function that returns an object. In this case, return an object with a field called birds that points to an array of individual birds. Each bird will have a name and a views count. Save the output of the function to a value called store, then pass the store to a prop called store in the Provider:
import React from 'react';
import ReactDOM from 'react-dom';
import './index.css';
import App from './components/App/App';
import * as serviceWorker from './serviceWorker';
import { Provider } from 'react-redux';
import { createStore } from 'redux';

const store = createStore(() => ({
  birds: [
    {
      name: 'robin',
      views: 1
    }
  ]
}));

ReactDOM.render(
  <React.StrictMode>
    <Provider store={store}>
      <App />
    </Provider>
  </React.StrictMode>,
  document.getElementById('root')
);

// If you want your app to work offline and load faster, you can change
// unregister() to register() below. Note this comes with some pitfalls.
// Learn more about service workers: https://bit.ly/CRA-PWA
serviceWorker.unregister();
Save and close the file. Now that you have some data, you need to be able to display it. Open src/components/App/App.js:
- nano src/components/App/App.js
Like with context, every child component will be able to access the store without any additional props. To access items in your Redux store, use a Hook called useSelector from the react-redux package. The useSelector Hook takes a selector function as an argument. The selector function will receive the state of your store as an argument that you will use to return the field you want:
import React from 'react';
import { useSelector } from 'react-redux';
import './App.css';

function App() {
  const birds = useSelector(state => state.birds);

  return <></>
}

export default App;
Since useSelector is a custom Hook, the component will re-render whenever the Hook is called. That means that the data—birds—will always be up to date.
Now that you have the data, you can display it in an unordered list. Create a surrounding <div> with a className of wrapper. Inside, add a <ul> element and loop over the birds array with map(), returning a new <li> item for each. Be sure to use the bird.name as a key:
import React from 'react';
import { useSelector } from 'react-redux'
import './App.css';

function App() {
  const birds = useSelector(state => state.birds);

  return (
    <div className="wrapper">
      <h1>Bird List</h1>
      <ul>
        {birds.map(bird => (
          <li key={bird.name}>
            <h3>{bird.name}</h3>
            <div>
              Views: {bird.views}
            </div>
          </li>
        ))}
      </ul>
    </div>
  );
}

export default App;
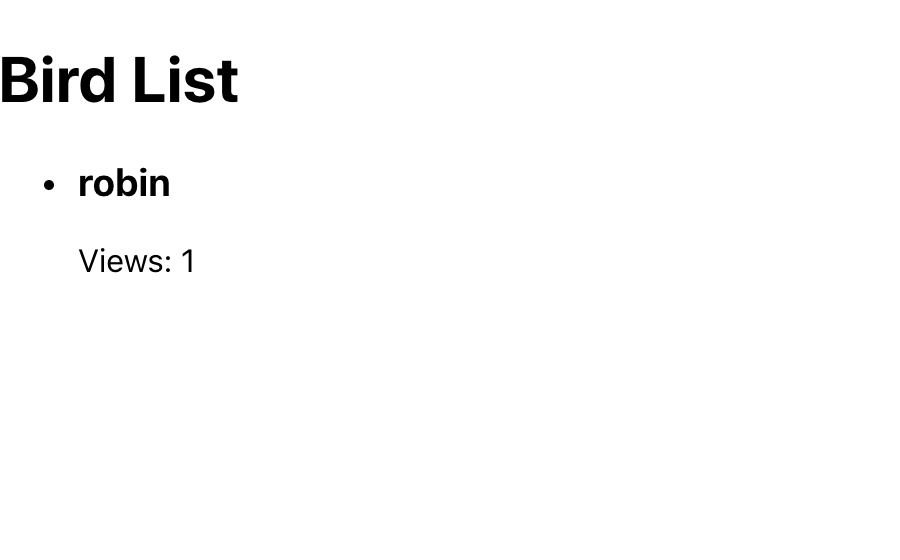
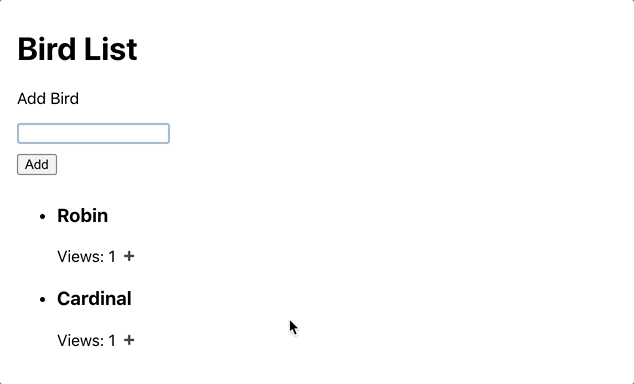
Save the file. Once the file is saved, the browser will reload and you’ll find your bird list::
Now that you have a basic list, add in the rest of the components you’ll need for your bird watching app. First, add a button to increment the views after the list of views:
import React from 'react';
import { useSelector } from 'react-redux'
import './App.css';

function App() {
  const birds = useSelector(state => state.birds);

  return (
    <div className="wrapper">
      <h1>Bird List</h1>
      <ul>
        {birds.map(bird => (
          <li key={bird.name}>
            <h3>{bird.name}</h3>
            <div>
              Views: {bird.views}
              <button><span role="img" aria-label="add">➕</span></button>
            </div>
          </li>
        ))}
      </ul>
    </div>
  );
}

export default App;
Next, create a <form> with a single <input> before the bird list so a user can add in a new bird. Be sure to surround the <input> with a <label> and to add a type of submit to the add button to make sure everything is accessible:
import React from 'react';
import { useSelector } from 'react-redux'
import './App.css';

function App() {
  const birds = useSelector(state => state.birds);

  return (
    <div className="wrapper">
      <h1>Bird List</h1>
      <form>
        <label>
          <p>
            Add Bird
          </p>
          <input type="text" />
        </label>
        <div>
          <button type="submit">Add</button>
        </div>
      </form>
      <ul>
        {birds.map(bird => (
          <li key={bird.name}>
            <h3>{bird.name}</h3>
            <div>
              Views: {bird.views}
              <button><span role="img" aria-label="add">➕</span></button>
            </div>
          </li>
        ))}
      </ul>
    </div>
  );
}

export default App;
Save and close the file. Next, open up App.css to add some styling:
- nano src/components/App/App.css
Add some padding to the wrapper class. Then capitalize the h3 element, which holds the bird name. Finally, style the buttons. Remove the default button styles on the add <button> and then add a margin to the form <button>.
Replace the file’s contents with the following:
.wrapper {
    padding: 20px;
}

.wrapper h3 {
    text-transform: capitalize;
}

.wrapper form button {
    margin: 10px 0;
    cursor: pointer;
}

.wrapper ul button {
    background: none;
    border: none;
    cursor: pointer;
}
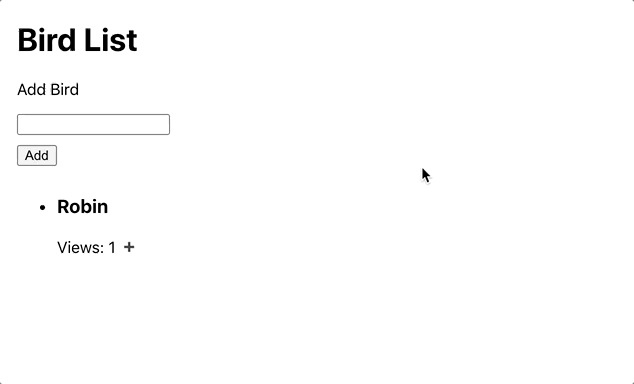
Additionally, give each button a cursor of pointer, which will change the cursor when hovering over the button to indicate to the user that the button is clickable.
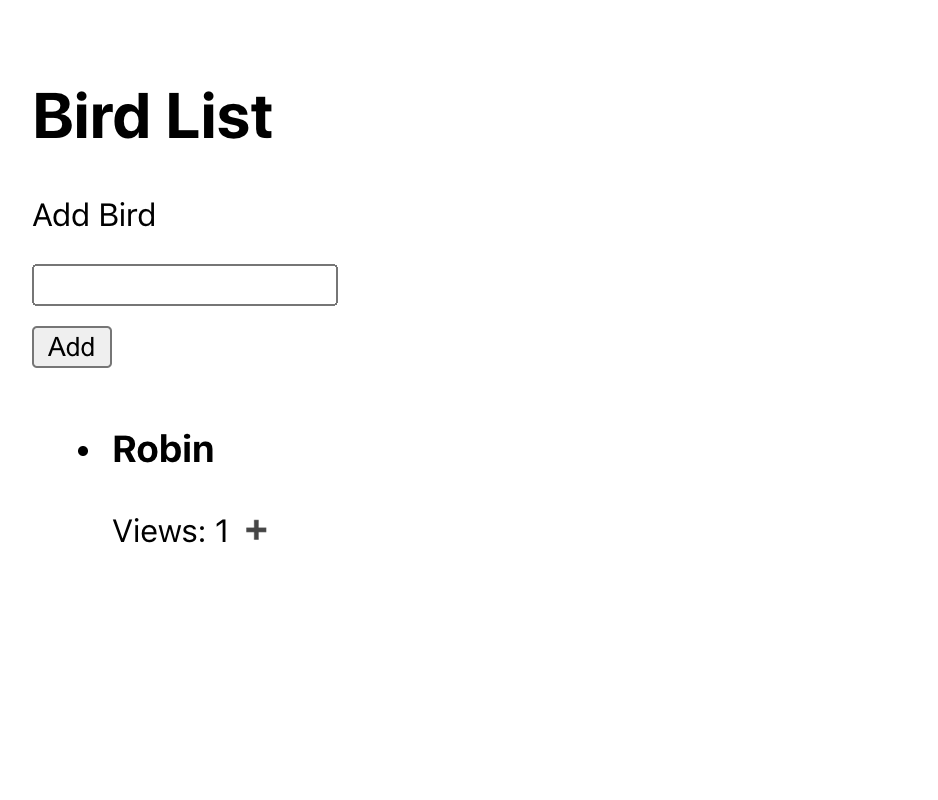
Save and close the file. When you do the browser will refresh with your components:

The buttons and form are not connected to any actions yet, and so can not interact with the Redux store. You’ll add the actions in Step 2 and connect them in Step 3.
In this step, you installed Redux and created a new store for your application. You connected the store to your application using Provider and accessed the elements inside your components using the useSelector Hook.
In the next step, you’ll create actions and reducers to update your store with new information.
Step 2 — Creating Actions and Reducers
Next, you’ll create actions to add a bird and to increment a view. You’ll then make a reducer that will update the information depending on the action type. Finally, you’ll use the reducers to create a default store using combineReducers.
Actions are the message you send to the data store with the intended change. Reducers take those messages and update the shared store by applying the changes depending on the action type. Your components will send the actions they want your store to use, and your reducers will use actions to update the data in the store. You never call reducers directly, and there are cases where one action may impact several reducers.
There are many different options for organizing your actions and reducers. In this tutorial, you’ll organize by domain. That means your actions and reducers will be defined by the type of feature they will impact.
Create a directory called store:
- mkdir src/store
This directory will contain all of your actions and reducers. Some patterns store them alongside components, but the advantage here is that you have a separate point of reference for the shape of the whole store. When a new developer enters the project, they will be able to read the structure of the store at a glance.
Make a directory called birds inside the store directory. This will contain the actions and reducers specifically for updating your bird data:
- mkdir src/store/birds
Next, open up a file called birds.js so that you can start to add actions and reducers. If you have a large number of actions and reducers you may want to split them into separate files, such as birds.actions.js and birds.reducers.js, but when there are only a few it can be easier to read when they are in the same location:
- nano src/store/birds/birds.js
First, you are going to create actions. Actions are the messages that you send from a component to your store using a method called dispatch, which you’ll use in the next step.
An action must return an object with a type field. Otherwise, the return object can include any additional information you want to send.
Create a function called addBirds that takes a bird as an argument and returns an object containing a type of 'ADD_BIRD' and the bird as a field:
export function addBird(bird) {
  return {
    type: 'ADD_BIRD',
    bird,
  }
}
Notice that you are exporting the function so that you can later import and dispatch it from your component.
The type field is important for communicating with reducers, so by convention most Redux stores will save the type to a variable to protect against misspelling.
Create a const called ADD_BIRD that saves the string 'ADD_BIRD'. Then update the action:
const ADD_BIRD = 'ADD_BIRD';

export function addBird(bird) {
  return {
    type: ADD_BIRD,
    bird,
  }
}
Now that you have an action, create a reducer that will respond to the action.
Reducers are functions that will determine how a state should change based on actions. The actions don’t make changes themselves; the reducers will take the state and make changes based on actions.
A reducer receives two arguments: the current state and the action. The current state refers to the state for a particular section of the store. Generally, the name of the reducer will match with a field in the store. For example, suppose you had a store shaped like this:
{
  birds: [
    // collection of bird objects
  ],
  gear: {
    // gear information
  }
}
You would create two reducers: birds and gear. The state for the birds reducer will be the array of birds. The state for the gear reducer would be the object containing the gear information.
Inside birds.js create a reducer called birds that takes state and action and returns the state without any changes:
const ADD_BIRD = 'ADD_BIRD';

export function addBird(bird) {
  return {
    type: ADD_BIRD,
    bird,
  }
}

function birds(state, action) {
  return state;
}
Notice that you are not exporting the reducer. You will not use the reducer directly and instead will combine them into a usable collection that you will export and use to create your base store in index.js. Notice also that you need to return the state if there are no changes. Redux will run all the reducers anytime you dispatch an action, so if you don’t return state you risk losing your changes.
Finally, since Redux returns the state if there are no changes, add a default state using default parameters.
Create a defaultBirds array that will have the placeholder bird information. Then update the state to include defaultBirds as the default parameter:
const ADD_BIRD = 'ADD_BIRD';

export function addBird(bird) {
  return {
    type: ADD_BIRD,
    bird,
  }
}

const defaultBirds = [
  {
    name: 'robin',
    views: 1,
  }
];

function birds(state=defaultBirds, action) {
  return state;
}
Now that you have a reducer returning your state, you can use the action to apply the changes. The most common pattern is to use a switch on the action.type to apply changes.
Create a switch statement that will look at the action.type. If the case is ADD_BIRD, spread out the current state into a new array and add the bird with a single view:
const ADD_BIRD = 'ADD_BIRD';

export function addBird(bird) {
  return {
    type: ADD_BIRD,
    bird,
  }
}

const defaultBirds = [
  {
    name: 'robin',
    views: 1,
  }
];

function birds(state=defaultBirds, action) {
  switch (action.type) {
    case ADD_BIRD:
      return [
        ...state,
        {
          name: action.bird,
          views: 1
        }
      ];
    default:
      return state;
  }
}
Notice that you are returning the state as the default value. More importantly, you are not mutating state directly. Instead, you are creating a new array by spreading the old array and adding a new value.
Now that you have one action, you can create an action for incrementing a view.
Create an action called incrementBird. Like the addBird action, this will take a bird as an argument and return an object with a type and a bird. The only difference is the type will be 'INCREMENT_BIRD':
const ADD_BIRD = 'ADD_BIRD';
const INCREMENT_BIRD = 'INCREMENT_BIRD';

export function addBird(bird) {
  return {
    type: ADD_BIRD,
    bird,
  }
}

export function incrementBird(bird) {
  return {
    type: INCREMENT_BIRD,
    bird
  }
}

const defaultBirds = [
  {
    name: 'robin',
    views: 1,
  }
];

function birds(state=defaultBirds, action) {
  switch (action.type) {
    case ADD_BIRD:
      return [
        ...state,
        {
          name: action.bird,
          views: 1
        }
      ];
    default:
      return state;
  }
}
This action is separate, but you will use the same reducer. Remember, the actions convey the change you want to make on the data and the reducer applies those changes to return a new state.
Incrementing a bird involves a bit more than adding a new bird. Inside of birds add a new case for INCREMENT_BIRD. Then pull the bird you need to increment out of the array using find() to compare each name with the action.bird:
const ADD_BIRD = 'ADD_BIRD';
...
function birds(state=defaultBirds, action) {
  switch (action.type) {
    case ADD_BIRD:
      return [
        ...state,
        {
          name: action.bird,
          views: 1
        }
      ];
    case INCREMENT_BIRD:
      const bird = state.find(b => action.bird === b.name);
      return state;
    default:
      return state;
  }
}
You have the bird you need to change, but you need to return a new state containing all the unchanged birds as well as the bird you’re updating. Select all remaining birds with state.filter by selecting all birds with a name that does not equal action.name. Then return a new array by spreading the birds array and adding the bird at the end:
const ADD_BIRD = 'ADD_BIRD';
...

function birds(state=defaultBirds, action) {
  switch (action.type) {
    case ADD_BIRD:
      return [
        ...state,
        {
          name: action.bird,
          views: 1
        }
      ];
    case INCREMENT_BIRD:
      const bird = state.find(b => action.bird === b.name);
      const birds = state.filter(b => action.bird !== b.name);
      return [
        ...birds,
        bird,
      ];
    default:
      return state;
  }
}
Finally, update the bird by creating a new object with an incremented view:
const ADD_BIRD = 'ADD_BIRD';
...
function birds(state=defaultBirds, action) {
  switch (action.type) {
    case ADD_BIRD:
      return [
        ...state,
        {
          name: action.bird,
          views: 1
        }
      ];
    case INCREMENT_BIRD:
      const bird = state.find(b => action.bird === b.name);
      const birds = state.filter(b => action.bird !== b.name);
      return [
        ...birds,
        {
          ...bird,
          views: bird.views + 1
        }
      ];
    default:
      return state;
  }
}
Notice that you are not using the reducers to sort the data. Sorting could be considered a view concern since the view displays the information to a user. You could have one view that sorts by name and one view that sorts by view count, so it’s better to let individual components handle the sorting. Instead, keep reducers focused on updating the data, and the component focused on converting the data to a usable view for a user.
This reducer is also imperfect since you could add birds with the same name. In a production app you would need to either validate before adding or give birds a unique id so that you could select the bird by id instead of name.
Now you have two complete actions and a reducer. The final step is to export the reducer so that it can initialize the store. In the first step, you created the store by passing a function that returns an object. You will do the same thing in this case. The function will take the store and the action and then pass the specific slice of the store to the reducers along with the action. It would look something like this:
export function birdApp(store={}, action) {
    return {
        birds: birds(store.birds, action)
    }
}
To simplify things, Redux has a helper function called combineReducers that combines the reducers for you.
Inside of birds.js, import combineReducers from redux. Then call the function with birds and export the result:
import { combineReducers } from 'redux';
const ADD_BIRD = 'ADD_BIRD';
const INCREMENT_BIRD = 'INCREMENT_BIRD';

export function addBird(bird) {
  return {
    type: ADD_BIRD,
    bird,
  }
}

export function incrementBird(bird) {
  return {
    type: INCREMENT_BIRD,
    bird
  }
}

const defaultBirds = [
  {
    name: 'robin',
    views: 1,
  }
];

function birds(state=defaultBirds, action) {
  switch (action.type) {
    case ADD_BIRD:
      return [
        ...state,
        {
          name: action.bird,
          views: 1
        }
      ];
    case INCREMENT_BIRD:
      const bird = state.find(b => action.bird === b.name);
      const birds = state.filter(b => action.bird !== b.name);
      return [
        ...birds,
        {
          ...bird,
          views: bird.views + 1
        }
      ];
    default:
      return state;
  }
}

const birdApp = combineReducers({
  birds
});

export default birdApp;
Save and close the file.
Your actions and reducers are all set up. The final step is to initialize your store using the combined reducers instead of a placeholder function.
Open src/index.js:
- nano src/index.js
Import the birdApp from birds.js. Then initialize the store using birdApp:
import React from 'react';
import ReactDOM from 'react-dom';
import './index.css';
import App from './components/App/App';
import * as serviceWorker from './serviceWorker';
import { Provider } from 'react-redux'
import { createStore } from 'redux'
import birdApp from './store/birds/birds';

const store = createStore(birdApp);

ReactDOM.render(
  <React.StrictMode>
    <Provider store={store}>
      <App />
    </Provider>
  </React.StrictMode>,
  document.getElementById('root')
);

// If you want your app to work offline and load faster, you can change
// unregister() to register() below. Note this comes with some pitfalls.
// Learn more about service workers: https://bit.ly/CRA-PWA
serviceWorker.unregister();
Save and close the file. When you do the browser will refresh with your application:
In this step you created actions and reducers. You learned how to create actions that return a type and how to build reducers that use the action to build and return a new state based on the action. Finally, you combined the reducers into a function that you used to initialize the store.
Your Redux store is now all set up and ready for changes. In the next step you’ll dispatch actions from a component to update the data.
Step 3 — Dispatching Changes in a Component
In this step, you’ll import and call your actions from your component. You’ll use a method called dispatch to send the action and you’ll dispatch the actions inside of event handlers for the form and the button.
By the end of this step, you’ll have a working application that combines a Redux store and your custom components. You’ll be able to update the Redux store in real time and will be able to display the information in your component as it changes.
Now that you have working actions, you need to connect them to your events so that you can update the store. The method you will use is called dispatch and it sends a particular action to the Redux store. When Redux receives an action you have dispatched, it will pass the action to the reducers and they will update the data.
Open App.js:
- nano src/components/App/App.js
Inside of App.js import the Hook useDispath from react-redux. Then call the function to create a new dispatch function:
import React from 'react';
import { useDispatch, useSelector } from 'react-redux'
import './App.css';

function App() {
  ...
}

export default App;
Next you’ll need to import your actions. Remember, actions are functions that return an object. The object is what you will ultimately pass into the dispatch function.
Import incrementBird from the store. Then create an onClick event on the button. When the user clicks on the button, call incrementBird with bird.name and pass the result to dispatch. To make things more readable, call the incrementBird function inside of dispatch:
import React from 'react';
import { useDispatch, useSelector } from 'react-redux'
import { incrementBird } from '../../store/birds/birds';
import './App.css';

function App() {
  const birds = useSelector(state => state.birds);
  const dispatch = useDispatch();

  return (
    <div className="wrapper">
      <h1>Bird List</h1>
      <form>
        <label>
          <p>
            Add Bird
          </p>
          <input type="text" />
        </label>
        <div>
          <button type="submit">Add</button>
        </div>
      </form>
      <ul>
        {birds.map(bird => (
          <li key={bird.name}>
            <h3>{bird.name}</h3>
            <div>
              Views: {bird.views}
              <button onClick={() => dispatch(incrementBird(bird.name))}><span role="img" aria-label="add">➕</span></button>
            </div>
          </li>
        ))}
      </ul>
    </div>
  );
}

export default App;
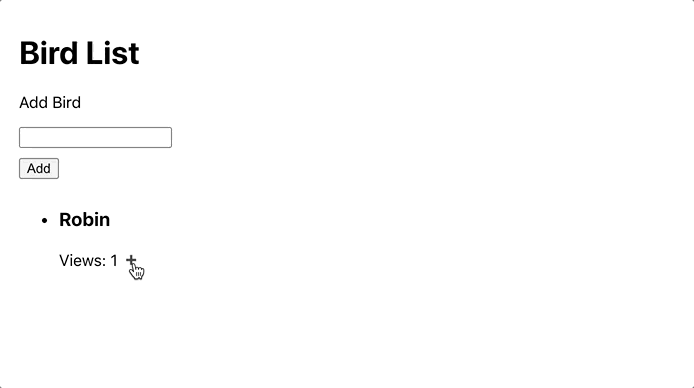
Save the file. When you do, you’ll be able to increment the robin count:
Next, you need to dispatch the addBird action. This will take two steps: saving the input to an internal state and triggering the dispatch with onSubmit.
Use the useState Hook to save the input value. Be sure to convert the input to a controlled component by setting the value on the input. Check out the tutorial How To Build Forms in React for a more in-depth look at controlled components.
Make the following changes to your code:
import React, { useState } from 'react';
import { useDispatch, useSelector } from 'react-redux'
import { incrementBird } from '../../store/birds/birds';
import './App.css';

function App() {
  const [birdName, setBird] = useState('');
  const birds = useSelector(state => state.birds);
  const dispatch = useDispatch();

  return (
    <div className="wrapper">
      <h1>Bird List</h1>
      <form>
        <label>
          <p>
            Add Bird
          </p>
          <input
            type="text"
            onChange={e => setBird(e.target.value)}
            value={birdName}
          />
        </label>
        <div>
          <button type="submit">Add</button>
        </div>
      </form>
      <ul>
        ...
      </ul>
    </div>
  );
}

export default App;
Next, import addBird from birds.js, then create a function called handleSubmit. Inside the handleSubmit function, prevent the page form submission with event.preventDefault, then dispatch the addBird action with the birdName as an argument. After dispatching the action, call setBird('') to clear the input. Finally, pass handleSubmit to the onSubmit event handler on the form:
import React, { useState } from 'react';
import { useDispatch, useSelector } from 'react-redux'
import { addBird, incrementBird } from '../../store/birds/birds';
import './App.css';

function App() {
  const [birdName, setBird] = useState('');
  const birds = useSelector(state => state.birds);
  const dispatch = useDispatch();

  const handleSubmit = event => {
    event.preventDefault();
    dispatch(addBird(birdName))
    setBird('');
  };

  return (
    <div className="wrapper">
      <h1>Bird List</h1>
      <form onSubmit={handleSubmit}>
        <label>
          <p>
            Add Bird
          </p>
          <input
            type="text"
            onChange={e => setBird(e.target.value)}
            value={birdName}
          />
        </label>
        <div>
          <button type="submit">Add</button>
        </div>
      </form>
      <ul>
        {birds.map(bird => (
          <li key={bird.name}>
            <h3>{bird.name}</h3>
            <div>
              Views: {bird.views}
              <button onClick={() => dispatch(incrementBird(bird.name))}><span role="img" aria-label="add">➕</span></button>
            </div>
          </li>
        ))}
      </ul>
    </div>
  );
}

export default App;
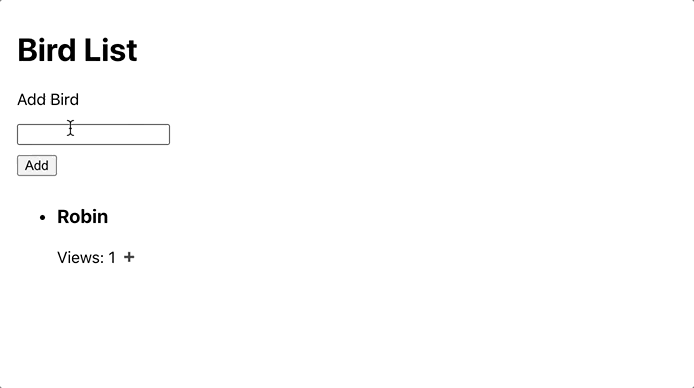
Save the file. When you do, the browser will reload and you’ll be able to add a bird:
You are now calling your actions and updating your birds list in the store. Notice that when your application refreshed you lost the previous information. The store is all contained in memory and so a page refresh will wipe the data.
This list order will also change if you increment a bird higher in the list.
As you saw in Step 2, your reducer is not concerned with sorting the data. To prevent an unexpected change in the components, you can sort the data in your component. Add a sort() function to the birds array. Remember that sorting will mutate the array and you never want to mutate the store. Be sure to create a new array by spreading the data before sorting:
import React, { useState } from 'react';
import { useDispatch, useSelector } from 'react-redux'
import { addBird, incrementBird } from '../../store/birds/birds';
import './App.css';

function App() {
  const [birdName, setBird] = useState('');
  const birds = [...useSelector(state => state.birds)].sort((a, b) => {
    return a.name.toLowerCase() > b.name.toLowerCase() ? 1 : -1;
  });
  const dispatch = useDispatch();

  const handleSubmit = event => {
    event.preventDefault();
    dispatch(addBird(birdName))
    setBird('');
  };

  return (
    <div className="wrapper">
      <h1>Bird List</h1>
      <form onSubmit={handleSubmit}>
        <label>
          <p>
            Add Bird
          </p>
          <input
            type="text"
            onChange={e => setBird(e.target.value)}
            value={birdName}
          />
        </label>
        <div>
          <button type="submit">Add</button>
        </div>
      </form>
      <ul>
        {birds.map(bird => (
          <li key={bird.name}>
            <h3>{bird.name}</h3>
            <div>
              Views: {bird.views}
              <button onClick={() => dispatch(incrementBird(bird.name))}><span role="img" aria-label="add">➕</span></button>
            </div>
          </li>
        ))}
      </ul>
    </div>
  );
}

export default App;
Save the file. When you do, the components will stay in alphabetical order as you increment birds.
It’s important to not try and do too much in your Redux store. Keep the reducers focused on maintaining up-to-date information then pull and manipulate the data for your users inside the component.
Note: In this tutorial, notice that there is a fair amount of code for each action and reducer. Fortunately, there is an officially supported project called Redux Toolkit that can help you reduce the amount of boilerplate code. The Redux Toolkit provides an opinionated set of utilities to quickly create actions and reducers, and will also let you create and configure your store with less code.
In this step, you dispatched your actions from a component. You learned how to call actions and how to send the result to a dispatch function, and you connected them to event handlers on your components to create a fully interactive store. Finally, you learned how to maintain a consistent user experience by sorting the data without directly mutating the store.
Conclusion
Redux is a popular single store. It can be advantageous when working with components that need a common source of information. However, it is not always the right choice in all projects. Smaller projects or projects with isolated components will be able to use built-in state management and context. But as your applications grow in complexity, you may find that central storage is critical to maintaining data integrity. In such cases, Redux is an excellent tool to create a single unified data store that you can use across your components with minimal effort.
If you would like to read more React tutorials, check out our React Topic page, or return to the How To Code in React.js series page.
Thanks for learning with the DigitalOcean Community. Check out our offerings for compute, storage, networking, and managed databases.
Tutorial Series: How To Code in React.js
React is a popular JavaScript framework for creating front-end applications, such as user interfaces that allow users to interact with programs. Originally created by Facebook, it has gained popularity by allowing developers to create fast applications using an intuitive programming paradigm that ties JavaScript with an HTML-like syntax known as JSX.
In this series, you will build out examples of React projects to gain an understanding of this framework, giving you the knowledge you need to pursue front-end web development or start out on your way to full stack development.
Browse Series: 21 tutorials
About the author(s)
Author of Simplifying JavaScript. Writing featured in Slate, FreeCodeCamp, and here! I like to break things and put them back together. 🛠
Former Senior Technical Editor at DigitalOcean, fiction writer and podcaster elsewhere, always searching for the next good nautical pun! Areas of expertise include Node.js, PostgreSQL, CSS, JavaScript.
Still looking for an answer?
This textbox defaults to using Markdown to format your answer.
You can type !ref in this text area to quickly search our full set of tutorials, documentation & marketplace offerings and insert the link!
Super helpful article especially for beginners like myself. Was going thru tutorial hell but could never fully grasp Redux and its workings. Thank you.
Quick input - I’m not able to access the store via Redux Chrome extension. Am I missing something or do I need to set it up separately?
Joe, I like your tutorials, they are very easy to follow. Please sometimes use real world examples that may asked in work environment. I am speaking just from novice perspective. thank you.
// more straightforward approach but I guess Joe over complicated
// things intentionally in order to showcase sort later
data.map(o=>o.name===name ? {...o, views: o.views+1} : o)
 This work is licensed under a Creative Commons Attribution-NonCommercial- ShareAlike 4.0 International License.
Become a contributor for community
Get paid to write technical tutorials and select a tech-focused charity to receive a matching donation.

DigitalOcean Documentation
Full documentation for every DigitalOcean product.

Resources for startups and AI-native businesses
The Wave has everything you need to know about building a business, from raising funding to marketing your product.
The developer cloud
Scale up as you grow — whether you're running one virtual machine or ten thousand.

Start building today
From GPU-powered inference and Kubernetes to managed databases and storage, get everything you need to build, scale, and deploy intelligent applications.
