By Joe Morgan and Timothy Nolan

The author selected Creative Commons to receive a donation as part of the Write for DOnations program.
Introduction
In this tutorial, you’ll share state across multiple components using React context. React context is an interface for sharing information with other components without explicitly passing the data as props. This means that you can share information between a parent component and a deeply nested child component, or store site-wide data in a single place and access them anywhere in the application. You can even update data from nested components by providing update functions along with the data.
React context is flexible enough to use as a centralized state management system for your project, or you can scope it to smaller sections of your application. With context, you can share data across the application without any additional third-party tools and with a small amount of configuration. This provides a lighter weight alternative to tools like Redux, which can help with larger applications but may require too much setup for medium-sized projects.
Throughout this tutorial, you’ll use context to build an application that use common data sets across different components. To illustrate this, you’ll create a website where users can build custom salads. The website will use context to store customer information, favorite items, and custom salads. You’ll then access that data and update it throughout the application without passing the data via props. By the end of this tutorial, you’ll learn how to use context to store data at different levels of the project and how to access and update the data in nested components.
Prerequisites
-
You will need a development environment running Node.js; this tutorial was tested on Node.js version 10.20.1 and npm version 6.14.4. To install this on macOS or Ubuntu 18.04, follow the steps in How to Install Node.js and Create a Local Development Environment on macOS or the Installing Using a PPA section of How To Install Node.js on Ubuntu 18.04.
-
A React development environment set up with Create React App, with the non-essential boilerplate removed. To set this up, follow Step 1 — Creating an Empty Project of the How To Manage State on React Class Components tutorial. This tutorial will use
state-context-tutorialas the project name. -
You will also need a basic knowledge of JavaScript, which you can find in How To Code in JavaScript, along with a basic knowledge of HTML and CSS. A useful resource for HTML and CSS is the Mozilla Developer Network.
-
You will be using React components, the
useStateHook, and theuseReducerHook, which you can learn about in our tutorials How To Create Custom Components in React and How To Manage State with Hooks on React Components.
Step 1 — Building the Basis for Your Application
In this step, you’ll build the general structure of your custom salad builder. You’ll create components to display possible toppings, a list of selected toppings, and customer information. As you build the application with static data, you’ll find how different pieces of information are used in a variety of components and how to identify pieces of data that would be helpful in a context.
Here’s an example of the application you will build:
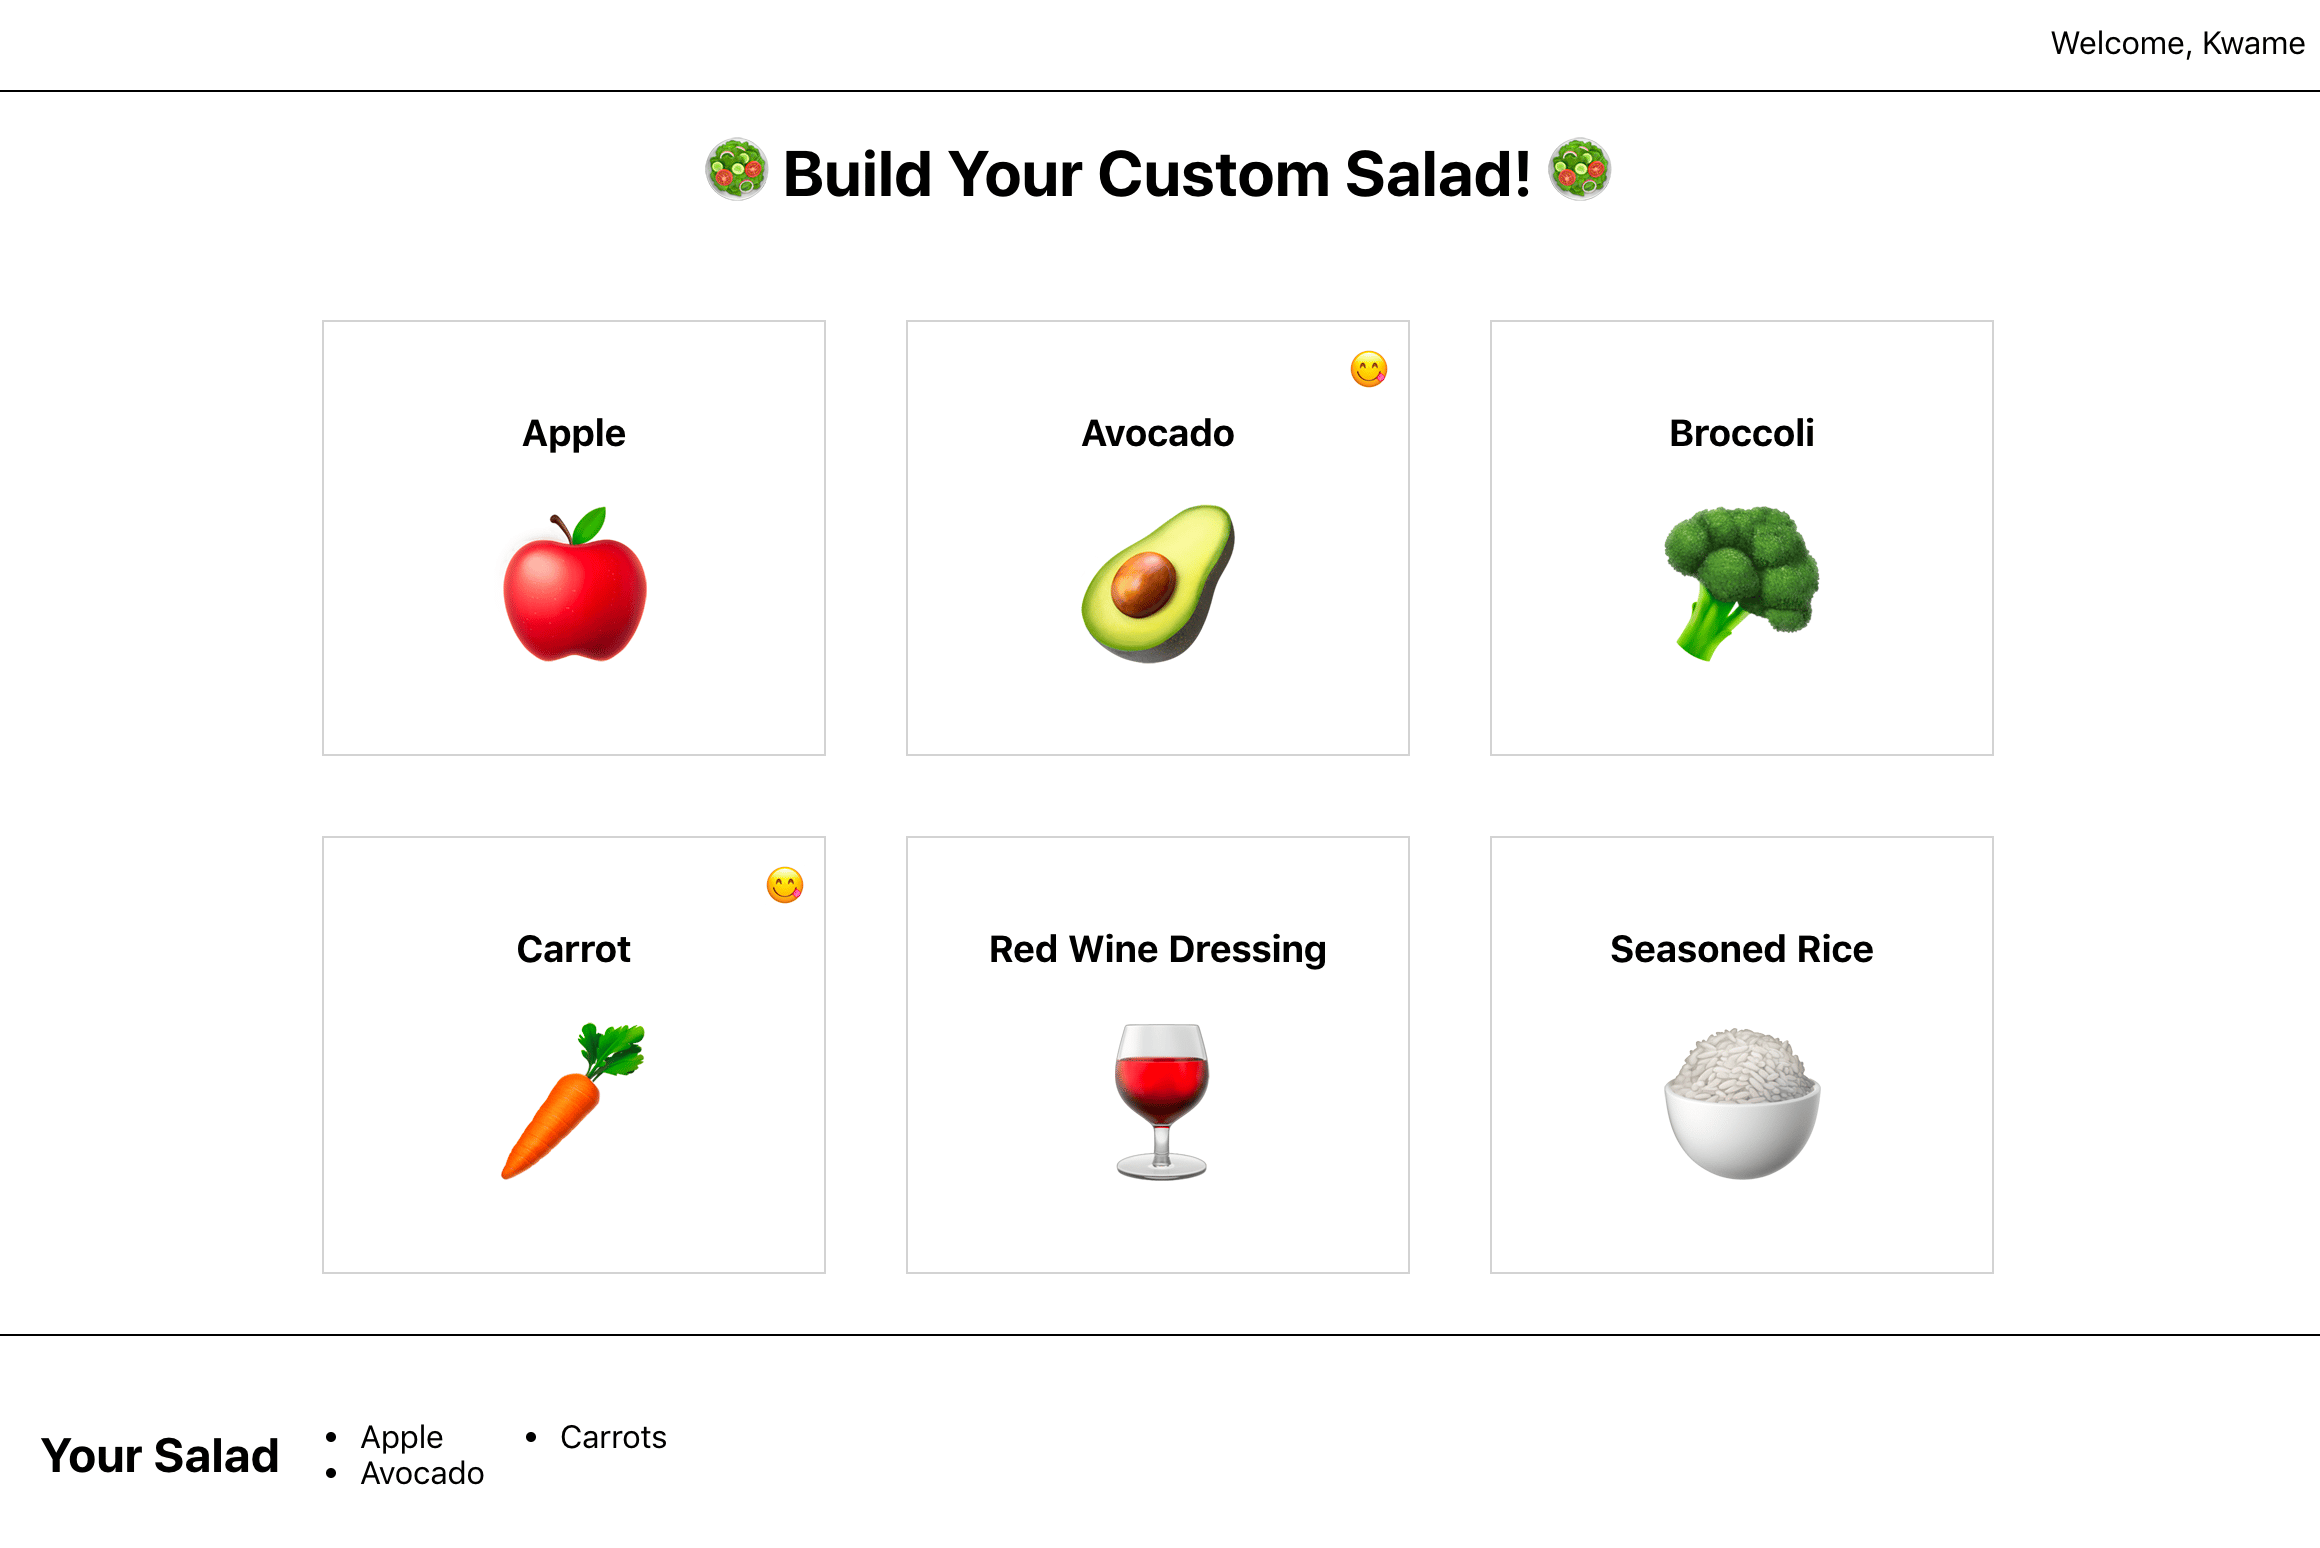
Notice how there is information that you might need to use across components. For example, the username (which for this sample is Kwame) displays user data in a navigation area, but you may also need user information to identify favorite items or for a checkout page. The user information will need to be accessible by any component in the application. Looking at the salad builder itself, each salad ingredient will need to be able to update the Your Salad list at the bottom of the screen, so you’ll need to store and update that data from a location that is accessible to each component as well.
Start by hard-coding all the data so that you can work out the structure of your app. Later, you’ll add in the context starting in the next step. Context provides the most value as applications start to grow, so in this step you’ll build several components to show how context works across a component tree. For smaller components or libraries, you can often use wrapping components and lower level state management techniques, like React Hooks and class-based management.
Since you are building a small app with multiple components, install JSS to make sure there won’t be any class name conflicts and so that you can add styles in the same file as a component. For more on JSS, see Styling React Components.
Run the following command:
- npm install react-jss
npm will install the component, and when it completes you’ll see a message like this:
Output+ react-jss@10.3.0
added 27 packages from 10 contributors, removed 10 packages andaudited 1973 packages in 15.507s
Now that you have JSS installed, consider the different components you’ll need. At the top of the page, you’ll have a Navigation component to store the welcome message. The next component will be the SaladMaker itself. This will hold the title along with the builder and the Your Salad list at the bottom. The section with ingredients will be a separate component called the SaladBuilder, nested inside SaladMaker. Each ingredient will be an instance of a SaladItem component. Finally, the bottom list will be a component called SaladSummary.
Note: The components do not need to be divided this way. As you work on your applications, your structure will change and evolve as you add more functionality. This example is meant to give you a structure to explore how context affects different components in the tree.
Now that you have an idea of the components you’ll need, make a directory for each one:
- mkdir src/components/Navigation
- mkdir src/components/SaladMaker
- mkdir src/components/SaladItem
- mkdir src/components/SaladBuilder
- mkdir src/components/SaladSummary
Next, build the components from the top down starting with Navigation. First, open the component file in a text editor:
- nano src/components/Navigation/Navigation.js
Create a component called Navigation and add some styling to give the Navigation a border and padding:
import React from 'react';
import { createUseStyles } from 'react-jss';

const useStyles = createUseStyles({
  wrapper: {
    borderBottom: 'black solid 1px',
    padding: [15, 10],
    textAlign: 'right',
  }
});

export default function Navigation() {
  const classes = useStyles();
  return(
    <div className={classes.wrapper}>
      Welcome, Kwame
    </div>
  )
}
Since you are using JSS, you can create style objects directly in the component rather than a CSS file. The wrapper div will have a padding, a solid black border, and align the text to the right with textAlign.
Save and close the file. Next, open App.js, which is the root of the project:
- nano src/components/App/App.js
Import the Navigation component and render it inside empty tags by adding the highlighted lines:
import React from 'react';
import Navigation from '../Navigation/Navigation';

function App() {
  return (
    <>
      <Navigation />
    </>
  );
}

export default App;
Save and close the file. When you do, the browser will refresh and you’ll see the navigation bar:
Think of the navigation bar as a global component, since in this example it’s serving as a template component that will be reused on every page.
The next component will be the SaladMaker itself. This is a component that will only render on certain pages or in certain states.
Open SaladMaker.js in your text editor:
- nano src/components/SaladMaker/SaladMaker.js
Create a component that has an <h1> tag with the heading:
import React from 'react';
import { createUseStyles } from 'react-jss';

const useStyles = createUseStyles({
  wrapper: {
    textAlign: 'center',
  }
});

export default function SaladMaker() {
  const classes = useStyles();
  return(
    <>
      <h1 className={classes.wrapper}>
        <span role="img" aria-label="salad">🥗 </span>
          Build Your Custom Salad!
          <span role="img" aria-label="salad"> 🥗</span>
      </h1>
    </>
  )
}
In this code, you are using textAlign to center the component on the page. The role and aria-label attributes of the span element will help with accessibility using Accessible Rich Internet Applications (ARIA).
Save and close the file. Open App.js to render the component:
- nano src/components/App/App.js
Import SaladMaker and render after the Navigation component:
import React from 'react';
import Navigation from '../Navigation/Navigation';
import SaladMaker from '../SaladMaker/SaladMaker';

function App() {
  return (
    <>
      <Navigation />
      <SaladMaker />
    </>
  );
}

export default App;
Save and close the file. When you do, the page will reload and you’ll see the heading:

Next, create a component called SaladItem. This will be a card for each individual ingredient.
Open the file in your text editor:
- nano src/components/SaladItem/SaladItem.js
This component will have three parts: the name of the item, an icon showing if the item is a favorite of the user, and an emoji placed inside a button that will add the item to the salad on click. Add the following lines to SaladItem.js:
import React from 'react';
import PropTypes from 'prop-types';
import { createUseStyles } from 'react-jss';

const useStyles = createUseStyles({
  add: {
    background: 'none',
    border: 'none',
    cursor: 'pointer',
  },
  favorite: {
    fontSize: 20,
    position: 'absolute',
    top: 10,
    right: 10,
  },
  image: {
    fontSize: 80
  },
  wrapper: {
    border: 'lightgrey solid 1px',
    margin: 20,
    padding: 25,
    position: 'relative',
    textAlign: 'center',
    textTransform: 'capitalize',
    width: 200,
  }
});

export default function SaladItem({ image, name }) {
  const classes = useStyles();
  const favorite = true;
  return(
    <div className={classes.wrapper}>
        <h3>
          {name}
        </h3>
        <span className={classes.favorite} aria-label={favorite ? 'Favorite' : 'Not Favorite'}>
          {favorite ? '😋' : ''}
        </span>
        <button className={classes.add}>
          <span className={classes.image} role="img" aria-label={name}>{image}</span>
        </button>
    </div>
  )
}

SaladItem.propTypes = {
  image: PropTypes.string.isRequired,
  name: PropTypes.string.isRequired,
}
The image and name will be props. The code uses the favorite variable and ternary operators to conditionally determine if the favorite icon appears or not. The favorite variable will later be determined with context as part of the user’s profile. For now, set it to true. The styling will place the favorite icon in the upper right corner of the card and remove the default border and background on the button. The wrapper class will add a small border and transform some of the text. Finally, PropTypes adds a weak typing system to provide some enforcement to make sure the wrong prop type is not passed.
Save and close the file. Now, you’ll need to render the different items. You’ll do that with a component called SaladBuilder, which will contain a list of items that it will convert to a series of SaladItem components:
Open SaladBuilder:
- nano src/components/SaladBuilder/SaladBuilder.js
If this were a production app, this data would often come from an Application Programming Interface (API). But for now, use a hard-coded list of ingredients:
import React from 'react';
import SaladItem from '../SaladItem/SaladItem';

import { createUseStyles } from 'react-jss';

const useStyles = createUseStyles({
  wrapper: {
    display: 'flex',
    flexWrap: 'wrap',
    padding: [10, 50],
    justifyContent: 'center',
  }
});

const ingredients = [
  {
    image: '🍎',
    name: 'apple',
  },
  {
    image: '🥑',
    name: 'avocado',
  },
  {
    image: '🥦',
    name: 'broccoli',
  },
  {
    image: '🥕',
    name: 'carrot',
  },
  {
    image: '🍷',
    name: 'red wine dressing',
  },
  {
    image: '🍚',
    name: 'seasoned rice',
  },
];

export default function SaladBuilder() {
  const classes = useStyles();
  return(
    <div className={classes.wrapper}>
      {
        ingredients.map(ingredient => (
          <SaladItem
            key={ingredient.name}
            image={ingredient.image}
            name={ingredient.name}
          />
        ))
      }
    </div>
  )
}
This snippet uses the map() array method to map over each item in the list, passing the name and image as props to a SaladItem component. Be sure to add a key to each item as you map. The styling for this component adds a display of flex for the flexbox layout, wraps the components, and centers them.
Save and close the file.
Finally, render the component in SaladMaker so it will appear in the page.
Open SaladMaker:
- nano src/components/SaladMaker/SaladMaker.js
Then import SaladBuilder and render after the heading:
import React from 'react';
import { createUseStyles } from 'react-jss';
import SaladBuilder from '../SaladBuilder/SaladBuilder';

const useStyles = createUseStyles({
  wrapper: {
    textAlign: 'center',
  }
});

export default function SaladMaker() {
  const classes = useStyles();
  return(
    <>
      <h1 className={classes.wrapper}>
        <span role="img" aria-label="salad">🥗 </span>
          Build Your Custom Salad!
          <span role="img" aria-label="salad"> 🥗</span>
      </h1>
      <SaladBuilder />
    </>
  )
}
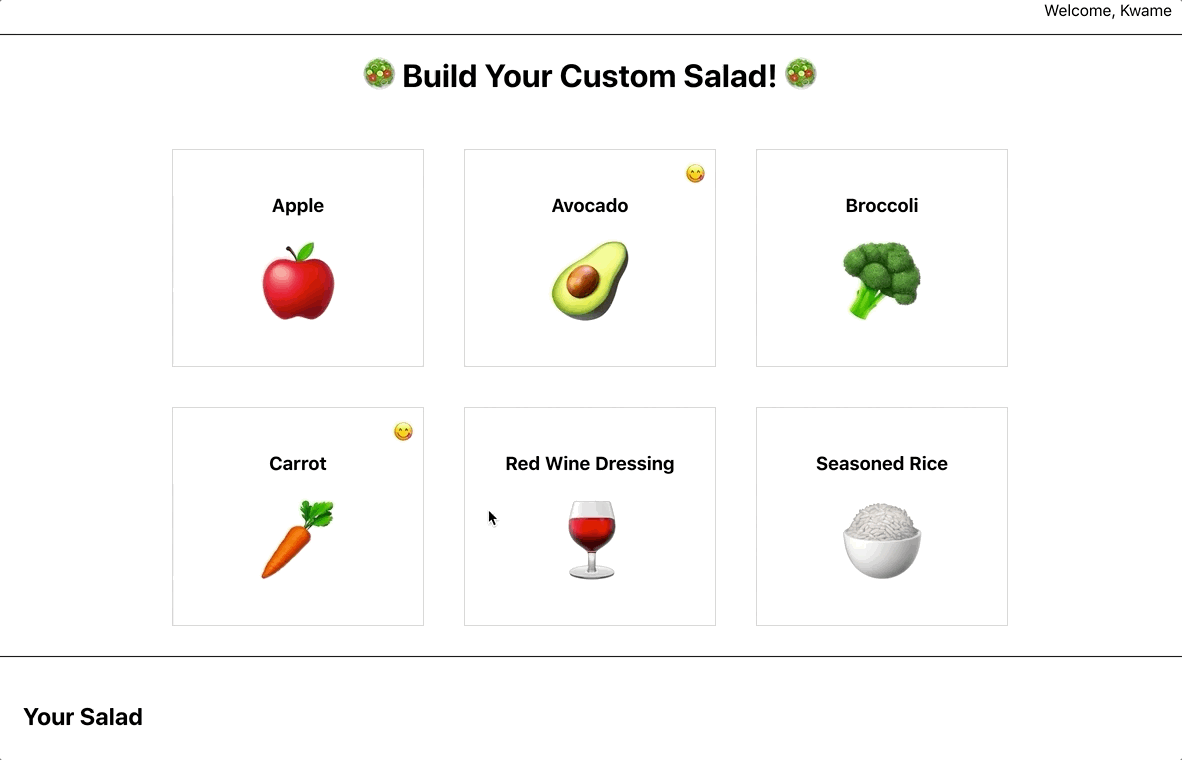
Save and close the file. When you do the page will reload and you’ll find the content:

The last step is to add the summary of the salad in progress. This component will show a list of items a user has selected. For now, you’ll hard-code the items. You’ll update them with context in Step 3.
Open SaladSummary in your text editor:
- nano src/components/SaladSummary/SaladSummary.js
The component will be a heading and an unsorted list of items. You’ll use flexbox to make them wrap:
import React from 'react';
import { createUseStyles } from 'react-jss';

const useStyles = createUseStyles({
  list: {
    display: 'flex',
    flexDirection: 'column',
    flexWrap: 'wrap',
    maxHeight: 50,
    '& li': {
      width: 100
    }
  },
  wrapper: {
    borderTop: 'black solid 1px',
    display: 'flex',
    padding: 25,
  }
});

export default function SaladSummary() {
  const classes = useStyles();
  return(
    <div className={classes.wrapper}>
      <h2>Your Salad</h2>
      <ul className={classes.list}>
        <li>Apple</li>
        <li>Avocado</li>
        <li>Carrots</li>
      </ul>
    </div>
  )
}
Save the file. Then open SaladMaker to render the item:
- nano src/components/SaladMaker/SaladMaker.js
Import and add SaladSummary after the SaladBuilder:
import React from 'react';
import { createUseStyles } from 'react-jss';
import SaladBuilder from '../SaladBuilder/SaladBuilder';
import SaladSummary from '../SaladSummary/SaladSummary';

const useStyles = createUseStyles({
  wrapper: {
    textAlign: 'center',
  }
});

export default function SaladMaker() {
  const classes = useStyles();
  return(
    <>
      <h1 className={classes.wrapper}>
        <span role="img" aria-label="salad">🥗 </span>
          Build Your Custom Salad!
          <span role="img" aria-label="salad"> 🥗</span>
      </h1>
      <SaladBuilder />
      <SaladSummary />
    </>
  )
}
Save and close the file. When you do, the page will refresh and you’ll find the full application:
There is shared data throughout the application. The Navigation component and the SaladItem component both need to know something about the user: their name and their list of favorites. The SaladItem also needs to update data that is accessible in the SaladSummary component. The components share common ancestors, but passing the data down through the tree would be difficult and error prone.
That’s where context comes in. You can declare the data in a common parent and then access later without explicitly passing it down the hierarchy of components.
In this step, you created an application to allow the user to build a salad from a list of options. You created a set of components that need to access or update data that is controlled by other components. In the next step, you’ll use context to store data and access it in child components.
Step 2 — Providing Data from a Root Component
In this step, you’ll use context to store the customer information at the root of the component. You’ll create a custom context, then use a special wrapping component called a Provider that will store the information at the root of the project. You’ll then use the useContext Hook to connect with the provider in nested components so you can display the static information. By the end of this step, you’ll be able to provide centralized stores of information and use information stored in a context in many different components.
Context at its most basic is an interface for sharing information. Many applications have some universal information they need to share across the application, such as user preferences, theming information, and site-wide application changes. With context, you can store that information at the root level then access it anywhere. Since you set the information in a parent, you know it will always be available and it will always be up-to-date.
To add a context, create a new directory called User:
- mkdir src/components/User
User isn’t going to be a traditional component, in that you are going to use it both as a component and as a piece of data for a special Hook called useContext. For now, keep the flat file structure, but if you use a lot of contexts, it might be worth moving them to a different directory structure.
Next, open up User.js in your text editor:
- nano src/components/User/User.js
Inside the file, import the createContext function from React, then execute the function and export the result:
import { createContext } from 'react';

const UserContext = createContext();
export default UserContext;
By executing the function, you have registered the context. The result, UserContext, is what you will use in your components.
Save and close the file.
The next step is to apply the context to a set of elements. To do that, you will use a component called a Provider. The Provider is a component that sets the data and then wraps some child components. Any wrapped child components will have access to data from the Provider with the useContext Hook.
Since the user data will be constant across the project, put it as high up the component tree as you can. In this application, you will put it at the root level in the App component:
Open up App:
- nano src/components/App/App.js
Add in the following highlighted lines of code to import the context and pass along the data:
import React from 'react';
import Navigation from '../Navigation/Navigation';
import SaladMaker from '../SaladMaker/SaladMaker';
import UserContext from '../User/User';

const user = {
  name: 'Kwame',
  favorites: [
    'avocado',
    'carrot'
  ]
}

function App() {
  return (
    <UserContext.Provider value={user}>
      <Navigation />
      <SaladMaker />
    </UserContext.Provider>
  );
}

export default App;
In a typical application, you would fetch the user data or have it stored during a server-side render. In this case, you hard-coded some data that you might receive from an API. You created an object called user that holds the username as a string and an array of favorite ingredients.
Next, you imported the UserContext, then wrapped Navigation and SaladMaker with a component called the UserContext.Provider. Notice how in this case UserContext is acting as a standard React component. This component will take a single prop called value. That prop will be the data you want to share, which in this case is the user object.
Save and close the file. Now the data is available throughout the application. However, to use the data, you’ll need to once again import and access the context.
Now that you have set context, you can start replacing hard-coded data in your component with dynamic values. Start by replacing the hard-coded name in Navigation with the user data you set with UserContext.Provider.
Open Navigation.js:
- nano src/components/Navigation/Navigation.js
Inside of Navigation, import the useContext Hook from React and UserContext from the component directory. Then call useContext using UserContext as an argument. Unlike the UserContext.Provider, you do not need to render UserContext in the JSX. The Hook will return the data that you provided in the value prop. Save the data to a new variable called user, which is an object containing name and favorites. You can then replace the hard-coded name with user.name:
import React, { useContext } from 'react';
import { createUseStyles } from 'react-jss';

import UserContext from '../User/User';

const useStyles = createUseStyles({
  wrapper: {
    outline: 'black solid 1px',
    padding: [15, 10],
    textAlign: 'right',
  }
});

export default function Navigation() {
  const user = useContext(UserContext);
  const classes = useStyles();
  return(
    <div className={classes.wrapper}>
      Welcome, {user.name}
    </div>
  )
}
UserContext worked as a component in App.js, but here you are using it more as a piece of data. However, it can still act as a component if you would like. You can access the same data by using a Consumer that is part of the UserContext. You retrieve the data by adding UserContext.Consumer to your JSX, then use a function as a child to access the data.
While it’s possible to use the Consumer component, using Hooks can often be shorter and easier to read, while still providing the same up-to-date information. This is why this tutorial uses the Hooks approach.
Save and close the file. When you do, the page will refresh and you’ll see the same name. But this time it has updated dynamically:
In this case the data didn’t travel across many components. The component tree that represents the path that the data traveled would look like this:
| UserContext.Provider
  | Navigation
You could pass this username as a prop, and at this scale that could be an effective strategy. But as the application grows, there’s a chance that the Navigation component will move. There may be a component called Header that wraps the Navigation component and another component such as a TitleBar, or maybe you’ll create a Template component and then nest the Navigation in there. By using context, you won’t have to refactor Navigation as long as the Provider is up the tree, making refactoring easier.
The next component that needs user data is the SaladItem component. In the SaladItem component, you’ll need the user’s array of favorites. You’ll conditionally display the emoji if the ingredient is a favorite of the user.
Open SaladItem.js:
- nano src/components/SaladItem/SaladItem.js
Import useContext and UserContext, then call useContext with UserContext. After that, check to see if the ingredient is in the favorites array using the includes method:
import React, { useContext } from 'react';
import PropTypes from 'prop-types';
import { createUseStyles } from 'react-jss';

import UserContext from '../User/User';

const useStyles = createUseStyles({
...
});

export default function SaladItem({ image, name }) {
  const classes = useStyles();
  const user = useContext(UserContext);
  const favorite = user.favorites.includes(name);
  return(
    <div className={classes.wrapper}>
        <h3>
          {name}
        </h3>
        <span className={classes.favorite} aria-label={favorite ? 'Favorite' : 'Not Favorite'}>
          {favorite ? '😋' : ''}
        </span>
        <button className={classes.add}>
          <span className={classes.image} role="img" aria-label={name}>{image}</span>
        </button>
    </div>
  )
}

SaladItem.propTypes = {
  image: PropTypes.string.isRequired,
  name: PropTypes.string.isRequired,
}
Save and close the file. When you do, the browser will refresh and you’ll see that only the favorite items have the emoji:

Unlike Navigation, the context is traveling much farther. The component tree would look something like this:
| User.Provider
  | SaladMaker
    | SaladBuilder
      | SaladItem
The information skipped over two intermediary components without any props. If you had to pass the data as a prop all the way through the tree, it would be a lot of work and you’d risk having a future developer refactor the code and forget to pass the prop down. With context, you can be confident the code will work as the application grows and evolves.
In this step, you created a context and used a Provider to set the data in the component tree. You also accessed context with the useContext Hook and used context across multiple components. This data was static and thus never changed after the initial set up, but there are going to be times when you need to share data and also modify the data across multiple components. In the next step, you’ll update nested data using context.
Step 3 — Updating Data from Nested Components
In this step, you’ll use context and the useReducer Hook to create dynamic data that nested components can consume and update. You’ll update your SaladItem components to set data that the SaladSummary will use and display. You’ll also set context providers outside of the root component. By the end of this step, you’ll have an application that can use and update data across several components and you’ll be able to add multiple context providers at different levels of an application.
At this point, your application is displaying user data across multiple components, but it lacks any user interaction. In the previous step, you used context to share a single piece of data, but you can also share a collection of data, including functions. That means you can share data and also share the function to update the data.
In your application, each SaladItem needs to update a shared list. Then your SaladSummary component will display the items the user has selected and add it to the list. The problem is that these components are not direct descendants, so you can’t pass the data and the update functions as props. But they do share a common parent: SaladMaker.
One of the big differences between context and other state management solutions such as Redux is that context is not intended to be a central store. You can use it multiple times throughout an application and initiate it at the root level or deep in a component tree. In other words, you can spread your contexts throughout the application, creating focused data collections without worrying about conflicts.
To keep context focused, create Providers that wrap the nearest shared parent when possible. In this case, that means, rather than adding another context in App, you will add the context in the SaladMaker component.
Open SaladMaker:
- nano src/components/SaladMaker/SaladMaker.js
Then create and export a new context called SaladContext:
import React, { createContext } from 'react';
import { createUseStyles } from 'react-jss';
import SaladBuilder from '../SaladBuilder/SaladBuilder';
import SaladSummary from '../SaladSummary/SaladSummary';

const useStyles = createUseStyles({
  wrapper: {
    textAlign: 'center',
  }
});

export const SaladContext = createContext();

export default function SaladMaker() {
  const classes = useStyles();
  return(
    <>
      <h1 className={classes.wrapper}>
        <span role="img" aria-label="salad">🥗 </span>
          Build Your Custom Salad!
          <span role="img" aria-label="salad"> 🥗</span>
      </h1>
      <SaladBuilder />
      <SaladSummary />
    </>
  )
}
In the previous step, you made a separate component for your context, but in this case you are creating it in the same file that you are using it. Since User does not seem related directly to the App, it might make more sense to keep them separate. However, since the SaladContext is tied closely to the SaladMaker component, keeping them together will create more readable code.
In addition, you could create a more generic context called OrderContext, which you could reuse across multiple components. In that case, you’d want to make a separate component. For now, keep them together. You can always refactor later if you decide to shift to another pattern.
Before you add the Provider think about the data that you want to share. You’ll need an array of items and a function for adding the items. Unlike other centralized state management tools, context does not handle updates to your data. It merely holds the data for use later. To update data, you’ll need to use other state management tools such as Hooks. If you were collecting data for the same component, you’d use either the useState or useReducer Hooks. If you are new to these Hooks, check out How To Manage State with Hooks on React Components.
The useReducer Hook is a good fit since you’ll need to update the most recent state on every action.
Create a reducer function that adds a new item to a state array, then use the useReducer Hook to create a salad array and a setSalad function:
import React, { useReducer, createContext } from 'react';
import { createUseStyles } from 'react-jss';
import SaladBuilder from '../SaladBuilder/SaladBuilder';
import SaladSummary from '../SaladSummary/SaladSummary';

const useStyles = createUseStyles({
  wrapper: {
    textAlign: 'center',
  }
});

export const SaladContext = createContext();

function reducer(state, item) {
  return [...state, item]
}

export default function SaladMaker() {
  const classes = useStyles();
  const [salad, setSalad] = useReducer(reducer, []);
  return(
    <>
      <h1 className={classes.wrapper}>
        <span role="img" aria-label="salad">🥗 </span>
          Build Your Custom Salad!
          <span role="img" aria-label="salad"> 🥗</span>
      </h1>
      <SaladBuilder />
      <SaladSummary />
    </>
  )
}
Now you have a component that contains the salad data you want to share, a function called setSalad to update the data, and the SaladContext to share the data in the same component. At this point, you need to combine them together.
To combine, you’ll need to create a Provider. The problem is that the Provider takes a single value as a prop. Since you can’t pass salad and setSalad individually, you’ll need to combine them into an object and pass the object as the value:
import React, { useReducer, createContext } from 'react';
import { createUseStyles } from 'react-jss';
import SaladBuilder from '../SaladBuilder/SaladBuilder';
import SaladSummary from '../SaladSummary/SaladSummary';

const useStyles = createUseStyles({
  wrapper: {
    textAlign: 'center',
  }
});

export const SaladContext = createContext();

function reducer(state, item) {
  return [...state, item]
}

export default function SaladMaker() {
  const classes = useStyles();
  const [salad, setSalad] = useReducer(reducer, []);
  return(
    <SaladContext.Provider value={{ salad, setSalad }}>
      <h1 className={classes.wrapper}>
        <span role="img" aria-label="salad">🥗 </span>
          Build Your Custom Salad!
          <span role="img" aria-label="salad"> 🥗</span>
      </h1>
      <SaladBuilder />
      <SaladSummary />
    </SaladContext.Provider>
  )
}
Save and close the file. As with Navigation, it may seem unnecessary to create a context when the SaladSummary is in the same component as the context. Passing salad as a prop is perfectly reasonable, but you may end up refactoring it later. Using context here keeps the information together in a single place.
Next, go into the SaladItem component and pull the setSalad function out of the context.
Open the component in a text editor:
- nano src/components/SaladItem/SaladItem.js
Inside SaladItem, import the context from SaladMaker, then pull out the setSalad function using destructuring. Add a click event to the button that will call the setSalad function. Since you want a user to be able to add an item multiple times, you’ll also need to create a unique id for each item so that the map function will be able to assign a unique key:
import React, { useReducer, useContext } from 'react';
import PropTypes from 'prop-types';
import { createUseStyles } from 'react-jss';

import UserContext from '../User/User';
import { SaladContext } from '../SaladMaker/SaladMaker';

const useStyles = createUseStyles({
...
});

const reducer = key => key + 1;
export default function SaladItem({ image, name }) {
  const classes = useStyles();
  const { setSalad } = useContext(SaladContext)
  const user = useContext(UserContext);
  const favorite = user.favorites.includes(name);
  const [id, updateId] = useReducer(reducer, 0);
  function update() {
    setSalad({
      name,
      id: `${name}-${id}`
    })
    updateId();
  };
  return(
    <div className={classes.wrapper}>
        <h3>
          {name}
        </h3>
        <span className={classes.favorite} aria-label={favorite ? 'Favorite' : 'Not Favorite'}>
          {favorite ? '😋' : ''}
        </span>
        <button className={classes.add} onClick={update}>
          <span className={classes.image} role="img" aria-label={name}>{image}</span>
        </button>
    </div>
  )
}
...
To make the unique id, you’ll use the useReducer Hook to increment a value on every click. For the first click, the id will be 0; the second will be 1, and so on. You’ll never display this value to the user; this will just create a unique value for the mapping function later.
After creating the unique id, you created a function called update to increment the id and to call setSalad. Finally, you attached the function to the button with the onClick prop.
Save and close the file. The last step is to pull the dynamic data from the context in the SaladSummary.
Open SaladSummary:
- nano src/components/SaladSummary/SaladSummary.js
Import the SaladContext component, then pull out the salad data using destructuring. Replace the hard-coded list items with a function that maps over salad, converting the objects to <li> elements. Be sure to use the id as the key:
import React, { useContext } from 'react';
import { createUseStyles } from 'react-jss';

import { SaladContext } from '../SaladMaker/SaladMaker';

const useStyles = createUseStyles({
...
});

export default function SaladSummary() {
  const classes = useStyles();
  const { salad } = useContext(SaladContext);
  return(
    <div className={classes.wrapper}>
      <h2>Your Salad</h2>
      <ul className={classes.list}>
        {salad.map(({ name, id }) => (<li key={id}>{name}</li>))}
      </ul>
    </div>
  )
}
Save and close the file. When you do, you will be able to click on items and it will update the summary:
Notice how the context gave you the ability to share and update data in different components. The context didn’t update the items itself, but it gave you a way to use the useReducer Hook across multiple components. In addition, you also had the freedom to put the context lower in the tree. It may seem like it’s best to always keep the context at the root, but by keeping the context lower, you don’t have to worry about unused state sticking around in a central store. As soon as you unmount a component, the data disappears. That can be a problem if you ever want to save the data, but in that case, you just need to raise the context up to a higher parent.
Another advantage of using context lower in your application tree is that you can reuse a context without worrying about conflicts. Suppose you had a larger app that had a sandwich maker and a salad maker. You could create a generic context called OrderContext and then you could use it at multiple points in your component without worrying about data or name conflicts. If you had a SaladMaker and a SandwichMaker, the tree would look something like this:
| App
  | Salads
    | OrderContext
      | SaladMaker
  | Sandwiches
    | OrderContext
      | SandwichMaker
Notice that OrderContext is there twice. That’s fine, since the useContext Hook will look for the nearest provider.
In this step you shared and updated data using context. You also placed the context outside the root element so it’s close to the components that need the information without cluttering a root component. Finally, you combined context with state management Hooks to create data that is dynamic and accessible across several components.
Conclusion
Context is a powerful and flexible tool that gives you the ability to store and use data across an application. It gives you the ability to handle distributed data with built-in tools that do not require any additional third party installation or configuration.
Creating reusable contexts is important across a variety of common components such as forms that need to access data across elements or tab views that need a common context for both the tab and the display. You can store many types of information in contexts including themes, form data, alert messages, and more. Context gives you the freedom to build components that can access data without worrying about how to pass data through intermediary components or how to store data in a centralized store without making the store too large.
If you would like to look at more React tutorials, check out our React Topic page, or return to the How To Code in React.js series page.
Thanks for learning with the DigitalOcean Community. Check out our offerings for compute, storage, networking, and managed databases.
Tutorial Series: How To Code in React.js
React is a popular JavaScript framework for creating front-end applications, such as user interfaces that allow users to interact with programs. Originally created by Facebook, it has gained popularity by allowing developers to create fast applications using an intuitive programming paradigm that ties JavaScript with an HTML-like syntax known as JSX.
In this series, you will build out examples of React projects to gain an understanding of this framework, giving you the knowledge you need to pursue front-end web development or start out on your way to full stack development.
Browse Series: 21 tutorials
About the author(s)
Author of Simplifying JavaScript. Writing featured in Slate, FreeCodeCamp, and here! I like to break things and put them back together. 🛠
Former Senior Technical Editor at DigitalOcean, fiction writer and podcaster elsewhere, always searching for the next good nautical pun! Areas of expertise include Node.js, PostgreSQL, CSS, JavaScript.
Still looking for an answer?
This textbox defaults to using Markdown to format your answer.
You can type !ref in this text area to quickly search our full set of tutorials, documentation & marketplace offerings and insert the link!
First of all awesome tutorial! Question: On user login I get username, email, name, role and userId from API call. How can I add user info to the app.js? That way is available through the APP.
Thank you for the excellent articales. They’re very helpful and comprehensive. Just a small question, I can’t seem to find the definition of setSalad() function in this article. Although it might be just a few lines of code, but it would be good to include it for completedness.
Thankyou for the article. I have just started learning react. Finding your article really helpful. Everything works fine except SaladItem.js is throwing up error at runtime, setSalad() is not a function. Can you kindly advise how to fix it or if you may update the code. Thanks.
 This work is licensed under a Creative Commons Attribution-NonCommercial- ShareAlike 4.0 International License.
Become a contributor for community
Get paid to write technical tutorials and select a tech-focused charity to receive a matching donation.

DigitalOcean Documentation
Full documentation for every DigitalOcean product.

Resources for startups and AI-native businesses
The Wave has everything you need to know about building a business, from raising funding to marketing your product.
The developer cloud
Scale up as you grow — whether you're running one virtual machine or ten thousand.

Start building today
From GPU-powered inference and Kubernetes to managed databases and storage, get everything you need to build, scale, and deploy intelligent applications.
