By hitjethva and Matt Abrams
Not using CentOS 8?
Choose a different version or distribution.
The author selected the COVID-19 Relief Fund to receive a donation as part of the Write for DOnations program.
Introduction
The Apache web server uses virtual hosts to manage multiple domains on a single instance. Similarly, PHP-FPM uses a daemon to manage multiple PHP versions on a single instance. Together, you can use Apache and PHP-FPM to host multiple PHP web-applications, each using a different version of PHP, all on the same server, and all at the same time. This is useful because different applications may require different versions of PHP, but some server stacks, like a regularly configured LAMP stack, can only manage one. Combining Apache with PHP-FPM is also a more cost-efficient solution than hosting each application on its own instance.
PHP-FPM also offers configuration options for stderr and stdout logging, emergency restarts, and adaptive process spawning, which is useful for heavy-loaded sites. In fact, using Apache with PHP-FPM is one of the best stacks for hosting PHP applications, especially when it comes to performance.
In this tutorial you will set up two PHP sites on a single instance. Each site will use its own domain, and each domain will deploy its own version of PHP. The first, site1.your_domain, will deploy PHP 7.3. The second, site2.your_domain, will deploy PHP 7.4.
Prerequisites
- One CentOS 8 server with at least 1GB of RAM set up by following the Initial Server Setup with CentOS 8, including a
sudonon-root user and a firewall. - An Apache web server set up and configured by following How to Install the Apache Web Server on CentOS 8.
- A domain name configured to point to your CentOS 8 server. You can learn how to point domains to DigitalOcean Droplets by following How To Point to DigitalOcean Nameservers From Common Domain Registrars. For the purposes of this tutorial, you will use two subdomains, each specified with an
Arecord in your DNS settings:site1.your_domainandsite2.your_domain.
Step 1 — Installing PHP Versions 7.3 and 7.4 with PHP-FPM
With the prerequisites completed, you will now install PHP versions 7.3 and 7.4, as well as PHP-FPM and several additional extensions. In order to install multiple versions of PHP, you will need to install and enable the Remi repository to your system. Which also offers the latest versions of the PHP stack on CentOS 8 system.
You can add the both repository to your system using the below commands:
- sudo dnf install http://rpms.remirepo.net/enterprise/remi-release-8.rpm
The command above will also enable the EPEL repository.
First let’s discover what versions of PHP 7 are available on Remi:
- sudo dnf module list php
You’ll see an output like this:
OutputRemi's Modular repository for Enterprise Linux 8 - x86_64
Name                     Stream                       Profiles                                       Summary
php                      remi-7.2                     common [d], devel, minimal                     PHP scripting language
php                      remi-7.3                     common [d], devel, minimal                     PHP scripting language
php                      remi-7.4                     common [d], devel, minimal                     PHP scripting language
Next, disable the default PHP module and enable Remi’s PHP7.3 module using the below command:
- sudo dnf module reset php
- sudo dnf module enable php:remi-7.3
-
Lets start to installing php73 and php73-php-fpm:
- sudo dnf install php73 php73-php-fpm -y
php73is a metapackage that can be used to run PHP application.php73-php-fpmprovides the Fast Process Manager interpreter that runs as a daemon and receives Fast/CGI requests.
Now repeat the process for PHP version 7.4. Install php74 and php74-php-fpm.
- sudo dnf module reset php
- sudo dnf module enable php:remi-7.4
- sudo dnf install php74 php74-php-fpm -y
After installing both PHP versions, start the php73-php-fpm service and enable it to start at boot with the following commands:
- sudo systemctl start php73-php-fpm
- sudo systemctl enable php73-php-fpm
Next, verify the status of php73-php-fpm service with the following commands:
- sudo systemctl status php73-php-fpm
You’ll see the following output:
- ● php73-php-fpm.service - The PHP FastCGI Process Manager
- Loaded: loaded (/usr/lib/systemd/system/php73-php-fpm.service; enabled; vendor preset: disabled)
- Active: active (running) since Wed 2020-04-22 05:14:46 UTC; 52s ago
- Main PID: 14206 (php-fpm)
- Status: "Processes active: 0, idle: 5, Requests: 0, slow: 0, Traffic: 0req/sec"
- Tasks: 6 (limit: 5059)
- Memory: 25.9M
- CGroup: /system.slice/php73-php-fpm.service
- ├─14206 php-fpm: master process (/etc/opt/remi/php73/php-fpm.conf)
- ├─14207 php-fpm: pool www
- ├─14208 php-fpm: pool www
- ├─14209 php-fpm: pool www
- ├─14210 php-fpm: pool www
- └─14211 php-fpm: pool www
-
- Apr 22 05:14:46 centos-s-1vcpu-1gb-nyc3-01 systemd[1]: Starting The PHP FastCGI Process Manager...
- Apr 22 05:14:46 centos-s-1vcpu-1gb-nyc3-01 systemd[1]: Started The PHP FastCGI Process Manager.
-
Repeating this process, now start the php74-php-fpm service and enable it to start at boot with the following commands:
- sudo systemctl start php74-php-fpm
- sudo systemctl enable php74-php-fpm
And then verify the status of php74-php-fpm service with the following commands:
- sudo systemctl status php74-php-fpm
You’ll see the following output:
- ● php74-php-fpm.service - The PHP FastCGI Process Manager
- Loaded: loaded (/usr/lib/systemd/system/php74-php-fpm.service; enabled; vendor preset: disabled)
- Active: active (running) since Wed 2020-04-22 05:16:16 UTC; 23s ago
- Main PID: 14244 (php-fpm)
- Status: "Processes active: 0, idle: 5, Requests: 0, slow: 0, Traffic: 0req/sec"
- Tasks: 6 (limit: 5059)
- Memory: 18.8M
- CGroup: /system.slice/php74-php-fpm.service
- ├─14244 php-fpm: master process (/etc/opt/remi/php74/php-fpm.conf)
- ├─14245 php-fpm: pool www
- ├─14246 php-fpm: pool www
- ├─14247 php-fpm: pool www
- ├─14248 php-fpm: pool www
- └─14249 php-fpm: pool www
-
- Apr 22 05:16:15 centos-s-1vcpu-1gb-nyc3-01 systemd[1]: Starting The PHP FastCGI Process Manager...
- Apr 22 05:16:16 centos-s-1vcpu-1gb-nyc3-01 systemd[1]: Started The PHP FastCGI Process Manager.
At this point you have installed two PHP versions on your server. Next, you will create a directory structure for each website you want to deploy.
Step 2 — Creating Directory Structures for Both Websites
In this section, you will create a document root directory and an index page for each of your two websites.
First, create document root directories for both site1.your_domain and site2.your_domain:
- sudo mkdir /var/www/site1.your_domain
- sudo mkdir /var/www/site2.your_domain
By default, Apache webserver runs as a apache user and apache group. To ensure that you have the correct ownership and permissions of your website root directories, execute the following commands:
- sudo chown -R apache:apache /var/www/site1.your_domain
- sudo chown -R apache:apache /var/www/site2.your_domain
- sudo chmod -R 755 /var/www/site1.your_domain
- sudo chmod -R 755 /var/www/site2.your_domain
The chown command changes the ownership of your two website directories to the apache user and the apache group. The chmod command changes the permissions associated with that user and group, as well as others.
Next you will create an info.php file inside each website root directory. This will display each website’s PHP version information. Begin with site1:
- sudo vi /var/www/site1.your_domain/info.php
Add the following line:
<?php phpinfo(); ?>
Save and close the file. Now copy the info.php file you created to site2:
- sudo cp /var/www/site1.your_domain/info.php /var/www/site2.your_domain/info.php
Your web server now has the document root directories that each site requires to serve data to visitors. Next, you will configure your Apache web server to work with two different PHP versions.
Step 3 — Configuring Apache for Both Websites
In this section, you will create two virtual host configuration files. This will enable your two websites to work simultaneously with two different PHP versions.
In order for Apache to serve this content, it is necessary to create a virtual host file with the correct directives. You’ll create two new virtual host configuration file inside the directory /etc/httpd/conf.d/.
First create a new virtual host configuration file for the website site1.your_domain. Here you will direct Apache to render content using php7.3:
- sudo vi /etc/httpd/conf.d/site1.your_domain.conf
Add the following content. Make sure the website directory path, server name, and PHP version match your setup:
<VirtualHost *:80>
     ServerAdmin admin@site1.your_domain
     ServerName site1.your_domain
     DocumentRoot /var/www/site1.your_domain
     DirectoryIndex info.php
     ErrorLog /var/log/httpd/site1.your_domain-error.log
     CustomLog /var/log/httpd/site1.your_domain-access.log combined

  <IfModule !mod_php7.c>
    <FilesMatch \.(php|phar)$>
        SetHandler "proxy:unix:/var/opt/remi/php73/run/php-fpm/www.sock|fcgi://localhost"
    </FilesMatch>
  </IfModule>

</VirtualHost>
For DocumentRoot you are specifying the path of your website root directory. For ServerAdmin you are adding an email that the your_domain site administrator can access. For ServerName you are adding the url for your first subdomain. For SetHandler you are specifying the PHP-FPM socket file for php7.3.
Save and close the file.
Next, create a new virtual host configuration file for the website site2.your_domain. You will specify this subdomain to deploy php7.4:
- sudo vi /etc/httpd/conf.d/site2.your_domain.conf
Add the following content. Again, make sure the website directory path, server name, and PHP version match your unique information:
<VirtualHost *:80>
     ServerAdmin admin@site2.your_domain
     ServerName site2.your_domain
     DocumentRoot /var/www/site2.your_domain
     DirectoryIndex info.php
     ErrorLog /var/log/httpd/site2.your_domain-error.log
     CustomLog /var/log/httpd/site2.your_domain-access.log combined
  <IfModule !mod_php7.c>
    <FilesMatch \.(php|phar)$>
        SetHandler "proxy:unix:/var/opt/remi/php74/run/php-fpm/www.sock|fcgi://localhost"
    </FilesMatch>
  </IfModule>

</VirtualHost>
Save and close the file when you are finished. Then, check the Apache configuration file for any syntax errors with the following command:
- sudo apachectl configtest
You’ll see an output printing Syntax OK:
- OutputSyntax OK
Finally, restart the Apache service to implement your changes:
- sudo systemctl restart httpd
Now that you have configured Apache to serve each site, you will test them to make sure the proper PHP versions are running.
Step 4 — Testing Both Websites
At this point, you have configured two websites to run two different versions of PHP. Now test the results.
Open your web browser and visit both sites http://site1.your_domain and http://site2.your_domain. You will see two pages that look like this:
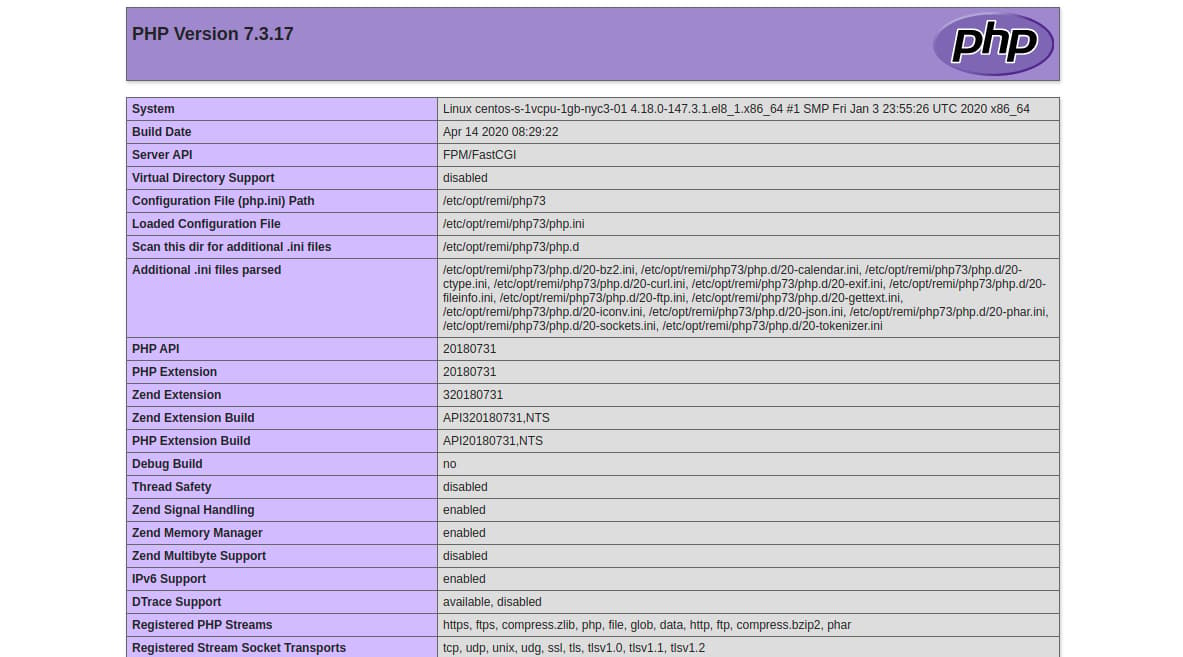
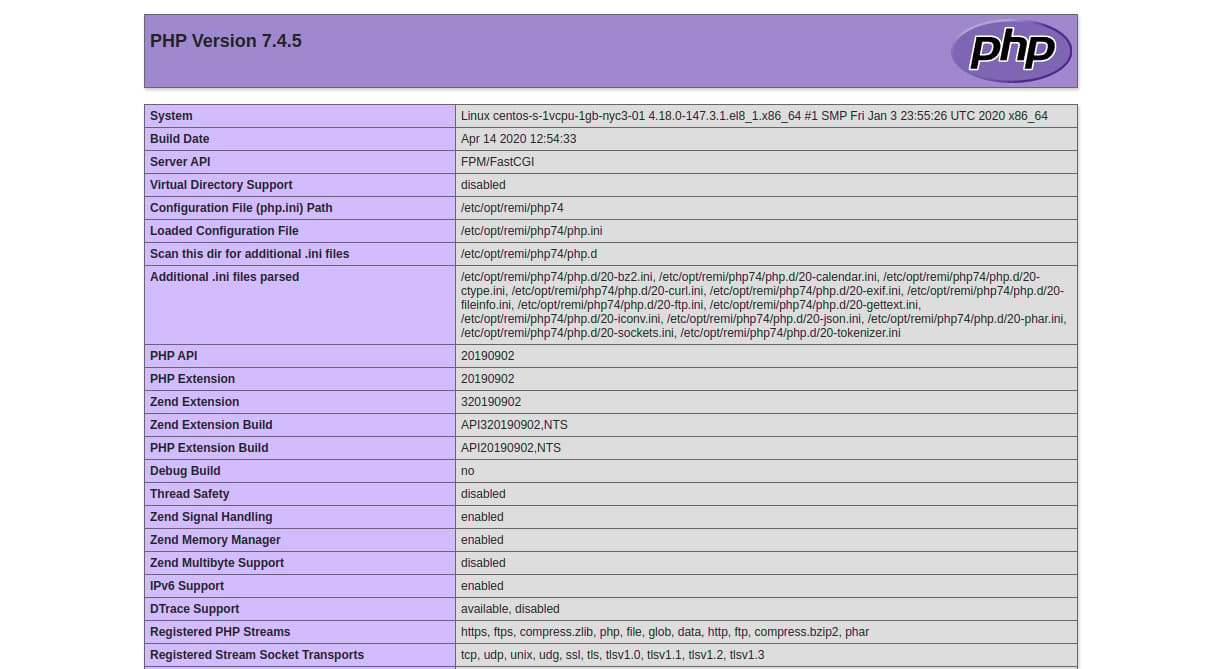
Note the titles. The first page indicates that site1.your_domain deployed PHP version 7.3. The second indicates that site2.your_domain deployed PHP version 7.4.
Now that you’ve tested your sites, remove the info.php files. Because they contain sensitive information about your server and are accessible to unauthorized users, they pose a security vulnerability. To remove both files, run the following commands:
- sudo rm -rf /var/www/site1.your_domain/info.php
- sudo rm -rf /var/www/site2.your_domain/info.php
You now have a single CentOS 8 server handling two websites with two different PHP versions. PHP-FPM, however, is not limited to this one application.
Conclusion
You have now combined virtual hosts and PHP-FPM to serve multiple websites and multiple versions of PHP on a single server. The only practical limit on the number of PHP sites and PHP versions that your Apache service can handle is the processing power of your instance.
From here you might consider exploring PHP-FPM’s more advanced features, like its adaptive spawning process or how it can log sdtout and stderr. Alternatively, you could now secure your websites with free TLS/SSL certificates from Let’s Encrypt.
Thanks for learning with the DigitalOcean Community. Check out our offerings for compute, storage, networking, and managed databases.
About the author(s)
Supporting the open-source community one tutorial at a time. Former Technical Editor at DigitalOcean. Expertise in topics including Ubuntu 22.04, Ubuntu 20.04, CentOS, and more.
Still looking for an answer?
This textbox defaults to using Markdown to format your answer.
You can type !ref in this text area to quickly search our full set of tutorials, documentation & marketplace offerings and insert the link!
Is it really necessary to use the dnf modules? It seems that it would be enough to just install with “dnf install php73 php73-php-fpm php74 php74-php-fpm”. Then for console commands one has to type “php73” or “php74” instead of “php”. Right? But apache can be configured like stated in this tutorial.
i follow the step above but when install phpmyadmin it show missing mysqli. how can i install mysqli?
 This work is licensed under a Creative Commons Attribution-NonCommercial- ShareAlike 4.0 International License.
Become a contributor for community
Get paid to write technical tutorials and select a tech-focused charity to receive a matching donation.

DigitalOcean Documentation
Full documentation for every DigitalOcean product.

Resources for startups and AI-native businesses
The Wave has everything you need to know about building a business, from raising funding to marketing your product.
The developer cloud
Scale up as you grow — whether you're running one virtual machine or ten thousand.

Start building today
From GPU-powered inference and Kubernetes to managed databases and storage, get everything you need to build, scale, and deploy intelligent applications.
