Sr Technical Content Strategist and Team Lead

Introduction
Kubernetes is a system for running modern, containerized applications at scale. With it, developers can deploy and manage applications across clusters of machines. And though it can be used to improve efficiency and reliability in single-instance application setups, Kubernetes is designed to run multiple instances of an application across groups of machines.
When creating multi-service deployments with Kubernetes, many developers opt to use the Helm package manager. Helm streamlines the process of creating multiple Kubernetes resources by offering charts and templates that coordinate how these objects interact. It also offers pre-packaged charts for popular open-source projects.
In this tutorial, you will deploy a Node.js application with a MongoDB database onto a Kubernetes cluster using Helm charts. You will use the official Helm MongoDB replica set chart to create a StatefulSet object consisting of three Pods, a Headless Service, and three PersistentVolumeClaims. You will also create a chart to deploy a multi-replica Node.js application using a custom application image. If you are new to connecting Node.js and MongoDB, How To Integrate MongoDB with Your Node Application covers the basics; the From Containers to Kubernetes with Node.js eBook extends this workflow. The setup you will build in this tutorial will mirror the functionality of the code described in Containerizing a Node.js Application with Docker Compose and will be a good starting point to build a resilient Node.js application with a MongoDB data store that can scale with your needs.
Key Takeaways
- You will deploy a Node.js application and a MongoDB database on a Kubernetes cluster using Helm charts for declarative, repeatable configuration.
- MongoDB will run as a replica set of three Pods (StatefulSet) with persistent storage and a headless service for stable network identity.
- The Node.js app will run as a multi-replica Deployment, with environment variables supplied via ConfigMaps and Secrets for database connection details.
- Scaling is split between stateless app replicas (handled by Kubernetes Deployments) and stateful MongoDB (handled by the replica set and Helm chart values).
- This pattern is a foundation for production-ready setups; for automatic scaling of the app layer, you can add the Horizontal Pod Autoscaler after completing this tutorial.
- Observability, resource requests, and safe MongoDB scaling practices are essential before increasing replica counts in production.
Architecture Overview
This tutorial uses a Helm-first approach to define a repeatable, declarative stack that separates stateless application scaling from stateful database scaling. The core components are:
- Node.js Deployment: multiple replicas of the application for horizontal scaling and high availability.
- MongoDB StatefulSet: three replica set members with persistent volumes for durable storage.
- ConfigMap and Secret: connection settings (hostnames, ports, replica set name) and credentials.
- Services: a headless service for MongoDB pod DNS resolution and a LoadBalancer service for the Node.js app.
Data flow looks like this: external traffic goes to the Node.js Service, the app reads MongoDB connection settings from environment variables, and the driver connects to the MongoDB replica set members by DNS. This separation is the basis for Kubernetes scaling Node.js applications while keeping MongoDB on Kubernetes reliable.
Prerequisites
To complete this tutorial, you will need:
- A Kubernetes 1.10+ cluster with role-based access control (RBAC) enabled. This setup will use a DigitalOcean Kubernetes cluster, but you are free to create a cluster using another method.
- The
kubectlcommand-line tool installed on your local machine or development server and configured to connect to your cluster. You can read more about installingkubectlin the official documentation. - Helm installed on your local machine or development server and Tiller installed on your cluster, following the directions outlined in Steps 1 and 2 of How To Install Software on Kubernetes Clusters with the Helm 2 Package Manager. For Helm 3 (no Tiller), see An Introduction to Helm, the Package Manager for Kubernetes.
- Docker installed on your local machine or development server. If you are working with Ubuntu 18.04, follow Steps 1 and 2 of How To Install and Use Docker on Ubuntu; otherwise, follow the official documentation for information about installing on other operating systems. Be sure to add your non-root user to the
dockergroup, as described in Step 2 of the linked tutorial. - A Docker Hub account. For an overview of how to set this up, refer to this introduction to Docker Hub.
Step 1 — Cloning and Packaging the Application
To use our application with Kubernetes, we will need to package it so that the kubelet agent can pull the image. Before packaging the application, however, we will need to modify the MongoDB connection URI in the application code to ensure that our application can connect to the members of the replica set that we will create with the Helm mongodb-replicaset chart.
Our first step will be to clone the node-mongo-docker-dev repository from the DigitalOcean Community GitHub account. This repository includes the code from the setup described in Containerizing a Node.js Application for Development With Docker Compose, which uses a demo Node.js application with a MongoDB database to demonstrate how to set up a development environment with Docker Compose. You can find more information about the application itself in the series From Containers to Kubernetes with Node.js.
Clone the repository into a directory called node_project:
- git clone https://github.com/do-community/node-mongo-docker-dev.git node_project
Navigate to the node_project directory:
- cd node_project
The node_project directory contains files and directories for a shark information application that works with user input. It has been modernized to work with containers: sensitive and specific configuration information has been removed from the application code and refactored to be injected at runtime, and the application’s state has been offloaded to a MongoDB database.
For more information about designing modern, containerized applications, please see Architecting Applications for Kubernetes and Modernizing Applications for Kubernetes.
When we deploy the Helm mongodb-replicaset chart, it will create:
- A StatefulSet object with three Pods: the members of the MongoDB replica set. Each Pod will have an associated PersistentVolumeClaim and will maintain a fixed identity in the event of rescheduling.
- A MongoDB replica set made up of the Pods in the StatefulSet. The set will include one primary and two secondaries. Data will be replicated from the primary to the secondaries, ensuring that our application data remains highly available.
For our application to interact with the database replicas, the MongoDB connection URI in our code will need to include both the hostnames of the replica set members as well as the name of the replica set itself. We therefore need to include these values in the URI.
The file in our cloned repository that specifies database connection information is called db.js. Open that file now using nano or your favorite editor:
- nano db.js
Currently, the file includes constants that are referenced in the database connection URI at runtime. The values for these constants are injected using Node’s process.env property, which returns an object with information about your user environment at runtime. Setting values dynamically in our application code allows us to decouple the code from the underlying infrastructure, which is necessary in a dynamic, stateless environment. For more information about refactoring application code in this way, see Step 2 of Containerizing a Node.js Application for Development With Docker Compose and the relevant discussion in The 12-Factor App.
The constants for the connection URI and the URI string itself currently look like this:
...
const {
  MONGO_USERNAME,
  MONGO_PASSWORD,
  MONGO_HOSTNAME,
  MONGO_PORT,
  MONGO_DB
} = process.env;

...

const url = `mongodb://${MONGO_USERNAME}:${MONGO_PASSWORD}@${MONGO_HOSTNAME}:${MONGO_PORT}/${MONGO_DB}?authSource=admin`;
...
In keeping with a 12FA approach, we do not want to hard code the hostnames of our replica instances or our replica set name into this URI string. The existing MONGO_HOSTNAME constant can be expanded to include multiple hostnames (the members of our replica set), so we will leave that in place. We will need to add a replica set constant to the options section of the URI string, however.
Add MONGO_REPLICASET to both the URI constant object and the connection string:
...
const {
  MONGO_USERNAME,
  MONGO_PASSWORD,
  MONGO_HOSTNAME,
  MONGO_PORT,
  MONGO_DB,
  MONGO_REPLICASET
} = process.env;

...
const url = `mongodb://${MONGO_USERNAME}:${MONGO_PASSWORD}@${MONGO_HOSTNAME}:${MONGO_PORT}/${MONGO_DB}?replicaSet=${MONGO_REPLICASET}&authSource=admin`;
...
Using the replicaSet option in the options section of the URI allows us to pass in the name of the replica set, which, along with the hostnames defined in the MONGO_HOSTNAME constant, will allow us to connect to the set members.
Save and close the file when you are finished editing.
With your database connection information modified to work with replica sets, you can now package your application, build the image with the docker build command, and push it to Docker Hub.
Build the image with docker build and the -t flag, which allows you to tag the image with a memorable name. In this case, tag the image with your Docker Hub username and name it node-replicas or a name of your own choosing:
- docker build -t your_dockerhub_username/node-replicas .
The . in the command specifies that the build context is the current directory.
It will take a minute or two to build the image. Once it is complete, check your images:
- docker images
You will see the following output:
OutputREPOSITORY                              TAG                 IMAGE ID            CREATED             SIZE
your_dockerhub_username/node-replicas   latest              56a69b4bc882        7 seconds ago       90.1MB
node                                    10-alpine           aa57b0242b33        6 days ago          71MB
Next, log in to the Docker Hub account you created in the prerequisites:
- docker login -u your_dockerhub_username
When prompted, enter your Docker Hub account password. Logging in this way will create a ~/.docker/config.json file in your non-root user’s home directory with your Docker Hub credentials.
Push the application image to Docker Hub with the docker push command. Remember to replace your_dockerhub_username with your own Docker Hub username:
- docker push your_dockerhub_username/node-replicas
You now have an application image that you can pull to run your replicated application with Kubernetes. The next step will be to configure specific parameters to use with the MongoDB Helm chart.
Step 2 — Creating Secrets for the MongoDB Replica Set
The stable/mongodb-replicaset chart provides different options when it comes to using Secrets, and we will create two to use with our chart deployment:
- A Secret for our replica set keyfile that will function as a shared password between replica set members, allowing them to authenticate other members.
- A Secret for our MongoDB admin user, who will be created as a root user on the
admindatabase. This role will allow you to create subsequent users with limited permissions when deploying your application to production.
With these Secrets in place, we will be able to set our preferred parameter values in a dedicated values file and create the StatefulSet object and MongoDB replica set with the Helm chart.
First, let’s create the keyfile. We will use the openssl command with the rand option to generate a 756 byte random string for the keyfile:
- openssl rand -base64 756 > key.txt
The output generated by the command will be base64 encoded, ensuring uniform data transmission, and redirected to a file called key.txt, following the guidelines stated in the mongodb-replicaset chart authentication documentation. The key itself must be between 6 and 1024 characters long, consisting only of characters in the base64 set.
You can now create a Secret called keyfilesecret using this file with kubectl create:
- kubectl create secret generic keyfilesecret --from-file=key.txt
This will create a Secret object in the default namespace, since we have not created a specific namespace for our setup.
You will see the following output indicating that your Secret has been created:
Outputsecret/keyfilesecret created
Remove key.txt:
- rm key.txt
Alternatively, if you would like to save the file, be sure restrict its permissions and add it to your .gitignore file to keep it out of version control.
Next, create the Secret for your MongoDB admin user. The first step will be to convert your desired username and password to base64.
Convert your database username:
- echo -n 'your_database_username' | base64
Note down the value you see in the output.
Next, convert your password:
- echo -n 'your_database_password' | base64
Take note of the value in the output here as well.
Open a file for the Secret:
- nano secret.yaml
Note: Kubernetes objects are typically defined using YAML, which strictly forbids tabs and requires two spaces for indentation. If you would like to check the formatting of any of your YAML files, you can use a linter or test the validity of your syntax using kubectl create with the --dry-run and --validate flags:
- kubectl create -f your_yaml_file.yaml --dry-run --validate=true
In general, it is a good idea to validate your syntax before creating resources with kubectl.
Add the following code to the file to create a Secret that will define a user and password with the encoded values you just created. Be sure to replace the dummy values here with your own encoded username and password:
apiVersion: v1
kind: Secret
metadata:
  name: mongo-secret
data:
  user: your_encoded_username
  password: your_encoded_password
Here, we’re using the key names that the mongodb-replicaset chart expects: user and password. We have named the Secret object mongo-secret, but you are free to name it anything you would like.
Save and close the file when you are finished editing.
Create the Secret object with the following command:
- kubectl create -f secret.yaml
You will see the following output:
Outputsecret/mongo-secret created
Again, you can either remove secret.yaml or restrict its permissions and add it to your .gitignore file.
With your Secret objects created, you can move on to specifying the parameter values you will use with the mongodb-replicaset chart and creating the MongoDB deployment.
Step 3 — Configuring the MongoDB Helm Chart and Creating a Deployment
Note: The stable Helm repository was archived in 2022, and the stable/mongodb-replicaset chart is no longer maintained. The steps below still work with the archived chart for learning. For new deployments, consider using the Bitnami MongoDB chart with replica set support instead.
Helm comes with an actively maintained repository called stable that contains the chart we will be using: mongodb-replicaset. To use this chart with the Secrets we’ve just created, we will create a file with configuration parameter values called mongodb-values.yaml and then install the chart using this file.
Our mongodb-values.yaml file will largely mirror the default values.yaml file in the mongodb-replicaset chart repository. We will, however, make the following changes to our file:
- We will set the
authparameter totrueto ensure that our database instances start with authorization enabled. This means that all clients will be required to authenticate for access to database resources and operations. - We will add information about the Secrets we created in the previous Step so that the chart can use these values to create the replica set keyfile and admin user.
- We will decrease the size of the PersistentVolumes associated with each Pod in the StatefulSet to use the minimum viable DigitalOcean Block Storage unit, 1GB, though you are free to modify this to meet your storage requirements.
Before writing the mongodb-values.yaml file, however, you should first check that you have a StorageClass created and configured to provision storage resources. Each of the Pods in your database StatefulSet will have a sticky identity and an associated PersistentVolumeClaim, which will dynamically provision a PersistentVolume for the Pod. If a Pod is rescheduled, the PersistentVolume will be mounted to whichever node the Pod is scheduled on (though each Volume must be manually deleted if its associated Pod or StatefulSet is permanently deleted).
Because we are working with DigitalOcean Kubernetes, our default StorageClass provisioner is set to dobs.csi.digitalocean.com (DigitalOcean Block Storage), which we can check by typing:
- kubectl get storageclass
If you are working with a DigitalOcean cluster, you will see the following output:
OutputNAME                         PROVISIONER                 AGE
do-block-storage (default)   dobs.csi.digitalocean.com   21m
If you are not working with a DigitalOcean cluster, you will need to create a StorageClass and configure a provisioner of your choice. For details about how to do this, please see the official documentation.
Now that you have ensured that you have a StorageClass configured, open mongodb-values.yaml for editing:
- nano mongodb-values.yaml
You will set values in this file that will do the following:
- Enable authorization.
- Reference your
keyfilesecretandmongo-secretobjects. - Specify
1Gifor your PersistentVolumes. - Set your replica set name to
db. - Specify
3replicas for the set. - Pin the
mongoimage to the latest version at the time of writing:4.1.9.
Paste the following code into the file:
replicas: 3
port: 27017
replicaSetName: db
podDisruptionBudget: {}
auth:
  enabled: true
  existingKeySecret: keyfilesecret
  existingAdminSecret: mongo-secret
imagePullSecrets: []
installImage:
  repository: unguiculus/mongodb-install
  tag: 0.7
  pullPolicy: Always
copyConfigImage:
  repository: busybox
  tag: 1.29.3
  pullPolicy: Always
image:
  repository: mongo
  tag: 4.1.9
  pullPolicy: Always
extraVars: {}
metrics:
  enabled: false
  image:
    repository: ssalaues/mongodb-exporter
    tag: 0.6.1
    pullPolicy: IfNotPresent
  port: 9216
  path: /metrics
  socketTimeout: 3s
  syncTimeout: 1m
  prometheusServiceDiscovery: true
  resources: {}
podAnnotations: {}
securityContext:
  enabled: true
  runAsUser: 999
  fsGroup: 999
  runAsNonRoot: true
init:
  resources: {}
  timeout: 900
resources: {}
nodeSelector: {}
affinity: {}
tolerations: []
extraLabels: {}
persistentVolume:
  enabled: true
  #storageClass: "-"
  accessModes:
    - ReadWriteOnce
  size: 1Gi
  annotations: {}
serviceAnnotations: {}
terminationGracePeriodSeconds: 30
tls:
  enabled: false
configmap: {}
readinessProbe:
  initialDelaySeconds: 5
  timeoutSeconds: 1
  failureThreshold: 3
  periodSeconds: 10
  successThreshold: 1
livenessProbe:
  initialDelaySeconds: 30
  timeoutSeconds: 5
  failureThreshold: 3
  periodSeconds: 10
  successThreshold: 1
The persistentVolume.storageClass parameter is commented out here: removing the comment and setting its value to "-" would disable dynamic provisioning. In our case, because we are leaving this value undefined, the chart will choose the default provisioner (in our case, dobs.csi.digitalocean.com).
Also note the accessMode associated with the persistentVolume key: ReadWriteOnce means that the provisioned volume will be read-write only by a single node. Please see the documentation for more information about different access modes.
To learn more about the other parameters included in the file, see the configuration table included with the repo.
Save and close the file when you are finished editing.
Before deploying the mongodb-replicaset chart, you will want to update the stable repo with the helm repo update command:
- helm repo update
This will get the latest chart information from the stable repository.
Finally, install the chart with the following command:
- helm install --name mongo -f mongodb-values.yaml stable/mongodb-replicaset
Note: Before installing a chart, you can run helm install with the --dry-run and --debug options to check the generated manifests for your release:
- helm install --name your_release_name -f your_values_file.yaml --dry-run --debug your_chart
Note that we are naming the Helm release mongo. This name will refer to this particular deployment of the chart with the configuration options we’ve specified. We’ve pointed to these options by including the -f flag and our mongodb-values.yaml file.
Also note that because we did not include the --namespace flag with helm install, our chart objects will be created in the default namespace.
Once you have created the release, you will see output about its status, along with information about the created objects and instructions for interacting with them:
OutputNAME:   mongo
LAST DEPLOYED: Tue Apr 16 21:51:05 2019
NAMESPACE: default
STATUS: DEPLOYED

RESOURCES:
==> v1/ConfigMap
NAME                              DATA  AGE
mongo-mongodb-replicaset-init     1     1s
mongo-mongodb-replicaset-mongodb  1     1s
mongo-mongodb-replicaset-tests    1     0s
...
You can now check on the creation of your Pods with the following command:
- kubectl get pods
You will see output like the following as the Pods are being created:
OutputNAME                         READY   STATUS     RESTARTS   AGE
mongo-mongodb-replicaset-0   1/1     Running    0          67s
mongo-mongodb-replicaset-1   0/1     Init:0/3   0          8s
The READY and STATUS outputs here indicate that the Pods in our StatefulSet are not fully ready: the Init Containers associated with the Pod’s containers are still running. Because StatefulSet members are created in sequential order, each Pod in the StatefulSet must be Running and Ready before the next Pod will be created.
Once the Pods have been created and all of their associated containers are running, you will see this output:
OutputNAME                         READY   STATUS    RESTARTS   AGE
mongo-mongodb-replicaset-0   1/1     Running   0          2m33s
mongo-mongodb-replicaset-1   1/1     Running   0          94s
mongo-mongodb-replicaset-2   1/1     Running   0          36s
The Running STATUS indicates that your Pods are bound to nodes and that the containers associated with those Pods are running. READY indicates how many containers in a Pod are running. For more information, please consult the documentation on Pod lifecycles.
Note:
If you see unexpected phases in the STATUS column, remember that you can troubleshoot your Pods with the following commands:
- kubectl describe pods your_pod
- kubectl logs your_pod
Each of the Pods in your StatefulSet has a name that combines the name of the StatefulSet with the ordinal index of the Pod. Because we created three replicas, our StatefulSet members are numbered 0-2, and each has a stable DNS entry comprised of the following elements: $(statefulset-name)-$(ordinal).$(service name).$(namespace).svc.cluster.local.
In our case, the StatefulSet and the Headless Service created by the mongodb-replicaset chart have the same names:
kubectl get statefulset
OutputNAME                       READY   AGE
mongo-mongodb-replicaset   3/3     4m2s
- kubectl get svc
OutputNAME                              TYPE        CLUSTER-IP   EXTERNAL-IP   PORT(S)     AGE
kubernetes                        ClusterIP   10.245.0.1   <none>        443/TCP     42m
mongo-mongodb-replicaset          ClusterIP   None         <none>        27017/TCP   4m35s
mongo-mongodb-replicaset-client   ClusterIP   None         <none>        27017/TCP   4m35s
This means that the first member of our StatefulSet will have the following DNS entry:
mongo-mongodb-replicaset-0.mongo-mongodb-replicaset.default.svc.cluster.local
Because we need our application to connect to each MongoDB instance, it’s essential that we have this information so that we can communicate directly with the Pods, rather than with the Service. When we create our custom application Helm chart, we will pass the DNS entries for each Pod to our application using environment variables.
With your database instances up and running, you are ready to create the chart for your Node application.
Scaling MongoDB Safely
Scaling MongoDB on Kubernetes is not the same as scaling a stateless app. Before changing replica counts, review these safeguards:
- Replica set health: confirm all members are
PRIMARYorSECONDARYand fully synced before adding or removing members. - Storage sizing: PersistentVolumeClaims must be sized for growth. Reducing size later is not supported.
- Write concern: in production, use a majority write concern to ensure durability across replicas.
- Pod disruption: keep a PodDisruptionBudget so routine maintenance does not evict too many MongoDB pods at once.
- Connection string accuracy: update
MONGO_HOSTNAMEandMONGO_REPLICASETwhenever the replica set name or members change.
This keeps MongoDB StatefulSets stable and avoids split brain or data loss during scaling events.
Step 4 — Creating a Custom Application Chart and Configuring Parameters
We will create a custom Helm chart for our Node application and modify the default files in the standard chart directory so that our application can work with the replica set we have just created. We will also create files to define ConfigMap and Secret objects for our application.
First, create a new chart directory called nodeapp with the following command:
- helm create nodeapp
This will create a directory called nodeapp in your ~/node_project folder with the following resources:
- A
Chart.yamlfile with basic information about your chart. - A
values.yamlfile that allows you to set specific parameter values, as you did with your MongoDB deployment. - A
.helmignorefile with file and directory patterns that will be ignored when packaging charts. - A
templates/directory with the template files that will generate Kubernetes manifests. - A
templates/tests/directory for test files. - A
charts/directory for any charts that this chart depends on.
The first file we will modify out of these default files is values.yaml. Open that file now:
- nano nodeapp/values.yaml
The values that we will set here include:
- The number of replicas.
- The application image we want to use. In our case, this will be the
node-replicasimage we created in Step 1. - The ServiceType. In this case, we will specify LoadBalancer to create a point of access to our application for testing purposes. Because we are working with a DigitalOcean Kubernetes cluster, this will create a DigitalOcean Load Balancer when we deploy our chart. In production, you can configure your chart to use Ingress Resources and Ingress Controllers to route traffic to your Services.
- The targetPort to specify the port on the Pod where our application will be exposed.
We will not enter environment variables into this file. Instead, we will create templates for ConfigMap and Secret objects and add these values to our application Deployment manifest, located at ~/node_project/nodeapp/templates/deployment.yaml.
Configure the following values in the values.yaml file:
# Default values for nodeapp.
# This is a YAML-formatted file.
# Declare variables to be passed into your templates.

replicaCount: 3

image:
  repository: your_dockerhub_username/node-replicas
  tag: latest
  pullPolicy: IfNotPresent

nameOverride: ""
fullnameOverride: ""

service:
  type: LoadBalancer
  port: 80
  targetPort: 8080
...
Save and close the file when you are finished editing.
Next, open a secret.yaml file in the nodeapp/templates directory:
- nano nodeapp/templates/secret.yaml
In this file, add values for your MONGO_USERNAME and MONGO_PASSWORD application constants. These are the constants that your application will expect to have access to at runtime, as specified in db.js, your database connection file. As you add the values for these constants, remember to use the base64-encoded values that you used earlier in Step 2 when creating your mongo-secret object. If you need to recreate those values, you can return to Step 2 and run the relevant commands again.
Add the following code to the file:
apiVersion: v1
kind: Secret
metadata:
  name: {{ .Release.Name }}-auth
data:
  MONGO_USERNAME: your_encoded_username
  MONGO_PASSWORD: your_encoded_password
The name of this Secret object will depend on the name of your Helm release, which you will specify when you deploy the application chart.
Save and close the file when you are finished.
Next, open a file to create a ConfigMap for your application:
- nano nodeapp/templates/configmap.yaml
In this file, we will define the remaining variables that our application expects: MONGO_HOSTNAME, MONGO_PORT, MONGO_DB, and MONGO_REPLICASET. Our MONGO_HOSTNAME variable will include the DNS entry for each instance in our replica set, since this is what the MongoDB connection URI requires.
According to the Kubernetes documentation, when an application implements liveness and readiness checks, SRV records should be used when connecting to the Pods. As discussed in Step 3, our Pod SRV records follow this pattern: $(statefulset-name)-$(ordinal).$(service name).$(namespace).svc.cluster.local. Since our MongoDB StatefulSet implements liveness and readiness checks, we should use these stable identifiers when defining the values of the MONGO_HOSTNAME variable.
Add the following code to the file to define the MONGO_HOSTNAME, MONGO_PORT, MONGO_DB, and MONGO_REPLICASET variables. You are free to use another name for your MONGO_DB database, but your MONGO_HOSTNAME and MONGO_REPLICASET values must be written as they appear here:
apiVersion: v1
kind: ConfigMap
metadata:
  name: {{ .Release.Name }}-config
data:
  MONGO_HOSTNAME: "mongo-mongodb-replicaset-0.mongo-mongodb-replicaset.default.svc.cluster.local,mongo-mongodb-replicaset-1.mongo-mongodb-replicaset.default.svc.cluster.local,mongo-mongodb-replicaset-2.mongo-mongodb-replicaset.default.svc.cluster.local"
  MONGO_PORT: "27017"
  MONGO_DB: "sharkinfo"
  MONGO_REPLICASET: "db"
Because we have already created the StatefulSet object and replica set, the hostnames that are listed here must be listed in your file exactly as they appear in this example. If you destroy these objects and rename your MongoDB Helm release, then you will need to revise the values included in this ConfigMap. The same applies for MONGO_REPLICASET, since we specified the replica set name with our MongoDB release.
Also note that the values listed here are quoted, which is the expectation for environment variables in Helm.
Save and close the file when you are finished editing.
With your chart parameter values defined and your Secret and ConfigMap manifests created, you can edit the application Deployment template to use your environment variables.
Step 5 — Integrating Environment Variables into Your Helm Deployment
With the files for our application Secret and ConfigMap in place, we will need to make sure that our application Deployment can use these values. We will also customize the liveness and readiness probes that are already defined in the Deployment manifest.
Open the application Deployment template for editing:
- nano nodeapp/templates/deployment.yaml
Though this is a YAML file, Helm templates use a different syntax from standard Kubernetes YAML files in order to generate manifests. For more information about templates, see the Helm documentation.
In the file, first add an env key to your application container specifications, below the imagePullPolicy key and above ports:
apiVersion: apps/v1
kind: Deployment
metadata:
...
  spec:
    containers:
      - name: {{ .Chart.Name }}
        image: "{{ .Values.image.repository }}:{{ .Values.image.tag }}"
        imagePullPolicy: {{ .Values.image.pullPolicy }}
        env:
        ports:
Next, add the following keys to the list of env variables:
apiVersion: apps/v1
kind: Deployment
metadata:
...
  spec:
    containers:
      - name: {{ .Chart.Name }}
        image: "{{ .Values.image.repository }}:{{ .Values.image.tag }}"
        imagePullPolicy: {{ .Values.image.pullPolicy }}
        env:
        - name: MONGO_USERNAME
          valueFrom:
            secretKeyRef:
              key: MONGO_USERNAME
              name: {{ .Release.Name }}-auth
        - name: MONGO_PASSWORD
          valueFrom:
            secretKeyRef:
              key: MONGO_PASSWORD
              name: {{ .Release.Name }}-auth
        - name: MONGO_HOSTNAME
          valueFrom:
            configMapKeyRef:
              key: MONGO_HOSTNAME
              name: {{ .Release.Name }}-config
        - name: MONGO_PORT
          valueFrom:
            configMapKeyRef:
              key: MONGO_PORT
              name: {{ .Release.Name }}-config
        - name: MONGO_DB
          valueFrom:
            configMapKeyRef:
              key: MONGO_DB
              name: {{ .Release.Name }}-config
        - name: MONGO_REPLICASET
          valueFrom:
            configMapKeyRef:
              key: MONGO_REPLICASET
              name: {{ .Release.Name }}-config
Each variable includes a reference to its value, defined either by a secretKeyRef key, in the case of Secret values, or configMapKeyRef for ConfigMap values. These keys point to the Secret and ConfigMap files we created in the previous Step.
Next, under the ports key, modify the containerPort definition to specify the port on the container where our application will be exposed:
apiVersion: apps/v1
kind: Deployment
metadata:
...
  spec:
    containers:
    ...
      env:
    ...
      ports:
        - name: http
          containerPort: 8080
          protocol: TCP
      ...
Next, let’s modify the liveness and readiness checks that are included in this Deployment manifest by default. These checks ensure that our application Pods are running and ready to serve traffic:
- Readiness probes assess whether or not a Pod is ready to serve traffic, stopping all requests to the Pod until the checks succeed.
- Liveness probes check basic application behavior to determine whether or not the application in the container is running and behaving as expected. If a liveness probe fails, Kubernetes will restart the container.
For more about both, see the relevant discussion in Architecting Applications for Kubernetes.
In our case, we will build on the httpGet request that Helm has provided by default and test whether or not our application is accepting requests on the /sharks endpoint. The kubelet service will perform the probe by sending a GET request to the Node server running in the application Pod’s container and listening on port 8080. If the status code for the response is between 200 and 400, then the kubelet will conclude that the container is healthy. Otherwise, in the case of a 400 or 500 status, kubelet will either stop traffic to the container, in the case of the readiness probe, or restart the container, in the case of the liveness probe.
Add the following modification to the stated path for the liveness and readiness probes:
apiVersion: apps/v1
kind: Deployment
metadata:
...
  spec:
    containers:
    ...
      env:
    ...
      ports:
        - name: http
          containerPort: 8080
          protocol: TCP
      livenessProbe:
        httpGet:
          path: /sharks
          port: http
      readinessProbe:
        httpGet:
          path: /sharks
          port: http
Save and close the file when you are finished editing.
You are now ready to create your application release with Helm. Run the following helm install command, which includes the name of the release and the location of the chart directory:
helm install --name nodejs ./nodeapp
Remember that you can run helm install with the --dry-run and --debug options first, as discussed in Step 3, to check the generated manifests for your release.
Again, because we are not including the --namespace flag with helm install, our chart objects will be created in the default namespace.
You will see the following output indicating that your release has been created:
OutputNAME:   nodejs
LAST DEPLOYED: Wed Apr 17 18:10:29 2019
NAMESPACE: default
STATUS: DEPLOYED

RESOURCES:
==> v1/ConfigMap
NAME           DATA  AGE
nodejs-config  4     1s

==> v1/Deployment
NAME            READY  UP-TO-DATE  AVAILABLE  AGE
nodejs-nodeapp  0/3    3           0          1s

...
Again, the output will indicate the status of the release, along with information about the created objects and how you can interact with them.
Check the status of your Pods:
- kubectl get pods
OutputNAME                              READY   STATUS    RESTARTS   AGE
mongo-mongodb-replicaset-0        1/1     Running   0          57m
mongo-mongodb-replicaset-1        1/1     Running   0          56m
mongo-mongodb-replicaset-2        1/1     Running   0          55m
nodejs-nodeapp-577df49dcc-b5fq5   1/1     Running   0          117s
nodejs-nodeapp-577df49dcc-bkk66   1/1     Running   0          117s
nodejs-nodeapp-577df49dcc-lpmt2   1/1     Running   0          117s
Once your Pods are up and running, check your Services:
- kubectl get svc
OutputNAME                              TYPE           CLUSTER-IP     EXTERNAL-IP       PORT(S)        AGE
kubernetes                        ClusterIP      10.245.0.1     <none>            443/TCP        96m
mongo-mongodb-replicaset          ClusterIP      None           <none>            27017/TCP      58m
mongo-mongodb-replicaset-client   ClusterIP      None           <none>            27017/TCP      58m
nodejs-nodeapp                    LoadBalancer   10.245.33.46   your_lb_ip        80:31518/TCP   3m22s
The EXTERNAL_IP associated with the nodejs-nodeapp Service is the IP address where you can access the application from outside of the cluster. If you see a <pending> status in the EXTERNAL_IP column, this means that your load balancer is still being created.
Once you see an IP in that column, navigate to it in your browser: http://your_lb_ip.
You should see the following landing page:
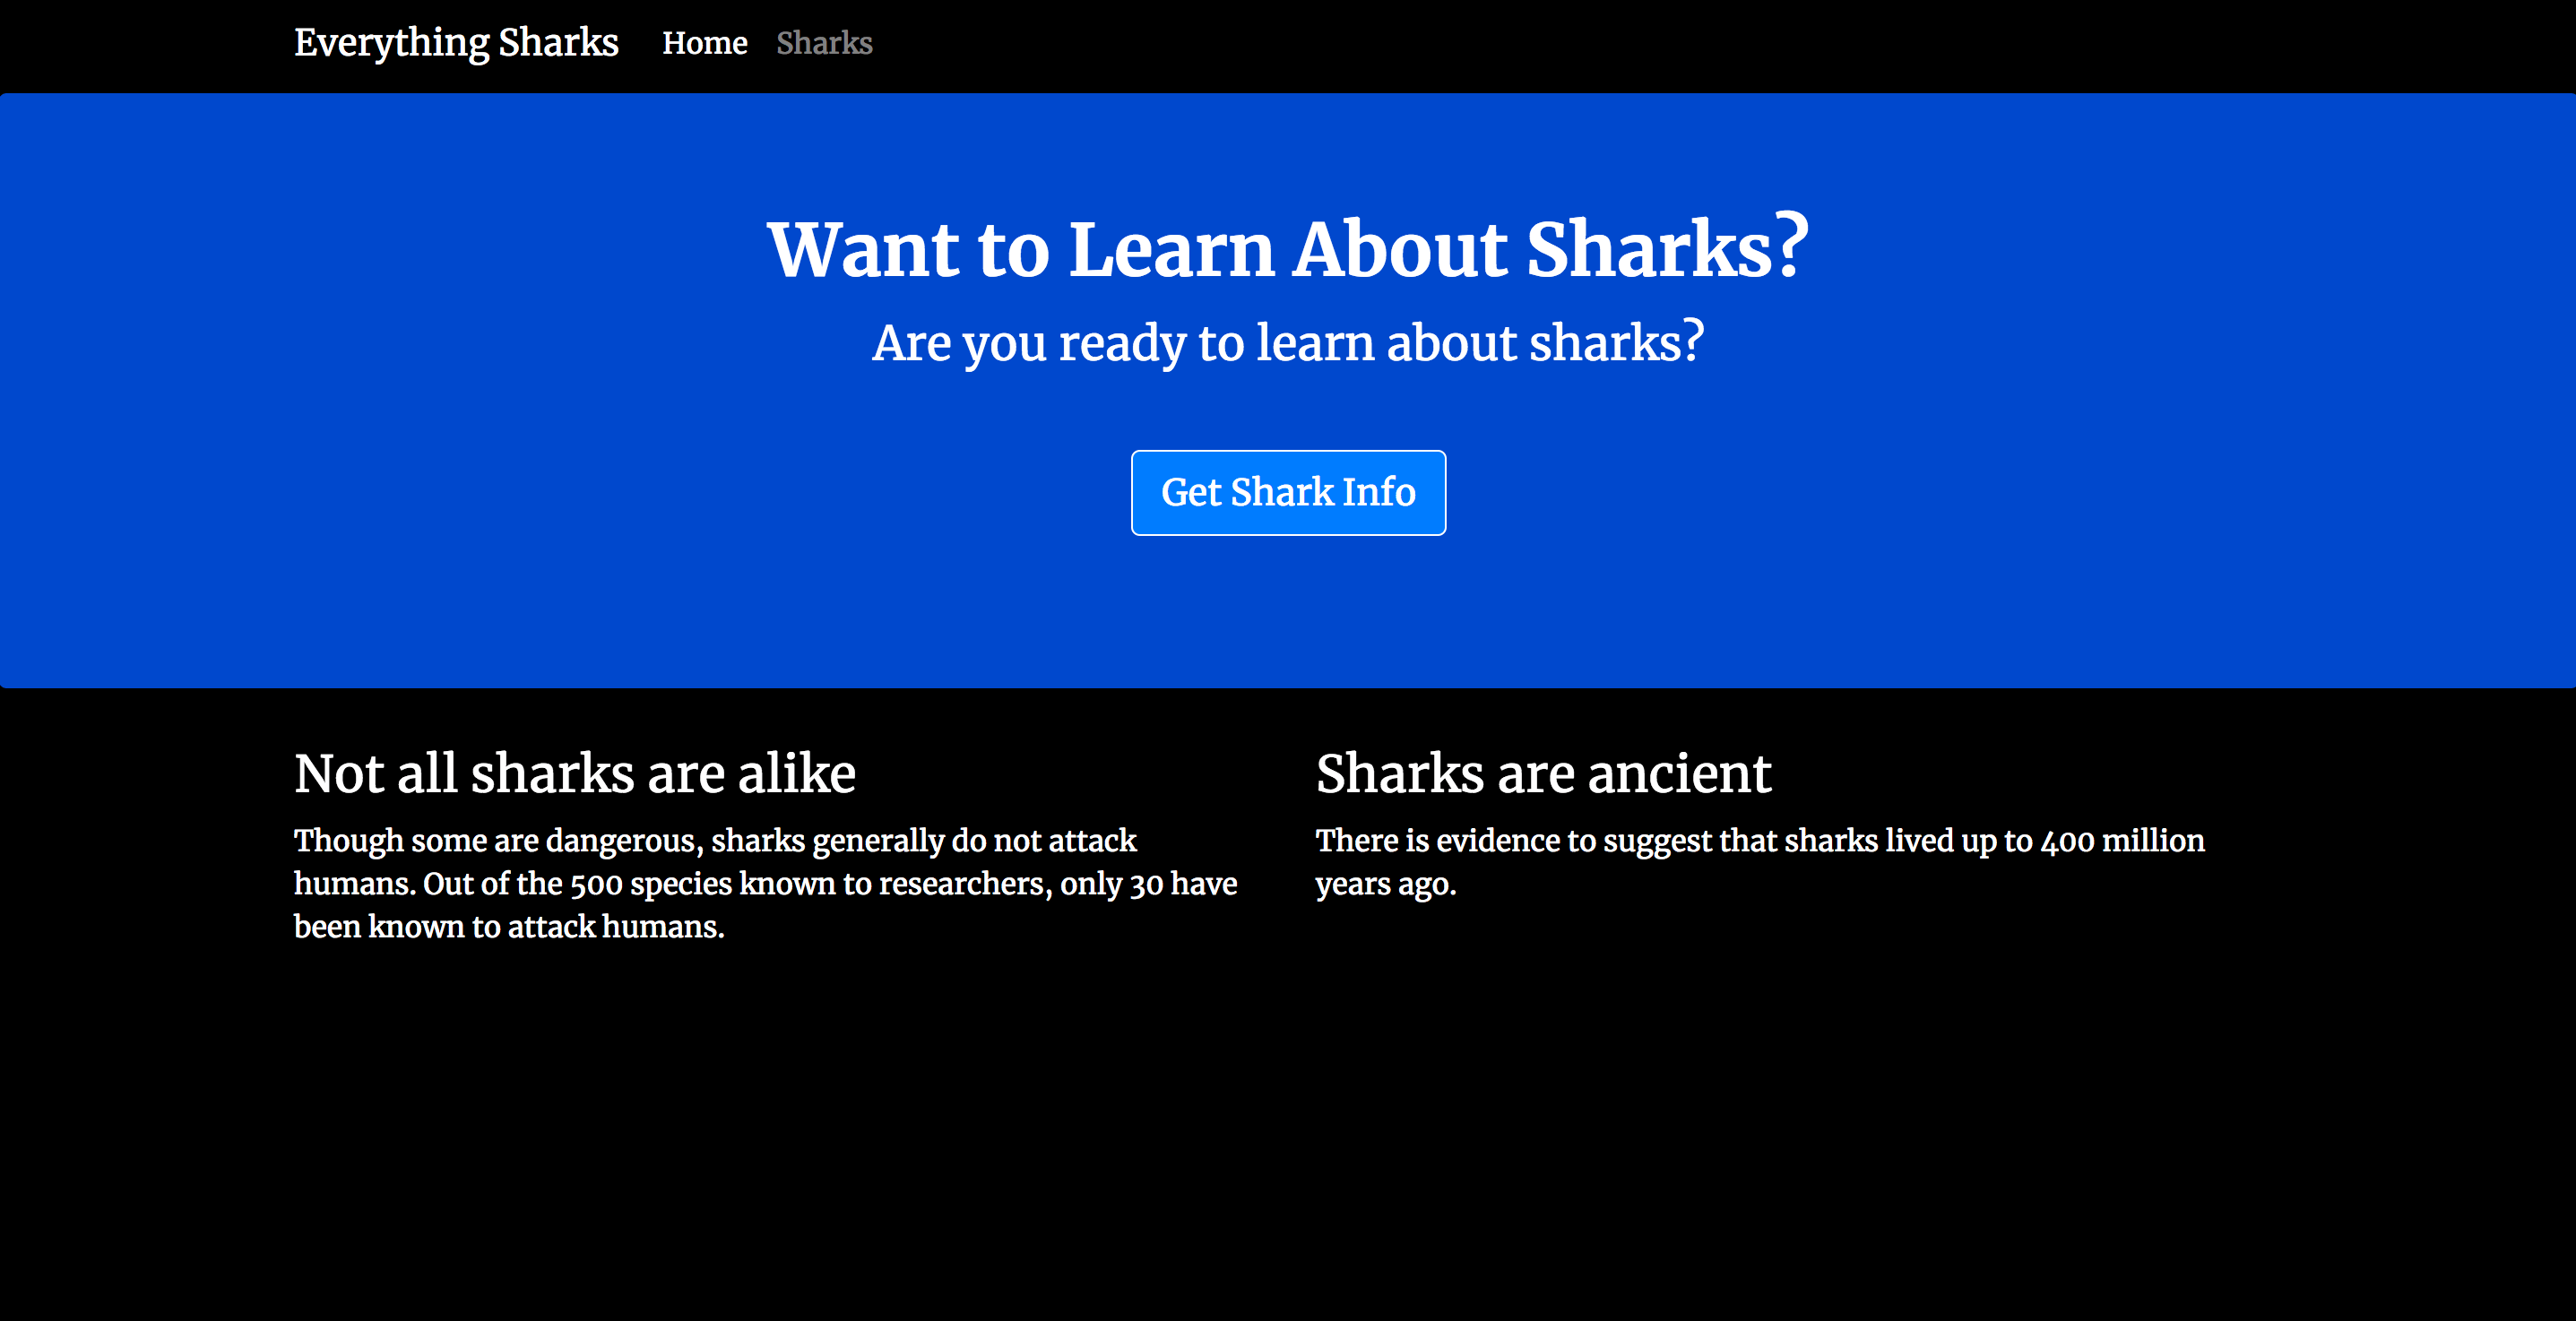
Now that your replicated application is working, let’s add some test data to ensure that replication is working between members of the replica set.
Observability and Performance Considerations
Before enabling Kubernetes autoscaling for your Node.js Deployment, add basic observability so you can validate impact on latency and database load:
- Application metrics: export HTTP request latency and error rates from the Node.js service.
- Database metrics: consider the MongoDB exporter and track replica set lag, operations per second, and connection counts.
- Resource requests: set CPU and memory requests for both the Node.js and MongoDB pods to make scaling predictable.
- Load testing: validate throughput at different replica counts and watch for MongoDB bottlenecks.
These steps make Kubernetes scaling Node.js applications more reliable, and they help you avoid overloading the MongoDB replica set.
Step 6 — Testing MongoDB Replication
With our application running and accessible through an external IP address, we can add some test data and ensure that it is being replicated between the members of our MongoDB replica set.
First, make sure you have navigated your browser to the application landing page:
Click on the Get Shark Info button. You will see a page with an entry form where you can enter a shark name and a description of that shark’s general character:

In the form, add an initial shark of your choosing. To demonstrate, we will add Megalodon Shark to the Shark Name field, and Ancient to the Shark Character field:
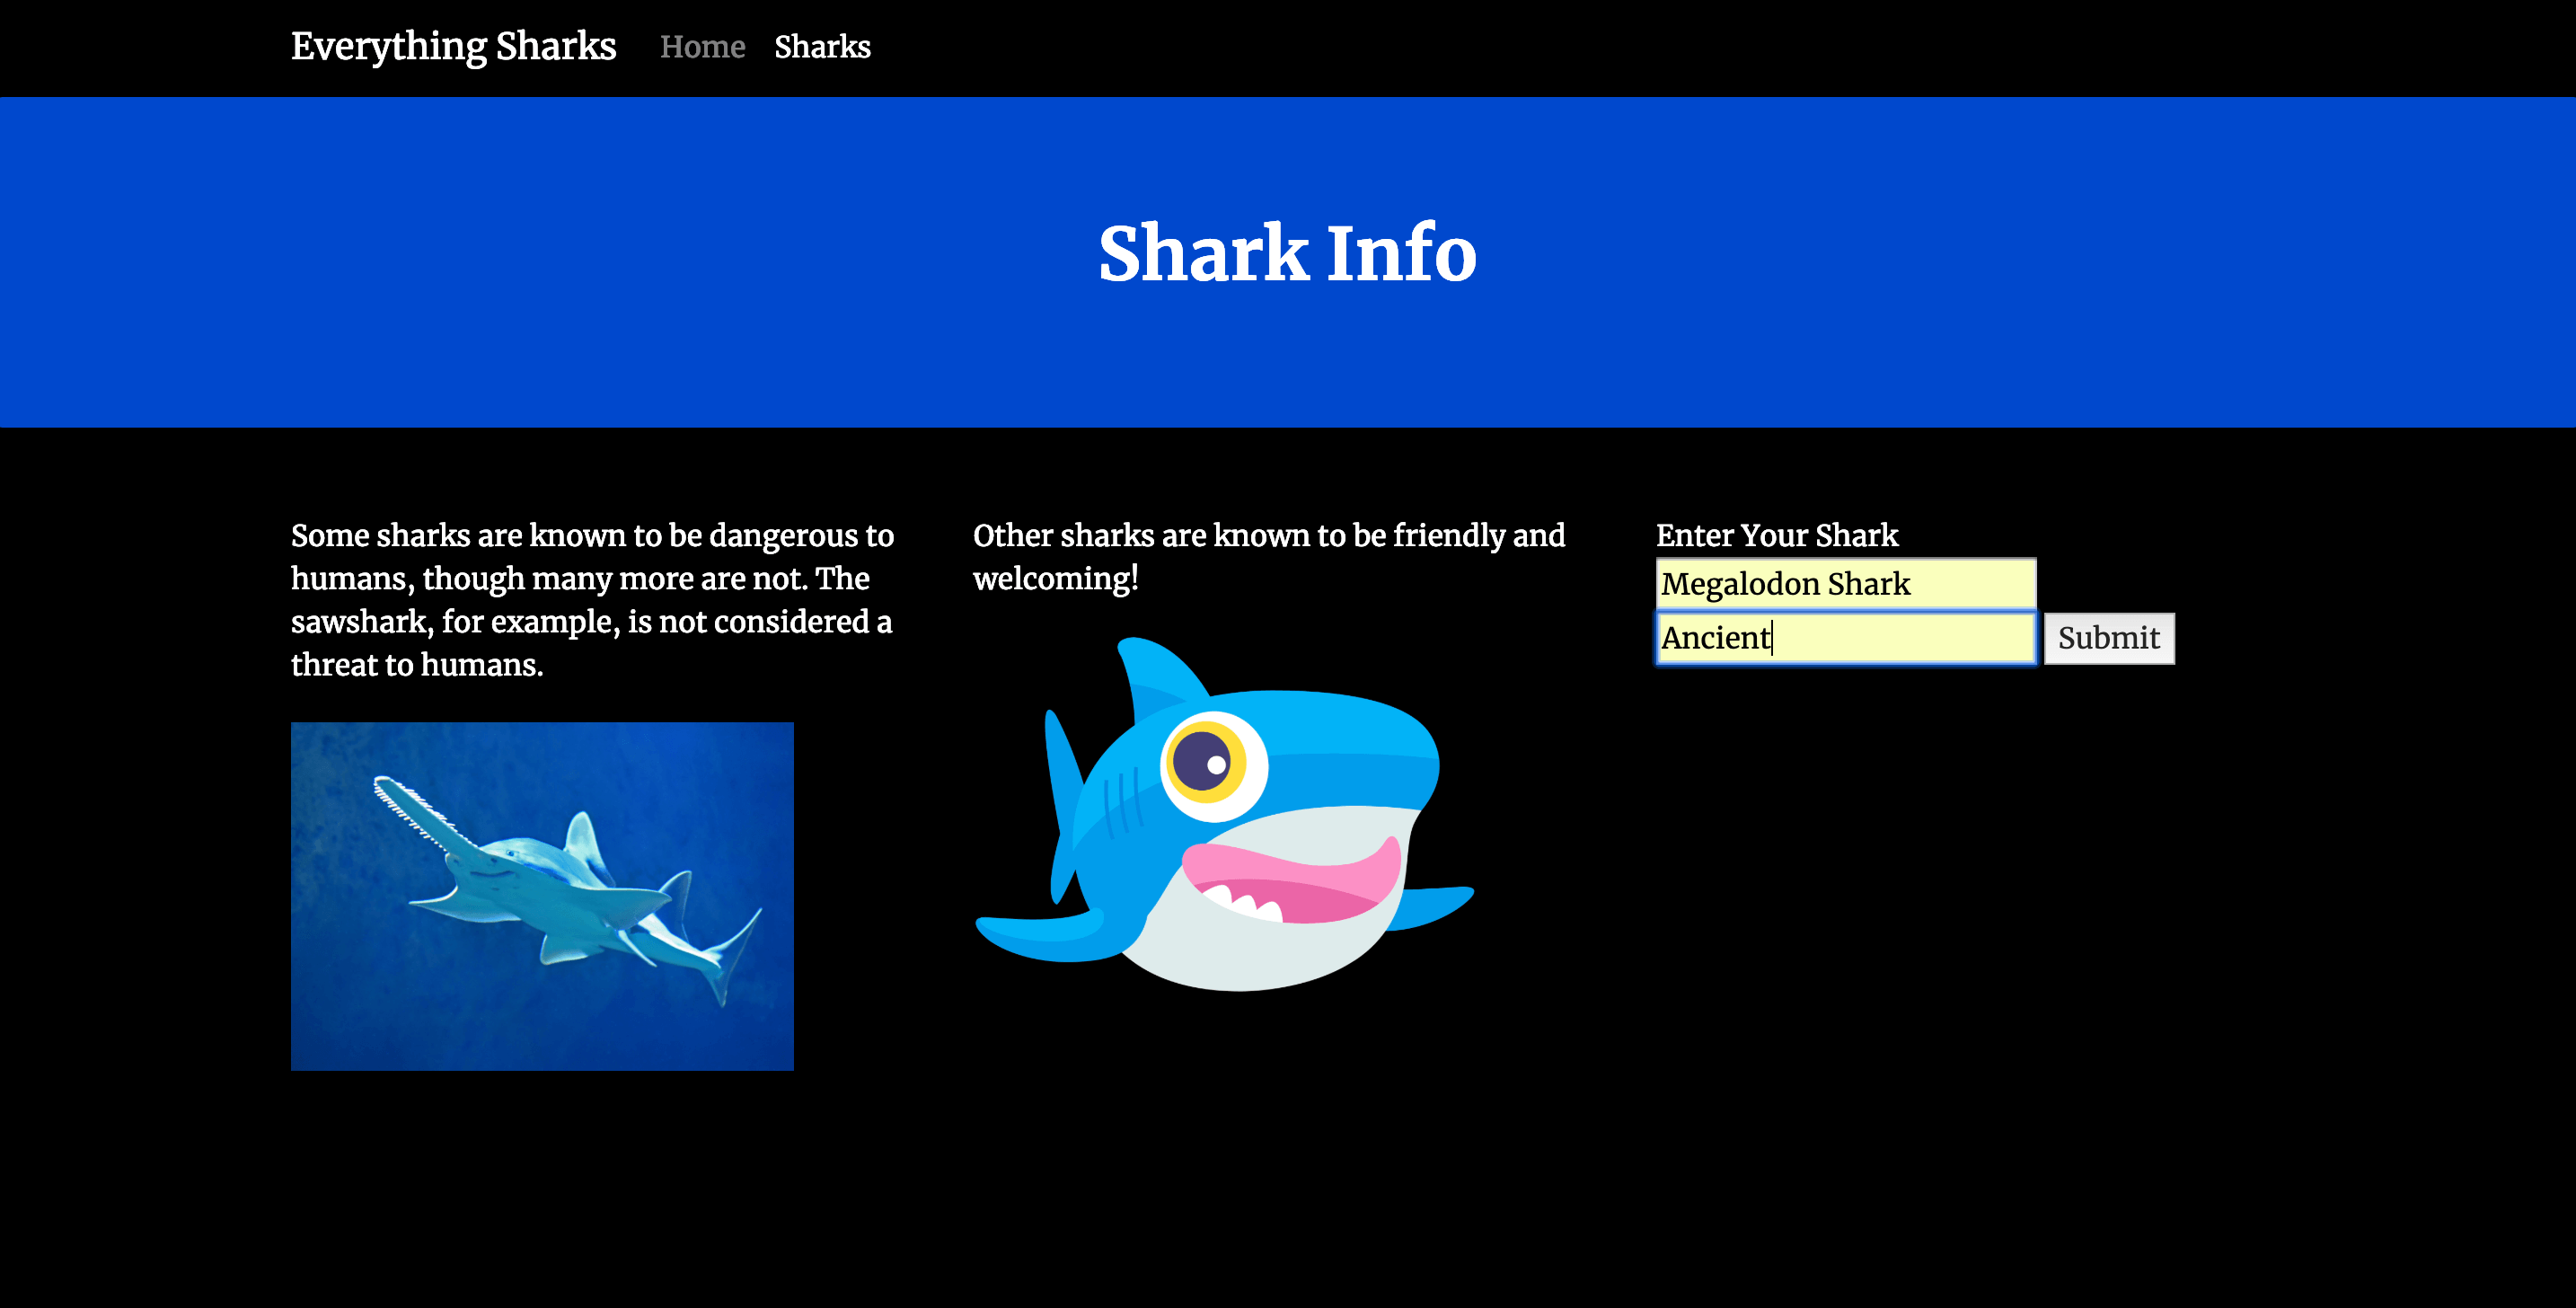
Click on the Submit button. You will see a page with this shark information displayed back to you:

Now head back to the shark information form by clicking on Sharks in the top navigation bar:
Enter a new shark of your choosing. We’ll go with Whale Shark and Large:
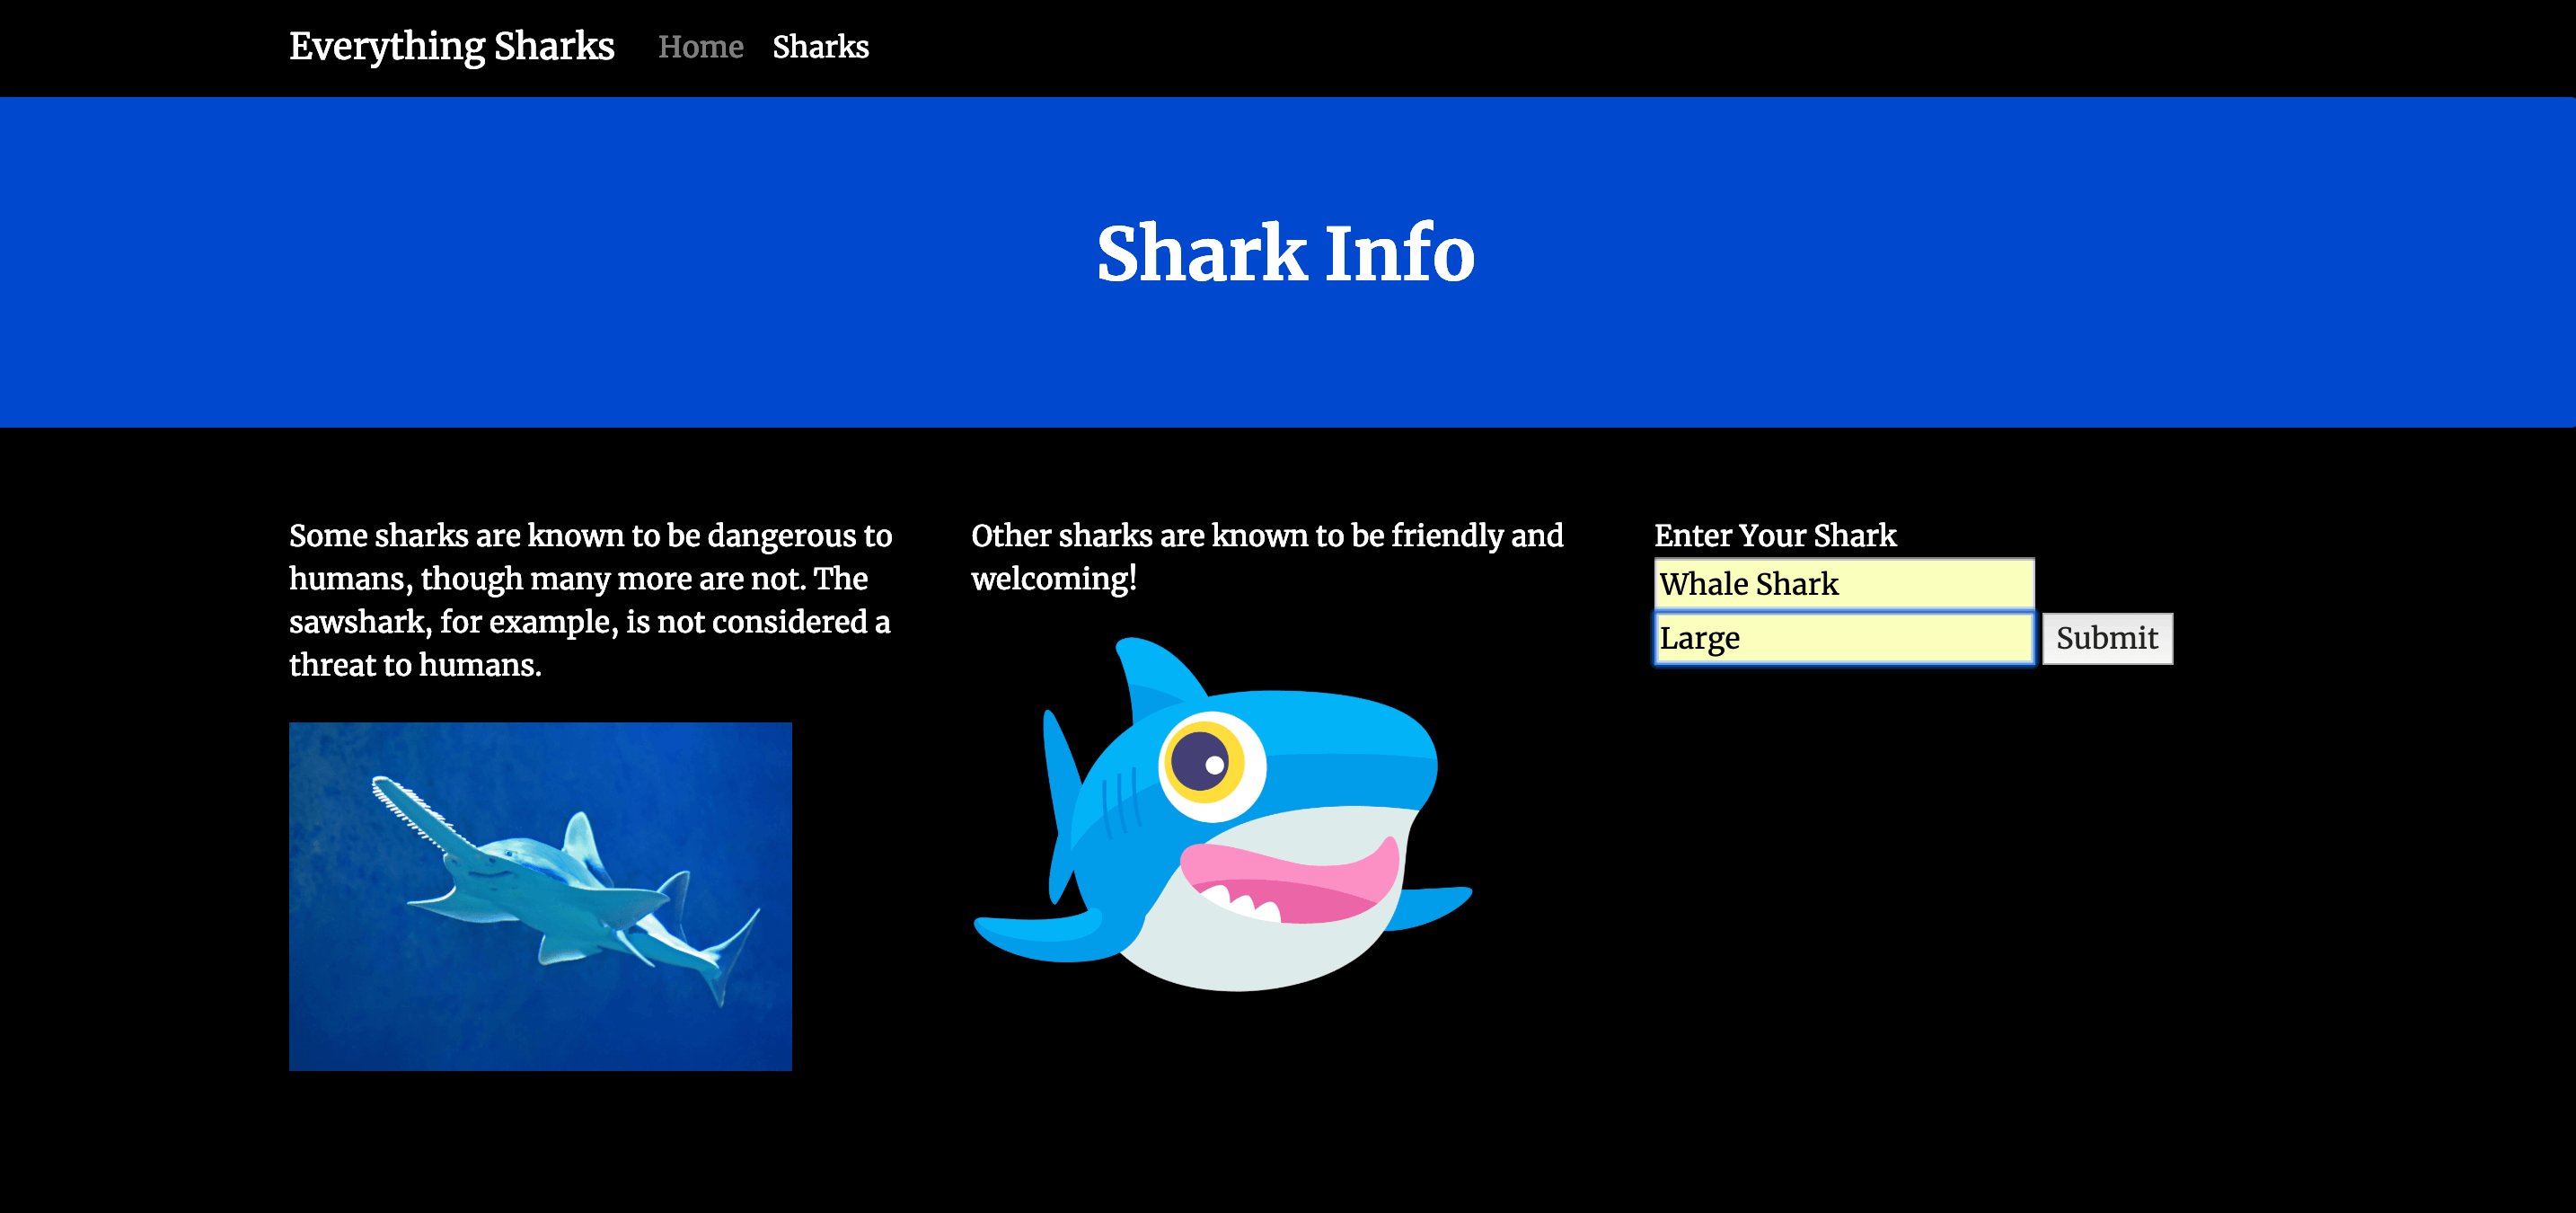
Once you click Submit, you will see that the new shark has been added to the shark collection in your database:
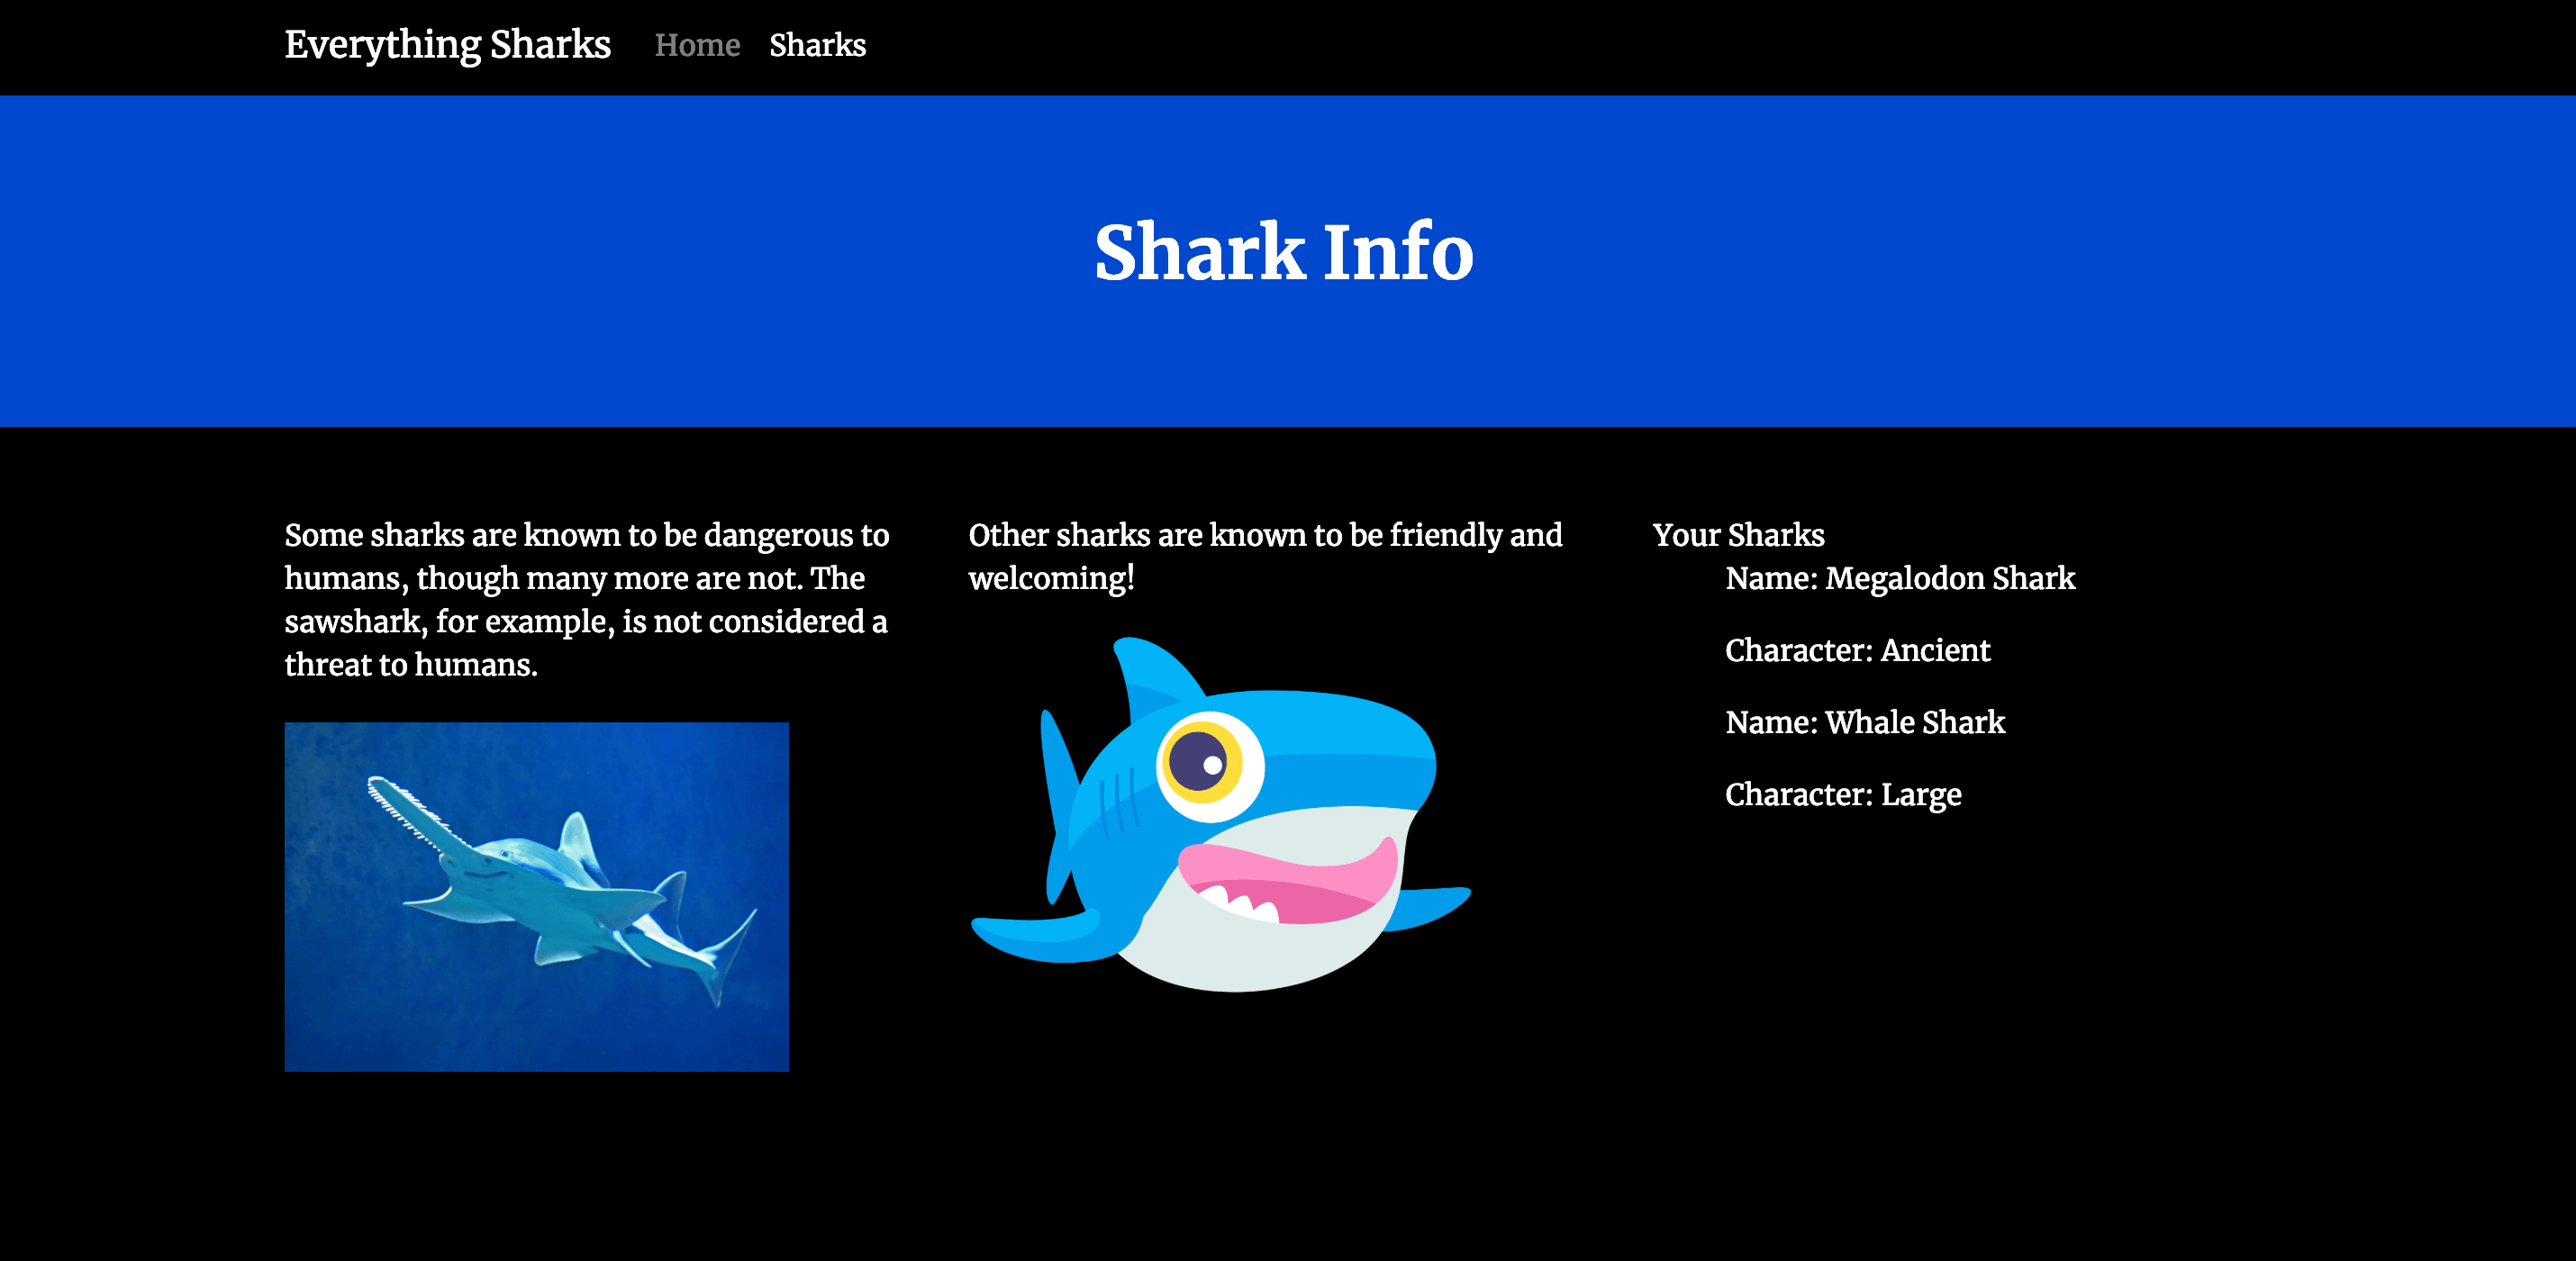
Let’s check that the data we’ve entered has been replicated between the primary and secondary members of our replica set.
Get a list of your Pods:
kubectl get pods
OutputNAME                              READY   STATUS    RESTARTS   AGE
mongo-mongodb-replicaset-0        1/1     Running   0          74m
mongo-mongodb-replicaset-1        1/1     Running   0          73m
mongo-mongodb-replicaset-2        1/1     Running   0          72m
nodejs-nodeapp-577df49dcc-b5fq5   1/1     Running   0          5m4s
nodejs-nodeapp-577df49dcc-bkk66   1/1     Running   0          5m4s
nodejs-nodeapp-577df49dcc-lpmt2   1/1     Running   0          5m4s
To access the mongo shell on your Pods, you can use the kubectl exec command and the username you used to create your mongo-secret in Step 2. Access the mongo shell on the first Pod in the StatefulSet with the following command:
- kubectl exec -it mongo-mongodb-replicaset-0 -- mongo -u your_database_username -p --authenticationDatabase admin
When prompted, enter the password associated with this username:
OutputMongoDB shell version v4.1.9
Enter password:
You will be dropped into an administrative shell:
OutputMongoDB server version: 4.1.9
Welcome to the MongoDB shell.
...

db:PRIMARY>
Though the prompt itself includes this information, you can manually check to see which replica set member is the primary with the rs.isMaster() method:
- rs.isMaster()
You will see output like the following, indicating the hostname of the primary:
Outputdb:PRIMARY> rs.isMaster()
{
        "hosts" : [
                "mongo-mongodb-replicaset-0.mongo-mongodb-replicaset.default.svc.cluster.local:27017",
                "mongo-mongodb-replicaset-1.mongo-mongodb-replicaset.default.svc.cluster.local:27017",
                "mongo-mongodb-replicaset-2.mongo-mongodb-replicaset.default.svc.cluster.local:27017"
        ],
        ...
        "primary" : "mongo-mongodb-replicaset-0.mongo-mongodb-replicaset.default.svc.cluster.local:27017",
        ...
Next, switch to your sharkinfo database:
- use sharkinfo
Outputswitched to db sharkinfo
List the collections in the database:
- show collections
Outputsharks
Output the documents in the collection:
- db.sharks.find()
You will see the following output:
Output{ "_id" : ObjectId("5cb7702c9111a5451c6dc8bb"), "name" : "Megalodon Shark", "character" : "Ancient", "__v" : 0 }
{ "_id" : ObjectId("5cb77054fcdbf563f3b47365"), "name" : "Whale Shark", "character" : "Large", "__v" : 0 }
Exit the MongoDB Shell:
- exit
Now that we have checked the data on our primary, let’s check that it’s being replicated to a secondary. kubectl exec into mongo-mongodb-replicaset-1 with the following command:
- kubectl exec -it mongo-mongodb-replicaset-1 -- mongo -u your_database_username -p --authenticationDatabase admin
Once in the administrative shell, we will need to use the db.setSlaveOk() method to permit read operations from the secondary instance:
- db.setSlaveOk(1)
Switch to the sharkinfo database:
- use sharkinfo
Outputswitched to db sharkinfo
Permit the read operation of the documents in the sharks collection:
- db.setSlaveOk(1)
Output the documents in the collection:
- db.sharks.find()
You should now see the same information that you saw when running this method on your primary instance:
Outputdb:SECONDARY> db.sharks.find()
{ "_id" : ObjectId("5cb7702c9111a5451c6dc8bb"), "name" : "Megalodon Shark", "character" : "Ancient", "__v" : 0 }
{ "_id" : ObjectId("5cb77054fcdbf563f3b47365"), "name" : "Whale Shark", "character" : "Large", "__v" : 0 }
This output confirms that your application data is being replicated between the members of your replica set.
Common Scaling Pitfalls and How to Avoid Them
- Scaling MongoDB like a stateless app: replica sets require coordination. Always scale deliberately and watch member health.
- Using a Service hostname in the connection string: the MongoDB driver should connect to individual replica members, not the headless service name alone.
- Missing resource requests: without requests, Kubernetes can oversubscribe nodes and cause latency spikes.
- No readiness probes: traffic can reach pods before they are ready, which causes connection errors.
- Under-provisioned volumes: ensure PersistentVolumes are large enough for expected dataset growth.
FAQs
1. What does it mean to scale a Node.js application on Kubernetes?
Scaling a Node.js application on Kubernetes refers to increasing the number of running instances (replicas) of your app across multiple nodes in the cluster. This helps your application handle higher traffic, improves availability, and ensures that if a pod or node fails, others can keep serving requests.
In practice, scaling is achieved by changing the replica count in your Deployment. For more dynamic scaling, Kubernetes offers the Horizontal Pod Autoscaler (HPA) to automatically adjust the number of pod replicas based on CPU utilization or custom metrics.
To manually increase the number of replicas for your Deployment, use:
- kubectl scale deployment your-deployment-name --replicas=desired-number
Replace your-deployment-name with your actual Deployment name and desired-number with the total number of replicas you want to run.
Alternatively, you can update your Helm values and upgrade the release:
- helm upgrade your-release-name --set replicaCount=desired-number your-chart
These methods allow you to easily scale your Node.js application up or down on Kubernetes.
2. How does Kubernetes handle scaling for Node.js applications?
Kubernetes scales Node.js applications by running multiple pods behind a Service. You set the number of replicas in the Deployment (or use an autoscaler), and the cluster schedules and distributes the pods. A load balancer or ingress then sends traffic to the healthy pods. The app layer is stateless so adding or removing replicas does not affect data; the database (e.g., MongoDB) is scaled separately. For more information, see How to Configure Kubernetes Horizontal Pod Autoscaler Using Metrics Server.
3. Why use Helm instead of raw Kubernetes manifests?
Helm provides charts and templates so you can define your Kubernetes resources once and reuse them with different values (e.g., replica count, image tag, environment). That makes it easier to deploy and upgrade multi-resource setups like a Node.js app plus MongoDB without maintaining many raw YAML files. For more information, see An Introduction to Helm, the Package Manager for Kubernetes.
4. How do you deploy a Node.js application on Kubernetes using Helm?
You package your app as a Docker image, create a Helm chart (or use an existing one) that defines a Deployment, Service, and any ConfigMaps or Secrets, then run helm install with your values. Your chart passes database connection details and other config into the app via environment variables. This tutorial walks through that process step by step; for a simpler Express-only deployment, see Deploying an Express Application on a Kubernetes Cluster.
5. Can MongoDB be scaled horizontally on Kubernetes?
Yes. MongoDB is scaled horizontally on Kubernetes by running it as a replica set: multiple MongoDB pods (usually in a StatefulSet) with one primary and one or more secondaries. Data is replicated from the primary to the secondaries. Your Node.js app connects to the replica set using a connection string that lists the member hostnames and the replica set name. Scaling the database layer is different from scaling the app: you change the replica count in the MongoDB Helm chart or StatefulSet and ensure your app’s connection string and config (e.g., in a ConfigMap) stay in sync. For more information, see How to Integrate MongoDB with Your Node Application.
Conclusion
You have now deployed a replicated, highly-available shark information application on a Kubernetes cluster using Helm charts. This demo application and the workflow outlined in this tutorial can act as a starting point as you build custom charts for your application and take advantage of Helm’s stable repository and other chart repositories.
As you move toward production, consider implementing the following:
- Centralized logging and monitoring. Please see the relevant discussion in Modernizing Applications for Kubernetes for a general overview. You can also look at How To Set Up an Elasticsearch, Fluentd and Kibana (EFK) Logging Stack on Kubernetes to learn how to set up a logging stack with Elasticsearch, Fluentd, and Kibana. Also check out An Introduction to Service Meshes for information about how service meshes like Istio implement this functionality.
- Ingress Resources to route traffic to your cluster. This is a good alternative to a LoadBalancer in cases where you are running multiple Services, which each require their own LoadBalancer, or where you would like to implement application-level routing strategies (A/B & canary tests, for example). For more information, check out How to Set Up an Nginx Ingress with Cert-Manager on DigitalOcean Kubernetes and the related discussion of routing in the service mesh context in An Introduction to Service Meshes.
- Backup strategies for your Kubernetes objects. For guidance on implementing backups with Velero (formerly Heptio Ark) with DigitalOcean’s Kubernetes product, please see How To Back Up and Restore a Kubernetes Cluster on DigitalOcean Using Heptio Ark.
To learn more about Helm, see An Introduction to Helm, the Package Manager for Kubernetes, How To Install Software on Kubernetes Clusters with the Helm 2 Package Manager, and the Helm documentation.
Next Steps and Related Resources
- Run this stack on DigitalOcean: Create a Kubernetes cluster on DigitalOcean and follow this tutorial using the cluster’s kubeconfig. Use DigitalOcean Block Storage for MongoDB persistent volumes and a Load Balancer for external access to your Node.js app.
- Go deeper on Node and MongoDB: For local development and app design, see How To Integrate MongoDB with Your Node Application and the From Containers to Kubernetes with Node.js eBook.
- Add autoscaling: After your app is deployed, add the Kubernetes Horizontal Pod Autoscaler with Metrics Server to scale the Node.js Deployment based on CPU or custom metrics.
- Explore more Helm and Kubernetes content: Browse DigitalOcean Community tutorials for Kubernetes, Docker, and Node.js.
Thanks for learning with the DigitalOcean Community. Check out our offerings for compute, storage, networking, and managed databases.
Tutorial Series: From Containers to Kubernetes with Node.js
In this series, you will build and containerize a Node.js application with a MongoDB database. The series is designed to introduce you to the fundamentals of migrating an application to Kubernetes, including modernizing your app using the 12FA methodology, containerizing it, and deploying it to Kubernetes. The series also includes information on deploying your app with Docker Compose using an Nginx reverse proxy and Let’s Encrypt.
Browse Series: 7 tutorials
About the author
Anish is a Sr Technical Content Strategist and Team Lead at DigitalOcean with 7+ years of experience as an DevOps SRE at Nutanix and Cloud consultant at AMEX, and technical writing at DOCN, and shipping deep infra and AI inference tutorials that help developers deploy production‑ready applications on DigitalOcean.
Still looking for an answer?
This textbox defaults to using Markdown to format your answer.
You can type !ref in this text area to quickly search our full set of tutorials, documentation & marketplace offerings and insert the link!
If you get authentication errors, it may be because the persistentvolumeclaims have a previous version of the database.
This will remove the kubernetes config and the wipe the volumes for a clean do-over :-)
helm delete mongo --purge
kubectl delete persistentvolumeclaims -l app=mongodb-replicaset,release=mongo
Very useful article, thank you!!
All is perfectly explained, but I had a hard time debugging an issue with the service ports. In the service.yaml created by Helm, the targetPort is harcoded to http (80), so the values.yaml is ignored (this causes the service to be inaccessible).
The solution is to update the service.yaml with:
- port: {{ .Values.service.port }}
  targetPort: {{ .Values.service.targetPort }} #!!!!
  protocol: TCP
  name: http
I followed this tutorial, but couldn’t get the replicaset up and running.
The pod status is always in Init:CrashLoopBackOff
As far as I know you can’t rescale persistent volume claims in Digital Ocean, yes? Is there any way to scale the storage size once mongo needs more storage?
Great tutorial!
What about MongoDB sharding? Does it make sense to implement that with a Kubernetes cluster as well?
Hi Kathleen,
Thank you for another awesome tutorial! I really enjoy your style of technical writing. I find that it’s very to follow and has excellent explanations.
I have a question about this tutorial: If the mongo replicaset release was deployed separately than our custom application release (nodejs), how could the application chart reach the internal DNS name for the mongo replicas? Is the internal DNS for the replicas available to any other release within the namespace?
Thanks, Adam
Does anyone face a problem with the replicaset. When the last one start the bootstrap container it keep falling and backoff
 This work is licensed under a Creative Commons Attribution-NonCommercial- ShareAlike 4.0 International License.
Become a contributor for community
Get paid to write technical tutorials and select a tech-focused charity to receive a matching donation.

DigitalOcean Documentation
Full documentation for every DigitalOcean product.

Resources for startups and AI-native businesses
The Wave has everything you need to know about building a business, from raising funding to marketing your product.
The developer cloud
Scale up as you grow — whether you're running one virtual machine or ten thousand.

Start building today
From GPU-powered inference and Kubernetes to managed databases and storage, get everything you need to build, scale, and deploy intelligent applications.
