By Bobby and Erika Heidi

Introduction
When scaling web applications horizontally, the first difficulties you’ll typically face are dealing with file storage and data persistence. This is mainly due to the fact that it is hard to maintain consistency of variable data between multiple application nodes; appropriate strategies must be in place to make sure data created in one node is immediately available to other nodes in a cluster.
A practical way of solving the consistency problem is by using managed databases and object storage systems. The first will outsource data persistence to a managed database, and the latter will provide a remote storage service where you can keep static files and variable content such as images uploaded by users. Each node can then connect to these services at the application level.
The following diagram demonstrates how such a setup can be used for horizontal scalability in the context of PHP applications:
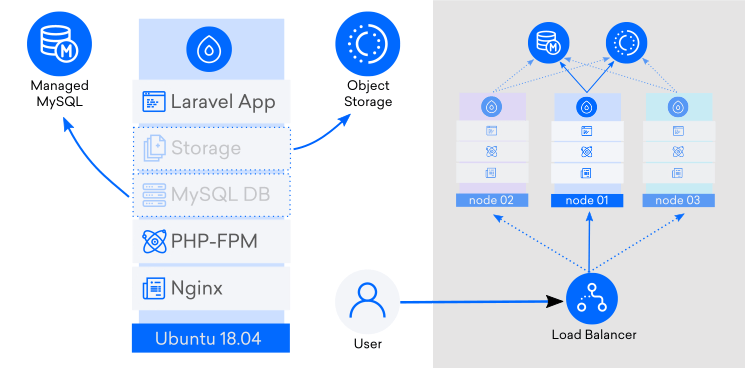
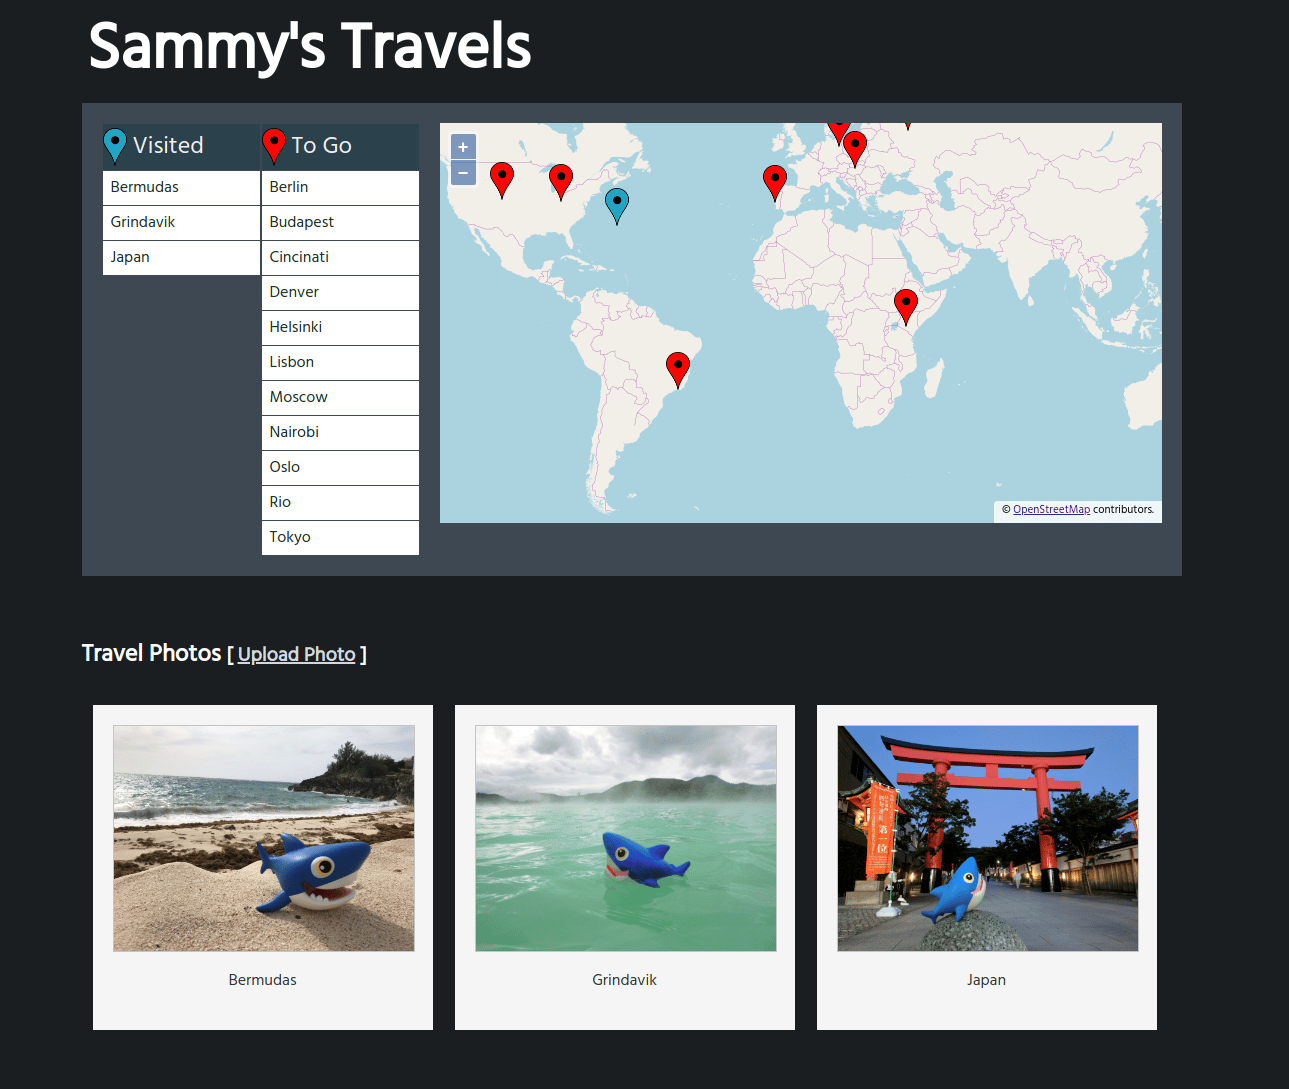
In this guide, we will update an existing Laravel 6 application to prepare it for horizontal scalability by connecting it to a managed MySQL database and setting up an S3-compatible object store to save user-generated files. By the end, you will have a travel list application running on an Nginx + PHP-FPM web server:
Note: this guide uses DigitalOcean Managed MySQL and Spaces to demonstrate a scalable application setup using managed databases and object storage. The instructions contained here should work in a similar way for other service providers.
Prerequisites
To begin this tutorial, you will first need the following prerequisites:
- Access to an Ubuntu 18.04 server as a non-root user with sudo privileges, and an active firewall installed on your server. To set these up, please refer to our Initial Server Setup Guide for Ubuntu 18.04.
- Nginx and PHP-FPM installed and configured on your server, as explained in steps 1 and 3 of How to Install LEMP on Ubuntu 18.04. You should skip the step where MySQL is installed.
- Composer installed on your server, as explained in steps 1 and 2 of How to Install and Use Composer on Ubuntu 18.04.
- Admin credentials to a managed MySQL 8 database. For this guide, we’ll be using a DigitalOcean Managed MySQL cluster, but the instructions here should work similarly for other managed database services.
- A set of API keys with read and write permissions to an S3-compatible object storage service. In this guide, we’ll use DigitalOcean Spaces, but you are free to use a provider of your choice.
- The
s3cmdtool installed and configured to connect to your object storage drive. For instructions on how to set this up for DigitalOcean Spaces, please refer to our product documentation.
Step 1 — Installing the MySQL 8 Client
The default Ubuntu apt repositories come with the MySQL 5 client, which is not compatible with the MySQL 8 server we’ll be using in this guide. To install the compatible MySQL client, we’ll need to use the MySQL APT Repository provided by Oracle.
Begin by navigating to the MySQL APT Repository page in your web browser. Find the Download button in the lower-right corner and click through to the next page. This page will prompt you to log in or sign up for an Oracle web account. You can skip that and instead look for the link that says No thanks, just start my download. Copy the link address and go back to your terminal window.
This link should point to a .deb package that will set up the MySQL APT Repository in your server. After installing it, you’ll be able to use apt to install the latest releases of MySQL. We’ll use curl to download this file into a temporary location.
Go to your server’s tmp folder:
- cd /tmp
Now download the package with curl and using the URL you copied from the MySQL APT Repository page:
- curl -OL https://dev.mysql.com/get/mysql-apt-config_0.8.13-1_all.deb
After the download is finished, you can use dpkg to install the package:
- sudo dpkg -i mysql-apt-config_0.8.13-1_all.deb
You will be presented with a screen where you can choose which MySQL version you’d like to select as default, as well as which MySQL components you’re interested in:
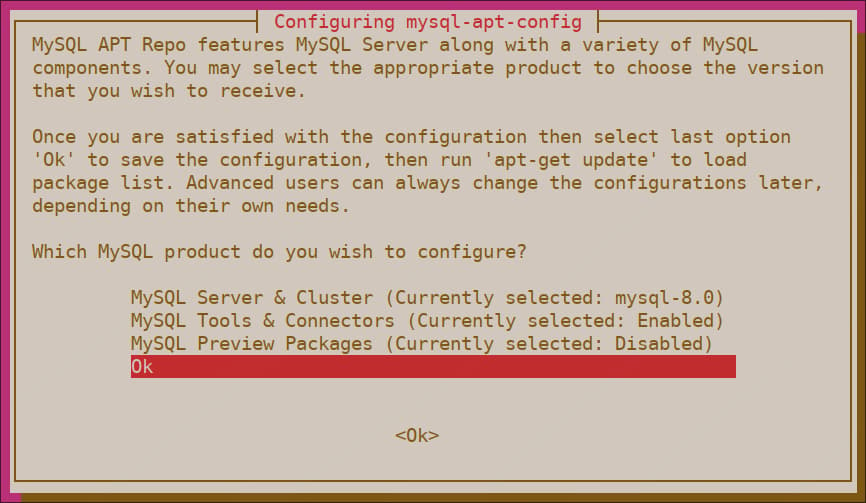
You don’t need to change anything here, because the default options will install the repositories we need. Select “Ok” and the configuration will be finished.
Next, you’ll need to update your apt cache with:
- sudo apt update
Now we can finally install the MySQL 8 client with:
- sudo apt install mysql-client
Once that command finishes, check the software version number to ensure that you have the latest release:
- mysql --version
You’ll see output like this:
Outputmysql Ver 8.0.18 for Linux on x86_64 (MySQL Community Server - GPL)
In the next step, we’ll use the MySQL client to connect to your managed MySQL server and prepare the database for the application.
Step 2 — Creating a new MySQL User and Database
At the time of this writing, the native MySQL PHP library mysqlnd doesn’t support caching_sha2_authentication, the default authentication method for MySQL 8. We’ll need to create a new user with the mysql_native_password authentication method in order to be able to connect our Laravel application to the MySQL 8 server. We’ll also create a dedicated database for our demo application.
To get started, log into your server using an admin account. Replace the highlighted values with your own MySQL user, host, and port:
- mysql -u MYSQL_USER -p -h MYSQL_HOST -P MYSQL_PORT
When prompted, provide the admin user’s password. After logging in, you will have access to the MySQL 8 server command line interface.
First, we’ll create a new database for the application. Run the following command to create a new database named travellist:
- CREATE DATABASE travellist;
Next, we’ll create a new user and set a password, using mysql_native_password as default authentication method for this user. You are encouraged to replace the highlighted values with values of your own, and to use a strong password:
- CREATE USER 'travellist-user'@'%' IDENTIFIED WITH mysql_native_password BY 'MYSQL_PASSWORD';
Now we need to give this user permission over our application database:
- GRANT ALL ON travellist.* TO 'travellist-user'@'%';
You can now exit the MySQL prompt with:
- exit;
You now have a dedicated database and a compatible user to connect from your Laravel application. In the next step, we’ll get the application code and set up configuration details, so your app can connect to your managed MySQL database.
In this guide, we’ll use Laravel Migrations and database seeds to set up our application tables. If you need to migrate an existing local database to a DigitalOcean Managed MySQL database, please refer to our documentation on How to Import MySQL Databases into DigitalOcean Managed Databases.
Step 3 — Setting Up the Demo Application
To get started, we’ll fetch the demo Laravel application from its Github repository. Feel free to inspect the contents of the application before running the next commands.
The demo application is a travel bucket list app that was initially developed in our guide on How to Install and Configure Laravel with LEMP on Ubuntu 18.04. The updated app now contains visual improvements including travel photos that can be uploaded by a visitor, and a world map. It also introduces a database migration script and database seeds to create the application tables and populate them with sample data, using artisan commands.
To obtain the application code that is compatible with this tutorial, we’ll download the 1.1 release from the project’s repository on Github. We’ll save the downloaded zip file as travellist.zip inside our home directory:
- cd ~
- curl -L https://github.com/do-community/travellist-laravel-demo/archive/1.1.zip -o travellist.zip
Now, unzip the contents of the application and rename its directory with:
- unzip travellist.zip
- mv travellist-laravel-demo-1.1 travellist
Navigate to the travellist directory:
- cd travellist
Before going ahead, we’ll need to install a few PHP modules that are required by the Laravel framework, namely: php-xml, php-mbstring, php-xml and php-bcmath. To install these packages, run:
- sudo apt install unzip php-xml php-mbstring php-xml php-bcmath
To install the application dependencies, run:
- composer install
You will see output similar to this:
OutputLoading composer repositories with package information
Installing dependencies (including require-dev) from lock file
Package operations: 80 installs, 0 updates, 0 removals
  - Installing doctrine/inflector (v1.3.0): Downloading (100%)
  - Installing doctrine/lexer (1.1.0): Downloading (100%)
  - Installing dragonmantank/cron-expression (v2.3.0): Downloading (100%)
  - Installing erusev/parsedown (1.7.3): Downloading (100%)

...

Generating optimized autoload files
> Illuminate\Foundation\ComposerScripts::postAutoloadDump
> @php artisan package:discover --ansi
Discovered Package: beyondcode/laravel-dump-server
Discovered Package: fideloper/proxy
Discovered Package: laravel/tinker
Discovered Package: nesbot/carbon
Discovered Package: nunomaduro/collision
Package manifest generated successfully.
The application dependencies are now installed. Next, we’ll configure the application to connect to the managed MySQL Database.
Creating the .env configuration file and setting the App Key
We’ll now create a .env file containing variables that will be used to configure the Laravel application in a per-environment basis. The application includes an example file that we can copy and then modify its values to reflect our environment settings.
Copy the .env.example file to a new file named .env:
- cp .env.example .env
Now we need to set the application key. This key is used to encrypt session data, and should be set to a unique 32 characters-long string. We can generate this key automatically with the artisan tool:
- php artisan key:generate
Let’s edit the environment configuration file to set up the database details. Open the .env file using your command line editor of choice. Here, we will be using nano:
- nano .env
Look for the database credentials section. The following variables need your attention:
DB_HOST: your managed MySQL server host.
DB_PORT: your managed MySQL server port.
DB_DATABASE: the name of the application database we created in Step 2.
DB_USERNAME: the database user we created in Step 2.
DB_PASSWORD: the password for the database user we defined in Step 2.
Update the highlighted values with your own managed MySQL info and credentials:
...
DB_CONNECTION=mysql
DB_HOST=MANAGED_MYSQL_HOST
DB_PORT=MANAGED_MYSQL_PORT
DB_DATABASE=MANAGED_MYSQL_DB
DB_USERNAME=MANAGED_MYSQL_USER
DB_PASSWORD=MANAGED_MYSQL_PASSWORD
...
Save and close the file by typing CTRL+X then Y and ENTER when you’re done editing.
Now that the application is configured to connect to the MySQL database, we can use Laravel’s command line tool artisan to create the database tables and populate them with sample data.
Setting up the storage link
Before executing the database tools provided by the artisan command, we need to create a symbolic link to the public storage folder that will host the travel photos we’re using in the application. This is necessary because our database seed script relies on these sample photos to insert data in the places table.
The following command will create a symbolic link inside the public directory, which is publicly exposed through the web server, pointing to the application’s internal storage directory storage/app/public:
- php artisan storage:link
OutputThe [public/storage] directory has been linked.
To check that the link was created and where it points to, you can run:
- ls -la public/
You’ll see output like this:
Outputtotal 36
drwxrwxr-x  5 sammy sammy 4096 Oct 25 14:59 .
drwxrwxr-x 12 sammy sammy 4096 Oct 25 14:58 ..
-rw-rw-r--  1 sammy sammy  593 Oct 25 06:29 .htaccess
drwxrwxr-x  2 sammy sammy 4096 Oct 25 06:29 css
-rw-rw-r--  1 sammy sammy    0 Oct 25 06:29 favicon.ico
drwxrwxr-x  2 sammy sammy 4096 Oct 25 06:29 img
-rw-rw-r--  1 sammy sammy 1823 Oct 25 06:29 index.php
drwxrwxr-x  2 sammy sammy 4096 Oct 25 06:29 js
-rw-rw-r--  1 sammy sammy   24 Oct 25 06:29 robots.txt
lrwxrwxrwx  1 sammy sammy   41 Oct 25 14:59 storage -> /home/sammy/travellist/storage/app/public
-rw-rw-r--  1 sammy sammy 1194 Oct 25 06:29 web.config
Migrating and populating the database
We’ll now use Laravel Migrations and database seeds to set up the application tables. This will help us determine if our database configuration works as expected.
To execute the migration script that will create the tables used by the application, run:
- php artisan migrate
You will see output similar to this:
OutputMigration table created successfully.
Migrating: 2019_09_19_123737_create_places_table
Migrated:  2019_09_19_123737_create_places_table (0.26 seconds)
Migrating: 2019_10_14_124700_create_photos_table
Migrated:  2019_10_14_124700_create_photos_table (0.42 seconds)
To populate the database with sample data, run:
- php artisan db:seed
You will see output like this:
OutputSeeding: PlacesTableSeeder
Seeded:  PlacesTableSeeder (0.86 seconds)
Database seeding completed successfully.
The application tables are now created and populated with sample data.
Running the test server (optional)
You can use the artisan serve command to quickly verify that everything is set up correctly within the application, before having to configure a full-featured web server like Nginx to serve the application for the long term.
We’ll use port 8000 to temporarily serve the application for testing. If you have the UFW firewall enabled on your server, you should first allow access to this port with:
- sudo ufw allow 8000
Now, to run the built in PHP server that Laravel exposes through the artisan tool, run:
- php artisan serve --host=0.0.0.0 --port=8000
This command will block your terminal until interrupted with a CTRL+C. It will use the built-in PHP web server to serve the application for test purposes on all network interfaces, using port 8000.
Now go to your browser and access the application using the server’s domain name or IP address on port 8000:
http://server_domain_or_IP:8000
You will see the following page:
If you see this page, it means the application is successfully pulling data about locations and photos from the configured managed database. The image files are still stored in the local disk, but we’ll change this in a following step of this guide.
When you are finished testing the application, you can stop the serve command by hitting CTRL+C.
Don’t forget to close port 8000 again if you are running UFW on your server:
- sudo ufw deny 8000
Step 4 — Configuring Nginx to Serve the Application
Although the built-in PHP web server is very useful for development and testing purposes, it is not intended to be used as a long term solution to serve PHP applications. Using a full featured web server like Nginx is the recommended way of doing that.
To get started, we’ll move the application folder to /var/www, which is the usual location for web applications running on Nginx. First, use the mv command to move the application folder with all its contents to /var/www/travellist:
- sudo mv ~/travellist /var/www/travellist
Now we need to give the web server user write access to the storage and bootstrap/cache folders, where Laravel stores application-generated files. We’ll set these permissions using setfacl, a command line utility that allows for more robust and fine-grained permission settings in files and folders.
To include read, write and execution (rwx) permissions to the web server user over the required directories, run:
- sudo setfacl -R -m g:www-data:rwx /var/www/travellist/storage
- sudo setfacl -R -m g:www-data:rwx /var/www/travellist/bootstrap/cache
The application files are now in order, but we still need to configure Nginx to serve the content. To do this, we’ll create a new virtual host configuration file at /etc/nginx/sites-available:
- sudo nano /etc/nginx/sites-available/travellist
The following configuration file contains the recommended settings for Laravel applications on Nginx:
server {
    listen 80;
    server_name server_domain_or_IP;
    root /var/www/travellist/public;

    add_header X-Frame-Options "SAMEORIGIN";
    add_header X-XSS-Protection "1; mode=block";
    add_header X-Content-Type-Options "nosniff";

    index index.html index.htm index.php;

    charset utf-8;

    location / {
        try_files $uri $uri/ /index.php?$query_string;
    }

    location = /favicon.ico { access_log off; log_not_found off; }
    location = /robots.txt  { access_log off; log_not_found off; }

    error_page 404 /index.php;

    location ~ \.php$ {
        fastcgi_pass unix:/var/run/php/php7.2-fpm.sock;
        fastcgi_index index.php;
        fastcgi_param SCRIPT_FILENAME $realpath_root$fastcgi_script_name;
        include fastcgi_params;
    }

    location ~ /\.(?!well-known).* {
        deny all;
    }
}
Copy this content to your /etc/nginx/sites-available/travellist file and adjust the highlighted values to align with your own configuration. Save and close the file when you’re done editing.
To activate the new virtual host configuration file, create a symbolic link to travellist in sites-enabled:
- sudo ln -s /etc/nginx/sites-available/travellist /etc/nginx/sites-enabled/
Note: If you have another virtual host file that was previously configured for the same server_name used in the travellist virtual host, you might need to deactivate the old configuration by removing the corresponding symbolic link inside /etc/nginx/sites-enabled/.
To confirm that the configuration doesn’t contain any syntax errors, you can use:
- sudo nginx -t
You should see output like this:
- Outputnginx: the configuration file /etc/nginx/nginx.conf syntax is ok
- nginx: configuration file /etc/nginx/nginx.conf test is successful
To apply the changes, reload Nginx with:
- sudo systemctl reload nginx
If you reload your browser now, the application images will be broken. That happens because we moved the application directory to a new location inside the server, and for that reason we need to re-create the symbolic link to the application storage folder.
Remove the old link with:
- cd /var/www/travellist
- rm -f public/storage
Now run once again the artisan command to generate the storage link:
- php artisan storage:link
Now go to your browser and access the application using the server’s domain name or IP address, as defined by the server_name directive in your configuration file:
http://server_domain_or_IP
In the next step, we’ll integrate an object storage service into the application. This will replace the current local disk storage used for the travel photos.
Step 5 — Integrating an S3-Compatible Object Storage into the Application
We’ll now set up the application to use an S3-compatible object storage service for storing the travel photos exhibited on the index page. Because the application already has a few sample photos stored in the local disk, we’ll also use the s3cmd tool to upload the existing local image files to the remote object storage.
Setting Up the S3 Driver for Laravel
Laravel uses league/flysystem, a filesystem abstraction library that enables a Laravel application to use and combine multiple storage solutions, including local disk and cloud services. An additional package is required to use the s3 driver. We can install this package using the composer require command.
Access the application directory:
- cd /var/www/travellist
- composer require league/flysystem-aws-s3-v3
You will see output similar to this:
OutputUsing version ^1.0 for league/flysystem-aws-s3-v3
./composer.json has been updated
Loading composer repositories with package information
Updating dependencies (including require-dev)
Package operations: 8 installs, 0 updates, 0 removals
  - Installing mtdowling/jmespath.php (2.4.0): Loading from cache
  - Installing ralouphie/getallheaders (3.0.3): Loading from cache
  - Installing psr/http-message (1.0.1): Loading from cache
  - Installing guzzlehttp/psr7 (1.6.1): Loading from cache
  - Installing guzzlehttp/promises (v1.3.1): Loading from cache
  - Installing guzzlehttp/guzzle (6.4.1): Downloading (100%)
  - Installing aws/aws-sdk-php (3.112.28): Downloading (100%)
  - Installing league/flysystem-aws-s3-v3 (1.0.23): Loading from cache
...
Now that the required packages are installed, we can update the application to connect to the object storage. First, we’ll open the .env file again to set up configuration details such as keys, bucket name, and region for your object storage service.
Open the .env file:
- nano .env
Include the following environment variables, replacing the highlighted values with your object store configuration details:
DO_SPACES_KEY=EXAMPLE7UQOTHDTF3GK4
DO_SPACES_SECRET=exampleb8e1ec97b97bff326955375c5
DO_SPACES_ENDPOINT=https://ams3.digitaloceanspaces.com
DO_SPACES_REGION=ams3
DO_SPACES_BUCKET=sammy-travellist
Save and close the file when you’re done. Now open the config/filesystems.php file:
- nano config/filesystems.php
Within this file, we’ll create a new disk entry in the disks array. We’ll name this disk spaces, and we’ll use the environment variables we’ve set in the .env file to configure the new disk. Include the following entry in the disks array:
'spaces' => [
   'driver' => 's3',
   'key' => env('DO_SPACES_KEY'),
   'secret' => env('DO_SPACES_SECRET'),
   'endpoint' => env('DO_SPACES_ENDPOINT'),
   'region' => env('DO_SPACES_REGION'),
   'bucket' => env('DO_SPACES_BUCKET'),
],
Still in the same file, locate the cloud entry and change it to set the new spaces disk as default cloud filesystem disk:
'cloud' => env('FILESYSTEM_CLOUD', 'spaces'),
Save and close the file when you’re done editing. From your controllers, you can now use the Storage::cloud() method as a shortcut to access the default cloud disk. This way, the application stays flexible to use multiple storage solutions, and you can switch between providers on a per-environment basis.
The application is now configured to use object storage, but we still need to update the code that uploads new photos to the application.
Let’s first examine the current uploadPhoto route, located in the PhotoController class. Open the file using your text editor:
- nano app/Http/Controllers/PhotoController.php
…

public function uploadPhoto(Request $request)
{
   $photo = new Photo();
   $place = Place::find($request->input('place'));

   if (!$place) {
       //add new place
       $place = new Place();
       $place->name = $request->input('place_name');
       $place->lat = $request->input('place_lat');
       $place->lng = $request->input('place_lng');
   }

   $place->visited = 1;
   $place->save();

   $photo->place()->associate($place);
   $photo->image = $request->image->store('/', 'public');
   $photo->save();

   return redirect()->route('Main');
}
This method accepts a POST request and creates a new photo entry in the photos table. It begins by checking if an existing place was selected in the photo upload form, and if that’s not the case, it will create a new place using the provided information. The place is then set to visited and saved to the database. Following that, an association is created so that the new photo is linked to the designated place. The image file is then stored in the root folder of the public disk. Finally, the photo is saved to the database. The user is then redirected to the main route, which is the index page of the application.
The highlighted line in this code is what we’re interested in. In that line, the image file is saved to the disk using the store method. The store method is used to save files to any of the disks defined in the filesystem.php configuration file. In this case, it is using the default disk to store uploaded images.
We will change this behavior so that the image is saved to the object store instead of the local disk. In order to do that, we need to replace the public disk by the spaces disk in the store method call. We also need to make sure the uploaded file’s visibility is set to public instead of private.
The following code contains the full PhotoController class, including the updated uploadPhoto method:
<?php

namespace App\Http\Controllers;

use Illuminate\Http\Request;
use App\Photo;
use App\Place;
use Illuminate\Support\Facades\Storage;

class PhotoController extends Controller
{
   public function uploadForm()
   {
       $places = Place::all();

       return view('upload_photo', [
           'places' => $places
       ]);
   }

   public function uploadPhoto(Request $request)
   {
       $photo = new Photo();
       $place = Place::find($request->input('place'));

       if (!$place) {
           //add new place
           $place = new Place();
           $place->name = $request->input('place_name');
           $place->lat = $request->input('place_lat');
           $place->lng = $request->input('place_lng');
       }

       $place->visited = 1;
       $place->save();

       $photo->place()->associate($place);
       $photo->image = $request->image->store('/', 'spaces');
       Storage::setVisibility($photo->image, 'public');
       $photo->save();

       return redirect()->route('Main');
   }
}
Copy the updated code to your own PhotoController so that it reflects the highlighted changes. Save and close the file when you’re done editing.
We still need to modify the application’s main view so that it uses the object storage file URL to render the image. Open the travel_list.blade.php template:
- nano resources/views/travel_list.blade.php
Now locate the footer section of the page, which currently looks like this:
@section('footer')
   <h2>Travel Photos <small>[ <a href="{{ route('Upload.form') }}">Upload Photo</a> ]</small></h2>
   @foreach ($photos as $photo)
       <div class="photo">
          <img src="{{ asset('storage') . '/' . $photo->image }}" />
           <p>{{ $photo->place->name }}</p>
       </div>
   @endforeach

@endsection
Replace the current image src attribute to use the file URL from the spaces storage disk:
<img src="{{ Storage::disk('spaces')->url($photo->image) }}" />
If you go to your browser now and reload the application page, it will show only broken images. That happens because the image files for those travel photos are still only in the local disk. We need to upload the existing image files to the object storage, so that the photos already stored in the database can be successfully exhibited in the application page.
Syncing local images with s3cmd
The s3cmd tool can be used to sync local files with an S3-compatible object storage service. We’ll run a sync command to upload all files inside storage/app/public/photos to the object storage service.
Access the public app storage directory:
- cd /var/www/travellist/storage/app/public
To have a look at the files already stored in your remote disk, you can use the s3cmd ls command:
- s3cmd ls s3://your_bucket_name
Now run the sync command to upload existing files in the public storage folder to the object storage:
- s3cmd sync ./ s3://your_bucket_name --acl-public --exclude=.gitignore
This will synchronize the current folder (storage/app/public) with the remote object storage’s root dir. You will get output similar to this:
Outputupload: './bermudas.jpg' -> 's3://sammy-travellist/bermudas.jpg'  [1 of 3]
 2538230 of 2538230   100% in    7s   329.12 kB/s  done
upload: './grindavik.jpg' -> 's3://sammy-travellist/grindavik.jpg'  [2 of 3]
 1295260 of 1295260   100% in    5s   230.45 kB/s  done
upload: './japan.jpg' -> 's3://sammy-travellist/japan.jpg'  [3 of 3]
 8940470 of 8940470   100% in   24s   363.61 kB/s  done
Done. Uploaded 12773960 bytes in 37.1 seconds, 336.68 kB/s.
Now, if you run s3cmd ls again, you will see that three new files were added to the root folder of your object storage bucket:
- s3cmd ls s3://your_bucket_name
Output2019-10-25 11:49   2538230   s3://sammy-travellist/bermudas.jpg
2019-10-25 11:49   1295260   s3://sammy-travellist/grindavik.jpg
2019-10-25 11:49   8940470   s3://sammy-travellist/japan.jpg
Go to your browser and reload the application page. All images should be visible now, and if you inspect them using your browser debug tools, you’ll notice that they’re all using URLs from your object storage.
Testing the Integration
The demo application is now fully functional, storing files in a remote object storage service, and saving data to a managed MySQL database. We can now upload a few photos to test our setup.
Access the /upload application route from your browser:
http://server_domain_or_IP/upload
You will see the following form:
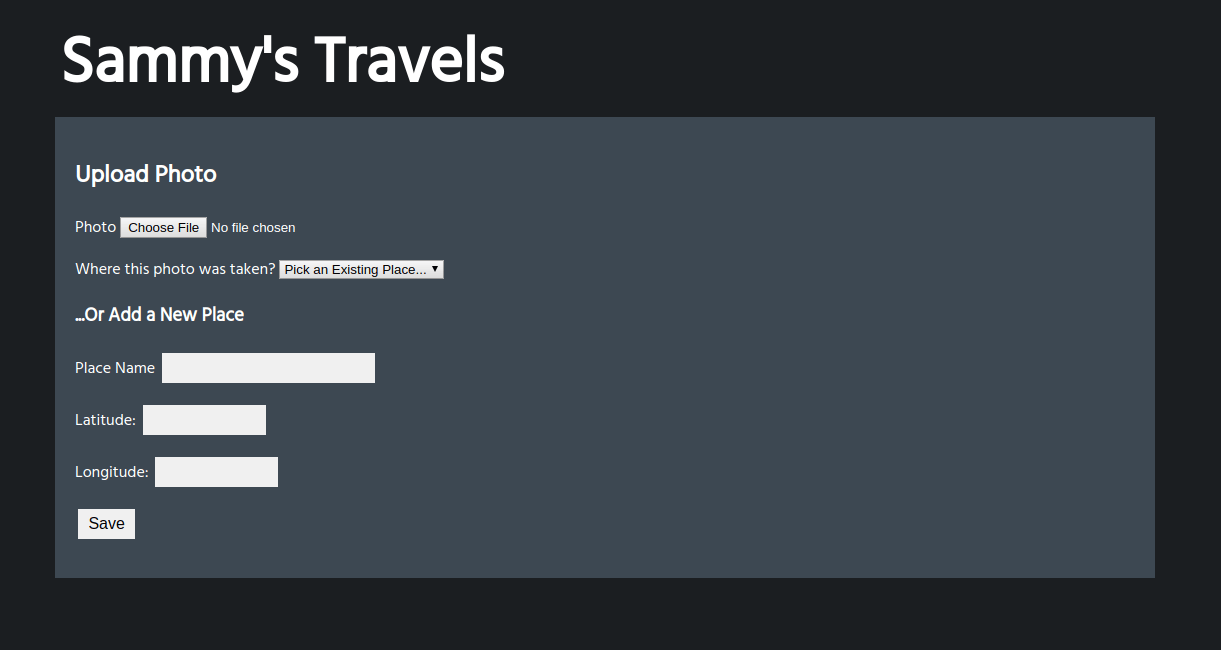
You can now upload a few photos to test the object storage integration. After choosing an image from your computer, you can select an existing place from the dropdown menu, or you can add a new place by providing its name and geographic coordinates so it can be loaded in the application map.
Step 6 — Scaling Up a DigitalOcean Managed MySQL Database with Read-Only Nodes (Optional)
Because read-only operations are typically more frequent than writing operations on database servers, its is a common practice to scale up a database cluster by setting up multiple read-only nodes. This will distribute the load generated by SELECT operations.
To demonstrate this setup, we’ll first add 2 read-only nodes to our DigitalOcean Managed MySQL cluster. Then, we’ll configure the Laravel application to use these nodes.
Access the DigitalOcean Cloud Panel and follow these instructions:
- Go to Databases and select your MySQL cluster.
- Click
Actionsand chooseAdd a read-only nodefrom the drop-down menu. - Configure the node options and hit the Create button. Notice that it might take several minutes for the new node to be ready.
- Repeat steps 1-4 one more time so that you have 2 read-only nodes.
- Note down the hosts of the two nodes as we will need them for our Laravel configuration.
Once you have your read-only nodes ready, head back to your terminal.
We’ll now configure our Laravel application to work with multiple database nodes. When we’re finished, queries such as INSERT and UPDATE will be forwarded to your primary cluster node, while all SELECT queries will be redirected to your read-only nodes.
First, go to the application’s directory on the server and open your .env file using your text editor of choice:
- cd /var/www/travellist
- nano .env
Locate the MySQL database configuration and comment out the DB_HOST line:
DB_CONNECTION=mysql
#DB_HOST=MANAGED_MYSQL_HOST
DB_PORT=MANAGED_MYSQL_PORT
DB_DATABASE=MANAGED_MYSQL_DB
DB_USERNAME=MANAGED_MYSQL_USER
DB_PASSWORD=MANAGED_MYSQL_PASSWORD
Save and close the file when you’re done. Now open the config/database.php in your text editor:
- nano config/database.php
Look for the mysql entry inside the connections array. You should include three new items in this configuration array: read, write, and sticky. The read and write entries will set up the cluster nodes, and the sticky option set to true will reuse write connections so that data written to the database is immediately available in the same request cycle. You can set it to false if you don’t want this behavior.
...
      'mysql' => [
         'read' => [
           'host' => [
              'READONLY_NODE1_HOST',
              'READONLY_NODE2_HOST',
           ],
         ],
         'write' => [
           'host' => [
             'MANAGED_MYSQL_HOST',
           ],
         ],
       'sticky' => true,
...
Save and close the file when you are done editing. To test that everything works as expected, we can create a temporary route inside routes/web.php to pull some data from the database and show details about the connection being used. This way we will be able to see how the requests are being load balanced between the read-only nodes.
Open the routes/web.php file:
- nano routes/web.php
Include the following route:
...

Route::get('/mysql-test', function () {
  $places = App\Place::all();
  $results = DB::select( DB::raw("SHOW VARIABLES LIKE 'server_id'") );

  return "Server ID: " . $results[0]->Value;
});
Now go to your browser and access the /mysql-test application route:
http://server_domain_or_IP/mysql-test
You’ll see a page like this:
Reload the page a few times and you will notice that the Server ID value changes, indicating that the requests are being randomly distributed between the two read-only nodes.
Conclusion
In this guide, we’ve prepared a Laravel 6 application for a highly available and scalable environment. We’ve outsourced the database system to an external managed MySQL service, and we’ve integrated an S3-compatible object storage service into the application to store files uploaded by users. Finally, we’ve seen how to scale up the application’s database by including additional read-only cluster nodes in the app’s configuration file.
The updated demo application code containing all modifications made in this guide can be found within the 2.1 tag in the application’s repository on Github.
From here, you can set up a Load Balancer to distribute load and scale your application among multiple nodes. You can also leverage this setup to create a containerized environment to run your application on Docker.
Thanks for learning with the DigitalOcean Community. Check out our offerings for compute, storage, networking, and managed databases.
About the author(s)
💻 DevOps Engineer | 🕸️ Laravel enthusiast | 🐧 Avid Linux lover | 🐳 Docker Captain
Dev/Ops passionate about open source, PHP, and Linux. Former Senior Technical Writer at DigitalOcean. Areas of expertise include LAMP Stack, Ubuntu, Debian 11, Linux, Ansible, and more.
Still looking for an answer?
This textbox defaults to using Markdown to format your answer.
You can type !ref in this text area to quickly search our full set of tutorials, documentation & marketplace offerings and insert the link!
What I do miss in this entire tutorial is dealing with DigitalOcean Spaces Rate Limiting 503 errors which pretty much makes object storage using Spaces useless.
As soon as you start storing a decent amount of photos or other static files and or retrieving them or simply backing them up you will hit the 200 requests or other rate limiting rules in no time.
You can read an entire thread on this at https://www.digitalocean.com/community/questions/rate-limiting-on-spaces . Nothing has been done about this. Using Spaces’ CDN or multiple Spaces does not help either. Many people because of this major showstopper move on to Amazon S3, Wasabi or Vultr for object storage as their rate limiting is more generous or even non existent.
 This work is licensed under a Creative Commons Attribution-NonCommercial- ShareAlike 4.0 International License.
Become a contributor for community
Get paid to write technical tutorials and select a tech-focused charity to receive a matching donation.

DigitalOcean Documentation
Full documentation for every DigitalOcean product.

Resources for startups and AI-native businesses
The Wave has everything you need to know about building a business, from raising funding to marketing your product.
The developer cloud
Scale up as you grow — whether you're running one virtual machine or ten thousand.

Start building today
From GPU-powered inference and Kubernetes to managed databases and storage, get everything you need to build, scale, and deploy intelligent applications.
