By Mateusz Papiernik and Sharon Campbell

Introduction
Background
Drupal is one of the most popular free open-source content management systems.
Since it uses an underlying database to store and retrieve data such as content pages, news items, comments, and blog posts, Drupal needs a considerable amount of processing power to serve a single page view. Each page impression involves launching the PHP interpreter, processing all Drupal elements, accessing the database to get the information, preparing the visual layout, and serving the ready content to the user.
This intensive process makes it difficult to cope with growing numbers of people viewing the website simultaneously. Since each visitor needs a non-negligible amount of processing power to be served, your server resources can quickly become a bottleneck.
There are many ways to accommodate growth and cope with performance problems, most of which can be considered a method of scaling. Scaling in terms of software is considered the system’s ability to accommodate increased load like increased numbers of simultaneous visitors.
Varnish helps with scaling on a software level, by adding additional software that can help with the bottlenecks.
This article was tested on Ubuntu 14.04 but should work with minor path changes on Debian 7. It may work on other distributions as well with minor changes.
Varnish Cache
Varnish is a cache, which means its role is to store and remember what a web application serves to the user the first time the content is accessed. Then it can serve the same content again for subsequent requests without asking the web application again.
It can be used to serve static content, such as images, scripts, or stylesheets, because Varnish is blazingly fast and copes with traffic much better than Apache does. It can also be used to cache quasi-static content; that is, content that is generated dynamically by the application (using the database and taking a considerable amount of time to prepare), but that stays unchanged for a period of time, making the content suitable for caching.
For example, when an article on the website gets published, it is rarely updated. It is then completely unnecessary to engage all the processing bits and pieces of Drupal to compute and show the same article every time it is requested. It will be perfectly fine for Varnish to remember serve the same page again without contacting Drupal at all. This makes it easy for Varnish to serve the same content to 10, 100, or even 1000 people at once - since serving a cached page requires very little processing power.
In most scenarios using Varnish makes almost any website unbelievably faster. It also make it easier to cope with sudden spikes of interest (for example, when a very popular article gets published). All this translates to happier visitors who get their content delivered faster and more reliably.
Prerequisites
The article assumes you have a working Drupal-based website on LAMP already up and running. Here are the requirements:
Step 1 — Reconfiguring Apache
By default, Apache listens on port 80. This lets Apache handle web requests like a browser URL request for http://example.com. To use Varnish, it must be able to handle those requests instead. First we have to tell Apache not to handle requests on port 80 anymore.
Changing the Port Apache Listens on
The port on which Apache listens by default is set in a file called ports.conf, which on both Debian and Ubuntu is located in /etc/apache2.
Edit the file:
sudo nano /etc/apache2/ports.conf
This will run a nano text editor showing the default contents of that file, which should be similar to the following. Update the NameVirtualHost and Listen lines to use port 81:
# If you just change the port or add more ports here, you will likely also
# have to change the VirtualHost statement in
# /etc/apache2/sites-enabled/000-default
# This is also true if you have upgraded from before 2.2.9-3 (i.e. from
# Debian etch). See /usr/share/doc/apache2.2-common/NEWS.Debian.gz and
# README.Debian.gz

NameVirtualHost *:81
Listen 81

<IfModule mod_ssl.c>
    # If you add NameVirtualHost *:443 here, you will also have to change
    # the VirtualHost statement in /etc/apache2/sites-available/default-ssl
    # to <VirtualHost *:443>
    # Server Name Indication for SSL named virtual hosts is currently not
    # supported by MSIE on Windows XP.
    Listen 443
</IfModule>
Let’s save the file by pressing CTRL+x, then y, then Enter.
Changing the Port for the Virtual Host
By default, a fresh Apache installation has one virtual host specified in a configuration file located in /etc/apache2/sites-enabled/000-default. If you have more than one virtual host configured, you will have to modify all of them.
To modify the configuration of the default Apache virtual host, let’s type:
sudo nano /etc/apache2/sites-enabled/000-default.conf
The file contents begin with lines like following:
<VirtualHost *:80>
        ServerAdmin webmaster@localhost
Just like before, we have to change the number from 80 to 81:
<VirtualHost *:81>
        ServerAdmin webmaster@localhost
Save the file using CTRL-x followed by y and Enter.
Reloading the Apache Configuration
After those changes, the Apache configuration needs to be reloaded:
sudo service apache2 reload
Now Apache will accept incoming requests on the new port 81 and not on 80 as before.
We can confirm that by opening our website in the browser – it should fail to open without specifying the port (like http://example.com) but show correctly after adding the new port to the address (like http://example.com:81).
We are now ready to install and configure Varnish to help us make the site faster.
Step 2 — Installing Varnish
Both Debian and Ubuntu have system packages with Varnish, but we recommend using prebuilt packages made by the authors of Varnish. It will ensure that Varnish is up to date, which will not be true for the system packages.
First, make sure the apt-transport-https package is installed, which allows the system to install packages over a secure connection:
sudo apt-get install apt-transport-https
This will either install the necessary package or tell us it has already been installed.
The public key of the Varnish package server needs to be installed in order to verify the authenticity of the installed packages. First, switch to root:
sudo su
Add the key:
curl https://repo.varnish-cache.org/ubuntu/GPG-key.txt | apt-key add -
For Debian:
echo "deb https://repo.varnish-cache.org/debian/ wheezy varnish-4.0" >> /etc/apt/sources.list.d/varnish-cache.list
For Ubuntu:
echo "deb https://repo.varnish-cache.org/ubuntu/ trusty varnish-4.0" >> /etc/apt/sources.list.d/varnish-cache.list
You can switch back to your sudo user now.
Update your system:
sudo apt-get update
Install Varnish:
sudo apt-get install varnish
This installs and runs Varnish!
Step 3 — Making Varnish Listen on Port 80
By default Varnish listens on port 6081. We will make Varnish listen on port 80 instead, taking all the incoming requests from our web users, just like Apache did before.
Let’s open the Varnish configuration file using:
sudo nano /etc/default/varnish
Locate the uncommented section shown below:
. . .

## Alternative 2, Configuration with VCL
#
# Listen on port 6081, administration on localhost:6082, and forward to
# one content server selected by the vcl file, based on the request.
# Use a 256MB memory based cache.
#
DAEMON_OPTS="-a :6081 \
             -T localhost:6082 \
             -f /etc/varnish/default.vcl \
             -S /etc/varnish/secret \
             -s malloc,256m"

. . .
Update the DAEMON_OPTS="-a: line to use port 80 (remember to keep the \ as well):
. . .

DAEMON_OPTS="-a :80 \
             -T localhost:6082 \
             -f /etc/varnish/default.vcl \
             -S /etc/varnish/secret \
             -s malloc,256m"

. . .
Save the file using CTRL-x and y followed by Enter.
Restart Varnish for the changes to take effect:
sudo service varnish restart
We should see messages like the following with no errors:
[ ok ] Stopping HTTP accelerator: varnishd.
[ ok ] Starting HTTP accelerator: varnishd.
Now check your website in the browser. Instead of your Drupal site that was previously available, you will see a white page with an error message saying:
Error 503 Backend fetch failed

Backend fetch failed

Guru Meditation:
XID: 131081

Varnish cache server
That means that Varnish has been properly configured to accept incoming connections, but is not yet available to serve our Drupal site. We will make changes to the configuration to bring the former Drupal site back online in the following steps.
How Varnish Works
A great resource to get a solid understanding of Varnish is the official Varnish Book, but we’ll cover a few basic facts about how Varnish works here.
You can also skip ahead to the next step if you want to finish the installation now and learn more later. However, if you learn how Varnish works, you’ll have a greater understanding of the next steps.
VCL Language
Varnish’s configuration is written in a language called VCL (Varnish Configuration Language). It’s a simple programming language that gets compiled to native C code by Varnish itself.
The configuration consists of methods that get executed during different moments of handling incoming web requests, along with the rest of the configuration contents.
Some instructions get executed by Varnish when it receives the request from the browser, but before the request gets handled, which tell it whether to forward the request to the actual application, or to serve cached content. In these instructions it is possible to manipulate the incoming request, change its contents, or make decisions based on the request (the URL, the file name, the headers, or the cookies).
Other instructions are executed when Varnish decides to get contents from the actual application (in our case, the Drupal website). Those instructions can be used to manipulate the contents received from the application.
Still other instructions are executed when Varnish serves the cached content without retrieving it fresh from the application.
Using VCL, it is possible to build a complex logic making different caching decisions based upon many factors. It is also possible to build a very simple set of instructions.
Varnish comes with a sensible default implementation for all its methods that can be changed if needed. That means that it is possible to specify in the configuration only some methods, and even then, only some instructions, still relying on the defaults for the rest. That makes it very easy to use basic Varnish abilities, while making it possible to create very complex configurations as you add custom instructions.
What gets cached and what doesn’t?
Perhaps the most difficult thing about configuring Varnish or any other caching mechanism is to decide when and what to cache. Most problems come from improper decisions – by caching either too much or not enough.
With a typical Drupal installation, this may lead to two different problem scenarios.
The first one is when not enough pages are cached, which renders Varnish almost unnecessary. It does not speed up things at all, since most of pages are fetched directly from the Drupal application every single time. This doesn’t help with performance problems, but it also doesn’t break anything.
The second one is when too many pages get cached. In this case it might be impossible to log in to the administrative panel at all. Visitors may get old, invalid content, or even mixed-up content when different content is served for anonymous and logged in users. In this scenario it is possible to break things that did work fine without Varnish.
Let’s go through some common factors to help us decide whether Varnish will or will not cache content.
Varnish caches everything
In default a scenario, the basic premise is that Varnish caches everything. The caching in Varnish is exclusive, not inclusive, which means that everything gets cached unless you make a rule otherwise.
Request method
The request method is the basic definition of a request. Varnish by default caches only GET and HEAD requests, never caching others like POST, PUT, and DELETE. This makes sure that requests that are intended to make some changes to the data get through to the application intact without being cached.
Authorization
By default, requests to password-protected pages are not cached at all. This holds true only for pages protected using HTTP Basic Authorization. Varnish is not aware of application-specific mechanisms, such as Drupal login pages. We will have to add our own rules to make sure login pages aren’t cached.
Cache headers
Sometimes web applications return their own caching information in headers. Varnish takes those headers into account, so when a web application such as Drupal tells Varnish to never cache its response, that’s exactly what will happen unless we program another behaviour in the VCL file. Since Drupal does send its own caching information, this will become important further on.
Cookies
Cookies are perhaps the most important and most difficult part of making caching decisions with web applications.
By default, if there are request or response cookies set, the page will not be cached. It is a sensible decision, since, for example, logged-in users are identified by a session cookie. If pages with cookies were cached, all logged in users would get the same content, and the application would be unable to discern between users. It is also, however, one of the biggest source of problems, since the use of cookies is widespread. Often harmless cookies are present in the requests, such as a Google Analytics tokens, which are not used by the application at all, but will make content uncacheable as well. Without careful decisions on which cookies should prohibit caching and which should be ignored, with today’s web applications we would end up with almost no caching at all, since there are so many cookies floating around.
Most fragments of Drupal-specific configuration for Varnish will deal with proper cookie handling to remove unnecessary cookies and allow caching, but retain those necessary to, for example, maintain administration page functionality.
Step 4 — Configuring Varnish for Drupal
Having the basic understanding of how caching with Varnish works, we can proceed to configure Varnish to work with our Drupal site.
Let’s open the Varnish VCL configuration file:
sudo nano /etc/varnish/default.vcl
The default contents shows all the Varnish methods empty, which means the defaults are in use.
We can add our own configuration instructions to achieve the necessary caching policy.
The first block instructs Varnish how to contact the backend web server, which in our case is Apache with a Drupal installation. We will change the code to reflect the port 81 we have used to configure Apache.
. . .

# Default backend definition. Set this to point to your content server.
backend default {
    .host = "127.0.0.1";
    .port = "81";
}

. . .
Now locate the empty placeholder method vcl_recv:
. . .

sub vcl_recv {
    # Happens before we check if we have this in cache already.
    #
    # Typically you clean up the request here, removing cookies you don't need,
    # rewriting the request, etc.
}

. . .
The code in this method is executed before Varnish contacts our Drupal site. It’s the place when we can strip some cookies coming from the browser, force caching (or not) for certain addresses, and make the first caching decision. We will add several rules that accomplish the following:
- Allow Varnish to serve stale (old) cache content in case of a Drupal failure. It will make the site partially available even if Drupal fails to respond
- Ensure that no administrative pages are cached at all, forcing Varnish to skip the cache for certain URLs
- Ensure caching of static files – images, scripts, stylesheets
- Strip all cookies other than several cookies needed by Drupal to work properly, including user login features
To achieve this let’s replace the default block with the following one. Lines preceded with # are comments and will not be taken into account by Varnish, but are here to help make the configuration file easy to understand. This entire block is new and can be pasted in as-is:
. . .

sub vcl_recv {

    # Return (pass) instructs Varnish not to cache the request
    # when the condition is met.

    ## ADMIN PAGES ##

    # Here we filter out all URLs containing Drupal administrative sections
    if (req.url ~ "^/status\.php$" ||
        req.url ~ "^/update\.php$" ||
        req.url ~ "^/admin$" ||
        req.url ~ "^/admin/.*$" ||
        req.url ~ "^/user$" ||
        req.url ~ "^/user/.*$" ||
        req.url ~ "^/flag/.*$" ||
        req.url ~ "^.*/ajax/.*$" ||
        req.url ~ "^.*/ahah/.*$") {
           return (pass);
    }


	## BACKUP AND MIGRATE MODULE ##

    # Backup and Migrate is a very popular Drupal module that needs to be excluded
    # It won't work with Varnish
    if (req.url ~ "^/admin/content/backup_migrate/export") {
        return (pipe);
    }

	## COOKIES ##

    # Remove cookies for stylesheets, scripts, and images used throughout the site.
    # Removing cookies will allow Varnish to cache those files.
    if (req.url ~ "(?i)\.(css|js|jpg|jpeg|gif|png|ico)(\?.*)?$") {
        unset req.http.Cookie;
    }

    # Remove all cookies that are not necessary for Drupal to work properly.
    # Since it would be cumbersome to REMOVE certain cookies, we specify
    # which ones are of interest to us, and remove all others. In this particular
    # case we leave SESS, SSESS and NO_CACHE cookies used by Drupal's administrative
    # interface. Cookies in cookie header are delimited with ";", so when there are
    # many cookies, the header looks like "Cookie1=value1; Cookie2=value2; Cookie3..."
    # and so on. That allows us to work with ";" to split cookies into individual
    # ones.
    #
    # The method for filtering unnecessary cookies has been adopted from:
    # https://fourkitchens.atlassian.net/wiki/display/TECH/Configure+Varnish+3+for+Drupal+7
    if (req.http.Cookie) {
        # 1. We add ; to the beginning of cookie header
        set req.http.Cookie = ";" + req.http.Cookie;
        # 2. We remove spaces following each occurence of ";". After this operation
        # all cookies are delimited with no spaces.
        set req.http.Cookie = regsuball(req.http.Cookie, "; +", ";");
        # 3. We replace ";" INTO "; " (adding the space we have previously removed) in cookies
        # named SESS..., SSESS... and NO_CACHE. After this operation those cookies will be
        # easy to differentiate from the others, because those will be the only one with space
        # after ";"
        set req.http.Cookie = regsuball(req.http.Cookie, ";(SESS[a-z0-9]+|SSESS[a-z0-9]+|NO_CACHE)=", "; \1=");
        # 4. We remove all cookies with no space after ";", so basically we remove all cookies other
        # than those above.
        set req.http.Cookie = regsuball(req.http.Cookie, ";[^ ][^;]*", "");
        # 5. We strip leading and trailing whitespace and semicolons.
        set req.http.Cookie = regsuball(req.http.Cookie, "^[; ]+|[; ]+$", "");

        # If there are no cookies after our striping procedure, we remove the header altogether,
        # thus allowing Varnish to cache this page
        if (req.http.Cookie == "") {
            unset req.http.Cookie;
        }
        # if any of our cookies of interest are still there, we disable caching and pass the request
        # straight to Apache and Drupal
        else {
            return (pass);
        }
    }
}

. . .
The next method is the vcl_backend_response. This method is responsible for processing the response from Apache and Drupal before putting it into cache or discarding it from cache. We can change what Drupal sends to fit into our caching strategy.
The default method looks like this:
. . .

sub vcl_backend_response {
    # Happens after we have read the response headers from the backend.
    #
    # Here you clean the response headers, removing silly Set-Cookie headers
    # and other mistakes your backend does.
}

. . .
Let’s replace it with this entirely new block as-is. Comments are included:
. . .

sub vcl_backend_response {
    # Remove cookies for stylesheets, scripts and images used throughout the site.
    # Removing cookies will allow Varnish to cache those files. It is uncommon for
    # static files to contain cookies, but it is possible for files generated
    # dynamically by Drupal. Those cookies are unnecessary, but could prevent files
    # from being cached.
    if (bereq.url ~ "(?i)\.(css|js|jpg|jpeg|gif|png|ico)(\?.*)?$") {
        unset beresp.http.set-cookie;
    }
}

. . .
The code removes cookies for static files using the same method of choosing the files as before, so cookies get removed for the same files both in vcl_recv and vcl_backend_response.
Let’s save the configuration file with CTRL+x, then y followed by Enter. Changing other methods is unnecessary.
Step 5 — Restarting Varnish
Restart Varnish for the changes to take effect:
sudo service varnish restart
The Varnish server should restart without errors.
Now you should be able to view your Drupal website again in your browser.
There is, however, one more step than we should take care of before our Drupal site will be properly cached. We need to enable caching in Drupal itself.
Step 6 — Enabling Cache in Drupal
By default Drupal has its cache mechanisms disabled. This results in headers being sent to Varnish which force pages not to be cached at all. So, a disabled Drupal cache will automatically block Varnish from helping us speed up the site.
To enable Drupal caching, log in to your Drupal site as an administrator.
Choose the Configuration menu and then Performance.
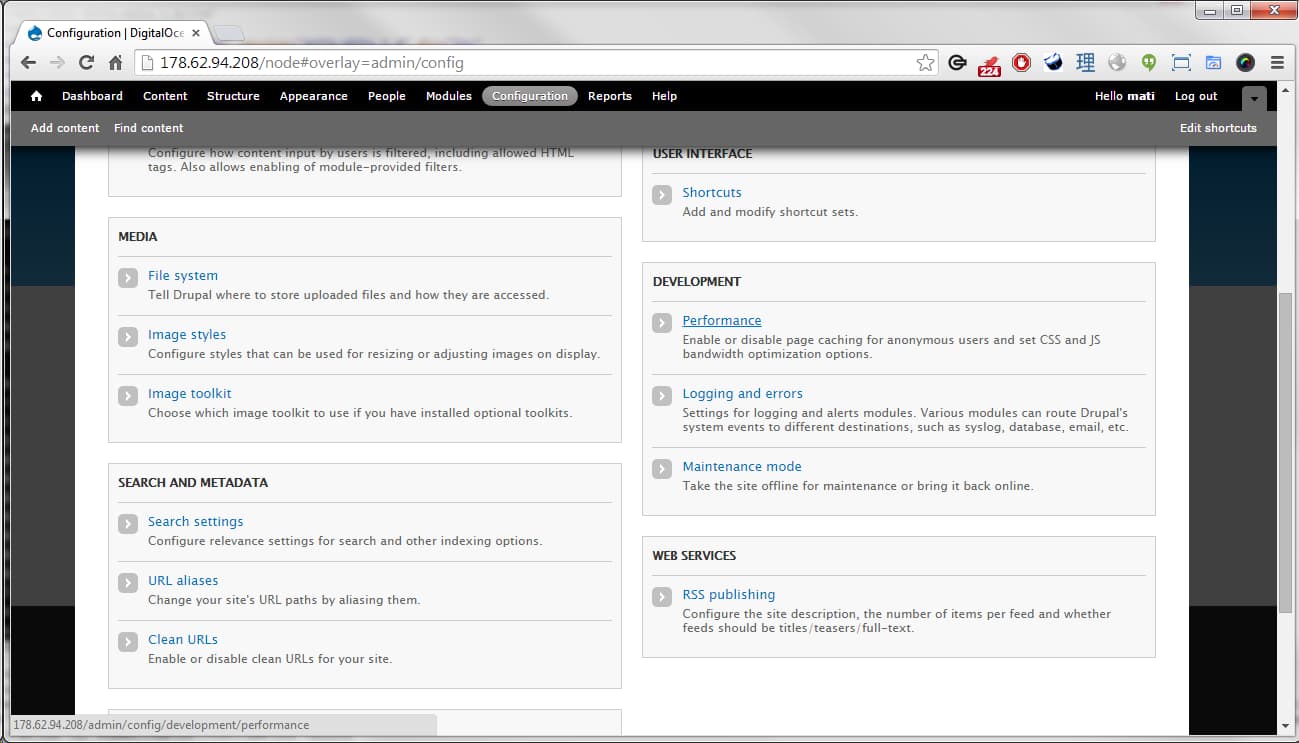
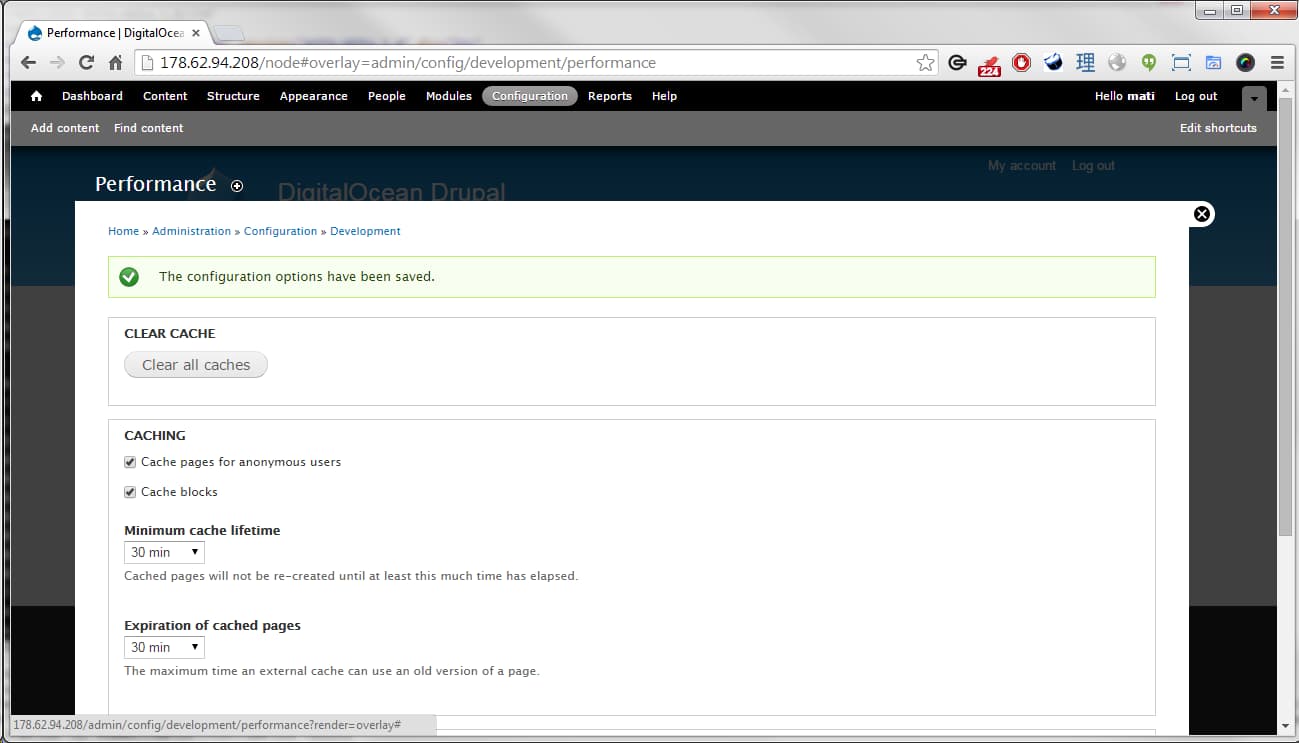
In the Performance section, locate and check the Cache pages for anonymous users and Cache blocks settings.
Set the Minimum cache lifetime and Expiration of cached pages to a sensible value, like 30 minutes. This value gives a considerable performance gain, and still makes sure that the cache is not stale for too long. The best setting for the cache lifetime depends on the individual site and how often it gets updated. After changing the values click Save configuration.
This completes the necessary configuration to make Varnish cache our Drupal site.
Step 7 — Verifying Varnish Configuration
To make sure Varnish is caching the site, we can use the simple tool called Is Varnish Working?. Enter your website’s address in the form. You should see a response like the one below:
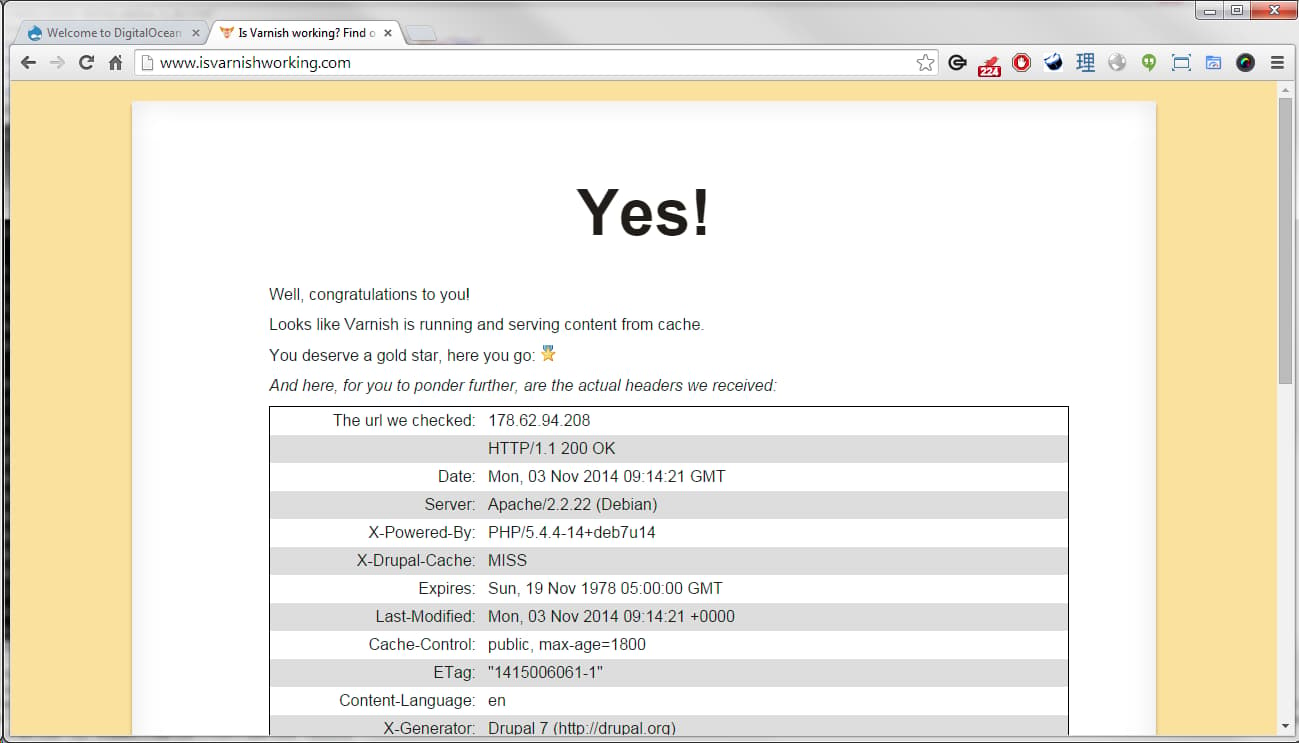
You might want to check twice if you get the “sort of” message the first time.
Further Reading
Topics covered in this article are just the tip of the iceberg. Varnish is very powerful software and can help with much more than just simple caching. The official Varnish documentation is a vast resource about Varnish possibilities and VCL syntax. To get the most out of Varnish and Drupal, it is also best to get to know Drupal’s own possibilities in terms of improving performance. The official Drupal performance documentation is a good starting point.
Varnish is a tool that can help your site’s performance immensely, but ultimately it is not a magical solution to all performance bottlenecks, and best results are achieved by careful planning at all stages. Having said that, even the simplest Varnish configuration can make your site snappy in a matter of minutes.
Thanks for learning with the DigitalOcean Community. Check out our offerings for compute, storage, networking, and managed databases.
About the author(s)
Creating bespoke software ◦ CTO & co-founder at Makimo. I'm a software enginner & a geek. I like making impossible things possible. And I need tea.
Current fan and former Editorial Manager at DigitalOcean. Hi! Expertise in areas including Ubuntu, Docker, Rails, and more.
Still looking for an answer?
This textbox defaults to using Markdown to format your answer.
You can type !ref in this text area to quickly search our full set of tutorials, documentation & marketplace offerings and insert the link!
Great article, thanks a lot!
Also, as an alternative you can connect your DigitalOcean account to Wodby (https://wodby.com) and it will deploy Drupal with built-in Varnish support in one click.
Thanks for posting this tutorial. It was really helpful.
However one issue i’m encountering is, logged in/authenticated users are getting same cache version of content pages as for anonymous users.
Can you help solving it?
@ rameez621:
You might want to check this out: https://github.com/iraneagle/Varnish-Drupal
There are some default.vcl settings, you can experiment with
This comment has been deleted
Great tutorial, thanks a lot.
Do you think this alternative VCL config posted in 2012, is still relevant ? There are some differences, i.e POST or DELETE requests are explicitly excluded… Thank you for your feedback !
sub vcl_recv {
  if (req.restarts == 0) {
    if (req.http.x-forwarded-for) {
        set req.http.X-Forwarded-For =
	req.http.X-Forwarded-For + ", " + client.ip;
    } else {
    set req.http.X-Forwarded-For = client.ip;
    }
  }

  if (req.request != "GET" &&
    req.request != "HEAD" &&
    req.request != "PUT" &&
    req.request != "POST" &&
    req.request != "TRACE" &&
    req.request != "OPTIONS" &&
    req.request != "DELETE") {
      /* Non-RFC2616 or CONNECT which is weird. */
      return (pipe);
  }
  if (req.request != "GET" && req.request != "HEAD") {
      /* We only deal with GET and HEAD by default */
      return (pass);
  }

  # Always cache things with these extensions
  if (req.url ~ "\.(js|css|jpg|jpeg|png|gif|gz|tgz|bz2|tbz|mp3|ogg|swf)$") {
    return (lookup);
  }

  # Do not cache these paths.
  if (req.url ~ "^/status\.php$" ||
      req.url ~ "^/update\.php$" ||
      req.url ~ "^/cron\.php$" ||
      req.url ~ "^/install\.php$" ||
      req.url ~ "^/ooyala/ping$" ||
      req.url ~ "^/admin" ||
      req.url ~ "^/admin/.*$" ||
      req.url ~ "^/flag/.*$" ||
      req.url ~ "^.*/server-status$" ||
      req.url ~ "^.*/ajax/.*$" ||
      req.url ~ "^.*/ahah/.*$") {
    return (pass);
  }

  ## Remove has_js, toolbar collapsed and Google Analytics cookies.
  set req.http.Cookie = regsuball(req.http.Cookie, "(^|;\s*)(__[a-z]+|has_js|Drupal.toolbar.collapsed|Drupal.tableDrag.showWeight)=[^;]*", "");

  ## Remove a ";" prefix, if present.
  set req.http.Cookie = regsub(req.http.Cookie, "^;\s*", "");

  ## Remove empty cookies.
  if (req.http.Cookie ~ "^\s*$") {
    unset req.http.Cookie;
  }

  ## fix compression per http://www.varnish-cache.org/trac/wiki/FAQ/Compression
  if (req.http.Accept-Encoding) {
    if (req.url ~ "\.(jpg|png|gif|gz|tgz|bz2|tbz|mp3|ogg)$") {
      # No point in compressing these
      remove req.http.Accept-Encoding;
    } elsif (req.http.Accept-Encoding ~ "gzip") {
      set req.http.Accept-Encoding = "gzip";
    } elsif (req.http.Accept-Encoding ~ "deflate" && req.http.user-agent !~ "MSIE") {
      set req.http.Accept-Encoding = "deflate";
    } else {
      # unkown algorithm
      remove req.http.Accept-Encoding;
    }
  }

  # If they still have any cookies, do not cache.
  if (req.http.Authorization || req.http.Cookie) {
    /* Not cacheable by default */
    return (pass);
  }

  # Don't cache Drupal logged-in user sessions
  # LOGGED_IN is the cookie that earlier version of Pressflow sets
  # VARNISH is the cookie which the varnish.module sets
  if (req.http.Cookie ~ "(VARNISH|DRUPAL_UID|LOGGED_IN)") {
    return (pass);
  }

  return (lookup);
}

sub vcl_hash {
  hash_data(req.url);
  if (req.http.host) {
    hash_data(req.http.host);
  } else {
    hash_data(server.ip);
  }
  return (hash);
}

sub vcl_deliver {
  # From http://varnish-cache.org/wiki/VCLExampleLongerCaching
  if (resp.http.magicmarker) {
    /* Remove the magic marker */
    unset resp.http.magicmarker;

    /* By definition we have a fresh object */
    set resp.http.age = "0";
  }

  #add cache hit data
  if (obj.hits > 0) {
    #if hit add hit count
    set resp.http.X-Varnish-Cache = "HIT";
    set resp.http.X-Varnish-Cache-Hits = obj.hits;
  }
  else {
    set resp.http.X-Varnish-Cache = "MISS";
  }

  return (deliver);
}
(source : Create a high performance Drupal server)
 This work is licensed under a Creative Commons Attribution-NonCommercial- ShareAlike 4.0 International License.
Become a contributor for community
Get paid to write technical tutorials and select a tech-focused charity to receive a matching donation.

DigitalOcean Documentation
Full documentation for every DigitalOcean product.

Resources for startups and AI-native businesses
The Wave has everything you need to know about building a business, from raising funding to marketing your product.
The developer cloud
Scale up as you grow — whether you're running one virtual machine or ten thousand.

Start building today
From GPU-powered inference and Kubernetes to managed databases and storage, get everything you need to build, scale, and deploy intelligent applications.
