
The author selected the COVID-19 Relief Fund to receive a donation as part of the Write for DOnations program.
Introduction
Flask is a framework for building web applications using the Python language. With Flask, you can use SQLite as your database engine to store application data.
Markdown is a markup language commonly used for the process of writing content in an easy-to-read text format. Using Markdown, you can format plain text with features such as headings, links, and images, you can then convert the text into HTML, which includes these formatting features. To learn how to use Markdown, check out the Markdown syntax standard.
Python-Markdown is a Python library that allows you to convert Markdown text to HTML; it mostly follows the Markdown standard, with a few minor differences to the standard Markdown syntax.
In this tutorial, you’ll use Flask, SQLite, and Python-Markdown to build a small note-taking web application that supports formatting text using Markdown. The app will allow users to display, create, and format notes with headings, links, lists, images, and other features. You’ll use the Bootstrap toolkit to style your application.
Prerequisites
-
A local Python 3 programming environment. Follow the tutorial for your distribution in the How To Install and Set Up a Local Programming Environment for Python 3 series. This tutorial will name the project directory
flask_notes. -
An understanding of basic Flask concepts, such as creating routes, rendering HTML templates, and connecting to a SQLite database. Check out How To Make a Web Application Using Flask in Python 3 and How To Use the sqlite3 Module in Python 3, if you are not familiar with these concepts.
Step 1 — Setting Up Dependencies
In this step, you will activate your Python environment and install Flask and Python-Markdown using the pip package installer. Then you’ll create the database you will use to store notes and add some sample data to it.
First, activate your programming environment if you haven’t already:
- source env/bin/activate
Once you have activated your programming environment, install Flask and the Python-Markdown library using the following command:
- pip install flask markdown
Then create a database schema file called schema.sql, which will contain SQL commands to create a notes table. Open the file inside your flask_notes directory:
- nano schema.sql
Type the following SQL commands inside this file:
DROP TABLE IF EXISTS notes;

CREATE TABLE notes (
    id INTEGER PRIMARY KEY AUTOINCREMENT,
    created TIMESTAMP NOT NULL DEFAULT CURRENT_TIMESTAMP,
    content TEXT NOT NULL
);
In this SQL file, you first delete any already existing table named notes, which could cause problems. This ensures that your notes table is exactly as described in this SQL. Note that this will delete all of the content you have in the database whenever you use these SQL commands, so ensure you don’t write any important content in the web application until you finish this tutorial and experiment with the final result.
You use the CREATE TABLE notes statement to create the notes table with the following columns:
id: An integer that represents a primary key; the database will assign this a unique value for each entry (a note).created: The note’s creation date; it will be automatically filled in with the time at which the note was added to the database.content: The note’s content.
Save and close the file.
To create the database using the schema.sql file, open a file named init_db.py inside the flask_notes directory:
- nano init_db.py
Then add the following code:
import sqlite3
connection = sqlite3.connect('database.db')
with open('schema.sql') as f:
connection.executescript(f.read())
cur = connection.cursor()
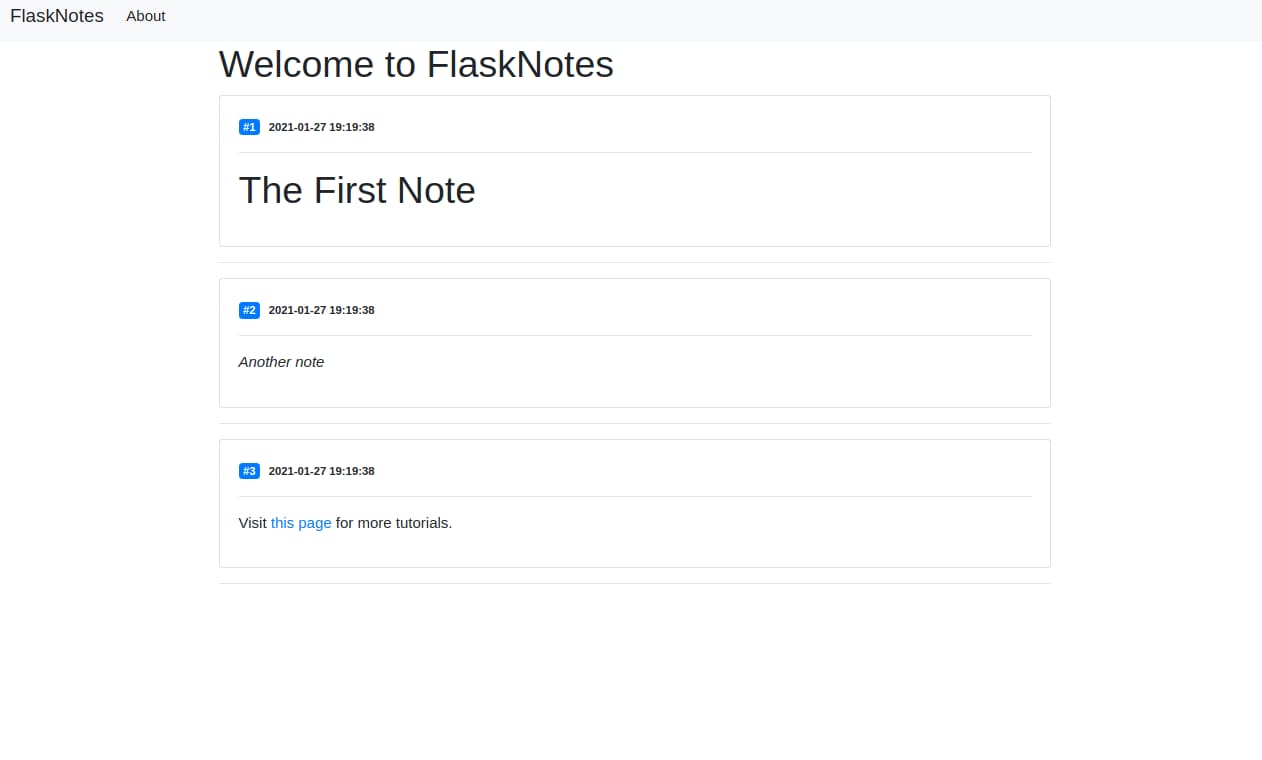
cur.execute("INSERT INTO notes (content) VALUES (?)", ('# The First Note',))
cur.execute("INSERT INTO notes (content) VALUES (?)", ('_Another note_',))
cur.execute("INSERT INTO notes (content) VALUES (?)", ('Visit [this page](https://www.digitalocean.com/community/tutorials) for more tutorials.',))
connection.commit()
connection.close()
Here, you first import the sqlite3 module. Next, you connect to a file called database.db that will be created once you execute this program. database.db is the database that will hold all your application’s data. You then open the schema.sql file and run it using the executescript() method that executes multiple SQL statements at once. This will create the notes table.
Using a Cursor object, you execute a few INSERT SQL statements to create three notes. You’re using Markdown syntax here: the first note is an <h1> heading, the second note is in italic, and the third note contains a link. You use the ? placeholder in the execute() method and pass a tuple containing the note’s content to safely insert data into the database.
Finally, you commit the changes and close the connection.
Save and close the file.
Run the program:
- python init_db.py
After execution, a new file called database.db will appear in your flask_notes directory.
You’ve activated your environment, installed Flask and Python-Markdown, and created the SQLite database. Next, you’ll retrieve the Markdown notes from the database, convert them to HTML, and display them on the application’s homepage.
Step 2 — Displaying the Notes on the Index Page
In this step, you will create a Flask application that connects to the database and displays the sample data you have in the database. You will convert the Markdown text in the database to HTML and then render it on the index page.
First, create the app.py application file inside your flask_notes directory:
- nano app.py
Add the following code to it:
import sqlite3
import markdown
from flask import Flask, render_template, request, flash, redirect, url_for

def get_db_connection():
    conn = sqlite3.connect('database.db')
    conn.row_factory = sqlite3.Row
    return conn
You first import the sqlite3 module, the markdown package, and Flask helpers.
The get_db_connection() function opens a connection to the database.db database file and then sets the row_factory attribute to sqlite3.Row. This gives you name-based access to columns, which means that the database connection will return rows that behave like regular Python dictionaries. Lastly, the function returns the conn connection object you’ll be using to access the database.
Following that, add the next snippet of code:
#. . .

app = Flask(__name__)
app.config['SECRET_KEY'] = 'this should be a secret random string'
Here, you create the Flask application object and set a secret key to secure sessions.
Then add the following code:
#. . .

@app.route('/')
def index():
    conn = get_db_connection()
    db_notes = conn.execute('SELECT id, created, content FROM notes;').fetchall()
    conn.close()

    notes = []
    for note in db_notes:
       note = dict(note)
       note['content'] = markdown.markdown(note['content'])
       notes.append(note)

    return render_template('index.html', notes=notes)
The index() function is a Flask view function, which is a function decorated using the special @app.route decorator. Flask converts this function’s return value into an HTTP response that an HTTP client, such as a web browser, will display.
In the index() view function, you open a database connection and you execute a SELECT SQL statement to fetch the ID, the creation date, and the content for all rows of the notes table. You use the fetchall() method to get a list of all the rows and save this data in the db_notes variable. Then, you close the connection.
To convert the content of the notes from Markdown to HTML, you create a new empty list called notes. You loop through the db_notes list and convert each note from an sqlite3.Row to a regular Python dictionary using the dict() Python function to allow assignment. Next, you use the markdown.markdown() function to convert the value of note['content'] to HTML. For example, calling markdown.markdown('#Hi') would return the string '<h1>Hi</h1>' because in Markdown # represents the <h1> heading. After modifying note['content'], you append the note to the notes list.
Finally, you render a template file called index.html, passing it the notes list.
After all the additions, your file will be as follows:
import sqlite3
import markdown
from flask import Flask, render_template, request, flash, redirect, url_for

def get_db_connection():
    conn = sqlite3.connect('database.db')
    conn.row_factory = sqlite3.Row
    return conn


app = Flask(__name__)
app.config['SECRET_KEY'] = 'this should be a secret random string'


@app.route('/')
def index():
    conn = get_db_connection()
    db_notes = conn.execute('SELECT id, created, content FROM notes;').fetchall()
    conn.close()

    notes = []
    for note in db_notes:
       note = dict(note)
       note['content'] = markdown.markdown(note['content'])
       notes.append(note)

    return render_template('index.html', notes=notes)
Save and close the file.
Next, you’ll create a base template and the index.html template file.
In your flask_notes directory, create a templates directory and open a file called base.html inside it:
- mkdir templates
- nano templates/base.html
Add the following code inside base.html; note that you’re using Bootstrap here. If you are not familiar with HTML templates in Flask, read Step 3 of How To Make a Web Application Using Flask in Python 3:
<!doctype html>
<html lang="en">
  <head>
    <!-- Required meta tags -->
    <meta charset="utf-8">
    <meta name="viewport" content="width=device-width, initial-scale=1, shrink-to-fit=no">

    <!-- Bootstrap CSS -->
    <link rel="stylesheet" href="https://stackpath.bootstrapcdn.com/bootstrap/4.3.1/css/bootstrap.min.css" integrity="sha384-ggOyR0iXCbMQv3Xipma34MD+dH/1fQ784/j6cY/iJTQUOhcWr7x9JvoRxT2MZw1T" crossorigin="anonymous">

    <title>{% block title %} {% endblock %}</title>
  </head>
  <body>
    <nav class="navbar navbar-expand-md navbar-light bg-light">
        <a class="navbar-brand" href="{{ url_for('index')}}">FlaskNotes</a>
        <button class="navbar-toggler" type="button" data-toggle="collapse" data-target="#navbarNav" aria-controls="navbarNav" aria-expanded="false" aria-label="Toggle navigation">
            <span class="navbar-toggler-icon"></span>
        </button>
        <div class="collapse navbar-collapse" id="navbarNav">
            <ul class="navbar-nav">
            <li class="nav-item active">
                <a class="nav-link" href="#">About</a>
            </li>
            </ul>
        </div>
    </nav>
    <div class="container">
        {% for message in get_flashed_messages() %}
            <div class="alert alert-danger">{{ message }}</div>
        {% endfor %}
        {% block content %} {% endblock %}
    </div>

    <!-- Optional JavaScript -->
    <!-- jQuery first, then Popper.js, then Bootstrap JS -->
    <script src="https://code.jquery.com/jquery-3.3.1.slim.min.js" integrity="sha384-q8i/X+965DzO0rT7abK41JStQIAqVgRVzpbzo5smXKp4YfRvH+8abtTE1Pi6jizo" crossorigin="anonymous"></script>
    <script src="https://cdnjs.cloudflare.com/ajax/libs/popper.js/1.14.7/umd/popper.min.js" integrity="sha384-UO2eT0CpHqdSJQ6hJty5KVphtPhzWj9WO1clHTMGa3JDZwrnQq4sF86dIHNDz0W1" crossorigin="anonymous"></script>
    <script src="https://stackpath.bootstrapcdn.com/bootstrap/4.3.1/js/bootstrap.min.js" integrity="sha384-JjSmVgyd0p3pXB1rRibZUAYoIIy6OrQ6VrjIEaFf/nJGzIxFDsf4x0xIM+B07jRM" crossorigin="anonymous"></script>
  </body>
</html>
Most of the code in the preceding block is standard HTML and code required for Bootstrap. The <meta> tags provide information for the web browser, the <link> tag links the Bootstrap CSS files, and the <script> tags are links to JavaScript code that allows some additional Bootstrap features.
The <title>{% block title %} {% endblock %}</title> tag allows the inheriting templates to define a custom title. You use the for message in get_flashed_messages() loop to display the flashed messages, like warnings and alerts. The {% block content %} {% endblock %} placeholder is where inheriting templates place the content so that all templates have the extra code this base template provides to avoid repetition.
Save and close the file.
Next, create the index.html file that will extend this base.html file:
- nano templates/index.html
Add the following code to it:
{% extends 'base.html' %}

{% block content %}
    <h1>{% block title %} Welcome to FlaskNotes {% endblock %}</h1>
    {% for note in notes %}
    <div class="card">
        <div class="card-body">
            <span class="badge badge-primary">#{{ note['id'] }}</span>
            <span class="badge badge-default">{{ note['created'] }}</span>
            <hr>
            <p>{{ note['content'] |safe }}</p>
        </div>
    </div>
    <hr>
    {% endfor %}
{% endblock %}
Here you extend base.html, you define a title, and you use a for loop to go through notes displaying each note in a Bootstrap card. You display the note’s ID, the note’s creation date, and the note’s content, which you converted into HTML in the index() view function.
You use the |safe Jinja filter, which you apply to the content using |; this is similar to calling a function in Python (in a similar way to safe(note['content'])). The |safe filter allows the browser to render HTML code—if it was not applied, it will display the HTML as plain text. This is usually referred to as “escaping HTML,” which is a security feature that prevents malicious HTML from being interpreted in the browser that would result in a dangerous security vulnerability called cross-site scripting (XSS). Since the Python-Markdown library returns safe HTML, you can allow the browser to render it using the |safe filter. Remember not to use this filter until you are certain that the HTML code you allow is safe and trusted.
For more, read Flask’s documentation on controlling autoescaping.
Save and close the file.
Set the environment variables Flask needs and run the application using the following commands:
- export FLASK_APP=app
- export FLASK_ENV=development
- flask run
The FLASK_APP environment variable specifies the application you want to run (the app.py file). The FLASK_ENV environment variable specifies the mode; development means that the application will run in development mode with the debugger running (remember to avoid using this mode in production). You run the application using the flask run command.
Open a browser and type in the URL http://127.0.0.1:5000/.
Here, you’ll find that each note is formatted and rendered as HTML in the browser instead of plain text.
You created a Flask application that connects to the database, fetches notes, converts their content from Markdown text to HTML, and then renders them on the index page. Next, you’ll add a route to allow users to add new notes, which they can write using Markdown syntax.
Step 3 — Adding New Notes
In this step, you’ll add a new route that will allow users to take new notes. Users can use Markdown syntax to write their notes—your application will save the notes to the database, which it will then display on the index page with the proper formatting. You will also add a button to the navigation bar that takes users to this new page.
You will use web forms to allow users to submit data in your Flask application and you’ll store user-submitted data in your database.
First open the app.py file to add a new route:
- nano app.py
Add the following code to the end of the file:
#. . .

@app.route('/create/', methods=('GET', 'POST'))
def create():
    conn = get_db_connection()

    if request.method == 'POST':
        content = request.form['content']
        if not content:
            flash('Content is required!')
            return redirect(url_for('index'))
        conn.execute('INSERT INTO notes (content) VALUES (?)', (content,))
        conn.commit()
        conn.close()
        return redirect(url_for('index'))

    return render_template('create.html')
Since you will use this route to insert new data to the database via a web form, you allow both GET and POST requests using methods=('GET', 'POST') in the app.route() decorator. In the create() view function, you open a database connection.
If the user has submitted a form that means the condition request.method == 'POST' is true, so you extract the note’s content that the user has submitted using request.form['content'] and save it to a variable called content. If the content is empty, you flash a 'Content is required!' message and redirect the user to the index page. If the content was not empty, you use an INSERT SQL statement to add the note’s content to the notes table. You commit the changes and close the connection, then you redirect the user to the index page.
If the request is a GET request, meaning the user has just visited the page, you render a template file called create.html.
Save and close the file.
Next, open the create.html template file:
- nano templates/create.html
Add the following code to it:
{% extends 'base.html' %}

{% block content %}
    <h1>{% block title %} Add a New Note {% endblock %}</h1>
    <form method="post">
    <div class="form-group">
        <label for="content">Note Content</label>
        <textarea type="text" name="content"
               placeholder="Note content, you can use Markdown syntax" class="form-control"
               value="{{ request.form['content'] }}" autofocus></textarea>
    </div>

    <div class="form-group">
        <button type="submit" class="btn btn-primary">Submit</button>
    </div>
    </form>

{% endblock %}
Here, you use a form with a text area for the note’s content. You use request.form to access the form data that is stored in case something goes wrong with your form submission (for example, if no content was provided). You add a submit button under the text area for the user to press to send data to the application in a POST request.
Save and close the file.
Next open the base.html file to add a New Note button to the navigation bar:
- nano templates/base.html
Edit the file with the highlighted code as follows:
<!doctype html>
<html lang="en">
  <head>
    <!-- Required meta tags -->
    <meta charset="utf-8">
    <meta name="viewport" content="width=device-width, initial-scale=1, shrink-to-fit=no">

    <!-- Bootstrap CSS -->
    <link rel="stylesheet" href="https://stackpath.bootstrapcdn.com/bootstrap/4.3.1/css/bootstrap.min.css" integrity="sha384-ggOyR0iXCbMQv3Xipma34MD+dH/1fQ784/j6cY/iJTQUOhcWr7x9JvoRxT2MZw1T" crossorigin="anonymous">

    <title>{% block title %} {% endblock %}</title>
  </head>
  <body>
    <nav class="navbar navbar-expand-md navbar-light bg-light">
        <a class="navbar-brand" href="{{ url_for('index')}}">FlaskNotes</a>
        <button class="navbar-toggler" type="button" data-toggle="collapse" data-target="#navbarNav" aria-controls="navbarNav" aria-expanded="false" aria-label="Toggle navigation">
            <span class="navbar-toggler-icon"></span>
        </button>
        <div class="collapse navbar-collapse" id="navbarNav">
            <ul class="navbar-nav">
            <li class="nav-item active">
                <a class="nav-link" href="#">About</a>
            </li>

            <li class="nav-item active">
                <a class="nav-link" href="{{ url_for('create') }}">New Note</a>
           </li>
            </ul>
        </div>
    </nav>
    <div class="container">
        {% for message in get_flashed_messages() %}
            <div class="alert alert-danger">{{ message }}</div>
        {% endfor %}
        {% block content %} {% endblock %}
    </div>

    <!-- Optional JavaScript -->
    <!-- jQuery first, then Popper.js, then Bootstrap JS -->
    <script src="https://code.jquery.com/jquery-3.3.1.slim.min.js" integrity="sha384-q8i/X+965DzO0rT7abK41JStQIAqVgRVzpbzo5smXKp4YfRvH+8abtTE1Pi6jizo" crossorigin="anonymous"></script>
    <script src="https://cdnjs.cloudflare.com/ajax/libs/popper.js/1.14.7/umd/popper.min.js" integrity="sha384-UO2eT0CpHqdSJQ6hJty5KVphtPhzWj9WO1clHTMGa3JDZwrnQq4sF86dIHNDz0W1" crossorigin="anonymous"></script>
    <script src="https://stackpath.bootstrapcdn.com/bootstrap/4.3.1/js/bootstrap.min.js" integrity="sha384-JjSmVgyd0p3pXB1rRibZUAYoIIy6OrQ6VrjIEaFf/nJGzIxFDsf4x0xIM+B07jRM" crossorigin="anonymous"></script>
  </body>
</html>
You add a new <li> item to the navigation bar with the url_for() function to link to the create() view function. With this, you can access the page for creating a new note from the navigation bar.
Run the development server if you haven’t already:
- flask run
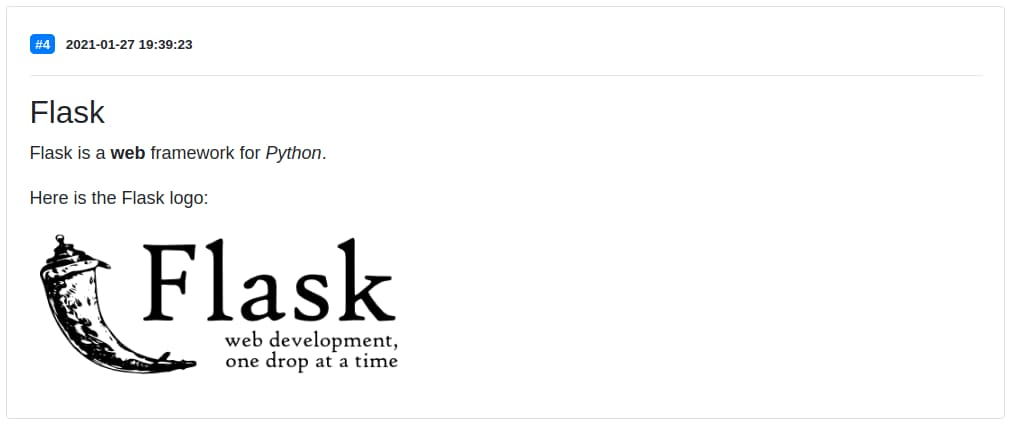
Use your browser to go to http://127.0.0.1:5000/create and add the following markdown note:
### Flask
Flask is a **web** framework for _Python_.
Here is the Flask logo:

This markdown contains an h3 heading, the word web in bold, the word Python in italic, and an image.
Submit the note, you will find that your application formats it into HTML.
You now have a new route that allows users to add new notes to the database. Users can take notes with Markdown formatting and the application will display the notes in HTML on the index page.
You can access the full code for the application from this repository.
Conclusion
You created a Flask application for taking notes in Markdown format to allow users to use text formatting such as headings, bold and italic text, adding images and links, among other things. You connected your application to a SQLite database to store and retrieve your data. You’ve incorporated Markdown text into HTML conversion so that notes will render on the page. To learn more about using Markdown in Python, read How To Use Python-Markdown to Convert Markdown Text to HTML.
For further information about Flask, check out the following tutorials:
Thanks for learning with the DigitalOcean Community. Check out our offerings for compute, storage, networking, and managed databases.
About the author
Web developer. I mostly use Python & JavaScript. I like Flask and I am currently learning React. You can say hi on Twitter :)
Still looking for an answer?
This textbox defaults to using Markdown to format your answer.
You can type !ref in this text area to quickly search our full set of tutorials, documentation & marketplace offerings and insert the link!
Hello! Thank you for writing this article. However, I do have one concern with this line (emphasis mine):
The
|safefilter allows the browser to render HTML code—if it was not applied, it will display the HTML as plain text. This is usually referred to as “escaping HTML,” which is a security feature that prevents malicious HTML from being interpreted in the browser that would result in a dangerous security vulnerability called cross-site scripting (XSS). Since the Python-Markdown library returns safe HTML, you can allow the browser to render it using the|safefilter.
As of 2024, as documented in this issue, Python-Markdown does not sanitize its input. I just confirmed this for myself - if you run user-specified text through markdown.markdown and then render the output directly with |safe without performing additional sanitization, users will be able to inject arbitrary HTML and javascript into the page content, creating a vector for dangerous stored XSS attacks. The best way to avoid this would be to both escape the user input before passing to markdown.markdown and to run the output through a selective sanitization library afterward to remove unexpected tags like script before rendering in the Flask template. For the latter case, bleach used to be the standard, but it has been deprecated - nh3 is newer, but it seems to be the preferred choice.
I would strongly urge you to update this article to more clearly warn about this possibility, and perhaps even suggest a library like nh3 for sanitizing the output. Thanks again!
 This work is licensed under a Creative Commons Attribution-NonCommercial- ShareAlike 4.0 International License.
Become a contributor for community
Get paid to write technical tutorials and select a tech-focused charity to receive a matching donation.

DigitalOcean Documentation
Full documentation for every DigitalOcean product.

Resources for startups and AI-native businesses
The Wave has everything you need to know about building a business, from raising funding to marketing your product.
The developer cloud
Scale up as you grow — whether you're running one virtual machine or ten thousand.

Start building today
From GPU-powered inference and Kubernetes to managed databases and storage, get everything you need to build, scale, and deploy intelligent applications.
