
Introduction
After setting up the bare minimum configuration for a new server, there are some additional steps that are highly recommended in most cases. In this guide, we’ll continue the configuration of our servers by tackling some recommended, but optional procedures.
Prerequisites and Goals
Before you start this guide, you should run through the Ubuntu 14.04 initial server setup guide. This is necessary in order to set up your user accounts, configure privilege elevation with sudo, and lock down SSH for security.
Once you have completed the guide above, you can continue with this article. In this guide, we will be focusing on configuring some optional but recommended components. This will involve setting our system up with a firewall, Network Time Protocol synchronization, and a swap files.
Configuring a Basic Firewall
Firewalls provide a basic level of security for your server. These applications are responsible for denying traffic to every port on your server with exceptions for ports/services you have approved. Ubuntu ships with a tool called ufw that can be used to configure your firewall policies. Our basic strategy will be to lock down everything that we do not have a good reason to keep open.
Before we enable or reload our firewall, we will create the rules that define the exceptions to our policy. First, we need to create an exception for SSH connections so that we can maintain access for remote administration.
The SSH daemon runs on port 22 by default and ufw can implement a rule by name if the default has not been changed. So if you have not modified SSH port, you can enable the exception by typing:
sudo ufw allow ssh
If you have modified the port that the SSH daemon is listening on, you will have to allow it by specifying the actual port number, along with the TCP protocol:
sudo ufw allow 4444/tcp
This is the bare minimum firewall configuration. It will only allow traffic on your SSH port and all other services will be inaccessible. If you plan on running additional services, you will need to open the firewall at each port required.
If you plan on running a conventional HTTP web server, you will need to allow access to port 80:
sudo ufw allow 80/tcp
If you plan to run a web server with SSL/TLS enabled, you should allow traffic to that port as well:
sudo ufw allow 443/tcp
If you need SMTP email enabled, port 25 will need to be opened:
sudo ufw allow 25/tcp
After you’ve finished adding the exceptions, you can review your selections by typing:
sudo ufw show added
If everything looks good, you can enable the firewall by typing:
sudo ufw enable
You will be asked to confirm your selection, so type “y” if you wish to continue. This will apply the exceptions you made, block all other traffic, and configure your firewall to start automatically at boot.
Remember that you will have to explicitly open the ports for any additional services that you may configure later. For more in-depth information, check out our article on configuring the ufw firewall.
Configure Timezones and Network Time Protocol Synchronization
The next step is to set the localization settings for your server and configure the Network Time Protocol (NTP) synchronization.
The first step will ensure that your server is operating under the correct time zone. The second step will configure your system to synchronize its system clock to the standard time maintained by a global network of NTP servers. This will help prevent some inconsistent behavior that can arise from out-of-sync clocks.
Configure Timezones
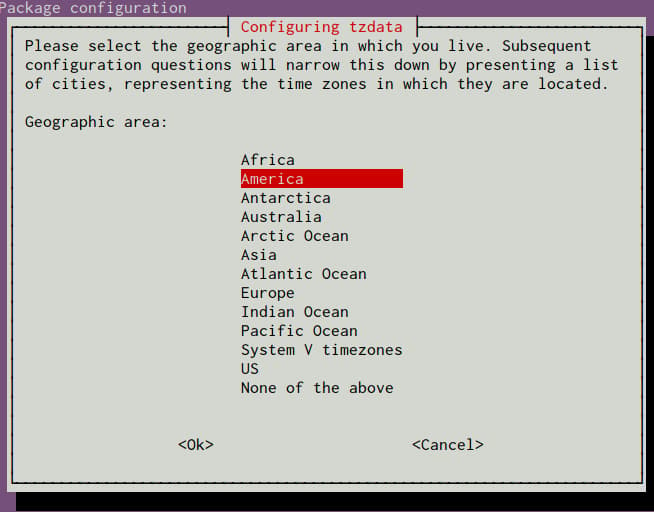
Our first step is to set our server’s timezone. This is a very simple procedure that can be accomplished by reconfiguring the tzdata package:
sudo dpkg-reconfigure tzdata
You will be presented with a menu system that allows you to select the geographic region of your server:
After selecting an area, you will have the ability to choose the specific time zone that is appropriate for your server:
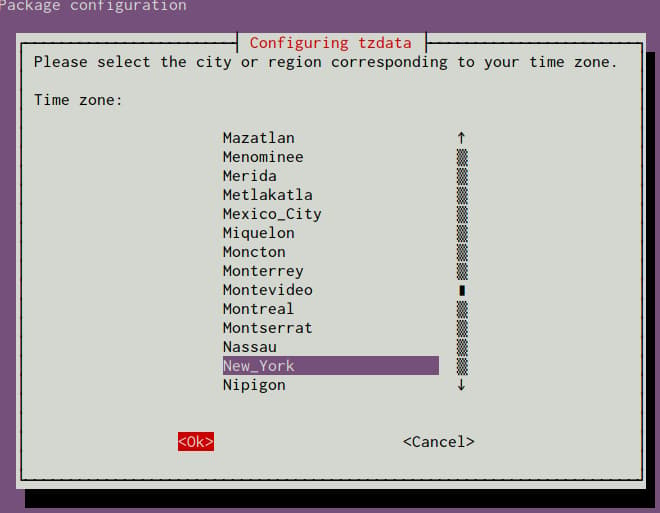
Your system will be updated to use the selected timezone, and the results will be printed to the screen:
Current default time zone: 'America/New_York'
Local time is now:      Mon Nov  3 17:00:11 EST 2014.
Universal Time is now:  Mon Nov  3 22:00:11 UTC 2014.
Next, we will move on to configure NTP.
Configure NTP Synchronization
Now that you have your timezone set, we should configure NTP. This will allow your computer to stay in sync with other servers, leading to more predictability in operations that rely on having the correct time.
For NTP synchronization, we will use a service called ntp, which we can install from Ubuntu’s default repositories:
sudo apt-get update
sudo apt-get install ntp
This is all that you have to do to set up NTP synchronization on Ubuntu. The daemon will start automatically each boot and will continuously adjust the system time to be in-line with the global NTP servers throughout the day.
Click here if you wish to learn more about NTP servers.
Create a Swap File
Adding “swap” to a Linux server allows the system to move the less frequently accessed information of a running program from RAM to a location on disk. Accessing data stored on disk is much slower than accessing RAM, but having swap available can often be the difference between your application staying alive and crashing. This is especially useful if you plan to host any databases on your system.
Note
Although swap is generally recommended for systems utilizing traditional spinning hard drives, using swap with SSDs can cause issues with hardware degradation over time. Due to this consideration, we do not recommend enabling swap on DigitalOcean or any other provider that utilizes SSD storage. Doing so can impact the reliability of the underlying hardware for you and your neighbors.
If you need to improve the performance of your server, we recommend upgrading your Droplet. This will lead to better results in general and will decrease the likelihood of contributing to hardware issues that can affect your service.
Advice about the best size for a swap space varies significantly depending on the source consulted. Generally, an amount equal to or double the amount of RAM on your system is a good starting point.
Allocate the space you want to use for your swap file using the fallocate utility. For example, if we need a 4 Gigabyte file, we can create a swap file located at /swapfile by typing:
sudo fallocate -l 4G /swapfile
After creating the file, we need to restrict access to the file so that other users or processes cannot see what is written there:
sudo chmod 600 /swapfile
We now have a file with the correct permissions. To tell our system to format the file for swap, we can type:
sudo mkswap /swapfile
Now, tell the system it can use the swap file by typing:
sudo swapon /swapfile
Our system is using the swap file for this session, but we need to modify a system file so that our server will do this automatically at boot. You can do this by typing:
sudo sh -c 'echo "/swapfile none swap sw 0 0" >> /etc/fstab'
With this addition, your system should use your swap file automatically at each boot.
Where To Go from Here?
You now have a very decent beginning setup for your Linux server. From here, there are quite a few places you can go. First, you may wish to snapshot your server in its current configuration.
Take a Snapshot of your Current Configuration
If you are happy with your configuration and wish to use this as a base for future installations, you can take a snapshot of your server through the DigitalOcean control panel. Starting in October of 2016, snapshots cost $0.05 per gigabyte per month, based on the amount of utilized space within the filesystem.
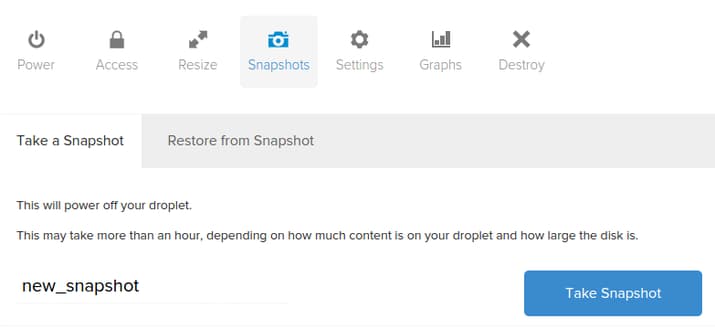
To prepare for the snapshot, shutdown your server from the command line. Although it is possible to take a snapshot of a running system, powering down leads to better guarantees that the filesystem will be consistent:
sudo poweroff
Now, in the DigitalOcean control panel, you can take a snapshot by visiting the “Snapshots” tab of your server:
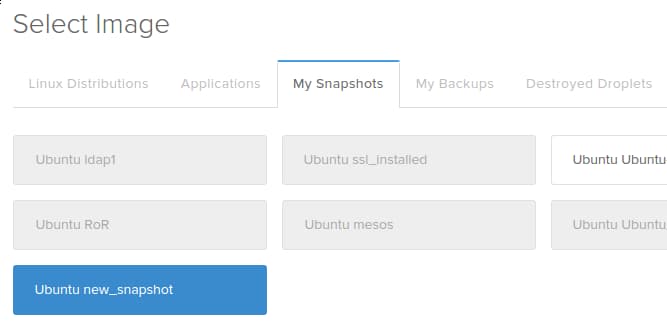
After taking your snapshot, you will be able to use that image as a base for future installations by selecting the snapshot from the “My Snapshots” tab for images during the creation process:
Additional Resources and Next Steps
From here, your path depends entirely on what you wish to do with your server. The list of guides below is in no way exhaustive, but represents some of the more common configurations that users turn to next:
- Setting up a LAMP (Linux, Apache, MySQL/MariaDB, PHP) stack
- Setting up a LEMP (Linux, Nginx, MySQL/MariaDB, PHP) stack
- Installing the WordPress CMS on an Apache web server
- Installing the WordPress CMS on an Nginx web server
- Installing the Drupal CMS on an Apache web server
- Installing Node.js
- Installing Ruby on Rails and RVM
- Installing Laravel, a PHP framework
- Installing Puppet to manage your infrastructure
Conclusion
By this point, you should know how to configure a solid foundation for your new servers. Hopefully, you also have a good idea for your next steps. Feel free to explore the site for more ideas that you can implement on your server.
Thanks for learning with the DigitalOcean Community. Check out our offerings for compute, storage, networking, and managed databases.
Tutorial Series: New Ubuntu 14.04 Server Checklist
When creating a new Ubuntu 14.04 server, there are some basic steps that you should take to ensure that your server is secure and configured properly. This tutorial series covers connecting to your server and general security best practices, and provides links to articles that will help you start running your own web server or application.
Browse Series: 2 tutorials
About the author
Former Senior Technical Writer at DigitalOcean, specializing in DevOps topics across multiple Linux distributions, including Ubuntu 18.04, 20.04, 22.04, as well as Debian 10 and 11.
Still looking for an answer?
This textbox defaults to using Markdown to format your answer.
You can type !ref in this text area to quickly search our full set of tutorials, documentation & marketplace offerings and insert the link!
Should it not be sudo chmod 600 /swapfile rather than sudo chown 600 /swapfile ?
This comment has been deleted
If you want to use NTP Syncronization you should enable port 123 in the firewall:
sudo ufw allow 123/tcp
per https://www.digitalocean.com/community/tutorials/how-to-set-up-time-synchronization-on-ubuntu-12-04
if I have changed my default ssh port … and added a rule in ufw for the new port, should i then dissallow access to the default ssh port ?
I get this, what happened and how to solve it?
sudo dpkg-reconfigure tzdata
perl: warning: Setting locale failed.
perl: warning: Please check that your locale settings:
	LANGUAGE = (unset),
	LC_ALL = (unset),
	LC_CTYPE = "UTF-8",
	LANG = "en_US.UTF-8"
    are supported and installed on your system.
perl: warning: Falling back to the standard locale ("C").
locale: Cannot set LC_CTYPE to default locale: No such file or directory
locale: Cannot set LC_ALL to default locale: No such file or directory
/usr/bin/locale: Cannot set LC_CTYPE to default locale: No such file or directory
/usr/bin/locale: Cannot set LC_ALL to default locale: No such file or directory

Current default time zone: 'Asia/Taipei'
Local time is now:      Mon Dec 29 14:21:43 CST 2014.
Universal Time is now:  Mon Dec 29 06:21:43 UTC 2014.
Some people might find (I did) imposible to create a swap file if running on a VPS.
Command swapon returns an error: “swapon: swap: swapon failed: Operation not permitted”
If your “swapon” is not responding, this might be the cause.
I am running Ubuntu 14.04 on a VPS provided by OVH, an european-based international ISP. Turns out that some of the virtualized operating systems ISPs use are modified to automatically provide swap memory (in my case, swap = 1/8 RAM). They also prevent root user from creating its own swap memory files.
When I run free -m i can see I had 128MB of swap memory from the very beginning.
total used free shared buffers cached
Mem: 1024 325 698 2 0 285 -/+ buffers/cache: 39 984 Swap: 128 0 128
This is an obvious shortcoming.
Hello,
I’m thinking about using your great services! However, I wonder if this guide trilogy is almost enough to deploy a normal local store Wordpress website, (just talking about the server mantainment). I would also use Cloudflare to stop spam and ddos attacks.
I mean, apart from updating packages, I’m worried about security, and any other kind of configuration not explained here. Are this firewall settings enough for the most common attacks? Should I take a special consideration on admin pages apart from SSL certificates?
Because, the fact that having my own VPS is great, and I know the Linux basics and I think I can configure my server! but I’m not server admin, so I’m not sure if my website will be a lot more naked than other managed servers (bluehost, etc)
Hi, I get a “Operation not permitted” on swapon, does it important ? how to fix it
me@vps:~$ sudo fallocate -l 4G /swapfile me@vps:~$ sudo chmod 600 /swapfile me@vps:~$ sudo mkswap /swapfile Setting up swapspace version 1, size = 4194300 KiB no label, UUID=468432d3-ea0d-4502-b326-ac101044c914 me@vps:~$ sudo swapon /swapfile swapon: /swapfile: swapon failed: Operation not permitted
Thkx
 This work is licensed under a Creative Commons Attribution-NonCommercial- ShareAlike 4.0 International License.
Become a contributor for community
Get paid to write technical tutorials and select a tech-focused charity to receive a matching donation.

DigitalOcean Documentation
Full documentation for every DigitalOcean product.

Resources for startups and AI-native businesses
The Wave has everything you need to know about building a business, from raising funding to marketing your product.
The developer cloud
Scale up as you grow — whether you're running one virtual machine or ten thousand.

Start building today
From GPU-powered inference and Kubernetes to managed databases and storage, get everything you need to build, scale, and deploy intelligent applications.
