
Introduction
In this part of the tutorial, we will deploy our example PHP application, WordPress, and a private DNS:
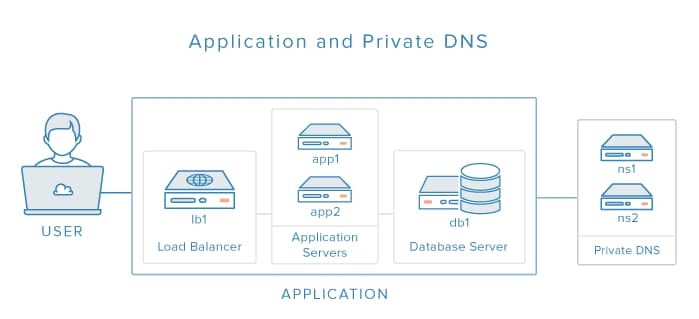
Your users will access your application over HTTPS via a domain name, e.g. “https://www.example.com”, that points to the load balancer. The load balancer will act as a reverse proxy to the application servers, which will connect to the database server. The private DNS will enable us to use names to refer to the private network addresses of our servers which ease the process of configuration of our servers.
We will set up the components that we just discussed on six servers, in this order:
- Private DNS (ns1 and ns2)
- Database Server (db1)
- Application Servers (app1 and app2)
- Load Balancer (lb1)
Let’s get started with the DNS setup.
Private DNS Servers
Using names for addresses helps with identifying the servers you are working with and becomes essential for the maintenance of a larger server setup, as you can replace a server by simply updating your DNS records (in a single place) instead of updating countless configuration files with IP addresses. In our setup, we will set up our DNS so we can reference the private network addresses of our servers by name instead of IP address.
We will refer to the private network address of each server by a hostname under the “nyc3.example.com” subdomain. For example, the database server’s private network address would be “db1.nyc3.example.com”, which resolves to it’s private IP address. Note that the example subdomain is almost completely arbitrary, and is usually chosen based on logical organization purposes; in our case, we “nyc3” indicates that the servers are in the NYC3 datacenter, and “example.com” is our application’s domain name.
Set this up by following this tutorial, and adding DNS records for each server in your setup:
After completing the DNS tutorial, you should have two BIND servers: ns1 and ns2. If you already know the private IP addresses of all of the servers in your setup, add them to your DNS now; otherwise, add the appropriate DNS records as you create your servers.
Now we’re ready to set up our database server.
Set Up Database Server
Because we want to load balance the our application servers, i.e. the ones running Apache and PHP, we need to decouple the database from the application servers by setting it up on a separate server. Decoupling the database from the application is an essential step before horizontally scaling many types of applications, as explained in this blog post: Horizontally Scaling PHP Applications: A Practical Overview.
This section covers all of the necessary steps to set up our database server, but you can learn more about setting up a remote, decoupled MySQL database server for a PHP application in this tutorial: How To Set up a Remote MySQL Database.
Install MySQL
On the database server, db1, install MySQL Server:
- sudo apt-get update
- sudo apt-get -y install mysql-server
Enter your desired MySQL root password at the prompt.
Now run:
- sudo mysql_install_db
- sudo mysql_secure_installation
You will have to enter the MySQL administrator’s password that you set in the steps above. Afterwards, it will ask if you want to change that password. Type “N” for no if you’re happy with your current password. Answer the rest of the questions with the defaults.
Configure MySQL to Listen on Private Network Interface
Open the MySQL configuration file:
- sudo vi /etc/mysql/my.cnf
Find the bind-address setting, and change it to the address of the private network address of your database server:
bind-address = db1.nyc3.example.com
Save and exit.
Restart MySQL:
- sudo service mysql restart
Set Up Database and Database Users
Now we need to create the database and database users that the application servers will use to connect.
Enter the MySQL console:
- mysql -u root -p
Enter the MySQL root password at the prompt.
At the MySQL prompt, create the database for your application:
- CREATE DATABASE app;
MySQL associates its users to the servers that they should be connecting from. In our case, we have two application servers that will be connecting, so we should make a user for each of them. Create a database user, “appuser” in our example, that can be connected to from private network address of each of your application servers (app1 and app2). You should use the same password for each user:
- CREATE USER 'appuser'@'app1.nyc3.example.com' IDENTIFIED BY 'password';
- CREATE USER 'appuser'@'app2.nyc3.example.com' IDENTIFIED BY 'password';
We will configure the final database user privileges later, but let’s give appuser full control over the app database:
- GRANT ALL PRIVILEGES ON app.* TO 'appuser'@'app1.nyc3.example.com';
- GRANT ALL PRIVILEGES ON app.* TO 'appuser'@'app2.nyc3.example.com';
- FLUSH PRIVILEGES;
These relaxed privileges ensure that the application’s installer will be able to install the application in the database. If you have more than two application servers, you should create all the necessary database users now.
Exit the MySQL prompt now:
- exit
The database server setup is complete. Let’s set up the application servers.
Set Up Application Servers
The application servers will run the code of our application, which will connect to the database server. Our example application is WordPress, which is a PHP application that is served through a web server such as Apache or Nginx. Because we want to load balance the application servers, we will set up two identical ones.
This section covers all of the necessary steps to set up our application servers, but the topic is covered in detail in the following tutorial, starting from the Set Up the Web Server section: How To Set Up a Remote Database.
Install Apache and PHP
On both application servers, app1 and app2, install Apache and PHP:
- sudo apt-get update
- sudo apt-get -y install apache2 php5-mysql php5 libapache2-mod-php5 php5-mcrypt
Configure Apache
We will be using HAProxy, on the load balancer server, to handle SSL termination, so we don’t want our users accessing the application servers directly. As such, we will bind Apache to each server’s private network address.
On each application server, app1 and app2, open your Apache ports configuration file. By default, this is the ports.conf file:
- sudo vi /etc/apache2/ports.conf
Find the line that says Listen 80, and add your private IP address to it, like so (substitute in the actual IP address of your server):
Listen private_IP:80
Save and exit. This configures Apache to listen only on the private network interface, which means it cannot be accessed by the public IP address or hostname.
Restart Apache to put the changes into effect:
- sudo service apache2 restart
Apache is now accessible via only the private network address of your application servers. We will configure the load balancer to send user requests here, in a moment.
Download and Configure Application
In our example, we are using WordPress as our application. If you are using a different PHP application, download it and perform any relevant configuration (e.g. database connection information), then skip to the next section.
On the first application server, app1, download the WordPress archive:
- cd ~
- wget http://wordpress.org/latest.tar.gz
Extract the WordPress archive:
- tar xvf latest.tar.gz
Change to the extracted directory:
- cd wordpress
WordPress needs a directory to be created for its uploads, wp-content/uploads. Let’s do that now:
- mkdir wp-content/uploads
We will use the sample WordPress configuration file as a template. Copy it to the proper location:
- cp wp-config-sample.php wp-config.php
Now open the configuration file for editing:
- vi wp-config.php
Configure the WordPress database connection by changing the highlighted information in the following lines:
/** The name of the database for WordPress */
define('DB_NAME', 'app');

/** MySQL database username */
define('DB_USER', 'appuser');

/** MySQL database password */
define('DB_PASSWORD', 'password');

/** MySQL hostname */
define('DB_HOST', 'db1.nyc3.example..com');
Because we are going to use TLS/SSL encryption on the load balancer server, we must add the following lines so WordPress will be aware that it is behind a reverse proxy that is using SSL:
define('FORCE_SSL_ADMIN', true);
if ($_SERVER['HTTP_X_FORWARDED_PROTO'] == 'https')
       $_SERVER['HTTPS']='on';
You will also want to update the keys and salts, so you can invalidate cookies when you want. We won’t cover this here but make sure that they are identical on all of your application servers.
Save and exit.
WordPress is now configured, but its files must be copied to the proper location to be served by our web server software.
Copy Application Files to Document Root
Now that we have our application configured, we need to copy it into Apache’s document root, where it can be served to visitors of our website.
The default location of Apache’s DocumentRoot is /var/www/html, so we will use that in our example.
First, delete the default index.html file:
- sudo rm /var/www/html/index.html
Then use rsync to copy the WordPress files to /var/www/html, and make www-data (the user that Apache runs as) the owner:
- sudo rsync -avP ~/wordpress/ /var/www/html
- sudo chgrp -R www-data /var/www/html/*
Our first application server, app1, is ready. We will set up the other application server.
Replicate Application Files to Other Servers
In order to keep your application’s files consistent across your various application servers, you should set up file replication of your web server’s document root. In the case of WordPress, using the web interface to upload files and install plugins will store the files on the particular server that processes the request. If these files are not replicated to all of your application servers, some of your users will be served pages with missing images and broken plugins. If your PHP application is not WordPress and does not store any of its data (e.g. uploaded files or downloaded plugins) on the application server, you can just copy the application files manually, once. If this is the case, use rsync to copy your application files from app1 to app2.
GlusterFS can be used to create a replicated volume of the necessary files, and it is demonstrated in the Synchronize Web Application Files section of this tutorial: How To Use HAProxy as a Load Balancer for WordPress Application Servers. Follow the instructions (skip the Edit Hosts File section, as our DNS takes care of that) and set up replication between app1 and app2.
Once your replication is set up properly, both of your application servers should be configured properly. Let’s set up our load balancer now.
Set Up Load Balancer Server
Our load balancer server will run HAProxy, which will serve as a reverse proxy load balancer for our application servers. Your users will access your application through the the load balancer server via a URL such as https://www.example.com.
This section covers all of the necessary steps to set up our load balancer server, but the subject is covered in detail in the following tutorials:
- How To Use HAProxy As A Layer 7 Load Balancer For WordPress and Nginx On Ubuntu 14.04
- How To Implement SSL Termination With HAProxy on Ubuntu 14.04:
Copy SSL Certificate
Perform these steps on the load balancer server, lb1.
In the directory that contains your SSL certificate (one of the prerequisites from the part 1), combine your certificate, any intermediate CA certificate, and your certificate’s key into a single .pem file. For example (our certs are in /root/certs:
- cd /root/certs
- cat www.example.com.crt CAintermediate.ca-bundle www.example.com.key > www.example.com.pem
Then copy the pem file to /etc/ssl/private:
- sudo cp www.example.com.pem /etc/ssl/private/
- ```
-
- This file will be used by HAProxy for SSL termination.
-
- ### Install HAProxy
-
- On the load balancer server, **lb1**, install HAProxy:
-
- ```command
- sudo add-apt-repository ppa:vbernat/haproxy-1.5
- sudo apt-get update
- sudo apt-get -y install haproxy
- ```
-
- Now let's configure HAProxy.
-
- ### HAProxy Configuration
-
- We need to configure HAProxy with some reasonable settings, SSL termination, and the appropriate frontends and backends to make it work with our application servers.
-
- Open the HAProxy configuration file for editing:
-
- ```command
- sudo vi /etc/haproxy/haproxy.cfg
- ```
-
- #### HAProxy Configuration: General Settings
-
- The first thing you will want to do is set maxconn to a reasonable number. This setting affects how many concurrent connections HAProxy will allow, which can affect QoS and prevent your web servers from crashing from trying to serve too many requests. You will need to play around with it to find what works for your environment. Add the following line (with a value you think is reasonable) to the global section of the configuration:
-
- ```
- [label haproxy.cfg — maxconn]
- maxconn 2048
- ```
-
- Add this line, to configure the maximum size of temporary DHE keys that are generated:
-
- ```
- [label haproxy.cfg — tune.ssl.default-dh-param]
- tune.ssl.default-dh-param 2048
- ```
-
- Next, in the defaults section, add the following lines under the line that says mode http:
-
- ```
- [label haproxy.cfg ]
- option forwardfor
- option http-server-close
- ```
-
- If you would like to enable the HAProxy stats page, add the following lines in the defaults section (substitute user and password with secure values):
-
- ```
- [label haproxy.cfg ]
- stats enable
- stats uri /stats
- stats realm Haproxy\ Statistics
- stats auth user:password
- ```
-
- This will allow you to look at the HAProxy stats page by going to your domain on /stats (e.g. "https://www.example.com/stats").
-
- Do not close the config file yet! We will add the proxy configuration next.
-
- #### HAProxy Configuration: Proxies
-
- The first thing we want to add is a frontend to handle incoming HTTP connections. At the end of the file, let's add a frontend called www-http:
-
- ```
- frontend www-http
- bind www.example.com:80
- reqadd X-Forwarded-Proto:\ http
- default_backend app-backend
- ```
-
- The purpose of this frontend is to accept HTTP connections so they can be redirected to HTTPS.
-
- Now add a frontend to handle the incoming HTTPS connections. Make sure to specify the appropriate `pem` certificate:
-
- ```
- frontend www-https
- bind www.example.com:443 ssl crt /etc/ssl/private/www.example.com.pem
- reqadd X-Forwarded-Proto:\ https
- default_backend app-backend
- ```
-
- After you are finished configuring the frontends, continue adding your backend by adding the following lines:
-
- ```
- backend app-backend
- redirect scheme https if !{ ssl_fc }
- server app1 app1.nyc3.example.com:80 check
- server app2 app2.nyc3.example.com:80 check
- ```
-
- This backend specifies which application servers to send the load balanced traffic to. Also, the `redirect scheme https` line tells it to redirect HTTP connections to HTTPS.
-
- Now save and exit haproxy.cfg. HAProxy is now ready to be started, but let's enable logging first.
-
- ### Enable HAProxy Logging
-
- Open the rsyslog configuration file:
-
- ```command
- sudo vi /etc/rsyslog.conf
- ```
-
- Then find the following lines and uncomment them to enable UDP syslog reception. It should look like the following when you're done:
-
-
- ```
- [label /etc/rsyslog.conf]
- $ModLoad imudp
- $UDPServerRun 514
- $UDPServerAddress 127.0.0.1
- ```
-
- Now restart rsyslog to enable the new configuration:
-
- ```
- sudo service rsyslog restart
- ```
-
- HAProxy logging is is now enabled! The log file will be created at `/var/log/haproxy.log` once HAProxy is started.
-
- ### Restart HAProxy
-
- Restart HAProxy to put the changes into effect:
-
- ```command
- sudo service haproxy restart
- ```
-
- Our load balancer is now set up.
-
- Now we need to run the application's install script.
-
- ## Install WordPress
-
- We must run the WordPress installation script, which prepares the database for its use, before we can use it.
-
- Open your site in a web browser:
-
- ```
- [secondary_label Open in a Web Browser]
- https://www.example.com/wp-admin/install.php
- ```
-
- This will display the WordPress installation screen. Fill out the forms and click the **Install WordPress** button.
-
- After WordPress installs, the application is ready to be used.
-
- ## Conclusion
-
- The servers that comprise your application are now set up, and your application is ready to be used. You may log in as the admin user, and your users may access the site over HTTPS via the proper domain name.
-
- Be sure to test out your application and make sure that it works as expected before moving on.
-
- Continue to the next tutorial to start working on the recovery plan for your production application setup: [Building for Production: Web Applications — Recovery Planning](https://www.digitalocean.com/community/tutorials/building-for-production-web-applications-recovery-planning).
Thanks for learning with the DigitalOcean Community. Check out our offerings for compute, storage, networking, and managed databases.
Tutorial Series: Building for Production: Web Applications
This 6-part tutorial will show you how to build out a multi-server production application setup from scratch. The final setup will be supported by backups, monitoring, and centralized logging systems, which will help you ensure that you will be able to detect problems and recover from them. The ultimate goal of this series is to build on standalone system administration concepts, and introduce you to some of the practical considerations of creating a production server setup.
About the author
Software Engineer @ DigitalOcean. Former Señor Technical Writer (I no longer update articles or respond to comments). Expertise in areas including Ubuntu, PostgreSQL, MySQL, and more.
Still looking for an answer?
 This work is licensed under a Creative Commons Attribution-NonCommercial- ShareAlike 4.0 International License.
Become a contributor for community
Get paid to write technical tutorials and select a tech-focused charity to receive a matching donation.

DigitalOcean Documentation
Full documentation for every DigitalOcean product.

Resources for startups and AI-native businesses
The Wave has everything you need to know about building a business, from raising funding to marketing your product.
The developer cloud
Scale up as you grow — whether you're running one virtual machine or ten thousand.

Start building today
From GPU-powered inference and Kubernetes to managed databases and storage, get everything you need to build, scale, and deploy intelligent applications.
