
Introduction
After getting your application server up and running, an important next step is to set up a backup system. A backup system will allow you to create periodic backup copies of your data, and restore data from those backups. As data can be lost due to user error or the eventual hardware failure that any computer system is prone to, you will want set up backups as a safety net.
This tutorial will show you how to create proper backups of a PHP application, running a LAMP stack on a single Ubuntu 14.04 server, by using a separate backups server that is running Bacula. One of the benefits of using a backup system like Bacula is that it gives you full control of what should be backed up and restored, at the individual file level, and the schedule of when the backups should be created. Having file-level granularity when creating backups allows us to limit our backup selections to only the files that are needed, which will save disk space compared to backing up the entire filesystem.
If this seems excessive to you, you may want to consider DigitalOcean Droplet Backups (snapshot backups of your entire Droplet), which must be enabled when you create your Droplet. These backups are easy to set up and may be sufficient for your needs if you only require weekly backups. If you opt for DigitalOcean Backups, be sure to set up hot backups of your database by following the Create Hot Backups of Your Database section—this is necessary to ensure that your database backups will be consistent (usable).
Prerequisites
This tutorial assumes that you are running a PHP application, such as WordPress, that is running on a LAMP (Linux, Apache, MySQL/MariaDB, and PHP) stack on a single Ubuntu 14.04 server, with private networking enabled. We will refer to this as the LAMP server. For our example, we will be creating backups of a WordPress server that was created by following these tutorials:
If you are running a different PHP application, or using Nginx instead of Apache, this tutorial will still work fine assuming that you make any necessary adjustments to your backup selection.
Of course, you will need sudo access to a server that the Bacula server software will be installed on, which we’ll refer to as the backups server. Ideally, it will be in the same data center as your LAMP server, and have private networking enabled. The backups that are created will live on this server, so it will need enough disk space to store multiple copies of your backup selection.
Backup Selection
As mentioned in the introduction, our backup selection—the files that will be copied every time a backup is created—will consist only of the files that are necessary to restore your application to a previous state. In short, this means we will backup the following data:
- PHP Application Files: This will be the DocumentRoot of your web server. On Ubuntu, this will be
/var/www/htmlby default - MySQL Database: While the MySQL data files are typically stored in
/var/lib/mysql, we must create a hot backup of the database in another location. The hot backups will be part of our backup selection
As a matter of convenience, we will also include the Apache and MySQL configuration files in our backup selection. If you have any other important files, such as SSL key and certificate files, be sure to include those too.
The rest of the files on the server can be replaced by following the software installation steps of the initial setup. In the case of a server failure, we could create a replacement LAMP server by following the prerequisite tutorials then restoring the backups, and restarting the appropriate services.
If you are not sure why we are including the aforementioned files in the backup selection, check out the Recovery Planning segment of the multi-part Building for Production: Web Applications tutorial series. It describes how a recovery plan can be developed for a web application, using a multi-server setup as its example.
Let’s set up the hot backups of our database.
Create Hot Backups of Database
To ensure that we produce consistent (i.e. usable) backups of our active database, special care must be taken. A simple and effective way to create hot backups with MySQL is to use Percona XtraBackup.
Install Percona XtraBackup
On your LAMP server, install and configure Percona XtraBackup by following this tutorial: How To Create Hot Backups of MySQL Databases with Percona XtraBackup on Ubuntu 14.04. Stop when you reach the Perform Full Hot Backup section.
Create XtraBackup Script
Percona XtraBackup is ready to create hot backups of your MySQL database, which will ultimately be backed up by Bacula (or DigitalOcean Backups), but the hot backups must be scheduled somehow. We will set up the simplest solution: a bash script and a cron job.
Create a bash script called run_extra_backup.sh in /usr/local/bin:
- sudo vi /usr/local/bin/run_xtrabackup.sh
Add the following script. Be sure to substitute the user and password with whatever you set up when you installed XtraBackup:
#!/bin/bash

# pre xtrabackup
chown -R mysql: /var/lib/mysql
find /var/lib/mysql -type d -exec chmod 770 "{}" \;

# delete existing full backup
rm -r /data/backups/full

# xtrabackup create backup
innobackupex --user=bkpuser  --password=bkppassword --no-timestamp /data/backups/full

# xtrabackup prepare backup
innobackupex --apply-log /data/backups/full
Save and exit. Running this script (with superuser privileges) will delete the existing XtraBackup backup at /data/backups/full and create a new full backup. In short, this script will maintain a single copy of the hot backup of the database. More details about creating backups with XtraBackup can be found in the Perform Full Hot Backup section of the of the XtraBackup tutorial.
Make the script executable:
- sudo chmod +x /usr/local/bin/run_xtrabackup.sh
In order to properly backup our database, we must run (and complete) the XtraBackup script before Bacula tries to backup the database. A good solution is to configure your Bacula backup job to run the script as a “pre-backup script”, but we will opt to use a cron job to keep it simple.
Create a cron configuration file (files in /etc/cron.d get added to root’s crontab):
- sudo vi /etc/cron.d/xtrabackup
Add the following cron job:
30 22 * * * root /usr/local/bin/run_xtrabackup.sh
This schedules the script to run as root every day at 10:30pm (22nd hour, 30th minute). We chose this time because Bacula’s default backup job is scheduled to run at 11:05pm daily—we will discuss adjusting this later. This allows 35 minutes for the XtraBackup script to complete.
Now that the database hot backups are set up, let’s install Bacula on our backups server.
Install Bacula on Backups Server
On your backups server, set up Bacula server by following this tutorial: How To Install Bacula Server on Ubuntu 14.04.
Then follow the Organize Bacula Director Configuration (Server) section of this tutorial: How To Back Up an Ubuntu 14.04 Server with Bacula. You will need the Director Name when setting up the Bacula clients (on the servers you want to back up). Stop when you reach the Install and Configure Bacula Client section.
Note that we will be using the RemoteFile pool for all of the backups jobs that we will be setting up. With that said, you may want to change some of the settings before proceeding.
Install Bacula Client on LAMP Server
On your LAMP server, install the Bacula client by following the Install and Configure Bacula Client section of this tutorial: How To Back Up an Ubuntu 14.04 Server with Bacula. Stop when you reach the Add FileSets (Server) section.
Note that you will need the FileDaemon Name (usually the hostname appended by “-fd”) and the Director Password (the password that the Bacula server will use to connect to the Bacula client) from the bacula-fd.conf file on the LAMP server.
Add Backup Client to Backups Server
On your backups server, the Bacula server, add a Client resource for the LAMP server to the /etc/bacula/conf.d/clients.conf file.
Open the clients.conf file:
- sudo vi /etc/bacula/conf.d/clients.conf
The Client resource definition for the LAMP server should look something like the following code block. Note that the value of Name should match the the Name of the FileDaemon resource and the Password should match the Password of the Director resource, on the LAMP server—these values can be found in /etc/bacula/bacula-fd.conf on the LAMP server:
Client {
  Name = lamp-fd
  Address = lamp_private_IP_or_hostname
  FDPort = 9102
  Catalog = MyCatalog
  Password = "PDL47XPnjI0QzRpZVJKCDJ_xqlMOp4k46"          # password for Remote FileDaemon
  File Retention = 30 days            # 30 days
  Job Retention = 6 months            # six months
  AutoPrune = yes                     # Prune expired Jobs/Files
}
Save and exit. This configures the Bacula Director, on the backups server, to be able to connect to the Bacula client on each server…
More details about this section can be found in the Install and Configure Bacula Client in the How To Back Up an Ubuntu Server with Bacula tutorial.
Now let’s configure the Bacula backup FileSets.
Configure Bacula FileSets
Bacula will create backups of files that are specified in the FileSets that are associated with the backup Jobs that will be executed. This section will cover creating FileSets that include the files that we determined to be part of our backup selection, earlier. More details about adding FileSets to Bacula can be found in the Add FileSets (Server) section of the Bacula tutorial.
On your backups server, open the filesets.conf file:
- sudo vi /etc/bacula/conf.d/filesets.conf
The required backups for our LAMP server, according to our backup selection, include:
- PHP Application Files:
/var/www/html - MySQL database:
/data/backups/full— full hot backup is created daily at 10:30pm by our XtraBackup script
We will also include the following files, for convenience:
- MySQL configuration:
/etc/mysql - Apache configuration:
/etc/apache2 - XtraBackup script:
/usr/local/bin/run_xtrabackup.sh - XtraBackup cron file:
/etc/cron.d/xtrabackup
With our backup selection in mind, we will add the following FileSet to our Bacula configuration:
FileSet {
  Name = "LAMP Files"
  Include {
    Options {
      signature = MD5
      compression = GZIP
    }
    File = /var/www/html
    File = /data/backups
    File = /etc/mysql
    File = /etc/apache2
    File = /usr/local/bin/run_xtrabackup.sh
    File = /etc/cron.d/xtrabackup
  }
  Exclude {
    File = /data/backups/exclude
  }
}
Save and exit. Note that all of the highlighted File directives are in the Include block. Those are the all of the files that we want to back up. If you want to exclude any files from the backup job, ones that exist within included directories, add them to the Exclude block.
Now our FileSet is configured. Let’s move on to the creating the Bacula backup job that will use this FileSet.
Create Bacula Backup Job
We will create Bacula backup job that will run and create backups of our LAMP server.
Create a jobs.conf file in /etc/bacula/conf.d:
- sudo vi /etc/bacula/conf.d/jobs.conf
LAMP Server Backup Job
For our LAMP server backup job, we will create a new job named “Backup LAMP”. The important thing here is that we specify the correct Client (lamp-fd) and FileSet (LAMP Files):
Job {
  Name = "Backup LAMP"
  JobDefs = "DefaultJob"
  Client = lamp-fd
  Pool = RemoteFile
  FileSet="LAMP Files"
}
Save and exit.
Now our backup job is configured. The last step is to restart the Bacula Director.
Restart Bacula Director
On the backups server, restart the Bacula Director to put all of our changes into effect:
- sudo service bacula-director restart
At this point, you will want to test your client connection and backup job, both of which are covered in the How To Back Up a Server with Bacula tutorial. That tutorial also covers how to restore Bacula backups. Note that restoring the MySQL database will require you to follow the Perform Backup Restoration step in the Percona XtraBackup Tutorial.
Review Backups Schedule
The Bacula backups schedule can be adjusted by modifying the Bacula Director configuration (/etc/bacula/bacula-dir.conf). The backup job that we created uses the “DefaultJob” JobDef, which uses the “WeeklyCycle” schedule, which is defined as:
- Full backup on the first Sunday of a month at 11:05pm
- Differential backups on all other Sundays at 11:05pm
- Incremental backups on other days, Monday through Saturday, at at 11:05pm
You can verify this by using the Bacula console to check the status of the Director. It should output all of your scheduled jobs:
Director Status — Scheduled JobsScheduled Jobs:
Level          Type     Pri  Scheduled          Name               Volume
===================================================================================
Incremental    Backup    10  20-May-15 23:05    BackupLocalFiles   MyVolume
Incremental    Backup    10  20-May-15 23:05    Backup lamp         Remote-0002
Feel free to add or adjust the schedule of any of your backup jobs. If you want your backups to be a bit more flexible, it would be prudent to separate the database backups from everything else. This way, you could modify the schedule of the application files backup job to occur at the same time that the Percona XtraBackup script is executed (10:30pm), and backup the hot backup of the database (produced by XtraBackup) when it is finished being prepared. This will reduce the chances of the application and database backups from being inconsistent with each other.
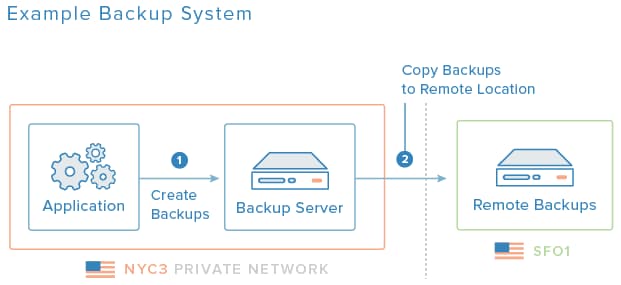
Set Up Remote Backups (Optional)
If you want to, you can create a remote server that will store copies of your Bacula backups. This remote server should be in a geographically separate region so you will have a copy of your critical backups even if there is a disaster in your production data center. For example, if your LAMP and backups servers are in New York, you could use DigitalOcean’s San Francisco (SFO1) region for your remotebackups server.
We will explain a simple method to send our backups from our backups server to our remotebackups server using public SSH keys, rsync, and cron.
On the remotebackups server, create a user that will be used for the rsync login.
Next, on the backups server, generate a password-less SSH key pair as root. Install the public key on the remotebackups user that you just created. This is covered in our How To Set Up SSH Keys tutorial.
On the backups server, write up an rsync command that copies the Bacula backup data (/bacula/backup) to somewhere on the remotebackups server. Rsync usage is covered in our How To Use Rsync tutorial. The command will probably look something like this:
- rsync -az /bacula/backup remoteuser@remotebackups_public_hostname_or_IP:/path/to/remote/backup
Add the command to a script, such as /usr/local/bin/rsync_backups.sh and make it executable.
Lastly, you will want to set up a cron job that runs the rsync_backups.sh script as root, after the Bacula backups jobs usually complete. This is covered in our How To Schedule Routine Tasks With Cron tutorial.
After you set all of this up, verify that there is a copy of your backups on the remotebackups server the next day.
Review Backup Disk Requirements
We didn’t talk about the disk requirements for your backups. You will definitely want to review how much disk space your backups are using, and revise your setup and backups schedule based on your needs and resources.
In our example, unless your PHP application has a fairly high volume of content and media, the backups will probably consume a relatively low amount of disk space. This is because our backup selection is very conservative, and the default backup job creates incremental backups when possible.
Conclusion
You should now have daily backups, and (if you set it up) a remote copy of those backups, of your LAMP server. Be sure to verify that you are able to restore the backed up files by quickly running through the restoration process.
Thanks for learning with the DigitalOcean Community. Check out our offerings for compute, storage, networking, and managed databases.
About the author
Software Engineer @ DigitalOcean. Former Señor Technical Writer (I no longer update articles or respond to comments). Expertise in areas including Ubuntu, PostgreSQL, MySQL, and more.
Still looking for an answer?
This textbox defaults to using Markdown to format your answer.
You can type !ref in this text area to quickly search our full set of tutorials, documentation & marketplace offerings and insert the link!
 This work is licensed under a Creative Commons Attribution-NonCommercial- ShareAlike 4.0 International License.
Become a contributor for community
Get paid to write technical tutorials and select a tech-focused charity to receive a matching donation.

DigitalOcean Documentation
Full documentation for every DigitalOcean product.

Resources for startups and AI-native businesses
The Wave has everything you need to know about building a business, from raising funding to marketing your product.
The developer cloud
Scale up as you grow — whether you're running one virtual machine or ten thousand.

Start building today
From GPU-powered inference and Kubernetes to managed databases and storage, get everything you need to build, scale, and deploy intelligent applications.
