
The author selected the Free and Open Source Fund to receive a donation as part of the Write for DOnations program.
Introduction
In web applications, you usually need a database, which is an organized collection of data. You use a database to store and maintain persistent data that can be retrieved and manipulated efficiently. For example, in a social media application, you have a database where user data (personal information, posts, comments, followers) is stored in a way that can be efficiently manipulated. You can add data to a database, retrieve it, modify it, or delete it, depending on different requirements and conditions. In a web application, these requirements might be a user adding a new post, deleting a post, or deleting their account, which might or might not delete their posts. The actions you perform to manipulate data will depend on specific features in your application. For example, you might not want users to add posts with no titles.
Flask is a lightweight Python web framework that provides useful tools and features for creating web applications in the Python Language. SQLite is a simple and fast open source SQL engine that can be used with Python to store and manipulate application data. SQLite works well with Python because the Python standard library provides the sqlite3 module, which you can use to interact with any SQLite database without having to install anything. Using SQLite with Python also requires minimal setup compared to other database engines.
In this tutorial, you’ll build a small web application that demonstrates how to use SQLite with Flask to perform basic data manipulation covering CRUD: Create, Read, Update, and Delete. The web application will be a basic blog that displays posts on the index page. Users can create, edit, and delete individual posts.
Prerequisites
-
A local Python 3 programming environment, follow the tutorial for your distribution in How To Install and Set Up a Local Programming Environment for Python 3 series. In this tutorial we’ll call our project directory
flask_app. -
An understanding of basic Flask concepts, such as routes, view functions, and templates. If you are not familiar with Flask, check out How to Create Your First Web Application Using Flask and Python and How to Use Templates in a Flask Application.
-
An understanding of basic HTML concepts. You can review our How To Build a Website with HTML tutorial series for background knowledge.
-
A basic understanding of how to use SQLite. See How To Install and Use SQLite on Ubuntu 20.04.
Step 1 — Setting up the Database
In this step, you’ll set up the SQLite database you’ll use to store your data (the blog posts for your application). You’ll then populate the database with a few example entries.
You will use the sqlite3 module to interact with the database, which is readily available in the standard Python library.
Data in SQLite is stored in tables and columns, so you first need to create a table called posts with the necessary columns. You’ll create a .sql file that contains SQL commands to create the posts table with a few columns. You’ll then use this schema file to create the database.
Open a database schema file called schema.sql inside your flask_app directory:
- nano schema.sql
Type the following SQL commands inside this file:
DROP TABLE IF EXISTS posts;

CREATE TABLE posts (
    id INTEGER PRIMARY KEY AUTOINCREMENT,
    created TIMESTAMP NOT NULL DEFAULT CURRENT_TIMESTAMP,
    title TEXT NOT NULL,
    content TEXT NOT NULL
);
Save and close the file.
In this schema file, you first delete the posts table if it already exists. This avoids the possibility of another table named posts existing, which might result in confusing behavior (for example, if it has different columns). This isn’t the case here, because you haven’t created the table yet, so the SQL command won’t be executed. Note that this will delete all of the existing data whenever you execute this schema file. For our purposes, you will only execute this schema once, but you might want to execute it again to delete whatever data you inserted and start with an empty database again.
Next, you use CREATE TABLE posts to create the posts table with the following columns:
id: An integer that represents a primary key. This key will get assigned a unique value by the database for each entry (that is, each blog post).AUTOINCREMENTautomatically increments the post IDs, so that the first post will have an ID of1, and the post added after it will have an ID of2, and so on. Each post will always have the same ID, even if other posts are deleted.created: The time the blog post was created.NOT NULLsignifies that this column should not be empty, and theDEFAULTvalue is theCURRENT_TIMESTAMPvalue, which is the time at which the post was added to the database. Just likeid, you don’t need to specify a value for this column, as it will be automatically filled in.title: The post title.NOT NULLsignifies that this column can’t be empty.content: The post content.NOT NULLsignifies that this column can’t be empty.
Now, you’ll use the schema.sql file to create the database. To do so, you’ll create a Python file that will generate an SQLite .db database file based on this schema.sql file. Open a file named init_db.py inside your flask_app directory:
- nano init_db.py
Add the following code to it:
import sqlite3

connection = sqlite3.connect('database.db')


with open('schema.sql') as f:
    connection.executescript(f.read())

cur = connection.cursor()

cur.execute("INSERT INTO posts (title, content) VALUES (?, ?)",
            ('First Post', 'Content for the first post')
            )

cur.execute("INSERT INTO posts (title, content) VALUES (?, ?)",
            ('Second Post', 'Content for the second post')
            )

connection.commit()
connection.close()
You first import the sqlite3 module. You open a connection to a database file named database.db, which will be created once you run the Python file. Then you use the open() function to open the schema.sql file. Next you execute its contents using the executescript() method that executes multiple SQL statements at once, which will create the posts table. You create a Cursor object that allows you to process rows in a database. In this case, you’ll use the cursor’s execute() method to execute two INSERT SQL statements to add two blog posts to your posts table. Finally, you commit the changes and close the connection.
Save and close the file and then run it in the terminal using the python command:
- python init_db.py
Once the file finishes execution, a new file called database.db will appear in your flask_app directory. This means you’ve successfully set up your database.
Next, you’ll create a small Flask application, retrieve the two posts you inserted into the database, and display them on the index page.
Step 2 — Displaying Posts
In this step, you will create a Flask application with an index page where the blog posts you have in your database are displayed.
With your programming environment activated and Flask installed, open a file called app.py for editing inside your flask_app directory:
- nano app.py
This file will set up your database connection and create a single Flask route to use that connection. Add the following code to the file:
import sqlite3
from flask import Flask, render_template

app = Flask(__name__)

def get_db_connection():
    conn = sqlite3.connect('database.db')
    conn.row_factory = sqlite3.Row
    return conn


@app.route('/')
def index():
    conn = get_db_connection()
    posts = conn.execute('SELECT * FROM posts').fetchall()
    conn.close()
    return render_template('index.html', posts=posts)
Save and close the file.
In the code above, you first import the sqlite3 module to use it to connect to your database. Then you import the Flask class and the render_template() function from the flask package. You make a Flask application instance called app. You define a function called get_db_connection(), which opens a connection to the database.db database file you created earlier, and sets the row_factory attribute to sqlite3.Row so you can have name-based access to columns. This means that the database connection will return rows that behave like regular Python dictionaries. Lastly, the function returns the conn connection object you’ll be using to access the database.
You then use the app.route() decorator to create a Flask view function called index(). You use the get_db_connection() function to open a database connection. Then you execute an SQL query to select all entries from the posts table. You use the fetchall() method to fetch all the rows of the query result, this will return a list of the posts you inserted into the database in the previous step.
You close the database connection using the close() method and return the result of rendering the index.html template. You also pass the posts object as an argument, which contains the results you got from the database. This will allow you to access the blog posts in the index.html template.
To display the posts you have in your database on the index page, you will first create a base template, which will have all the basic HTML code other templates will also use to avoid code repetition. Then you’ll create the index.html template file you rendered in your index() function. To learn more about templates, see How to Use Templates in a Flask Application.
Create a templates directory, then open a new template called base.html:
- mkdir templates
- nano templates/base.html
Add the following code inside the base.html file:
<!DOCTYPE html>
<html lang="en">
<head>
    <meta charset="UTF-8">
    <title>{% block title %} {% endblock %}- FlaskApp</title>
    <style>
        .post {
            padding: 10px;
            margin: 5px;
            background-color: #f3f3f3
        }

        nav a {
            color: #d64161;
            font-size: 3em;
            margin-left: 50px;
            text-decoration: none;
        }
    </style>
</head>
<body>
    <nav>
        <a href="{{ url_for('index') }}">FlaskApp</a>
        <a href="#">About</a>
    </nav>
    <hr>
    <div class="content">
        {% block content %} {% endblock %}
    </div>
</body>
</html>
Save and close the file.
This base template has all the HTML boilerplate you’ll need to reuse in your other templates. The title block will be replaced to set a title for each page, and the content block will be replaced with the content of each page. The navigation bar has two links, one for the index page where you use the url_for() helper function to link to the index() view function, and the other for an About page if you choose to include one in your application.
Next, open a template called index.html. This is the template you referenced in the app.py file:
- nano templates/index.html
Add the following code to it:
{% extends 'base.html' %}

{% block content %}
    <h1>{% block title %} Posts {% endblock %}</h1>
    {% for post in posts %}
        <div class='post'>
            <p>{{ post['created'] }}</p>
            <h2>{{ post['title'] }}</h2>
            <p>{{ post['content'] }}</p>
        </div>
    {% endfor %}
{% endblock %}
Save and close the file.
In the code above, you extend the base.html template and replace the contents of the content block. You use an <h1> heading that also serves as a title.
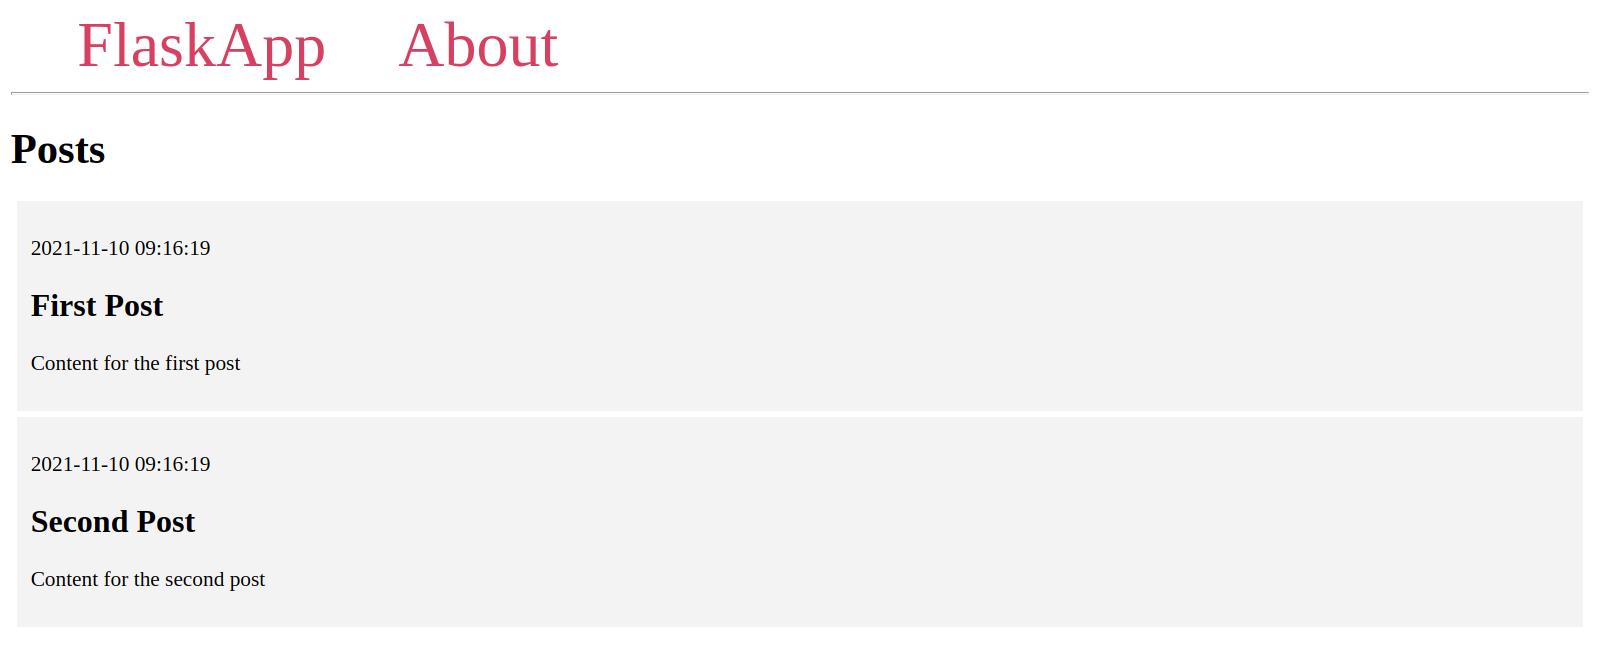
You use a Jinja for loop in the line {% for post in posts %} to go through each post in the posts list. You access the creation date via {{ post['created'] }}, the title via {{ post['title'] }}, and the post content via {{ post['content'] }}.
While in your flask_app directory with your virtual environment activated, tell Flask about the application (app.py in this case) using the FLASK_APP environment variable:
- export FLASK_APP=app
Then set the FLASK_ENV environment variable to development to run the application in development mode and get access to the debugger. For more information about the Flask debugger, see How To Handle Errors in a Flask Application. Use the following commands to do this (on Windows, use set instead of export):
- export FLASK_ENV=development
Next, run the application:
- flask run
With the development server running, visit the following URL using your browser:
http://127.0.0.1:5000/
You’ll see the posts you added to the database on the first initiation.
You’ve displayed the posts in your database on the index page. You now need to allow users to add new posts. You’ll add a new route for adding posts in the next step.
Step 3 — Creating Posts
In this step, you will add a new route to your Flask application that allows users to add new blog posts to the database, which will then appear on the index page.
You’ll add a page with a web form where users enter the post title and post content. This form will be validated to make sure users don’t submit an empty form. To inform users the form is invalid, you’ll use a flash message which will only be shown once and will disappear on the next request (if you navigate to another page for example).
Leave the development server running and open a new terminal window.
First, open your app.py file:
- nano app.py
For handling the web form, you’ll need to import a few things from the flask package:
- The global
requestobject to access submitted data. - The
url_for()function to generate URLs. - The
flash()function to flash a message if a request is invalid. - The
redirect()function to redirect users to the index page after adding the posts to the database.
Add these imports to the first line in the file:
from flask import Flask, render_template, request, url_for, flash, redirect

# ...
The flash() function stores flashed messages in the client’s browser session, which requires setting a secret key to secure sessions that remember information from one request to another. You must never allow anyone to access your secret key. See the Flask documentation for sessions for more information.
Set a secret key by adding a SECRET_KEY configuration to your application via the app.config object. Add it next to the app instance definition.
# ...
app = Flask(__name__)
app.config['SECRET_KEY'] = 'your secret key'
Remember that the secret key should be a long random string. For more on web forms and the secret key configuration, see How To Use Web Forms in a Flask Application.
Next, add the following route at the end of the app.py file:
# ...

@app.route('/create/', methods=('GET', 'POST'))
def create():
    return render_template('create.html')
Save and close the file.
In this route, you pass the tuple ('GET', 'POST') to the methods parameter to allow both GET and POST requests. GET requests are used to retrieve data from the server. POST requests are used to post data to a specific route. By default, only GET requests are allowed. When the user first requests the /create route using a GET request, a template file called create.html will be rendered. You will later edit this route to handle POST requests for when users fill and submit the web form for creating new posts.
Open the new create.html template:
- nano templates/create.html
Add the following code to it:
{% extends 'base.html' %}

{% block content %}
    <h1>{% block title %} Add a New Post {% endblock %}</h1>
    <form method="post">
        <label for="title">Title</label>
        <br>
        <input type="text" name="title"
               placeholder="Post title"
               value="{{ request.form['title'] }}"></input>
        <br>

        <label for="content">Post Content</label>
        <br>
        <textarea name="content"
                  placeholder="Post content"
                  rows="15"
                  cols="60"
                  >{{ request.form['content'] }}</textarea>
        <br>
        <button type="submit">Submit</button>
    </form>
{% endblock %}
Save and close the file.
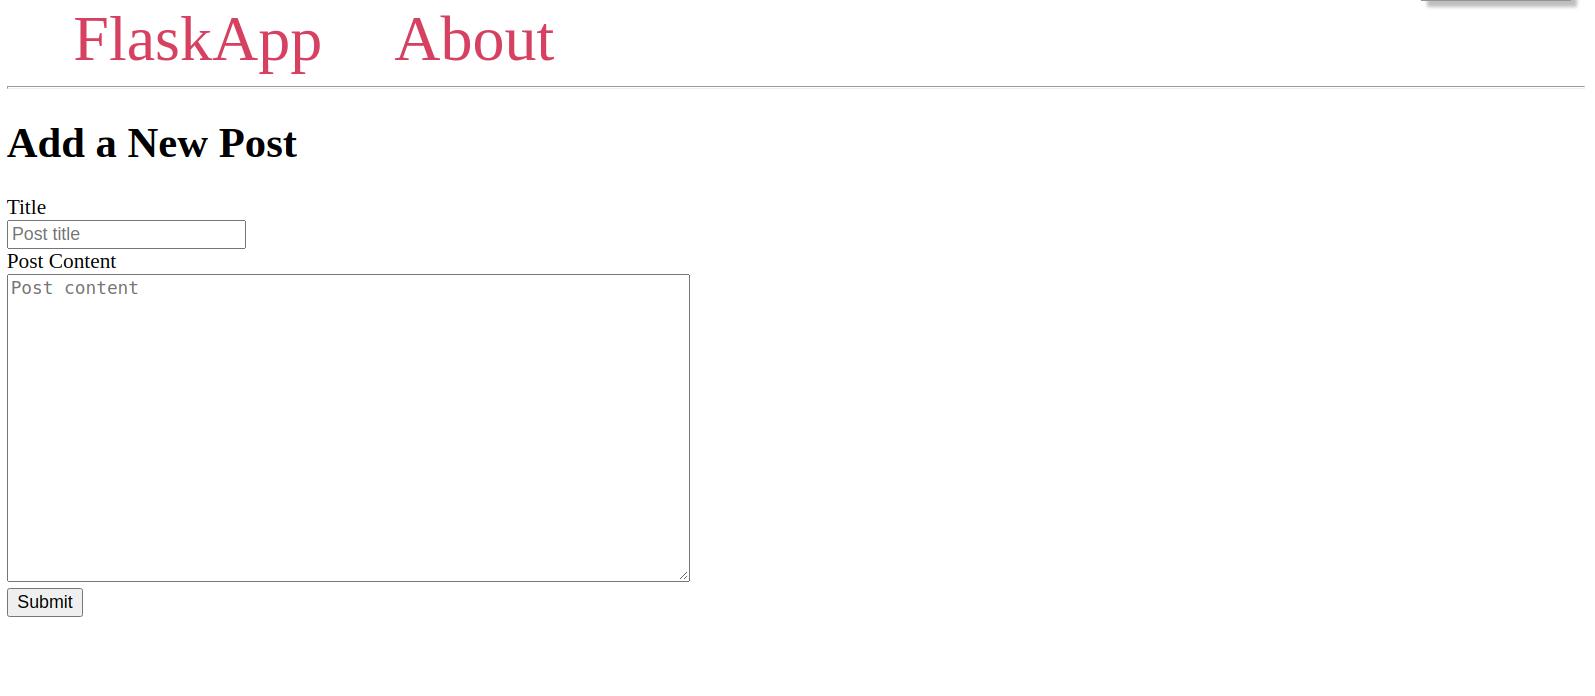
You extend the base template, set a heading as a title, and use a <form> tag with the attribute method set to post to indicate that the form will submit a POST request. You have a text field with the name title, which you’ll use to access the title data in your /create route. You set the value of the text field to request.form['title'] which is either empty or a saved version of the title if the form is invalid, so that the title does not get lost when things go wrong.
After the title input field, you add a text area named content with the value {{ request.form['content'] }} to restore post content if the form is invalid.
Last, you have a Submit button at the end of the form.
Now, with the development server running, use your browser to navigate to the /create route:
http://127.0.0.1:5000/create
You will see an Add a New Post page with an input field for a post title, a text area for the post’s content, and a Submit button.
If you fill in the form and submit it, sending a POST request to the server, nothing happens because you did not handle POST requests on the /create route.
Open app.py to handle the POST request the user submits:
- nano app.py
Edit the /create route to look as follows:
# ...

@app.route('/create/', methods=('GET', 'POST'))
def create():
    if request.method == 'POST':
        title = request.form['title']
        content = request.form['content']

        if not title:
            flash('Title is required!')
        elif not content:
            flash('Content is required!')
        else:
            conn = get_db_connection()
            conn.execute('INSERT INTO posts (title, content) VALUES (?, ?)',
                         (title, content))
            conn.commit()
            conn.close()
            return redirect(url_for('index'))

    return render_template('create.html')
Save and close the file.
You handle POST requests inside the if request.method == 'POST' condition. You extract the title and content the user submits from the request.form object. If the title is empty, you use the flash() function to flash the message Title is required!. You do the same in case of empty content.
If both the title and the content are supplied, you open a database connection using the get_db_connection() function. You use the execute() method to execute an INSERT INTO SQL statement to add a new post to the posts table with the title and content the user submits as values. You use the ? placeholder to insert data into the table safely. You commit the transaction and close the connection. Lastly, you redirect the user to the index page where they can see their new post below existing posts.
Warning: Never use Python string operations to dynamically create an SQL statement string. Always use the ? placeholder in your SQL statements to dynamically substitute values. Pass a tuple of values as the second argument to the execute() method to bind your values to the SQL statement. This prevents SQL injection attacks.
With the development server running, use your browser to navigate to the /create route:
http://127.0.0.1:5000/create
Fill the form and submit it.
You’ll be redirected to the index page where you’ll see your new post.
If you submit a form without a title or one without any content, your post won’t be added to the database, you won’t be redirected to the index page, and you won’t receive any feedback for why that is. This is because you haven’t set up flashed messages to be displayed anywhere yet.
Open base.html to add a link to the Create page in the navigation bar, and to display flashed messages below it.
- nano templates/base.html
Edit the file to look as follows:
<!DOCTYPE html>
<html lang="en">
<head>
    <meta charset="UTF-8">
    <title>{% block title %} {% endblock %} - FlaskApp</title>
    <style>
        .post {
            padding: 10px;
            margin: 5px;
            background-color: #f3f3f3
        }

        nav a {
            color: #d64161;
            font-size: 3em;
            margin-left: 50px;
            text-decoration: none;
        }

        .alert {
            padding: 20px;
            margin: 5px;
            color: #970020;
            background-color: #ffd5de;
        }
    </style>
</head>
<body>
    <nav>
        <a href="{{ url_for('index') }}">FlaskApp</a>
        <a href="{{ url_for('create') }}">Create</a>
        <a href="#">About</a>
    </nav>
    <hr>
    <div class="content">
        {% for message in get_flashed_messages() %}
            <div class="alert">{{ message }}</div>
        {% endfor %}

        {% block content %} {% endblock %}
    </div>
</body>
</html>
Save and close the file.
Here, you add a new <a> link to the navigation bar that points to the Create page.
You use a Jinja for loop to go through the flashed messages. These are available in the get_flashed_messages() special function. Each message is displayed in a <div> tag with a CSS class called alert. You style this <div> tag inside the <style> tag in the <head> section.
Refresh your index page and you’ll see the new link in the navigation bar.
Click the Create link, and submit an empty form. You’ll receive the flashed message “Title is required!”
Fill in the title field and leave the content text area empty. Submit the form again, and you’ll receive a “Content is required!” message. Notice how the “Title is required!” message is gone. This is because it’s a flashed message and not a permanent one.
You now have a way of adding new posts. Next, you’ll add a new route for allowing users to edit existing posts.
Step 4 — Editing Posts
In this step, you will add a new route to the application to allow users to edit existing posts.
First, to avoid code repetition and to isolate code and make it easier to maintain, you’ll add a new function that takes an ID and retrieves a post associated with it from the database. You’ll use this function to get the post data you want to edit, and you’ll use it to get the post for when you want to delete it in the next step.
Open app.py:
- nano app.py
The function you’ll use to retrieve a post will respond with a 404 Not Found error if the ID of the requested post does not correspond with any of the existing posts. To do this, you’ll use the abort() function, which aborts a request and responds with an error message. For more, see How To Handle Errors in a Flask Application.
Add the abort() function to the imports:
from flask import Flask, render_template, request, url_for, flash, redirect, abort
Add a new function called get_post() below your get_db_connection() function:
# ...

def get_db_connection():
    conn = sqlite3.connect('database.db')
    conn.row_factory = sqlite3.Row
    return conn

def get_post(post_id):
    conn = get_db_connection()
    post = conn.execute('SELECT * FROM posts WHERE id = ?',
                        (post_id,)).fetchone()
    conn.close()
    if post is None:
        abort(404)
    return post

# ...
This new function has a post_id argument that determines what post to retrieve and return. You open a database connection with get_db_connection() and execute an SQL query to get the post associated with the given post_id value. You get the post with the fetchone() method, store it in the post variable, and close the connection.
If the post variable has the value None, meaning no result was found in the database, you use the abort() function you imported earlier to respond with a 404 error code and the function will finish execution. If, however, a post was found, you return the value of the post variable.
Next, add a new route for editing posts at the end of the file:
# ...

@app.route('/<int:id>/edit/', methods=('GET', 'POST'))
def edit(id):
    post = get_post(id)

    if request.method == 'POST':
        title = request.form['title']
        content = request.form['content']

        if not title:
            flash('Title is required!')

        elif not content:
            flash('Content is required!')

        else:
            conn = get_db_connection()
            conn.execute('UPDATE posts SET title = ?, content = ?'
                         ' WHERE id = ?',
                         (title, content, id))
            conn.commit()
            conn.close()
            return redirect(url_for('index'))

    return render_template('edit.html', post=post)
Save and close the file.
You use the route /<int:id>/edit/, with int: being a converter that accepts positive integers. And id is the URL variable that will determine the post you want to edit. For example, /2/edit/ will allow you to edit the post with the ID of 2. The ID is passed from the URL to the edit() view function. You pass the value of the id argument to the get_post() function to fetch the post associated with the provided ID from the database. Remember that this will respond with a 404 Not Found error if no post with the given ID exists.
The last line renders a template file called edit.html, and passes in the post variable that has the post data. You’ll use this to display the existing title and content on the Edit page.
The if request.method == 'POST' block handles the new data the user submits. Similar to adding a new post, you extract the title and content. You flash a message if the title or the content is not provided.
If the form is valid, you open a database connection and use the UPDATE SQL statement to update the posts table by setting the new title and new content, where the ID of the post in the database is equal to the ID that was in the URL. You commit the transaction, close the connection, and redirect to the index page.
Next you need to create a page where users can do the editing. Open a new edit.html template:
- nano templates/edit.html
Add the following code to it:
{% extends 'base.html' %}

{% block content %}
    <h1>{% block title %} Edit "{{ post['title'] }}" {% endblock %}</h1>
    <form method="post">
        <label for="title">Title</label>
        <br>
        <input type="text" name="title"
               placeholder="Post title"
               value="{{ request.form['title'] or post['title'] }}"></input>
        <br>

        <label for="content">Post Content</label>
        <br>
        <textarea name="content"
                  placeholder="Post content"
                  rows="15"
                  cols="60"
                  >{{ request.form['content'] or post['content'] }}</textarea>
        <br>
        <button type="submit">Submit</button>
    </form>
{% endblock %}
Save and close the file.
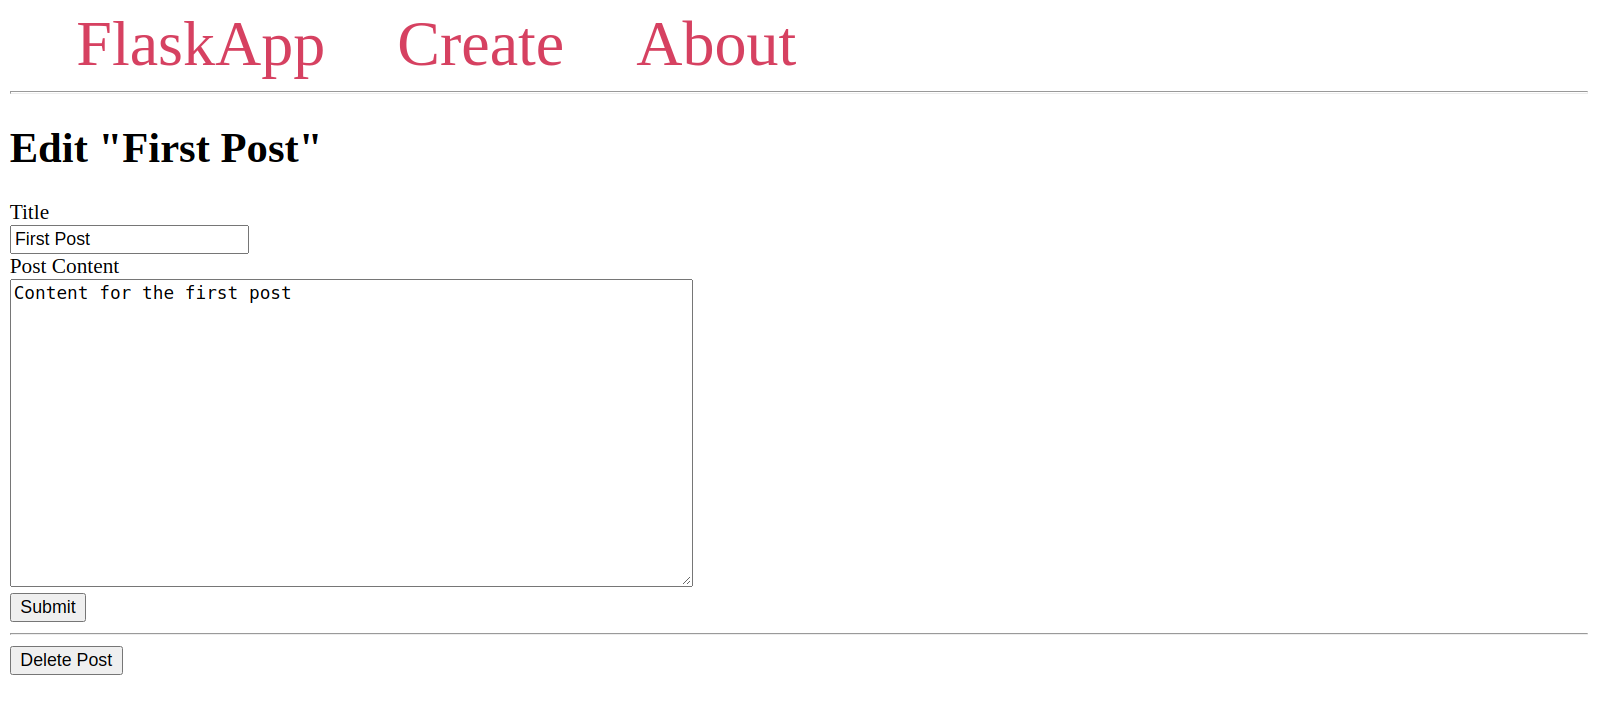
This is similar to the code in the create.html template, except for displaying the post title inside the page’s title in the line {% block title %} Edit "{{ post['title'] }}" {% endblock %}, the value of the input in {{ request.form['title'] or post['title'] }}, and the value of the text area in {{ request.form['content'] or post['content'] }}. This displays the data stored in the request if it exists; otherwise it displays the data from the post variable that was passed to the template containing current database data.
With the development server running, use your browser to navigate to the following URL to edit the first post:
http://127.0.0.1:5000/1/edit
You’ll see a page that looks as follows:
Edit the post and submit the form. You’ll see your changes applied on the index page. If you submit a form without a title or without any content, you’ll receive a flashed message.
You now need to add a link that points to the Edit page for each post on the index page. Open the index.html template file:
- nano templates/index.html
Edit the file to look exactly like the following:
{% extends 'base.html' %}

{% block content %}
    <h1>{% block title %} Posts {% endblock %}</h1>
    {% for post in posts %}
        <div class='post'>
            <p>{{ post['created'] }}</p>
            <h2>{{ post['title'] }}</h2>
            <p>{{ post['content'] }}</p>
            <a href="{{ url_for('edit', id=post['id']) }}">Edit</a>
        </div>
    {% endfor %}
{% endblock %}
Save and close the file.
You added an <a> tag that links to the edit() view function. You pass the post ID you have in post['id']) to the url_for() function to generate the post’s edit link. This adds a link to the Edit page of each post below it.
Refresh the index page and click the Edit link to edit a post.
You can now add new posts and edit existing ones. Next, you’ll add a button to allow users to delete existing posts.
Step 5 — Deleting Posts
In this step, you will add a Delete button to the Edit page to allow users to delete a post.
First, you’ll add a new /id/delete route that accepts POST requests, similar to the edit() view function. Your new delete() view function will receive the ID of the post to be deleted from the URL, retrieve it using the get_post() function, and then delete it from the database if it exists.
Open the app.py file:
- nano app.py
Add the following route at the end:
# ...

@app.route('/<int:id>/delete/', methods=('POST',))
def delete(id):
    post = get_post(id)
    conn = get_db_connection()
    conn.execute('DELETE FROM posts WHERE id = ?', (id,))
    conn.commit()
    conn.close()
    flash('"{}" was successfully deleted!'.format(post['title']))
    return redirect(url_for('index'))
Save and close the file.
This view function only accepts POST requests in the methods parameter. This means that navigating to the /ID/delete route on your browser will return a 405 Method Not Allowed error, because web browsers default to GET requests. To delete a post, the user clicks on a button that sends a POST request to this route.
The function receives the ID of the post to be deleted. You use this ID to retrieve the post using the get_post() function. This responds with a 404 Not Found error if no post with the given ID exists. You open a database connection and execute a DELETE FROM SQL command to delete the post. You use WHERE id = ? to specify the post you want to delete.
You commit the change to the database and close the connection. You flash a message to inform the user that the post was successfully deleted and redirect them to the index page.
Note that you don’t render a template file. This is because you’ll just add a Delete button to the Edit page.
Open the edit.html template file:
- nano templates/edit.html
Then add the following <hr> and <form> tags directly before the {% endblock %} line:
        <button type="submit">Submit</button>
    </form>


    <hr>
    <form action="{{ url_for('delete', id=post['id']) }}" method="POST">
        <input type="submit" value="Delete Post"
                onclick="return confirm('Are you sure you want to delete this post?')">
    </form>
{% endblock %}
Save and close the file.
Here, you have a web form that submits a POST request to the delete() view function. You pass post['id'] to specify the post that will be deleted. You use the confirm() method available in web browsers to display a confirmation message before submitting the request.
Now navigate again to the Edit page of a post and try deleting it:
http://127.0.0.1:5000/1/edit
After you confirm the deletion, you’ll be redirected to the index page, and the post will no longer be there. A flash message will appear below the navigation bar informing you that the post was successfully deleted.
You now have a way of deleting unwanted posts from the database in your Flask application.
Conclusion
You built a small web blog that communicates with an SQLite database. You have basic functionalities in your Flask application, such as adding new data to the database, retrieving data and displaying it on a page, and editing and deleting existing data.
For more on how to use SQLite with Python and Flask, see the following tutorials:
- How To Use the sqlite3 Module in Python 3
- How To Use One-to-Many Database Relationships with Flask and SQLite
- How To Modify Items in a One-to-Many Database Relationships with Flask and SQLite
- How To Use Many-to-Many Database Relationships with Flask and SQLite
If you would like to read more about Flask, check out the other tutorials in the Flask series.
Thanks for learning with the DigitalOcean Community. Check out our offerings for compute, storage, networking, and managed databases.
Tutorial Series: How To Build Web Applications with Flask

Flask is a lightweight Python web framework that provides useful tools and features for creating web applications in the Python Language. It gives developers flexibility and is an accessible framework for new developers because you can build a web application quickly using only a single Python file. Flask is also extensible and doesn’t force a particular directory structure or require complicated boilerplate code before getting started. Learning Flask will allow you to quickly create web applications in Python. You can take advantage of Python libraries to add advanced features to your web application, like storing your data in a database, or validating web forms.
Browse Series: 13 tutorials
About the author
Web developer. I mostly use Python & JavaScript. I like Flask and I am currently learning React. You can say hi on Twitter :)
Still looking for an answer?
This textbox defaults to using Markdown to format your answer.
You can type !ref in this text area to quickly search our full set of tutorials, documentation & marketplace offerings and insert the link!
how would you deploy it to a production website that uses CORS to satisfy browser security?
 This work is licensed under a Creative Commons Attribution-NonCommercial- ShareAlike 4.0 International License.
Become a contributor for community
Get paid to write technical tutorials and select a tech-focused charity to receive a matching donation.

DigitalOcean Documentation
Full documentation for every DigitalOcean product.

Resources for startups and AI-native businesses
The Wave has everything you need to know about building a business, from raising funding to marketing your product.
The developer cloud
Scale up as you grow — whether you're running one virtual machine or ten thousand.

Start building today
From GPU-powered inference and Kubernetes to managed databases and storage, get everything you need to build, scale, and deploy intelligent applications.
