By Jonah Aragon and Tammy Fox

Introduction
RainLoop is a free email client that can access any IMAP/SMTP emails, including Ajenti V’s built-in email. It supports multiple accounts, social logins (log in with Twitter, Facebook, etc.), two factor authentication, and more. RainLoop is a great program to install with Ajenti V because the Ajenti V platform itself has no default webmail.

At the end of this tutorial we will have RainLoop installed on mail.example.com with IMAP/SMTP access to mailboxes on example.com.
Prerequisites
- Ajenti with Ajenti V installed (read How to Install the Ajenti Control Panel and Ajenti V on Ubuntu 14.04)
- A registered domain name that resolves to the Droplet (example.com is used throughout this tutorial)
- A subdomain (
mail.example.com) that resolves to the Droplet. (follow the directions for setting up an A record in How To Set Up a Host Name with DigitalOcean) - An email mailbox set up in Ajenti (read Creating a Website and an Email Account on Ajentu V)
Step 1 — Creating the RainLoop Website in Ajenti V
In your browser, browse to your Ajenti control panel (usually located at https://panel.example.com/), and log in. In the sidebar to the right, under the Web section, click Websites.
Under the New Website section there is a Name text field. Type RainLoop and click the Create button. Under the Websites section on that same page, click Manage on the new RainLoop line.
On the page that appears, uncheck the box next to Maintenance mode. In the Website Files section below that, change Path from /srv/new-website to /srv/RainLoop. Press the Set button next to that text field. Then press the Create Directory button below that. Click Apply Changes at the bottom of the screen.
On the top of the page, click the Domains tab. Click Add and replace example.com with mail.example.com, replacing example.com with your domain name. Click Apply Changes at the bottom of the screen.
RainLoop is PHP-based, so now we need to enable PHP for the RainLoop website we are creating. Click the Content tab. Change the dropdown box to PHP FastCGI, and click Create.
Now click the Advanced tab. In the Custom Configuration box, enter:
location ^~ /data {
  deny all;
}
This addition denies web access to information stored in the /data directory.
Click Apply Changes at the bottom of the screen. Configuration should now be complete. The next step is to install RainLoop.
Step 2 — Installing RainLoop
In the Ajenti sidebar, under the Tools section, click Terminal. Click the New button at the top of the screen, then click the black box that appears.
Note: All commands here are run as root.
At the terminal prompt, type:
- cd /srv/RainLoop
Press ENTER. Then, type the following to install some software dependencies:
- apt-get install php5-cli php5-curl
Press ENTER to start the installation process. Press Y if prompted. Finally, enter the following to install RainLoop:
- wget -qO- http://repository.rainloop.net/installer.php | php
Press ENTER. This command extracts all RainLoop files and installs them on the server.
Now we should set the correct permissions for the files and make them owned by the correct user. Enter these commands in the same terminal, pressing ENTER after each one:
find . -type d -exec chmod 755 {} \;
find . -type f -exec chmod 644 {} \;
chown -R www-data:www-data .
Now that all the files and directories are setup, you can press the X on the Terminal 0 tab to leave the terminal.
Step 3 — Changing the Admin Password
Browse to http://mail.example.com/?admin in your web browser, replacing example.com with your domain name. The default username is admin, and the default password is 12345. Log in with those credentials.
When you login for the first time, you will be greeted with a warning:

The change word in the warning is a link. Click it, and change the admin password to make your installation more secure. Click Update Password to finish changing it. The button will turn green, signifying your change was accepted.
Step 4 — Setting Up Your Domain
In the sidebar of RainLoop, click Login. In the Default Domain text field, you should enter the domain that comes after the @ in your Ajenti V email (usually this is your registered domain name). Press ENTER, and a green check mark will appear temporarily, showing it’s saved.
In the sidebar, now click Domains. There is a list of default email domains already added. This list includes commercial domains such as gmail.com, outlook.com, qq.com, and yahoo.com. If you have an account with one of those services and you would like to be able to check them within RainLoop, you can leave them. Otherwise, you can click the trash can icon next to them to remove them.
Now, click Add Domain at the top of that page. In the Name field, enter your domain name such as example.com. Under the IMAP section, below Server, enter mail.your_domain_name. Under Secure, use the dropdown to select STARTTLS. Now under the SMTP section, below Server enter mail.your_domain_name.
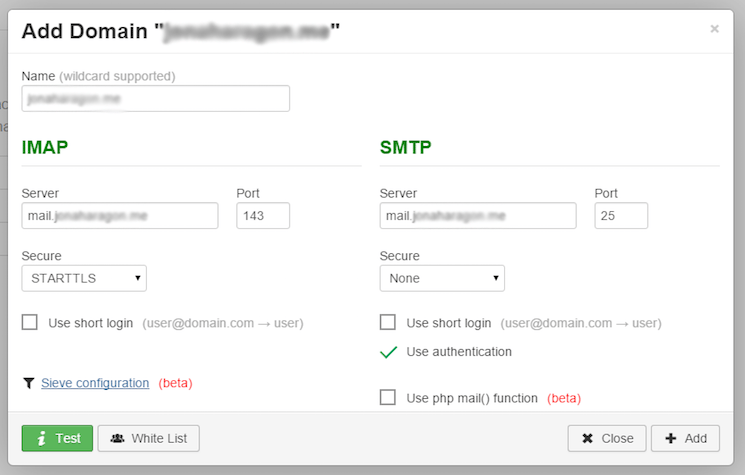
At the bottom of this screen click the Test button. If it turns green, click the Add button at the bottom of the modal to add your domain. If it turns red, read the error messages to figure out why it can’t connect.
Step 5 — Enabling Two Factor Authentication (Optional)
If you use a service like Google Authenticator or Authy, this section may be of interest to you.
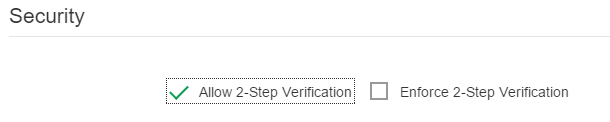
Browse to the Security option in the sidebar. Check the box next to Allow 2-Step Verification. Optionally, you can check the box next to Enforce 2-Step Verification as well, but this isn’t necessary unless you have multiple users using this and you want them all to be forced to use Two Factor Authentication.
You will learn how to configure Two Factor Authentication later in this tutorial.
Step 6 — Logging in to RainLoop
Browse to http://mail.your_domain_name. Enter your entire email address (not just your username) in the first box and your email password in the next. This is not your admin login. Rather, it is the account information you specified when setting up your mailbox in Ajenti. Check the Remember Me box if you do not want to have to log in every time you visit RainLoop on your computer.
Once you login, you should be done! You can now read your email messages and compose. You can choose to finish here or continue with some optional settings.
Step 7 — Customizing RainLoop (Optional)
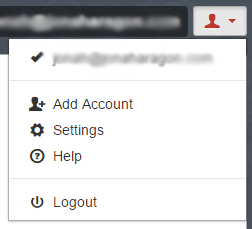
At the top of the page, click the dropdown button with the silhouette person icon.
Click Settings. In the first screen that shows up, you will have the option to configure general details to your liking. You can choose between vertical and horizontal layouts, the default text editor, etc.
One option that may be useful is the Notifications options. If this is your primary email client, you might want to enable notifications upon email arrival. Just check both boxes under the Notifications section to start getting popups from your browser when you receive an email:
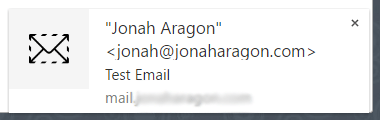
As you can see, it shows who sent the email and the subject line. Simply click it to read the full message in your browser. RainLoop will need to be open in a browser tab at all times for this to work.
Step 8 — Setting Up Two Factor Authentication (Optional)
If you would like to set up Two Factor Authentication, follow these steps. Log into the RainLoop user interface at http://mail.your_domain_name and go to Settings. In Settings, click Security in the sidebar. There should be a link titled Configurate 2-Step Authentication. Click it, and click the Activate button that appears.
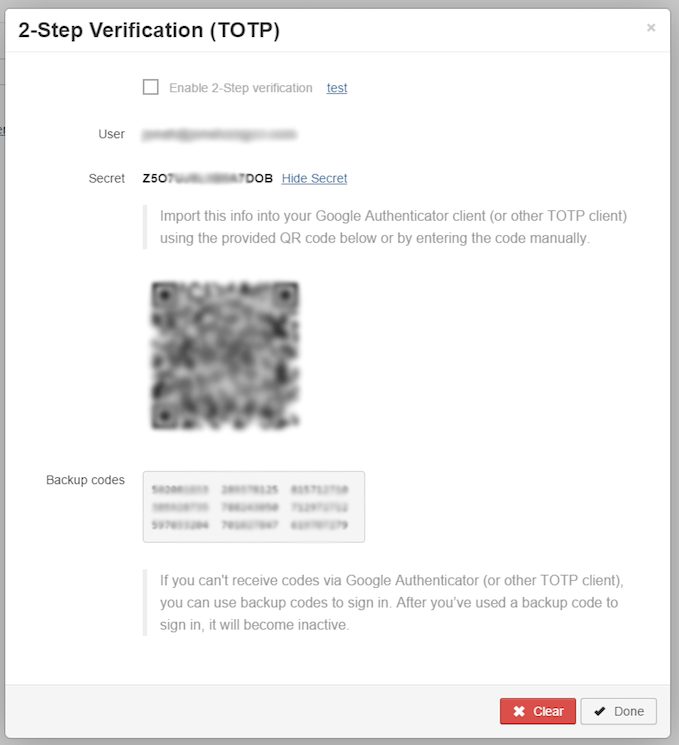
Note: The following screenshots are for Google Authenticator. The steps for your authentication app may vary.
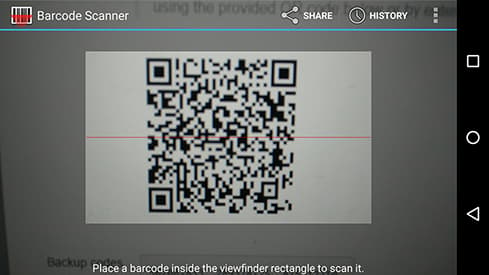
In Google Authenticator, under Manually Activate an Account, click Scan a barcode. You may be prompted to install a barcode scanner app. If so, install it and return to the app.

Now scan the QR code displayed on the webpage.
There should now be a six-digit code displayed on your phone. You will need this code to sign into your webmail.
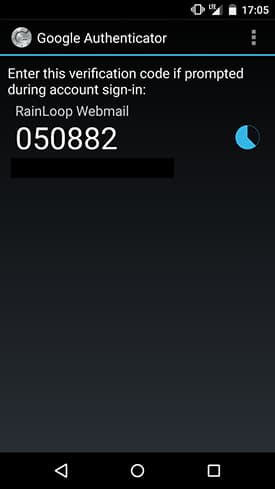
Back in the Two Factor Authentication modal on your computer, next to Enable 2-step verification at the top, there will be a link that says test. Click it, enter the 6-digit code on your phone, and press ENTER. If the button turns green, click the X on that window, and check the box next to Enable 2-Step verification. Then press Done at the bottom of the screen.
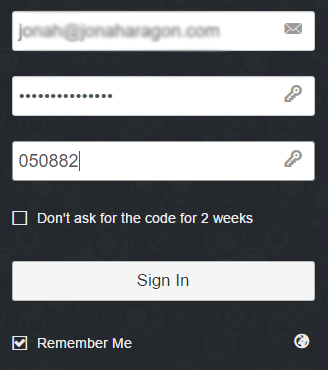
From now on, every time you sign into RainLoop, you will need to lookup the six-digit code in Google Authenticator and enter it along with your username and password combination.
Writing an Email
Back at the homepage of RainLoop, where you can view your emails, there is an icon of a paper airplane in the top left corner of the page. Simply click it and the compose email modal box will appear, allowing you to write an email.

When you finish, click Send, and your email will be sent to its recipient.
Conclusion
RainLoop should now be installed on your server, granting easy email account access to your mailboxes from any web browser.
Thanks for learning with the DigitalOcean Community. Check out our offerings for compute, storage, networking, and managed databases.
Tutorial Series: Using the Ajenti Control Panel with Ajenti V
Ajenti is an open source, web-based control panel that can be used for a large variety of server management tasks. It can install packages and run commands, and you can view basic server information such as RAM in use, free disk space, etc. All this can be accessed from a web browser.
Optionally, an add-on package called Ajenti V allows you to manage multiple websites from the same control panel and easily configure email accounts for your domains.
Browse Series: 5 tutorials
About the author(s)
Sign up for DigitalOcean with this link and get a $10 credit: https://www.digitalocean.com/?refcode=fb6730f5bb99
Technical Editor, DigitalOcean
Still looking for an answer?
This textbox defaults to using Markdown to format your answer.
You can type !ref in this text area to quickly search our full set of tutorials, documentation & marketplace offerings and insert the link!
Great guide, I think a lot of this is under hyped. I really want to know if RainLoop is reasonably secure from some code auditors because its a UI I can get behind.
I’m stuck on beginning of step 3 when I navigate to http://mail.example.com where example is my domain instead of seeing login panel I start downloading a file named ‘download’ inside of that file I have following:
<?php

if (!defined('APP_VERSION'))
{
	define('APP_VERSION', '1.9.2.351');
	define('APP_INDEX_ROOT_FILE', __FILE__);
	define('APP_INDEX_ROOT_PATH', str_replace('\\', '/', rtrim(dirname(__FILE__), '\\/').'/'));
}

if (file_exists(APP_INDEX_ROOT_PATH.'rainloop/v/'.APP_VERSION.'/include.php'))
{
	include APP_INDEX_ROOT_PATH.'rainloop/v/'.APP_VERSION.'/include.php';
}
else
{
	echo '[105] Missing version directory';
	exit(105);
}
Any idea on what I did wrong here?
NOTE: I just noticed that in order to access my panel I need to specify port at the end of url so http://panel.example.com:8000 maybe this has something to do with the issue.
I’m stuck at Step 3 just like IljaDaderko. http://mail.mydomain.com/?admin just tries to download a file called “download” which is actually index.php.
If I on the other hand go to http://mail.mydomain.com/index.php then it loads and provides a login screen, but not the admin screen, so I can’t login from there (or at least not with the provided login and password).
It also just downloads the “download” file if I just go to http://mail.mydomain.com.
I am also stuck at Step 3, Keeps on downloading the file. cannot access the admin of rainloop.
Any steps i am missing. Please help.
Everything is fine but I can’t send messages. Any ideas? Some logs (email replaced with xxx):
2015-09-02 22:29:35 1ZXKHO-0003zW-Tw alt3.gmail-smtp-in.l.google.com [2a00:1450:400c:c07::1b] Network is unreachable
2015-09-02 22:30:05 1ZXK9g-0003xT-Uz mx2.hotmail.com [65.55.37.88] Connection timed out
2015-09-02 22:30:15 1ZXKFu-0003yS-Qz alt3.gmail-smtp-in.l.google.com [64.233.166.26] Connection timed out
2015-09-02 22:30:15 1ZXKFu-0003yS-Qz alt4.gmail-smtp-in.l.google.com [2a00:1450:4013:c00::1b] Network is unreachable
2015-09-02 22:31:42 1ZXKHO-0003zW-Tw alt3.gmail-smtp-in.l.google.com [64.233.166.26] Connection timed out
2015-09-02 22:31:42 1ZXKHO-0003zW-Tw alt4.gmail-smtp-in.l.google.com [2a00:1450:4013:c00::1b] Network is unreachable
2015-09-02 22:32:13 1ZXK9g-0003xT-Uz mx2.hotmail.com [65.55.37.72] Connection timed out
2015-09-02 22:32:13 1ZXK9g-0003xT-Uz == xxxx@hotmail.com R=dnslookup T=remote_smtp defer (110): Connection timed out
2015-09-02 22:32:22 1ZXKFu-0003yS-Qz alt4.gmail-smtp-in.l.google.com [173.194.65.26] Connection timed out
2015-09-02 22:32:22 1ZXKFu-0003yS-Qz == xxxx@gmail.com R=dnslookup T=remote_smtp defer (110): Connection timed out
Hi,
Is there a way, i can install rainloop on different subdomain instead of mail.mydomain.com.
Something like 22mail11.mydomain.com , to make it secure. because most common mail address will be mail.yourdomain.com.
or is it mandatory to install on mail.mydomain.com
Hi, thanks for the tutorial, but, i have to add all the domains that i want to allow? can’t integrate with ajenti-v-mail? i have multiple domains, and multiple accounts
@jonaharagon I need your help. I made all settings but does not send e-mail to an external server. Please help me.
It seems restarting the server and clearing my browser cache worked. I used to get the same error as IljaDaderko: the php files were downloaded and not executed.
Thanks for the guide, but having followed everything I keep getting my mails rejected by @gmail.com (at least).
Are they any other settings I need to do?
-
What about DKIM, SPF and anything else related to a mail server?
-
Only non-secure SMTP seems to work or PHP (beta). What I get back is… SMTP error from remote mail server after end of data: host gmail-smtp-in.l.google.com [64.233.166.27]: 550-5.7.1 [139.59.189.* 1] Our system has detected an unusual rate of 550-5.7.1 unsolicited mail originating from your IP address. To protect our 550-5.7.1 users from spam, mail sent from your IP address has been blocked. 550-5.7.1 Please visit 550-5.7.1 https://support.google.com/mail/answer/81126 to review our Bulk Email 550 5.7.1 Senders Guidelines. e126si24070143wmd.17 - gsmtp*
-
What about the hostname? Is that relevant? https://www.digitalocean.com/community/questions/emails-getting-rejected-from-gmail-on-virtualmin-webmin-and-centos-2
Thanks :)
 This work is licensed under a Creative Commons Attribution-NonCommercial- ShareAlike 4.0 International License.
Become a contributor for community
Get paid to write technical tutorials and select a tech-focused charity to receive a matching donation.

DigitalOcean Documentation
Full documentation for every DigitalOcean product.

Resources for startups and AI-native businesses
The Wave has everything you need to know about building a business, from raising funding to marketing your product.
The developer cloud
Scale up as you grow — whether you're running one virtual machine or ten thousand.

Start building today
From GPU-powered inference and Kubernetes to managed databases and storage, get everything you need to build, scale, and deploy intelligent applications.
