AI Technical Writer

Introduction
Object detection has come a long way and is still continuing to evolve, and YOLOv12 is a perfect example of how far these computer vision models have come.
YOLOv12 builds on top of YOLOv11 with better feature extraction modules, improved architectural design blocks, and optimized training strategies, resulting in higher accuracy and faster inference speeds across multiple vision benchmarks. By using attention attention-centric YOLO framework, optimized feature aggregation, and redefined architecture, YOLOV12 surpasses previous YOLO models and also outperforms end-to-end detectors like RT-DETR.
We’ve already covered the YOLOv12 architecture in a previous blog post. In this guide, we’ll focus on training YOLOv12 step-by-step using a parking space detection dataset, and we’ll run the training on DigitalOcean Gradient™ AI GPU Droplets. Instead of investing in expensive cloud environments or building your own GPU machine, you can quickly launch a GPU droplet, attach storage, and start training within minutes.
DigitalOcean offers flexible GPU choices, predictable pricing, and a setup that’s very developer-friendly. This makes training high-performance vision models like YOLOv12 accessible to startups, researchers, and individual developers alike.
So let us jump into fine-tuning YOLOv12 and run optimized training on DigitalOcean’s GPU infrastructure.
Key Takeaway
- YOLOv12 combines efficient attention with real-time performance, making it a powerful upgrade over previous YOLO versions.
- DigitalOcean GPU Droplets provide an easy, cost-efficient way to train and fine-tune YOLOv12 without the need for expensive hardware.
- YOLOv12-N already beats other nano models by >1% mAP while still running ~1.6 ms latency on a T4 GPU.
- You can use public datasets (like Roboflow) or bring your own images (annotated using LabelImg) to build truly custom detection models.
- At times, YOLOv12 requires flash-attn, but if the installation fails, just skip installing flash-attn, and YOLOv12 runs perfectly fine without it.
What is YOLOv12?
YOLOv12 is a new attention-centric addition to the YOLO family. Instead of depending mostly on CNN blocks, it introduces an efficient area attention mechanism that captures global context without the heavy computational cost of full self-attention. Combining this with R-ELAN (Residual Efficient Layer Aggregation Networks), scaled residuals, and improved MLP design, YOLOv12 delivers stronger feature aggregation and more stable training.
Its five variants (N, S, M, L, X from ~2.6M to ~59M parameters) offer flexibility across speed vs. accuracy tradeoffs. YOLOv12 consistently outperforms earlier YOLO versions (YOLOv8/10/11) and real-time detectors like RT-DETR, for example, YOLOv12-N already beats other nano models by >1% mAP while still running ~1.6 ms latency on a T4 GPU.
Why is GPU essential for Efficient YOLOv12 Training?
YOLOv12 (or any YOLO model) is extremely compute-intensive. If you do not want performance hindrance and do not wish your model training to go on for hours, GPUs are a good option.
Training it on CPU would be:
- Slow
- Not practical
- It could take days/weeks for even small datasets
Training on a GPU is the correct choice because GPUs are meant to perform thousands of parallel matrix operations at once, thus accelerating the convolution operations massively. Furthermore, GPUs are optimized for deep learning frameworks like PyTorch.
CPU is only okay for:
- Inference testing
- Preprocessing
- Converting datasets
Ideal GPU for Training YOLOv12
What to look for in a GPU when training YOLOv12
| Factor | What it means | Why it matters |
|---|---|---|
| VRAM (GPU Memory) | How much model activations + gradients can fit at once (especially for bigger batch sizes or multi-scale augmentation)? | More VRAM = you can train with larger images + bigger batches without running out of memory. |
| Memory Bandwidth | How fast the GPU can stream tensors in/out of memory each step. | Faster memory means the GPU doesn’t “wait around” — training moves quicker. |
| FP16 / Tensor Core Throughput | Mixed precision (FP16/AMP) uses special cores for faster matrix math (TFLOPS). | These “special math engines” make training way faster without losing accuracy. |
| Multi-GPU Interconnect | NVLink/NVSwitch (or AMD Infinity Fabric) reduces latency for cross-GPU gradient sync. | If you’re using multiple GPUs, a faster connection between them = less slowdown. |
| Software Ecosystem | CUDA/cuDNN/NCCL support + stable drivers. | You want a GPU that “just works” with PyTorch, not one you need to fight with. |
| Cost vs Speed | Faster GPUs reduce wall-clock training time (sometimes making total cost lower). | A cheaper GPU can be more expensive if it’s slow, since time = money. |
If you are doing large research or production-level training with multiple GPUs, choose platforms like H200 or H100 since they offer the best ecosystem support and scale very well. For single-node setups that require very high memory, the AMD MI300X/MI325X can be a viable option if you are comfortable with ROCm. Alternatively, the RTX 6000(Ada) or L40S will provide a smoother CUDA workflow with ample VRAM. And if you are just experimenting or doing small prototype runs, cards like the RTX 4000 (Ada) or similar workstation GPUs are good enough and affordable for quick iteration.
Practical tip: start with a smaller, affordable GPU for iteration (annotations, quick training loops), then move to a high-memory instance (H100/H200 or MI300X/MI325X) for full production runs to minimize total cost/time.
Why Use DigitalOcean GPU Droplets for YOLOv12 Training
DigitalOcean GPU Droplets make it really easy to get started. You can spin up a GPU machine in minutes, and they’re built specifically for heavy AI workloads. When your dataset is large or you need to train for many epochs, GPU performance becomes critical, and this is where DO’s GPUs are extremely useful. The best part is you don’t have to waste time configuring drivers, CUDA versions, or worrying about compatibility. Just create the droplet, connect, and start training. Since these instances support CUDA out of the box, they are truly meant for deep learning workloads.
Benefits for Deep Learning Tasks
For training YOLOv12, this is a huge advantage because:
- You can scale up to bigger GPU tiers when your experiments get heavier.
- DigitalOcean gives access to powerful data-center GPUs (like NVIDIA H100 and H200).
- You get low-latency storage + fast compute, so training feels smooth and responsive.
- You can also access a GPU Droplet directly from VS Code, and even run/experiment using Jupyter Notebooks from there.
| Factor | Local Machine | DigitalOcean GPU Droplet |
|---|---|---|
| Setup Time | Days or weeks (buy hardware, install drivers) | Minutes (ready to train) |
| GPU Options | Limited to what you own | Multiple GPU tiers |
| Upgrades | Requires buying a new GPU | Click + scale up |
| Cost | High upfront cost | Pay-as-you-go |
| Mobility | Tied to one device | Access from anywhere |
So instead of buying and maintaining your own GPU workstation, you can simply rent high-performance GPUs on demand and start training YOLOv12 immediately. This saves money, time, and effort, especially if you just want to experiment, fine-tune, and move fast.
Setting Up the Environment
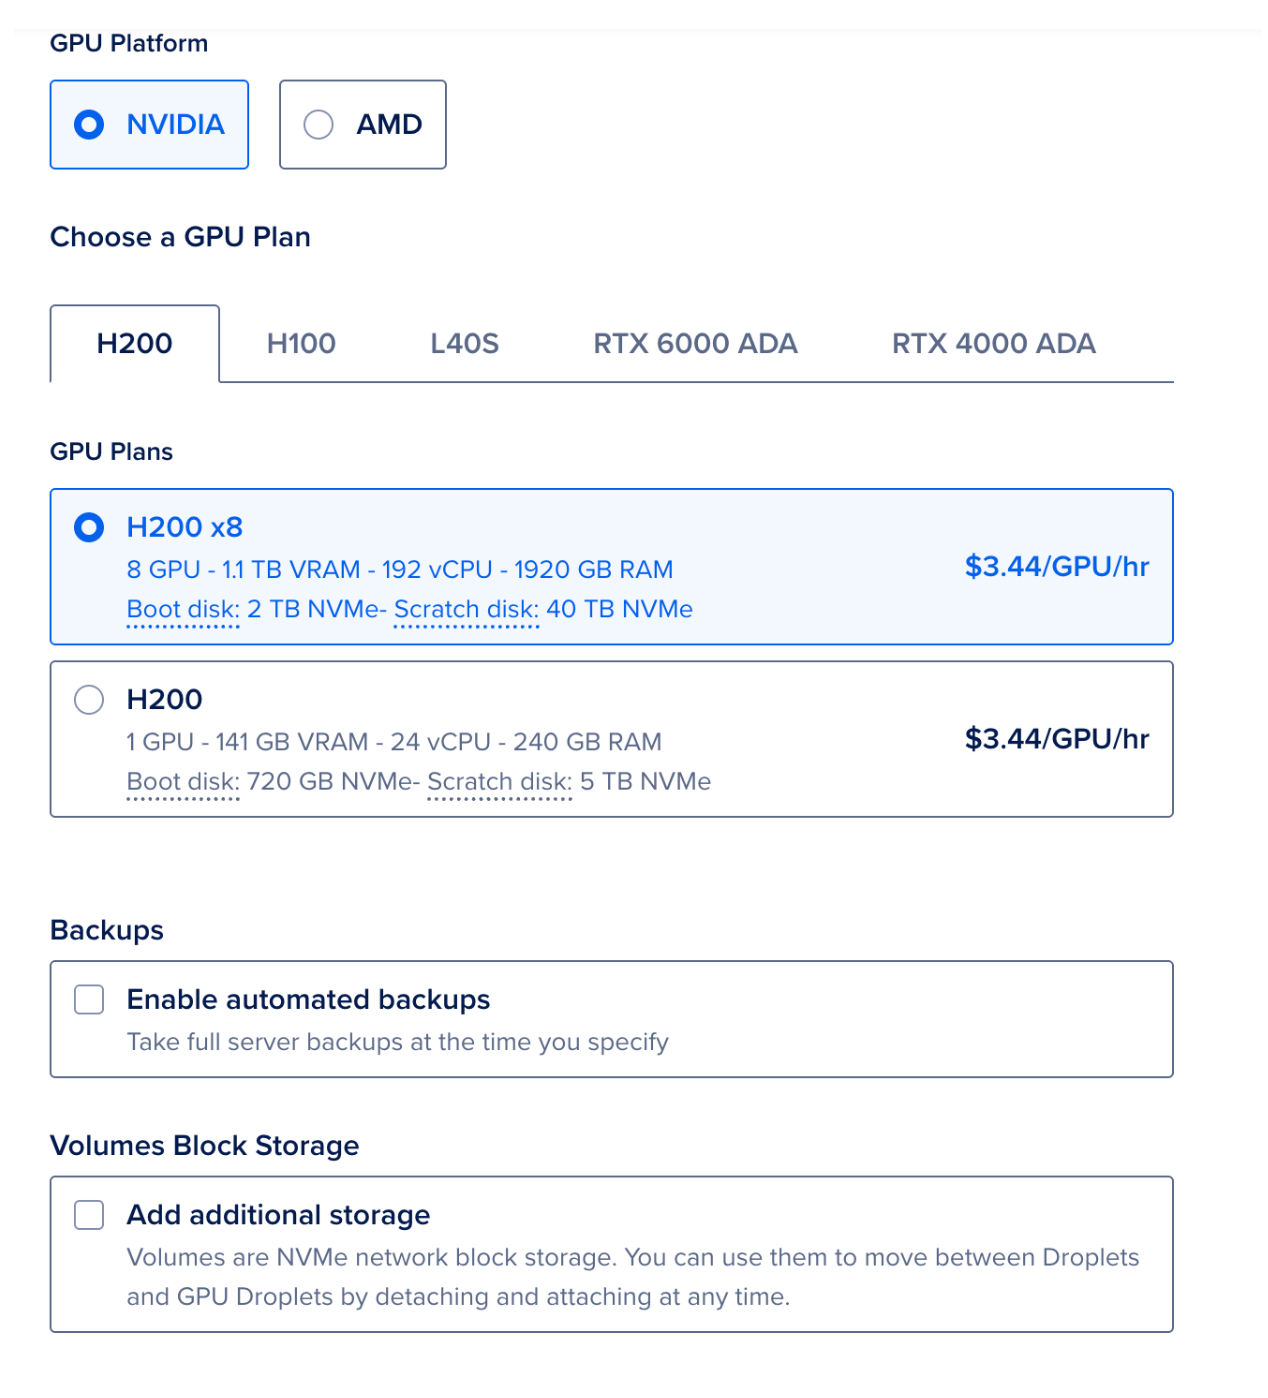
Before we begin, we will need a DigitalOcean account and log in to it. For this tutorial, we will be using a DigitalOcean GPU Droplet, specifically the NVIDIA H100 configuration, though you can select your own GPU as per your requirement.
Steps to create a DigitalOcean GPU Droplet
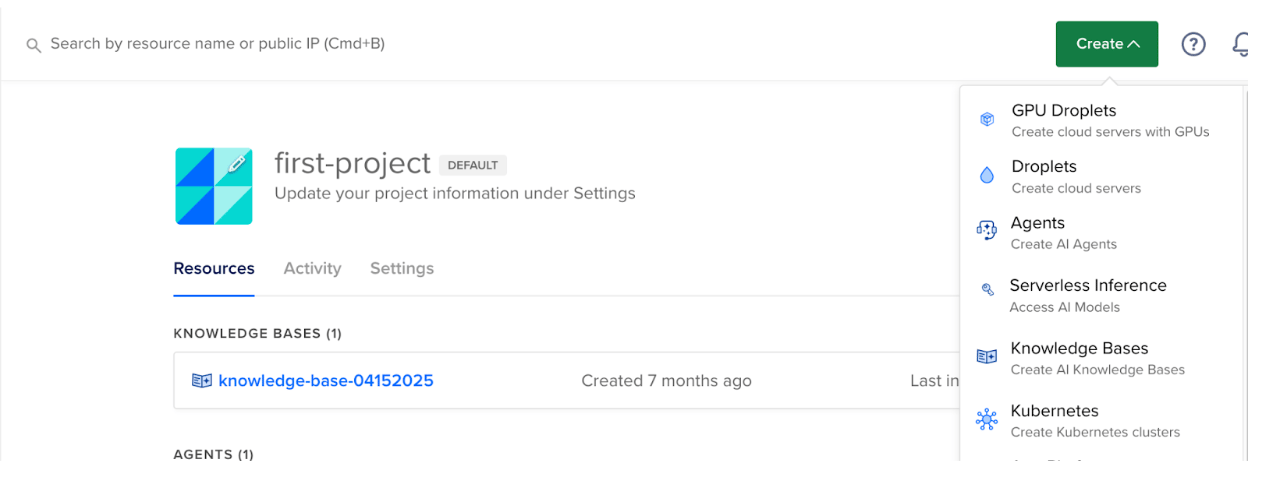
- Log in to your DigitalOcean account.
- Click Create → GPU Droplets
- In the “Create GPU Droplet” page, select a datacenter region, select an image, and other specifications that you need for your project.
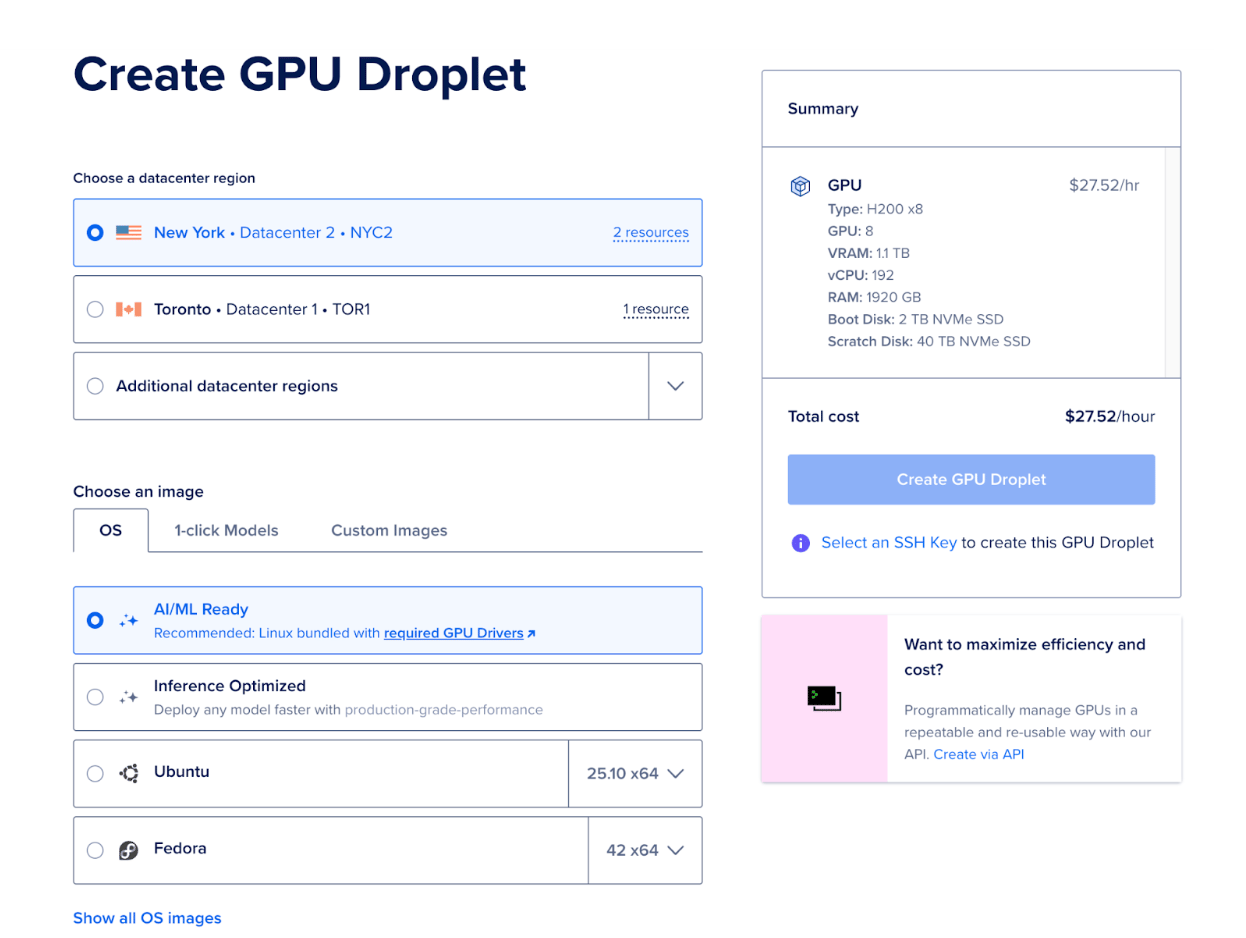
- Select the GPU platform and Droplet of your choice
-
Choose SSH key authentication (recommended)
Now, if we wish to learn the entire steps to create the droplet and authenticate using SSH key, we have listed the detailed blog in the resources section. -
Next, click on “Create GPU Droplet” And within a couple of minutes, your GPU-powered machine will be ready to train your YOLOv12 model.
Finding the right Dataset and preparing the Dataset
For this experiment, we’re using a Parking Space Dataset from Roboflow:
You can download it directly from Roboflow in YOLO format (YOLOv8/YOLOv12 compatible).
Most Roboflow exports include:
train/valid/test/data.yaml(containing paths & class names)
If You Want to Use Your Own Images
If you prefer to train YOLOv12 on your own dataset (custom business images / personal captured images / CCTV footage, etc.), here’s the workflow:
- Collect Images: Take images from your camera, mobile device, or video frames.
- Annotate/Label the Images: Use LabelImg (the most common GUI tool) to draw bounding boxes on objects you want YOLO to detect. Example: parking spaces, cars, potholes, helmets, fruits — anything.
Install LabelImg:
pip install labelImg
labelImg
Export in YOLO Format: In LabelImg, set the output to YOLO format (.txt labels).
For each image, a .txt is created with bounding box coordinates in the format:
class_id x_center y_center width height
Folder Structure: Same folder structure as Roboflow:
my_dataset/
  train/images
  train/labels
  valid/images
  valid/labels
  data.yaml
- Update data.yaml: You must create a
data.yamlfile that points to your custom dataset.
Once your dataset is ready (Roboflow or your own), YOLOv12 reads it automatically using the data.yaml file.
Example:
train: ../train/images
val: ../valid/images
test: ../test/images

nc: 2
names: ['empty', 'occupied']

roboflow:
  workspace: workspace-yaml-format
  project: parking-space-ipm1b
  version: 4
  license: CC BY 4.0
  url: https://universe.roboflow.com/muhammad-syihab-bdynf/parking-space-ipm1b/dataset/4
Next step → training the model.
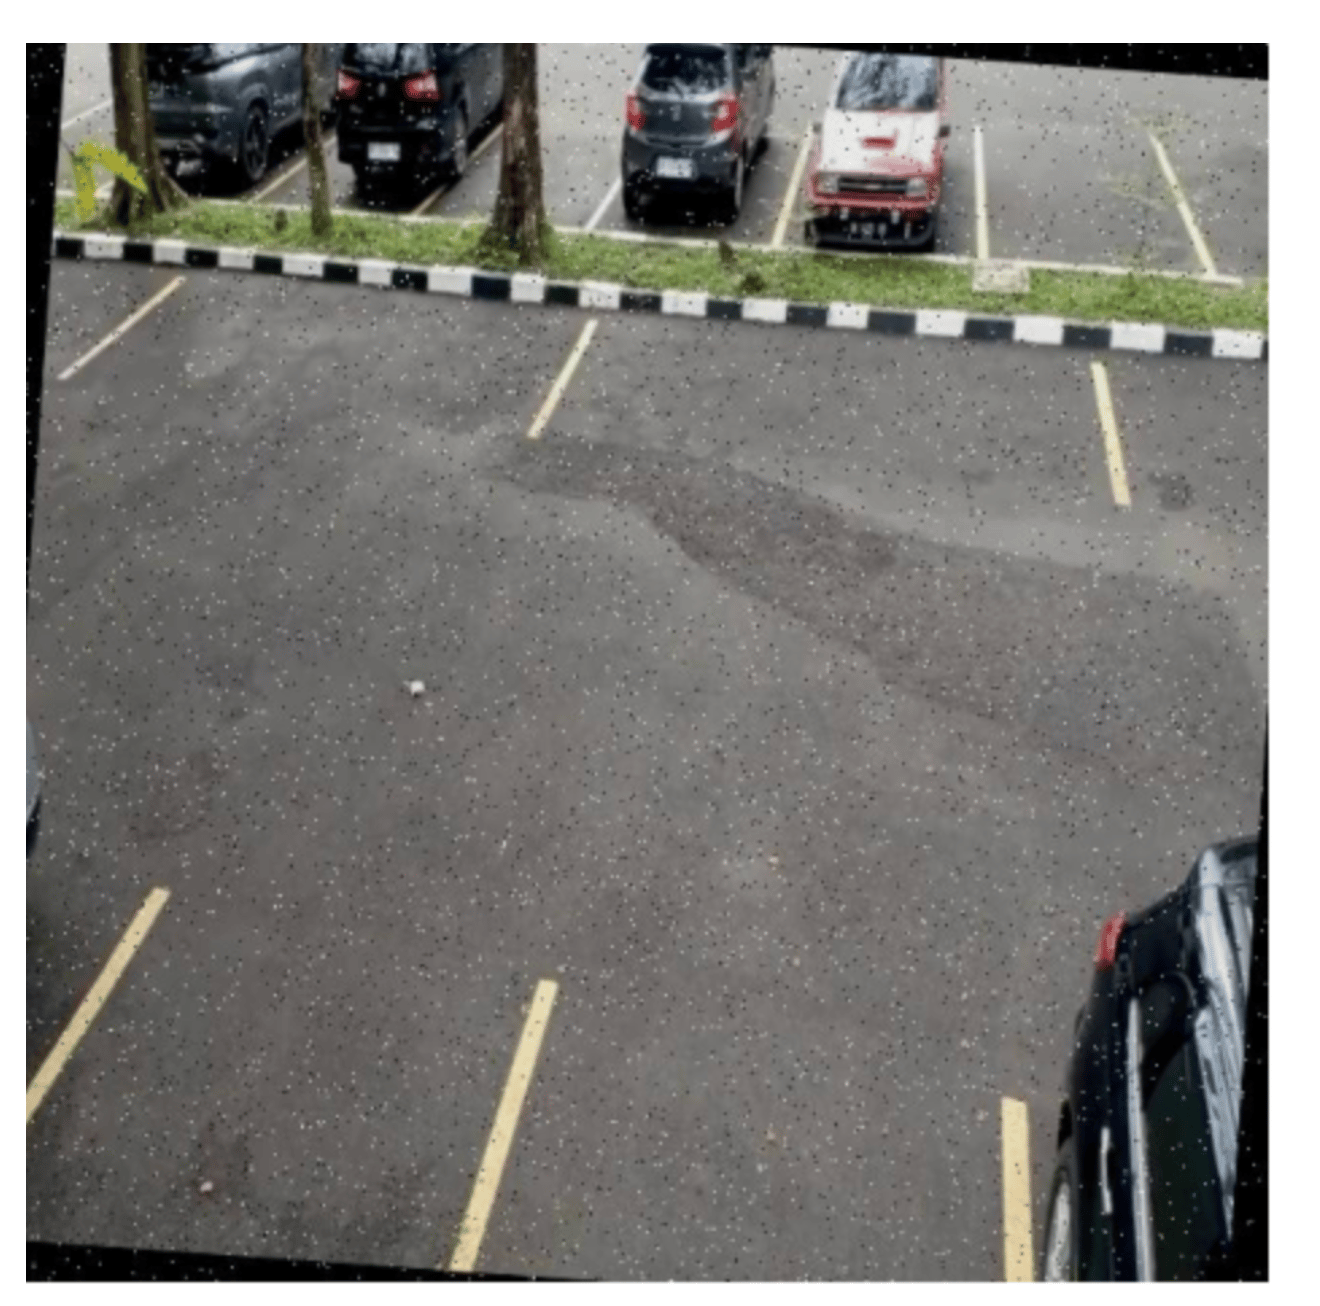
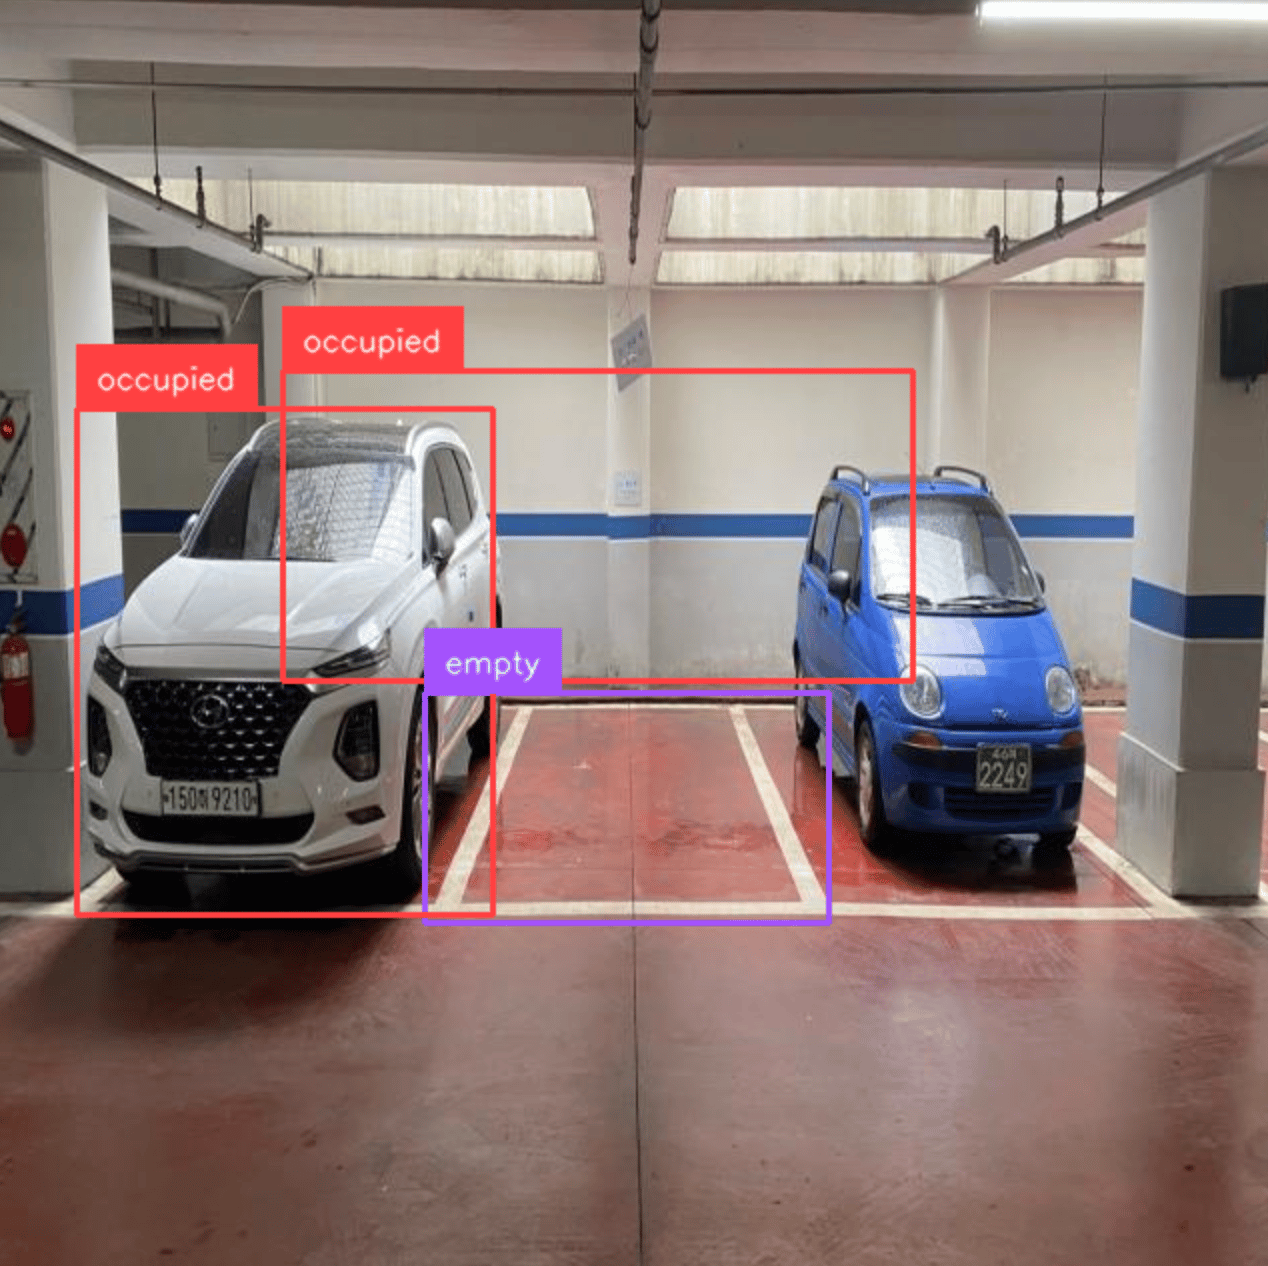
Sample image
Configuring YOLOv12 for Custom Training
Once your dataset is ready, the next step is to configure YOLOv12 for custom training on your DigitalOcean GPU Droplet. Below is a simple environment setup that works smoothly with YOLOv12:
sudo apt update && sudo apt install -y python3-pip
pip install virtualenv
virtualenv myenv
source myenv/bin/activate
pip install ultralytics
pip install huggingface_hub
Note: YOLO internally uses huggingface_hub, so it must be installed; otherwise, you’ll see ModuleNotFoundError: huggingface_hub.
Note: For this example, I’ll use a Jupyter Notebook to run code and experiment step-by-step. It makes debugging and iteration easier, so feel free to adjust the code based on your setup.
Next, download YOLOv12:
!pip install -q git+https://github.com/sunsmarterjie/yolov12.git roboflow supervision flash-attn supervision
Now, here you might face some challenges in installing flash-attention, as flash-attn is sensitive to:
- Python version
- CUDA version
- GPU arch (H100 is Hopper → SM90)
Most H100 machines need flash-attn v2
So, try to follow this sequence of installation:
pip install torch torchvision torchaudio --index-url https://download.pytorch.org/whl/cu121
pip install roboflow supervision
pip install git+https://github.com/sunsmarterjie/yolov12.git
pip install flash-attn==2.5.6 --no-build-isolation
--no-build-isolation forces pip to use the already-installed torch + CUDA inside your current env instead of spinning a temporary isolated build environment (which is where your error comes from).
If this STILL fails
Don’t install flash-attn at all, YOLOv12 works fine without it.
Just do:
pip install git+https://github.com/sunsmarterjie/yolov12.git
flash-attn is only used for speed and is not required.
Dataset Setup on DigitalOcean GPU Droplet
#Export your Roboflow API key (replace with your actual key)
export ROBOFLOW_API_KEY="YOUR_API_KEY_HERE"
Or if you are using a notebook
import os
os.environ["ROBOFLOW_API_KEY"] = "your_roboflow_key"
Download the dataset in YOLOv12 format
from roboflow import download_dataset
dataset = download_dataset('https://universe.roboflow.com/muhammad-syihab-bdynf/parking-space-ipm1b/dataset/4', 'yolov12')
To prepare your dataset for training, execute the following bash commands. These commands will update the relative paths within the data.yaml file, ensuring it accurately points to the correct subdirectories containing your dataset’s training, testing, and validation subsets.
!sed -i '$d' {dataset.location}/data.yaml
!sed -i '$d' {dataset.location}/data.yaml
!sed -i '$d' {dataset.location}/data.yaml
!sed -i '$d' {dataset.location}/data.yaml
!echo -e "test: ../test/images\ntrain: ../train/images\nval: ../valid/images" >> {dataset.location}/data.yaml
Fine-tune YOLOv12
We’re now ready to fine-tune YOLOv12. In the example below, we initialize the model with yolov12s.yaml, but feel free to use any other variant (yolov12n.pt, yolov12m.pt, yolov12l.pt, or yolov12x.pt) depending on your needs. We train for 100 epochs here, but you should tune this along with batch size, image size, and augmentation settings (scale, mosaic, mixup, copy-paste) based on your GPU and dataset size.
from ultralytics import YOLO
model = YOLO('yolov12s.yaml')
results = model.train(data=f'{dataset.location}/data.yaml', epochs=100)
Initially, during experimentation, we highly recommend using a Jupyter Notebook for training and debugging. It makes it easier to visualize outputs (like sample images, confusion matrices, loss curves), test data loading pipelines interactively, and iterate on hyperparameters without running full scripts each time. You can quickly check tensor shapes, display random training samples, and inspect augmentation transformations all in one place.
Additionally, Jupyter Notebook provides cell-level execution, which is ideal for experimenting with various YOLOv12 configurations, datasets, or augmentation ideas without having to rerun the entire training pipeline.
If you want to learn how to set up and access Jupyter Notebook on a DigitalOcean GPU Droplet, the link to that step-by-step guide is available in the Resources section.
This will start the fine-tuning process.
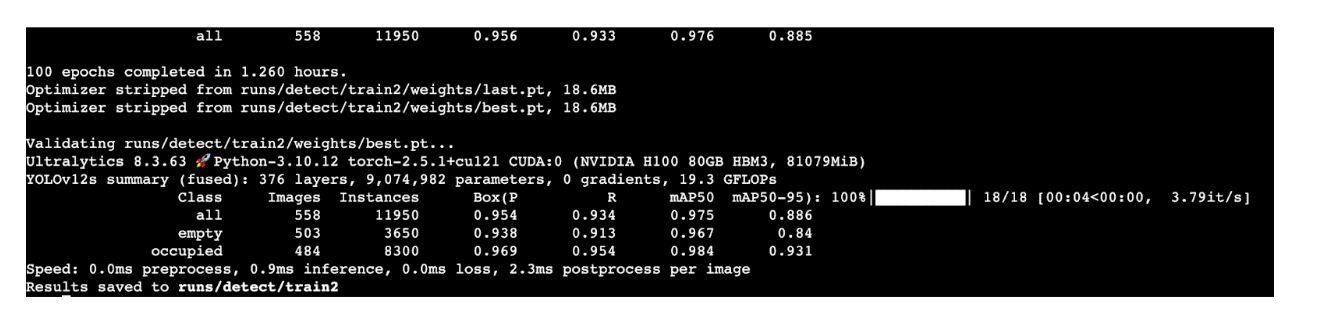
One hundred epochs will approximately take 1 hour and 26 minutes.
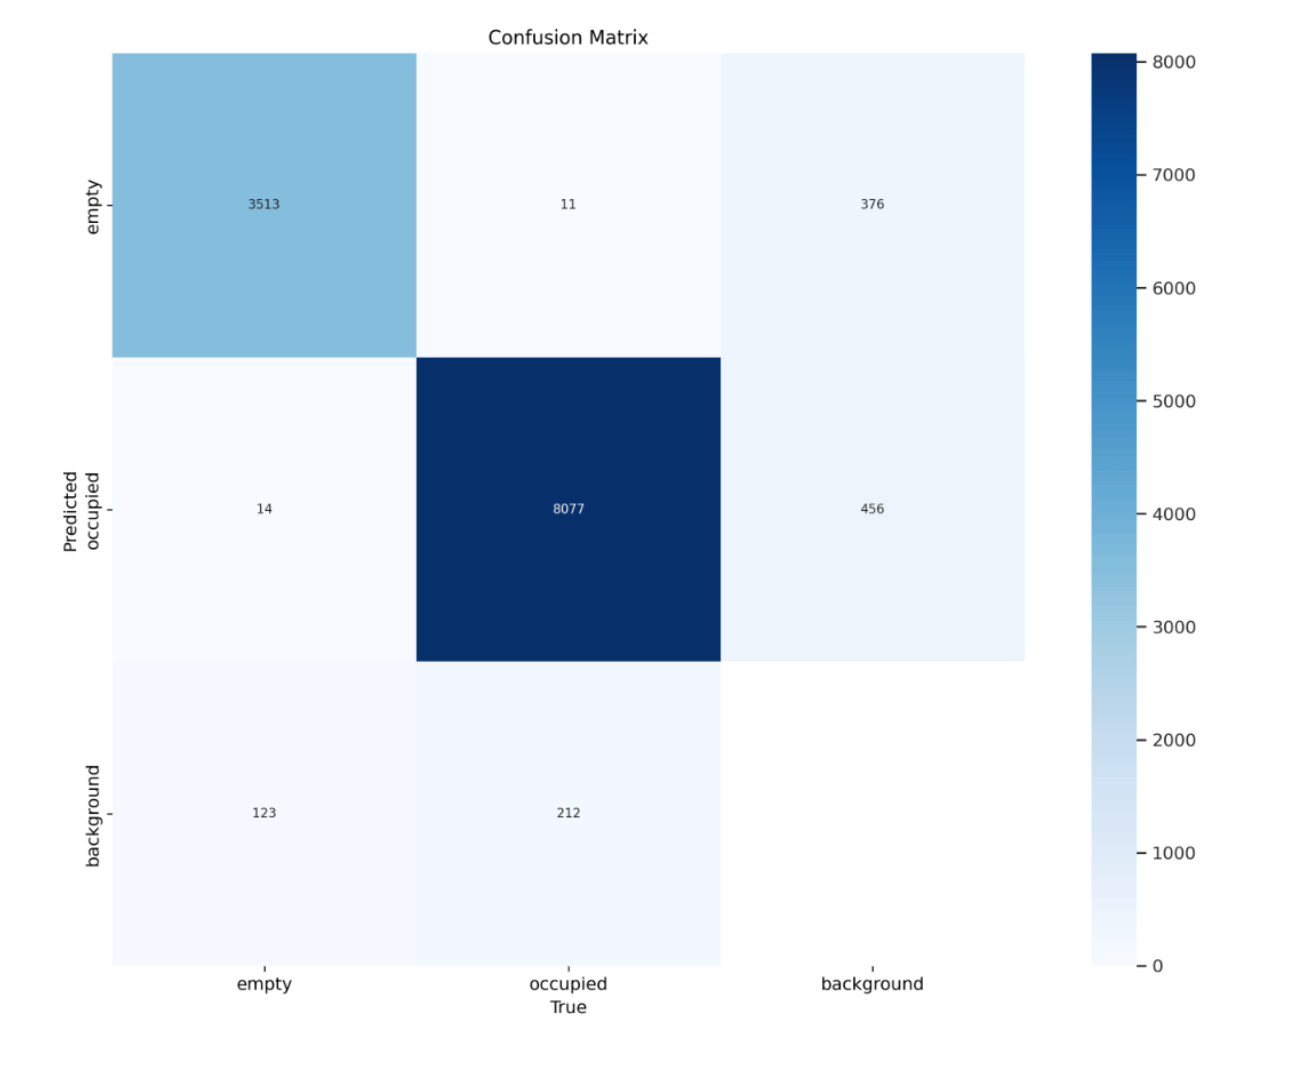
from IPython.display import Image
Image(filename='runs/detect/train/confusion_matrix.png', width=600)
Image(filename='runs/detect/train/results.png', width=1000)

Run inference with the trained model
import supervision as sv

ds = sv.DetectionDataset.from_yolo(
   images_directory_path=f"{dataset.location}/test/images",
   annotations_directory_path=f"{dataset.location}/test/labels",
   data_yaml_path=f"{dataset.location}/data.yaml"
)

ds.classes
[‘empty’, ‘occupied’]
import supervision as sv

model = YOLO(f'/{HOME}/runs/detect/train/weights/best.pt')

ds = sv.DetectionDataset.from_yolo(
   images_directory_path=f"{dataset.location}/test/images",
   annotations_directory_path=f"{dataset.location}/test/labels",
   data_yaml_path=f"{dataset.location}/data.yaml"
)
import random
import numpy as np
import cv2
import matplotlib.pyplot as plt

i = random.randint(0, len(ds))

image_path, image, target = ds[i]

# convert torch tensors → numpy
if not isinstance(image, np.ndarray):
    image = image.permute(1,2,0).cpu().numpy()

# force uint8
image = image.astype(np.uint8)

# ensure RGB
if image.shape[2] == 3:
    image = cv2.cvtColor(image, cv2.COLOR_BGR2RGB)

results = model.predict(image, verbose=False)[0]   # use model.predict()

detections = sv.Detections.from_ultralytics(results).with_nms()

box_annotator = sv.BoxAnnotator()
label_annotator = sv.LabelAnnotator()

annotated = box_annotator.annotate(scene=image.copy(), detections=detections)
annotated = label_annotator.annotate(scene=annotated, detections=detections)

plt.figure(figsize=(6,6))
plt.imshow(annotated)
plt.axis('off')
plt.show()
This can be further extended into a Gradio app, allowing you to upload test images directly from your browser, run inferences, and instantly preview the annotated results without writing additional code in the notebook. If required, this Gradio app can later be containerized and deployed on a DigitalOcean GPU Droplet, providing a fully online inference endpoint backed by the same GPU that trained the model.
Conclusion
YOLOv12 brings a major leap in accuracy and attention efficiency, and pairing it with DigitalOcean GPU Droplets makes experimentation and fine-tuning both accessible and scalable. It’s easy to upload datasets from Roboflow or annotate your own custom images using tools like LabelImg, then plug them straight into your training pipeline.
With DigitalOcean’s GPU Droplets, you can iterate faster, test multiple YOLOv12 variants, and push from development → proof-of-concept → production without locking yourself into long-term infrastructure costs. Start training your own computer vision models on DigitalOcean GPU Droplets today.🚀
Resources
- Step-by-Step Guide to Installing CUDA and cuDNN for GPU Acceleration
- Monitoring GPU utilization for Deep Learning
- How to Create DigitalOcean Gradient™ AI GPU Droplets
- YOLOv9 Object Detection Features, Benefits, and Use Cases
- How to Train a YOLOv12 Object Detection Model on a Custom Dataset
- How to Add SSH Keys to New or Existing Droplets
Thanks for learning with the DigitalOcean Community. Check out our offerings for compute, storage, networking, and managed databases.
About the author
With a strong background in data science and over six years of experience, I am passionate about creating in-depth content on technologies. Currently focused on AI, machine learning, and GPU computing, working on topics ranging from deep learning frameworks to optimizing GPU-based workloads.
Still looking for an answer?
This textbox defaults to using Markdown to format your answer.
You can type !ref in this text area to quickly search our full set of tutorials, documentation & marketplace offerings and insert the link!
 This work is licensed under a Creative Commons Attribution-NonCommercial- ShareAlike 4.0 International License.
Become a contributor for community
Get paid to write technical tutorials and select a tech-focused charity to receive a matching donation.

DigitalOcean Documentation
Full documentation for every DigitalOcean product.

Resources for startups and AI-native businesses
The Wave has everything you need to know about building a business, from raising funding to marketing your product.
The developer cloud
Scale up as you grow — whether you're running one virtual machine or ten thousand.

Start building today
From GPU-powered inference and Kubernetes to managed databases and storage, get everything you need to build, scale, and deploy intelligent applications.
