Full-Stack Software Developer

The author selected the Internet Archive to receive a donation as part of the Write for DOnations program.
Introduction
One of the key features of the popular static site generator Gatsby is its flexibility in consuming content sources. Gatsby can generate static pages from almost any data source, such as a Content Management System (CMS), API, database, or even a local file system.
Markdown files are a popular file-based source to use with Gatsby. Markdown is a markup language that is lightweight and designed for readability, which makes it ideal for documentation projects, blog posts, or any text-heavy websites.
In this tutorial, you will create a Gatsby-powered static site that builds itself from local Markdown source files, using the gatsby-source-filesystem plugin to collect the files and the gatsby-transformer-remark plugin to convert them into HTML.
Prerequisites
Before starting, here are a few things you will need:
- A local installation of Node.js for running Gatsby and building your site. The installation procedure varies by operating system, but DigitalOcean has guides for Ubuntu 20.04 and macOS, and you can always find the latest release on the official Node.js download page.
- Some familiarity with JavaScript, for working in Gatsby. The JavaScript language is an expansive topic, but a good starting spot is our How to Code in JavaScript series.
- Some familiarity with React and JSX, as well as HTML elements, if you want to customize the user interface (UI) of your posts beyond what is covered in this tutorial.
- A new Gatsby project named
markdown-tutorial, scaffolded fromgatsby-starter-default. To build a new Gatsby project from scratch, you can refer to Step 1 of the How To Set Up Your First Gatsby Website tutorial.
This tutorial was tested on Node.js v14.16.1, npm v6.14.12, Gatsby v3.10.2, gatsby-source-filesystem v3.10.0, and gatsby-transformer-remark v4.7.0.
Step 1 — Standardizing Your Markdown Content
Given Markdown’s flexibility as a markup language, documents written in Markdown can take on various forms and levels of complexity. Gatsby does not require you to format all your Markdown files in the same way, but to make your site and URLs easier to organize, you will first standardize how you write and store your Markdown files within this project.
For this tutorial, you will add blog posts to your site, and each post will have a title, customized URL, publication date, and post body. You will start with a single post, Learning About Gatsby, where you can share your experience of learning about Gatsby with the world.
In preparation for storing this and future posts, create a new directory under src, named blog. If you prefer to do this from the command line, you can do so with mkdir from the root directory of the project:
- mkdir src/blog
Next, create an empty Markdown file within that new directory. For the purposes of this tutorial, filenames do not control the published URL or SEO, so the naming conventions here are just to keep things organized. Give your new post a filename of learning-about-gatsby.md.
You can either do this in your IDE, or use the terminal with touch:
- touch src/blog/learning-about-gatsby.md
Finally, fill in the actual content of the post. Open the file in your editor of choice and add the following:
---
title: "Learning about Gatsby"
slug: "/blog/learning-about-gatsby"
date: "2021-08-01"
---

## What I'm Working On

Right now, I'm working through a [DigitalOcean tutorial](https://www.digitalocean.com/community/tutorials) on using [Gatsby](https://www.gatsbyjs.com/) with Markdown.
The top section enclosed by --- is called frontmatter and consists of key-value pairs. It is written in YAML, which is a configuration language outside of Markdown. Property keys go on the left, and your values go on the right. In your frontmatter block, you have defined values for your post’s title, the publication date, and the slug. The slug is the customized portion of the post’s URL that comes after your domain name (also known as the path).
Any text below the frontmatter will become the post body. Within that area, you have a heading of What I'm Working On, with two hash symbols (##) at the beginning of the line. In Markdown, this indicates a level-2 heading, which Gatsby will convert into <h2></h2> in HTML. Within the text below that heading, you have some links that are written using Markdown syntax: [link_text](link_destination).
Save your changes to learning-about-gatsby.md and then close the file.
You have just created your first post using Markdown and saved it within your project’s source code. You have also standardized the format, including specific property values in the frontmatter of the blog posts. This keeps your source code organized and will be important for later steps. For now, the next step is to install and configure the plugins that are required for Gatsby to process this new Markdown post.
Step 2 — Installing and Configuring the Required Plugins
With your Markdown file in place, it is time to tell Gatsby where to find them and process them. In this step, you will install the plugins that are required to achieve this and update the Gatsby configuration to load them.
Two plugins are required to process Markdown in Gatsby: gatsby-transformer-remark and gatsby-source-filesystem. gatsby-transformer-remark will parse your Markdown and convert your frontmatter into fields that Gatsby can query, and gatsby-source-filesystem will allow you to bring data from your local filesystem into your application.
Install both at the same time by running the following command in your Gatsby project directory:
- npm install gatsby-source-filesystem gatsby-transformer-remark
After you install both plugins, open up the main Gatsby configuration file that lives in the root of your project folder: gatsby-config.js. By editing this file, you are telling Gatsby how to use the newly installed plugins to read your Markdown files and begin processing them. Add the following code to your config file:
module.exports = {
...
  plugins: [
    `gatsby-plugin-react-helmet`,
    `gatsby-plugin-image`,
    {
      resolve: `gatsby-source-filesystem`,
      options: {
        name: `images`,
        path: `${__dirname}/src/images`,
      },
    },
    {
      resolve: `gatsby-source-filesystem`,
      options: {
        name: `blog`,
        path: `${__dirname}/src/blog`,
      },
    },
    `gatsby-transformer-remark`,
    `gatsby-transformer-sharp`,
...
The first block loads the gatsby-source-filesystem plugin and passes it an options object telling it to scan the src/blog directory for files and use the blog name as a label for the collection. The final line loads the gatsby-transformer-remark plugin with all default options, since you don’t need to customize them for this tutorial.
You have now configured Gatsby to load the two plugins that are necessary for scanning in and parsing your Markdown files. In the next step, you will create a page template file for Gatsby to combine with your Markdown content and render as web pages.
Step 3 — Creating a Page Template File
Gatsby will now scan your Markdown files and process them with gatsby-transformer-remark, but it still needs instructions on how to display them in the browser. This step covers how to give it those instructions by adding a page template file (also known as a page template component).
First, create an empty file in src/pages with a filename of {MarkdownRemark.frontmatter__slug}.js. The filename needs to exactly match this, because it uses a Gatsby API called the File System Route API, in which filenames dictate the routes (URLs) created on your site.
Note: The File System Route API is a newer feature in Gatsby, and you might still see other Markdown page tutorials that involve the createPages API in gatsby-node.js instead. Although it is not deprecated, that API is no longer necessary for the use case covered by this tutorial. However, if you have a project that involves creating arbitrary pages that don’t mirror the file system or exceeds the capabilities of the File System Route API in some other way, you might still need to use the createPages approach.
To create your component, add the following code to the file:
import { graphql } from "gatsby";
import * as React from "react";
import Layout from "../components/layout";
import Seo from "../components/seo";

export default function BlogPostTemplate({ data: { markdownRemark } }) {
  const { frontmatter, html } = markdownRemark;
  return (
    <Layout>
      <Seo title={frontmatter.title} />
      <h1>{frontmatter.title}</h1>
      <h2>{frontmatter.date}</h2>
      <div className="post-body" dangerouslySetInnerHTML={{ __html: html }} />
    </Layout>
  );
}

export const pageQuery = graphql`
  query ($id: String!) {
    markdownRemark(id: { eq: $id }) {
      html
      frontmatter {
        date(formatString: "MMMM DD, YYYY")
        title
      }
    }
  }
`;
This code has two main sections. The one at the end of the file is pageQuery, which uses the Gatsby GraphQL tag to evaluate the GraphQL query that follows it. The results of that query are passed to the BlogPostTemplate function and give you access to properties of the post fetched over GraphQL.
The BlogPostTemplate function is a React component that returns JSX. Within the BlogPostTemplate you display the values of each post’s standardized frontmatter fields, the title and the date, in header elements. The actual body of the post you have placed into a <div> with a class of post-body, using React’s dangerouslySetInnerHTML property to directly echo out the HTML into the rendered result.
Finally, using export default before declaring the BlogPostTemplate function is necessary in your code, because Gatsby will expect the default export of each page template file to be the React component responsible for producing the final rendered page.
Now that you have added the template code to the file, save the changes and close it.
In completing this step, you added a brand new page template file to your Gatsby project. With a filename that uses the File System Route API, it dynamically creates routes and pages based on GraphQL results and your Markdown source files. This was the final step to get Gatsby to generate pages from Markdown. In the next step, you will see these pages in action, as well as add new ones.
Step 4 — Previewing Your Content and Adding More Posts
With all the code now in place to turn your Markdown blog posts into web pages, you can now preview your work and add more Markdown content to your site.
To preview your new blog posts and all the work you have done so far, run this command in your project directory:
- npm run develop
Once Gatsby is ready, it will prompt you to open your project in your web browser, which you can do by navigating to localhost:8000. However, this will first only show you the homepage of your Gatsby application instead of the blog post. To see your new Markdown blog post, navigate to localhost:8000/blog/learning-about-gatsby/. You will find your Markdown file rendered as HTML:

From now on, you can continue to add new blog posts by creating Markdown files in the src/blog directory. Each time you create a new post, remember to follow the conventions you set up for your frontmatter. This means making sure to start the slug value with /blog/ followed by the custom path you want, as well as providing the post with a title and date.
To test this out, copy your learning-about-gatsby.md Markdown file to be the base of a new post named continuing-learning.md:
- cp src/blog/learning-about-gatsby.md src/blog/continuing-learning.md
Next, open the new file and make the following highlighted changes to the content:
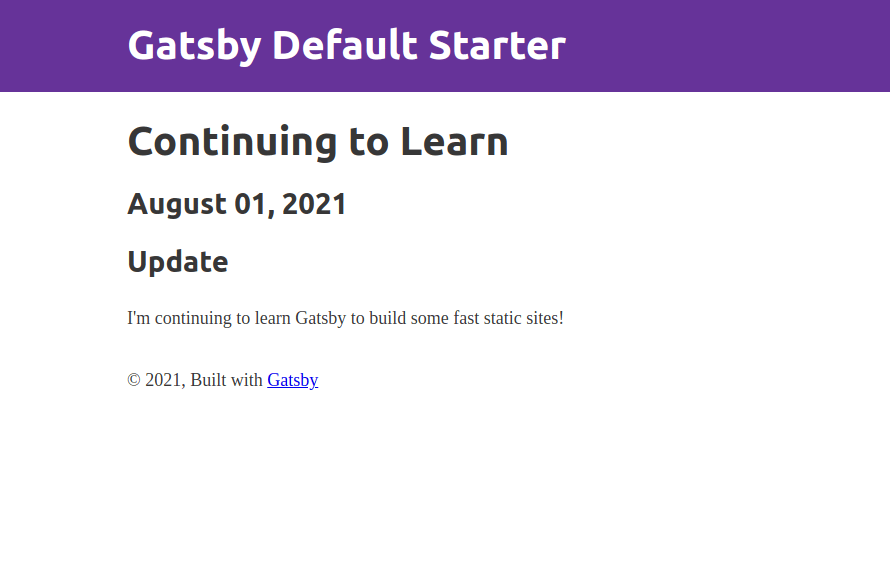
---
title: "Continuing to Learn"
slug: "/blog/continuing-learning"
date: "2021-08-01"
---

## Update

I'm continuing to learn Gatsby to build some fast static sites!
In this file, you kept the formatting the same but changed the title and slug of the frontmatter and the content of the blog post. Save the file then exit from it.
Once your server has rebuilt your Gatsby site, navigate to http://localhost:8000/blog/continuing-learning in your browser. You will find the new post rendered at this URL:
Note: If you wanted to add Markdown pages outside of blog, you could do so by modifying the slug to whatever path you would like. If you do this, make sure to use folders to keep your files organized.
You now have new pages generated from Markdown in Gatsby and have previewed the results.
Conclusion
By following the steps in this tutorial, you added Markdown content to your Gatsby project, configured Gatsby to find the files and process them, and created template code to render each post as a new page. Although some of these steps could be omitted by using a Markdown-specific Gatsby Starter template, going through the process manually allows you to customize your Markdown-powered Gatsby site exactly how you want it.
Although you can link to any new post or page using the Gatsby Link component, if your site has a large amount of Markdown files that are rapidly changing you might want to explore adding a dynamic listing as a next step, so visitors to your site can quickly find all your most recent posts and navigate to each one. To do so, you could use a Gatsby GraphQL tag to query the Markdown posts you want to list, and then iterate over them and display them as links. You can read more about this in this Adding a List of Markdown Blog Posts tutorial.
If you would like to read more on Gatsby, check out the rest of the How To Create Static Web Sites with Gatsby.js series.
Thanks for learning with the DigitalOcean Community. Check out our offerings for compute, storage, networking, and managed databases.
Tutorial Series: How To Create Static Web Sites with Gatsby.js
Gatsby is a React framework that allows you to create static and serverless apps. Gatsby websites are different from traditional websites because they are usually deployed on a content delivery network (CDN) and are content agnostic. In this tutorial, you will learn the basics of creating a site with Gatsby, allowing you to create static sites that are optimized for your users.
About the author
I love learning new things and sharing knowledge along the way!
Still looking for an answer?
This textbox defaults to using Markdown to format your answer.
You can type !ref in this text area to quickly search our full set of tutorials, documentation & marketplace offerings and insert the link!
 This work is licensed under a Creative Commons Attribution-NonCommercial- ShareAlike 4.0 International License.
Become a contributor for community
Get paid to write technical tutorials and select a tech-focused charity to receive a matching donation.

DigitalOcean Documentation
Full documentation for every DigitalOcean product.

Resources for startups and AI-native businesses
The Wave has everything you need to know about building a business, from raising funding to marketing your product.
The developer cloud
Scale up as you grow — whether you're running one virtual machine or ten thousand.

Start building today
From GPU-powered inference and Kubernetes to managed databases and storage, get everything you need to build, scale, and deploy intelligent applications.
