By Dave Berning
Developer and Author

The author selected Open Sourcing Mental Illness to receive a donation as part of the Write for DOnations program.
Introduction
Vuex is the first-party development state management library for Vue.js. It was created by Evan You and is currently maintained by the Vue.js Core Team. Like many other state management libraries, Vuex follows the principle that Redux has popularized over the past years: Data flows in one direction, with actions and mutations modifying data in a single source of truth called the store.
A Vuex store is a collection of different methods and data. Some of these methods, such as actions, can fetch and process data before it is sent to a mutation. A mutation is a method that mutates or updates the store property with the value provided. Getters are methods that can modify or combine data to create a new state property. These getters are read-only and do not mutate data. These are similar to computed properties in a Vue.js component. The last component to Vuex is the state, or the dataset that acts as your single source of truth.
In this tutorial, you will create an application that renders a list of cards with airport information in them. When clicked, these cards will execute the Vuex workflow to add the selected airport to a list of favorites. By running through this example, you will make actions and mutations to manage state and getters to retrieve computed data.
Prerequisites
- Node.js version
14.16.0or greater installed on your computer. To install this on macOS or Ubuntu 20.04, follow the steps in How To Install Node.js and Create a Local Development Environment on macOS or the Installing Using a PPA section of How To Install Node.js on Ubuntu 20.04 - Vue CLI installed on your machine and a fresh project generated. Make sure that you select the
Default (Vue 3 Preview)option when generating the app. The name of this project will befavorite-airports, which will act as the root directory. - You will also need a basic knowledge of JavaScript, HTML, and CSS, which you can find in our How To Build a Website With HTML series, How To Build a Website With CSS series, and in How To Code in JavaScript.
Step 1 — Setting Up the Example Application
In order to help visualize how state is managed with Vuex, set up a project with some data to display in the view. You will use this project and throughout the tutorial.
Once the favorite-airports project is created as described in the Prerequisites section, create a directory to hold all of your local data for this project. Open your terminal and run the following commands in the project root directory (favorite-airports):
- mkdir src/data
- touch src/data/airports.js
This will create the data directory and an empty airports.js file inside it.
In your text editor of choice, open the newly created airports.js file and add in the following:
export default [
  {
    name: 'Cincinnati/Northern Kentucky International Airport',
    abbreviation: 'CVG',
    city: 'Hebron',
    state: 'KY'
  },
  {
    name: 'Seattle-Tacoma International Airport',
    abbreviation: 'SEA',
    city: 'Seattle',
    state: 'WA',
  },
  {
    name: 'Minneapolis-Saint Paul International Airport',
    abbreviation: 'MSP',
    city: 'Bloomington',
    state: 'MN',
  },
  {
    name: 'Louis Armstrong New Orleans International Airport',
    abbreviation: 'MSY',
    city: 'New Orleans',
    state: 'LA',
  },
  {
    name: `Chicago O'hare International Airport`,
    abbreviation: 'ORD',
    city: 'Chicago',
    state: 'IL',
  },
  {
    name: `Miami International Airport`,
    abbreviation: 'MIA',
    city: 'Miami',
    state: 'FL',
  }
]
This is an array of objects consisting of a few airports in the United States. In this application, you are going to iterate through this data to generate cards consisting of the name , abbreviation, city, and state properties. When the user clicks on a card, you will execute a dispatch method, which will add that airport to your Vuex state as a favorite airport.
Save data/airports.js and return to the terminal.
When you’ve completed that step, create a single-file component (SFC) with the name AirportCard.vue. This file will live in the components directory of your project. This component will contain all the styles and logic for the airport card. In your terminal, create the .vue file using the touch command:
- touch src/components/AirportCard.vue
Open AirportCard.vue in your text editor and add the following:
<template>
  <div class="airport">
    <p>{{ airport.abbreviation }}</p>
    <p>{{ airport.name }}</p>
    <p>{{ airport.city }}, {{ airport.state }}</p>
  </div>
</template>

<script>
export default {
  props: {
    airport: {
      type: Object,
      required: true
    }
  }
}
</script>

<style scoped>
.airport {
  border: 3px solid;
  border-radius: .5rem;
  padding: 1rem;
  margin-bottom: 1rem;
}

.airport p:first-child {
  font-weight: bold;
  font-size: 2.5rem;
  margin: 1rem 0;
}

.airport p:last-child {
  font-style: italic;
  font-size: .8rem;
}
</style>
You may notice that there is some CSS included in this code snippet. In the AirportCard.vue component, the wrapper <div> contains the class of airport. This CSS adds some styling to the generated HTML by adding borders to give each airport the appearance of a “card”. The :first-child and :last-child are pseudo selectors that apply different styling to the first and last p tags in the HTML inside the div with the class of airport. In addition to that, you may also notice that this component contains a prop, which in Vue.js is a way to pass data down from a parent component to a child component.
Save and exit from the file.
Before wrapping up the setup, replace the existing App.vue component with the following code:
<template>
  <div class="wrapper">
    <div v-for="airport in airports" :key="airport.abbreviation">
      <airport-card :airport="airport" />
    </div>
  </div>
</template>

<script>
import { ref } from 'vue'
import allAirports from '@/data/airports.js'
import AirportCard from '@/components/AirportCard.vue'

export default {
  components: {
    AirportCard
  },
  setup() {
    const airports = ref(allAirports)
    return { airports }
  }
}
</script>

<style>
#app {
  font-family: Avenir, Helvetica, Arial, sans-serif;
  -webkit-font-smoothing: antialiased;
  -moz-osx-font-smoothing: grayscale;
  text-align: center;
  color: #2c3e50;
  margin-top: 60px;
}

.wrapper {
  display: grid;
  grid-template-columns: 1fr 1fr 1fr;
  grid-column-gap: 1rem;
  max-width: 960px;
  margin: 0 auto;
}

p,
h3 {
  grid-column: span 3;
}
</style>
This code contains a v-for loop that iterates through the airports.js data and renders a series of AirportCards.vue components with airport data passed in via the prop :airport. Save this code and return to the command line.
With the project set up, run the local development server using the npm run serve command in your terminal:
- npm run serve
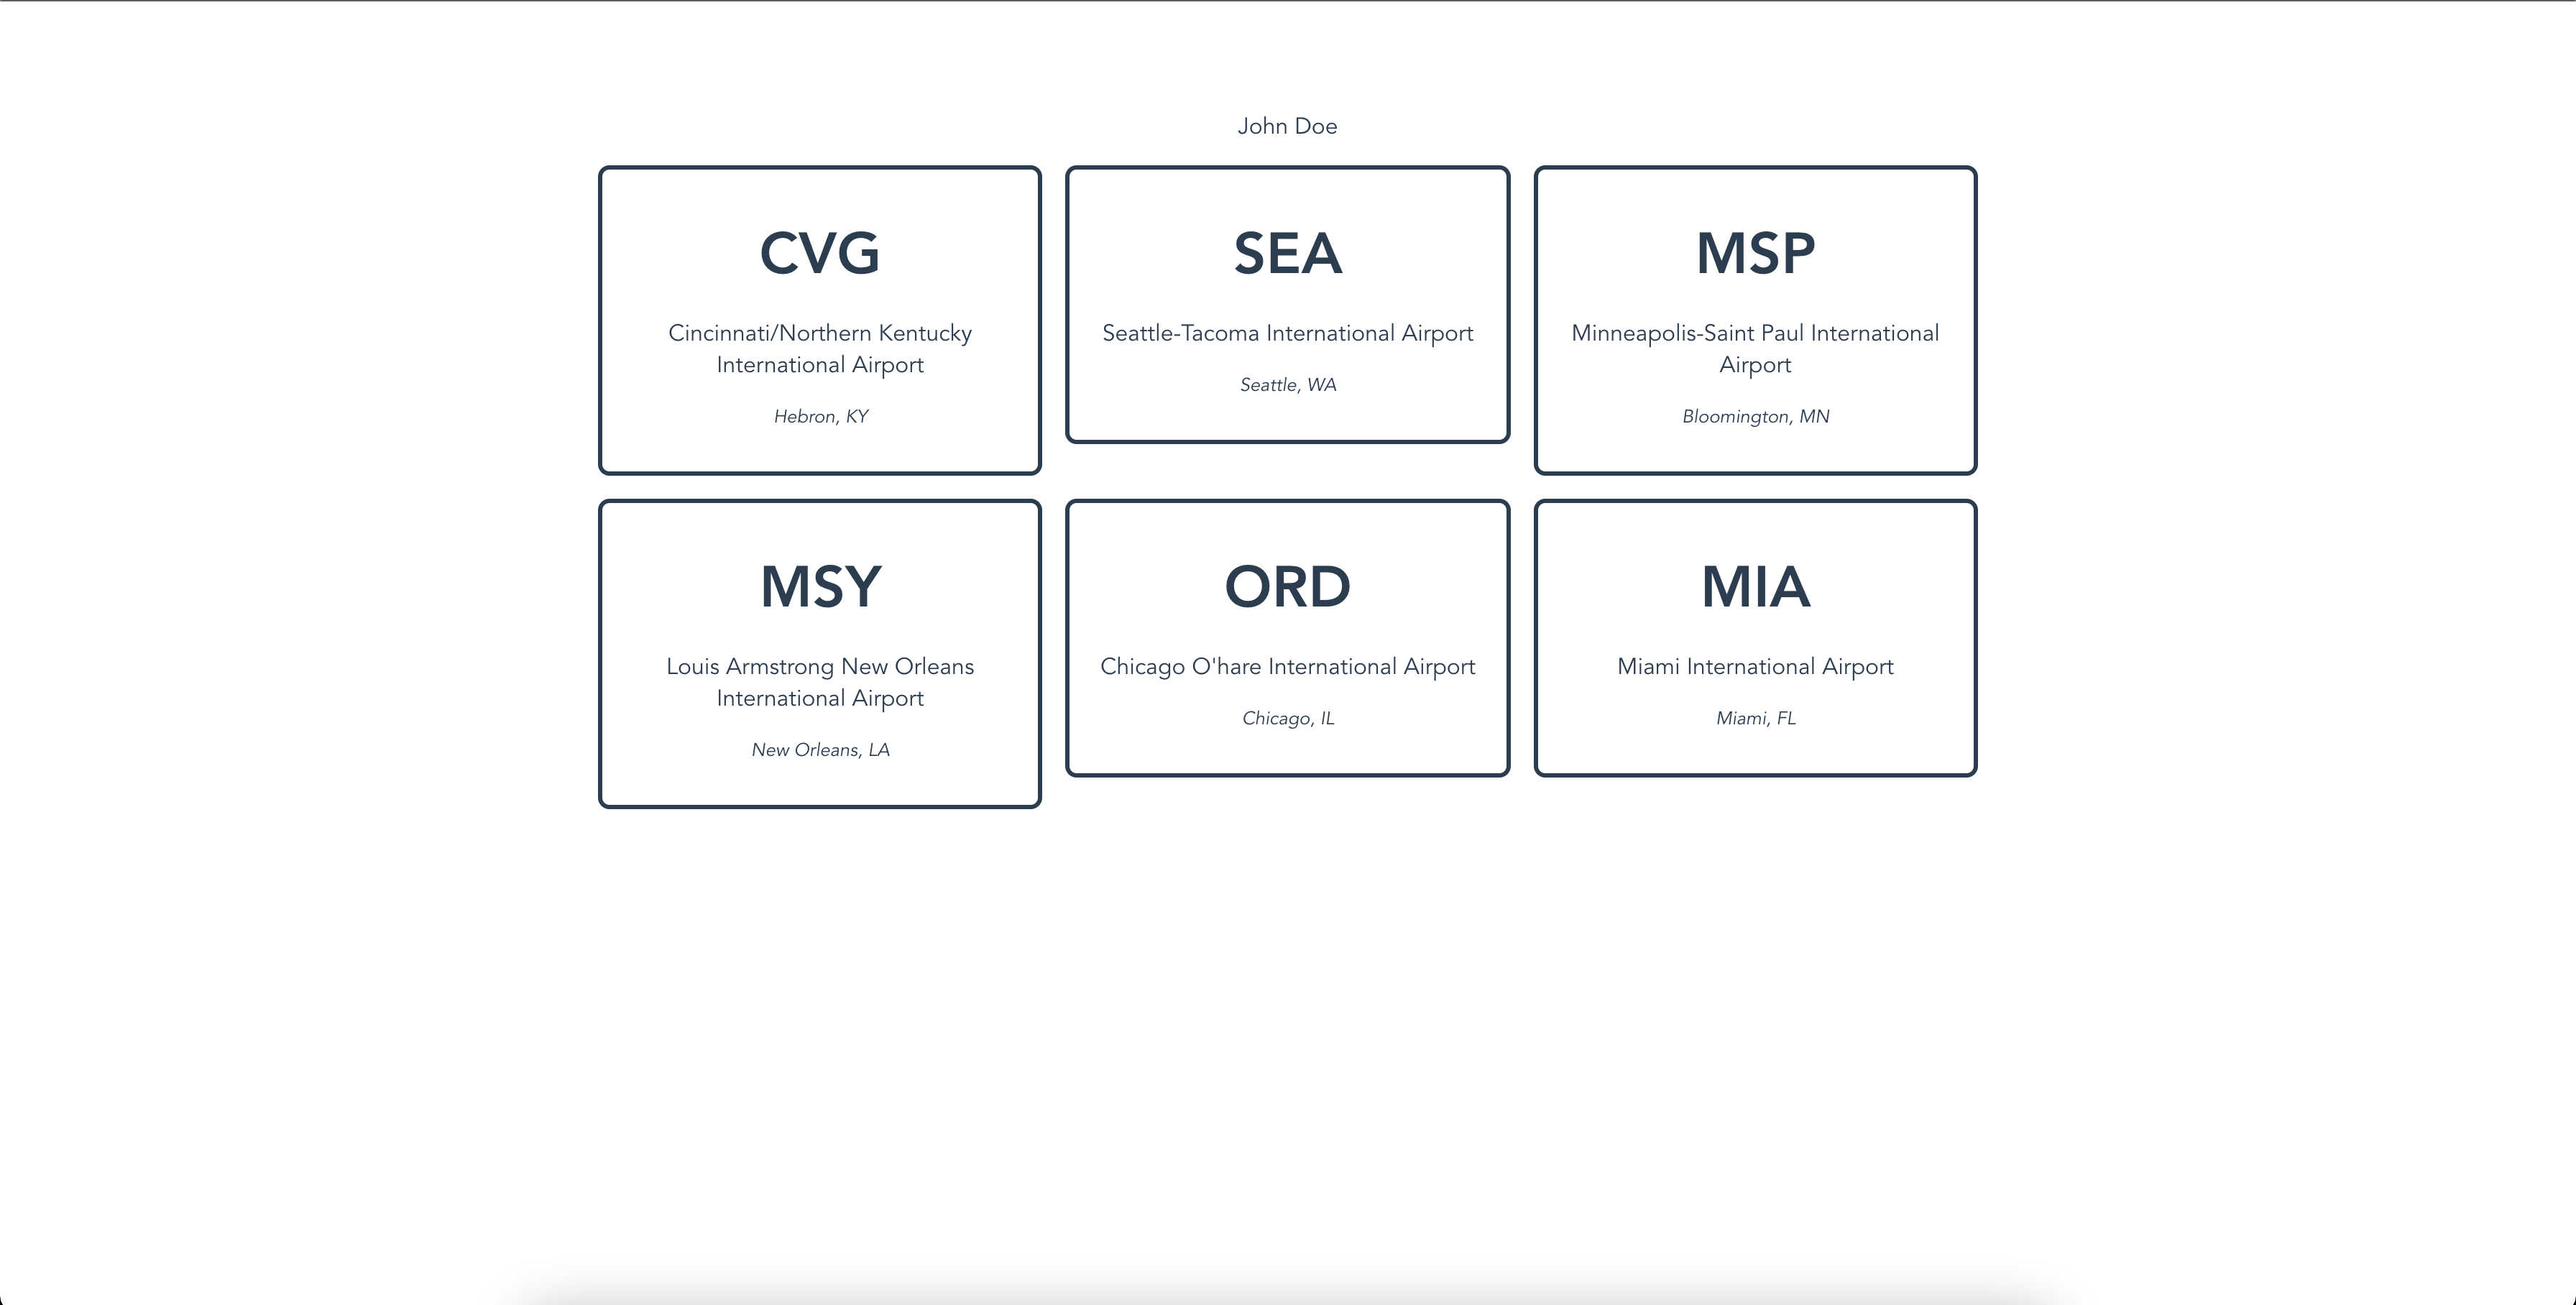
This will start a server on your localhost, usually at port 8080. Open your web browser of choice and visit localhost:8080to see the following:

Now that your example application is set up, in the next step you are going to install the Vuex library and create a store. This store is a collection of a number of different Vuex items including: state, mutations, actions, and getters. To illustrate this, you will be executing dispatch methods, which will add an airport to a favorites section of your app.
Step 2 — Installing Vuex
When working on web-based applications, you will often work with state. State is a collection of data at a given time. This state can be changed with user interactions via dispatch and commit methods. When the user modifies data, a dispatch event is executed, which passes data to a mutation and updates the state object.
There are a few ways to approach updating state. Some developers skip actions and go straight to mutatations. However, for the sake of this tutorial, you will always execute an action that in turn calls a mutation. This way you can have multiple mutations inside of an action. The cardinal rule of Vuex is that mutations have one job and one job only: update the store. Actions can do a number of different things including combining data, fetching data, and running JavaScript logic.
In addition to actions, there are also getters. A getter is a way to combine multiple state values into a single value. If you are familiar with computed properties in Vue.js, getters can be thought of as state-specific computed properties.
With the Vuex terminology covered, start installing and integrating Vuex. Open your terminal and run the following command:
- npm install vuex@next --save
This command will install the version of Vuex that is the most compatible with Vue.js 3.x and saves it in your package.json file. Next, create a directory and an index file for your store. You will use the mkdir command to make a directory and touch to create a new file:
- mkdir src/store
- touch src/store/index.js
Open your text editor and in your store/index.js file, initialize your Vuex store. To do this, you need to leverage the createStore function from Vuex:
import { createStore } from 'vuex'

export default createStore({

})
You also export this, as you will later import it into your main.js file.
At this point, you have your Vuex store set up, but the application is not yet aware of it or how to use it. To fully initialize the store, import it into your main.js file. In your text editor, open the src/main.js file.
Immediately after createApp(App), chain the use method and pass into the store that you are importing, as shown in the following highlighted code:
import { createApp } from 'vue'
import App from './App.vue'
import store from './store'

createApp(App).use(store).mount('#app')
Once you’ve chained the use method, save this file. The use method tells the Vue application which code to bundle together when the application is built. In this case, you are telling Vue to “use” or bundle the Vuex store.
Before you move on to the next section, add a state value into your store and reference it in the App.vue file. Open your store/index.js file and add the following objects and values:
import { createStore } from 'vuex'

export default createStore({
state: {
    firstName: 'John',
    lastName: 'Doe'
  },
mutations: {

},
actions: {

},
getters: {

}
})
These properties reflect the type of data the store holds: state for state (global data), mutations (commits that mutate data), actions (dispatches that call mutations), and getters (store computed properties).
Save store/index.js, then open your App.vue file in your text editor and add the following:
<template>
  <div class="wrapper">
    <p>{{ $store.state.firstName }} {{ $store.state.lastName }}</p>
    <div v-for="airport in airports" :key="airport.abbreviation">
      <airport-card :airport="airport" />
    </div>
  </div>
</template>
...
The $store in this case is the global store that you initialized in the main.js file. If you were to log this.$store into the console, you would see the store object. From there, the code accesses the property you want to display via dot notation.
Save App.vue then open your web browser. Above the airport cards, you will see the first and last name that you saved to your Vuex store. These are the default values of firstName and lastName, respectively.
In this step, you installed Vuex and created a Vuex store. You added some default store data and displayed it in the view with the $store object using dot notion. In the next step, you will be updating your Vuex store via actions and mutations, and you will get combined data with getters.
Step 3 — Creating Actions, Mutations, and Getters
In Step 2, you installed Vuex manually and integrated it into your project. In this step you still have the first and last name rendered in your browser, but you will create a Vuex getter to render the data as one string. As mentioned before, you can think of Vuex getters as computed properties for your Vuex store.
To create a getter, open your src/store/index.js file in your text editor of choice. Once open, create a property in the getters object with a function as its value. The name of the property is how you will access the getter later.
Add the following highlighted code:
import { createStore } from 'vuex'

export default createStore({
  state: {
    firstName: 'John',
    lastName: 'Doe'
  },
  ...
  getters: {
    fullName: function () {

    }
  }
})
In this case, you will use the function to combine the first and last names and store the resulting property as fullName. Inside the function, you will need to pass in the state object that is inside your Vuex store. From there, return a string with the first and last name interpolated:
import { createStore } from 'vuex'

export default createStore({
  state: {
    firstName: 'John',
    lastName: 'Doe'
  },
  ...
  getters: {
    fullName: function (state) {
      return `${state.firstName} ${state.lastName}`
    }
  }
})
You are using template literals here to put the firstName and lastName into one string.
Save this file, then move back to App.vue. In this file, remove the first and last values and replace them with the getter:
<template>
  <div class="wrapper">
    <p>{{ $store.getters.fullName }}</p>
    <div v-for="airport in airports" :key="airport.abbreviation">
      <airport-card :airport="airport" />
    </div>
  </div>
</template>
...
Once you make this change and save the file, your browser will hot reload. You will see the first and last name in your browser as before, but now you are leveraging the getter. If you change one of the names in your Vuex store, the getter will be updated automatically.
Moving on from getters, there are actions. As mentioned in the last step, for the sake of this tutorial, you will always use an action rather than mutating the data directly.
In this project, you will add an airport’s data to a “favorites” list when a user clicks on the card. You are going to first get the action and mutation created, then later assign it to a click event using the v-on directive.
To create an action, open the src/store/index.js file in your text editor. In the actions section of the store, create a function. Like the getter, the function name will be how you reference the action later. Name this function addToFavorites:
import { createStore } from 'vuex'

export default createStore({
  state: {
    firstName: 'John',
    lastName: 'Doe',
    favorites: [] // will store favorites here
  },
  mutations: {

  },
  actions: {
    addToFavorites() {

    }
  },
  getters: {
    fullName: function (state) {
      return `${state.firstName} ${state.lastName}`
    }
}
})
An action accepts two arguments: the context, or the Vue app itself, and the payload, or the data that you want to add to the store. The context has a commit method associated with it that you will use to call a mutation you will make later:
import { createStore } from 'vuex'

export default createStore({
  state: {
    firstName: 'John',
    lastName: 'Doe',
    favorites: []
  },
  mutations: {

  },
  actions: {
    addToFavorites(context, payload) {
      context.commit('UPDATE_FAVORITES', payload)
    }
  },
  getters: {
    fullName: function (state) {
      return `${state.firstName} ${state.lastName}`
    }
 }
})
The commit method also accepts two arguments: the name of the mutation to call and the payload or the data that the mutation will replace the state with.
In this code, you are naming the mutation UPDATE_FAVORITES. Mutation names should be agnostic and not named after a specific action. For example, a mutation like ADD_FAVORITE and REMOVE_FAVORITE implies a logic, like removing or adding a piece of data. This is not ideal, since mutations should have one job and one job only: update the state. To differentiate between adding and removing data, you could have two different actions that remove or add a favorite airport from the array, which then execute a single mutation called UPDATE_FAVORITES that updates the array with whatever was passed in. Minimizing the amount of mutations you have in your store will help make your Vuex store easier to manage as it grows larger in complexity and size.
Next, add some logic to this action. When you add an airport as a “favorite”, you will add that payload (the airport data) to the existing array. To do that, you can use the push method in JavaScript:
import { createStore } from 'vuex'

export default createStore({
  state: {
    firstName: 'John',
    lastName: 'Doe',
    favorites: []
  },
  mutations: {

  },
  actions: {
    addToFavorites(context, payload) {
      const favorites = context.state.favorites
      favorites.push(payload)
      context.commit('UPDATE_FAVORITES', favorites)
    }
  },
  getters: {
    fullName: function (state) {
      return `${state.firstName} ${state.lastName}`
    }
 }
})
At this point, your action is set up to to add the payload to your favorites array then call a mutation with the mutated array as the new data. Next, you will define the UPDATE_FAVORITES mutation. Add the following code to set the favorites array as a new array:
import { createStore } from 'vuex'

export default createStore({
  state: {
      firstName: 'John',
    lastName: 'Doe',
    favorites: []
    },
  mutations: {
    UPDATE_FAVORITES(state, payload) {
      state.favorites = payload
    }
  },
  actions: {
    addToFavorites(context, payload) {
      const favorites = context.state.favorites
      favorites.push(payload)
      context.commit('UPDATE_FAVORITES', favorites)
    }
  },
  getters: {
    fullName: function (state) {
      return `${state.firstName} ${state.lastName}`
    }
 }
})
Now that you have your action and your mutation, you can save this file.
To execute this action, you can call a dispatch event when the user clicks on a card. You will do this with the v-on directive.
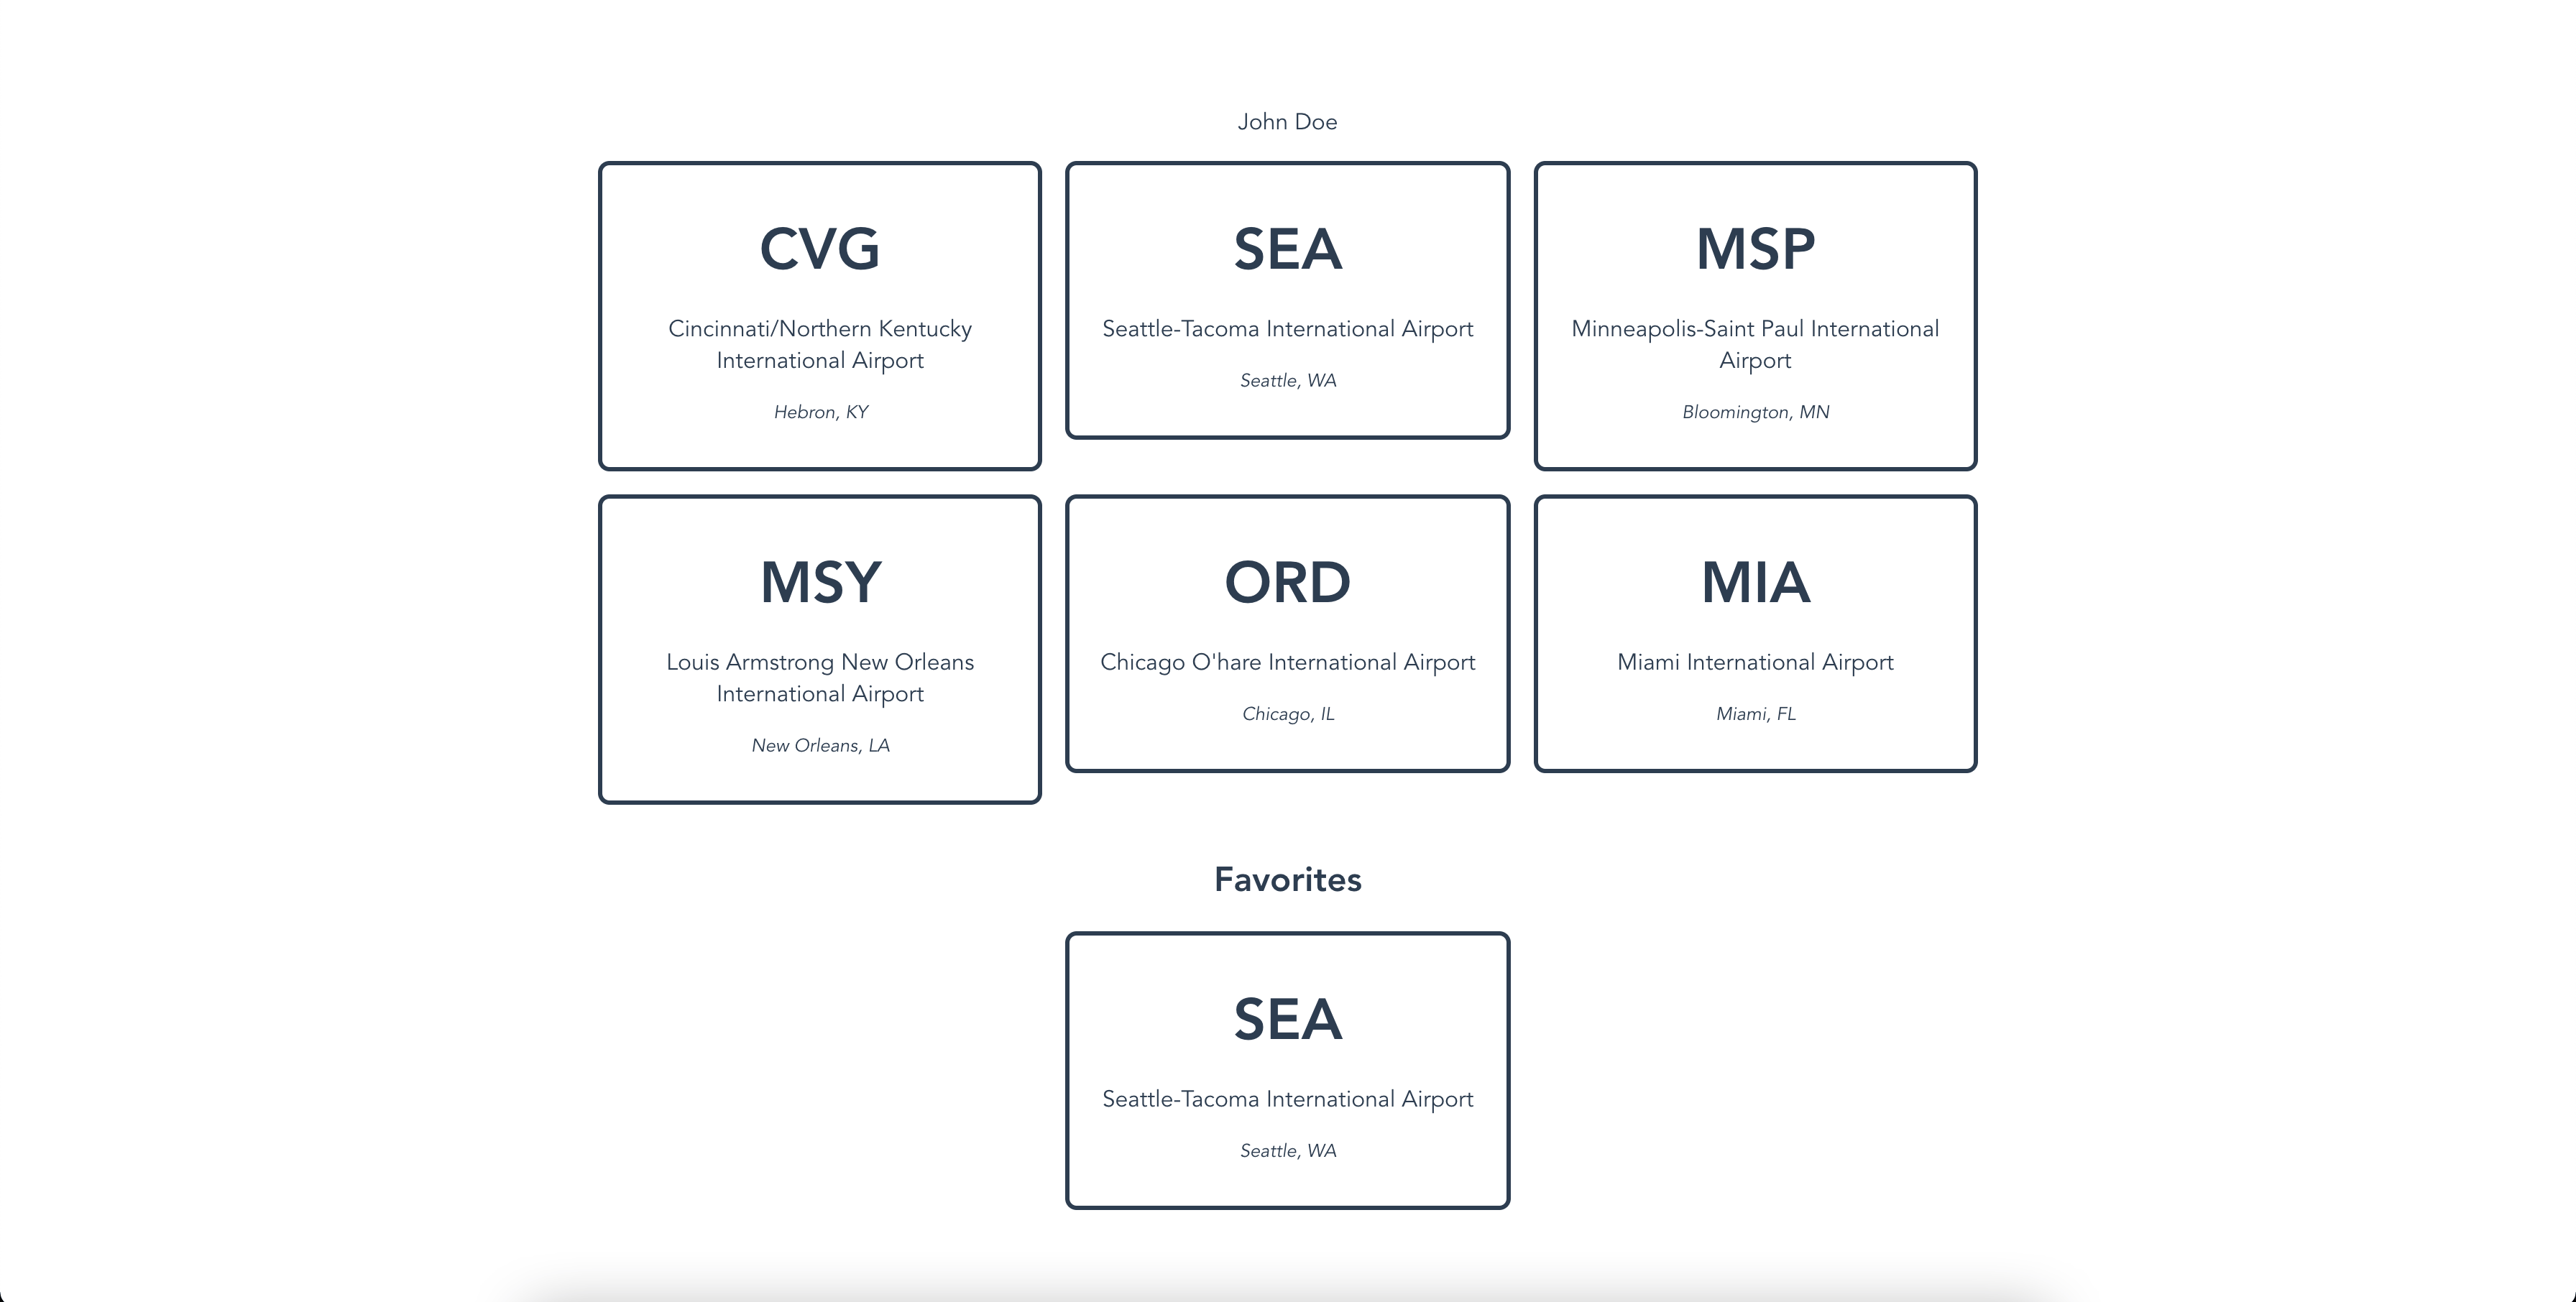
Open the App.vue file in your text editor. On the <airport-card /> component, add the v-on directive shorthand syntax (@) with the event being click:
<template>
  <div class="wrapper">
    <p>{{ $store.getters.fullName }}</p>
    <div v-for="airport in airports" :key="airport.abbreviation">
      <airport-card :airport="airport" @click="$store.dispatch('addToFavorites', airport)" />
    </div>
    <h2 v-if="$store.state.favorites.length">Favorites</h2>
    <div v-for="airport in $store.state.favorites" :key="airport.abbreviation">
      <airport-card :airport="airport"  />
    </div>
  </div>
</template>
...
The dispatch function accepts two arguments: the action name and the payload data that you are sending to the action.
Save this file and open it in your browser. Now, when you click on an airport card, the action will call the mutation that updates the state and adds the airport to the favorites property.
In this step, you expanded on the Vuex store that you created earlier. You created an action that copies an array and pushes a new item to that array. That action called a mutation that in turn updated the state. In addition to that, you learned about getters and how they can be leveraged to create new properties by combining or modifying read-only values in the Vuex store.
In the final step, you will implement Vuex modules. Modules are a great way to break up your Vuex store into smaller Vuex stores. This is useful as your Vuex store growers larger in size and complexity.
Step 4 — Composing Vuex Modules
Modules are smaller Vuex stores that are combined into a single Vuex store. This is similar to how multiple Vue.js components are imported into a single .vue file, such as App.vue. In this step, you are going to separate this Vuex store into two separate modules. One module will be for a user state, and the other will be specific to airport state, actions, and mutations.
In your terminal, cd into the store directory and use the touch command to create two separate files.
- touch src/store/user.module.js
- touch src/store/airports.module.js
Inside of the user.module.js file, create an object that will be exported by default by adding the following code:
export default {
  namespaced: true
}
You are also adding the property namespaced with its value as true. The namespace property will make it so you can reference the module name while accessing a property with dot notation later.
Inside of this object, you will add the state and getter information that is associated with a user:
export default {
  namespaced: true,
  state: {
    firstName: 'John',
    lastName: 'Doe'
  },
  getters: {
    fullName: function (state) {
      return `${state.firstName} ${state.lastName}`
    }
  }
}
The user module contains everything that you need for user information. Save and exit from the file.
Go ahead and do the same thing in the airports.module.js file. Open the airports.module.js file in your text editor and add the following:
export default {
  state: {
    favorites: []
  },
  mutations: {
    UPDATE_FAVORITES(state, payload) {
      state.favorites = payload
    }
  },
  actions: {
    addToFavorites(context, payload) {
      const favorites = context.state.favorites
      favorites.push(payload)
      context.commit('UPDATE_FAVORITES', favorites)
    }
  },
}
Now that you have put the airport-related mutations, actions, and state, you can save your airports.module.js.
Next, import these two files into the main store/index.js file. In your text editor, open the store/index.js file and remove the state, mutations, actions, and getters properties. Your file will resemble the following snippet:
import { createStore } from 'vuex'

export default createStore({

})
To register modules, you will need to import them into this index.js file with the following highlighted code:
import { createStore } from 'vuex'
import UserModule from './user.module.js'
import AirportsModule from './airports.module.js'

export default createStore({

})
From here, you will need to have a property called modules with an object as its value. The property names inside of this object will be the names of the Vuex modules. The value of the module name is the imported module itself:
import { createStore } from 'vuex'
import UserModule from './user.module.js'
import AirportsModule from './airports.module.js'

export default createStore({
modules: {
  user: UserModule,
  airports: AirportsModule
}
})
Once you save this file, your modules have now been registered and combined into your single Vuex store. Save store/index.js, then open the App.vue file and update it to reference the newly created modules:
<template>
  <div class="wrapper">
    <p>{{ $store.getters['user/fullName'] }}</p>
    <div v-for="airport in airports" :key="airport.abbreviation">
      <airport-card :airport="airport" @click="$store.dispatch('addToFavorites', airport)" />
    </div>
    <h2 v-if="$store.state.airports.favorites.length">Favorites</h2>
    <div v-for="airport in $store.state.airports.favorites" :key="airport.abbreviation">
      <airport-card :airport="airport"  />
    </div>
  </div>
</template>
...
Now you have a modular version of your Vuex setup.
In this step, you segmented your existing Vuex store into smaller chunks called modules. These modules are a great way to group related store properties into a smaller Vuex store. You also updated your App.vue to reference the state and dispatch events in each module.
Conclusion
At a high level, state management is all about updating data. In this setup, the data in the state is global throughout your entire application and acts as a single source of truth, which can only be updated with explicit functions in the form of actions and mutations. In this tutorial, you ran through examples of state, mutations, actions, and getters and saw how each of these properties have their own purpose in the update cycle.
To learn more about Vuex, actions, mutations, and modules, review the official Vuex documentation written by the Vue.js Core Team. For more tutorials on Vue, check out the How To Develop Websites with Vue.js series page.
Thanks for learning with the DigitalOcean Community. Check out our offerings for compute, storage, networking, and managed databases.
Tutorial Series: How To Develop Websites with Vue.js
This series provides a starting point for building websites with the front-end JavaScript framework Vue.js. Created in 2014 by Evan You (formally of Google), Vue.js is often described as a combination of React and Angular, borrowing the prop-driven development of React and the templating power of Angular. By the end of this series, you will have the tools to develop websites that focus on traditional HTML and CSS, while still taking advantage of the robustness and scalability of a front-end framework.
About the author
I'm a software engineer from Cincinnati. I work on TypeScript apps with Vue.js. Currently a Senior Front-End Engineer at Enodo, based in Chicago.
Still looking for an answer?
This textbox defaults to using Markdown to format your answer.
You can type !ref in this text area to quickly search our full set of tutorials, documentation & marketplace offerings and insert the link!
Hi Dave, Thanks for this tutorial on Vue State Management. In this Vue State action methods below in this file “favorite-airports/src/store/airports.module.js”
actions: { addToFavorites(context, payload) { const favorites = context.state.favorites favorites.push(payload) context.commit(‘UPDATE_FAVORITES’, favorites) }
const favorites variable is referencing the current state favorites and you are adding a payload into the favorites array. Are you not already mutating the state before the context.commit(‘UPDATE_FAVORITES’, favorites) is called?
Thanks. Regards, Prabin
Can someone please change the colors in the code? It’s absolutely impossible to read it. Thanks.
 This work is licensed under a Creative Commons Attribution-NonCommercial- ShareAlike 4.0 International License.
Become a contributor for community
Get paid to write technical tutorials and select a tech-focused charity to receive a matching donation.

DigitalOcean Documentation
Full documentation for every DigitalOcean product.

Resources for startups and AI-native businesses
The Wave has everything you need to know about building a business, from raising funding to marketing your product.
The developer cloud
Scale up as you grow — whether you're running one virtual machine or ten thousand.

Start building today
From GPU-powered inference and Kubernetes to managed databases and storage, get everything you need to build, scale, and deploy intelligent applications.
